display MINI Hardtop 2 Door 2015 Repair Manual
[x] Cancel search | Manufacturer: MINI, Model Year: 2015, Model line: Hardtop 2 Door, Model: MINI Hardtop 2 Door 2015Pages: 251, PDF Size: 11.4 MB
Page 149 of 251
The function is available in a certain speed
range.
A proactively driving style helps the driver to
use the function as often as possible and sup‐
ports the fuel-conserving effect of coasting.
Safety mode
The function is not available under one of the
following conditions.▷DSC OFF or TRACTION activated.▷Driving in the dynamic limit range and on
steep uphill or downhill grades.▷Battery charge status temporarily too low
or vehicle electrical system drawing exces‐
sive current.▷Cruise control activated.
Functional requirements
In GREEN mode, this function is available in a
speed range from approximately 30 mph, ap‐
prox. 50 km/h to 100 mph, approx. 160 km/h,
if the following conditions are met:
▷Accelerator pedal and brake pedal are not
operated.▷The selector lever is in selector lever posi‐
tion D.▷Engine and transmission are at operating
temperature.
Display
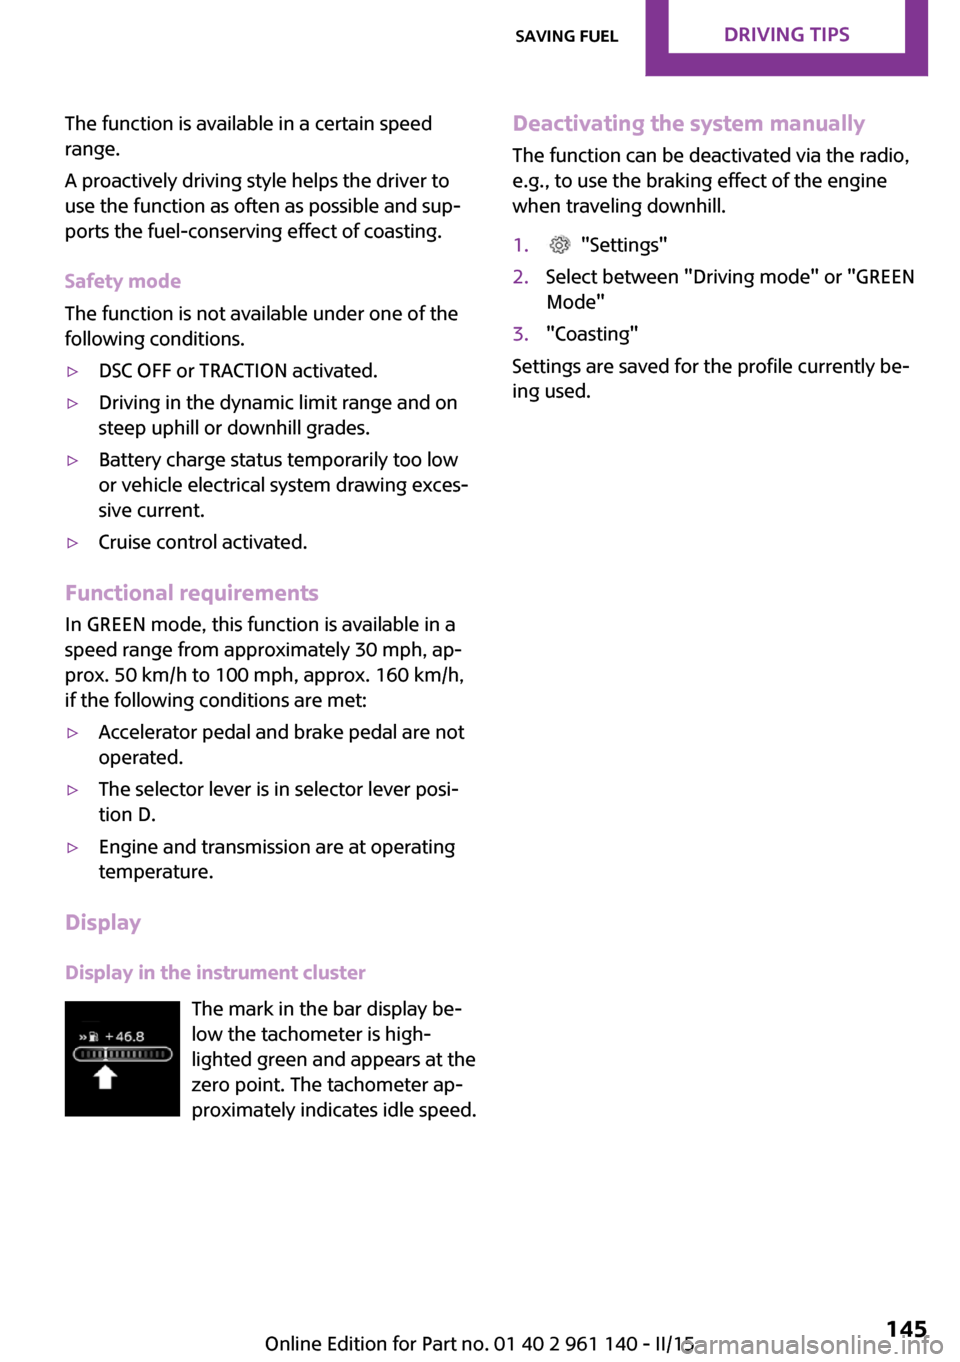
Display in the instrument cluster The mark in the bar display be‐
low the tachometer is high‐
lighted green and appears at the
zero point. The tachometer ap‐
proximately indicates idle speed.
Deactivating the system manually
The function can be deactivated via the radio,
e.g., to use the braking effect of the engine
when traveling downhill.1. "Settings"2.Select between "Driving mode" or "GREEN
Mode"3."Coasting"
Settings are saved for the profile currently be‐
ing used.
Seite 145Saving fuelDRIVING TIPS145
Online Edition for Part no. 01 40 2 961 140 - II/15
Page 153 of 251
RadioVehicle features and op‐
tions
This chapter describes all standard, country-
specific and optional features offered with the
series. It also describes features that are not
necessarily available in your car, e. g., due to
the selected options or country versions. This
also applies to safety-related functions and sys‐
tems. The respectively applicable country provi‐
sions must be observed when using the respec‐
tive features and systems.
General information Settings are stored for the profile, refer to
page 23, currently in use.
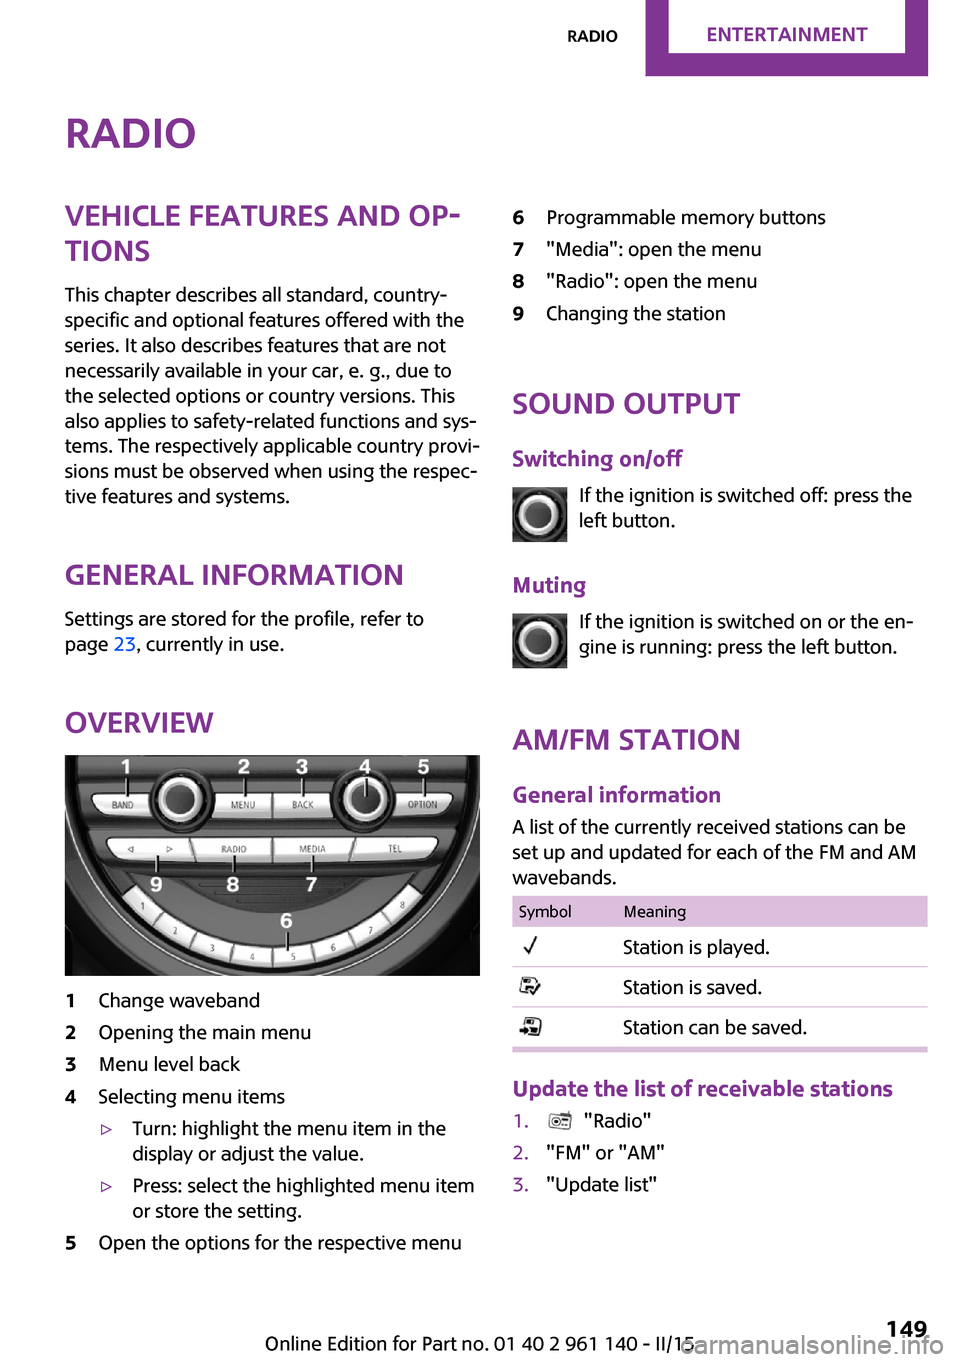
Overview1Change waveband2Opening the main menu3Menu level back4Selecting menu items▷Turn: highlight the menu item in the
display or adjust the value.▷Press: select the highlighted menu item
or store the setting.5Open the options for the respective menu6Programmable memory buttons7"Media": open the menu8"Radio": open the menu9Changing the station
Sound output
Switching on/off If the ignition is switched off: press the
left button.
Muting If the ignition is switched on or the en‐
gine is running: press the left button.
AM/FM station General information
A list of the currently received stations can be
set up and updated for each of the FM and AM
wavebands.
SymbolMeaningStation is played.Station is saved.Station can be saved.
Update the list of receivable stations
1. "Radio"2."FM" or "AM"3."Update list"Seite 149RadioENTERTAINMENT149
Online Edition for Part no. 01 40 2 961 140 - II/15
Page 154 of 251
Selecting a station1. "Radio"2."FM" or "AM"3.Select a station.
Selecting a station manually
1. "Radio"2."FM" or "AM"3."Manual search ( )"4.Turn the right-hand knob until the desired
frequency is displayed.
Changing the station
About the radio:
Press button.
Via the buttons on the steering wheel: Press button.
The next station with reception or stored sta‐
tion is played. If traffic bulletins are activated,
the next traffic information station is played.
About the radio:
Press and hold this button.
Via the buttons on the steering wheel: Press and hold this button.
The waveband is traversed. After the button is
released, the next station with reception is
played.
Storing a station
1. "Radio"2."FM" or "AM"3.Select a station.4.Press the right button.5.Select the memory location.
The stations can also be stored on the Favorites
buttons, refer to page 152.
Renaming a station When storing a station with RDS signal, the RDS
information transferred during storing is ac‐
cepted as the station name. This name can be
changed.
1.Select the station that is to be renamed.2. Press button.3."Rename to:"
If necessary, wait until the desired name
appears.4.Press the right-hand knob to store this
name.
Displaying additional information
If a radio station broadcasts radio text or radio
text plus, this information can be displayed,
e.g., the track or the performer of the music.
Availability, content and sequence are set by
the radio station.
1. "Radio"2."FM" or "AM"3. Press button.4."Station info"
RDS Radio Data System
The concept
RDS broadcasts additional information, such as
the station name, in the FM wave band.
When playing a station with multiple frequen‐
cies, the system automatically switches to the
frequency with the best reception, if needed.
Seite 150ENTERTAINMENTRadio150
Online Edition for Part no. 01 40 2 961 140 - II/15
Page 155 of 251
Switching on/offIt is recommended to switch on RDS1. "Radio"2."FM"3. Press button.4."RDS"
HD Radio™ reception
Many stations broadcast both analog and digi‐
tal signals.
License conditions
HD Radio technology manufactured under li‐
cense from iBiquity Digital Corporation. U. S.
and Foreign Patents. HD Radio™ and the HD,
HD Radio, and “Arc” logos are proprietary
trademarks of iBiquity Digital Corp.
Activating/deactivating digital radio
reception
1. "Radio"2."FM" or "AM"3. Press button.4."HD Radio reception"
This symbol is displayed in the status line
when the audio signal is digital.
When setting a station with a digital signal, it
may take a few seconds before the station
plays in digital quality.
Information about HD Radio stations whose
station name ends with ...HD or with ...HD1:
In areas in which the station is not continuously
received in digital mode, the playback switches
between analog and digital reception. In this
case, switch off digital radio reception.
Information about HD Radio multicast stations
whose station name ends
with ...HD2, ...HD3, ...:
In areas in which the station is not continuously
received in digital mode, there may be inter‐
ruptions of the audible signal lasting several
seconds. This depends on the reception.
Displaying additional information
Some stations broadcast additional information
on the current track, such as the name of the
artist.1.Select the desired station.2. Press button.3."Station info"
Stored stations
General information
It is possible to store up to 40 stations.
SymbolMeaning1 ... 40Memory location.FMStations out of the FM waveband.AMStations out of the AM waveband.SATSatellite radio station.
Calling up a station
1. "Radio"2."Presets"3.Select the desired memory location.
Storing a station The station currently selected is stored.
1. "Radio"2."Presets"3."Store station ( )"4.Memory location to be selected.
The stations can also be stored on the Favorites
buttons, refer to page 152.
Seite 151RadioENTERTAINMENT151
Online Edition for Part no. 01 40 2 961 140 - II/15
Page 156 of 251
Programmable memory buttons
The first eight locations in the station list corre‐
spond to the assignment of the Favorites keys.
To store the station:1.Select a station.2.Press and hold Favorites button until a sig‐
nal sounds.
Calling up a station:
1.Press Favorites button.
Shifting stations
1. "Radio"2."Presets"3.Select the station that is to be moved.4. Press button.5."Move entry"6.Select the memory location.
Deleting a station
1. "Radio"2."Presets"3. Press button.4."Delete entry"
Deleting all stations
1. "Radio"2."Presets"3. Press button.4."Delete presets"5.Confirm "Are you sure you want to delete
all saved stations?".Satellite radio
General information
The channels are offered in predefined pack‐
ages. The packages must be subscribed by
phone.
Managing a subscription
To be able to enable or unsubscribe from the
channels, you must have reception. This is usu‐
ally the case when you have an unobstructed
view of the sky.
Enabling channels
The Unsubscribed Channels category contains
all disabled channels.1. "Radio"2."Satellite radio"3.Select the Unsubscribed category.4.Select the channel.5. Press button.6."Manage subscription"
The phone number and an electronic serial
number, ESN, are displayed.7.Select the displayed phone number to sub‐
scribe to the channel.
The serial number, ESN, is needed to sub‐
scribe.
You can unsubscribe from the channels again
via this phone number.
Unsubscribing from channels
1. "Radio"2."Satellite radio"3.Select the channel.4. Press button.5."Manage subscription"Seite 152ENTERTAINMENTRadio152
Online Edition for Part no. 01 40 2 961 140 - II/15
Page 157 of 251
The phone number and an electronic serial
number, ESN, are displayed.6.Select the displayed phone number to un‐
subscribe from the channel.
The serial number, ESN, is needed to un‐
subscribe.
Selecting channels
You can only listen to enabled channels.
1. "Radio"2."Satellite radio"3.Select categories.4.Select the channel.
The selected channel is stored in the remote
control currently in use.
Changing the channel Press button.
Storing a channel
1. "Radio"2."Satellite radio"3.Select the channel.4.Press the right button.5.Select the memory location.
The channels are stored for the remote control
currently in use.
The channels can also be stored on the pro‐
grammable memory buttons.
Weather & Traffic jump Traffic and weather information for a selected
region is broadcast every few minutes.
Selecting a region
1. "Radio"2."Satellite radio"3. Press button.4."Set area:"5.Select region.
The region is stored in the remote control cur‐
rently in use.
Activating/deactivating the jump
Reception must be guaranteed in order to acti‐
vate or deactivate.
1. "Radio"2."Satellite radio"3. Press button.4."Weather & Traffic Jump"
Information for the selected region is broadcast
as soon as it is available.
Hints
▷Reception may not be available in some sit‐
uations, such as under certain environmen‐
tal or topographic conditions.▷The signal may not be available in tunnels
or underground garages; next to tall build‐
ings; or near trees, mountains or powerful
sources of radio interference.Seite 153RadioENTERTAINMENT153
Online Edition for Part no. 01 40 2 961 140 - II/15
Page 158 of 251
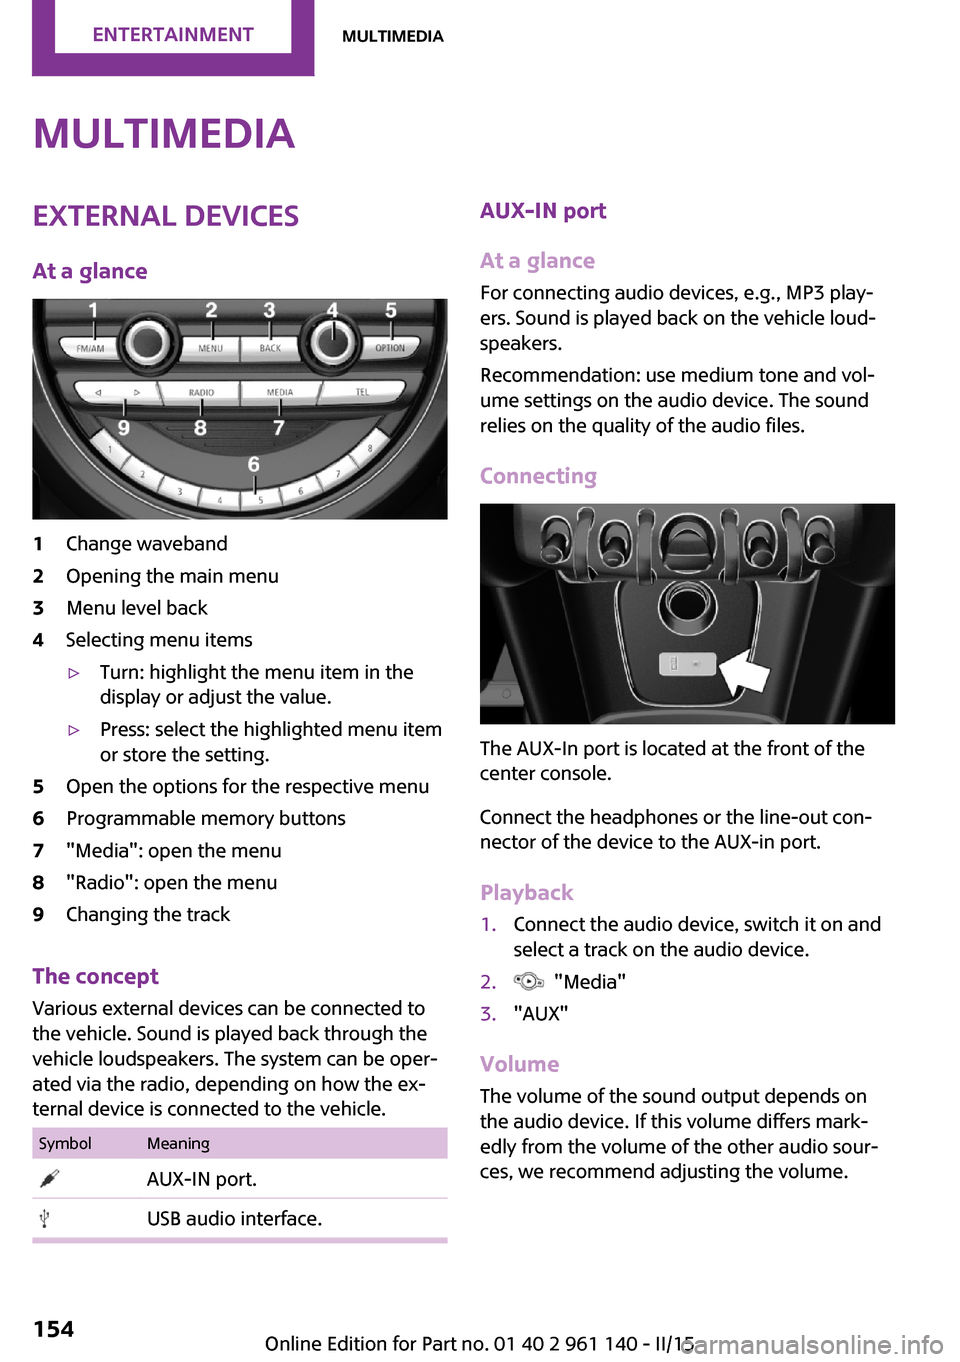
MultimediaExternal devices
At a glance1Change waveband2Opening the main menu3Menu level back4Selecting menu items▷Turn: highlight the menu item in the
display or adjust the value.▷Press: select the highlighted menu item
or store the setting.5Open the options for the respective menu6Programmable memory buttons7"Media": open the menu8"Radio": open the menu9Changing the track
The concept
Various external devices can be connected to
the vehicle. Sound is played back through the
vehicle loudspeakers. The system can be oper‐
ated via the radio, depending on how the ex‐
ternal device is connected to the vehicle.
SymbolMeaning AUX-IN port. USB audio interface.AUX-IN port
At a glance
For connecting audio devices, e.g., MP3 play‐
ers. Sound is played back on the vehicle loud‐
speakers.
Recommendation: use medium tone and vol‐
ume settings on the audio device. The sound
relies on the quality of the audio files.
Connecting
The AUX-In port is located at the front of the
center console.
Connect the headphones or the line-out con‐
nector of the device to the AUX-in port.
Playback
1.Connect the audio device, switch it on and
select a track on the audio device.2. "Media"3."AUX"
Volume
The volume of the sound output depends on
the audio device. If this volume differs mark‐
edly from the volume of the other audio sour‐
ces, we recommend adjusting the volume.
Seite 154ENTERTAINMENTMultimedia154
Online Edition for Part no. 01 40 2 961 140 - II/15
Page 160 of 251
▷Via the directory structure in the audio de‐
vice.
Current playback
List of tracks that is currently being played. E. g.
the list of tracks that was found in the track
search or a playlist.
1. "Media"2."USB device"3."Current playback"4.Select the track at which the playback is to
begin.
Searching directories
1. "Media"2."USB device"3."Browse directory"
Directories and titles at the top directory
level are displayed. Should the USB device
support external memory cards, their direc‐
tories are also displayed.4.Select the directory.5.Select the track at which the playback is to
begin. Tracks in subdirectories are not
played back.
Playback lists
1. "Media"2."USB device"3."Playlists"4.Select the playback list.
Changing the track
Press button.
A switch is made to the previous/next track
from the currently played one.
Fast forward/reverse
Press and hold this button.
The current track is fast forwarded/
rewound with increasing speed.
Playback information
Information about the current track can be dis‐
played, such as the artist and the name of the
track. This information is stored in the audio file
and does not have to match the file name of
the track.
Switching playback information on/off1. "Media"2."USB device"3. Press button.4."Show playback information"
Random playback
Playback in random order can be selected for
all tracks of the USB device or for the current
play.
Switching random playback for all tracks
on/off
1. "Media"2."USB device"3. Press button.4."All titles"
Switching random playback for the current
playback on/off
1. "Media"2."USB device"3. Press button.4."Current playback"Seite 156ENTERTAINMENTMultimedia156
Online Edition for Part no. 01 40 2 961 140 - II/15
Page 166 of 251
Bluetooth hands-free systemVehicle features and op‐
tions
This chapter describes all standard, country-
specific and optional features offered with the
series. It also describes features that are not
necessarily available in your car, e. g., due to
the selected options or country versions. This
also applies to safety-related functions and sys‐
tems. The respectively applicable country provi‐
sions must be observed when using the respec‐
tive features and systems.
The concept Mobile phones can be connected to the vehicle
via Bluetooth. After the mobile phones are
paired once, they are recognized automatically
when the ignition is switched on. As soon as
they are inside the vehicle they can be oper‐
ated via the radio and via the buttons on the
steering wheel.
Hints Using the mobile phone while driving
Make entries only when traffic and road
conditions allow. Do not hold the mobile phone
in your hand while you are driving; use the
hands-free system instead. If you do not ob‐
serve this precaution, you can endanger the ve‐
hicle's occupants and other traffic. ◀
Certain functions may need to be enabled by the mobile phone provider or service provider.
At high temperatures, the charge functions of
the mobile phone can be limited under certain
circumstances, and some functions are no lon‐
ger executed.Do not operate a mobile phone that is con‐
nected to the vehicle on the mobile phone key‐
pad, as this may lead to a malfunction.
When the mobile phone is used via the vehicle,
refer to the operating manual of the mobile
phone.
Approved mobile phones Accurate information about which mobile
phones are supported with a Bluetooth inter‐
face is available at www.mini.com/connectivity.
These approved mobile phones, with a certain
software version, support the vehicle functions
described below.
Malfunctions may occur with other mobile
phones or software versions.
Displaying the vehicle identification
number and software part number
The vehicle identification number and software
part number are needed to determine which
mobile phones are supported by the mobile
phone installation package. The software ver‐
sion of the mobile phone may also be required.1. "Telephone"2. Press button.3."Bluetooth® info"4."System information"
Pairing/unpairing the
mobile phone
Requirements
▷The mobile phone is compatible.▷The mobile phone is ready for operation.Seite 162COMMUNICATIONBluetooth hands-free system162
Online Edition for Part no. 01 40 2 961 140 - II/15
Page 167 of 251
▷The ignition is switched on.▷Bluetooth connection on the vehicle and on
the mobile phone activated.▷Bluetooth presets may need to be made on
the mobile phone, e.g., for a connection
without confirmation or visibility, refer to
the mobile phone operating instructions.▷Set Bluetooth passkey for one-time use in
the logon procedure.▷Vehicle is stationary.
Bluetooth activation/deactivation
1. "Telephone"2. Press button.3."Bluetooth®"
Pairing and connecting
Pairing the mobile phone
To avoid becoming distracted and posing
an unnecessary hazard both to your own vehi‐
cle's occupants and to other traffic, only pair
the mobile phone while the vehicle is station‐
ary. ◀
1. "Telephone"2.A mobile phone has not yet been paired:
"OK"
A mobile phone has been paired:
"Bluetooth®"3.A mobile phone has not yet been paired:
the Bluetooth name of the vehicle is shown
on the display.
A mobile phone has not yet been paired:
"Add new phone". The Bluetooth name of
the vehicle is shown on the display.4.To perform additional steps on the mobile
phone, refer to the mobile phone operating
instructions.The Bluetooth name of the vehicle appears
on the mobile phone display. Select this.5.Enter the same passkey on the mobile
phone and on the display
Or
Compare the control number on the display
with the control number in the display of
the mobile phone and confirm.
Four mobile phones can be logged in on the
vehicle, and one mobile phone can be con‐
nected to the vehicle.
Following the initial pairing Mobile phone is connected to the vehicle after
a brief time.
The phone book entries stored on the SIM card
or in the mobile phone are transferred to the
vehicle.
Specific settings may be necessary in some mo‐
bile phones, e.g., authorization or a secure con‐
nection; refer to the mobile phone operating
instructions.
Connecting a particular mobile phone
1. "Telephone"2."Bluetooth®"3.Select the mobile phone that is to be con‐
nected.
Unpairing the mobile phone
1. "Telephone"2."Bluetooth®"3.Highlight any mobile phone that is to be re‐
moved.4. Press button.5."Remove device" or "Remove all devices"
What to do if...
Information on suitable mobile phones, refer to
page 162.
Seite 163Bluetooth hands-free systemCOMMUNICATION163
Online Edition for Part no. 01 40 2 961 140 - II/15