high beam MINI Hardtop 2 Door 2015 Owner's Manual
[x] Cancel search | Manufacturer: MINI, Model Year: 2015, Model line: Hardtop 2 Door, Model: MINI Hardtop 2 Door 2015Pages: 251, PDF Size: 11.4 MB
Page 18 of 251

CockpitVehicle features and op‐
tions
This chapter describes all standard, country-
specific and optional features offered with the
series. It also describes features that are notnecessarily available in your car, e. g., due to
the selected options or country versions. This
also applies to safety-related functions and sys‐
tems. The respectively applicable country provi‐
sions must be observed when using the respec‐
tive features and systems.
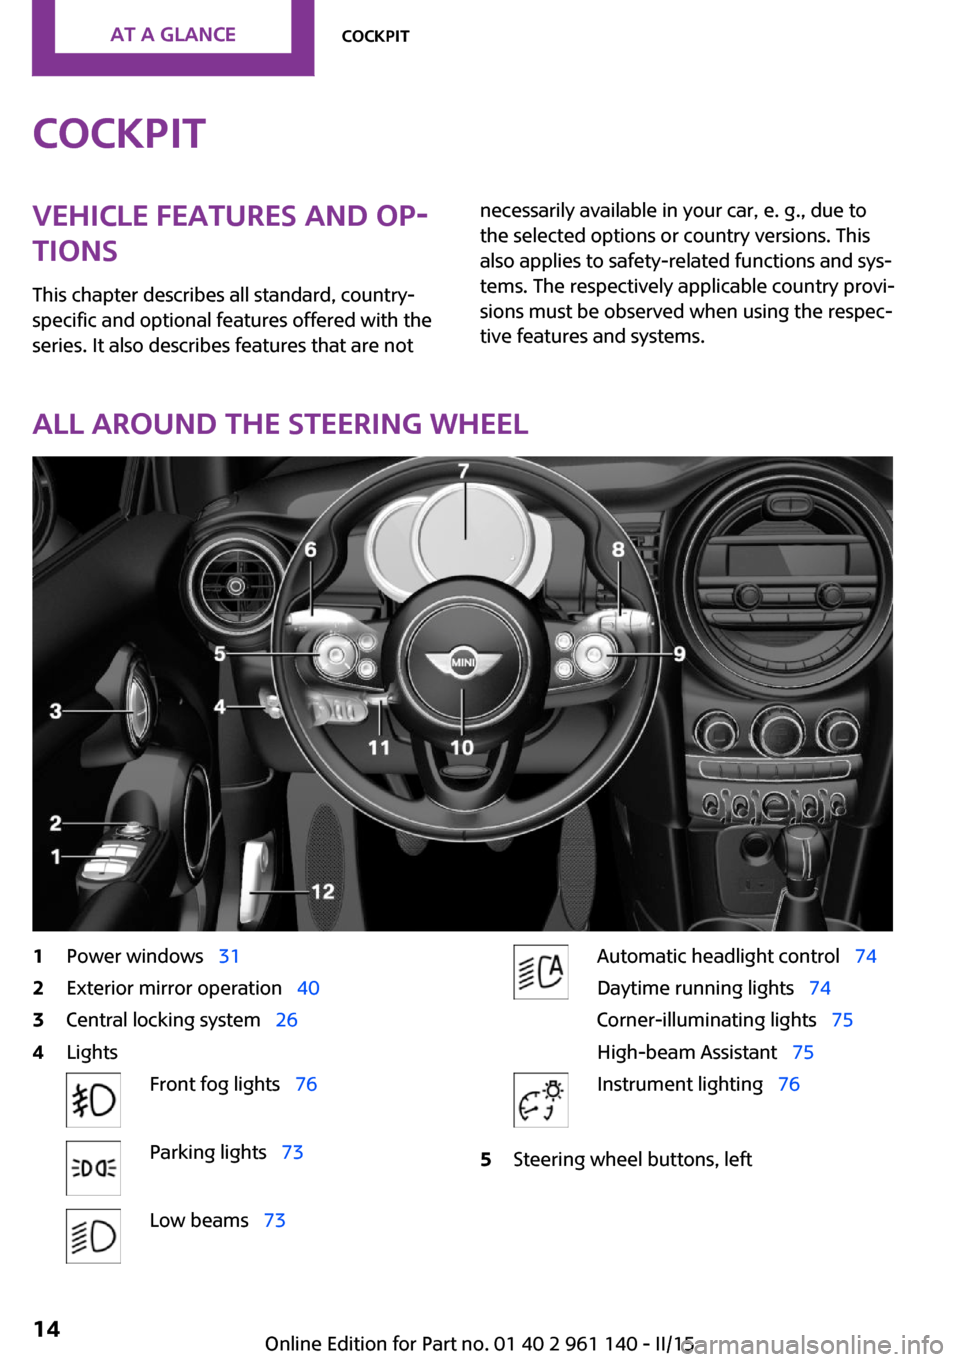
All around the steering wheel
1Power windows 312Exterior mirror operation 403Central locking system 264LightsFront fog lights 76Parking lights 73Low beams 73Automatic headlight control 74
Daytime running lights 74
Corner-illuminating lights 75
High-beam Assistant 75Instrument lighting 765Steering wheel buttons, leftSeite 14AT A GLANCECockpit14
Online Edition for Part no. 01 40 2 961 140 - II/15
Page 19 of 251

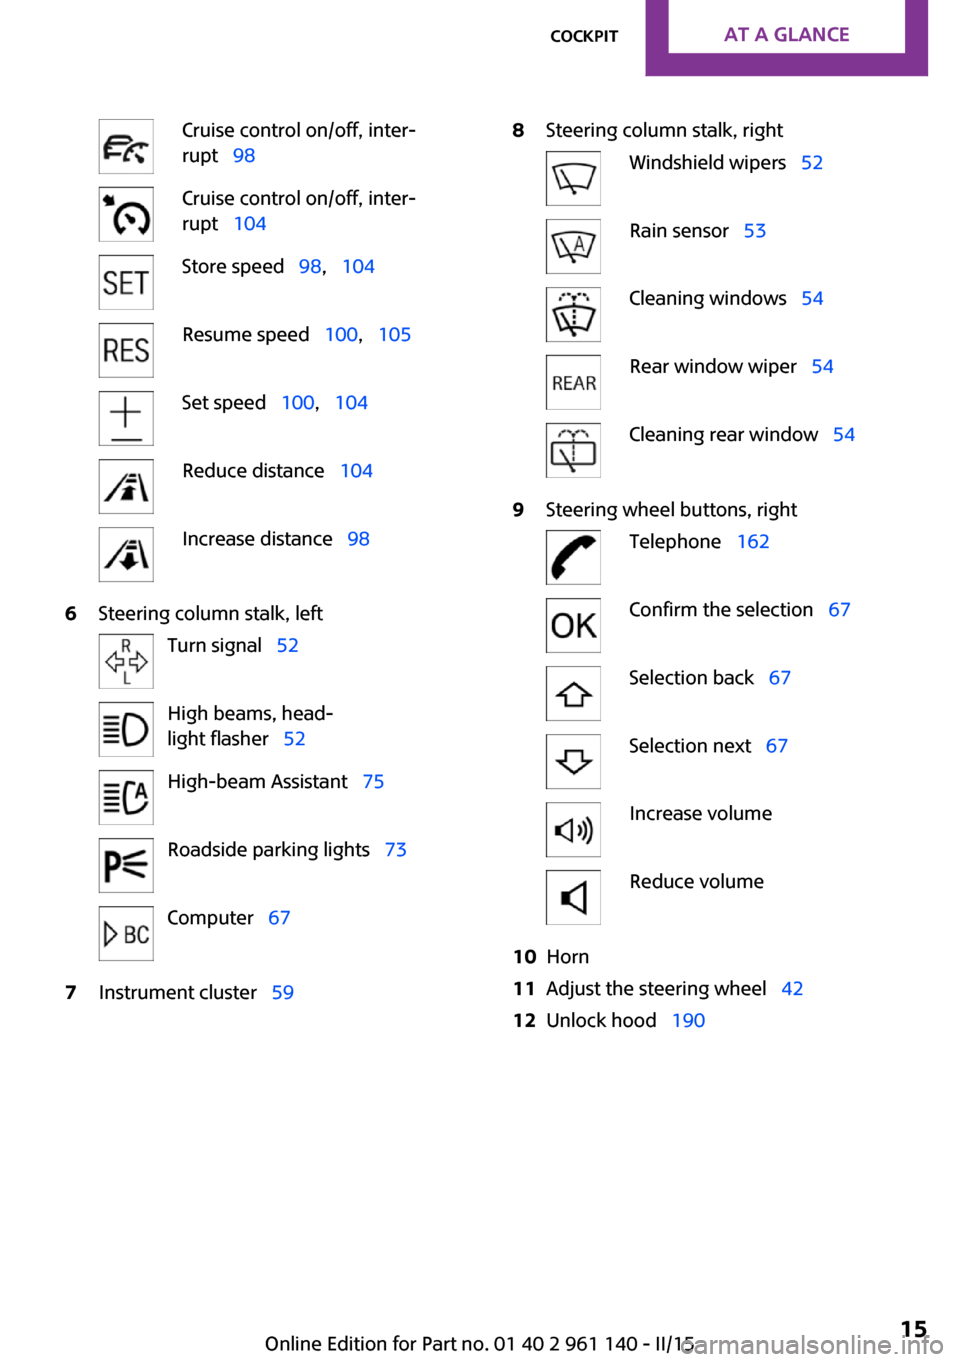
Cruise control on/off, inter‐
rupt 98Cruise control on/off, inter‐
rupt 104Store speed 98, 104Resume speed 100, 105Set speed 100, 104Reduce distance 104Increase distance 986Steering column stalk, leftTurn signal 52High beams, head‐
light flasher 52High-beam Assistant 75Roadside parking lights 73Computer 677Instrument cluster 598Steering column stalk, rightWindshield wipers 52Rain sensor 53Cleaning windows 54Rear window wiper 54Cleaning rear window 549Steering wheel buttons, rightTelephone 162Confirm the selection 67Selection back 67Selection next 67Increase volumeReduce volume10Horn11Adjust the steering wheel 4212Unlock hood 190Seite 15CockpitAT A GLANCE15
Online Edition for Part no. 01 40 2 961 140 - II/15
Page 52 of 251

▷After approx. 8 minutes.▷When the vehicle is locked using the central
locking system.▷Shortly before the battery is discharged
completely, so that the engine can still be
started.
The radio-ready state remains active if, e.g., the
ignition is automatically switched off for the fol‐
lowing reasons:
▷Opening or closing the driver's door.▷Unfastening of the driver's safety belt.▷When automatically switching from low
beams to parking lights.
If the engine is switched off and the ignition is
switched on, the system automatically switches
to the radio-ready state if the lights are turned
off or, if correspondingly equipped, the day‐
time running lights are activated.
Starting the engine
Hints Enclosed areas
Do not let the engine run in enclosed
areas, since breathing in exhaust fumes may
lead to loss of consciousness and death. The
exhaust gases contain carbon monoxide, an
odorless and colorless but highly toxic gas. ◀
Unattended vehicle
Do not leave the vehicle unattended with
the engine running; doing so poses a risk of
danger.
Before leaving the vehicle with the engine run‐
ning, set the parking brake and place the trans‐
mission in selector lever position P or N to pre‐
vent the vehicle from moving. ◀
Repeated starting in quick succession
Avoid trying to start the vehicle repeat‐
edly and in quick succession. Otherwise, the
fuel is not burned or is inadequately burned,
posing a risk of overheating and damage to the
catalytic converter. ◀
Do not wait for the engine to warm-up while
the vehicle remains stationary. Start driving at
moderate engine speeds.
Steptronic transmission
Starting the engine1.Depress the brake pedal.2.Engage selector lever position P or N.3.Press the Start/Stop button.
The ignition is activated automatically for a cer‐
tain time and is stopped as soon as the engine
starts.
Manual transmission
Starting the engine
1.Depress the brake pedal.2.Press on the clutch pedal and shift to neu‐
tral.3.Press the Start/Stop button.
The ignition is activated automatically for a cer‐
tain time and is stopped as soon as the engine
starts.
Engine stop
Hints Take the remote control with you
Take the remote control with you when
leaving the vehicle so that children, e.g., cannot
start the engine. ◀
Apply parking brake and further secure
the vehicle if needed.
Set the parking brake firmly when parking; oth‐
erwise, the vehicle could roll. On steep upward
and downward inclines, further secure the ve‐
Seite 48CONTROLSDriving48
Online Edition for Part no. 01 40 2 961 140 - II/15
Page 56 of 251

Turn signal, high beams,
headlight flasher
Turn signal
Using turn signals
Press the lever beyond the resistance point.
To switch off manually, press the lever to the
resistance point.
Unusually rapid flashing of the indicator lamp
indicates that a turn signal bulb has failed.
Triple turn signal activation Press the lever to the resistance point.
The turn signal flashes three times.
The function can be activated or deactivated.
Set via radio.
1. Press button.2. "Settings"3."Lighting"4."Triple turn signal"
Settings are stored for the profile currently in
use.
Signaling briefly
Press the lever to the resistance point and hold
it there for as long as you want the turn signal
to flash.
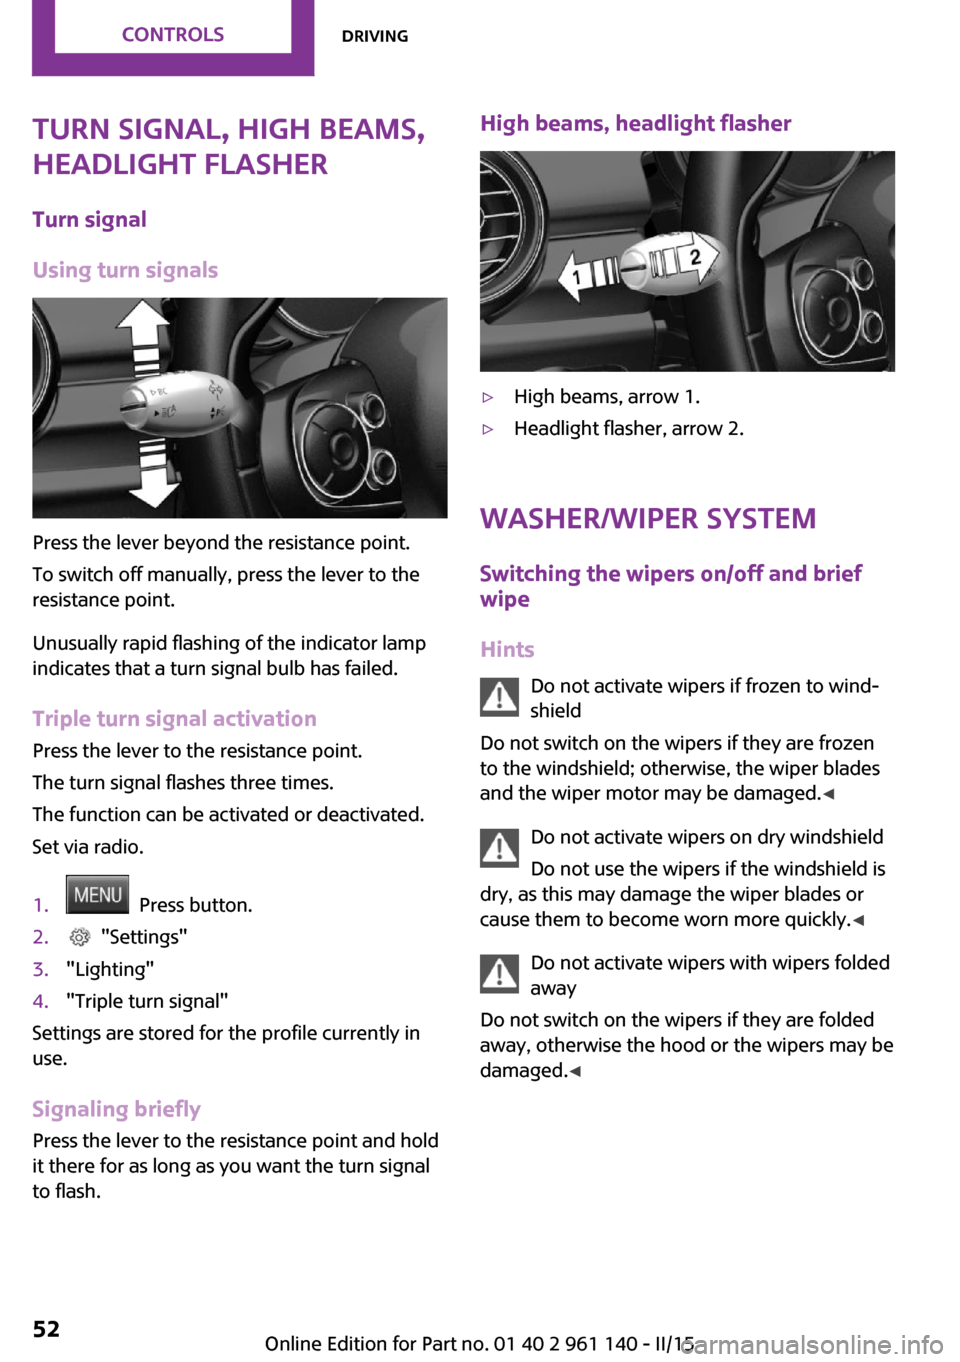
High beams, headlight flasher▷High beams, arrow 1.▷Headlight flasher, arrow 2.
Washer/wiper system
Switching the wipers on/off and brief
wipe
Hints Do not activate wipers if frozen to wind‐
shield
Do not switch on the wipers if they are frozen
to the windshield; otherwise, the wiper blades
and the wiper motor may be damaged. ◀
Do not activate wipers on dry windshield
Do not use the wipers if the windshield is
dry, as this may damage the wiper blades or
cause them to become worn more quickly. ◀
Do not activate wipers with wipers folded
away
Do not switch on the wipers if they are folded
away, otherwise the hood or the wipers may be
damaged. ◀
Seite 52CONTROLSDriving52
Online Edition for Part no. 01 40 2 961 140 - II/15
Page 67 of 251

High-beam AssistantHigh-beam Assistant is switched on.
High beams are activated and off auto‐
matically as a function of the traffic sit‐
uation.
For additional information, refer to High-beam
Assistant, refer to page 75.
Cruise control The system is switched on. It maintains
the speed that was set using the control
elements on the steering wheel.
Blue lights
High beams High beams are activated.
For additional information, refer to High
beams, refer to page 52.
General lamps At least one Check Control message is
displayed or is stored. The symbol is
shown in the display of the instrument
cluster.
Text messages
Text messages in combination with a symbol in
the instrument cluster explain a Check Control
message and the meaning of the indicator and
warning lights.
Supplementary text messages Additional information, such as on the cause of
an error or the required action, can be called up
via Check Control.
With urgent messages the added text will be
automatically displayed on the radio display.
To view the entire text line for line: turn the
right-hand knob on the radio.Hiding Check Control messages
Press the onboard computer button on the turn
signal lever.
▷Some Check Control messages are dis‐
played continuously and are not cleared
until the malfunction is eliminated. If sev‐
eral malfunctions occur at once, the mes‐
sages are displayed consecutively.
These messages can be faded for approx.
8 seconds. After this time, they are dis‐
played again automatically.▷Other Check Control messages are faded
automatically after approx. 20 seconds.
They are stored and can be displayed again
later.
Displaying stored Check Control
messages
1. Press button.2. "Vehicle Info"3."Vehicle status"4."Check Control"5.Selecting the desired Check Control mes‐
sage
Messages after trip completion
Special messages displayed while driving are
displayed again after the ignition is switched
off.
Seite 63DisplaysCONTROLS63
Online Edition for Part no. 01 40 2 961 140 - II/15
Page 77 of 251

LightsVehicle features and op‐
tions
This chapter describes all standard, country-
specific and optional features offered with the series. It also describes features that are notnecessarily available in your car, e. g., due to
the selected options or country versions. This
also applies to safety-related functions and sys‐
tems. The respectively applicable country provi‐
sions must be observed when using the respec‐
tive features and systems.
Overview1Rear fog lights2Front fog lights3Depending on the equipment: automatic
headlight control, cornering lights, High-
beam Assistant, welcome lights, daytime
running lights4Lights off, daytime running lights5Parking lights / daytime running lights6Depending on the equipment: low beams,
welcome lights, High-beam Assistant7Instrument lightingParking lights, corner‐
ing lights and roadside
parking lights
General information Position of switch:
, ,
If the driver door is opened with the ignition
switched off, the exterior lighting is automati‐
cally switched off at these switch settings.
Parking lights
Position of switch
: the vehicle's lights
light up on all sides, e.g., for parking.
Do not use the parking lights for extended peri‐
ods; otherwise, the battery may become dis‐
charged and it would then be impossible to
start the engine.
When parking you better turn on just the road-
side parking light.
Low beams
Position of switch
with the ignition
switched on: the low beams light up.
Roadside parking lights
The vehicle can be illuminated on one side.
Seite 73LightsCONTROLS73
Online Edition for Part no. 01 40 2 961 140 - II/15
Page 79 of 251

Set via radio.1. Press button.2. "Settings"3."Lighting"4."Daytime running lamps"
Settings are stored for the profile currently in
use.
Cornering lamp
Position of switch
: going around corners,
the cornering lamp also lights the interior area
of the curve. Below a speed of approx.
25 mph/40 km/h when the flasher is switched
on and the steering angle is detected, there is
automatic activation.
Malfunction
A Check Control message is displayed.
Cornering light is disrupted or failed. Have the
system checked as soon as possible.
High-beam Assistant The concept
When the low beams are activated, this system
automatically switches the high beams on and
off. The procedure is controlled by a camera on
the front of the interior rearview mirror. The as‐
sistant ensures that the high beams are acti‐
vated whenever the traffic situation allows. The
driver can intervene at any time and switch the
high beams on and off as usual.
Note Personal responsibility
The High-beam Assistant cannot serve as
a substitute for the driver's personal judgment
of when to use the high beams. Therefore,
manually reel off the high beams in situations
where required to avoid a safety risk. ◀
Activating
The High-beam Assistant can be activated
when the low beams are activated.
1.Depending on the equipment, turn the light
switch into position
or .
2.Press button on the turn signal lever, arrow.
The indicator lamp in the instrument
cluster lights up.
When the low beams are on, the lights are au‐
tomatically brightened or dimmed.
The system responds to light from oncoming
traffic and traffic driving ahead of you, and to
adequate illumination, e.g., in towns and cities.
The blue indicator lamp in the instru‐
ment cluster lights up when the system
switches on the high beams.
Switching the high beams on and off
manually
▷High beams on, arrow 1.Seite 75LightsCONTROLS75
Online Edition for Part no. 01 40 2 961 140 - II/15
Page 80 of 251

▷High beams off/headlight flasher, arrow 2.
The High-beam Assistant can be switched off
when manually adjusting the light. To reacti‐
vate the High-beam Assistant, press the button
on the turn signal lever.
System limits
The system is not fully functional in situations
such as the following, and driver intervention
may be necessary:
▷In very unfavorable weather conditions,
such as fog or heavy precipitation.▷When detecting poorly-lit road users such
as pedestrians, cyclists, horseback riders
and wagons; when driving close to train or
ship traffic; and at animal crossings.▷In tight curves, on hilltops or in depressions,
in cross traffic or half-obscured oncoming
traffic on freeways.▷In poorly-lit towns and cities and in the
presence of highly reflective signs.▷At low speeds.▷When the windshield behind the interior
rearview mirror is fogged over, dirty or cov‐
ered with stickers, etc.
Fog lights
Front fog lights
The low beams must be switched on.
Press button. The green indicator lamp
lights up.
If the automatic headlight control, refer to
page 74, is activated, the low beams will come
on automatically when you switch on the front
fog lights.
When the high beams or headlight flasher are
activated, the front fog lights are not switched
on.
Rear fog lights
The low beams or front fog lights must be
switched on.
Press button. The yellow indicator
lamp lights up.
If the automatic headlight control, refer to
page 74, is activated, the low beams will come
on automatically when you switch on the rear
fog lights.
Instrument lighting
Adjusting The parking lights or low beams
must be switched on to adjust
the brightness.
Adjust the brightness with the
thumbwheel.
Interior lights
General information The interior lights, footwell lights, access lights
and courtesy lights are controlled automati‐
cally.
Thumb wheel for the instrument lighting con‐
trols brightness of some of these features.Seite 76CONTROLSLights76
Online Edition for Part no. 01 40 2 961 140 - II/15
Page 205 of 251

Front lights, bulb replacement
Overview
Halogen headlights1Low beams/high beams2Turn signal
LED headlights
1Daytime running lights2Low beams/high beams3Turn signalBug light1Parking lights2Daytime running lights3Fog lights
LED bug light
1Parking lights2Fog lights
LED low beams/LED high beams Follow the general instructions on lights and
bulbs, refer to page 200.
The lights feature LED technology. Contact your
service center in the event of a malfunction.
halogen low beams/halogen high
beams
Follow the general instructions on lights and
bulbs, refer to page 200.
Seite 201Replacing componentsMOBILITY201
Online Edition for Part no. 01 40 2 961 140 - II/15
Page 245 of 251

Formats, setting 69
Front airbags 78
Front-end collision warning with City Braking func‐
tion 87
Front fog lights 76
front-seat passenger airbags, automatic deactivation 80
Front-seat passenger airbags, indicator lamp 80
FTM Flat Tire Monitor 84
Fuel 174
Fuel consumption, current 65
Fuel consumption, refer to Average fuel consump‐
tion 68
Fuel filler flap 172
Fuel gauge 64
Fuel lid 172
Fuel quality 174
Fuel recommendation 174
Fuel, tank capacity 226
Fuse 210
G Garage door opener, refer to Universal Integrated Remote
Control 119
Gasoline 174
Gear change, Steptronic trans‐ mission 56
Gear shift indicator 65
General driving notes 134
Glare shield 123
Glass sunroof, refer to Panor‐ amic glass sunroof 32
Glove compartment 127
Gong, volume equaliza‐ tion 148
GREEN mode 142
GREEN mode, bonus range 143
GREEN mode indicator 142
GREEN - program, driving dy‐ namics 96 GREEN tip 144
Gross vehicle weight, ap‐ proved 223
Ground clearance 136
H
Halogen headlights 201
Handbrake, refer to parking brake 51
Hand-held transmitter, alter‐ nating code 120
Hands-free system 162
Hazard warning flashers 211
HD Radio 151
Head airbags 78
Headlight control, auto‐ matic 74
Headlight courtesy delay fea‐ ture 74
Headlight flasher 52
Headlight glass 200
Headlights, care 217
Head restraints 35
Head restraints, front 38
Head restraints, rear 39
Heavy cargo, stowing 138
High-beam Assistant 75
High beams 52
High beams/low beams, refer to High-beam Assistant 75
Hills 136
Hill start assistant, refer to Drive-off assistant 97
Hints 6
Holder for beverages 128
Homepage 6
Hood 190
Horn 14
Hot exhaust system 135
Hydroplaning 135
I Ice warning, see External tem‐ perature warning 64 Icy roads, see External tem‐
perature warning 64
Identification marks, tires 180
Identification number, see ve‐ hicle identification number 9
Ignition key, refer to Remote control 22
Ignition off 47
Ignition on 47
Illuminated ring, central in‐ strument cluster 70
Indication of a flat tire 82, 85
Indicator lamp, see Check Control 60
Individual air distribu‐ tion 113, 116
Individual settings, refer to Personal Profile 23
Inflation pressure, tires 176
Inflation pressure warning, tires 84
Info display, refer to On-Board computer 67
Initialize, Tire Pressure Moni‐ tor TPM 82
Initializing, Flat Tire Monitor FTM 85
Instrument cluster 59
Instrument cluster, electronic displays 60
Instrument lighting 76
Integrated key 22
Intelligent Safety 86
Intensity, AUTO program 116
Interior equipment 119
Interior lights 76
Interior lights during unlock‐ ing 24
Interior lights with the vehicle locked 25
Interior motion sensor 31
Interior rearview mirror, auto‐ matic dimming feature 42
Interior rearview mirror, com‐ pass 121 Seite 241Everything from A to ZREFERENCE241
Online Edition for Part no. 01 40 2 961 140 - II/15