remote control MINI Paceman 2013 Owner's Guide
[x] Cancel search | Manufacturer: MINI, Model Year: 2013, Model line: Paceman, Model: MINI Paceman 2013Pages: 275, PDF Size: 4.23 MB
Page 94 of 275
Practical interior accessoriesCONTROLS
93
Practical interior accessories
Vehicle equipment
In this chapter, all production, country, and
optional equipment that is offered in the model
range is described. Equipment is also described
that is not available because of, for example,
selected options or count ry version. This also
applies to safety related functions and systems.
Integrated universal
remote control
The concept
By using the Integrated universal remote con-
trol, up to 3 functions of remote controlled
devices, e.g., garage door openers or lighting
systems, can be operated . As a result, the uni-
versal remote control can replace up to 3 differ-
ent remote controls. To operate, the buttons on
the rearview mirror must be programmed with
the desired functions. For programming, the
remote control for each device is needed.
To prevent possible damage or injury,
before programming or using the inte-
grated universal remote control, always inspect
the immediate area to make certain that no
people, animals or objects are within the travel
range of the device.
Comply also with the safe ty instructions supplied
with the original hand-held transmitter. <
Before selling the vehicle, delete the stored
functions as a safety precaution, page.
Checking compatibility
Depending on your vehicle's equip-
ment, the glove compartment can be
ventilated and, if the cooling function is
switched on, can also be cooled.
For additional information, please contact your
MINI dealer or call: 1-800-355-3515. A list of compatible remo
te controls is available
on the Internet at www.homelink.com.
HomeLink is a registered trademark of Johnson
Controls, Inc.
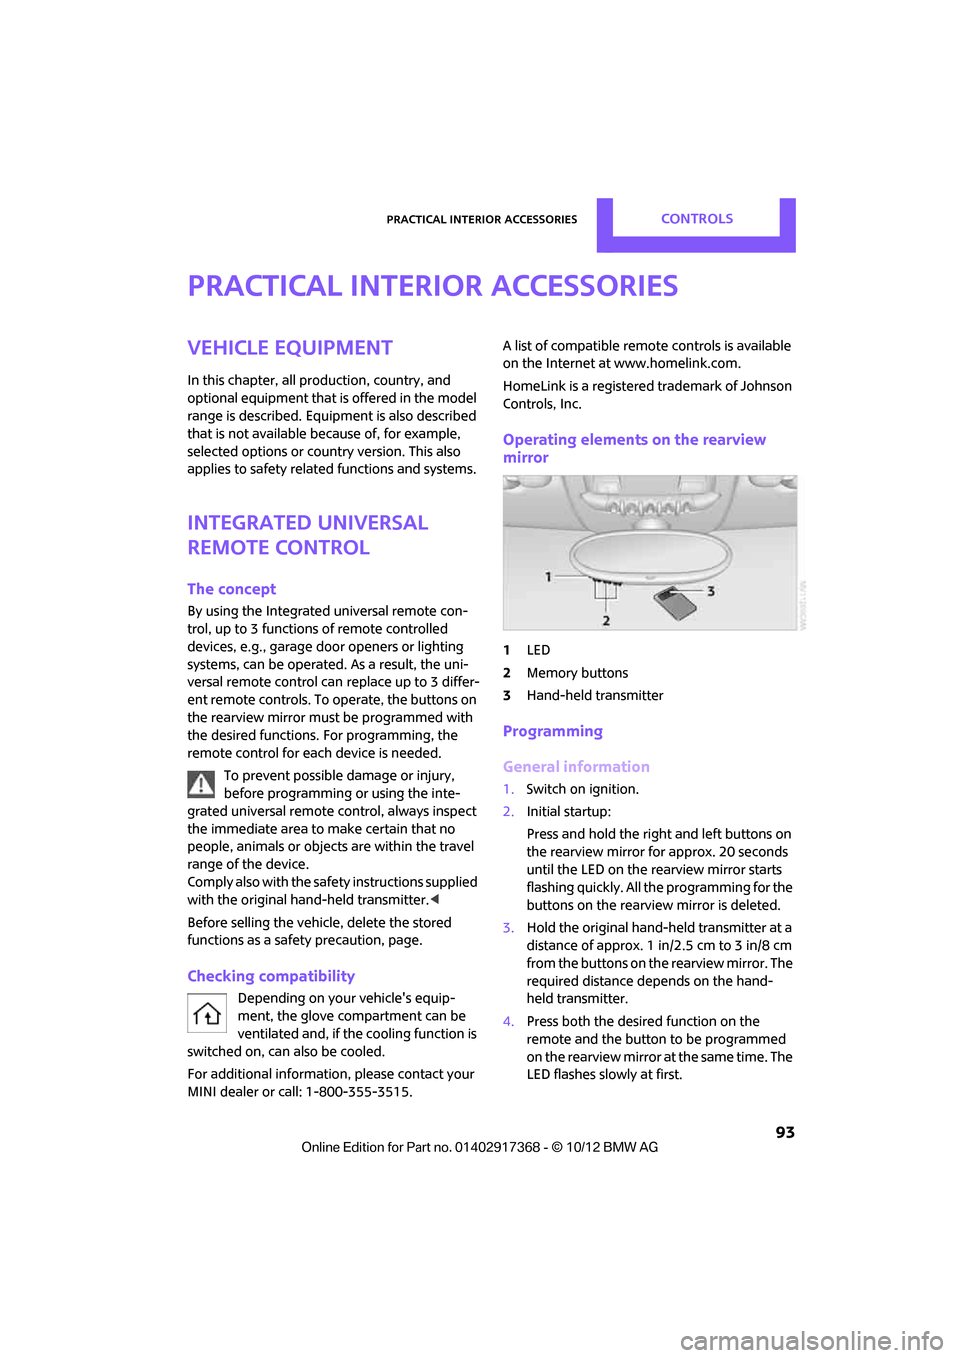
Operating elements on the rearview
mirror
1 LED
2 Memory buttons
3 Hand-held transmitter
Programming
General information
1.Switch on ignition.
2. Initial startup:
Press and hold the righ t and left buttons on
the rearview mirror for approx. 20 seconds
until the LED on the rearview mirror starts
flashing quickly. All the programming for the
buttons on the rearview mirror is deleted.
3. Hold the original hand-held transmitter at a
distance of approx. 1 in/2.5 cm to 3 in/8 cm
from the buttons on the rearview mirror. The
required distance depends on the hand-
held transmitter.
4. Press both the desire d function on the
remote and the button to be programmed
on the rearview mirror at the same time. The
LED flashes slowly at first.
00320051004F004C00510048000300280047004C0057004C005200510003
Page 95 of 275
CONTROLSPractical interior accessories
94
5.As soon as the LED flashes rapidly, release
both buttons. The quick flashing indicates
that the button on the rearview mirror has
been programmed.
If the LED does not flash rapidly after
approx. 60 seconds, alter the distance
between the rearview mirror and hand-held
transmitter and repeat this step. Several
attempts at different distances may be nec-
essary. Wait at least 15 seconds before each
attempt.
Canada: if the programming was interrupted
by the hand-held transm itter, press and hold
the memory button and press the button on
the hand-held transmit ter for 2 seconds and
release several times.
6. To program other functions on other but-
tons, repeat steps 3 to 5.
You can operate the system with the engine
running or with the ignition switched on.
Special features of hopping-code
transmitter systems
If the device cannot be operated after being
programmed repeatedly, then check if the
device to be operated is equipped with a hop-
ping-code system. In a ddition, check in the
operating instructions for the device or press the
programmed button on the rearview mirror for a
longer period of time. If the LED on the rearview
mirror first flashes quickl y and then is on for
2 seconds, then the device is equipped with a
hopping-code system. The flashing and the LED
being on repeats itself for approx. 20 seconds.
In addition, for devices with hopping-code sys-
tems, the integrated universal remote control
and the device must be synchronized.
Information about synchr onizing can be found
in the operating in structions for the device to be
set.
Programming will be easier with the aid of a sec-
ond person. Synchronizing:
1.
Park your vehicle within the range of the
remote-controlled device.
Do not exceed the 164 ft/50 m range of the
remote-controlled device.
2. Program the particular button on the rear-
view mirrors as described.
3. Find and press the button for synchronizing
the device to be set. There remain approx.
30 seconds for the next step.
4. Press and hold the programmed button on
the rearview mirror for approx. 3seconds
and then release. Repeat this step, possibly
up to three times, to complete the synchro-
nization. After the sy nchronization is com-
pleted, the programmed function is imple-
mented.
To reprogram individual buttons
1. Switch on ignition.
2. Press and hold the button to be pro-
grammed on the rearview mirror.
3. As soon as the LED on the rearview mirror
starts flashing slowly, hold the hand-held
transmitter of the device to be operated
approx. 1in/2.5cm to 3in/8cm from the
buttons on the rearview mirror. The required
distance depends on the hand-held trans-
mitter.
4. Press and also hold the button with the
desired function on the hand-held transmit-
ter.
5. As soon as the LED on the rearview mirror
starts blinking faster, release both buttons.
The quick flashing indicates that the button
on the rearview mirror has been pro-
grammed. The device can now be operated
using the button on the rearview mirror.
Canada: if the LED is not flashing rapidly
after 60 seconds, change the distance and
repeat the step or, if the programming was
interrupted by the hand-held transmitter,
press and hold the memory button and
00320051004F004C00510048000300280047004C0057004C005200510003
Page 96 of 275
Practical interior accessoriesCONTROLS
95
press the button on the hand-held transmit-
ter for 2 seconds and release several times.
Operation
Before using the integrated universal
remote control, always inspect the imme-
diate area to make certain that no people, ani-
mals or objects are within the travel range of the
device.
Comply also with the safe ty instructions supplied
with the original hand-held transmitter. <
The device, for example a garage door, can be
operated while the engine is running or when
the ignition is on by using the button on the
rearview mirror. In addi tion, while within the
reception range of the device, press the button
until the function is deleted. The LED on the
rearview mirror is constant ly on while the signal
is being transmitted.
Deleting stored functions
Press and hold the right and left buttons on the
rearview mirror for approx. 20 seconds until the
LED on the rearview mirror starts flashing
quickly. All stored functions are deleted. The
functions can not be deleted individually.
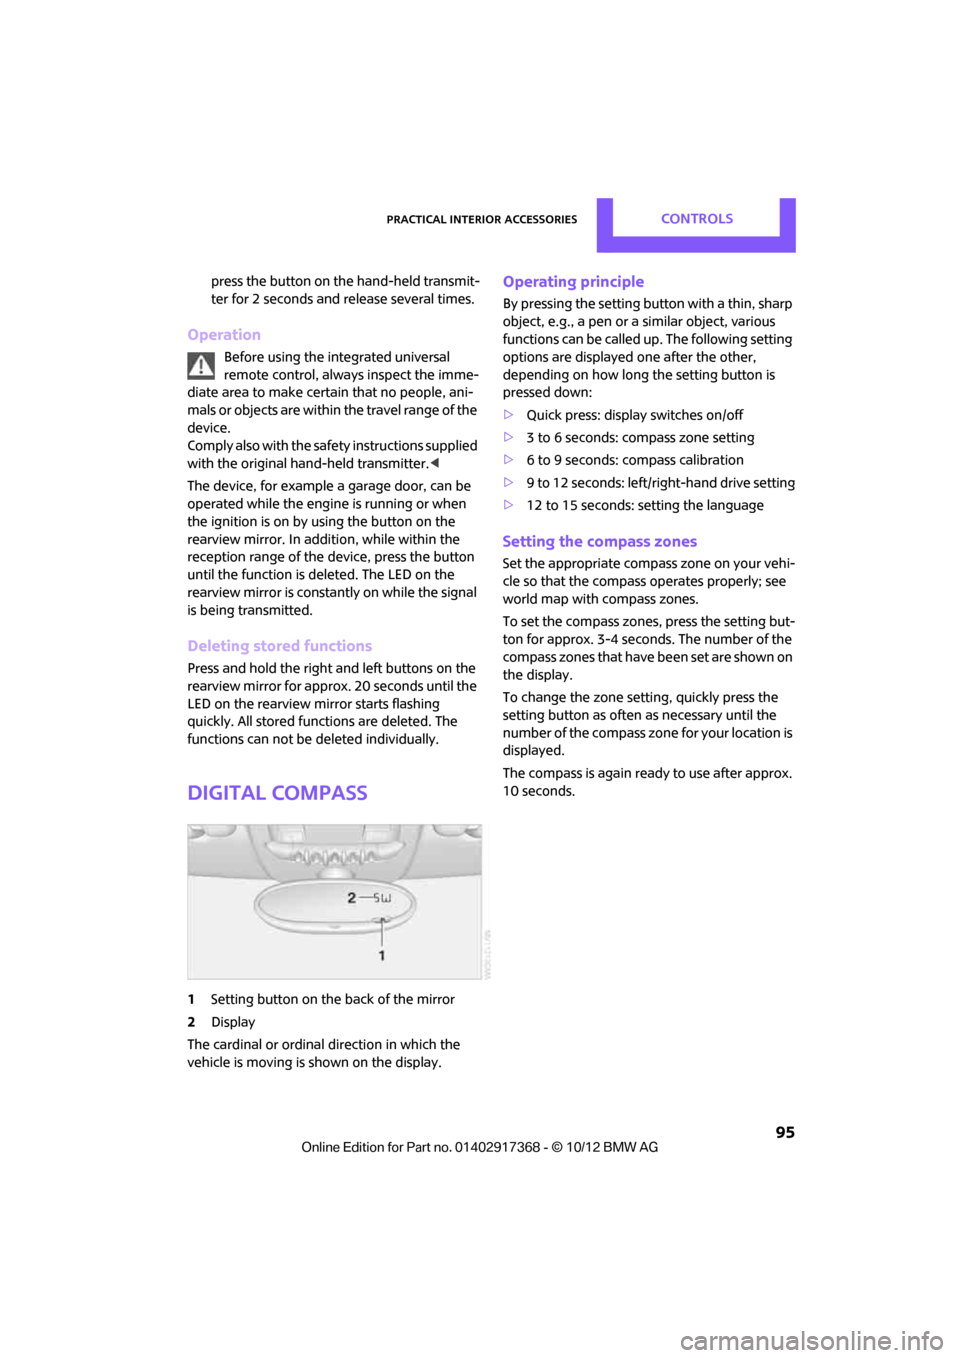
Digital compass
1 Setting button on the back of the mirror
2 Display
The cardinal or ordinal direction in which the
vehicle is moving is shown on the display.
Operating principle
By pressing the setting button with a thin, sharp
object, e.g., a pen or a similar object, various
functions can be called up. The following setting
options are displayed one after the other,
depending on how long the setting button is
pressed down:
> Quick press: display switches on/off
> 3 to 6 seconds: compass zone setting
> 6 to 9 seconds: compass calibration
> 9 to 12 seconds: left/right-hand drive setting
> 12 to 15 seconds: setting the language
Setting the compass zones
Set the appropriate compass zone on your vehi-
cle so that the compass operates properly; see
world map with compass zones.
To set the compass zones, press the setting but-
ton for approx. 3-4 seconds. The number of the
compass zones that have been set are shown on
the display.
To change the zone se tting, quickly press the
setting button as often as necessary until the
number of the compass zone for your location is
displayed.
The compass is again ready to use after approx.
10 seconds.
00320051004F004C00510048000300280047004C0057004C005200510003
Page 133 of 275
NAVIGATIONRoute guidance
132
Traffic information, refer to page133.
Planned route
After route guidance is started, the planned
route is displayed on the map.
Status boxes
Show/hide: press the MINI joystick.
>Upper status box: time, phone details, and
entertainment details.
> Lower status box: symb ol for active route
guidance, traffic inform ation status, arrival
time, and distance from destination.
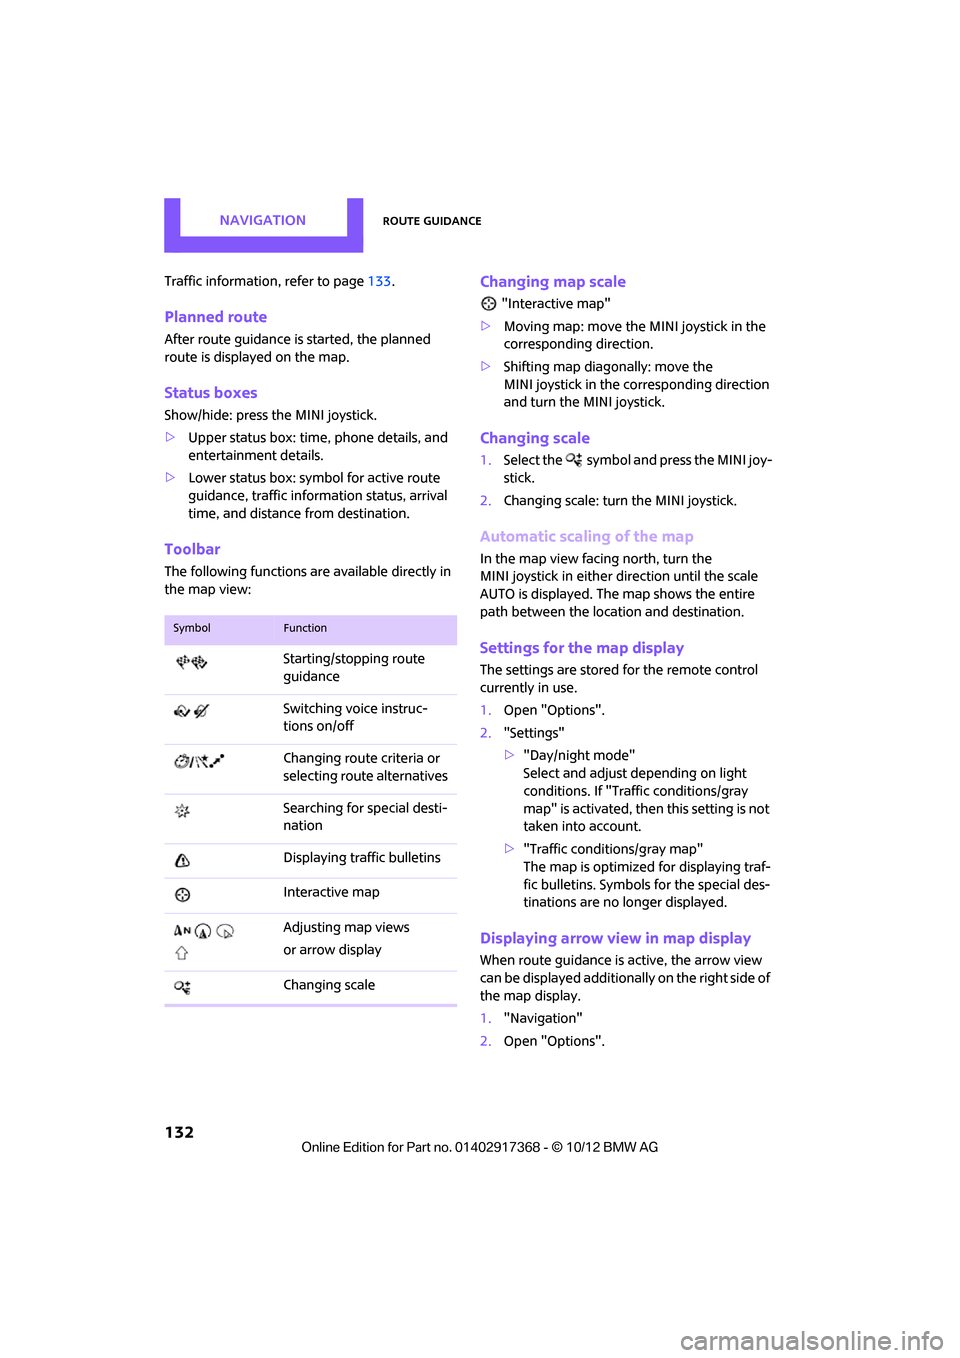
Toolbar
The following functions ar e available directly in
the map view:
Changing map scale
"Interactive map"
> Moving map: move the MINI joystick in the
corresponding direction.
> Shifting map diagonally: move the
MINI joystick in the co rresponding direction
and turn the MINI joystick.
Changing scale
1. Select the symbol and press the MINI joy-
stick.
2. Changing scale: turn the MINI joystick.
Automatic scaling of the map
In the map view facing north, turn the
MINI joystick in either direction until the scale
AUTO is displayed. The map shows the entire
path between the location and destination.
Settings for the map display
The settings are stored for the remote control
currently in use.
1.Open "Options".
2. "Settings"
>"Day/night mode"
Select and adjust depending on light
conditions. If "Traffic conditions/gray
map" is activated, then this setting is not
taken into account.
> "Traffic conditions/gray map"
The map is optimized for displaying traf-
fic bulletins. Symbols for the special des-
tinations are no longer displayed.
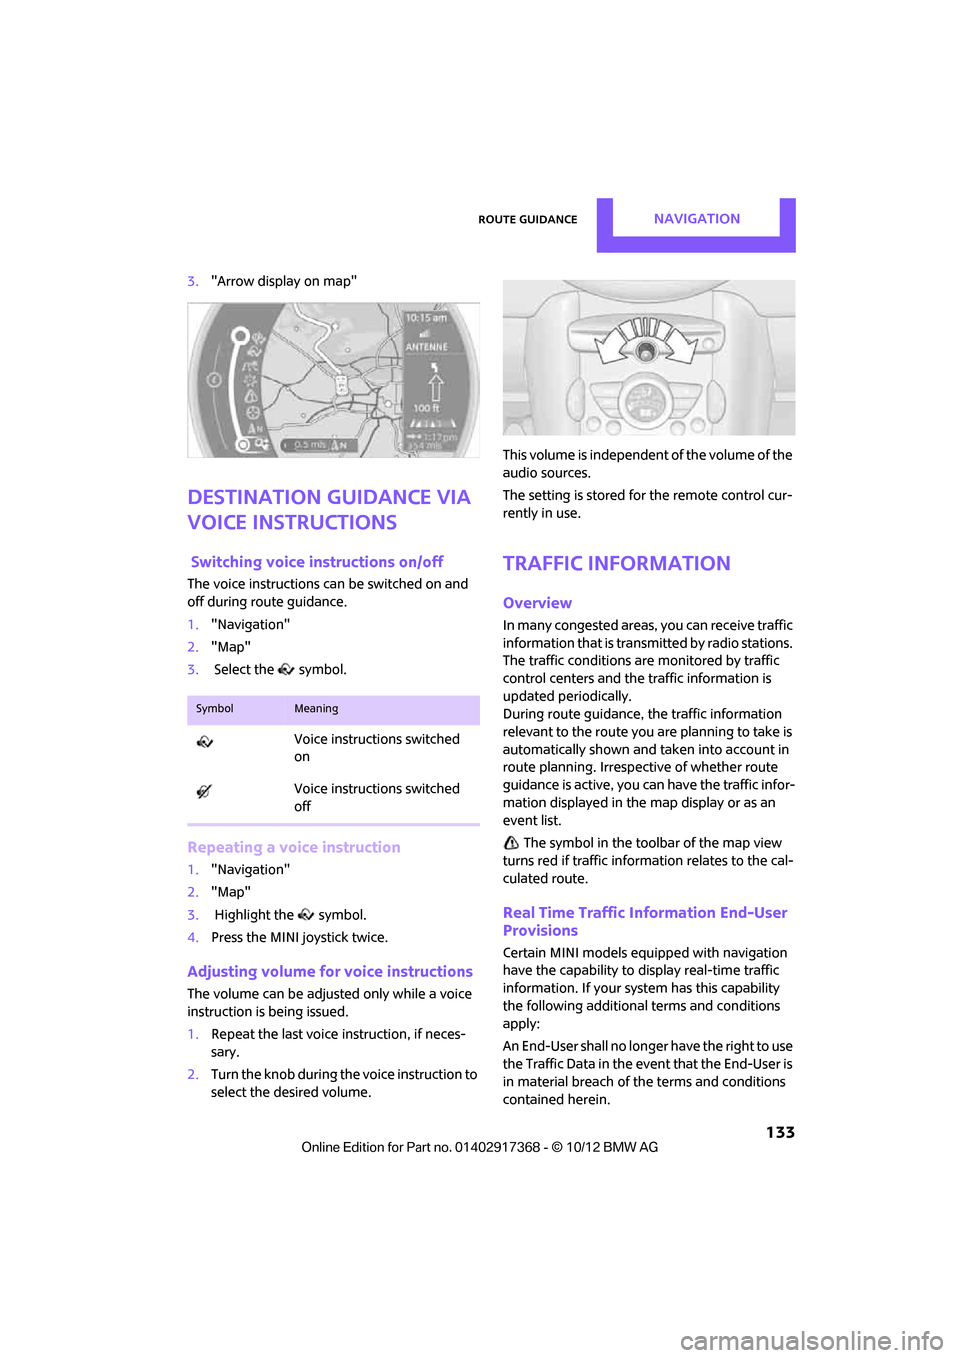
Displaying arrow view in map display
When route guidance is active, the arrow view
can be displayed additionally on the right side of
the map display.
1. "Navigation"
2. Open "Options".
SymbolFunction
Starting/stopping route
guidance
Switching voice instruc-
tions on/off
Changing route criteria or
selecting route alternatives
Searching for special desti-
nation
Displaying traffic bulletins
Interactive map
Adjusting map views
or arrow display
Changing scale
00320051004F004C00510048000300280047004C0057004C005200510003
Page 134 of 275
Route guidanceNAVIGATION
133
3."Arrow display on map"
Destination guidance via
voice instructions
Switching voice in structions on/off
The voice instructions ca n be switched on and
off during route guidance.
1. "Navigation"
2. "Map"
3. Select the symbol.
Repeating a voice instruction
1."Navigation"
2. "Map"
3. Highlight the symbol.
4. Press the MINI joystick twice.
Adjusting volume for voice instructions
The volume can be adjust ed only while a voice
instruction is being issued.
1. Repeat the last voice instruction, if neces-
sary.
2. Turn the knob during th e voice instruction to
select the desired volume. This volume is independent of the volume of the
audio sources.
The setting is stored for the remote control cur-
rently in use.
Traffic information
Overview
In many congested areas,
you can receive traffic
information that is transm itted by radio stations.
The traffic conditions are monitored by traffic
control centers and the traffic information is
updated periodically.
During route guidance, the traffic information
relevant to the route you are planning to take is
automatically shown and taken into account in
route planning. Irrespective of whether route
guidance is active, you can have the traffic infor-
mation displayed in the map display or as an
event list.
The symbol in the toolbar of the map view
turns red if traffic inform ation relates to the cal-
culated route.
Real Time Traffic Information End-User
Provisions
Certain MINI models equipped with navigation
have the capability to display real-time traffic
information. If your system has this capability
the following additional terms and conditions
apply:
An End-User shall no longer have the right to use
the Traffic Data in the event that the End-User is
in material breach of the terms and conditions
contained herein.
SymbolMeaning
Voice instructions switched
on
Voice instructions switched
off
00320051004F004C00510048000300280047004C0057004C005200510003
Page 142 of 275
On/off and toneEntertainment
141
Adjusting volume
Turn the knob to the desired volume.
The volume can also be adjusted on the steering
wheel, refer to page10.
The setting is stored for the remote control cur-
rently in use; refer to Personal Profile, page 26.
Setting tone controls
Various tone settings can be changed, e.g. treble
and bass or the speed-dependent volume con-
trol.
The tone settings are set for all audio sources at
once.
The settings are stored for the remote control
currently in use; refer to Personal Profile,
page 26.
Treble, bass, balance, fader
> "Treble": treble adjustment.
> "Bass": bass adjustment.
> "Balance": volume distribution right/left.
> "Fader": volume distribution front/back.
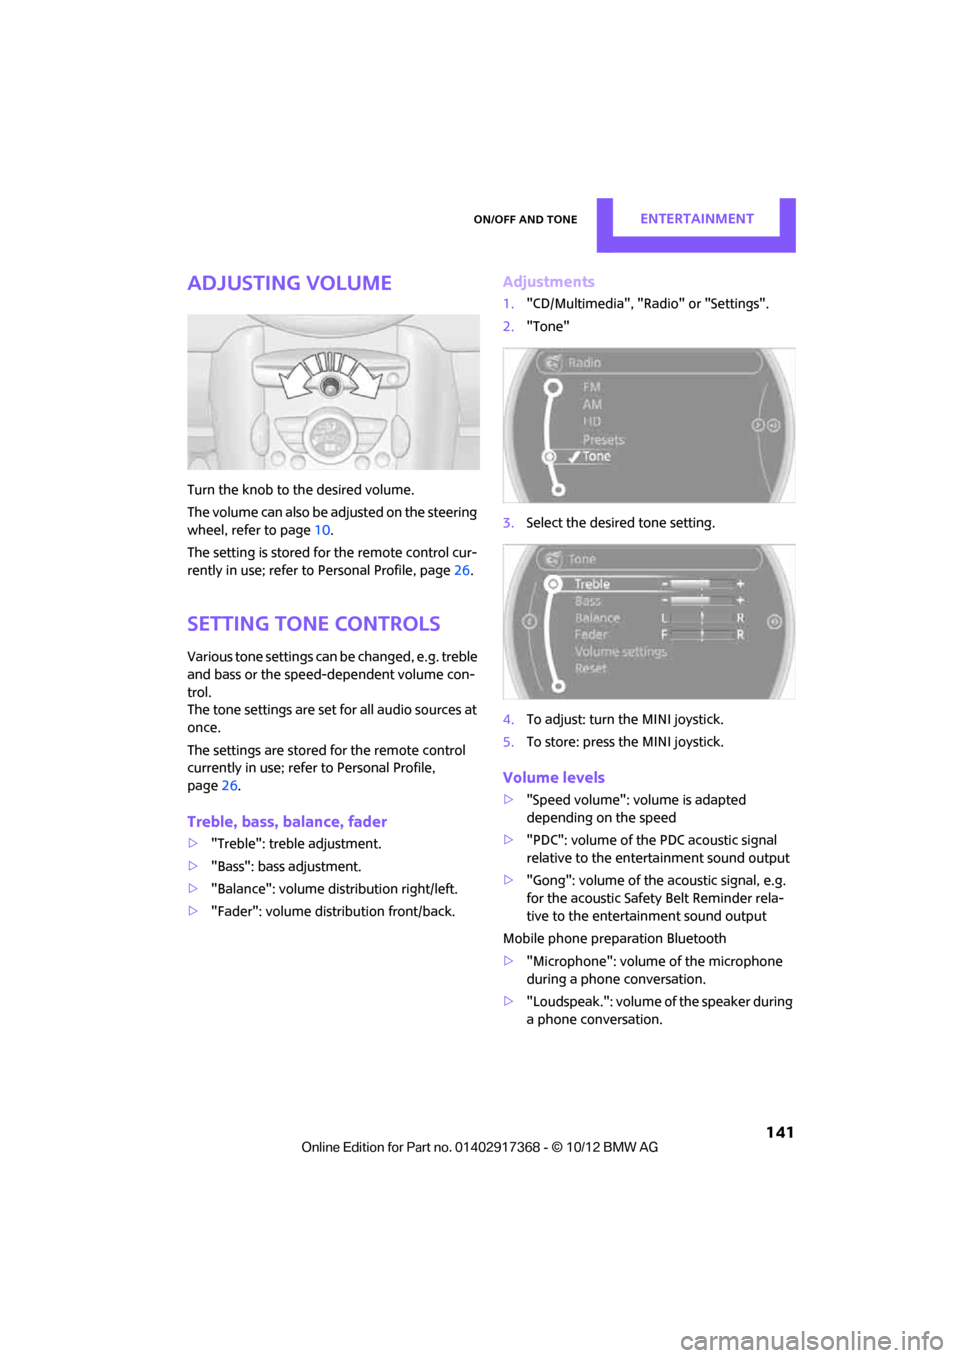
Adjustments
1."CD/Multimedia", "Rad io" or "Settings".
2. "Tone"
3. Select the desired tone setting.
4. To adjust: turn the MINI joystick.
5. To store: press the MINI joystick.
Volume levels
>"Speed volume": vo lume is adapted
depending on the speed
> "PDC": volume of the PDC acoustic signal
relative to the entertainment sound output
> "Gong": volume of the acoustic signal, e.g.
for the acoustic Safety Belt Reminder rela-
tive to the entertainment sound output
Mobile phone preparation Bluetooth
> "Microphone": volume of the microphone
during a phone conversation.
> "Loudspeak.": volume of the speaker during
a phone conversation.
00320051004F004C00510048000300280047004C0057004C005200510003
Page 144 of 275
RadioEntertainment
143
Radio
Vehicle equipment
In this chapter, all production, country, and
optional equipment that is offered in the model
range is described. Equipment is also described
that is not available because of, for example,
selected options or count ry version. This also
applies to safety related functions and systems.
General information
Your radio is designed for reception of the fol-
lowing stations:
> FM and AM
> HD Radio
> Satellite radio
AM/FM station
Selecting a station
Press the knob if the sound output is switched
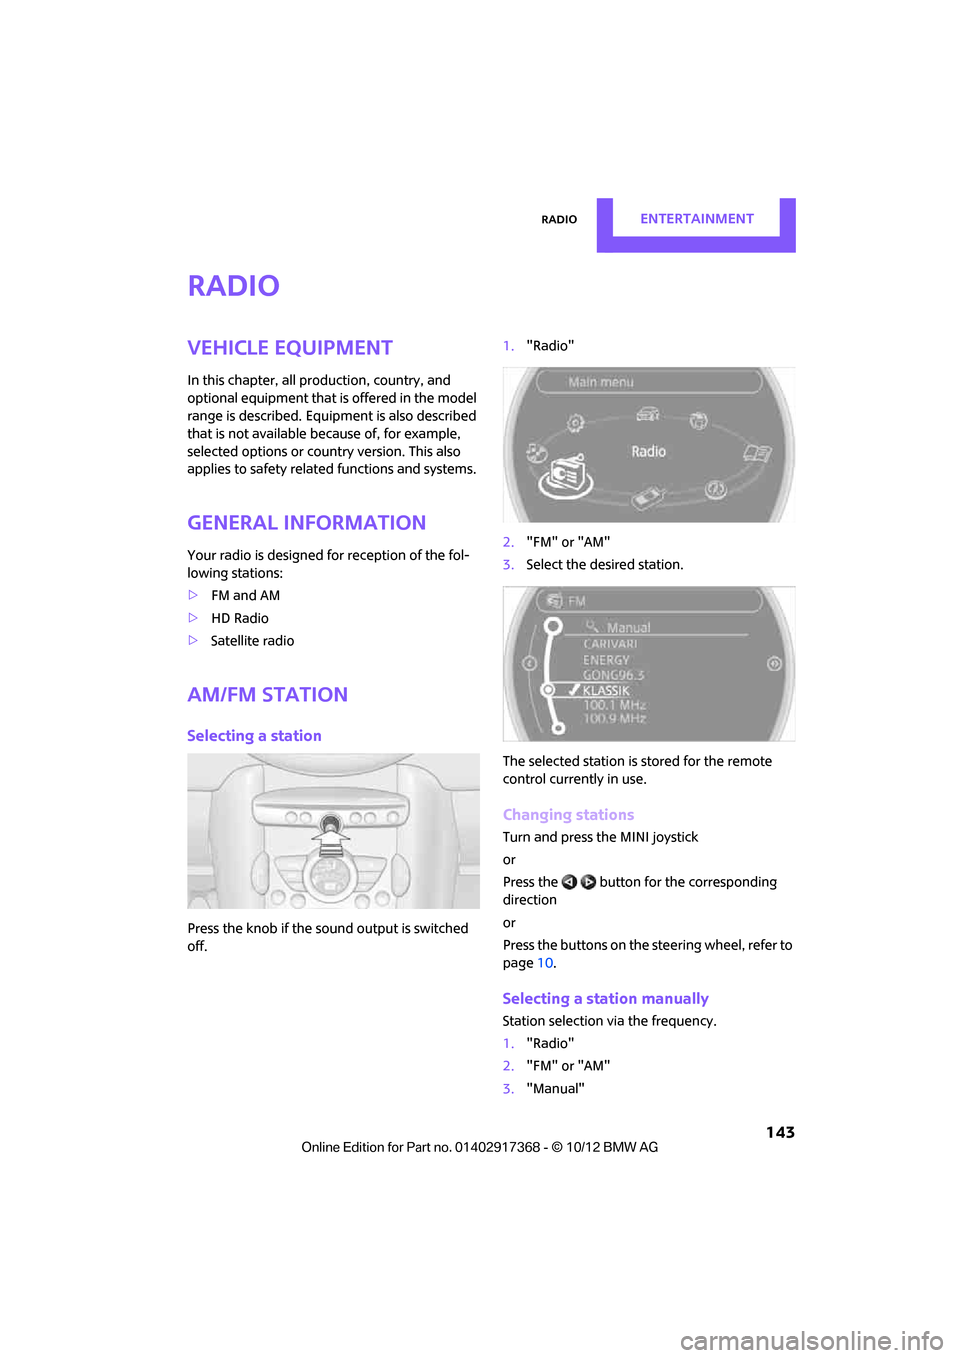
off. 1.
"Radio"
2. "FM" or "AM"
3. Select the desired station.
The selected station is stored for the remote
control current ly in use.
Changing stations
Turn and press the MINI joystick
or
Press the button for the corresponding
direction
or
Press the buttons on the steering wheel, refer to
page10.
Selecting a station manually
Station selection via the frequency.
1. "Radio"
2. "FM" or "AM"
3. "Manual"
00320051004F004C00510048000300280047004C0057004C005200510003
Page 145 of 275
EntertainmentRadio
144
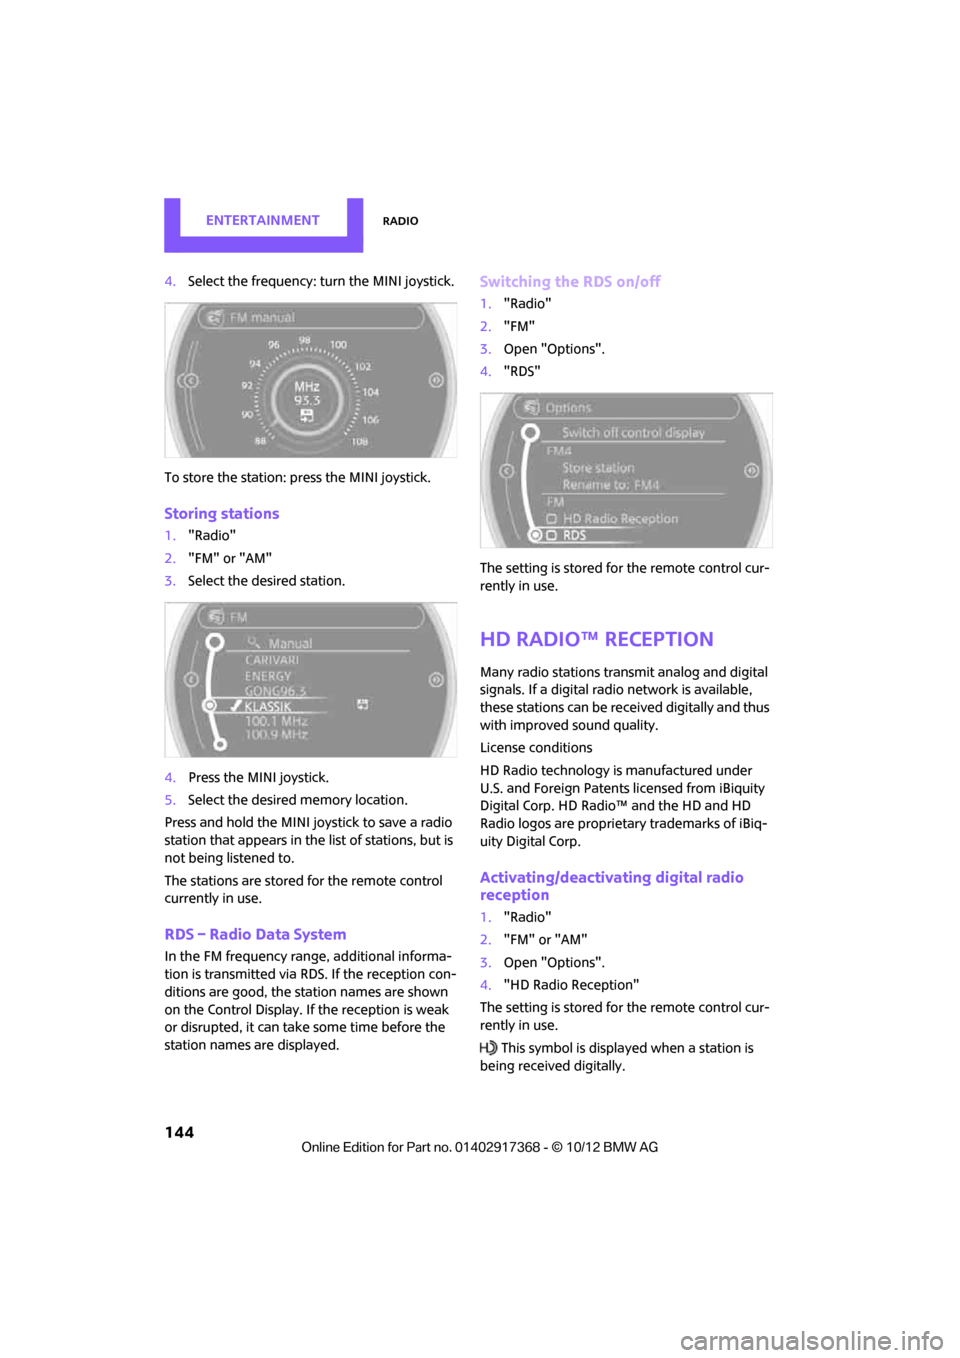
4.Select the frequency: turn the MINI joystick.
To store the station: press the MINI joystick.
Storing stations
1."Radio"
2. "FM" or "AM"
3. Select the desired station.
4. Press the MINI joystick.
5. Select the desired memory location.
Press and hold the MINI joystick to save a radio
station that appears in the list of stations, but is
not being listened to.
The stations are stored for the remote control
currently in use.
RDS – Radio Data System
In the FM frequency rang e, additional informa-
tion is transmitted via RDS. If the reception con-
ditions are good, the st ation names are shown
on the Control Display. If the reception is weak
or disrupted, it can take some time before the
station names are displayed.
Switching the RDS on/off
1. "Radio"
2. "FM"
3. Open "Options".
4. "RDS"
The setting is stored fo r the remote control cur-
rently in use.
HD Radio™ reception
Many radio stations tran smit analog and digital
signals. If a digital radio network is available,
these stations can be rece ived digitally and thus
with improved sound quality.
License conditions
HD Radio technology is manufactured under
U.S. and Foreign Patents licensed from iBiquity
Digital Corp. HD Radio™ and the HD and HD
Radio logos are proprietary trademarks of iBiq-
uity Digital Corp.
Activating/deactivating digital radio
reception
1. "Radio"
2. "FM" or "AM"
3. Open "Options".
4. "HD Radio Reception"
The setting is stored fo r the remote control cur-
rently in use.
This symbol is displa yed when a station is
being received digitally.
00320051004F004C00510048000300280047004C0057004C005200510003
Page 146 of 275
RadioEntertainment
145
When setting a station with a digital signal, it
may be a few seconds until the station is repro-
duced in digital quality.
In areas in which the station is not continuously
received in digital mode, playback switches
between analog and digita l reception. In this
case, switch off digi tal radio reception.
Displaying additional information
Some stations broadcast additional information
on the current track, such as the name of the art-
ist.
1.Select the desired station.
2. Open "Options".
3. "Station info"
Selecting a substation
The symbol indicates that a main station also
broadcasts additional su bstations. The station
name of the main station ends in HD1. The sta-
tion names of the substations end in HD2, HD3,
etc.
1. Select the desired station.
2. Press the MINI joystick.
3. Select the substation.
When reception is poor, the substation is muted
for several seconds.
Stored stations
It is possible to store up to 40 stations.
Selecting a station
1. "Radio"
2. "Presets"
3. Select the desired station.
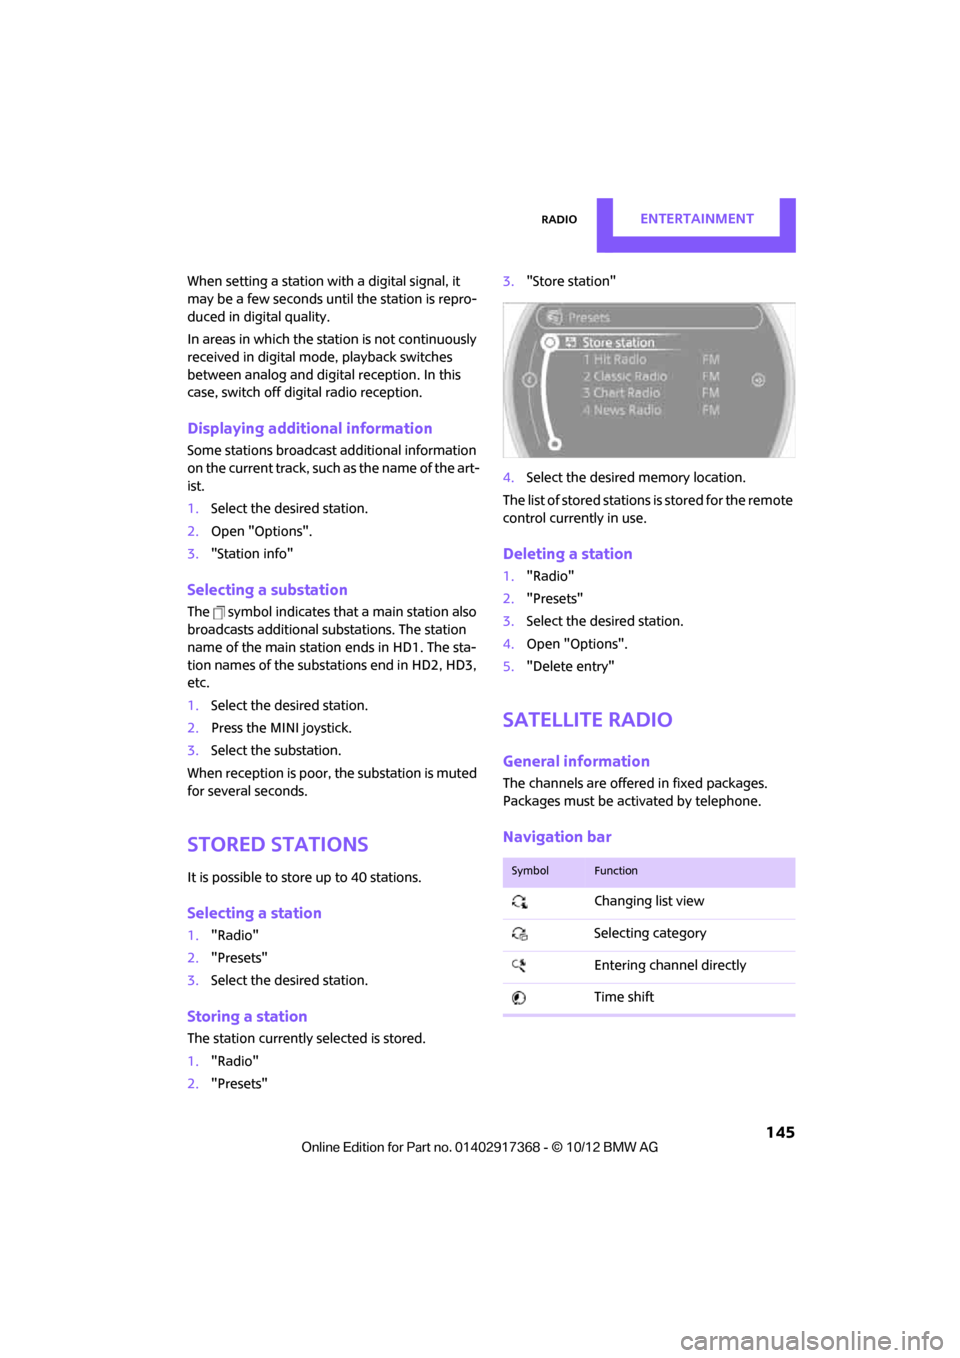
Storing a station
The station curre ntly selected is stored.
1. "Radio"
2. "Presets" 3.
"Store station"
4. Select the desired memory location.
The list of stored stations is stored for the remote
control current ly in use.
Deleting a station
1."Radio"
2. "Presets"
3. Select the desired station.
4. Open "Options".
5. "Delete entry"
Satellite radio
General information
The channels are offered in fixed packages.
Packages must be activated by telephone.
Navigation bar
SymbolFunction
Changing list view
Selecting category
Entering channel directly
Time shift
00320051004F004C00510048000300280047004C0057004C005200510003
Page 147 of 275
EntertainmentRadio
146
Managing subscription
Clear reception is required for activating and
deactivating channels. Reception is best when
you have an unobstructed view to the sky. The
channel name is displayed in the status line.
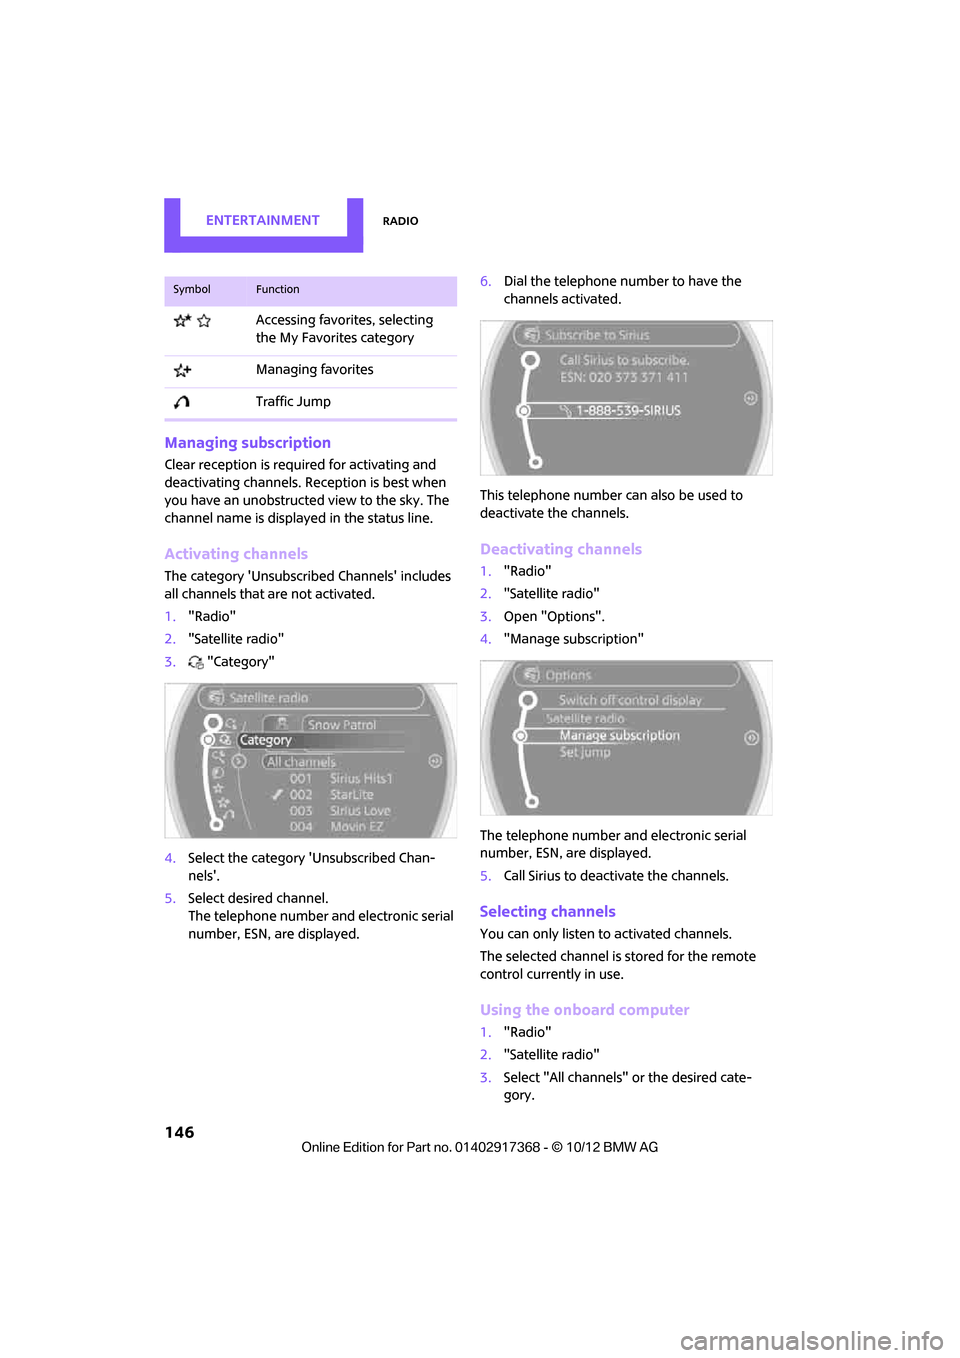
Activating channels
The category 'Unsubscribed Channels' includes
all channels that are not activated.
1."Radio"
2. "Satellite radio"
3. "Category"
4. Select the ca tegory 'Unsubscribed Chan-
nels'.
5. Select desired channel.
The telephone number and electronic serial
number, ESN, are displayed. 6.
Dial the telephone number to have the
channels activated.
This telephone number can also be used to
deactivate the channels.
Deactivating channels
1. "Radio"
2. "Satellite radio"
3. Open "Options".
4. "Manage subscription"
The telephone number and electronic serial
number, ESN, are displayed.
5. Call Sirius to deactivate the channels.
Selecting channels
You can only listen to activated channels.
The selected channel is stored for the remote
control currently in use.
Using the onboard computer
1."Radio"
2. "Satellite radio"
3. Select "All channels" or the desired cate-
gory.
Accessing favorites, selecting
the My Favorites category
Managing favorites
Traffic Jump
SymbolFunction
00320051004F004C00510048000300280047004C0057004C005200510003