audio MINI Paceman 2013 Owner's Manual
[x] Cancel search | Manufacturer: MINI, Model Year: 2013, Model line: Paceman, Model: MINI Paceman 2013Pages: 275, PDF Size: 4.23 MB
Page 15 of 275
AT A GLANCECockpit
14
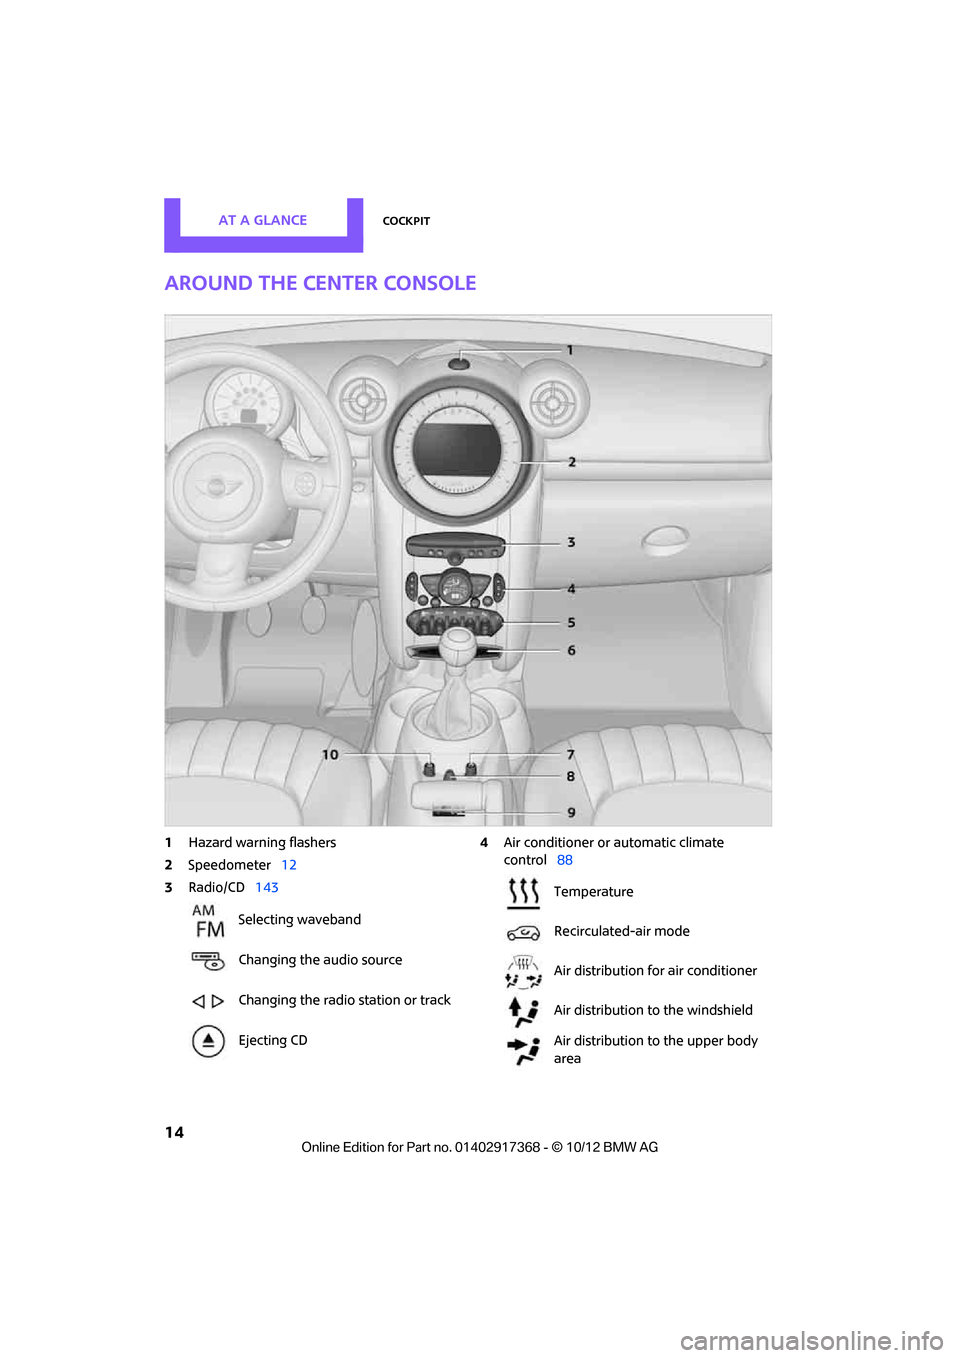
Around the center console
1Hazard warning flashers
2 Speedometer 12
3 Radio/CD 143 4
Air conditioner or automatic climate
control 88
Selecting waveband
Changing the audio source
Changing the radio station or track
Ejecting CD
Temperature
Recirculated-air mode
Air distribution for air conditioner
Air distribution to the windshield
Air distribution to the upper body
area
00320051004F004C00510048000300280047004C0057004C005200510003
Page 16 of 275
CockpitAT A GLANCE
15
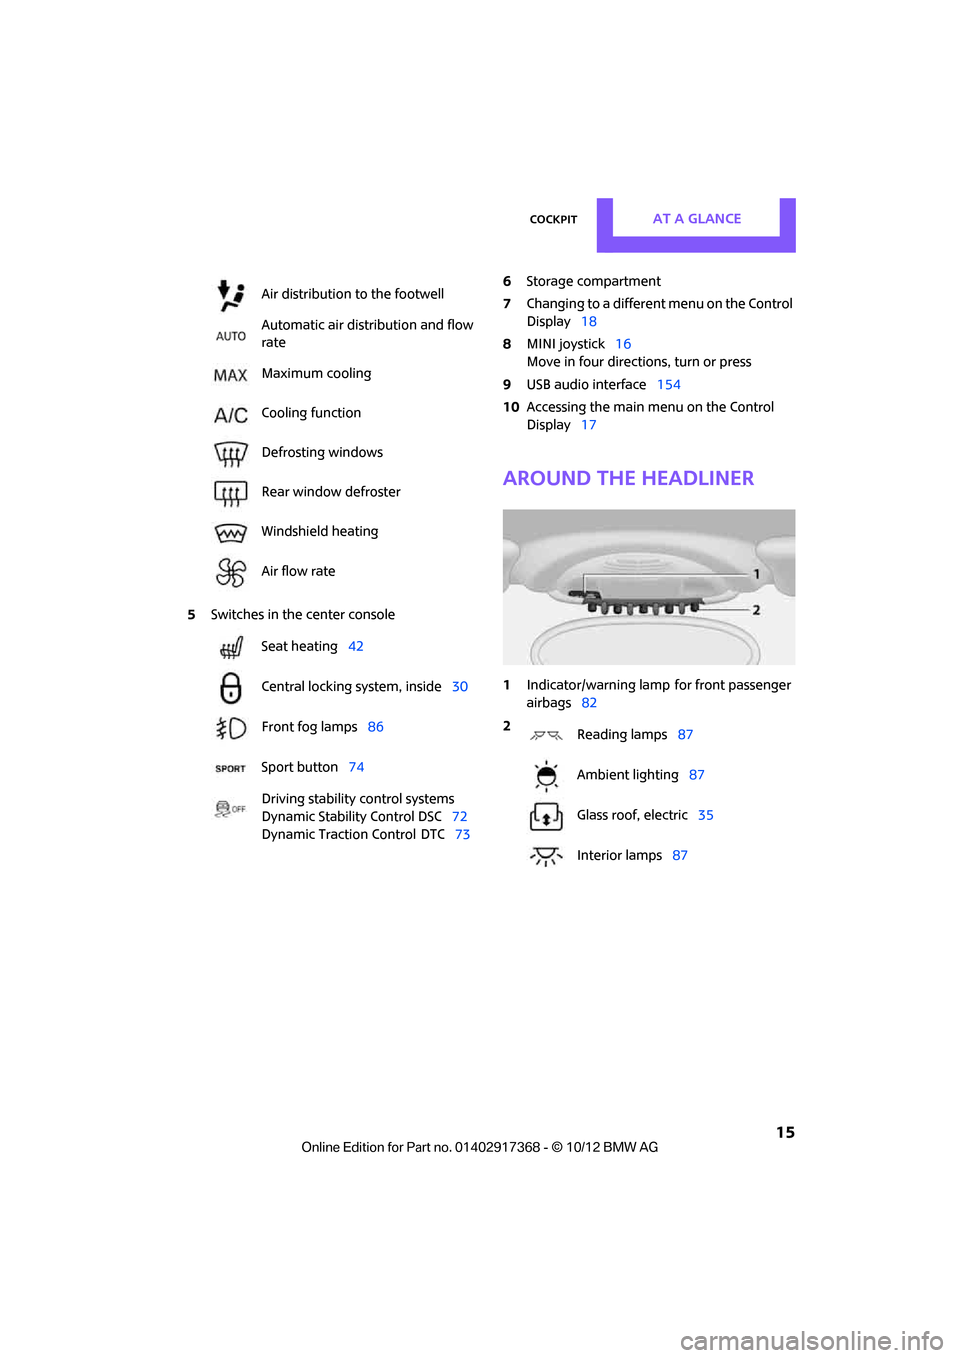
5Switches in the center console 6
Storage compartment
7 Changing to a differen t menu on the Control
Display 18
8 MINI joystick 16
Move in four directions, turn or press
9 USB audio interface 154
10 Accessing the main me nu on the Control
Display 17
Around the headliner
1Indicator/warning lamp for front passenger
airbags 82
Air distribution to the footwell
Automatic air distribution and flow
rate
Maximum cooling
Cooling function
Defrosting windows
Rear window defroster
Windshield heating
Air flow rate
Seat heating
42
Central locking system, inside 30
Front fog lamps 86
Sport button 74
Driving stability control systems
Dynamic Stability Control DSC 72
Dynamic Traction Control
DTC 73
2
Reading lamps 87
Ambient lighting 87
Glass roof, electric 35
Interior lamps 87
00320051004F004C00510048000300280047004C0057004C005200510003
Page 28 of 275
Opening and closingCONTROLS
27
Personal Profile settings
For more information on specific settings, refer
to the specified pages.
> Response of the central locking system
when the car is being unlocked 27
> Automatic locking of the vehicle 30
> Triple turn signal activation 55
> Settings for the displays on the onboard
computer, in the speedometer and in the
tachometer:
>12 h/24 h mode of the clock 66
> Date format 67
> Brightness of the Control Display 70
> Language on the Control Display 69
> Units of measure for fuel consumption,
distance covered/re maining distances
and temperature 64
> Light settings:
>Pathway lighting 85
> Daytime running lights 85
> Automatic climate control: activating/deac-
tivating the AUTO program, setting the tem-
perature, air volume and air distribution 90
> Entertainment:
>Audio volume 141
> Tone control 141
Central lock ing system
The concept
The central locking system is ready for operation
whenever the driver's door is closed.
The system simultaneously engages and
releases the locks on the following:
>Doors
> Tailgate
> Fuel filler flap
Operating from outside
>Via the remote control
> Using the door lock
> In cars with Comfor t Access, via the door
handles on the driver's and passenger's
sides
The anti-theft system is also operated at the
same time. It prevents the doors from being
unlocked using the lock buttons or door han-
dles. The remote control can also be used to
switch the welcome lamps, the interior light, and
the ambient lighting on and off. The alarm sys-
tem
is also activated or deactivated, page 32.
Operating from inside
Switch/button for central locking system,
page30.
In the event of a sufficiently severe accident, the
central locking system unlocks automatically. In
addition, the hazard warning flashers and inte-
rior lamps come on.
Opening and closing:
from outside
Persons or animals in a parked vehicle
could lock the doors from the inside. Take
the key with you when you leave the vehicle so
that the vehicle can be opened from the out-
side. <
Using the remote control
Unlocking
Press the button.
The welcome lamps and interior lamps come on.
Unlocking mode
You can also set which parts of the car are
unlocked. The setting is stored for the remote
control in use.
00320051004F004C00510048000300280047004C0057004C005200510003
Page 98 of 275
Practical interior accessoriesCONTROLS
97
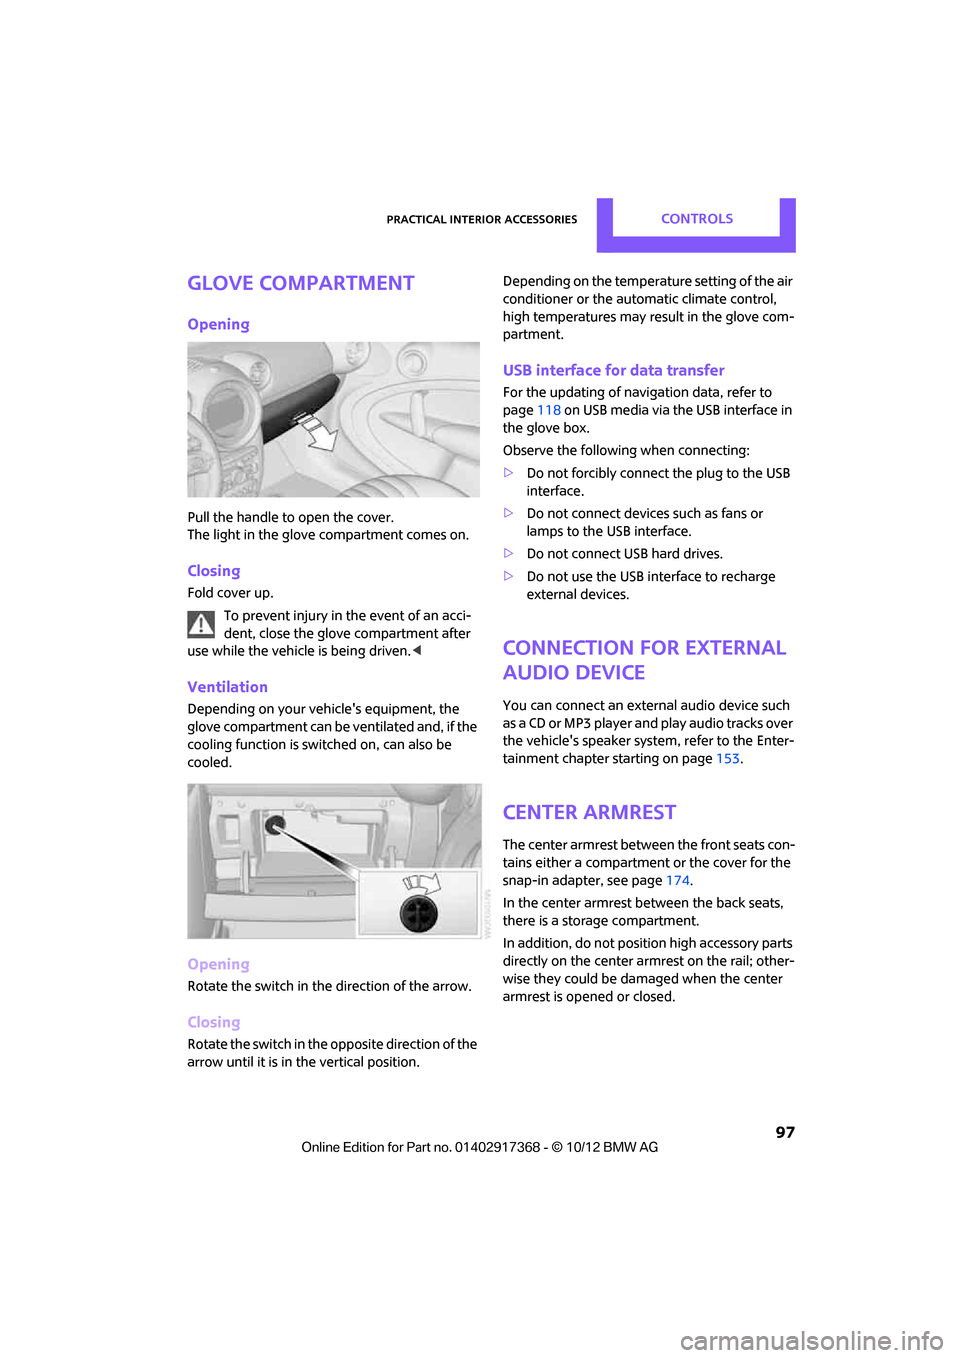
Glove compartment
Opening
Pull the handle to open the cover.
The light in the glove compartment comes on.
Closing
Fold cover up.To prevent injury in the event of an acci-
dent, close the glove compartment after
use while the vehicle is being driven. <
Ventilation
Depending on your vehicle's equipment, the
glove compartment can be ventilated and, if the
cooling function is switched on, can also be
cooled.
Opening
Rotate the switch in the direction of the arrow.
Closing
Rotate the switch in the opposite direction of the
arrow until it is in the vertical position. Depending on the temperature setting of the air
conditioner or the automatic climate control,
high temperatures may result in the glove com-
partment.
USB interface for data transfer
For the updating of navi
gation data, refer to
page 118 on USB media via the USB interface in
the glove box.
Observe the following when connecting:
> Do not forcibly connect the plug to the USB
interface.
> Do not connect devices such as fans or
lamps to the USB interface.
> Do not connect USB hard drives.
> Do not use the USB interface to recharge
external devices.
Connection for external
audio device
You can connect an external audio device such
as a CD or MP3 player an d play audio tracks over
the vehicle's speaker system, refer to the Enter-
tainment chapter starting on page 153.
Center armrest
The center armrest between the front seats con-
tains either a compartment or the cover for the
snap-in adapter, see page 174.
In the center armrest between the back seats,
there is a storage compartment.
In addition, do not position high accessory parts
directly on the center armrest on the rail; other-
wise they could be damaged when the center
armrest is opened or closed.
00320051004F004C00510048000300280047004C0057004C005200510003
Page 100 of 275
Practical interior accessoriesCONTROLS
99
Center Rail
Various accessory parts can be attached to the
Center Rail and installe d in different positions.
Do not use accessory parts near the hand
brake; otherwise these could be damaged
when the hand brake lever is operated. <
Smartphone holder
The upper part of the smartphone holder can be
rotated by 360°.
When installing in the front of the rail, make sure
that there is sufficient space, e.g., away from the
seat; otherwise, damage may be caused when
rotating.
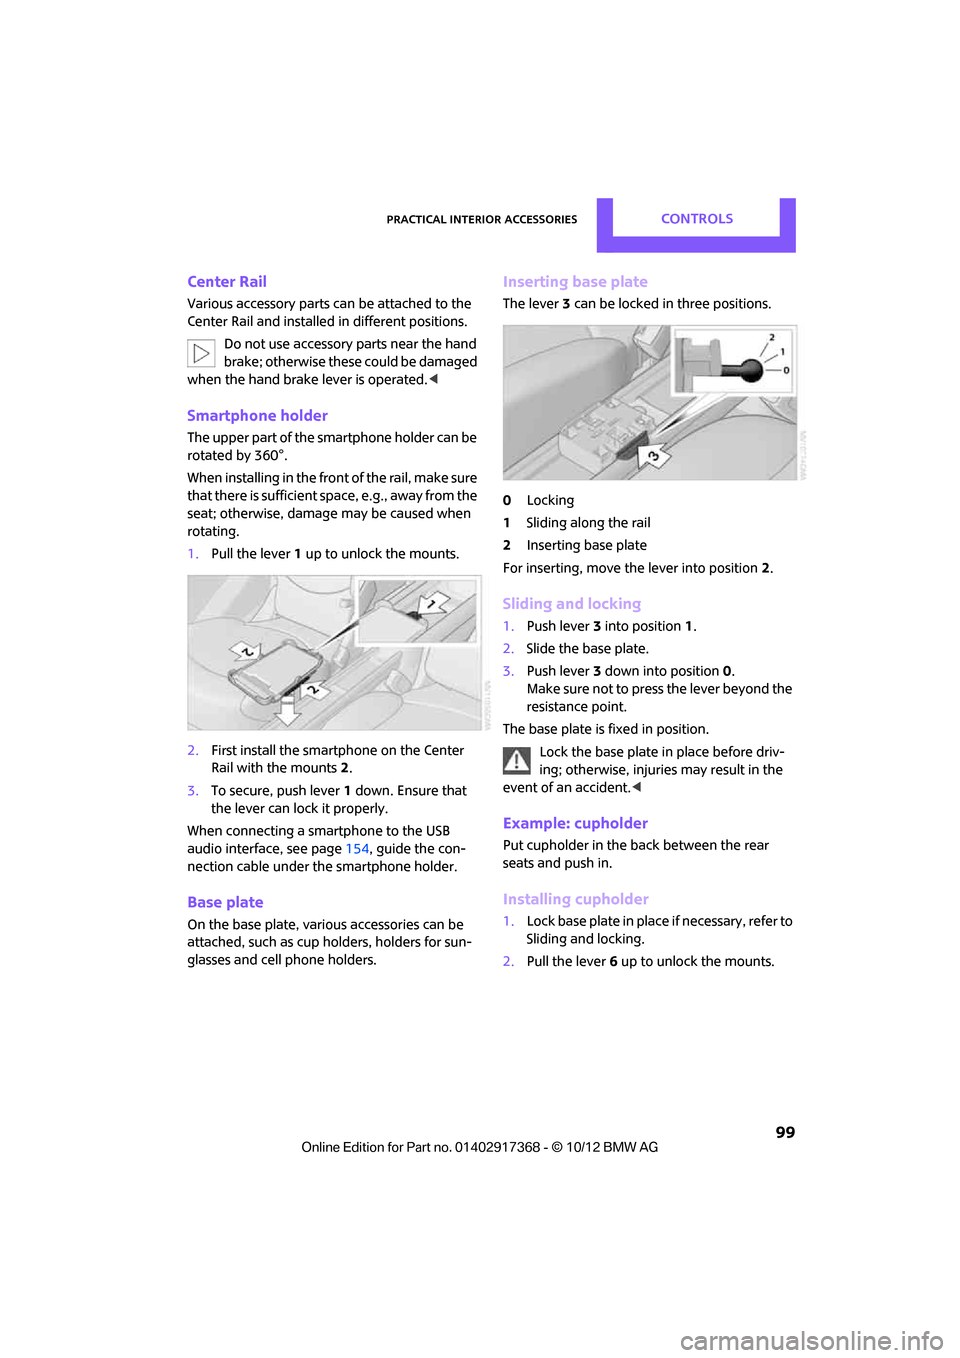
1. Pull the lever 1 up to unlock the mounts.
2. First install the smartp hone on the Center
Rail with the mounts 2.
3. To secure, push lever 1 down. Ensure that
the lever can lock it properly.
When connecting a smartphone to the USB
audio interface, see page 154, guide the con-
nection cable under the smartphone holder.
Base plate
On the base plate, vari ous accessories can be
attached, such as cup holders, holders for sun-
glasses and cell phone holders.
Inserting base plate
The lever 3 can be locked in three positions.
0 Locking
1 Sliding along the rail
2 Inserting base plate
For inserting, move th e lever into position2.
Sliding and locking
1. Push lever 3 into position 1.
2. Slide the base plate.
3. Push lever 3 down into position 0.
Make sure not to press the lever beyond the
resistance point.
The base plate is fixed in position.
Lock the base plate in place before driv-
ing; otherwise, injuries may result in the
event of an accident. <
Example: cupholder
Put cupholder in the back between the rear
seats and push in.
Installing cupholder
1.Lock base plate in plac e if necessary, refer to
Sliding and locking.
2. Pull the lever 6 up to unlock the mounts.
00320051004F004C00510048000300280047004C0057004C005200510003
Page 119 of 275

NAVIGATIONNavigation system
118
Navigation system
Vehicle equipment
In this chapter, all production, country, and
optional equipment that is offered in the model
range is described. Equipment is also described
that is not available because of, for example,
selected options or coun try version. This also
applies to safety relate d functions and systems.
General information
The navigation system can determine the pre-
cise position of the vehicle, with the aid of satel-
lites and vehicle sensors, and can reliably guide
you to every entered destination.
Enter data only with the vehicle station-
ary, and always give priority to the appli-
cable traffic regulations in the event of any con-
tradiction between traffic and road conditions
and the instructions issu ed by the navigation
system. Failure to take to this precaution can
place you in violation of the law and put vehicle
occupants and other ro ad users in danger.<
Selecting navigation
1."Navigation"
During route guidance, an arrow view or a map
view is displayed on the onboard computer.
Navigation data
Information on navigation data
1. "Navigation"
2. Open "Options".
3. "Navigation system version"
Information about the data version is displayed.
Updating the navigation data
General information
Navigation data are stored in the vehicle and
can be updated.
You may obtain current navigation data and the
enabling code at your MINI dealer.
Updating the data can take several hours,
depending on the volume of data.
> Update data while driving to reduce the
drain on the battery.
> The update is resumed automatically when
a trip is continued after an interruption.
> You can inquire as to the status of the
update.
> The data are stored in the vehicle.
> After the updating process is complete, the
system restarts.
> The medium with the na vigation data can be
removed after the update.
To update
1. Depending on equipment: insert USB stor-
age device with navigation data
>into the USB interface in the glove com-
partment
> into the USB audio interface, refer to
page 154.
2. Follow the instructions on the onboard com-
puter.
00320051004F004C00510048000300280047004C0057004C005200510003
Page 134 of 275
Route guidanceNAVIGATION
133
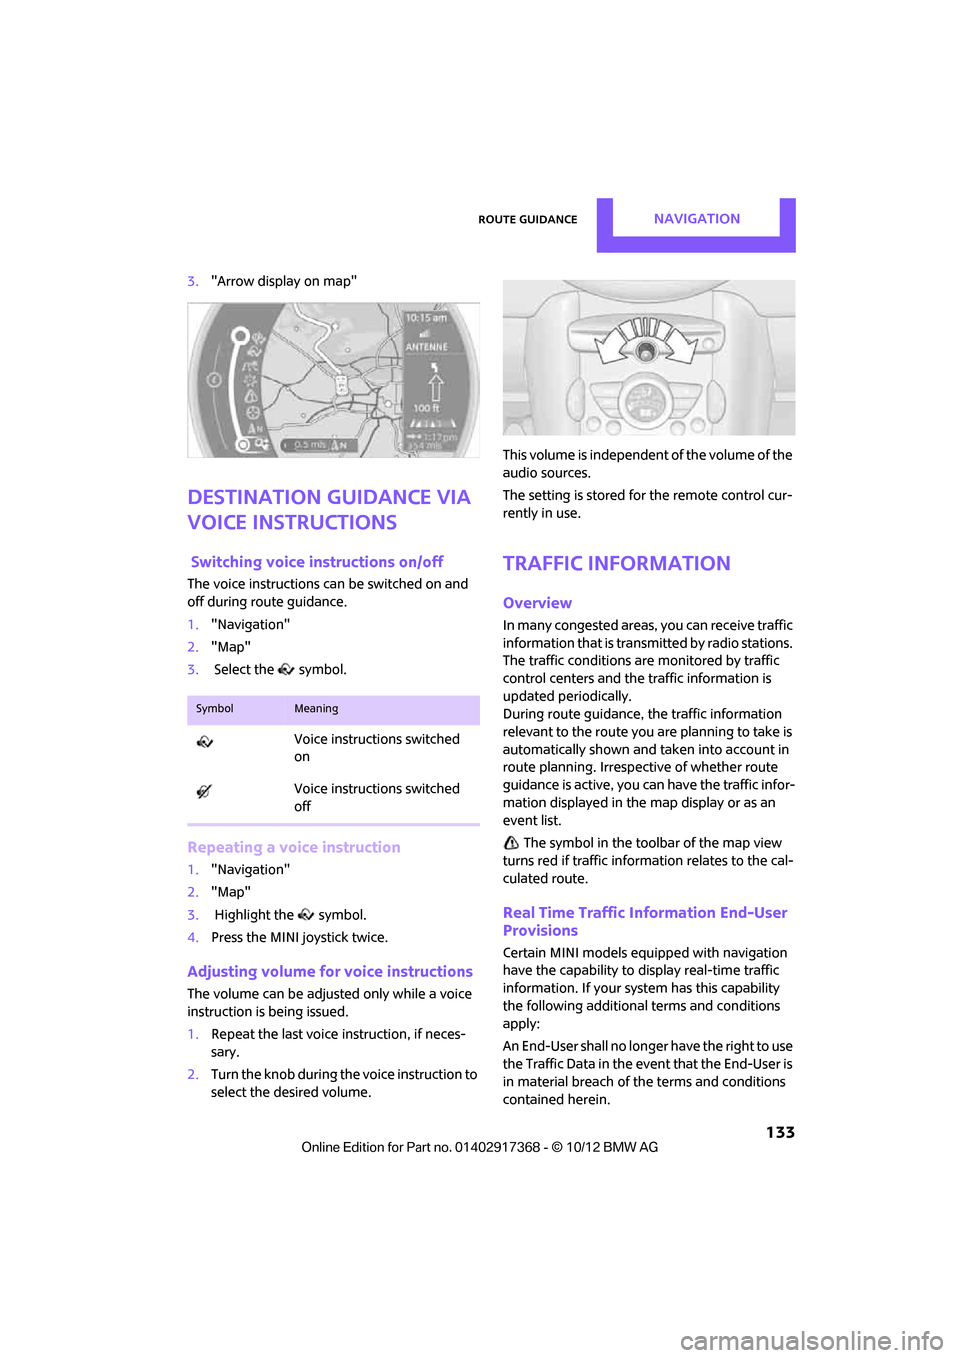
3."Arrow display on map"
Destination guidance via
voice instructions
Switching voice in structions on/off
The voice instructions ca n be switched on and
off during route guidance.
1. "Navigation"
2. "Map"
3. Select the symbol.
Repeating a voice instruction
1."Navigation"
2. "Map"
3. Highlight the symbol.
4. Press the MINI joystick twice.
Adjusting volume for voice instructions
The volume can be adjust ed only while a voice
instruction is being issued.
1. Repeat the last voice instruction, if neces-
sary.
2. Turn the knob during th e voice instruction to
select the desired volume. This volume is independent of the volume of the
audio sources.
The setting is stored for the remote control cur-
rently in use.
Traffic information
Overview
In many congested areas,
you can receive traffic
information that is transm itted by radio stations.
The traffic conditions are monitored by traffic
control centers and the traffic information is
updated periodically.
During route guidance, the traffic information
relevant to the route you are planning to take is
automatically shown and taken into account in
route planning. Irrespective of whether route
guidance is active, you can have the traffic infor-
mation displayed in the map display or as an
event list.
The symbol in the toolbar of the map view
turns red if traffic inform ation relates to the cal-
culated route.
Real Time Traffic Information End-User
Provisions
Certain MINI models equipped with navigation
have the capability to display real-time traffic
information. If your system has this capability
the following additional terms and conditions
apply:
An End-User shall no longer have the right to use
the Traffic Data in the event that the End-User is
in material breach of the terms and conditions
contained herein.
SymbolMeaning
Voice instructions switched
on
Voice instructions switched
off
00320051004F004C00510048000300280047004C0057004C005200510003
Page 141 of 275
EntertainmentOn/off and tone
140
On/off and tone
Vehicle equipment
In this chapter, all production, country, and
optional equipment that is offered in the model
range is described. Equipment is also described
that is not available because of, for example,
selected options or coun try version. This also
applies to safety relate d functions and systems.
General information
The following audio source s have shared control
elements and setting options:
> Radio
> CD player
> External devices, e.g. MP3 player
Controls
The audio sources can be operated using:
>Buttons near the CD player
> Onboard computer
> Buttons on the steering wheel, refer to
page 10
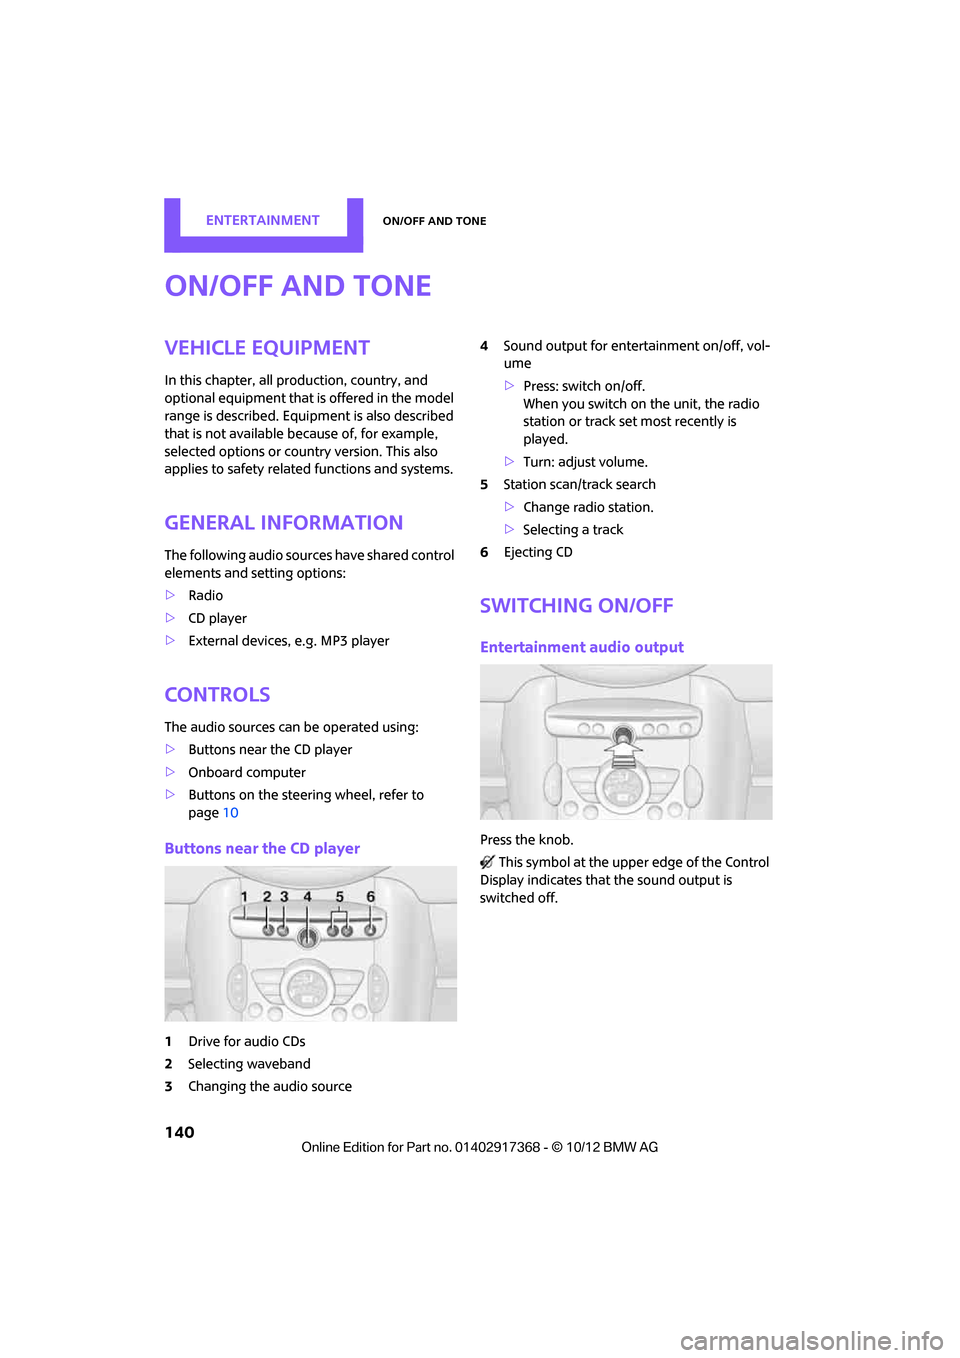
Buttons near the CD player
1Drive for audio CDs
2 Selecting waveband
3 Changing the audio source 4
Sound output for ente rtainment on/off, vol-
ume
> Press: switch on/off.
When you switch on the unit, the radio
station or track set most recently is
played.
> Turn: adjust volume.
5 Station scan/track search
>Change radi o station.
> Selecting a track
6 Ejecting CD
Switching on/off
Entertainment audio output
Press the knob.
This symbol at the upper edge of the Control
Display indicates that the sound output is
switched off.
00320051004F004C00510048000300280047004C0057004C005200510003
Page 142 of 275
On/off and toneEntertainment
141
Adjusting volume
Turn the knob to the desired volume.
The volume can also be adjusted on the steering
wheel, refer to page10.
The setting is stored for the remote control cur-
rently in use; refer to Personal Profile, page 26.
Setting tone controls
Various tone settings can be changed, e.g. treble
and bass or the speed-dependent volume con-
trol.
The tone settings are set for all audio sources at
once.
The settings are stored for the remote control
currently in use; refer to Personal Profile,
page 26.
Treble, bass, balance, fader
> "Treble": treble adjustment.
> "Bass": bass adjustment.
> "Balance": volume distribution right/left.
> "Fader": volume distribution front/back.
Adjustments
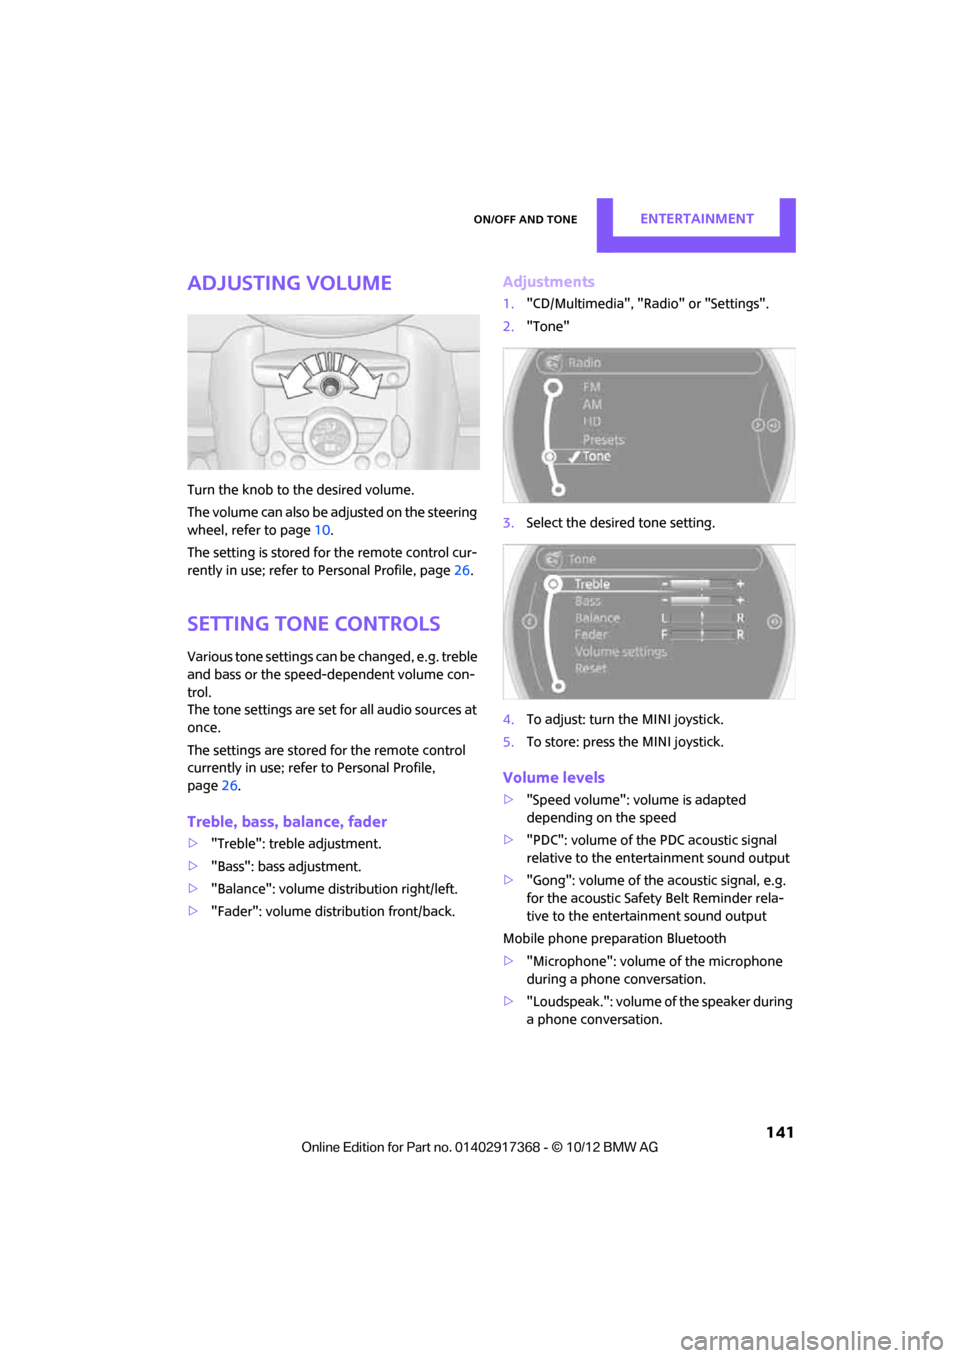
1."CD/Multimedia", "Rad io" or "Settings".
2. "Tone"
3. Select the desired tone setting.
4. To adjust: turn the MINI joystick.
5. To store: press the MINI joystick.
Volume levels
>"Speed volume": vo lume is adapted
depending on the speed
> "PDC": volume of the PDC acoustic signal
relative to the entertainment sound output
> "Gong": volume of the acoustic signal, e.g.
for the acoustic Safety Belt Reminder rela-
tive to the entertainment sound output
Mobile phone preparation Bluetooth
> "Microphone": volume of the microphone
during a phone conversation.
> "Loudspeak.": volume of the speaker during
a phone conversation.
00320051004F004C00510048000300280047004C0057004C005200510003
Page 148 of 275
RadioEntertainment
147
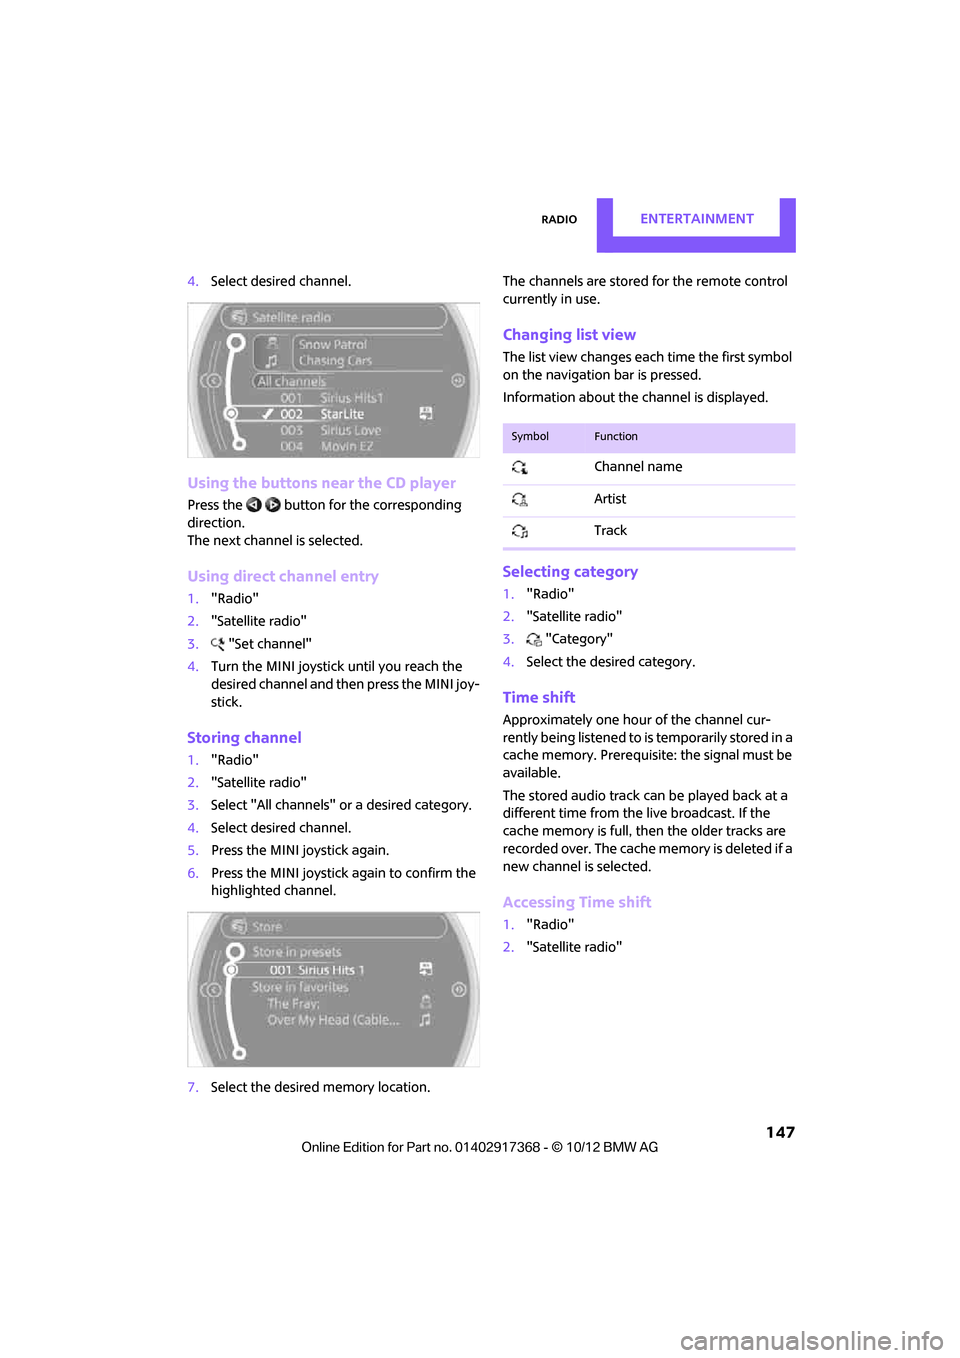
4.Select desired channel.
Using the buttons near the CD player
Press the button for the corresponding
direction.
The next channel is selected.
Using direct channel entry
1."Radio"
2. "Satellite radio"
3. "Set channel"
4. Turn the MINI joystick until you reach the
desired channel and then press the MINI joy-
stick.
Storing channel
1."Radio"
2. "Satellite radio"
3. Select "All channels" or a desired category.
4. Select desired channel.
5. Press the MINI joystick again.
6. Press the MINI joystick again to confirm the
highlighted channel.
7. Select the desired memory location. The channels are stored for the remote control
currently in use.
Changing list view
The list view changes each time the first symbol
on the navigation bar is pressed.
Information about the channel is displayed.
Selecting category
1.
"Radio"
2. "Satellite radio"
3. "Category"
4. Select the desired category.
Time shift
Approximately one hour of the channel cur-
rently being listened to is temporarily stored in a
cache memory. Prerequisite: the signal must be
available.
The stored audio track ca n be played back at a
different time from the live broadcast. If the
cache memory is full, then the older tracks are
recorded over. The cache memory is deleted if a
new channel is selected.
Accessing Time shift
1. "Radio"
2. "Satellite radio"
SymbolFunction
Channel name
Artist
Track
00320051004F004C00510048000300280047004C0057004C005200510003