ignition MINI Paceman 2014 (Mini Connected) Owner's Guide
[x] Cancel search | Manufacturer: MINI, Model Year: 2014, Model line: Paceman, Model: MINI Paceman 2014Pages: 282, PDF Size: 6.76 MB
Page 180 of 282
Bluetooth hands-free systemVehicle equipmentThis chapter describes all series equipment as
well as country-specific and special equipment
offered for this model series.Therefore, it also
describes equipment that may not be found in
your vehicle, for instance due to the selected
special equipment or the country version. This
also applies to safety-related functions and sys‐
tems.
At a glance The concept
Mobile phones can be connected with the vehi‐
cle via Bluetooth.
Bluetooth® is a registered trademark of Blue‐
tooth® SIG, Inc.
After these devices are paired once, they are
recognized automatically when the ignition is
switched on as soon as they are in the vehicle
and can then be operated via the onboard
monitor, the buttons on the steering wheel,
and voice activation.
Up to four external devices can be paired.
Certain functions may need to be enabled by
the mobile phone provider or service provider.
Using the mobile phone while driving
Make entries only when traffic and road
conditions allow. Do not hold the mobile phone
in your hand while you are driving; use the
hands-free system instead. If you do not ob‐
serve this precaution, you can endanger the ve‐
hicle occupants and other road users. ◀
Approved mobile phones
Details on which mobile phones are supported
by the hands-free system can be obtained at
www.mini.com/connectivity.Displaying the vehicle identification
number and software part number
The vehicle identification number and software
part number are needed to determine which
mobile phones are supported by the mobile
phone preparation package. The software ver‐
sion of the mobile phone may also be required.1."Telephone"2.Open "Options".3."Bluetooth® info"4."Display system information"
These approved mobile phones with a certain
software version, support the vehicle functions
described below.
Malfunctions may occur with other mobile
phones or software versions.
Do not operate a mobile phone that is con‐
nected to the vehicle on the mobile phone key‐
pad, as this may lead to a malfunction.
Notes
At high temperatures, the charging function of
the mobile phone may be limited and functions
may not be executed.
When using the mobile phone via the vehicle,
note the operating instructions of the mobile phone.
Pairing/unpairing the
mobile phone
Requirements
▷The mobile phone is suitable, refer to
page 180.▷The mobile phone is ready for operation.▷Bluetooth is activated in the vehicle and on
the mobile phone.Seite 180CommunicationBluetooth hands-free system180
Online Edition for Part no. 01 40 2 911 544 - VI/13
Page 182 of 282

"OK"7.Select the functions for which the mobile
phone is to be used.8."OK"9.Move the MINI joystick to the left.
If the pairing was successful, the mobile phone
appears at the top of the list of mobile phones.
If pairing was unsuccessful: What to do if..., re‐
fer to page 182.
Following the initial pairing
▷The mobile phone is detected/connected in
the vehicle within a short period of time
when the engine is running or the ignition
is switched on.▷The phone book entries of the telephone
stored on the SIM card or mobile phone are
transmitted to the vehicle after detection,
depending on the mobile phone.▷Four mobile phones can be paired.▷Specific settings may be necessary in some
mobile phones, e.g., authorization or a se‐
cure connection; refer to the mobile phone
operating instructions.
Connecting a particular mobile phone
1."Telephone"2."Bluetooth® (phone)"
All paired mobile phones are listed.3.Select the mobile phone that is to be con‐
nected.
Unpairing the mobile phone
1."Telephone"2."Bluetooth® (phone)"
All paired mobile phones are listed.3.Highlight the mobile phone that is to be
unpaired.4.Open "Options".5."Remove phone from list"
What to do if...
Information on suitable mobile phones, refer to
page 180.
The mobile phone could not be paired or con‐
nected.
▷Is Bluetooth activated in the vehicle and on
the mobile phone? Activate Bluetooth in
the vehicle and on the mobile phone.▷Do the Bluetooth passkeys on the mobile
phone and the vehicle match? Enter the
same passkey on the mobile phone and via
the onboard monitor.Seite 182CommunicationBluetooth hands-free system182
Online Edition for Part no. 01 40 2 911 544 - VI/13
Page 187 of 282

those calls are displayed that were received in
the vehicle.
The 20 telephone calls that were last received
are displayed. The sorting order and display of
the phone numbers depends on the particular
mobile phone.1."Telephone"2."Received calls"
Calling a number from the list
Selecting an entry.
The connection is established.
Deleting a single entry or all entries
The deletion of entries depends on your partic‐
ular mobile phone.
1.Highlight the entry.2.Open "Options".3."Delete entry" or "Delete list"
Saving an entry in the contacts
1.Highlight the entry.2.Open "Options".3."Store as new contact" or "Add to existing
contact"4.Select the contact if necessary.5.Select the type of number: "Home",
"Business", "Mobile" or "Other"6.Complete the entries if necessary.7."Store contact"Hands-free system
General information
Calls that are being made on the hands-free
system can be continued on the mobile phone
and vice versa.
From the mobile phone to the hands-
free system
Calls that were begun outside of the Bluetooth
range of the vehicle can be continued on the
hands-free system with the ignition switched
on.
Depending on the mobile phone, the system
automatically switches to the hands-free sys‐
tem.
If the system does not switch over automati‐
cally, follow the instructions on the mobile
phone display; refer also to the mobile phone
operating instructions.
From the hands-free system to the
mobile phone
Calls that are made on the hands-free system
can in some cases be continued on the mobile
phone; this depends on the mobile phone.
Follow the instructions on the mobile phone
display; refer also to the mobile phone operat‐
ing instructions.
Contacts
General information Contacts can be created and edited and the ad‐
dresses can be adopted as destinations for nav‐
igation.Seite 187Bluetooth hands-free systemCommunication187
Online Edition for Part no. 01 40 2 911 544 - VI/13
Page 190 of 282
Bluetooth mobile phone
preparation packageVehicle equipment This chapter describes all series equipment as
well as country-specific and special equipment
offered for this model series.Therefore, it also
describes equipment that may not be found in
your vehicle, for instance due to the selected
special equipment or the country version. This
also applies to safety-related functions and sys‐
tems.
At a glance The concept
Mobile phones or other external devices such
as audio players can be connected to the vehi‐
cle via Bluetooth.
Bluetooth® is a registered trademark of Blue‐
tooth® SIG, Inc.
After these devices are paired once, they are
recognized automatically when the ignition is
switched on as soon as they are in the vehicle
and can then be operated via the onboard
monitor, using the buttons on the steering
wheel, and via voice activation.
Depending on their functionality, external devi‐
ces can be used via the vehicle as a telephone
or as an audio source. The telephone functions
are described in the following. Operating the
audio functions, refer to page 173.
Up to four external devices can be paired.
Certain functions may need to be enabled by the mobile phone provider or service provider.
Using the mobile phone while driving
Make entries only when traffic and road
conditions allow. Do not hold the mobile phone
in your hand while you are driving; use thehands-free system instead. If you do not ob‐
serve this precaution, you can endanger the ve‐
hicle occupants and other road users. ◀
Snap-in adapter
The snap-in adapter is used to:▷Hold the mobile phone.▷Recharge the battery.▷Connect the mobile phone to an outside
antenna of the vehicle.
This provides for better network reception
and consistent sound quality.
Approved mobile phones
Displaying the vehicle identification
number and software part number
The vehicle identification number and software
part number are needed to determine which
mobile phones are supported by the mobile
phone preparation package. The software ver‐
sion of the mobile phone may also be required.
1."Telephone"2.Open "Options".3."Bluetooth® info"4."Display system information"
These approved mobile phones with a certain
software version, support the vehicle functions
described below.
Malfunctions may occur with other mobile
phones or software versions.
Do not operate a mobile phone that is con‐
nected to the vehicle on the mobile phone key‐
pad, as this may lead to a malfunction.
Seite 190CommunicationBluetooth mobile phone preparation package190
Online Edition for Part no. 01 40 2 911 544 - VI/13
Page 193 of 282
If the pairing was successful, the mobile phone
appears at the top of the list of mobile phones.
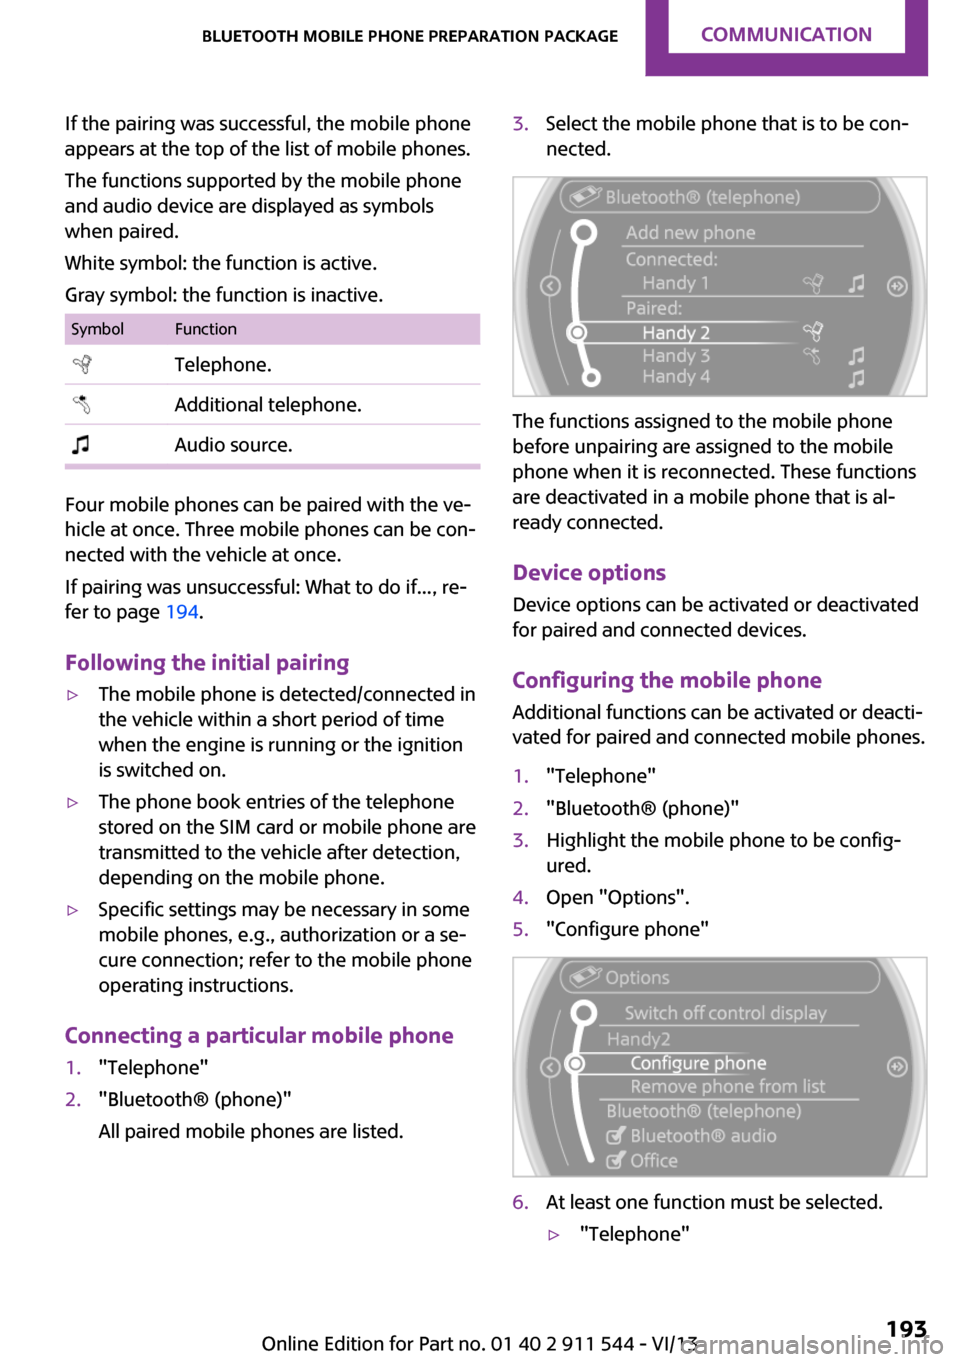
The functions supported by the mobile phone
and audio device are displayed as symbols
when paired.
White symbol: the function is active.
Gray symbol: the function is inactive.SymbolFunction Telephone. Additional telephone. Audio source.
Four mobile phones can be paired with the ve‐
hicle at once. Three mobile phones can be con‐
nected with the vehicle at once.
If pairing was unsuccessful: What to do if..., re‐
fer to page 194.
Following the initial pairing
▷The mobile phone is detected/connected in
the vehicle within a short period of time
when the engine is running or the ignition
is switched on.▷The phone book entries of the telephone
stored on the SIM card or mobile phone are
transmitted to the vehicle after detection,
depending on the mobile phone.▷Specific settings may be necessary in some
mobile phones, e.g., authorization or a se‐
cure connection; refer to the mobile phone
operating instructions.
Connecting a particular mobile phone
1."Telephone"2."Bluetooth® (phone)"
All paired mobile phones are listed.3.Select the mobile phone that is to be con‐
nected.
The functions assigned to the mobile phone
before unpairing are assigned to the mobile
phone when it is reconnected. These functions
are deactivated in a mobile phone that is al‐
ready connected.
Device options Device options can be activated or deactivated
for paired and connected devices.
Configuring the mobile phoneAdditional functions can be activated or deacti‐
vated for paired and connected mobile phones.
1."Telephone"2."Bluetooth® (phone)"3.Highlight the mobile phone to be config‐
ured.4.Open "Options".5."Configure phone"6.At least one function must be selected.▷"Telephone"Seite 193Bluetooth mobile phone preparation packageCommunication193
Online Edition for Part no. 01 40 2 911 544 - VI/13
Page 243 of 282
Lateral turn signals
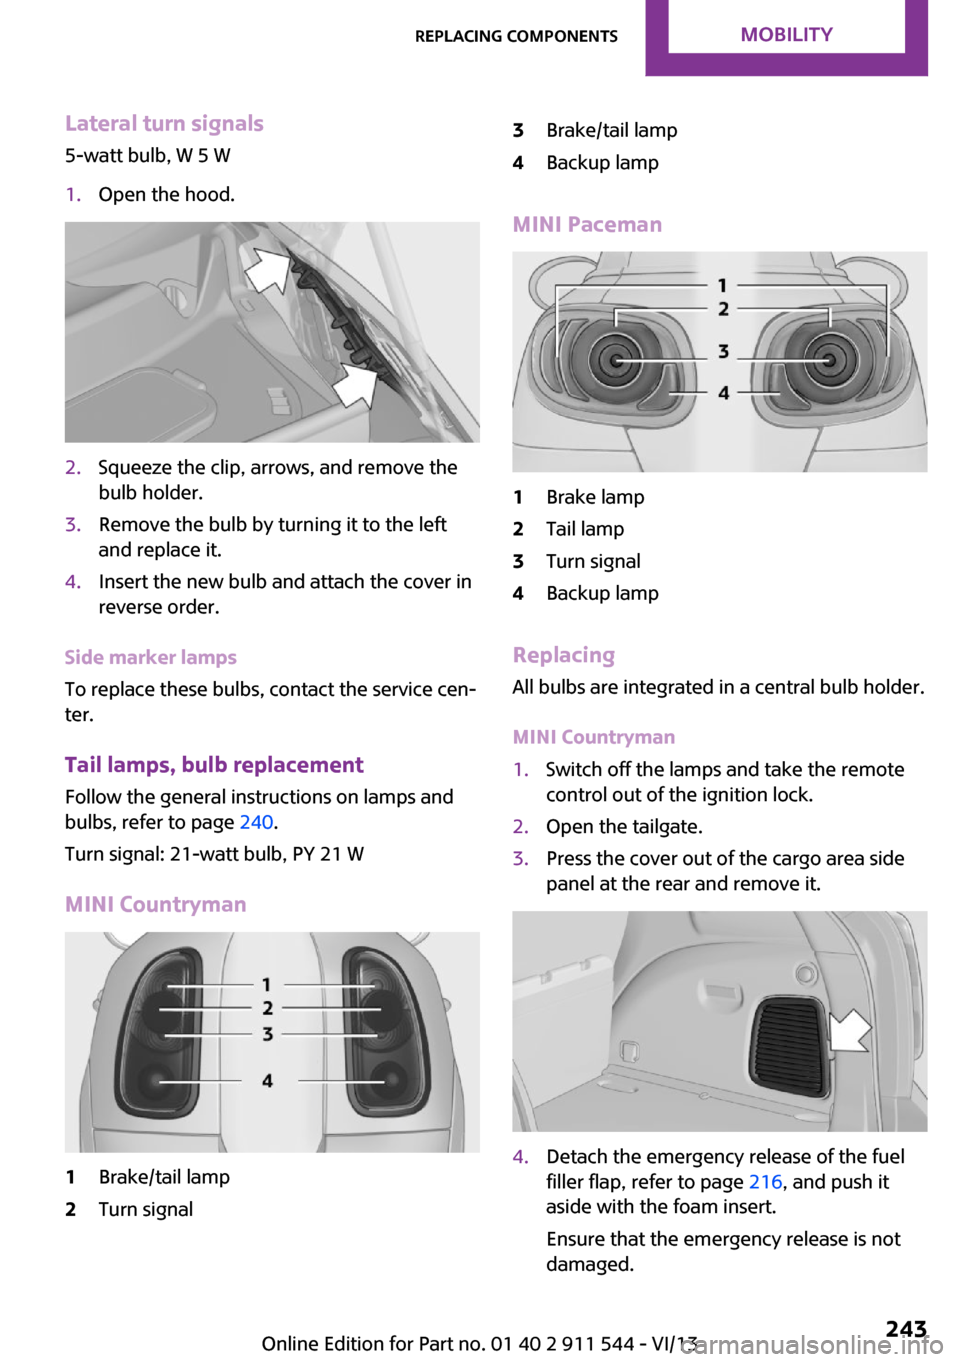
5-watt bulb, W 5 W1.Open the hood.2.Squeeze the clip, arrows, and remove the
bulb holder.3.Remove the bulb by turning it to the left
and replace it.4.Insert the new bulb and attach the cover in
reverse order.
Side marker lamps
To replace these bulbs, contact the service cen‐
ter.
Tail lamps, bulb replacement Follow the general instructions on lamps and
bulbs, refer to page 240.
Turn signal: 21-watt bulb, PY 21 W
MINI Countryman
1Brake/tail lamp2Turn signal3Brake/tail lamp4Backup lamp
MINI Paceman
1Brake lamp2Tail lamp3Turn signal4Backup lamp
Replacing
All bulbs are integrated in a central bulb holder.
MINI Countryman
1.Switch off the lamps and take the remote
control out of the ignition lock.2.Open the tailgate.3.Press the cover out of the cargo area side
panel at the rear and remove it.4.Detach the emergency release of the fuel
filler flap, refer to page 216, and push it
aside with the foam insert.
Ensure that the emergency release is not
damaged.Seite 243Replacing componentsMobility243
Online Edition for Part no. 01 40 2 911 544 - VI/13
Page 244 of 282

5.Disengage the bulb holder by pushing
down the clip, arrow 1.6.Take out the bulb holder and detach the
cable, arrow 2.7.Apply gentle pressure to the bulb while
turning it to the left and remove it.8.Insert the new bulb and mount the bulb
holder in reverse order. Ensure that the
bulb holder engages in all fasteners.9.Return the foam insert to its original posi‐
tion and reattach the emergency release of
the fuel filler flap.10.Reattach the cover.
MINI Paceman
1.Switch off the lamps and take the remote
control out of the ignition lock.2.Open the tailgate.3.Remove the cover from the cargo area side
trim.4.Unlock the fastening elements, arrows 1, by
turning.5.Remove the screws, arrows 2, using the hex
key from the vehicle document portfolio.6.Remove the tail lamp.7.Disengage the bulb holder by pushing
down the clip, arrows 1.8.Take out the bulb holder and detach the
cable, arrow 2.9.Apply gentle pressure to the bulb while
turning it to the left and remove it.10.Insert the new bulb and mount the bulb
holder in reverse order. Ensure that the
bulb holder engages in all fasteners.
License plate lamps
5-watt bulb, C 5 W
Seite 244MobilityReplacing components244
Online Edition for Part no. 01 40 2 911 544 - VI/13
Page 251 of 282
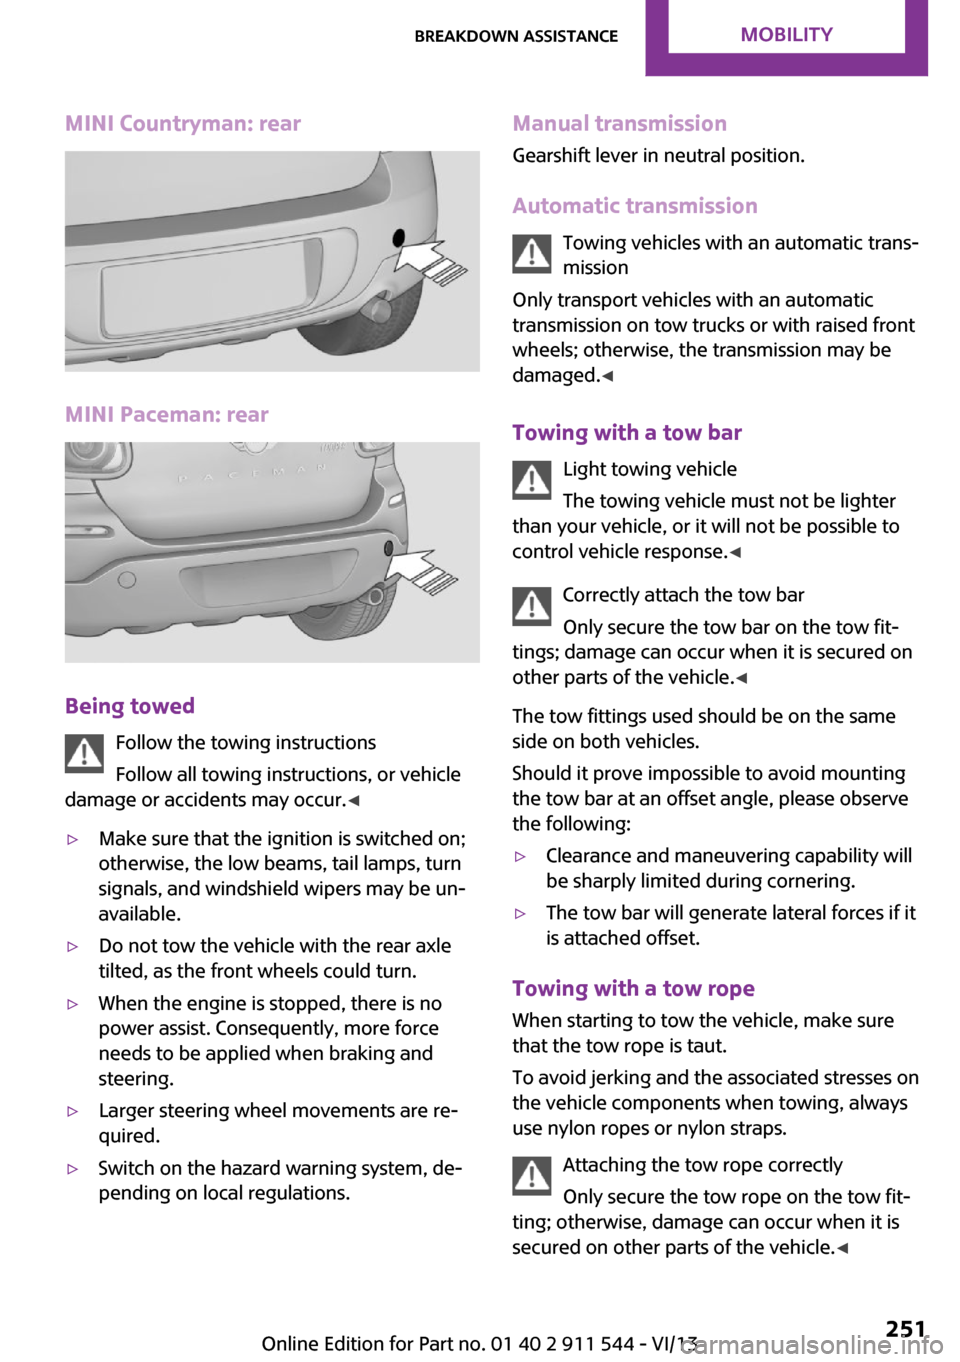
MINI Countryman: rear
MINI Paceman: rear
Being towedFollow the towing instructions
Follow all towing instructions, or vehicle
damage or accidents may occur. ◀
▷Make sure that the ignition is switched on;
otherwise, the low beams, tail lamps, turn
signals, and windshield wipers may be un‐
available.▷Do not tow the vehicle with the rear axle
tilted, as the front wheels could turn.▷When the engine is stopped, there is no
power assist. Consequently, more force
needs to be applied when braking and
steering.▷Larger steering wheel movements are re‐
quired.▷Switch on the hazard warning system, de‐
pending on local regulations.Manual transmission
Gearshift lever in neutral position.
Automatic transmission Towing vehicles with an automatic trans‐
mission
Only transport vehicles with an automatic
transmission on tow trucks or with raised front
wheels; otherwise, the transmission may be
damaged. ◀
Towing with a tow bar Light towing vehicle
The towing vehicle must not be lighter
than your vehicle, or it will not be possible to
control vehicle response. ◀
Correctly attach the tow bar
Only secure the tow bar on the tow fit‐
tings; damage can occur when it is secured on
other parts of the vehicle. ◀
The tow fittings used should be on the same
side on both vehicles.
Should it prove impossible to avoid mounting
the tow bar at an offset angle, please observe
the following:▷Clearance and maneuvering capability will
be sharply limited during cornering.▷The tow bar will generate lateral forces if it
is attached offset.
Towing with a tow rope
When starting to tow the vehicle, make sure
that the tow rope is taut.
To avoid jerking and the associated stresses on
the vehicle components when towing, always
use nylon ropes or nylon straps.
Attaching the tow rope correctly
Only secure the tow rope on the tow fit‐
ting; otherwise, damage can occur when it is
secured on other parts of the vehicle. ◀
Seite 251Breakdown assistanceMobility251
Online Edition for Part no. 01 40 2 911 544 - VI/13
Page 252 of 282
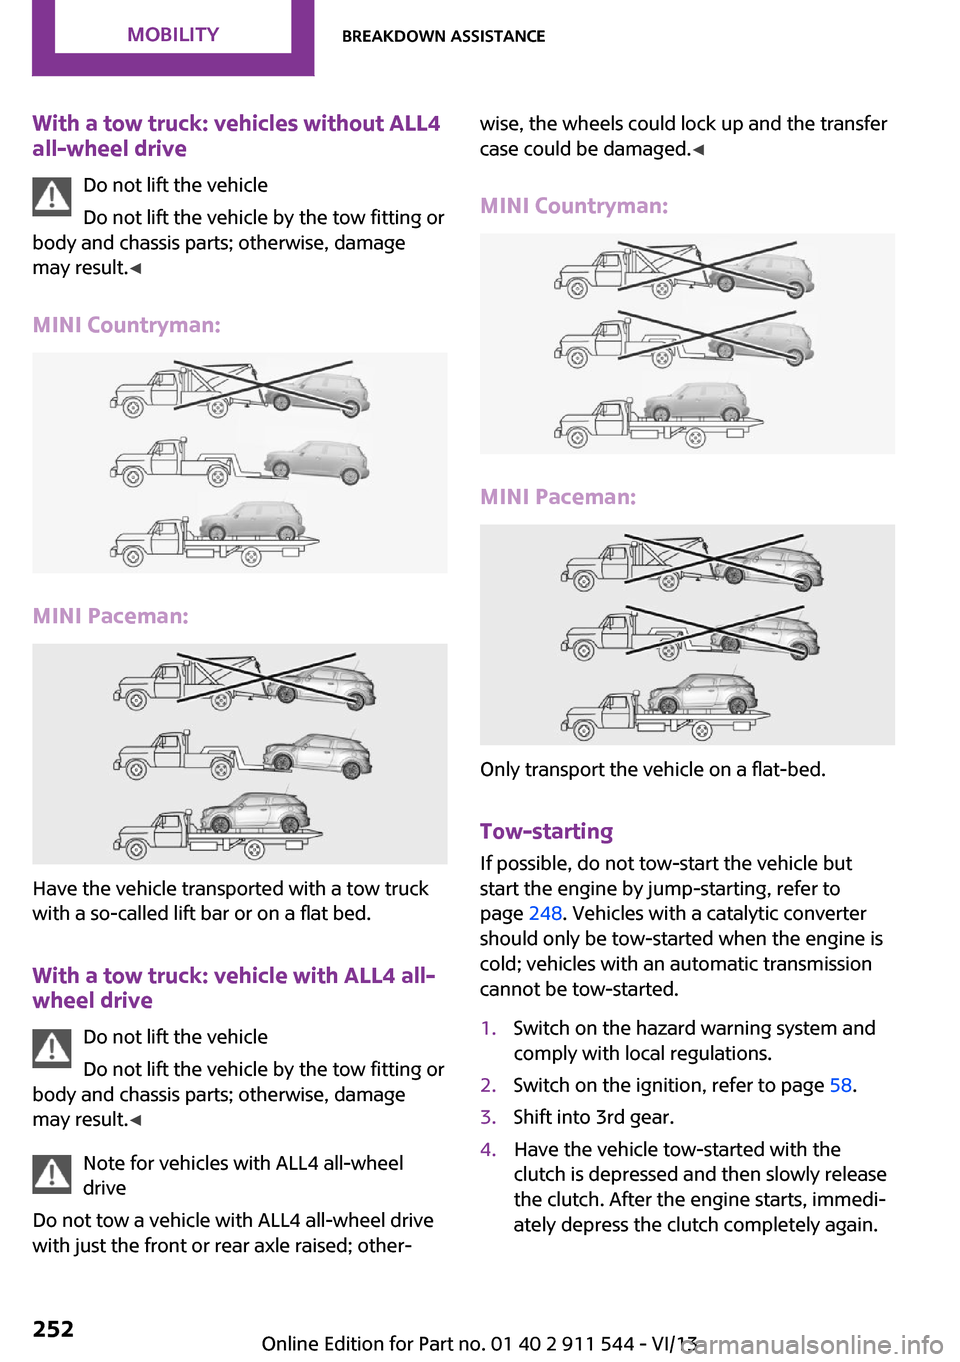
With a tow truck: vehicles without ALL4all-wheel drive
Do not lift the vehicle
Do not lift the vehicle by the tow fitting or
body and chassis parts; otherwise, damage
may result. ◀
MINI Countryman:
MINI Paceman:
Have the vehicle transported with a tow truck
with a so-called lift bar or on a flat bed.
With a tow truck: vehicle with ALL4 all-wheel drive
Do not lift the vehicle
Do not lift the vehicle by the tow fitting or
body and chassis parts; otherwise, damage
may result. ◀
Note for vehicles with ALL4 all-wheel
drive
Do not tow a vehicle with ALL4 all-wheel drive
with just the front or rear axle raised; other‐
wise, the wheels could lock up and the transfer
case could be damaged. ◀
MINI Countryman:
MINI Paceman:
Only transport the vehicle on a flat-bed.
Tow-starting
If possible, do not tow-start the vehicle but
start the engine by jump-starting, refer to page 248. Vehicles with a catalytic converter
should only be tow-started when the engine is
cold; vehicles with an automatic transmission
cannot be tow-started.
1.Switch on the hazard warning system and
comply with local regulations.2.Switch on the ignition, refer to page 58.3.Shift into 3rd gear.4.Have the vehicle tow-started with the
clutch is depressed and then slowly release
the clutch. After the engine starts, immedi‐
ately depress the clutch completely again.Seite 252MobilityBreakdown assistance252
Online Edition for Part no. 01 40 2 911 544 - VI/13
Page 255 of 282

▷Remove additional attachments, for in‐
stance a spoiler or telephone antenna, if
there is a risk that these may be damaged.▷Insert the remote control into the ignition
lock.
Automatic transmission
Before driving into the car wash, note the fol‐
lowing to ensure that the vehicle can roll:
1.Insert the remote control into the ignition
lock, even with Comfort Access.2.Move the selector lever to position N.3.Release the handbrake.4.Switch the engine off.5.Leave the remote control in the ignition
lock so that the vehicle can roll.
Hand car wash
If washing the vehicle by hand, use copious
quantities of water and car shampoo if neces‐
sary. Clean the vehicle with a sponge or a
washing brush by applying gentle pressure.
Before cleaning the windshield, deactivate the
rain sensor to avoid unintentional wiper activa‐
tion or switch off the ignition.
Adhere to the local regulations regarding
washing cars by hand.
Headlamps
Do not rub dry and do not use abrasive or caus‐
tic cleansers. Soak areas that have been soiled,
e.g., due to insects, with shampoo and rinse off
with copious quantities of water.
Thaw ice with a window deicer; do not use an
ice scraper.
Windows Clean the outside and inside surfaces of the
windows and the mirror glasses with window
cleaner.
Do not clean mirror glass with cleaners contain‐
ing quartz.
Wiper blades
Clean with soapy water and replace regularly to
avoid streaking.
Wax and preservative residue and soiling on
the windows cause streaking during window
wiping and lead to premature wear on the
wiper blades and malfunctions of the rain sen‐
sor.
Vehicle care Car care products
Regular cleaning and care contributes signifi‐
cantly to vehicle value retention.
The manufacturer recommends using cleaning
and care products from MINI, since these have
been tested and approved.
Original MINI CareProducts have been tested
on materials, in the laboratory, and in the field,
and offer optimum care and protection for MINI
vehicles.
Do not use cleansers that contain alcohol
or solvents
Do not use cleansers that contain alcohol or
solvents, such as lacquer thinners, heavy-duty
grease removers, fuel, or such; this could lead
to surface damage. ◀
Car care and cleaning products
Follow the instructions on the container.
When cleaning the interior, open the doors or
windows.
Only use products intended for cleaning vehi‐
cles.
Cleansers can contain substances that are dan‐
gerous and harmful to your health. ◀Seite 255CareMobility255
Online Edition for Part no. 01 40 2 911 544 - VI/13