fold seats MINI Paceman 2014 Owner's Manual (Mini Connected)
[x] Cancel search | Manufacturer: MINI, Model Year: 2014, Model line: Paceman, Model: MINI Paceman 2014Pages: 282, PDF Size: 6.76 MB
Page 47 of 282

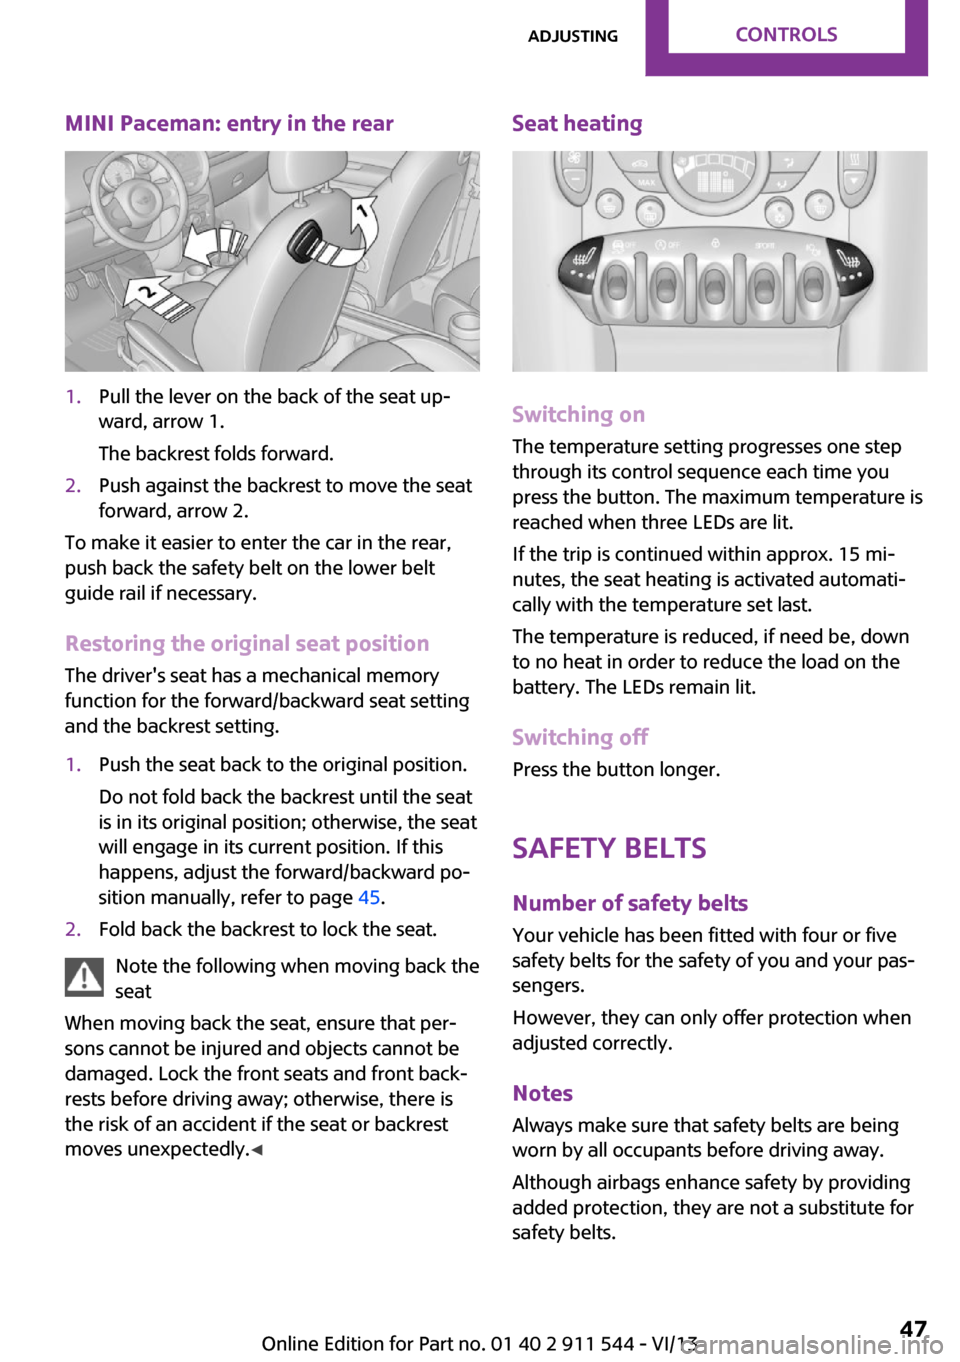
MINI Paceman: entry in the rear1.Pull the lever on the back of the seat up‐
ward, arrow 1.
The backrest folds forward.2.Push against the backrest to move the seat
forward, arrow 2.
To make it easier to enter the car in the rear,
push back the safety belt on the lower belt
guide rail if necessary.
Restoring the original seat position The driver's seat has a mechanical memory
function for the forward/backward seat setting
and the backrest setting.
1.Push the seat back to the original position.
Do not fold back the backrest until the seat
is in its original position; otherwise, the seat
will engage in its current position. If this
happens, adjust the forward/backward po‐
sition manually, refer to page 45.2.Fold back the backrest to lock the seat.
Note the following when moving back the
seat
When moving back the seat, ensure that per‐
sons cannot be injured and objects cannot be
damaged. Lock the front seats and front back‐
rests before driving away; otherwise, there is
the risk of an accident if the seat or backrest
moves unexpectedly. ◀
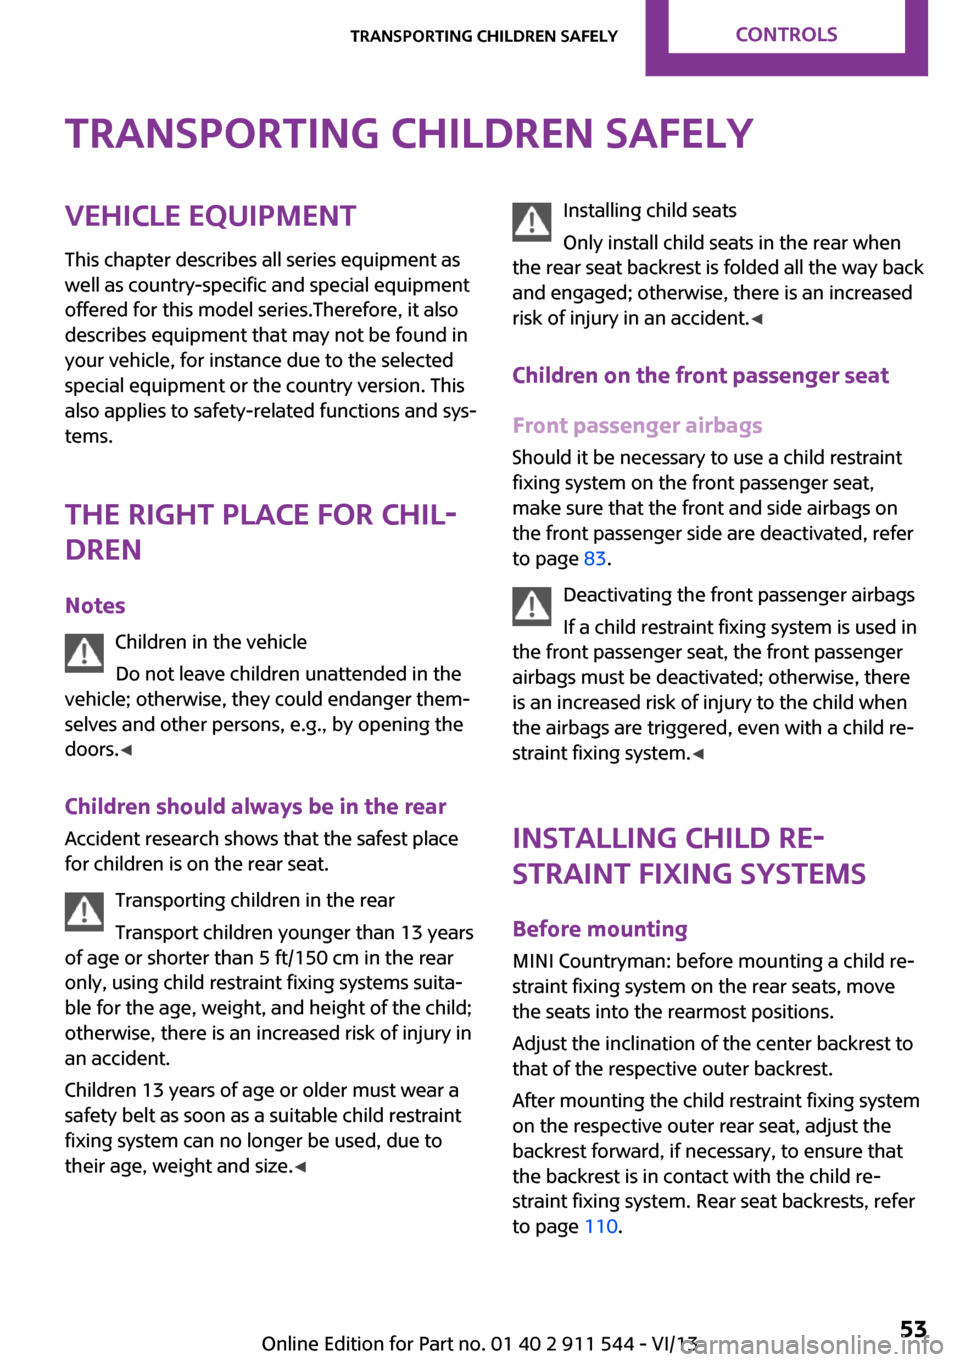
Seat heating
Switching on
The temperature setting progresses one step
through its control sequence each time you
press the button. The maximum temperature is
reached when three LEDs are lit.
If the trip is continued within approx. 15 mi‐
nutes, the seat heating is activated automati‐
cally with the temperature set last.
The temperature is reduced, if need be, down
to no heat in order to reduce the load on the
battery. The LEDs remain lit.
Switching off
Press the button longer.
Safety beltsNumber of safety belts
Your vehicle has been fitted with four or five
safety belts for the safety of you and your pas‐
sengers.
However, they can only offer protection when
adjusted correctly.
NotesAlways make sure that safety belts are beingworn by all occupants before driving away.
Although airbags enhance safety by providing
added protection, they are not a substitute for
safety belts.
Seite 47AdjustingControls47
Online Edition for Part no. 01 40 2 911 544 - VI/13
Page 50 of 282

Safety belt reminder for driver's seat
and front passenger seat
The indicator lamps light up and a sig‐
nal sounds. In addition, a message ap‐
pears on the Control Display. Check
whether the safety belt has been fas‐
tened correctly.
Damage to safety belts
In the case of strain caused by accidents or
damage:
Have the safety belts, including the safety belt
tensioners, replaced and have the belt anchors
checked.
Checking and replacing safety belts
Have the work performed only by your
service center; otherwise, it cannot be ensured
that this safety feature will function properly. ◀
Head restraints Correctly set head restraint
A correctly adjusted head restraint reduces the
risk of spinal injury in the event of an accident.
Adjusting the head restraint
Correctly adjust the head restraints of all
occupied seats; otherwise, there is an increased
risk of injury in an accident. ◀
Height Adjust the head restraint so that its center is
approx. at ear level.Height adjustment
To raise: pull.
To lower: press the button, arrow 1, and push
the head restraint down.
Removing
Only remove the head restraint if no one will be
sitting in the seat in question.
Before transporting passengers
Reinstall the head restraint before trans‐
porting anyone in the seat; otherwise, the pro‐
tective function of the head restraint is unavail‐
able. ◀
Front
1.Pull upward as far as possible.2.Fold the backrest back slightly.3.Press button 1 and pull out the head re‐
straint all the way to the stop.4.MINI Countryman: press the additional but‐
ton 2 using a suitable tool.5.Pull out the head restraint.6.Fold back the backrest.Seite 50ControlsAdjusting50
Online Edition for Part no. 01 40 2 911 544 - VI/13
Page 53 of 282

Transporting children safelyVehicle equipment
This chapter describes all series equipment as
well as country-specific and special equipment
offered for this model series.Therefore, it also
describes equipment that may not be found in
your vehicle, for instance due to the selected
special equipment or the country version. This
also applies to safety-related functions and sys‐
tems.
The right place for chil‐
dren
Notes Children in the vehicle
Do not leave children unattended in the
vehicle; otherwise, they could endanger them‐
selves and other persons, e.g., by opening the
doors. ◀
Children should always be in the rear Accident research shows that the safest place
for children is on the rear seat.
Transporting children in the rear
Transport children younger than 13 years
of age or shorter than 5 ft/150 cm in the rear
only, using child restraint fixing systems suita‐
ble for the age, weight, and height of the child; otherwise, there is an increased risk of injury in
an accident.
Children 13 years of age or older must wear a
safety belt as soon as a suitable child restraint fixing system can no longer be used, due to
their age, weight and size. ◀Installing child seats
Only install child seats in the rear when
the rear seat backrest is folded all the way back
and engaged; otherwise, there is an increased
risk of injury in an accident. ◀
Children on the front passenger seat
Front passenger airbags Should it be necessary to use a child restraint
fixing system on the front passenger seat,
make sure that the front and side airbags on
the front passenger side are deactivated, refer
to page 83.
Deactivating the front passenger airbags
If a child restraint fixing system is used in
the front passenger seat, the front passenger
airbags must be deactivated; otherwise, there
is an increased risk of injury to the child when
the airbags are triggered, even with a child re‐
straint fixing system. ◀
Installing child re‐
straint fixing systems
Before mounting MINI Countryman: before mounting a child re‐
straint fixing system on the rear seats, move
the seats into the rearmost positions.
Adjust the inclination of the center backrest to
that of the respective outer backrest.
After mounting the child restraint fixing system
on the respective outer rear seat, adjust the
backrest forward, if necessary, to ensure that
the backrest is in contact with the child re‐
straint fixing system. Rear seat backrests, refer
to page 110.Seite 53Transporting children safelyControls53
Online Edition for Part no. 01 40 2 911 544 - VI/13
Page 112 of 282

2.Lift the loading floor at the rear, arrow 1,
and fold it forward, arrow 2.
MINI Countryman:
MINI Paceman:
Before closing the tailgate, lower the loading
floor back onto the cargo area floor.
Removing
The loading floor can be removed if necessary.
1.Fold up the loading floor.2.Pull it back slightly and out of the holders.3.Then remove it upward.
The folded loading floor can be stored in the
cargo area.
MINI Countryman: partition net Firmly attach the partition net
Make sure that the partition net is firmly
attached; otherwise, injuries may result. ◀
Before installing1.Remove the pouch with the partition net
from the storage compartment under the
loading floor in the cargo area.2.Take the partition net out of the pouch, un‐
roll it, and unfold it.
After use, fold and roll up the partition net
in the same manner and place it in the
pouch so that it can be stowed back under
the cargo floor panel. Ensure that hooks
and tensioning buckles do not rest on the
rod elements.3.Unfold the partition net to the point where
the rod elements engage.
Installation behind the front seats
1.Take out the cargo cover if necessary.2.Fold down the rear seat backrests, refer to
Enlarging the cargo area.3.Insert the retaining pins of the partition net
all the way into the front holders in the
headliner, arrow 1, and push forward.4.Attach the hooks, arrow 2, at the bottom of
the retaining straps on both sides to the
eyelets on the vehicle floor.5.Lash the partition net tightly. To do this,
tighten the retaining straps using the ten‐
sioning buckles.
Removing
To remove and stow the partition net, proceed
in reverse order.
Seite 112ControlsInterior equipment112
Online Edition for Part no. 01 40 2 911 544 - VI/13
Page 277 of 282

Radio ready state, switchedoff 59
Radio ready state, switched on 58
Radio setting, refer to Radio ready state 58
Rain sensor 62
Random 167
Random playback 167
Range 70
RDS 159
Reading out loud 208
Rear 46
Rear fog lamp, bulb replace‐ ment 243
Rear fog lamps, indicator lamp 17
Rear lamps, refer to Tail lamps 243
Rear seat backrests, folda‐ ble 110 , 111
Rearview mirror, refer to Mir‐ rors 51
Rear window de‐ froster 100, 103
Rear window, washing 63
Rear window wiper 63
Recirculated air mode 100, 102
Recommended tire brands 227
Redialing 186, 198
Releasing, refer to Unlock‐ ing 39
Remaining range for service, refer to Service require‐
ments 74
Remaining range, refer to Range 70
Reminders 208
Remote control– Battery replacement 41– Comfort Access 38– Malfunctions 35, 40
Remote control, removing
from the ignition lock 58
Remote control, service
data 237
Remote control, univer‐ sal 104
Remote inquiry 185, 197
Replacement remote con‐ trol 32
Replacing wheels/tires 227
Reporting safety defects 9
Reserve warning, refer to Fuel gauge 69
Reservoir for washer fluid, re‐ fer to Washer fluid reser‐
voir 64
Restraining systems– Refer to Safety belts 47
Restraint systems for chil‐
dren 53
Retreaded tires 227
Reverse gear, manual trans‐ mission 65
Road, avoiding 145
Road detour 145
Roadside Assistance 248
Roadside parking lamp, bulb replacement 241
Roadside parking lamps 79
RON gasoline quality 218
RON, refer to Fuel quality 218
Route 146
Route criteria, route 145
Route, displaying 146
Route section, bypassing 146
RPM, refer to Engine data 260
Rubber seals, care 256
Run-flat tires 228
Run-flat tires
– Flat tire 86
Run-flat tires, tire inflation
pressure 220
Running lights, refer to Park‐ ing lamps/low beams 78
S Safe braking 123
Safety 7
Safety belts 47
Safety belts– Damage 50– Rear center safety belt 48
Safety belts, care 257
Safety belts, indicator/warning lamp 50
Safety belts, reminder 50
Safety systems
– Safety belts 47
Safety systems, airbags 82
Satellite radio 160
Saving fuel 130
Scale, changing during navi‐ gation 149
Screen, see Control Display 20
Seat adjustment 46
Seat adjustment
– Manual 45
Seat belts
– Refer to Safety belts 47
Seat heating 47
Seats
– Adjusting 45– Heating 47– Sitting safely 45
Selector lever, automatic
transmission with Step‐
tronic 65
Selector lever lock, overrid‐ ing 67
Selector lever lock, refer to Changing selector lever posi‐
tions, Shiftlock 65
Selector lever positions, auto‐ matic transmission with
Steptronic 65
Service and warranty 8
Service data in the remote control 237
Service interval display, refer to Condition Based Service
CBS 237
Service interval display, refer to Service requirements 74
Service requirements 74
Seite 277Everything from A to ZReference277
Online Edition for Part no. 01 40 2 911 544 - VI/13