lights MINI Paceman 2015 Service Manual
[x] Cancel search | Manufacturer: MINI, Model Year: 2015, Model line: Paceman, Model: MINI Paceman 2015Pages: 223, PDF Size: 5.51 MB
Page 178 of 223
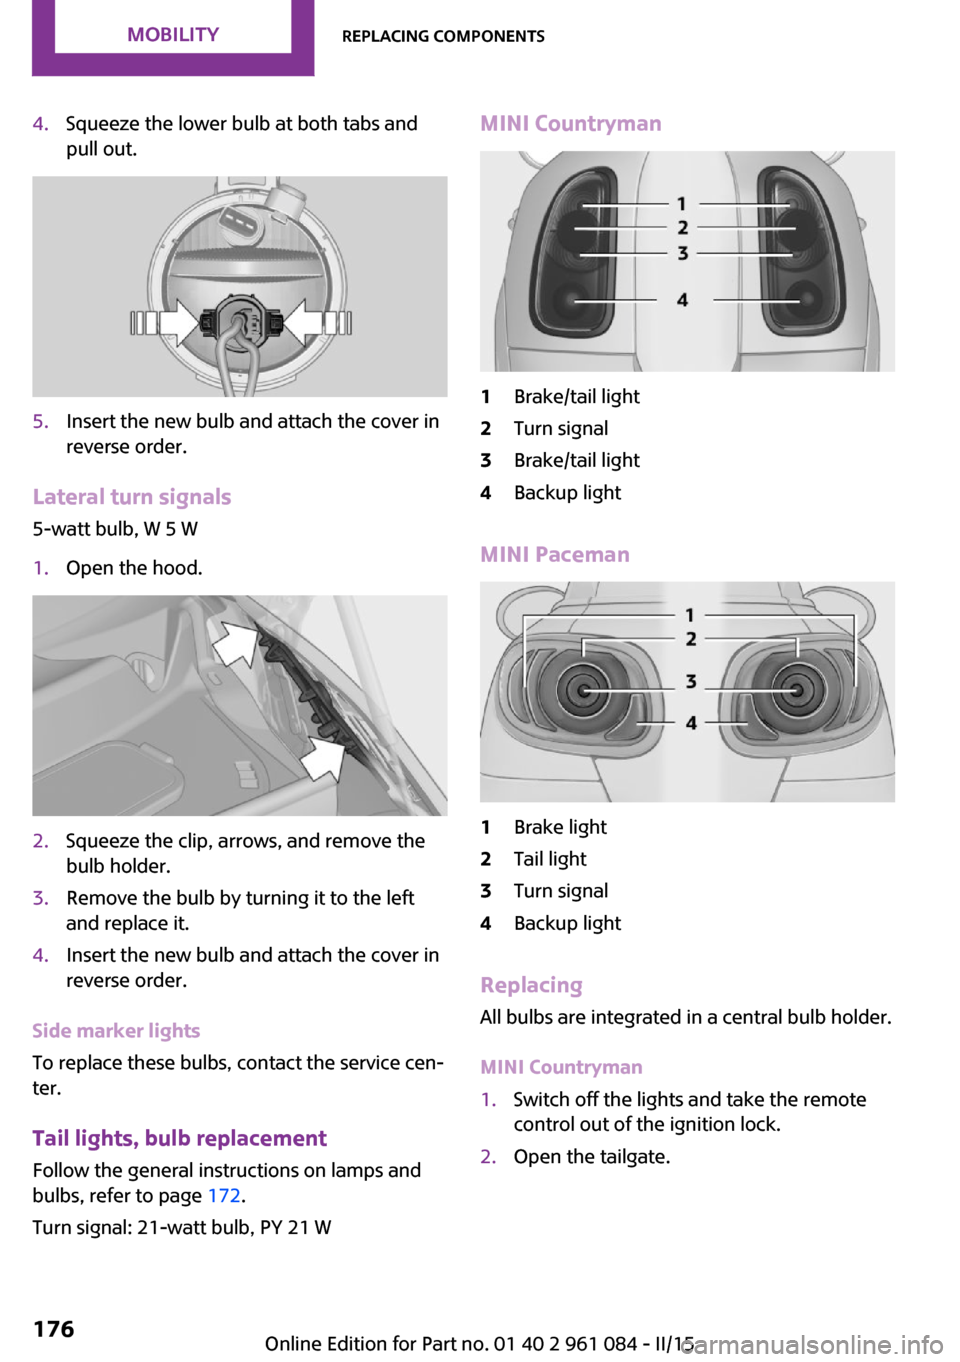
4.Squeeze the lower bulb at both tabs and
pull out.5.Insert the new bulb and attach the cover in
reverse order.
Lateral turn signals
5-watt bulb, W 5 W
1.Open the hood.2.Squeeze the clip, arrows, and remove the
bulb holder.3.Remove the bulb by turning it to the left
and replace it.4.Insert the new bulb and attach the cover in
reverse order.
Side marker lights
To replace these bulbs, contact the service cen‐
ter.
Tail lights, bulb replacement
Follow the general instructions on lamps and
bulbs, refer to page 172.
Turn signal: 21-watt bulb, PY 21 W
MINI Countryman1Brake/tail light2Turn signal3Brake/tail light4Backup light
MINI Paceman
1Brake light2Tail light3Turn signal4Backup light
Replacing
All bulbs are integrated in a central bulb holder.
MINI Countryman
1.Switch off the lights and take the remote
control out of the ignition lock.2.Open the tailgate.Seite 176MOBILITYReplacing components176
Online Edition for Part no. 01 40 2 961 084 - II/15
Page 179 of 223
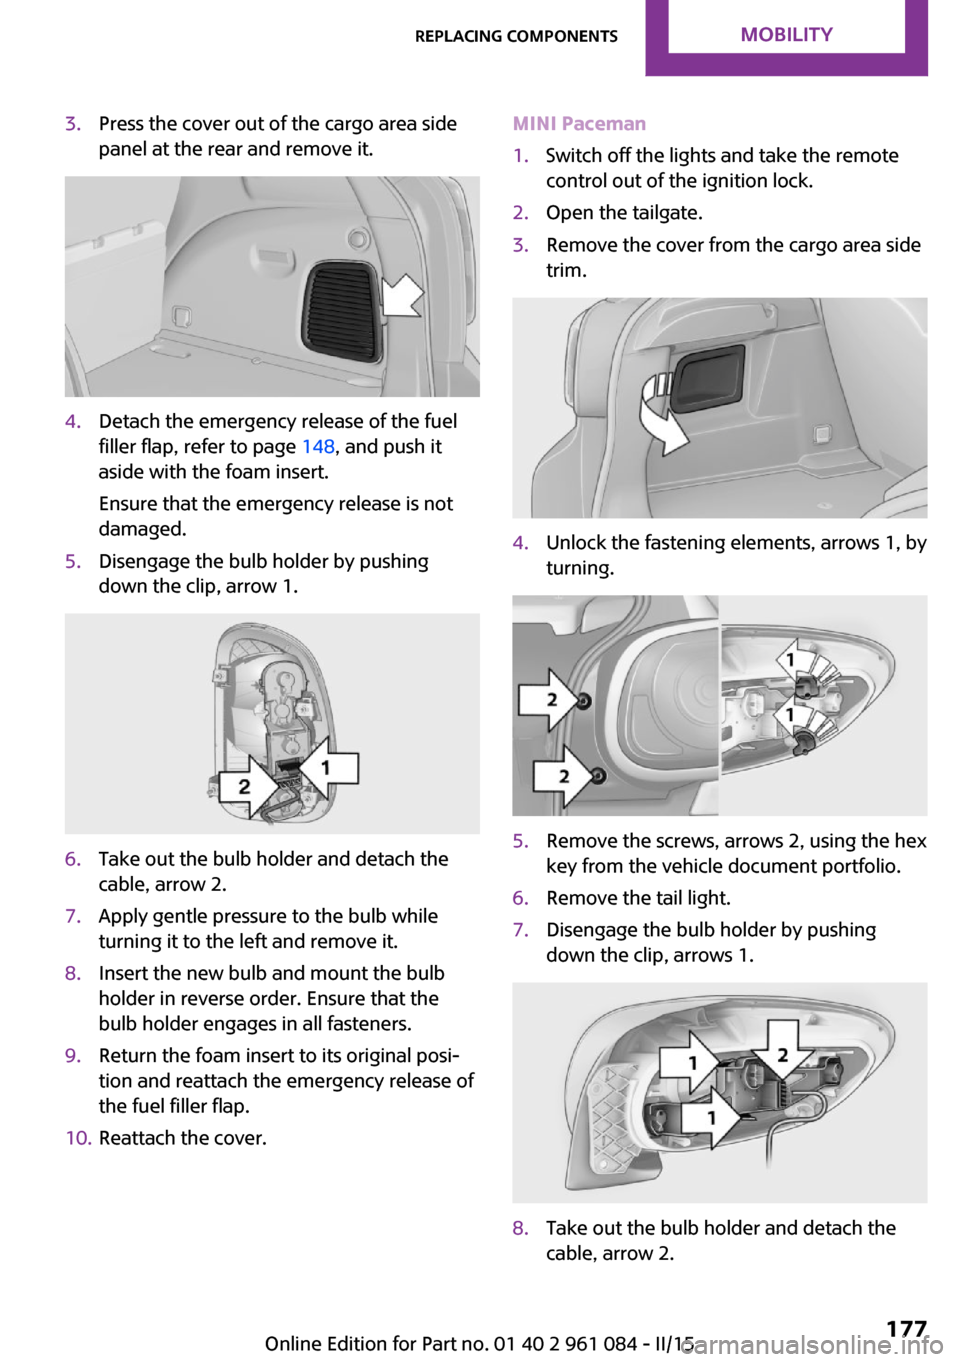
3.Press the cover out of the cargo area side
panel at the rear and remove it.4.Detach the emergency release of the fuel
filler flap, refer to page 148, and push it
aside with the foam insert.
Ensure that the emergency release is not
damaged.5.Disengage the bulb holder by pushing
down the clip, arrow 1.6.Take out the bulb holder and detach the
cable, arrow 2.7.Apply gentle pressure to the bulb while
turning it to the left and remove it.8.Insert the new bulb and mount the bulb
holder in reverse order. Ensure that the
bulb holder engages in all fasteners.9.Return the foam insert to its original posi‐
tion and reattach the emergency release of
the fuel filler flap.10.Reattach the cover.MINI Paceman1.Switch off the lights and take the remote
control out of the ignition lock.2.Open the tailgate.3.Remove the cover from the cargo area side
trim.4.Unlock the fastening elements, arrows 1, by
turning.5.Remove the screws, arrows 2, using the hex
key from the vehicle document portfolio.6.Remove the tail light.7.Disengage the bulb holder by pushing
down the clip, arrows 1.8.Take out the bulb holder and detach the
cable, arrow 2.Seite 177Replacing componentsMOBILITY177
Online Edition for Part no. 01 40 2 961 084 - II/15
Page 180 of 223
9.Apply gentle pressure to the bulb while
turning it to the left and remove it.10.Insert the new bulb and mount the bulb
holder in reverse order. Ensure that the
bulb holder engages in all fasteners.
License plate lights
5-watt bulb, C 5 W
Replacing
MINI Countryman
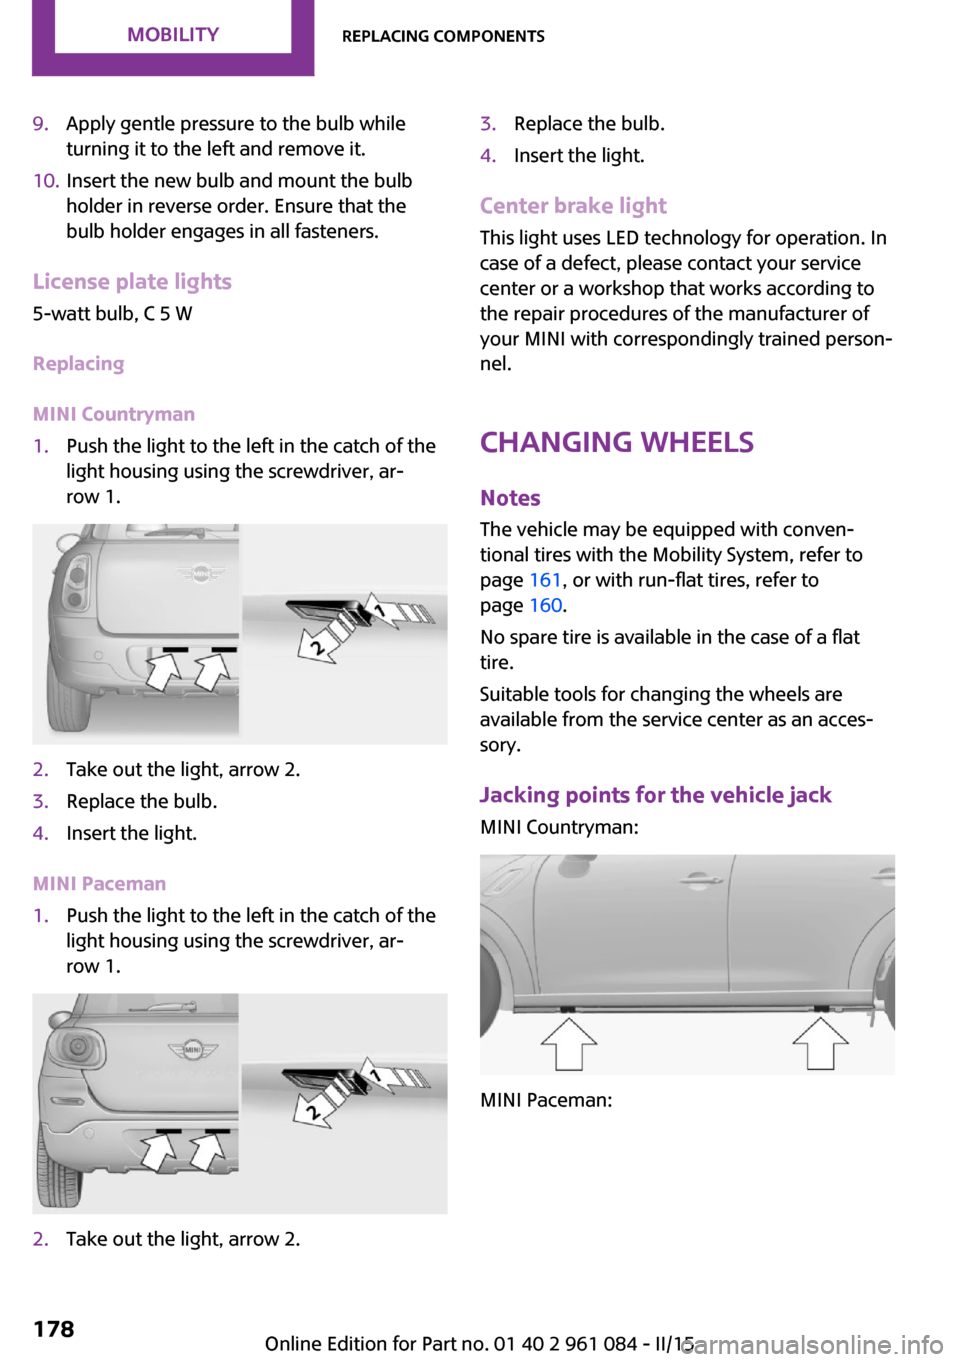
1.Push the light to the left in the catch of the
light housing using the screwdriver, ar‐
row 1.2.Take out the light, arrow 2.3.Replace the bulb.4.Insert the light.
MINI Paceman
1.Push the light to the left in the catch of the
light housing using the screwdriver, ar‐
row 1.2.Take out the light, arrow 2.3.Replace the bulb.4.Insert the light.
Center brake light
This light uses LED technology for operation. In
case of a defect, please contact your service
center or a workshop that works according to
the repair procedures of the manufacturer of
your MINI with correspondingly trained person‐
nel.
Changing wheels
Notes The vehicle may be equipped with conven‐tional tires with the Mobility System, refer to
page 161, or with run-flat tires, refer to
page 160.
No spare tire is available in the case of a flat
tire.
Suitable tools for changing the wheels are
available from the service center as an acces‐
sory.
Jacking points for the vehicle jack MINI Countryman:
MINI Paceman:
Seite 178MOBILITYReplacing components178
Online Edition for Part no. 01 40 2 961 084 - II/15
Page 186 of 223
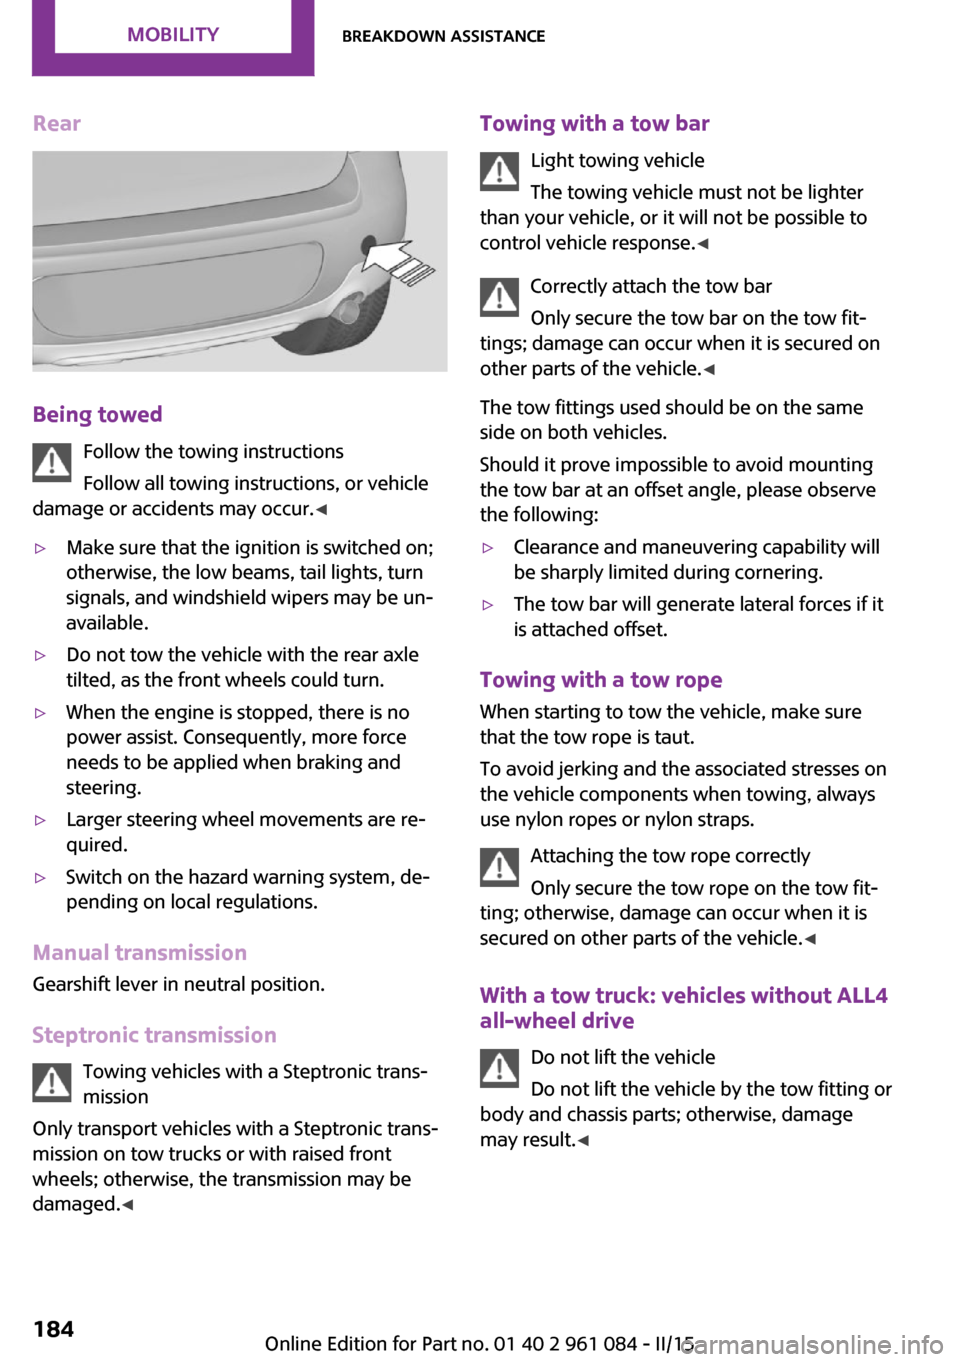
Rear
Being towedFollow the towing instructions
Follow all towing instructions, or vehicle
damage or accidents may occur. ◀
▷Make sure that the ignition is switched on;
otherwise, the low beams, tail lights, turn
signals, and windshield wipers may be un‐
available.▷Do not tow the vehicle with the rear axle
tilted, as the front wheels could turn.▷When the engine is stopped, there is no
power assist. Consequently, more force
needs to be applied when braking and
steering.▷Larger steering wheel movements are re‐
quired.▷Switch on the hazard warning system, de‐
pending on local regulations.
Manual transmission
Gearshift lever in neutral position.
Steptronic transmission Towing vehicles with a Steptronic trans‐
mission
Only transport vehicles with a Steptronic trans‐
mission on tow trucks or with raised front
wheels; otherwise, the transmission may be
damaged. ◀
Towing with a tow bar
Light towing vehicle
The towing vehicle must not be lighter
than your vehicle, or it will not be possible to
control vehicle response. ◀
Correctly attach the tow bar
Only secure the tow bar on the tow fit‐
tings; damage can occur when it is secured on
other parts of the vehicle. ◀
The tow fittings used should be on the same
side on both vehicles.
Should it prove impossible to avoid mounting
the tow bar at an offset angle, please observe
the following:▷Clearance and maneuvering capability will
be sharply limited during cornering.▷The tow bar will generate lateral forces if it
is attached offset.
Towing with a tow rope
When starting to tow the vehicle, make sure
that the tow rope is taut.
To avoid jerking and the associated stresses on
the vehicle components when towing, always
use nylon ropes or nylon straps.
Attaching the tow rope correctly
Only secure the tow rope on the tow fit‐
ting; otherwise, damage can occur when it is
secured on other parts of the vehicle. ◀
With a tow truck: vehicles without ALL4
all-wheel drive
Do not lift the vehicle
Do not lift the vehicle by the tow fitting or
body and chassis parts; otherwise, damage
may result. ◀
Seite 184MOBILITYBreakdown assistance184
Online Edition for Part no. 01 40 2 961 084 - II/15
Page 189 of 223
▷Remove additional attachments, for in‐
stance a spoiler or telephone antenna, if
there is a risk that these may be damaged.▷Insert the remote control into the ignition
lock.
Steptronic transmission
Before driving into the car wash, note the fol‐
lowing to ensure that the vehicle can roll:
1.Insert the remote control into the ignition
lock, even with Comfort Access.2.Move the selector lever to position N.3.Release the parking brake.4.Switch the engine off.5.Leave the remote control in the ignition
lock so that the vehicle can roll.
Hand car wash
If washing the vehicle by hand, use copious
quantities of water and car shampoo if neces‐
sary. Clean the vehicle with a sponge or a
washing brush by applying gentle pressure.
Before cleaning the windshield, deactivate the
rain sensor to avoid unintentional wiper activa‐
tion or switch off the ignition.
Adhere to the local regulations regarding
washing cars by hand.
Headlights Do not rub dry and do not use abrasive or caus‐
tic cleansers. Soak areas that have been soiled,
e.g., due to insects, with shampoo and rinse off
with copious quantities of water.
Thaw ice with a window deicer; do not use an
ice scraper.
Windows
Clean the outside and inside surfaces of the
windows and the mirror glasses with window
cleaner.
Do not clean mirror glass with cleaners contain‐
ing quartz.
Wiper blades
Clean with soapy water and replace regularly to
avoid streaking.
Wax and preservative residue and soiling on
the windows cause streaking during window
wiping and lead to premature wear on the
wiper blades and malfunctions of the rain sen‐
sor.
Vehicle care Car care products
Regular cleaning and care contributes signifi‐
cantly to vehicle value retention.
The manufacturer recommends using cleaning
and care products from MINI, since these have
been tested and approved.
Original MINI CareProducts have been tested
on materials, in the laboratory, and in the field,
and offer optimum care and protection for MINI
vehicles.
Do not use cleansers that contain alcohol
or solvents
Do not use cleansers that contain alcohol or
solvents, such as lacquer thinners, heavy-duty
grease removers, fuel, or such; this could lead
to surface damage. ◀
Car care and cleaning products
Follow the instructions on the container.
When cleaning the interior, open the doors or
windows.
Only use products intended for cleaning vehi‐
cles.
Cleansers can contain substances that are dan‐
gerous and harmful to your health. ◀Seite 187CareMOBILITY187
Online Edition for Part no. 01 40 2 961 084 - II/15
Page 193 of 223
Indicator/warning lampsVehicle equipment
This chapter describes all series equipment as
well as country-specific and special equipment
offered for this model series. Therefore, it also
describes equipment that may not be found in
your vehicle, for instance due to the selectedspecial equipment or the country version. This
also applies to safety-related functions and sys‐
tems.
When using the features and systems described
here, adhere to local regulations.
Overview
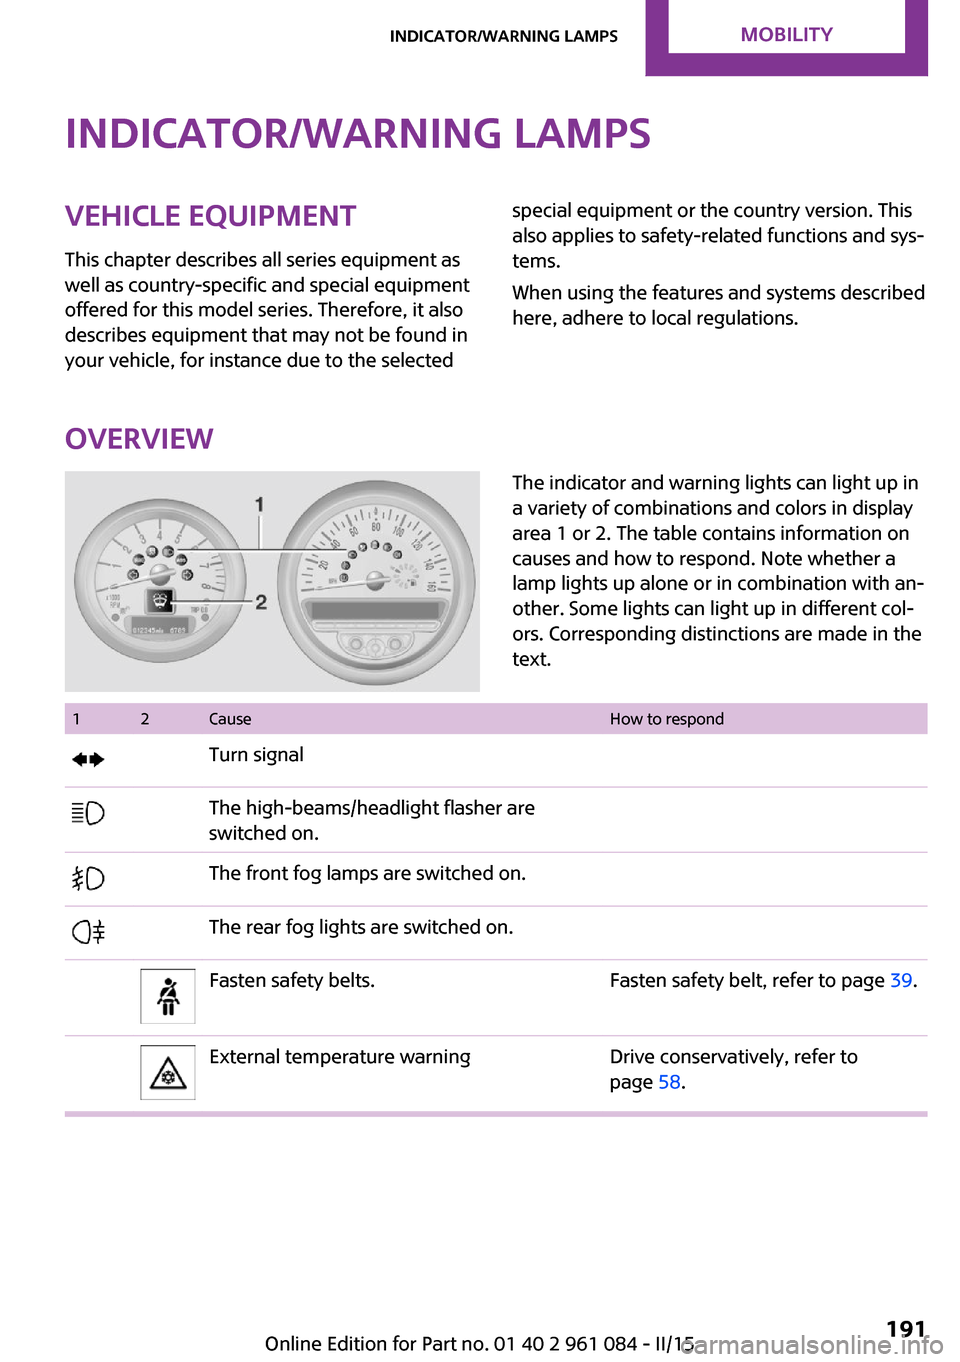
The indicator and warning lights can light up in
a variety of combinations and colors in display
area 1 or 2. The table contains information on
causes and how to respond. Note whether a
lamp lights up alone or in combination with an‐
other. Some lights can light up in different col‐
ors. Corresponding distinctions are made in the
text. 12CauseHow to respondTurn signalThe high-beams/headlight flasher are
switched on.The front fog lamps are switched on.The rear fog lights are switched on.Fasten safety belts.Fasten safety belt, refer to page 39.External temperature warningDrive conservatively, refer to
page 58.Seite 191Indicator/warning lampsMOBILITY191
Online Edition for Part no. 01 40 2 961 084 - II/15
Page 194 of 223
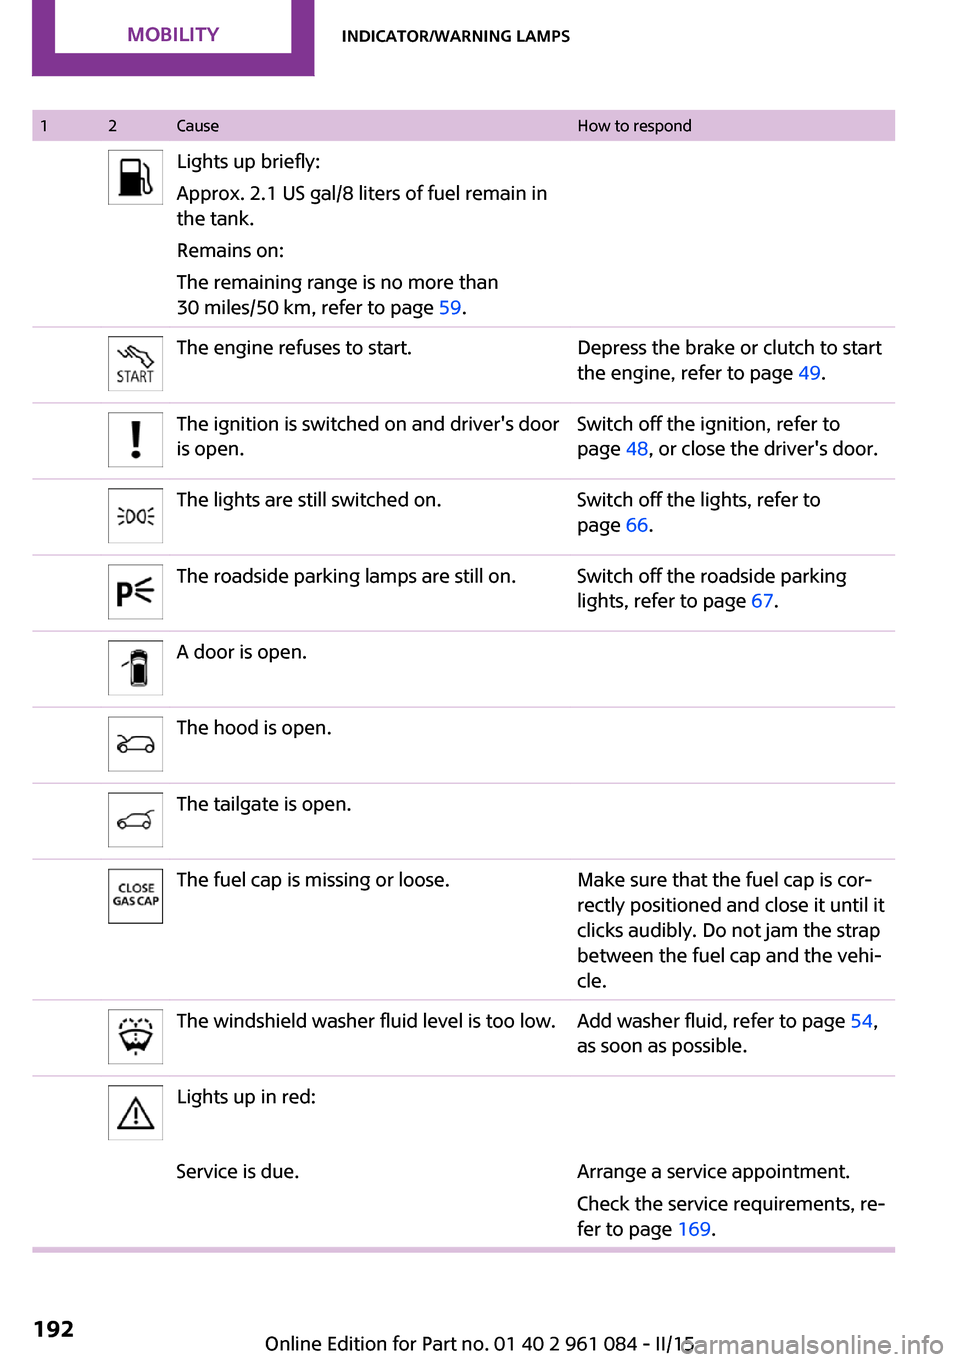
12CauseHow to respondLights up briefly:
Approx. 2.1 US gal/8 liters of fuel remain in
the tank.
Remains on:
The remaining range is no more than
30 miles/50 km, refer to page 59.The engine refuses to start.Depress the brake or clutch to start
the engine, refer to page 49.The ignition is switched on and driver's door
is open.Switch off the ignition, refer to
page 48, or close the driver's door.The lights are still switched on.Switch off the lights, refer to
page 66.The roadside parking lamps are still on.Switch off the roadside parking
lights, refer to page 67.A door is open.The hood is open.The tailgate is open.The fuel cap is missing or loose.Make sure that the fuel cap is cor‐
rectly positioned and close it until it
clicks audibly. Do not jam the strap
between the fuel cap and the vehi‐
cle.The windshield washer fluid level is too low.Add washer fluid, refer to page 54,
as soon as possible.Lights up in red:Service is due.Arrange a service appointment.
Check the service requirements, re‐
fer to page 169.Seite 192MOBILITYIndicator/warning lamps192
Online Edition for Part no. 01 40 2 961 084 - II/15
Page 195 of 223
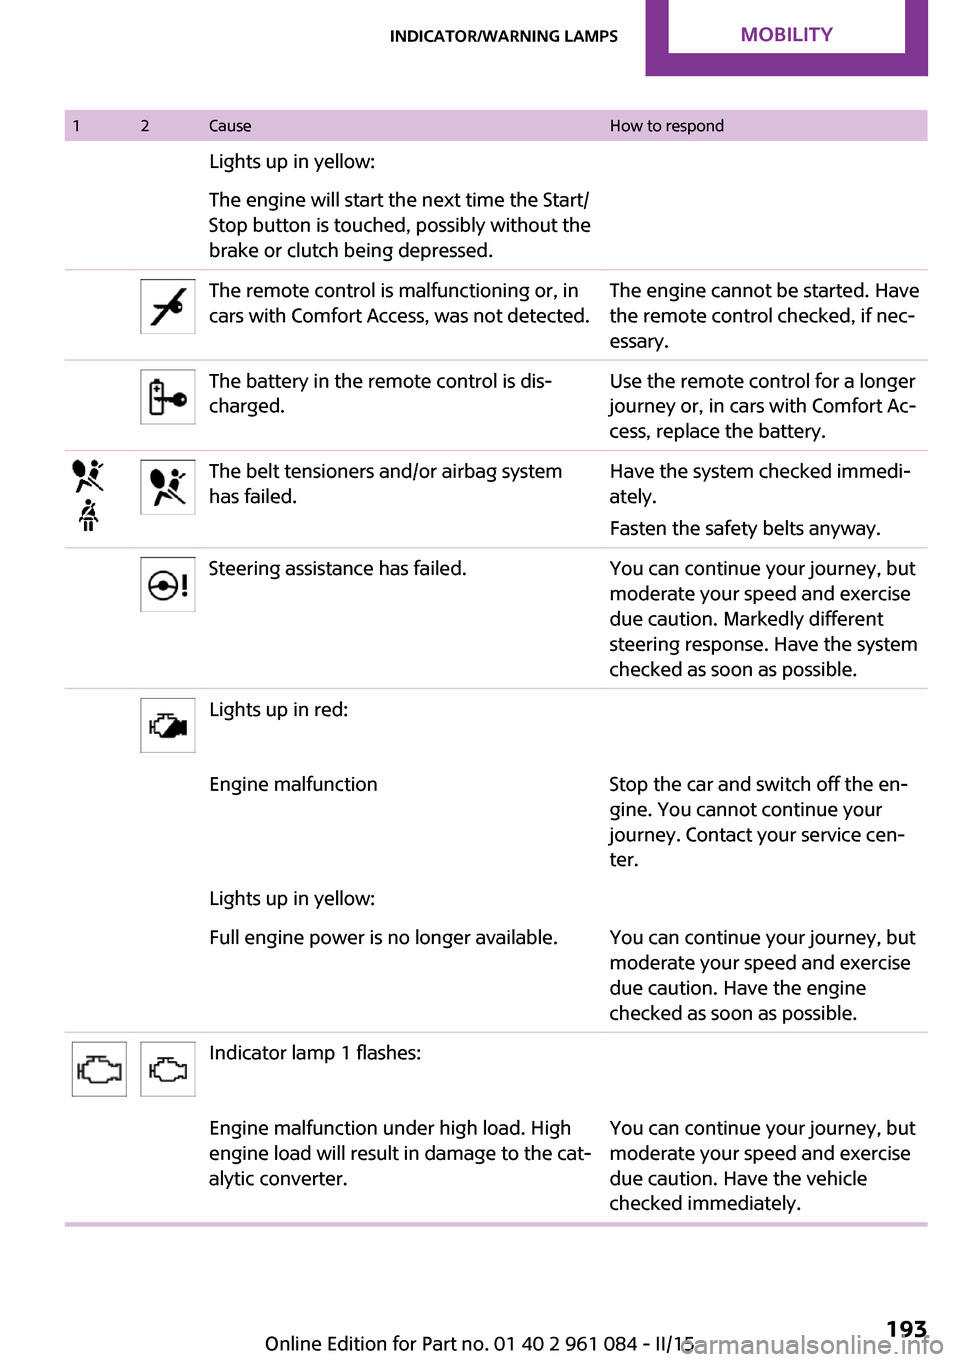
12CauseHow to respondLights up in yellow:The engine will start the next time the Start/
Stop button is touched, possibly without the
brake or clutch being depressed.The remote control is malfunctioning or, in
cars with Comfort Access, was not detected.The engine cannot be started. Have
the remote control checked, if nec‐
essary.The battery in the remote control is dis‐
charged.Use the remote control for a longer
journey or, in cars with Comfort Ac‐
cess, replace the battery.The belt tensioners and/or airbag system
has failed.Have the system checked immedi‐
ately.
Fasten the safety belts anyway.Steering assistance has failed.You can continue your journey, but
moderate your speed and exercise
due caution. Markedly different
steering response. Have the system
checked as soon as possible.Lights up in red:Engine malfunctionStop the car and switch off the en‐
gine. You cannot continue your
journey. Contact your service cen‐
ter.Lights up in yellow:Full engine power is no longer available.You can continue your journey, but
moderate your speed and exercise
due caution. Have the engine
checked as soon as possible.Indicator lamp 1 flashes:Engine malfunction under high load. High
engine load will result in damage to the cat‐
alytic converter.You can continue your journey, but
moderate your speed and exercise
due caution. Have the vehicle
checked immediately.Seite 193Indicator/warning lampsMOBILITY193
Online Edition for Part no. 01 40 2 961 084 - II/15
Page 196 of 223
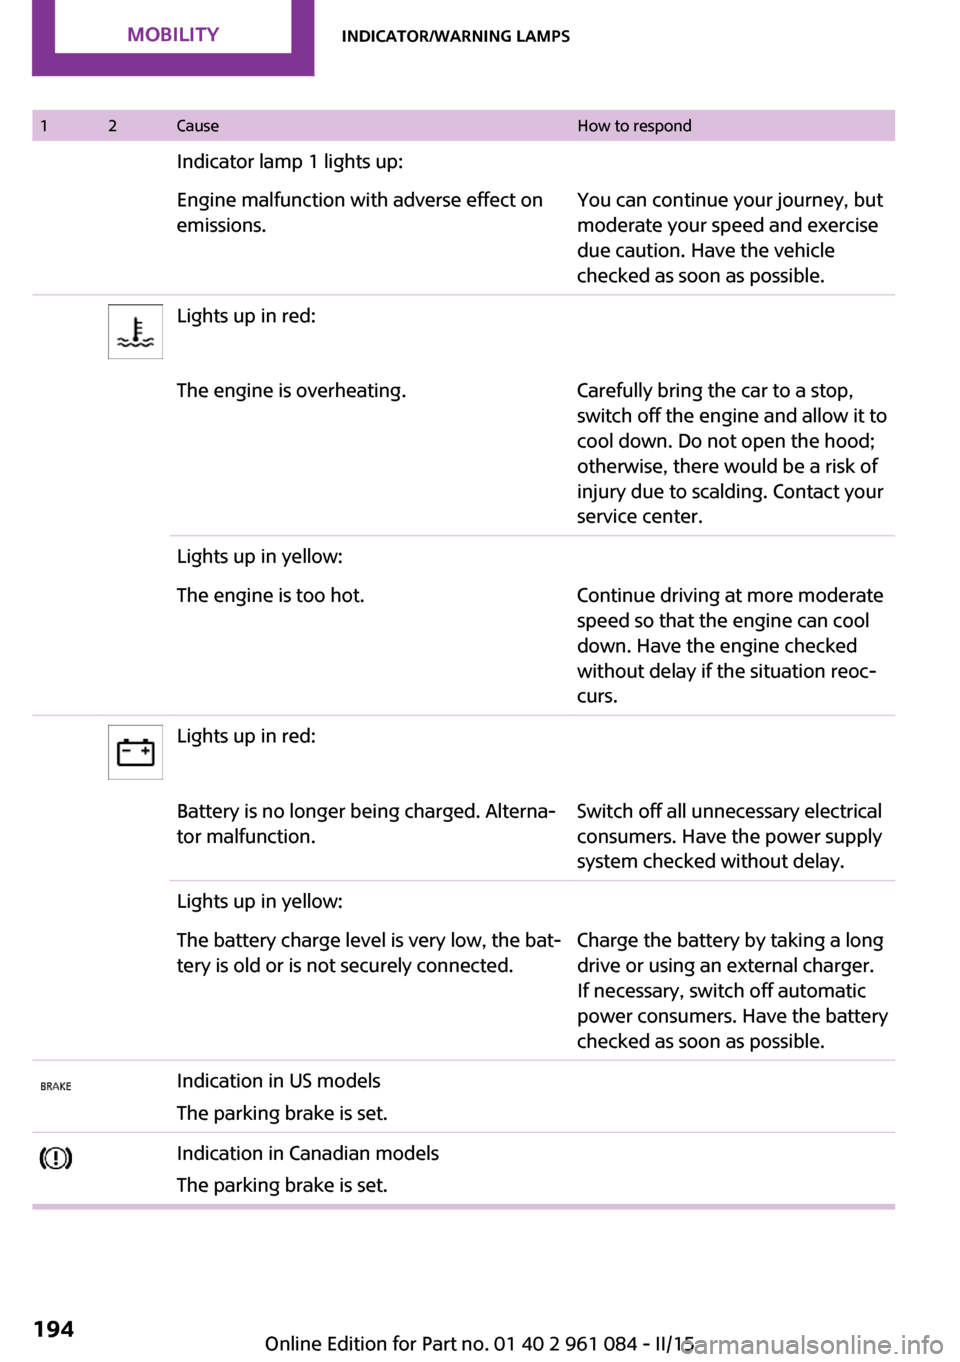
12CauseHow to respondIndicator lamp 1 lights up:Engine malfunction with adverse effect on
emissions.You can continue your journey, but
moderate your speed and exercise
due caution. Have the vehicle
checked as soon as possible.Lights up in red:The engine is overheating.Carefully bring the car to a stop,
switch off the engine and allow it to
cool down. Do not open the hood;
otherwise, there would be a risk of
injury due to scalding. Contact your
service center.Lights up in yellow:The engine is too hot.Continue driving at more moderate
speed so that the engine can cool
down. Have the engine checked
without delay if the situation reoc‐
curs.Lights up in red:Battery is no longer being charged. Alterna‐
tor malfunction.Switch off all unnecessary electrical
consumers. Have the power supply
system checked without delay.Lights up in yellow:The battery charge level is very low, the bat‐
tery is old or is not securely connected.Charge the battery by taking a long
drive or using an external charger.
If necessary, switch off automatic
power consumers. Have the battery
checked as soon as possible.Indication in US models
The parking brake is set.Indication in Canadian models
The parking brake is set.Seite 194MOBILITYIndicator/warning lamps194
Online Edition for Part no. 01 40 2 961 084 - II/15
Page 197 of 223
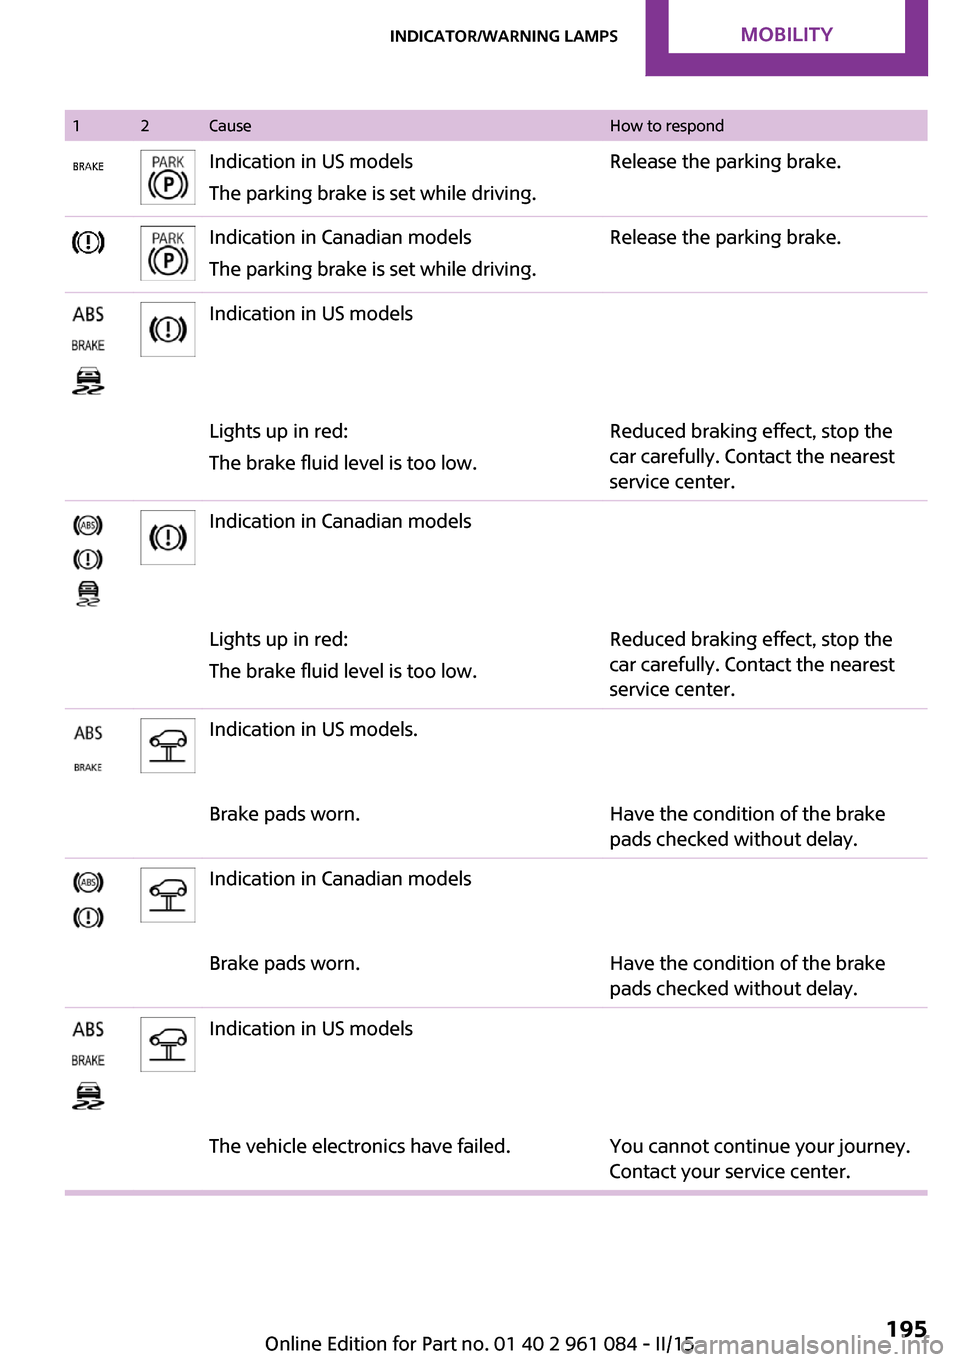
12CauseHow to respondIndication in US models
The parking brake is set while driving.Release the parking brake.Indication in Canadian models
The parking brake is set while driving.Release the parking brake.Indication in US modelsLights up in red:
The brake fluid level is too low.Reduced braking effect, stop the
car carefully. Contact the nearest
service center.Indication in Canadian modelsLights up in red:
The brake fluid level is too low.Reduced braking effect, stop the
car carefully. Contact the nearest
service center.Indication in US models.Brake pads worn.Have the condition of the brake
pads checked without delay.Indication in Canadian modelsBrake pads worn.Have the condition of the brake
pads checked without delay.Indication in US modelsThe vehicle electronics have failed.You cannot continue your journey.
Contact your service center.Seite 195Indicator/warning lampsMOBILITY195
Online Edition for Part no. 01 40 2 961 084 - II/15