seat adjustment MINI Paceman 2016 Owner's Manual (Mini Connected)
[x] Cancel search | Manufacturer: MINI, Model Year: 2016, Model line: Paceman, Model: MINI Paceman 2016Pages: 223, PDF Size: 5.52 MB
Page 36 of 223

AdjustingVehicle features and op‐
tions
This chapter describes all standard, country-
specific and optional features offered with the
series. It also describes features that are not
necessarily available in your car, e. g., due to
the selected options or country versions. This
also applies to safety-related functions and sys‐
tems.
When using the features and systems described
here, adhere to local regulations.
Sitting safely
The ideal seating position can make a vital con‐ tribution to relaxed, fatigue-free driving.
The seating position plays an important role in
an accident in combination with:▷Safety belts, refer to page 38▷Head restraints, refer to page 41.▷Airbags, refer to page 74.
Seats
Note before adjusting WARNING
Seat adjustments while driving can lead
to unexpected movements of the seat. Vehicle
control could be lost. There is risk of an acci‐
dent. Only adjust the side on the driver's side
when the vehicle is stationary. ◀
WARNING
With a backrest inclined too far to the
rear, the protective effect of the safety belt
cannot be ensured anymore. There is a danger
of sliding under the safety belt in an accident.
There is risk of injuries or danger to life. Adjust
the seat prior to starting the trip. Adjust the
backrest in an as upright position as possible
and do not adjust again while driving. ◀
WARNING
There is risk of jamming when moving the
seats. There is risk of injuries or risk of property
damage. Make sure that the area of movement
of the seat is clear prior to any adjustment. ◀
Front seat adjustment
Forward/backward
Pull the lever, arrow 1, and slide the seat into
the desired position, arrows 2.
After releasing the lever, move the seat forward
or back slightly to make sure it engages prop‐
erly.
Seite 36CONTROLSAdjusting36
Online Edition for Part no. 01 40 2 964 433 - VI/15
Page 37 of 223
Height
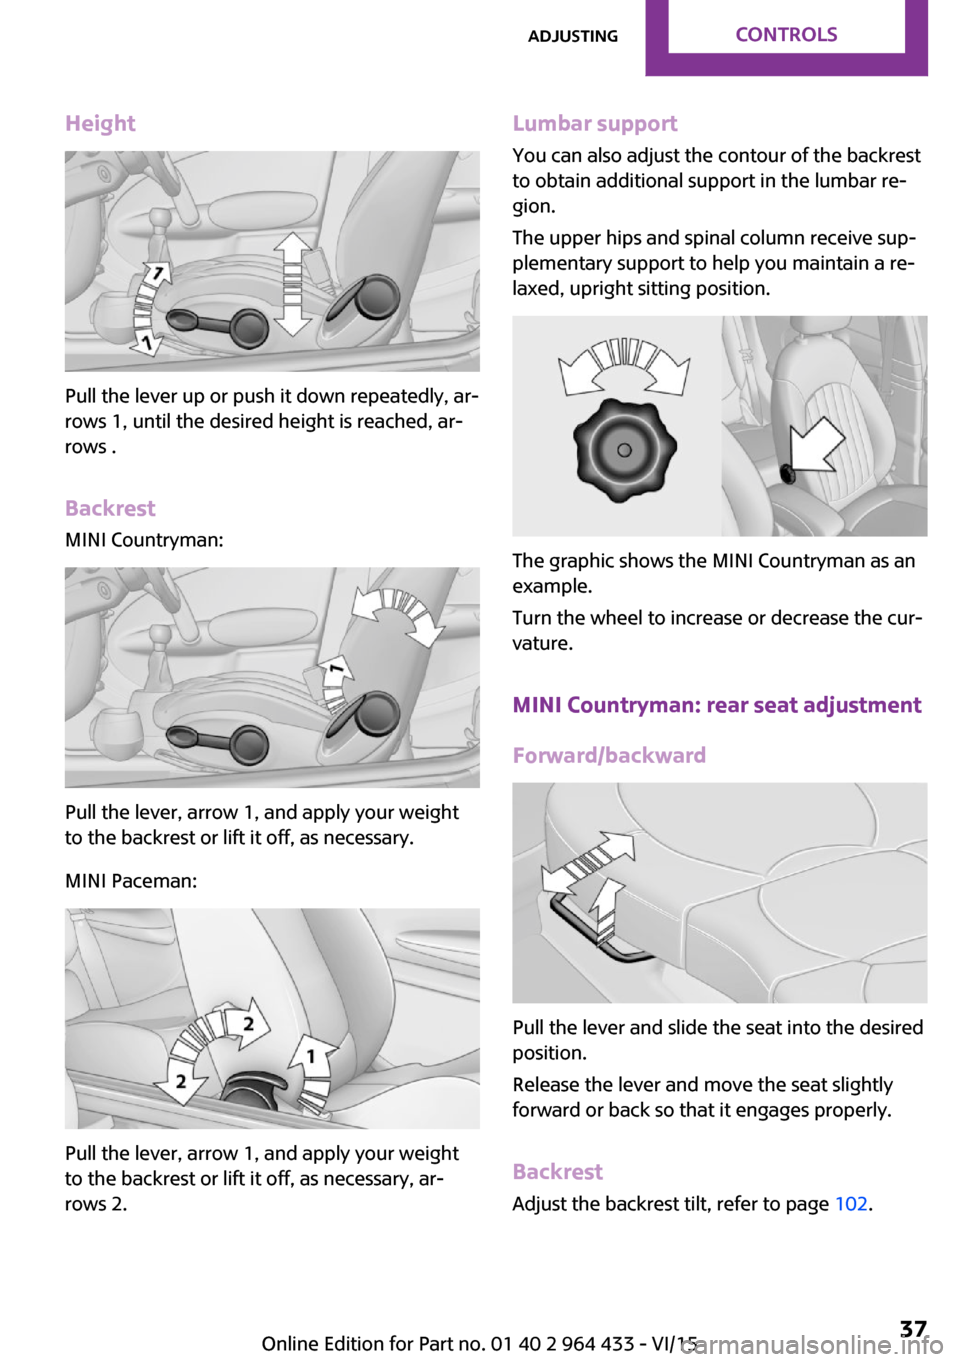
Pull the lever up or push it down repeatedly, ar‐
rows 1, until the desired height is reached, ar‐
rows .
Backrest MINI Countryman:
Pull the lever, arrow 1, and apply your weight
to the backrest or lift it off, as necessary.
MINI Paceman:
Pull the lever, arrow 1, and apply your weight
to the backrest or lift it off, as necessary, ar‐
rows 2.
Lumbar support
You can also adjust the contour of the backrest
to obtain additional support in the lumbar re‐
gion.
The upper hips and spinal column receive sup‐
plementary support to help you maintain a re‐
laxed, upright sitting position.
The graphic shows the MINI Countryman as an
example.
Turn the wheel to increase or decrease the cur‐
vature.
MINI Countryman: rear seat adjustmentForward/backward
Pull the lever and slide the seat into the desired
position.
Release the lever and move the seat slightly
forward or back so that it engages properly.
Backrest Adjust the backrest tilt, refer to page 102.
Seite 37AdjustingCONTROLS37
Online Edition for Part no. 01 40 2 964 433 - VI/15
Page 38 of 223
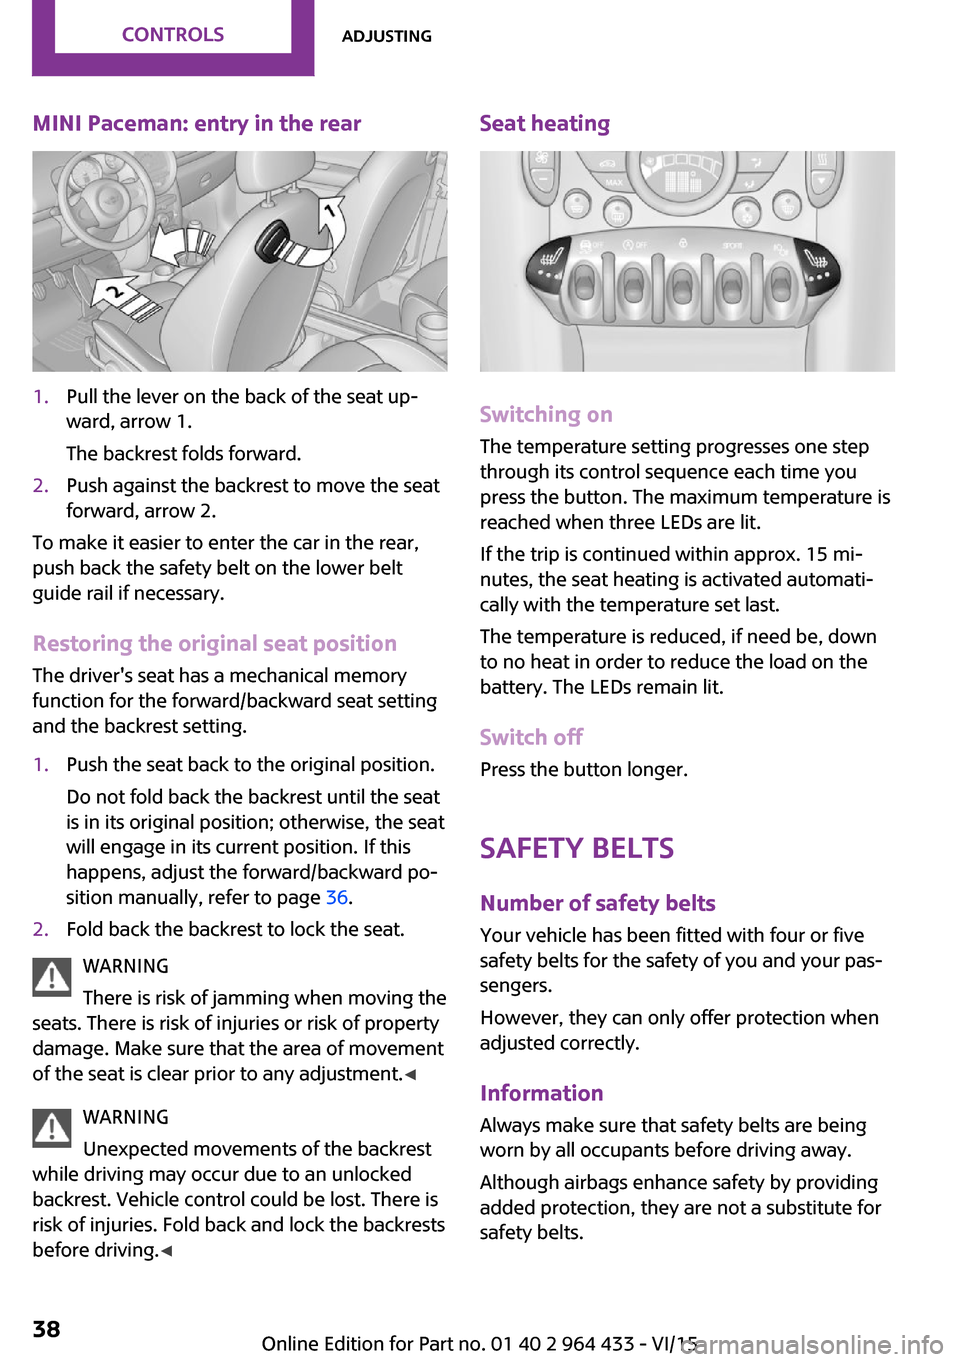
MINI Paceman: entry in the rear1.Pull the lever on the back of the seat up‐
ward, arrow 1.
The backrest folds forward.2.Push against the backrest to move the seat
forward, arrow 2.
To make it easier to enter the car in the rear,
push back the safety belt on the lower belt
guide rail if necessary.
Restoring the original seat position The driver's seat has a mechanical memory
function for the forward/backward seat setting
and the backrest setting.
1.Push the seat back to the original position.
Do not fold back the backrest until the seat
is in its original position; otherwise, the seat
will engage in its current position. If this
happens, adjust the forward/backward po‐
sition manually, refer to page 36.2.Fold back the backrest to lock the seat.
WARNING
There is risk of jamming when moving the
seats. There is risk of injuries or risk of property
damage. Make sure that the area of movement
of the seat is clear prior to any adjustment. ◀
WARNING
Unexpected movements of the backrest
while driving may occur due to an unlocked
backrest. Vehicle control could be lost. There is
risk of injuries. Fold back and lock the backrests
before driving. ◀
Seat heating
Switching on
The temperature setting progresses one step
through its control sequence each time you
press the button. The maximum temperature is
reached when three LEDs are lit.
If the trip is continued within approx. 15 mi‐
nutes, the seat heating is activated automati‐
cally with the temperature set last.
The temperature is reduced, if need be, down
to no heat in order to reduce the load on the
battery. The LEDs remain lit.
Switch off
Press the button longer.
Safety beltsNumber of safety belts
Your vehicle has been fitted with four or five
safety belts for the safety of you and your pas‐
sengers.
However, they can only offer protection when
adjusted correctly.
InformationAlways make sure that safety belts are being
worn by all occupants before driving away.
Although airbags enhance safety by providing
added protection, they are not a substitute for
safety belts.
Seite 38CONTROLSAdjusting38
Online Edition for Part no. 01 40 2 964 433 - VI/15
Page 42 of 223
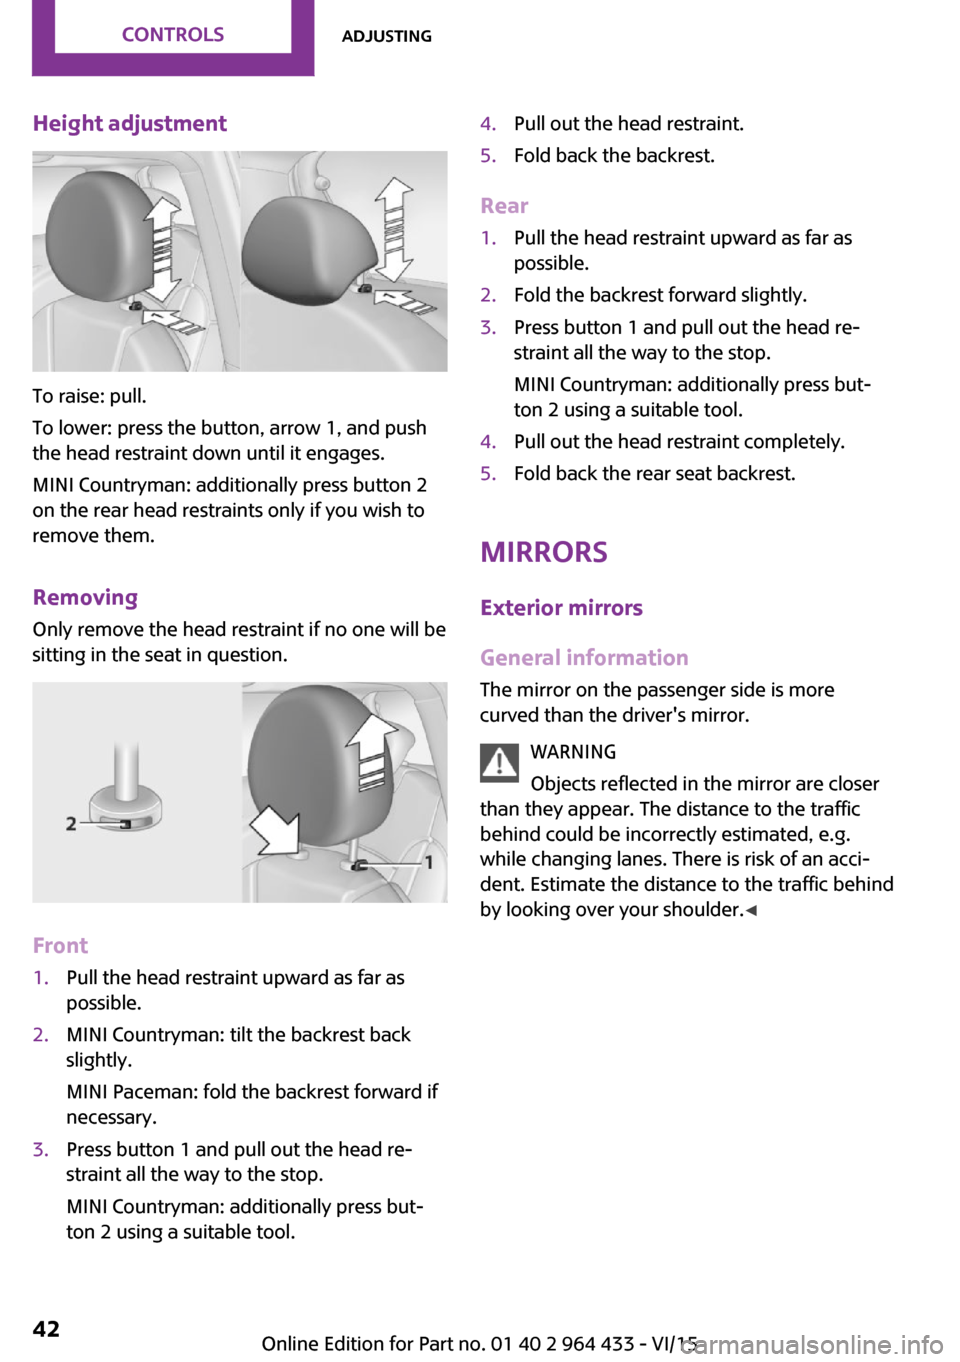
Height adjustment
To raise: pull.
To lower: press the button, arrow 1, and push
the head restraint down until it engages.
MINI Countryman: additionally press button 2
on the rear head restraints only if you wish to
remove them.
Removing Only remove the head restraint if no one will be
sitting in the seat in question.
Front
1.Pull the head restraint upward as far as
possible.2.MINI Countryman: tilt the backrest back
slightly.
MINI Paceman: fold the backrest forward if
necessary.3.Press button 1 and pull out the head re‐
straint all the way to the stop.
MINI Countryman: additionally press but‐
ton 2 using a suitable tool.4.Pull out the head restraint.5.Fold back the backrest.
Rear
1.Pull the head restraint upward as far as
possible.2.Fold the backrest forward slightly.3.Press button 1 and pull out the head re‐
straint all the way to the stop.
MINI Countryman: additionally press but‐
ton 2 using a suitable tool.4.Pull out the head restraint completely.5.Fold back the rear seat backrest.
Mirrors
Exterior mirrors
General information
The mirror on the passenger side is more
curved than the driver's mirror.
WARNING
Objects reflected in the mirror are closer
than they appear. The distance to the traffic
behind could be incorrectly estimated, e.g.
while changing lanes. There is risk of an acci‐
dent. Estimate the distance to the traffic behind
by looking over your shoulder. ◀
Seite 42CONTROLSAdjusting42
Online Edition for Part no. 01 40 2 964 433 - VI/15
Page 44 of 223
▷Do not cover the area between the inside
rearview mirror and the windshield.▷Do not apply stickers to the windshield in
front of the mirror.
Steering wheel
Adjusting WARNING
Steering wheel adjustments while driving
can lead to unexpected steering wheel move‐
ments. Vehicle control could be lost. There is
risk of an accident. Adjust the steering wheel
while the vehicle is stationary only. ◀
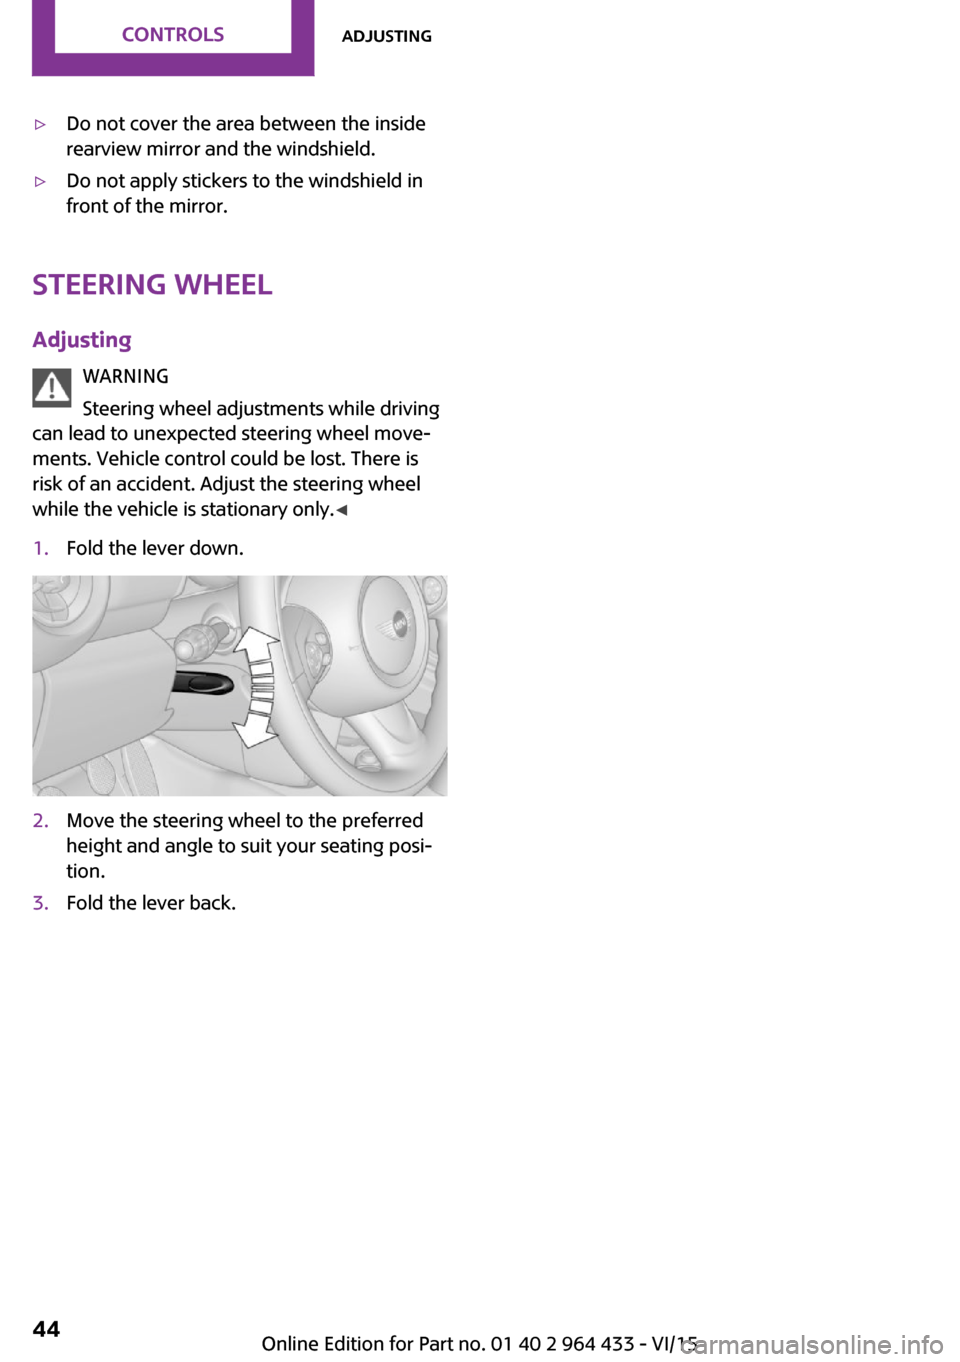
1.Fold the lever down.2.Move the steering wheel to the preferred
height and angle to suit your seating posi‐
tion.3.Fold the lever back.Seite 44CONTROLSAdjusting44
Online Edition for Part no. 01 40 2 964 433 - VI/15
Page 45 of 223

Transporting children safelyVehicle features and op‐
tions
This chapter describes all standard, country-
specific and optional features offered with the
series. It also describes features that are not
necessarily available in your car, e. g., due to
the selected options or country versions. This
also applies to safety-related functions and sys‐
tems.
When using the features and systems described
here, adhere to local regulations.
The right place for chil‐
dren
Information WARNING
Unattended children or animals can move
the vehicle and endanger themselves and traf‐
fic, e.g. with the following actions:▷Pressing the Start/Stop button.▷Releasing the parking brake.▷Opening and closing of doors or windows.▷Shifting the selector lever into neutral.▷Using vehicle equipment.
There is risk of accidents or injuries. Do not
leave children or animals unattended in the ve‐
hicle. Carry remote control along when exiting
and lock the vehicle. ◀
Children should always be in the rear WARNING
Persons shorter than 5 ft, 150 cm cannot
correctly fasten the safety belt without suitable
additional restraint systems. The protective ef‐
fect of the safety belts can be limited or lost
when safety belts are fastened incorrectly. An
incorrectly fastened safety belt can cause addi‐
tional injuries, e.g. in the event of an accident
or during braking and evasive maneuvers.
There is risk of injuries or danger to life. Secure
persons shorter than 5 ft, 150 cm using suitable
restraint systems. ◀
Accident research shows that the safest place
for children is on the rear seat.
Only transport children younger than 12 years
of age (13 years of age) or shorter than 5 ft,
150 cm in the rear in child restraint systems
suitable for the age, weight and size of the
child.
Children 13 years of age or older must wear a
safety belt as soon as a suitable child restraint
system can no longer be used due to their age,
weight and size.
Children on the front passenger seat
Should it be necessary to use a child restraint
fixing system on the front passenger seat,
make sure that the front and side airbags on
the front passenger side are deactivated, refer
to page 75.
Information WARNING
Active front-seat passenger airbags can
injure a child in a child restraint system when
the airbags are activated. There is risk of inju‐
ries. Make sure that the front-seat passenger
airbags are deactivated and that the PASSEN‐
GER AIRBAG OFF indicator lamp lights up. ◀
WARNING
The stability of the child restraint system
is limited or compromised with incorrect seat
adjustment or improper installation of the child
seat. There is risk of injuries or danger to life.
Make sure that the child restraint system fitsSeite 45Transporting children safelyCONTROLS45
Online Edition for Part no. 01 40 2 964 433 - VI/15
Page 46 of 223
securely against the backrest. If possible, adjust
the backrest tilt for all affected backrests and
correctly adjust the seats. Make sure that seats
and backrests are securely engaged. If possible,
adjust the height of the head restraints or re‐
move them. ◀
Installing child re‐ straint fixing systems
Before mounting MINI Countryman: before mounting a child re‐
straint fixing system on the rear seats, move
the seats into the rearmost positions.
Adjust the inclination of the center backrest to
that of the respective outer backrest.
After mounting the child restraint fixing system
on the respective outer rear seat, adjust the
backrest forward, if necessary, to ensure that
the backrest is in contact with the child re‐
straint fixing system. Rear seat backrests, refer
to page 102.
Information Pay attention to the specifications of the child
restraint system manufacturer when selecting,
installing, and using child restraint systems.
WARNING
The stability of the child restraint system
is limited or compromised with incorrect seat
adjustment or improper installation of the child seat. There is risk of injuries or danger to life.
Make sure that the child restraint system fits
securely against the backrest. If possible, adjust
the backrest tilt for all affected backrests and
correctly adjust the seats. Make sure that seats
and backrests are securely engaged. If possible,
adjust the height of the head restraints or re‐
move them. ◀On the front passenger seat
Deactivating the airbags After installing a child restraint fixing system on
the front passenger seat, ensure that the front,
side, and knee airbags on the front passenger
side are deactivated.
Seat position and height Before installing a child restraint fixing system,move the front passenger seat as far back aspossible and adjust its height to the highest po‐
sition to obtain the best possible position for
the belt and to offer optimal protection in the
event of an accident.
Do not change this seat position once it has
been set.
Child seat security
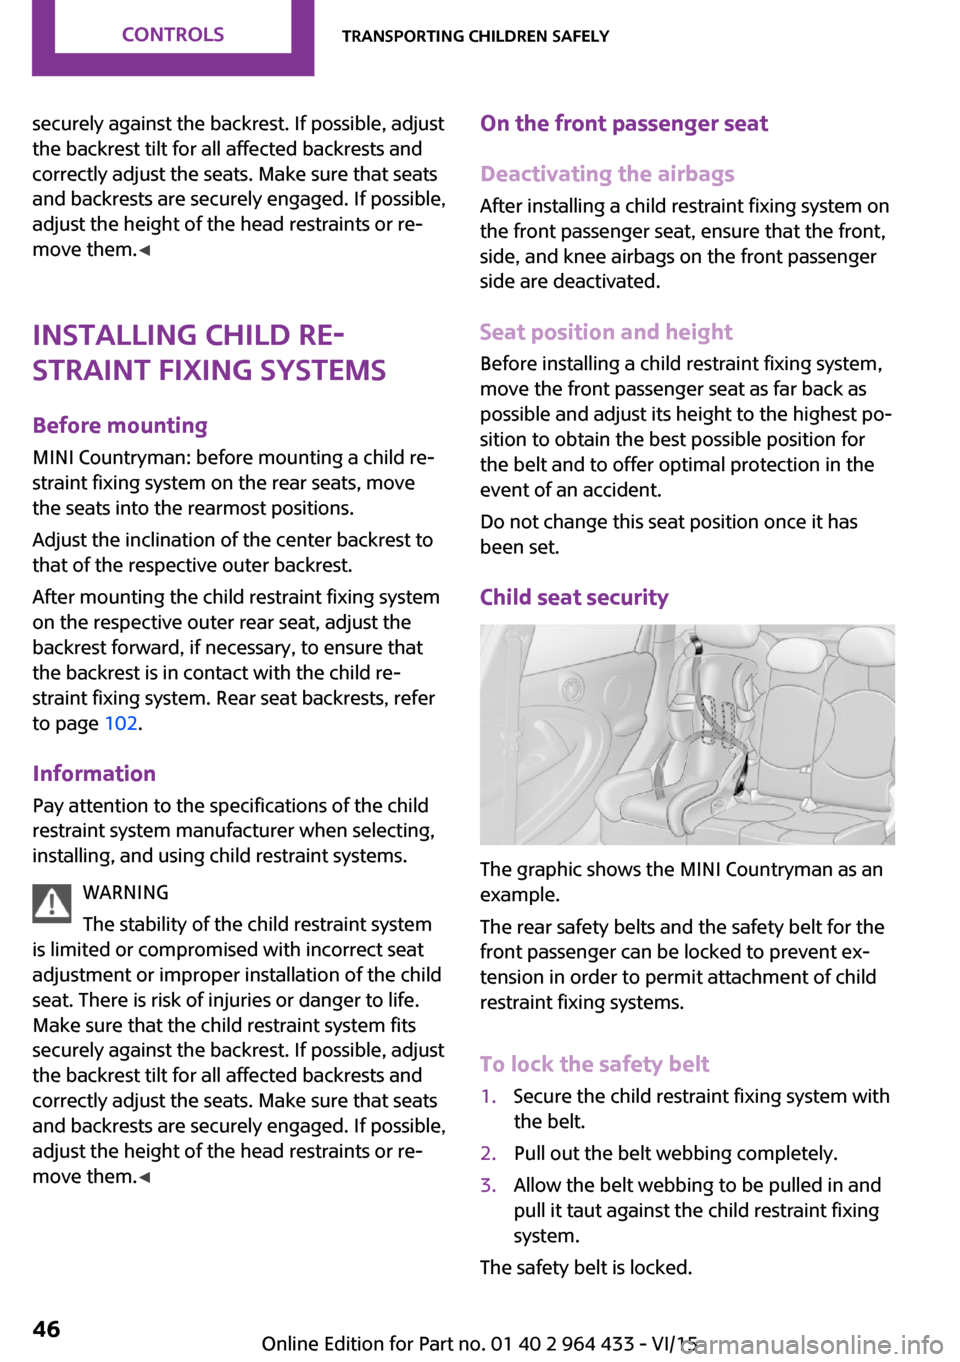
The graphic shows the MINI Countryman as an
example.
The rear safety belts and the safety belt for the
front passenger can be locked to prevent ex‐
tension in order to permit attachment of child
restraint fixing systems.
To lock the safety belt
1.Secure the child restraint fixing system with
the belt.2.Pull out the belt webbing completely.3.Allow the belt webbing to be pulled in and
pull it taut against the child restraint fixing
system.
The safety belt is locked.
Seite 46CONTROLSTransporting children safely46
Online Edition for Part no. 01 40 2 964 433 - VI/15
Page 100 of 223

Right-hand/left-hand steering
The digital compass is set for right-hand or left-
hand steering at the factory.
Setting the language
Press the adjustment button for 12‑13 seconds.
Briefly press the adjustment button again to
switch between English "E" and German "O".
The setting is automatically saved after approx.
10 seconds.
Cupholders and ashtray/
lighter
Cupholders
Two cupholders are located in the center con‐
sole in the front.
MINI Countryman: two additional cupholders
are located at the end of the center console in
the rear. Additional cupholders can be installed
on the center rail.
MINI Paceman: additional cupholders are lo‐
cated in the console between the rear seats.
Depending on the equipment, additional cu‐
pholders can be installed on the center rail.
WARNING
Unsuitable containers in the cup holder
and hot beverages can damage the cup holder
and increase the risk of injuries in the event of
an accident. There is risk of injuries or risk of
property damage. Use light-weight, unbreaka‐
ble, and sealable containers. Do not transport
hot beverages. Do not force objects into the
cup holder. ◀
Ashtray
The ashtray is located in one of the cupholders
in the center console at the front.
EmptyingTake out the entire ashtray, arrow.
When installing, ensure that the ashtray is in‐
serted in the cupholder with the adapter.
Lighter
With the engine running or the ignition
switched on, press in the cigarette lighter.
Seite 100CONTROLSInterior equipment100
Online Edition for Part no. 01 40 2 964 433 - VI/15
Page 103 of 223
The backrests can be adjusted to 10 different
positions between the comfort and transport
positions and they can be folded down.
In the comfort position, the backrests are tilted
back to the greatest possible angle and in the
transport position they are nearly vertical.
Before beginning with the mounting of a child
restraint fixing system, note the instructions,
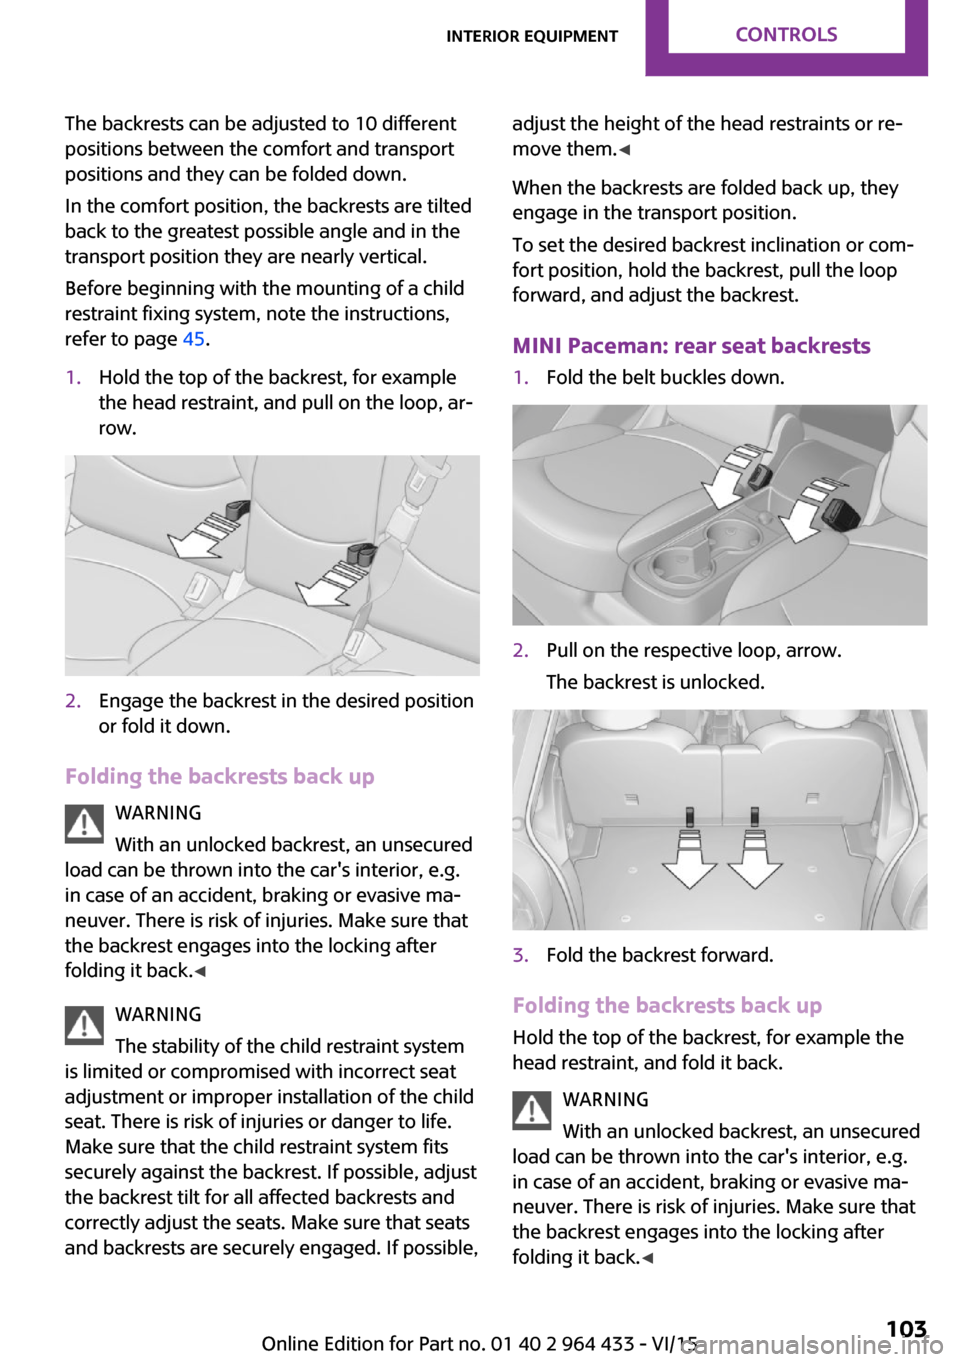
refer to page 45.1.Hold the top of the backrest, for example
the head restraint, and pull on the loop, ar‐
row.2.Engage the backrest in the desired position
or fold it down.
Folding the backrests back up
WARNING
With an unlocked backrest, an unsecured
load can be thrown into the car's interior, e.g.
in case of an accident, braking or evasive ma‐
neuver. There is risk of injuries. Make sure that
the backrest engages into the locking after
folding it back. ◀
WARNING
The stability of the child restraint system
is limited or compromised with incorrect seat
adjustment or improper installation of the child
seat. There is risk of injuries or danger to life.
Make sure that the child restraint system fits
securely against the backrest. If possible, adjust
the backrest tilt for all affected backrests and
correctly adjust the seats. Make sure that seats
and backrests are securely engaged. If possible,
adjust the height of the head restraints or re‐
move them. ◀
When the backrests are folded back up, they
engage in the transport position.
To set the desired backrest inclination or com‐
fort position, hold the backrest, pull the loop
forward, and adjust the backrest.
MINI Paceman: rear seat backrests1.Fold the belt buckles down.2.Pull on the respective loop, arrow.
The backrest is unlocked.3.Fold the backrest forward.
Folding the backrests back up Hold the top of the backrest, for example the
head restraint, and fold it back.
WARNING
With an unlocked backrest, an unsecured
load can be thrown into the car's interior, e.g.
in case of an accident, braking or evasive ma‐
neuver. There is risk of injuries. Make sure that
the backrest engages into the locking after
folding it back. ◀
Seite 103Interior equipmentCONTROLS103
Online Edition for Part no. 01 40 2 964 433 - VI/15
Page 216 of 223
Hazard warning system 15
Head airbags 74
Headlamp control, refer to Parking lamps/low
beams 69
Headlamps, care 191
Headlight control, auto‐ matic 69
Headlight courtesy delay fea‐ ture 71
Headlight flasher 53
Headlights 69
Headlights, cleaning, washer fluid 57
Head restraints 41
Head restraints, adjusting the height 41
Head restraints, removing 42
Heatable rear window, air conditioner 92
Heatable windshield 95
Heating, rear window with au‐ tomatic climate control 95
Heating, seats 38
Heating, windshield 95
Height adjustment, seats 36
High-beams 70
High beams, bulb replace‐ ment 176
Hill drive-off assistant 86
Hills 114
Holder for remote control, re‐ fer to Ignition lock 50
Homepage 6
Hood 167
Hood, closing 167
Hood, opening 167
Hood, unlocking 167
Horn 12
Hydraulic brake assistant 84
I
Ice warning, refer to External temperature warning 61 Icy roads, refer to External
temperature warning 61
Identification marks, run-flat tires 162
Identification marks, tires 158
Ignition 50
Ignition key position 1, refer to Radio ready state 50
Ignition key position 2, refer to Ignition on 50
Ignition key, refer to Remote control with integrated
key 20
Ignition lock 50
Ignition, switched off 51
Ignition, switched on 50
Indicator and warning lamps, overview 194
Indicator and warning lamps, Tire Pressure Monitor
TPM 80
Indicator and warning lights 15
Individual air distribution 92
Inflation pressure monitor, re‐ fer to Flat Tire Monitor 77
Inflation pressure monitor, re‐ fer to Tire Pressure Monitor
TPM 79
Inflation pressure, refer to Tire inflation pressure 154
Initializing, compass, refer to Calibrating 99
Initializing, Flat Tire Monitor FTM 78
Initializing, glass sunroof, electrical 33
Instrument cluster, refer to Displays 14
Instrument lighting 72
Instruments, refer to Cock‐ pit 12
Integrated key 20
Integrated universal remote control 96
Interior equipment 96 Interior lights 72
Interior lights, remote con‐ trol 24
Interior mirror 43
Interior motion sensor 32
Interior rearview mirror, com‐ pass 98
Interior temperature, setting, air conditioner 91
Interior temperature, setting, automatic climate con‐
trol 93
Internet page 6
J Jump-starting 184
K
Keyless Go, refer to Comfort Access 28
Keyless opening and closing, refer to Comfort Access 28
Key Memory, refer to Personal Profile 21
Key, refer to Remote control with integrated key 20
Kickdown, Steptronic trans‐ mission 58
Knee airbag 74
Knocking control 152
L Lamp and bulb replacement, bulb replacement 175
Lamp, replacing, refer to Lamp and bulb replace‐
ment 175
Lamps 69
Lamps, automatic headlight control 69
Lap-and-shoulder belt, refer to Safety belts 38 Seite 216REFERENCEEverything from A to Z216
Online Edition for Part no. 01 40 2 964 433 - VI/15