service MINI Paceman 2016 Service Manual
[x] Cancel search | Manufacturer: MINI, Model Year: 2016, Model line: Paceman, Model: MINI Paceman 2016Pages: 223, PDF Size: 5.52 MB
Page 176 of 223
driving cautiously with the front fog lights, pro‐
vided this is permitted by local laws.
DANGER
There can be high voltage in the lighting
system. There is danger to life. The manufac‐
turer of your vehicle recommends that the
work on the lighting system including bulb re‐
placement be performed by a dealer’s service
center or another qualified service center or re‐
pair shop. ◀
Front lights, bulb replacement
Overview
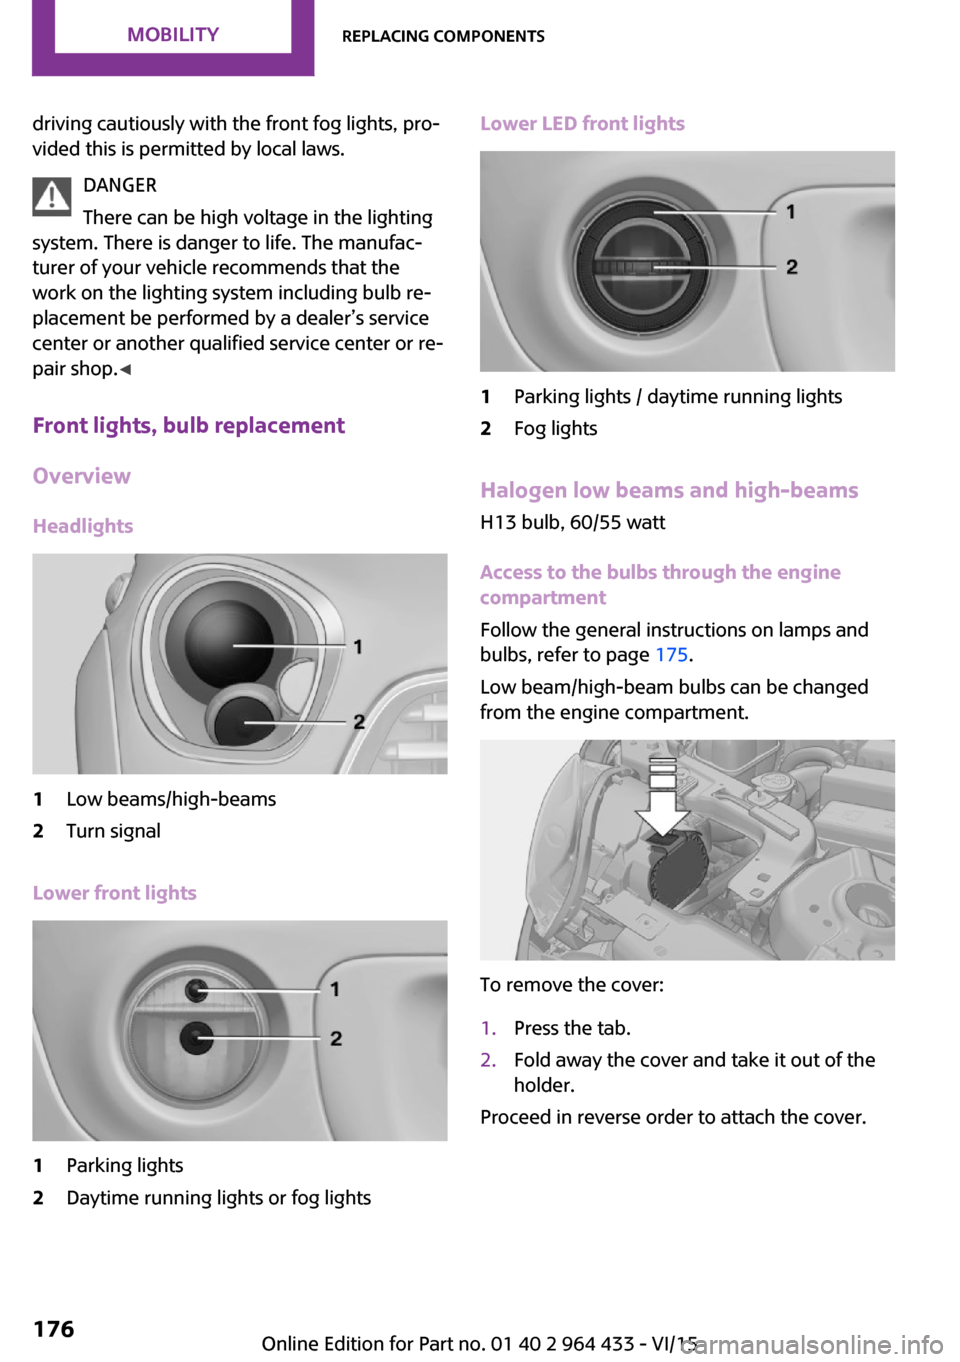
Headlights1Low beams/high-beams2Turn signal
Lower front lights
1Parking lights2Daytime running lights or fog lightsLower LED front lights1Parking lights / daytime running lights2Fog lights
Halogen low beams and high-beams
H13 bulb, 60/55 watt
Access to the bulbs through the engine
compartment
Follow the general instructions on lamps and
bulbs, refer to page 175.
Low beam/high-beam bulbs can be changed
from the engine compartment.
To remove the cover:
1.Press the tab.2.Fold away the cover and take it out of the
holder.
Proceed in reverse order to attach the cover.
Seite 176MOBILITYReplacing components176
Online Edition for Part no. 01 40 2 964 433 - VI/15
Page 177 of 223
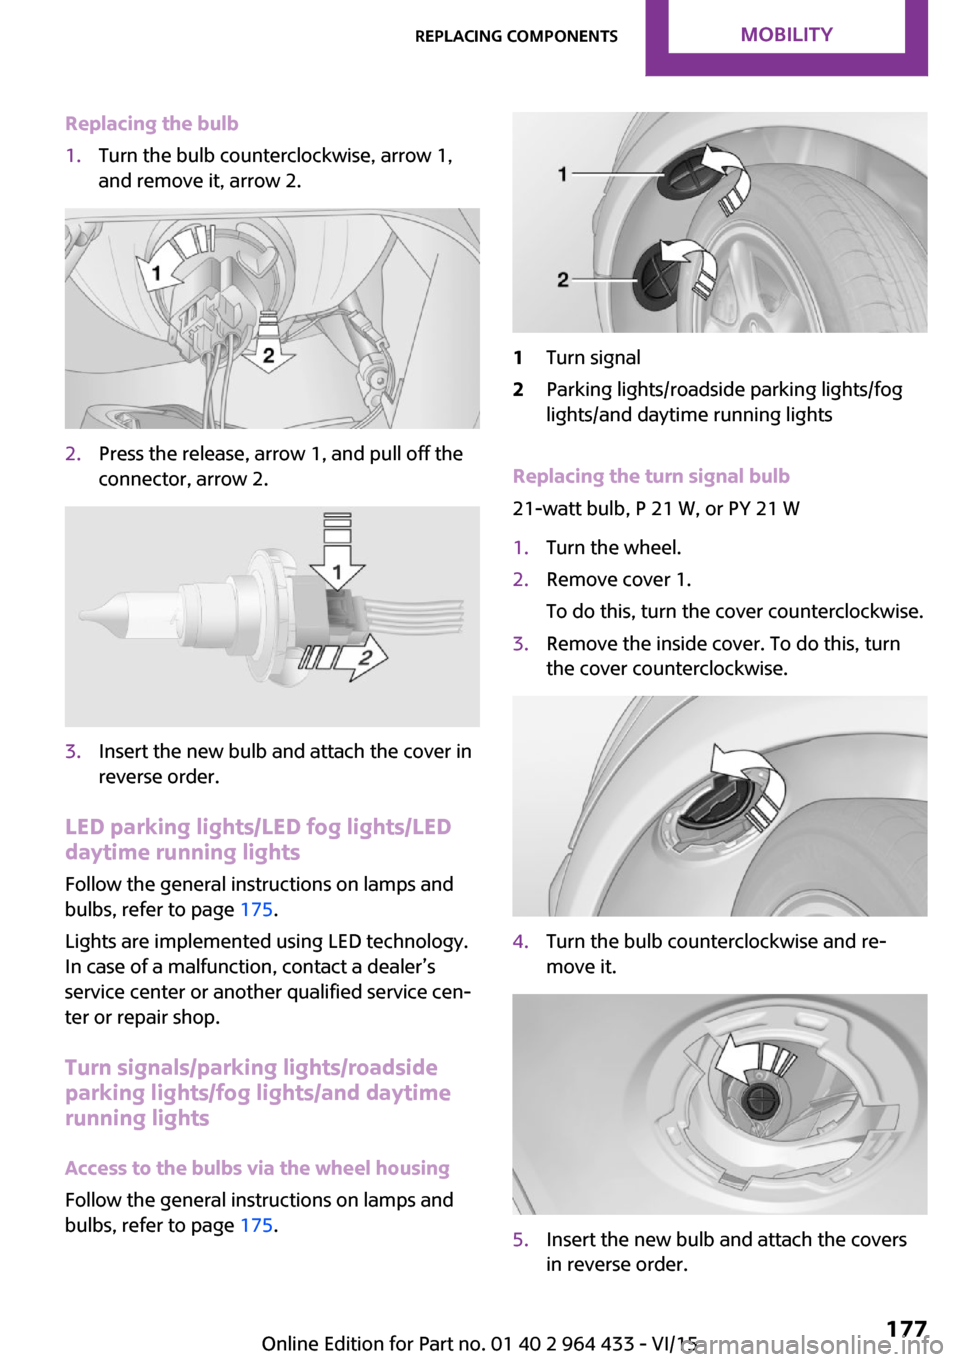
Replacing the bulb1.Turn the bulb counterclockwise, arrow 1,
and remove it, arrow 2.2.Press the release, arrow 1, and pull off the
connector, arrow 2.3.Insert the new bulb and attach the cover in
reverse order.
LED parking lights/LED fog lights/LED
daytime running lights
Follow the general instructions on lamps and
bulbs, refer to page 175.
Lights are implemented using LED technology.
In case of a malfunction, contact a dealer’s
service center or another qualified service cen‐
ter or repair shop.
Turn signals/parking lights/roadside
parking lights/fog lights/and daytime running lights
Access to the bulbs via the wheel housing
Follow the general instructions on lamps and
bulbs, refer to page 175.
1Turn signal2Parking lights/roadside parking lights/fog
lights/and daytime running lights
Replacing the turn signal bulb
21-watt bulb, P 21 W, or PY 21 W
1.Turn the wheel.2.Remove cover 1.
To do this, turn the cover counterclockwise.3.Remove the inside cover. To do this, turn
the cover counterclockwise.4.Turn the bulb counterclockwise and re‐
move it.5.Insert the new bulb and attach the covers
in reverse order.Seite 177Replacing componentsMOBILITY177
Online Edition for Part no. 01 40 2 964 433 - VI/15
Page 179 of 223
Side marker lights
To replace these bulbs, contact a dealer’s serv‐
ice center or another qualified service center or
repair shop.
Tail lights, bulb replacement
Follow the general instructions on lamps and
bulbs, refer to page 175.
Turn signal: 21-watt bulb, PY 21 W
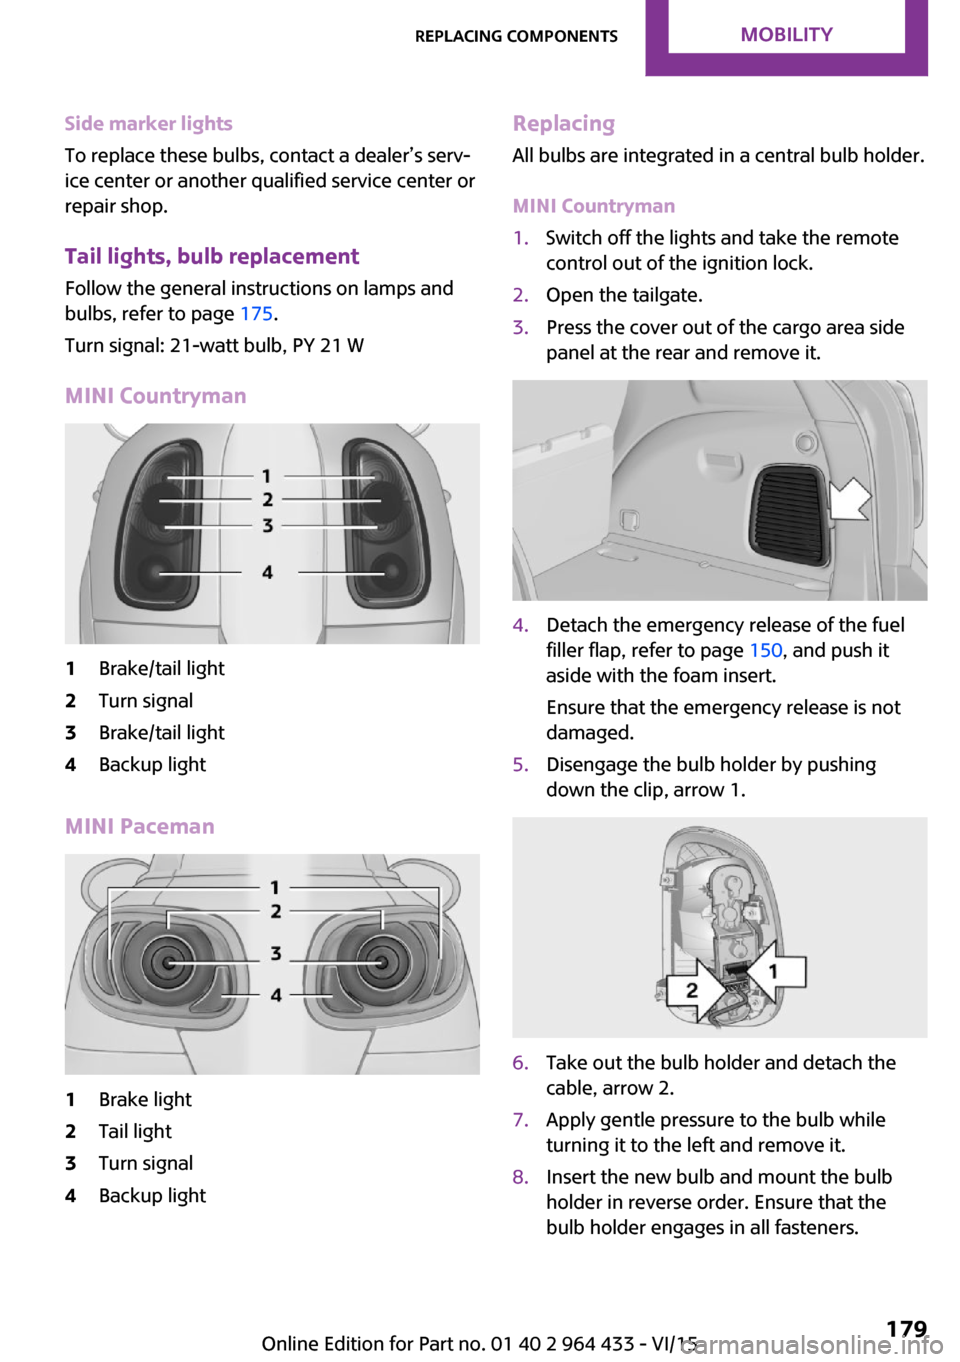
MINI Countryman1Brake/tail light2Turn signal3Brake/tail light4Backup light
MINI Paceman
1Brake light2Tail light3Turn signal4Backup lightReplacing
All bulbs are integrated in a central bulb holder.
MINI Countryman1.Switch off the lights and take the remote
control out of the ignition lock.2.Open the tailgate.3.Press the cover out of the cargo area side
panel at the rear and remove it.4.Detach the emergency release of the fuel
filler flap, refer to page 150, and push it
aside with the foam insert.
Ensure that the emergency release is not
damaged.5.Disengage the bulb holder by pushing
down the clip, arrow 1.6.Take out the bulb holder and detach the
cable, arrow 2.7.Apply gentle pressure to the bulb while
turning it to the left and remove it.8.Insert the new bulb and mount the bulb
holder in reverse order. Ensure that the
bulb holder engages in all fasteners.Seite 179Replacing componentsMOBILITY179
Online Edition for Part no. 01 40 2 964 433 - VI/15
Page 181 of 223
MINI Paceman1.Push the light to the left in the catch of the
light housing using the screwdriver, ar‐
row 1.2.Take out the light, arrow 2.3.Replace the bulb.4.Insert the light.
Center brake light
This light uses LED technology for operation. In
case of a malfunction, contact a dealer’s service
center or another qualified service center or re‐
pair shop.
Changing wheels InformationThe vehicle may be equipped with conven‐tional tires with the Mobility System, refer to
page 162, or with run-flat tires, refer to
page 162.
No spare tire is available in the case of a flat
tire.
The suitable tools for changing wheels are
available as accessories from a dealer’s service
center or another qualified service center or re‐
pair shop.
Safety measures
▷Park the vehicle as far as possible from
passing traffic and on solid ground. Switch
on the hazard warning system.▷Set the parking brake and move the selec‐
tor lever to position P.▷Have all vehicle occupants get out of the
vehicle and ensure that they remain out‐
side the immediate area in a safe place,
such as behind a guardrail.▷If a warning triangle or portable hazard
warning lamp is required, set it up on the
roadside at an appropriate distance from
the rear of the vehicle.▷Change the wheel only on a level, firm sur‐
face which is not slippery. The vehicle or
the jack could slip to the side if you attempt
to raise the vehicle on a soft or slippery sur‐
face such as snow, ice, tiles, etc.▷Do not use a wooden block or similar object
as a support base for the jack, as this would
prevent it from extending to its full support
height and reduce its load-carrying ca‐
pacity.▷To avoid serious or fatal injury: never lie un‐
der the vehicle, and never start the engine
while it is supported by the jack.
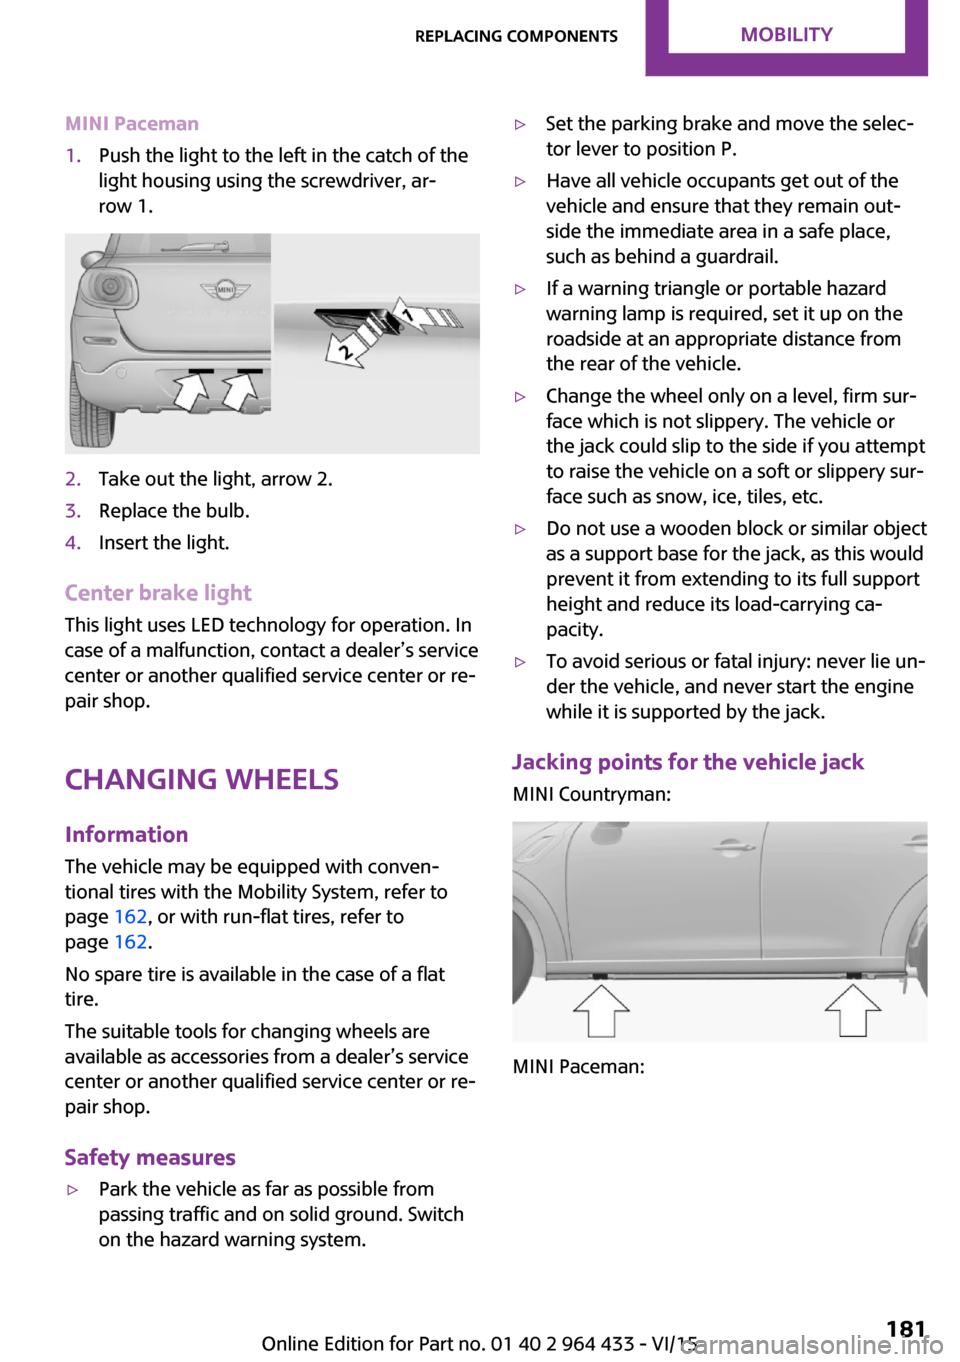
Jacking points for the vehicle jack
MINI Countryman:
MINI Paceman:
Seite 181Replacing componentsMOBILITY181
Online Edition for Part no. 01 40 2 964 433 - VI/15
Page 182 of 223
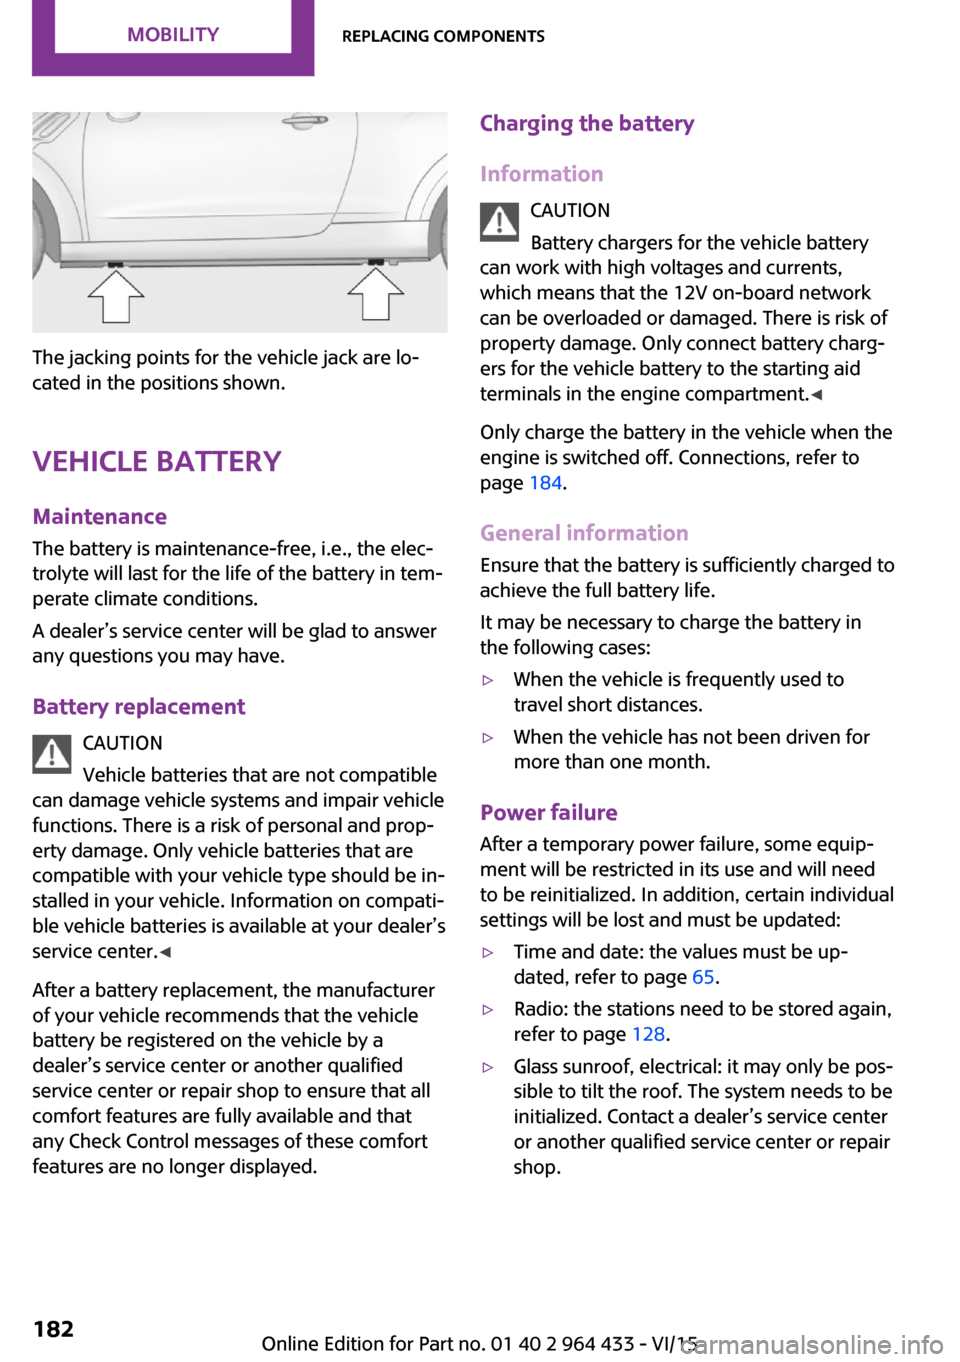
The jacking points for the vehicle jack are lo‐
cated in the positions shown.
Vehicle battery Maintenance
The battery is maintenance-free, i.e., the elec‐
trolyte will last for the life of the battery in tem‐
perate climate conditions.
A dealer’s service center will be glad to answer
any questions you may have.
Battery replacement CAUTION
Vehicle batteries that are not compatible
can damage vehicle systems and impair vehicle
functions. There is a risk of personal and prop‐
erty damage. Only vehicle batteries that are
compatible with your vehicle type should be in‐
stalled in your vehicle. Information on compati‐
ble vehicle batteries is available at your dealer’s
service center. ◀
After a battery replacement, the manufacturer
of your vehicle recommends that the vehicle
battery be registered on the vehicle by a
dealer’s service center or another qualified
service center or repair shop to ensure that all
comfort features are fully available and that
any Check Control messages of these comfort
features are no longer displayed.
Charging the battery
Information CAUTION
Battery chargers for the vehicle battery
can work with high voltages and currents, which means that the 12V on-board network
can be overloaded or damaged. There is risk of
property damage. Only connect battery charg‐
ers for the vehicle battery to the starting aid
terminals in the engine compartment. ◀
Only charge the battery in the vehicle when the
engine is switched off. Connections, refer to
page 184.
General information
Ensure that the battery is sufficiently charged to
achieve the full battery life.
It may be necessary to charge the battery in
the following cases:▷When the vehicle is frequently used to
travel short distances.▷When the vehicle has not been driven for
more than one month.
Power failure
After a temporary power failure, some equip‐
ment will be restricted in its use and will need
to be reinitialized. In addition, certain individual
settings will be lost and must be updated:
▷Time and date: the values must be up‐
dated, refer to page 65.▷Radio: the stations need to be stored again,
refer to page 128.▷Glass sunroof, electrical: it may only be pos‐
sible to tilt the roof. The system needs to be
initialized. Contact a dealer’s service center
or another qualified service center or repair
shop.Seite 182MOBILITYReplacing components182
Online Edition for Part no. 01 40 2 964 433 - VI/15
Page 183 of 223

Disposing of old batteriesAfter they are replaced, have old bat‐teries disposed of by a dealer’s service
center or another qualified service cen‐
ter or repair shop or take them to a collection
point.
Maintain the battery in an upright position for
transport and storage. Secure the battery so
that it does not tip over during transport.
Fuses WARNING
Incorrect and repaired fuses can overload
electrical lines and components. There is risk of
fire. Never attempt to repair a blown fuse and
do not replace a nonworking fuse with a substi‐ tute of another color or amperage rating. ◀
Have the fuses replaced by a dealer’s service
center or another qualified service center or re‐
pair shop.
Information on the fuses can be found on the
inside of the covers.
In the engine compartment
Opening the cover
Press the snap lock.
In interior
On the right side of the footwell.
Opening the cover
Push out at the recess.
Seite 183Replacing componentsMOBILITY183
Online Edition for Part no. 01 40 2 964 433 - VI/15
Page 184 of 223
Breakdown assistanceVehicle features and op‐
tions
This chapter describes all standard, country-
specific and optional features offered with the
series. It also describes features that are not
necessarily available in your car, e. g., due to
the selected options or country versions. This
also applies to safety-related functions and sys‐
tems.
When using the features and systems described
here, adhere to local regulations.
Hazard warning flash‐
ers
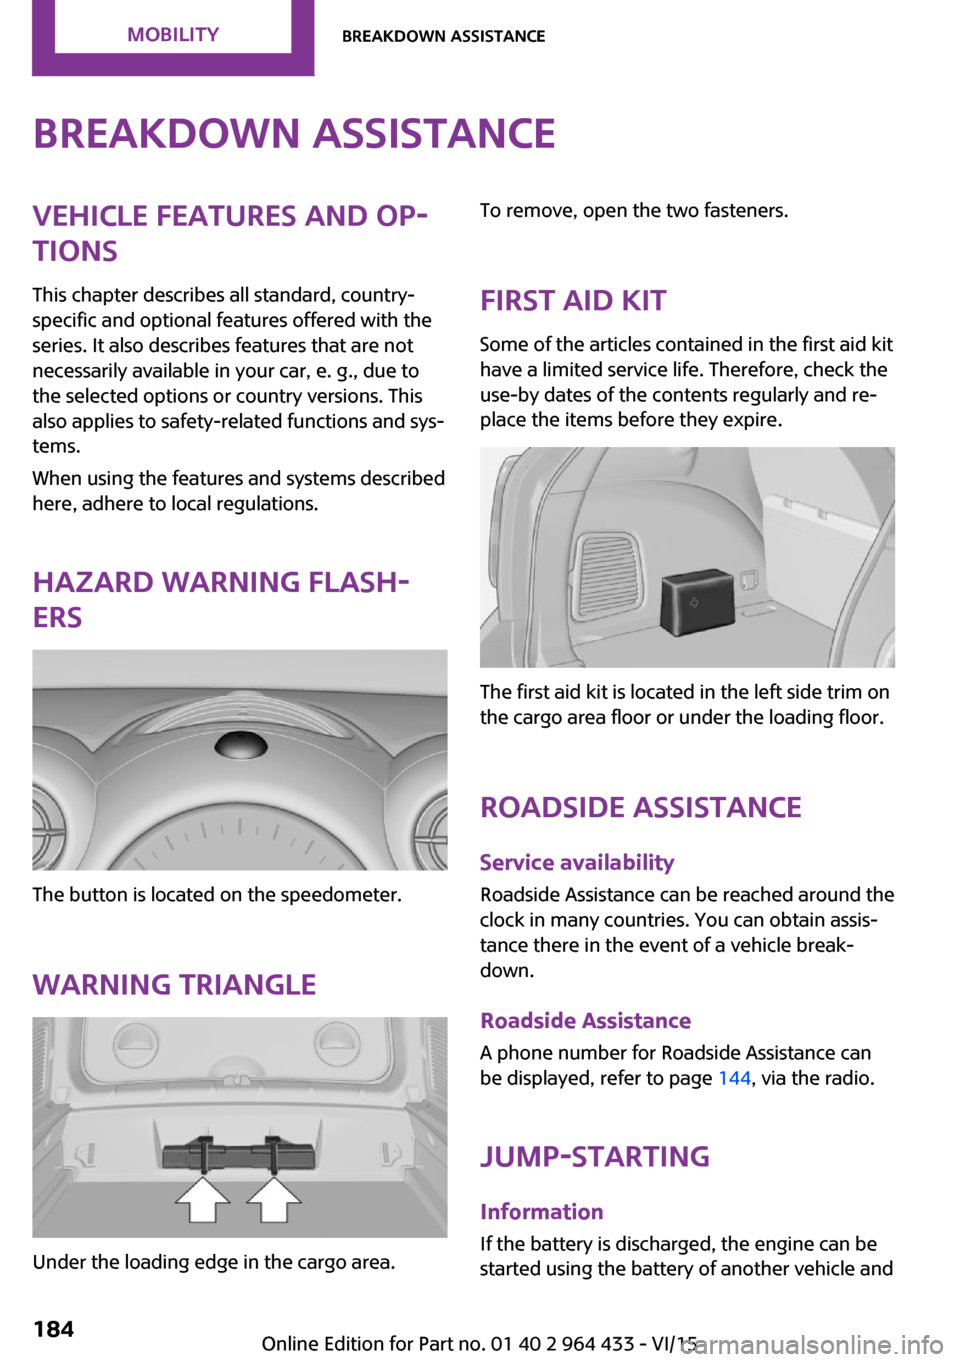
The button is located on the speedometer.
Warning triangle
Under the loading edge in the cargo area.
To remove, open the two fasteners.
First aid kit Some of the articles contained in the first aid kit
have a limited service life. Therefore, check the
use-by dates of the contents regularly and re‐
place the items before they expire.
The first aid kit is located in the left side trim on
the cargo area floor or under the loading floor.
Roadside Assistance Service availability
Roadside Assistance can be reached around the
clock in many countries. You can obtain assis‐
tance there in the event of a vehicle break‐
down.
Roadside Assistance A phone number for Roadside Assistance can
be displayed, refer to page 144, via the radio.
Jump-starting InformationIf the battery is discharged, the engine can be
started using the battery of another vehicle and
Seite 184MOBILITYBreakdown assistance184
Online Edition for Part no. 01 40 2 964 433 - VI/15
Page 192 of 223
Correcting paint damage
Depending on the severity of the damage, re‐
pair stone impact damage or scratches imme‐
diately to prevent rust formation.
The manufacturer recommends having paint
damage corrected with a professional repair
paint job according to factory specifications us‐
ing original MINI paint materials.
Preservation Preservation is needed when water no longer
beads off of the clean paint surfaces. Only use
paint preservation products that contain car‐
nauba or synthetic waxes.
Caring for matte finishes
Only use cleaning and care products suitable
for vehicles with matte finish. These are availa‐
ble from a dealer’s service center or another
qualified service center or repair shop.
Leather care
The leather processed by the manufacturer is a
high quality natural product. Light graininess is
a typical feature of natural leather.
Particles of dust and road grime chafe in pores
and folds, and lead to increased wear and pre‐
mature degradation of the leather surface.
Therefore, remove dust from the leather regu‐
larly, using a cloth or vacuum cleaner.
Make especially sure that light-colored leather
is cleaned regularly as it is more susceptible to
soiling.
Twice a year, treat the leather with a leather lo‐
tion as dirt and grease will attack the protective
layer of the leather.
Upholstery material care
Vacuum regularly with a vacuum cleaner to re‐
move superficial soiling.
In case of heavy soiling, e.g., beverage stains,
use a soft sponge or lint-free microfiber cloth incombination with a suitable interior cleaner.
Follow the instructions on the container.
Clean the upholstery material down to the
seams using large sweeping motions. Avoid
rubbing the material vigorously.
CAUTION
Open Velcro® fasteners on articles of
clothing can damage the seat covers. There is risk of property damage. Ensure that any Vel‐
cro® fasteners are closed. ◀
Caring for special components Interior plastic parts
These include:▷Imitation leather surfaces▷Lamp lenses▷Indicator covers▷Matte components
Clean with water and a solvent-free plastic
cleaner if necessary.
Rubber seals
Only treat with water or a rubber care product.
When cleaning rubber seals, do not use silicone
sprays or other care products containing sili‐
cone; otherwise, noise and damage may result.
Chrome surfaces Carefully clean components such as the radia‐
tor grille or door handles with an ample supply
of water, possibly with shampoo added, partic‐
ularly when they have been exposed to road
salt. For additional treatment, use a chrome
polish.
Light-alloy wheels
When cleaning the wheels on the vehicle, only
use a neutral wheel rim cleaner with a pH value
of 5 to 9.
Seite 192MOBILITYCare192
Online Edition for Part no. 01 40 2 964 433 - VI/15
Page 193 of 223

Do not use abrasive cleaners or a steam jet hot‐
ter than 140 ℉/60 ℃; otherwise, damage may
result. Adhere to the manufacturer instructions.
Aggressive, acidic, or alkaline cleaners may de‐
stroy the protective coating of neighboring
components such as the brake disc.
Exterior sensors The sensors on the outside of the vehicle, such
as for Park Distance Control, must be kept clean
and free of ice to ensure that they remain fully
functional.
Decorative trim
Clean decorative trims and fine wood compo‐
nents with a moist cloth only. Then dry with a
soft cloth.
Safety belts Dirty belt straps impede the reeling action and
thus have a negative impact on safety.
WARNING
Chemical cleansers can destroy the safety
belt webbing. Missing protective effect of the
safety belts. There is risk of injuries or danger to
life. Use only a mild soapy solution for cleaning
the safety belts. ◀
Carpets/floor mats WARNING
Objects in the driver's floor area can limit
the pedal distance or block a depressed pedal.
There is risk of an accident. Stow objects in the
vehicle such that they are secured and cannot
enter into the driver's floor area. Use floor mats
that are suitable for the vehicle and can be
safely attached to the floor. Do not use loose
floor mats and do not layer several floor mats.
Make sure that there is sufficient clearance for
the pedals. Ensure that the floor mats are se‐
curely fastened again after they were removed,
e.g. for cleaning. ◀
Floor mats can be removed for cleaning.If they are very dirty, clean with a microfiber
cloth and water or an interior cleaner. To pre‐
vent matting of the carpet, rub back and forth
in the direction of travel only.
Displays
To clean the displays, such as the radio or dis‐
play elements, use an antistatic microfiber
cloth.
CAUTION
Chemical cleansers, moisture or fluids of
any kind can damage the surface of displays
and screens. There is risk of property damage.
Clean with a clean, antistatic microfiber cloth. ◀
CD/DVD drives CAUTION
The use of cleaning CDs may damage
parts of the drive. There is risk of property dam‐
age. Do not use cleaning CDs. ◀
Long-term vehicle storage
A dealer's service center or another qualified
service center or repair shop can advise you on
what to consider when storing the vehicle for
longer than three months.Seite 193CareMOBILITY193
Online Edition for Part no. 01 40 2 964 433 - VI/15
Page 195 of 223
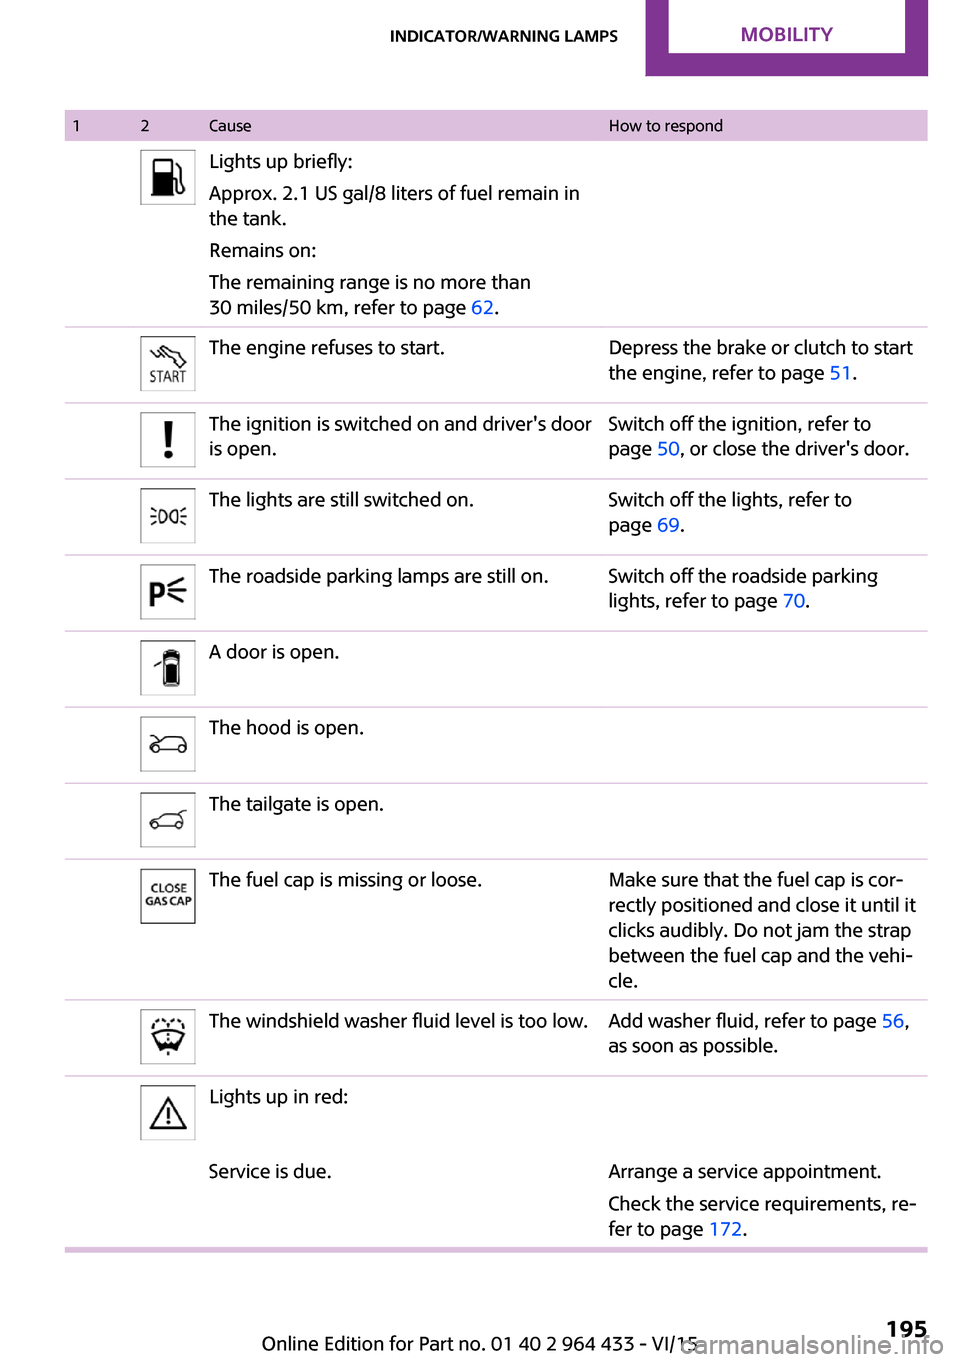
12CauseHow to respondLights up briefly:
Approx. 2.1 US gal/8 liters of fuel remain in
the tank.
Remains on:
The remaining range is no more than
30 miles/50 km, refer to page 62.The engine refuses to start.Depress the brake or clutch to start
the engine, refer to page 51.The ignition is switched on and driver's door
is open.Switch off the ignition, refer to
page 50, or close the driver's door.The lights are still switched on.Switch off the lights, refer to
page 69.The roadside parking lamps are still on.Switch off the roadside parking
lights, refer to page 70.A door is open.The hood is open.The tailgate is open.The fuel cap is missing or loose.Make sure that the fuel cap is cor‐
rectly positioned and close it until it
clicks audibly. Do not jam the strap
between the fuel cap and the vehi‐
cle.The windshield washer fluid level is too low.Add washer fluid, refer to page 56,
as soon as possible.Lights up in red:Service is due.Arrange a service appointment.
Check the service requirements, re‐
fer to page 172.Seite 195Indicator/warning lampsMOBILITY195
Online Edition for Part no. 01 40 2 964 433 - VI/15