ECO mode MITSUBISHI ASX 2012 (in English) Manual PDF
[x] Cancel search | Manufacturer: MITSUBISHI, Model Year: 2012, Model line: ASX, Model: MITSUBISHI ASX 2012Pages: 378, PDF Size: 18.2 MB
Page 158 of 378
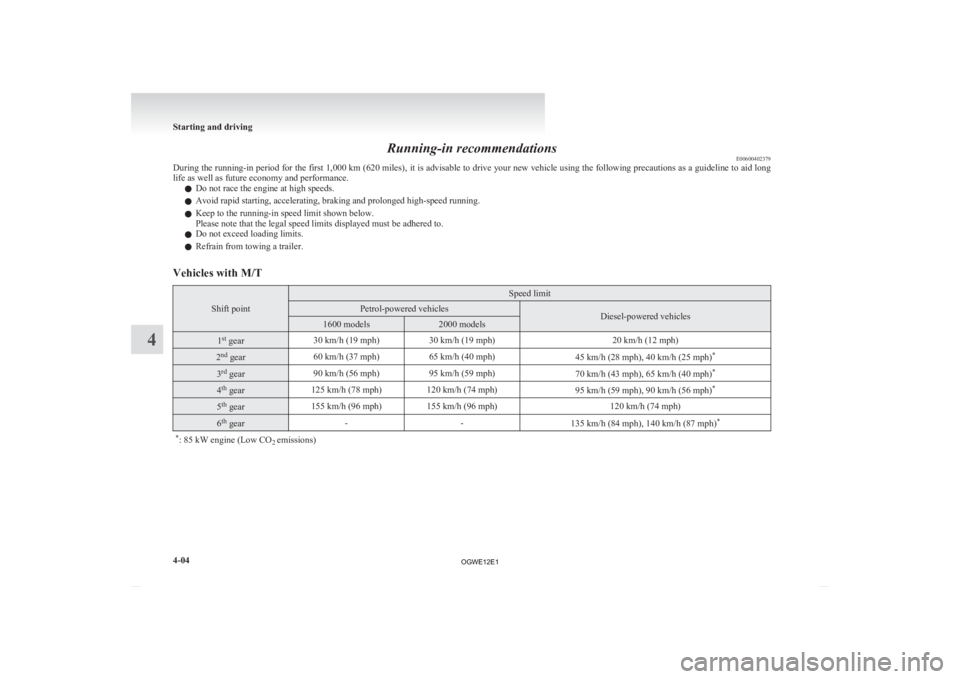
Running-in recommendations
E00600402379
During
the running-in period for the first 1,000 km (620 miles), it is advisable to drive your new vehicle using the following precautions as a guideline to aid long
life as well as future economy and performance.
l Do not race the engine at high speeds.
l Avoid rapid starting, accelerating, braking and prolonged high-speed running.
l Keep to the running-in speed limit shown below.
Please note that the legal speed limits displayed must be adhered to.
l Do not exceed loading limits.
l Refrain from towing a trailer.
Vehicles with M/T Shift point Speed limit
Petrol-powered vehicles
Diesel-powered vehicles
1600 models 2000 models
1
st
gear 30 km/h (19 mph)
30 km/h (19 mph) 20 km/h (12 mph)2
nd
gear 60 km/h (37 mph)
65 km/h (40 mph)
45 km/h (28 mph), 40 km/h (25 mph)*3
rd
gear 90 km/h (56 mph)
95 km/h (59 mph)
70 km/h (43 mph), 65 km/h (40 mph)*4
th
gear 125 km/h (78 mph) 120 km/h (74 mph)
95 km/h (59 mph), 90 km/h (56 mph)*5
th
gear 155 km/h (96 mph) 155 km/h (96 mph)
120 km/h (74 mph)6
th
gear -
-
135 km/h (84 mph), 140 km/h (87 mph) *
* : 85 kW engine (Low CO 2 emissions) Starting and driving
4-04
4
OGWE12E1
Page 165 of 378
CAUTION
l
Do not drive the vehicle with the mirror
folded in.
The lack of rearward visibility normally
provided by the mirror could lead to an
accident.
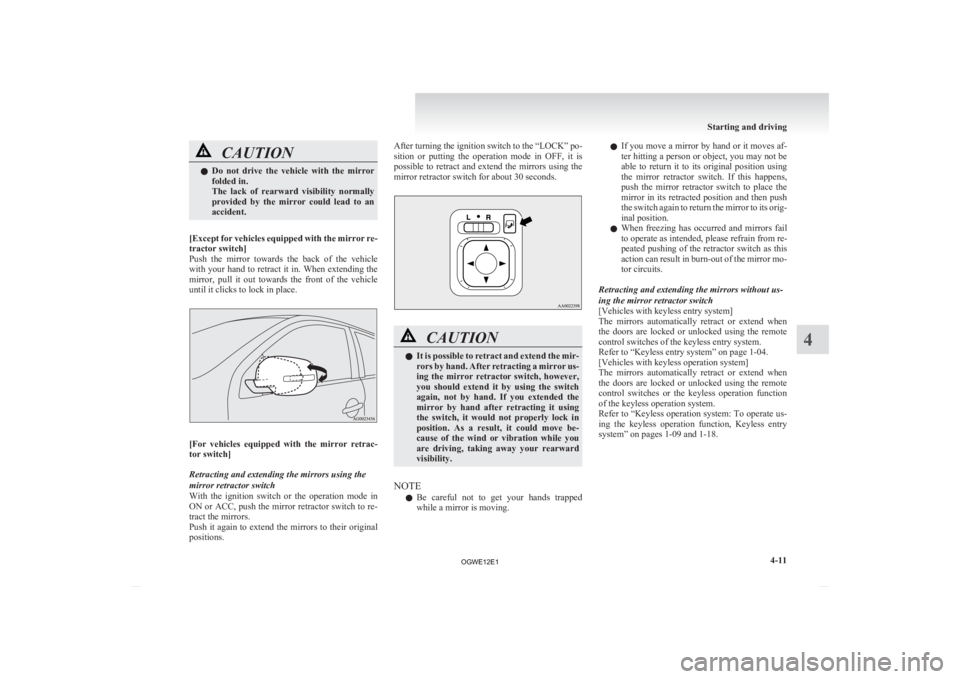
[Except
for vehicles equipped with the mirror re-
tractor switch]
Push the mirror towards the back of the vehicle
with your hand to retract it in. When extending the
mirror, pull it out towards the front of the vehicle
until it clicks to lock in place. [For
vehicles equipped with the mirror retrac-
tor switch]
Retracting and extending the mirrors using the
mirror retractor switch
With the ignition switch or the operation mode in
ON or ACC, push the mirror retractor switch to re-
tract the mirrors.
Push it again to extend the mirrors to their original
positions. After turning the ignition switch to the “LOCK” po-
sition
or putting the operation mode in OFF, it is
possible to retract and extend the mirrors using the
mirror retractor switch for about 30 seconds. CAUTION
l
It
is possible to retract and extend the mir-
rors by hand. After retracting a mirror us-
ing the mirror retractor switch, however,
you should extend it by using the switch
again, not by hand. If you extended the
mirror by hand after retracting it using
the switch, it would not properly lock in
position. As a result, it could move be-
cause of the wind or vibration while you
are driving, taking away your rearward
visibility.
NOTE l Be
careful not to get your hands trapped
while a mirror is moving. l
If
you move a mirror by hand or it moves af-
ter hitting a person or object, you may not be
able to return it to its original position using
the mirror retractor switch. If this happens,
push the mirror retractor switch to place the
mirror in its retracted position and then push
the switch again to return the mirror to its orig-
inal position.
l When freezing has occurred and mirrors fail
to operate as intended, please refrain from re-
peated pushing of the retractor switch as this
action can result in burn-out of the mirror mo-
tor circuits.
Retracting and extending the mirrors without us-
ing the mirror retractor switch
[Vehicles with keyless entry system]
The mirrors automatically retract or extend when
the doors are locked or unlocked using the remote
control switches of the keyless entry system.
Refer to “Keyless entry system” on page 1-04.
[Vehicles with keyless operation system]
The mirrors automatically retract or extend when
the doors are locked or unlocked using the remote
control switches or the keyless operation function
of the keyless operation system.
Refer to “Keyless operation system: To operate us-
ing the keyless operation function, Keyless entry
system” on pages 1-09 and 1-18. Starting and driving
4-11 4
OGWE12E1
Page 170 of 378
NOTE
l If
the engine is cold, the diesel preheat indi-
cation lamp is on for a longer time.
l When the engine has not been started within
about 5 seconds after the diesel preheat indi-
cation lamp went out, return the ignition key
to the “LOCK” position. Then, turn the key
to the “ON” position to preheat the engine
again.
l When the engine is warm, the diesel preheat
indication lamp does not come on even if the
ignition key is placed in the “ON” position.
Start the engine by turning the ignition key
right to the “START” position.
7. Turn the ignition key to the “START” posi- tion without depressing the accelerator pedal,
and release it when the engine starts.
NOTE l Minor noises may be heard on engine start-
up. These will disappear as the engine warms
up.
Using the MIVEC engine*
The MIVEC engine automatically switches its in-
take-valve control between a low-speed mode and
a high-speed mode in accordance with driving con-
ditions for maximum engine performance.
NOTE l To protect the engine, the high-speed mode
may not be selected while the engine coolant
temperature is low. Fuel injection amount learning proc-
ess (diesel-powered vehicles)
E00627900043
To
keep exhaust emissions and engine noise low,
the engine very occasionally performs a learning
process for the fuel injection amount.
The engine sounds slightly different from usual
while the learning process is taking place. The
change in the engine sound does not indicate a fault. Diesel particulate filter (DPF)*
E00619800245
The
diesel particulate filter (DPF) is a device that
captures most of the particulate matter (PM) in the
exhaust emissions of the diesel engine. The DPF au-
tomatically burns away trapped PM during vehicle
operation. Under certain driving conditions, howev-
er, the DPF is not able to burn away all of the trap-
ped PM and, as a result, an excessive amount of
PM accumulates inside it. WARNING
l The DPF reaches very high temperatures.
Do
not park your vehicle in areas where
combustible materials such as dry grass
or leaves can come in contact with a hot
exhaust system since a fire could occur. CAUTION
l
Do
not use any type of fuel or engine oil
that is not specified for your vehicle. Al-
so, do not use any moisture-removing
agent or other fuel additive. Such substan-
ces could have a detrimental effect on the
DPF.
Refer to “Fuel selection” on page 02 and
“Engine oil” on page 8-04.
NOTE l To
minimize the likelihood of excessive ac-
cumulation of PM, try to avoid driving for
long periods at low speeds and repeatedly
driving short distances. Starting and driving
4-16
4
OGWE12E1
Page 174 of 378
gine will not stop automatically even if the ve-
hicle is stopped.
•
Driver’s seat belt is not fastened
• Bonnet is open
• After the engine restarts automatically, the vehicle speed has not exceeded ap-
proximately 5 km/h (3 mph)
• Brake booster vacuum pressure is low be- cause the brake pedal is depressed repeat-
edly or depressed harder than usual
• After the ignition switch is turned from the “ON” position to the “START” posi-
tion, approximately 30 seconds or more
have not elapsed.
• After the engine restarts automatically and the vehicle stops again within 10 sec-
onds.
• After presing the engine switch to start the engine from the operation mode is in
ON, approximately 30 seconds or more
have not elapsed
• Engine coolant temperature is low
• Ambient temperature is lower than ap- proximately 3 °C
• Air conditioning is operating and passen- ger compartment has not sufficiently
cooled
• Mode selection dial is set to the demister position.
Refer to “Demisting of the windscreen
and door windows: For quick demisting”
on page 5-08.
• When the air conditioning is operated in AUTO mode where the temperature con-
trol dial is set to the max. hot or the max.
cool position (for vehicles with automatic
air conditioning). • Electric power consumption is high, such
as when the rear window demister or oth-
er electrical components are operating or
the blower speed is set to a high setting.
• Battery voltage or battery performance is low
• Check engine warning lamp is illumina-
ted or the “ ”
display/indicator is blinking
l If the Auto Stop & Go (AS&G) system oper-
ates while the air conditioning is operating,
both the engine and the air conditioning com-
pressor will stop. Therefore, only the blower
will operate.
l If the demisting function and the Auto Stop
& Go (AS&G) system are needed at the
same time, it is recommended to set the
mode selection dial to the Foot/demister posi-
tion.
Refer to “Mode selection dial” on page
5-02.
l If the air conditioning is operating, set the
temperature control dial higher to lengthen
the time that the engine is stopped automati-
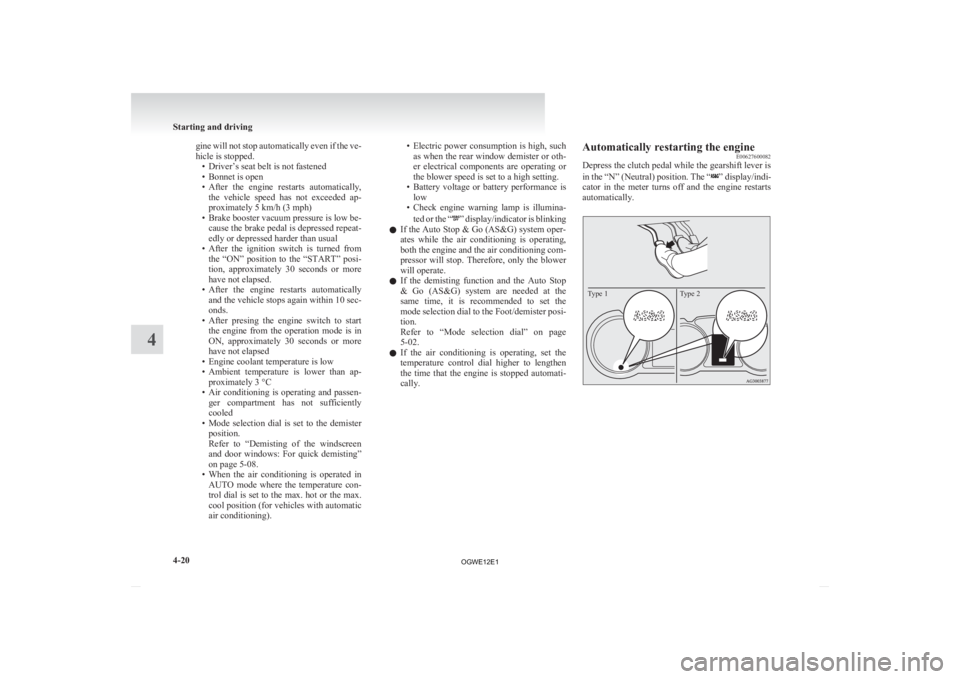
cally. Automatically restarting the engine
E00627600082
Depress the clutch pedal while the gearshift lever is
in
the “N” (Neutral) position. The “ ” display/indi-
cator
in the meter turns off and the engine restarts
automatically.
Type 2
Type 1 Starting and driving
4-20
4
OGWE12E1
Page 175 of 378
NOTE
l If the engine does not restart automatically or
if
the engine stalls, the oil pressure warning
lamp, charge warning lamp, and check en-
gine warning lamp will illuminate.
If this occurs, the engine will not restart even
if the clutch pedal is depressed again. While
depressing the brake pedal, fully depress the
clutch pedal and turn the ignition switch to
the “START” position to start the engine.
For details, refer to “Starting and stopping
the engine” on page 1-15 or “Starting” on
page 4-14. CAUTION
l
In
the following cases, the engine will re-
start automatically even if the engine was
stopped by the Auto Stop & Go (AS&G)
system. Pay attention, otherwise an unex-
pected accident might occur when the en-
gine restarts. • Vehicle speed is 3 km/h (2 mph) orhigher when coasting down a slope
• Brake booster vacuum pressure is low because the brake pedal is depressed
repeatedly or depressed harder than
usual
• Engine coolant temperature is low
• When the air conditioning is operated by pressing the air conditioning switch.
• When the preset temperature of the air conditioning is changed significant-
ly. CAUTION
• When
the air conditioning is operated
in AUTO mode where the tempera-
ture control dial is set to the max. hot
or the max. cool position (for vehicles
with automatic air conditioning).
• When the air conditioning is ON, the passenger compartment temperature
rises and the air conditioning compres-
sor operates to lower the temperature.
• Mode selection dial is set to the demis- ter position.
Refer to “Demisting of the windscreen
and door windows: For quick demist-
ing” on page 5-08
• Electric power consumption is high, such as when the rear window demis-
ter or other electrical components are
operating or the blower speed is set to
a high setting.
NOTE l If
the “Auto Stop & Go (AS&G) OFF”
switch is pressed to deactivate the Auto Stop
& Go (AS&G) system while the engine is
stopped automatically, the engine will not re-
start automatically even if the clutch pedal is
depressed.
l When the engine restarts automatically, the
audio volume may temporarily decrease.
This does not indicate a malfunction.
l When the engine is stopped automatically,
the air conditioning may temporarily change
the air volume.
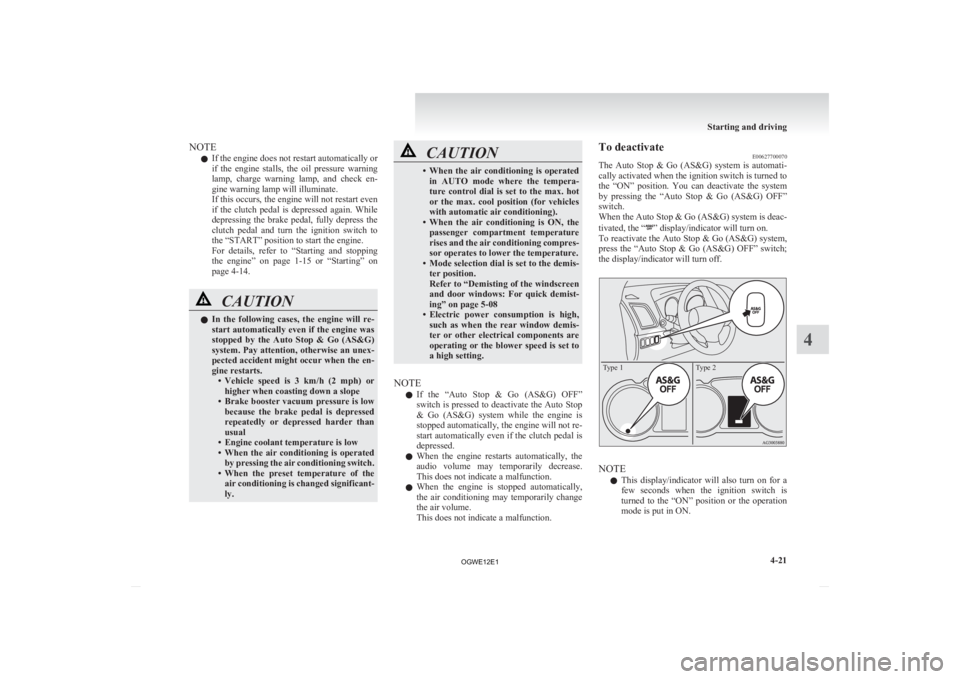
This does not indicate a malfunction. To deactivate
E00627700070
The
Auto Stop & Go (AS&G) system is automati-
cally activated when the ignition switch is turned to
the “ON” position. You can deactivate the system
by pressing the “Auto Stop & Go (AS&G) OFF”
switch.
When the Auto Stop & Go (AS&G) system is deac-
tivated, the “ ” display/indicator will turn on.
To
reactivate the Auto Stop & Go (AS&G) system,
press the “Auto Stop & Go (AS&G) OFF” switch;
the display/indicator will turn off.
Type 1 Type 2 NOTE
l This
display/indicator will also turn on for a
few seconds when the ignition switch is
turned to the “ON” position or the operation
mode is put in ON. Starting and driving
4-21 4
OGWE12E1
Page 178 of 378
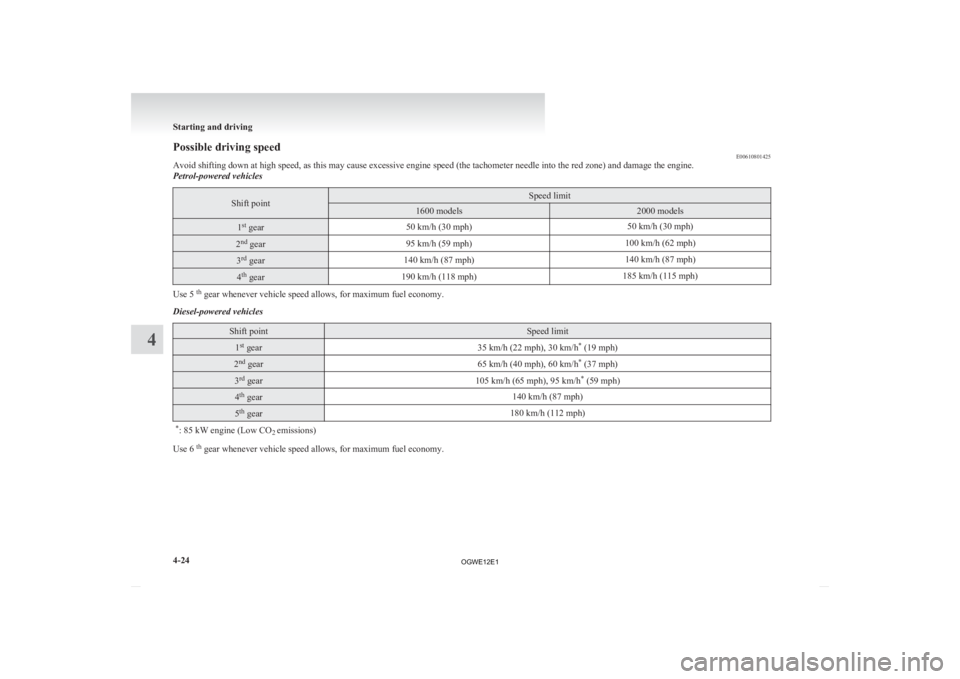
Possible driving speed
E00610801425
Avoid shifting down at high speed, as this may cause excessive engine speed (the tachometer needle into the red zone) and damage the engine.
Petrol-powered vehicles Shift point Speed limit
1600 models 2000 models
1
st
gear 50 km/h (30 mph) 50 km/h (30 mph)2
nd
gear 95 km/h (59 mph) 100 km/h (62 mph)3
rd
gear 140 km/h (87 mph) 140 km/h (87 mph)4
th
gear 190 km/h (118 mph) 185 km/h (115 mph)Use 5
th
gear whenever vehicle speed allows, for maximum fuel economy.
Diesel-powered vehicles Shift point Speed limit
1
st
gear 35 km/h (22 mph), 30 km/h*
(19 mph) 2
nd
gear 65 km/h (40 mph), 60 km/h*
(37 mph) 3
rd
gear 105 km/h (65 mph), 95 km/h*
(59 mph) 4
th
gear 140 km/h (87 mph)5
th
gear 180 km/h (112 mph)
* : 85 kW engine (Low CO 2 emissions) Use 6
th
gear whenever vehicle speed allows, for maximum fuel economy. Starting and driving
4-24
4
OGWE12E1
Page 181 of 378
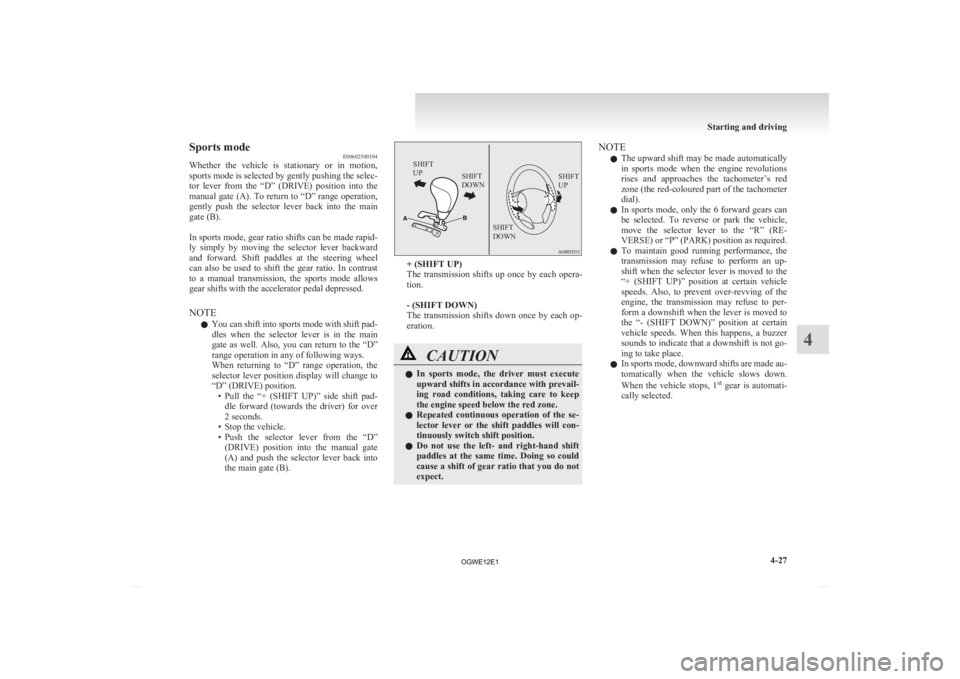
Sports mode
E00602500194
Whether
the vehicle is stationary or in motion,
sports mode is selected by gently pushing the selec-
tor lever from the “D” (DRIVE) position into the
manual gate (A). To return to “D” range operation,
gently push the selector lever back into the main
gate (B).
In sports mode, gear ratio shifts can be made rapid-
ly simply by moving the selector lever backward
and forward. Shift paddles at the steering wheel
can also be used to shift the gear ratio. In contrast
to a manual transmission, the sports mode allows
gear shifts with the accelerator pedal depressed.
NOTE
l You can shift into sports mode with shift pad-
dles when the selector lever is in the main
gate as well. Also, you can return to the “D”
range operation in any of following ways.
When returning to “D” range operation, the
selector lever position display will change to
“D” (DRIVE) position.
• Pull the “+ (SHIFT UP)” side shift pad-dle forward (towards the driver) for over
2 seconds.
• Stop the vehicle.
• Push the selector lever from the “D” (DRIVE) position into the manual gate
(A) and push the selector lever back into
the main gate (B).
SHIFT
UP SHIFT
DOWN SHIFT
UP
SHIFT
DOWN + (SHIFT UP)
The
transmission shifts up once by each opera-
tion.
- (SHIFT DOWN)
The transmission shifts down once by each op-
eration. CAUTION
l
In
sports mode, the driver must execute
upward shifts in accordance with prevail-
ing road conditions, taking care to keep
the engine speed below the red zone.
l Repeated continuous operation of the se-
lector lever or the shift paddles will con-
tinuously switch shift position.
l Do not use the left- and right-hand shift
paddles at the same time. Doing so could
cause a shift of gear ratio that you do not
expect. NOTE
l The
upward shift may be made automatically
in sports mode when the engine revolutions
rises and approaches the tachometer’s red
zone (the red-coloured part of the tachometer
dial).
l In sports mode, only the 6 forward gears can
be selected. To reverse or park the vehicle,
move the selector lever to the “R” (RE-
VERSE) or “P” (PARK) position as required.
l To maintain good running performance, the
transmission may refuse to perform an up-
shift when the selector lever is moved to the
“+ (SHIFT UP)” position at certain vehicle
speeds. Also, to prevent over-revving of the
engine, the transmission may refuse to per-
form a downshift when the lever is moved to
the “- (SHIFT DOWN)” position at certain
vehicle speeds. When this happens, a buzzer
sounds to indicate that a downshift is not go-
ing to take place.
l In sports mode, downward shifts are made au-
tomatically when the vehicle slows down.
When the vehicle stops, 1 st
gear is automati-
cally selected. Starting and driving
4-27 4
OGWE12E1
Page 182 of 378
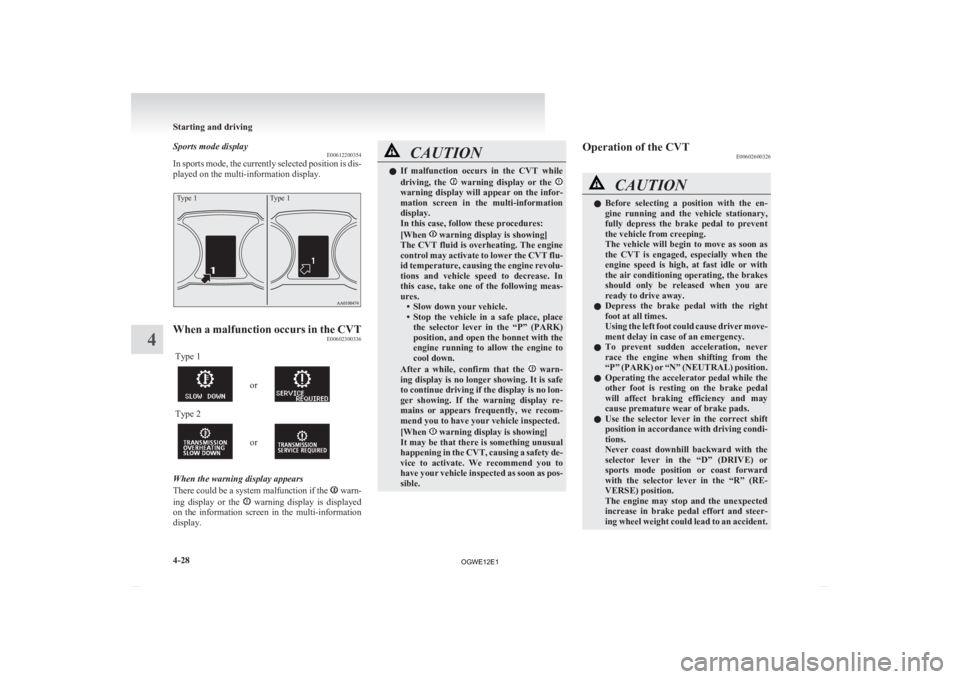
Sports mode display
E00612200354
In
sports mode, the currently selected position is dis-
played on the multi-information display.
Type 1 Type 1When a malfunction occurs in the CVT
E00602300336
Type 1 or
Type 2
or
When the warning display appears
There
could be a system malfunction if the warn-
ing
display or the warning display is displayed
on
the information screen in the multi-information
display. CAUTION
l
If
malfunction occurs in the CVT while
driving, the warning display or the
warning display will appear on the infor-
mation
screen in the multi-information
display.
In this case, follow these procedures:
[When warning display is showing]
The
CVT fluid is overheating. The engine
control may activate to lower the CVT flu-
id temperature, causing the engine revolu-
tions and vehicle speed to decrease. In
this case, take one of the following meas-
ures. • Slow down your vehicle.
• Stop the vehicle in a safe place, placethe selector lever in the “P” (PARK)
position, and open the bonnet with the
engine running to allow the engine to
cool down.
After a while, confirm that the warn-
ing
display is no longer showing. It is safe
to continue driving if the display is no lon-
ger showing. If the warning display re-
mains or appears frequently, we recom-
mend you to have your vehicle inspected.
[When warning display is showing]
It
may be that there is something unusual
happening in the CVT, causing a safety de-
vice to activate. We recommend you to
have your vehicle inspected as soon as pos-
sible. Operation of the CVT
E00602600326 CAUTION
l
Before
selecting a position with the en-
gine running and the vehicle stationary,
fully depress the brake pedal to prevent
the vehicle from creeping.
The vehicle will begin to move as soon as
the CVT is engaged, especially when the
engine speed is high, at fast idle or with
the air conditioning operating, the brakes
should only be released when you are
ready to drive away.
l Depress the brake pedal with the right
foot at all times.
Using the left foot could cause driver move-
ment delay in case of an emergency.
l To prevent sudden acceleration, never
race the engine when shifting from the
“P” (PARK) or “N” (NEUTRAL) position.
l Operating the accelerator pedal while the
other foot is resting on the brake pedal
will affect braking efficiency and may
cause premature wear of brake pads.
l Use the selector lever in the correct shift
position in accordance with driving condi-
tions.
Never coast downhill backward with the
selector lever in the “D” (DRIVE) or
sports mode position or coast forward
with the selector lever in the “R” (RE-
VERSE) position.
The engine may stop and the unexpected
increase in brake pedal effort and steer-
ing wheel weight could lead to an accident. Starting and driving
4-28
4
OGWE12E1
Page 183 of 378
CAUTION
l
Do not race the engine with brake pedal
pressed when the vehicle is stationary.
This can damage the CVT.
Also, when you depress the accelerator
pedal while holding down the brake ped-
al with the selector lever in the “D”
(DRIVE) position, the engine revolutions
may not rise as high as when performing
the same operation with the selector lever
in the “N” (NEUTRAL) position.
Passing acceleration E00602700109
To gain extra acceleration in “D” (DRIVE) posi-
tion,
push the accelerator to the floor. The CVT
will automatically downshift.
NOTE
l In “Sports mode”, downshifts do not take
place when the accelerator is depressed all
the way to the floor.
Uphill/downhill driving E00603000037
DRIVING UPHILL
The
transmission may not upshift to a higher shift
position if the computer determines the current
speed cannot be maintained once a higher shift po-
sition is engaged.
For smoother vehicle performance, if you release
the throttle while climbing a steep grade, the trans-
mission may not upshift.
This is normal, as the computer is temporarily pre-
venting shifting. After reaching the top of the hill,
normal shift function will resume. DRIVING DOWNHILL
When
travelling down steep grades, the computer
may automatically select a lower shift position.
This function assists engine braking efforts, reduc-
ing the need for using the service brakes.
Waiting E00602800126
For short waiting periods, such as at traffic signals
the
vehicle can be left in selector lever position and
held stationary with the service brake.
For longer waiting periods with the engine running,
place the selector lever in the “N” (NEUTRAL) po-
sition and apply the parking brake, while holding
the vehicle stationary with the service brake. CAUTION
l
Never
hold the vehicle stationary while in
CVT on a hill with the accelerator, al-
ways apply the parking brake and/or serv-
ice brake.
Parking E00602900039
To park the vehicle, first bring it to a complete
stop,
fully engage the parking brake, and then
move the selector lever to the “P” (PARK) position.
If you are going to leave the vehicle unattended, al-
ways switch off the engine and carry the key. NOTE
l On
a slope, be sure to apply the parking
brake before moving the selector lever to the
“P” (PARK) position. If you move the selec-
tor lever to the “P” (PARK) position before
applying the parking brake, it may be diffi-
cult to disengage the selector lever from the
“P” (PARK) position when next you drive
the vehicle, requiring application of a strong
force to the selector lever to move from the
“P” (PARK) position.
When the CVT makes no speed change E00603100139
If the transmission does not change speeds while
driving,
or your vehicle does not pick up enough
speed when starting on an uphill slope, it may be
that there is something unusual happening in the
transmission, causing a safety device to activate.
We recommend you to have your vehicle checked
as soon as possible. Starting and driving
4-29 4
OGWE12E1
Page 184 of 378
Electronically controlled 4WD
system* E00604900307
The
electronically controlled 4WD system is a 4-
wheel drive system that allows one of three drive
modes to be selected with a dial, in accordance
with the driving conditions.
The following drive modes are available. Drive mode Function
2WD This mode is for economical
driving on normal dry roads
and motorway.
Driving in front-wheel drive.
4WD AUTO The default mode.
This mode is for automatical-
ly controlling the distribution
of driving torque to all four
wheels according to the driv-
ing conditions.
4WD LOCK This mode is for driving in
slippery conditions such as
on snow-covered roads or
sand.
The large amount of driving
torque that is applied to the
rear tyres enables getting out
of slippery areas and power-
ful driving is possible across
all ranges.4-wheel drive operation requires special driving
skills.
Carefully
read the “4-wheel drive operation” on
page 4-32 and take care to drive safely. Drive mode-selector
The
drive mode can be switched by turning the dial
while the ignition switch or the operation mode is
in ON. 1- 2WD
2-
4WD AUTO
3- 4WD LOCK
The drive mode is displayed as an interrupt display
on the information screen in the multi-information
display when the drive mode is switched.
After a few seconds, the information screen returns
from the drive mode display to the previous screen. Drive mode Display
Type 1 Type 2
2WD 4WD AUTO
4WD LOCK
CAUTION
l
Do not operate the drive mode-selector
with the front wheels spinning on a
snowy road or in similar conditions. The
vehicle could lunge in an unexpected di-
rection.
l Driving on dry, paved roads in “4WD
LOCK” mode causes increased fuel con-
sumption and noise.
l Do not drive with the tyres spinning in
“2WD” mode.
Doing so could generate heat in the drive-
system components.
NOTE l The
drive mode can be switched while driv-
ing or stopped. Starting and driving
4-30
4
OGWE12E1