battery MITSUBISHI ASX 2014 (in English) Service Manual
[x] Cancel search | Manufacturer: MITSUBISHI, Model Year: 2014, Model line: ASX, Model: MITSUBISHI ASX 2014Pages: 418, PDF Size: 14.02 MB
Page 318 of 418
If the vehicle breaks downE00800101108
If the vehicle breaks down on the road, move it to the shoulder and turn on the hazard
warning flashers and set up a warning trian- gle, flashing lamp, etc.
Refer to “Hazard warning flasher switch” on
page 5-54.
If the engine stops/fails
Vehicle operation and control are affected if
the engine stops.
Before moving the vehicle to a safe area, be
aware of the following:
l The brake booster becomes inoperative
and the pedal effort will increase. Press down the brake pedal harder than usual.
l Since the power steering system is no
longer operative, the steering wheel feels
heavy when turning it.
Emergency starting
E00800502851
If the engine cannot be started because thebattery is weak or dead, the battery from an-other vehicle can be used with jumper cables to start the engine.
WARNINGl To start the engine using jumper cables
connected to another vehicle, perform the
correct procedures according to the in- struction below. Incorrect procedures could result in a fire or explosion or dam-
age to the vehicles.CAUTIONl Do not attempt to start the engine by pulling
or pushing the vehicle.
It could damage your vehicle.
l Always wear protective eye goggles when
working near the battery.
l Keep the battery out of the reach of children.
1.
Get the vehicles close enough so the
jumper cables can reach, but be sure the vehicles aren’t touching each other.
CAUTIONl Check the other vehicle. It must have a 12-
volt battery.
If the other system isn’t 12-volt, shorting can
damage both vehicles.
2. Turn off all lamps, heater and other elec-
trical loads.
3. Set the parking brake firmly on each ve-
hicle. Put an A/T, CVT in “P” (PARK)
or a M/T in “N” (Neutral).
4. Turn the ignition switch to the “LOCK”
position or put the operation mode in OFF.WARNINGl Perform step 4 on both vehicles before-
hand.
Make sure that the cables or your clothes cannot be caught by the fan or drive belt.
Personal injury could result.
5. Make sure battery electrolyte is at the
proper level.
Refer to “Battery” on page 10-08.
WARNINGl If electrolyte fluid is not visible, or ap-
pears to be frozen, Do Not Attempt Jump
Starting!
A battery might rupture or explode if the temperature is below the freezing point orif it is not filled to the proper level.
6. Connect one end of one jumper cable to
the positive (+) terminal of the dis-charged battery (A), and the other end to
the positive (+) terminal of the booster
battery (B).
If the vehicle breaks down
8-02 OGAE14E1For emergencies8
Page 319 of 418

Petrol-powered vehicles1600 models1800 models, 2000 modelsDiesel-powered vehicles
7.Connect one end of the other jumper ca-
ble to the negative (-) terminal of the
booster battery, and the other end to the engine block of the vehicle with the dis-
charged battery at the point farthest from the battery.
WARNINGl Make sure you observe the following or-
der when connecting the cables:
l Make sure you make connection to the
correct designated location (as shown in the illustration). If the connection is made
directly to the negative (-) side of the bat- tery, flammable gases generated from the
battery might catch fire and explode.
WARNINGl When connecting the jumper cables, do
not allow the positive (+) cable and nega-
tive (-) terminal to make contact. Other- wise sparks might cause explosion of the battery.CAUTIONl Take care not to get the jumper cable caught
in the cooling fan or other rotating part in
the engine compartment.
l Use the proper cables suitable for the battery
size to prevent overheating of the cables.
l Check the jumper cables for damage and
corrosion before use.
8. Start the engine in the vehicle which has
the booster battery, let the engine idle a
few minutes, then start the engine in the vehicle with the discharged battery.
CAUTIONl Keep the engine of the vehicle giving assis-
tance running.
Emergency starting
8-03
OGAE14E1For emergencies8
Page 320 of 418
NOTElFor vehicles equipped with the Auto Stop &
Go (AS&G) system, press the “Auto Stop &Go (AS&G) OFF” switch to deactivate theAuto Stop & Go (AS&G) system and pre- vent the engine from automatically stoppingbefore the battery is sufficiently charged.Refer to “To deactivate” on page 6-21.
9. After the engine is started, disconnect
the cables in the reverse order and keep
the engine running for several minutes.
WARNINGl If the battery has to be charged while fit-
ted in the vehicle, disconnect the vehicle side negative (-) terminal connected to the
battery.
l Keep sparks, cigarettes and flames away
from the battery because the battery may produce an explosion.
l Use adequate ventilation when charging
or using the battery in an enclosed space.
l Remove all the caps before charging the
battery.WARNINGl Electrolyte is corrosive diluted sulphuric
acid.
If electrolyte (battery acid) comes into contact with your hands, eyes, clothes and
the painted surface of your vehicle, it should be thoroughly flushed with water.If electrolyte gets in your eyes, flush them
with water immediately and thoroughly, and get prompt medical attention.NOTEl If the vehicle is put in motion without fully
charging the battery, it might cause the loss
of smooth engine operation and the anti-lock brake warning lamp to illuminate.
Refer to “Anti-lock brake system (ABS)” on
page 6-46.Engine overheating
E00800603761
When the engine is overheating, the informa-tion screen in the multi-information display
will be interrupted and the engine coolant
temperature warning display will appear. Al- so “
” will blink.
If this occurs, take the following corrective measures: 1. Stop the vehicle in a safe place.
2. Check whether steam is coming from the
engine compartment.
[If steam does not come from the engine
compartment]
With the engine still running, raise the
bonnet to ventilate the engine compart-
ment.NOTEl For vehicles equipped with the Auto Stop &
Go (AS&G) system, press the “Auto Stop &Go (AS&G) OFF” switch to deactivate theAuto Stop & Go (AS&G) system before stopping the vehicle.
Refer to “To deactivate” on page 6-21.
[If steam is coming from the engine
compartment]
Stop the engine, and when the steam
stops, raise the bonnet to ventilate the engine compartment. Restart the engine.
WARNINGl Do not open the bonnet while steam is
coming from the engine compartment. It
could cause steam or hot water to spurt out, causing burns. Hot water could spurt
out even when there is no steam coming out, and some parts will be very hot. Be
very careful when opening the bonnet.
Engine overheating
8-04 OGAE14E1For emergencies8
Page 347 of 418
Check body areas facing the road or the tyres
carefully for damage to the paint caused by gravels, etc. The paint code number for your
vehicle can be found on the vehicle informa- tion code plate in the engine compartment.Cleaning plastic parts
E00901300707
Use a sponge or chamois leather.
If a car wax adheres on a grey or black rough surface of the bumper, moulding or lamps, the surface becomes white. In such a case,
wipe it off using lukewarm water and soft cloth or chamois leather.
CAUTIONl Do not use a scrubbing brush or other hard
tools as they may damage the plastic part surface.
l Do not use wax containing compound (pol-
ishing powder) which may damage the plas-
tic part surface.
l Do not bring the plastic parts into contact
with petrol, light oil, brake fluids, engine
oils, greases, paint thinners, and sulphuric acid (battery electrolyte) which may crack,stain or discolour the plastic parts.
If they touch the plastic parts, wipe them off
with soft cloth, chamois or the like and an aqueous solution of neutral detergent thenimmediately rinse the affected parts with
water.Chrome parts
E00901400098
In order to prevent spots and corrosion of
chrome parts, wash with water, dry thorough-
ly, and apply a special protective coating.
This should be done more frequently in win- ter.
Aluminium wheels*
E00901500347
1. Remove dirt using a sponge while sprin-
kling water on the vehicle.
2. Use neutral detergent on any dirt that
cannot be removed easily with water.
Rinse off the neutral detergent after
washing the vehicle.
3. Dry the vehicle thoroughly using a cha-
mois leather or a soft cloth.
CAUTIONl Do not use a brush or other hard implement
on the wheels.
Doing so could scratch the wheels.
l Do not use any cleaner that contains an abra-
sive substance or is acidic or alkaline. Doing
so could cause the coating on the wheels to peel or become discoloured or stained.
l Do not directly apply hot water using a
steam cleaner or by any other means.
l Contact with seawater and road deicer can
cause corrosion. Rinse off such substances as soon as possible.Window glass
E00901600117
The window glass can normally be cleaned
using only a sponge and water.
Glass cleaner can be used to remove oil, grease, dead insects, etc. After washing the
glass, wipe dry with a clean, dry, soft cloth. Never use a cloth that is used for cleaning a
painted surface to clean a window. Wax from
the painted surface could get on the glass and lower glass transparency and visibility.
NOTEl To clean the inside of the rear window, al-
ways use a soft cloth and wipe the window
glass along the demister heater element so as not to cause damage.Wiper blades
E00901700062
Use a soft cloth and glass cleaner to remove
grease, dead insects, etc., from the wiper blades. Replace the wiper blades when they
no longer wipe properly. (Refer to page 10-16.)
Cleaning the exterior of your vehicle
9-05
OGAE14E1Vehicle care9
Page 348 of 418

Engine compartment
E00902100308
Clean the engine compartment at the begin-
ning and end of winter. Pay particular atten- tion to flanges, crevices and peripheral parts where dust containing road chemicals and
other corrosive materials might collect.
If salt and other chemicals are used on the roads in your area, clean the engine compart- ment at least every three months.
Never spray or splash water on the electrical
components in the engine compartment, as
this may cause damage.
Do not bring the nearby parts, the plastic parts and so on into contact with sulphuric
acid (battery electrolyte) which may crack,
stain or discolour them.
If they are in contact, wipe off with soft cloth, chamois or the like and an aqueous sol-
ution of neutral detergent then immediately rinse the affected parts with plenty of water.
Cleaning the exterior of your vehicle
9-06 OGAE14E1Vehicle care9
Page 349 of 418

Service precautions........................................................................... 10-02
Catalytic converter............................................................................ 10-02
Bonnet............................................................................................... 10-03
Engine oil.......................................................................................... 10-04 Engine coolant...................................................................................10-06
Washer fluid...................................................................................... 10-07
Brake fluid/Clutch fluid*.................................................................. 10-08
Battery............................................................................................... 10-08 Tyres..................................................................................................10-12Wiper blade rubber replacement....................................................... 10-16
General maintenance......................................................................... 10-18
For cold and snowy weather............................................................. 10-18
Fusible links...................................................................................... 10-19
Fuses..................................................................................................10-19
Replacement of lamp bulbs............................................................... 10-25Maintenance
OGAE14E110
Page 350 of 418

Service precautionsE01000102074
Adequate care of your vehicle at regular in- tervals serves to preserve the value and ap-
pearance as long as possible.
Maintenance items as described in this own- er’s manual can be performed by the owner.We recommend you to have the periodic in-
spection and maintenance performed by a MITSUBISHI MOTORS Authorized Service
Point or another specialist.In the event a malfunction or a problem is discovered, we recommend you to have it
checked and repaired. This section contains information on inspection maintenance pro- cedures that you can do yourself. Follow theinstructions and cautions for each of the vari-
ous procedures.
A- Cooling fans B- Caution label
*: Front of the vehicle
WARNINGl When checking or servicing the inside of
the engine compartment, make sure theengine is switched off and has had achance to cool down.WARNINGl If it is necessary to do work in the engine
compartment with the engine running, be
especially careful that your clothing, hair,
etc., does not become caught by the fan, drive belts, or other moving parts.
l The fan may turn on automatically even if
the engine is not running. Turn the igni-
tion switch to the “LOCK” position or put
the operation mode in OFF to be safe while you work in the engine compart-
ment.
l Do not smoke, cause sparks or allow open
flames around fuel or battery. The fumesare flammable.
l Be extremely cautious when working
around the battery. It contains poisonous
and corrosive sulphuric acid.
l Do not get under your vehicle with just
the body jack supporting it. Always use
automotive jack stands.
l Improper handling of components and
materials used in the vehicle can endangeryour personal safety. We recommend you to consult a specialist for necessary infor- mation.Catalytic converter
E01000200765
The exhaust gas scavenging devices usedwith the catalytic converter are extremely ef- ficient for the reduction of noxious gases.
The catalytic converter is installed in the ex- haust system.
Service precautions
10-02 OGAE14E1Maintenance10
Page 356 of 418
NOTElThe washer fluid container serves the wind-
screen, rear window and headlamps (if soequipped).
During cold weather
To ensure proper operation of the washers at
low temperatures, use a fluid containing ananti-freezing agent.
Brake fluid/Clutch fluid*
E01000800631
The brake fluid and the clutch fluid share thereservoir tank.
To check the fluid level
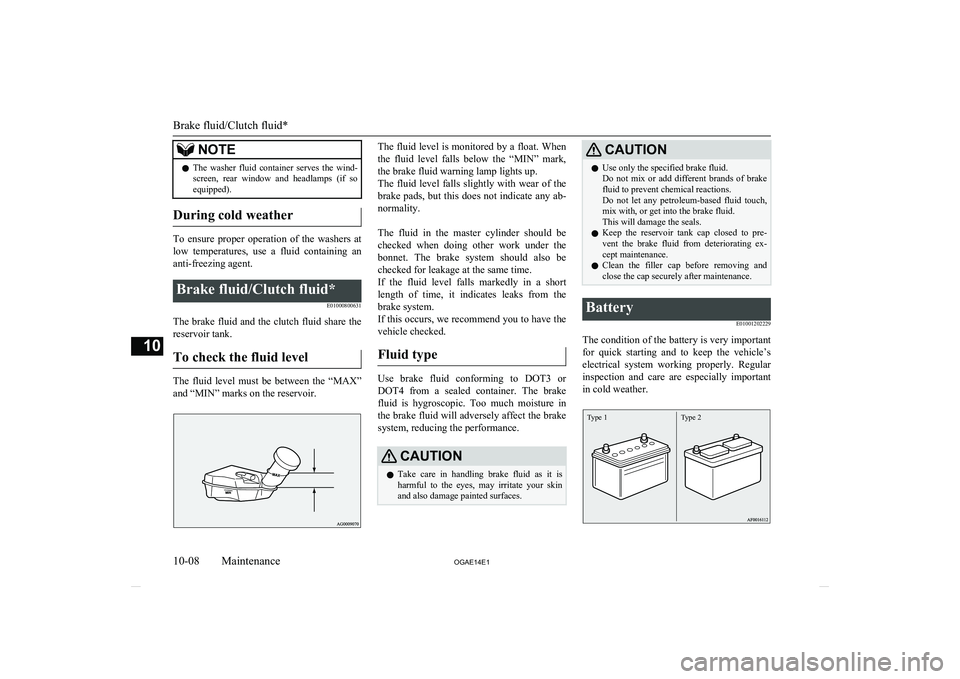
The fluid level must be between the “MAX” and “MIN” marks on the reservoir.
The fluid level is monitored by a float. When
the fluid level falls below the “MIN” mark, the brake fluid warning lamp lights up.The fluid level falls slightly with wear of the brake pads, but this does not indicate any ab-
normality.
The fluid in the master cylinder should be checked when doing other work under thebonnet. The brake system should also be checked for leakage at the same time.
If the fluid level falls markedly in a short length of time, it indicates leaks from the
brake system.
If this occurs, we recommend you to have the
vehicle checked.
Fluid type
Use brake fluid conforming to DOT3 or DOT4 from a sealed container. The brake
fluid is hygroscopic. Too much moisture in the brake fluid will adversely affect the brake
system, reducing the performance.
CAUTIONl Take care in handling brake fluid as it is
harmful to the eyes, may irritate your skin
and also damage painted surfaces.CAUTIONl Use only the specified brake fluid.
Do not mix or add different brands of brake fluid to prevent chemical reactions.
Do not let any petroleum-based fluid touch, mix with, or get into the brake fluid.
This will damage the seals.
l Keep the reservoir tank cap closed to pre-
vent the brake fluid from deteriorating ex- cept maintenance.
l Clean the filler cap before removing and
close the cap securely after maintenance.Battery
E01001202229
The condition of the battery is very important
for quick starting and to keep the vehicle’s electrical system working properly. Regularinspection and care are especially importantin cold weather.
Type 1Type 2
Brake fluid/Clutch fluid*
10-08 OGAE14E1Maintenance10
Page 357 of 418

NOTElAfter replacing the battery, the electronic
control system data for the automatic trans- mission, etc., will be erased. As a result,
shift shocks may occur.
Shift shocks will become smoother after sev-
eral changes in speed.
Checking battery electrolyte
level (Type 1 only)
The electrolyte level must be between the specified limit on the outside of the battery.
Replenish with distilled water as necessary.
The inside of the battery is divided into sev- eral compartments; remove the cap from each
compartment and fill to the upper mark. Do not top up beyond the upper mark because
spillage during driving could cause damage.
Check the electrolyte level at least once every
4 weeks, depending on the operating condi- tions.
If the battery is not used, it will discharge by
itself with time.
Check it once every 4 weeks and charge with
low current as necessary.NOTEl To replenish with the distilled water, remove
the upper cover and duct.
Refer to “Removing and installing the upper
cover and duct” on page 10-09.Removing and installing the
upper cover and duct
E01010700112
WARNINGl Turn the ignition switch to the “LOCK”
position or put the operation mode in OFF.
Make sure that your clothes cannot be
caught by the fan or drive belt. Personal
injury could result.To remove
1. Remove the clips (A), and then remove
the upper cover (B).
2. Remove the clips (C), and then remove
the air duct (D).
Battery
10-09
OGAE14E1Maintenance10
Page 358 of 418

To install
1.Install the air duct (A), and then tighten
the clips (B).
2. Turn the upper cover over. Squeeze the
head of the moulding clip (C) with pliers and remove the moulding.
3. Install the upper cover, and then attach
the moulding (D).
NOTEl Attach the moulding with the wide part to-
wards the front of the vehicle.
4. Install the clips (E).
During cold weather
E01010900068
The capacity of the battery is reduced at low
temperatures. This is an inevitable result of
its chemical and physical properties.
This is why a very cold battery, particularly one that is not fully charged, will only deliver a fraction of the starter current which is nor-
mally available.
We recommend you to have the battery checked before the start of cold weather and,
if necessary, have it charged or replaced.
This does not only ensure reliable starting, but a battery which is kept fully charged alsohas a longer life.
Disconnection and connection
E01011001223
To disconnect the battery cable, stop the en- gine, first disconnect the negative (-) terminal
and then the positive (+) terminal. When con-
necting the battery, first connect the positive
(+) terminal and then the negative (-) termi- nal.
NOTEl Open the terminal cover (A) before discon-
necting or connecting the positive (+) termi-
nal of the battery.
l Loosen the nut (B), and then disconnect the
battery cable from the positive (+) terminal.
Battery
10-10 OGAE14E1Maintenance10