check engine light MITSUBISHI ASX 2014 Owner's Manual (in English)
[x] Cancel search | Manufacturer: MITSUBISHI, Model Year: 2014, Model line: ASX, Model: MITSUBISHI ASX 2014Pages: 418, PDF Size: 14.02 MB
Page 151 of 418
Oil pressure warning display
E00524900214
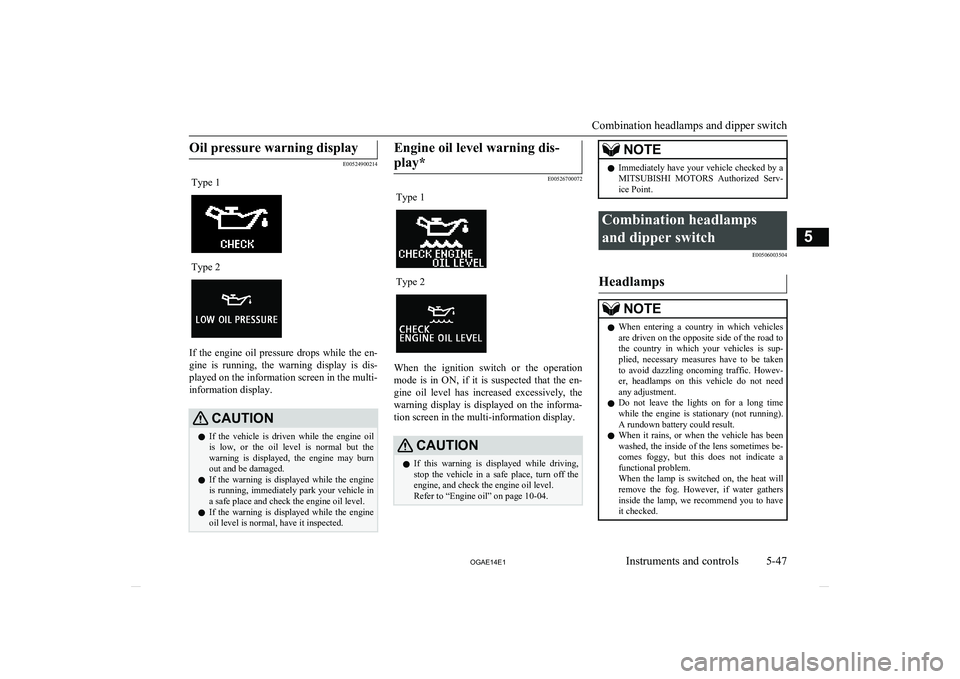
Type 1Type 2
If the engine oil pressure drops while the en-gine is running, the warning display is dis-
played on the information screen in the multi- information display.
CAUTIONl If the vehicle is driven while the engine oil
is low, or the oil level is normal but the
warning is displayed, the engine may burn out and be damaged.
l If the warning is displayed while the engine
is running, immediately park your vehicle in
a safe place and check the engine oil level.
l If the warning is displayed while the engine
oil level is normal, have it inspected.Engine oil level warning dis-
play*
E00526700072
Type 1Type 2
When the ignition switch or the operation mode is in ON, if it is suspected that the en-
gine oil level has increased excessively, the warning display is displayed on the informa-
tion screen in the multi-information display.
CAUTIONl If this warning is displayed while driving,
stop the vehicle in a safe place, turn off the engine, and check the engine oil level.
Refer to “Engine oil” on page 10-04.NOTEl Immediately have your vehicle checked by a
MITSUBISHI MOTORS Authorized Serv-
ice Point.Combination headlamps
and dipper switch E00506003504
Headlamps
NOTElWhen entering a country in which vehicles
are driven on the opposite side of the road tothe country in which your vehicles is sup- plied, necessary measures have to be takento avoid dazzling oncoming traffic. Howev-
er, headlamps on this vehicle do not need any adjustment.
l Do not leave the lights on for a long time
while the engine is stationary (not running).A rundown battery could result.
l When it rains, or when the vehicle has been
washed, the inside of the lens sometimes be-
comes foggy, but this does not indicate a functional problem.
When the lamp is switched on, the heat will
remove the fog. However, if water gathers
inside the lamp, we recommend you to have it checked.
Combination headlamps and dipper switch
5-47
OGAE14E1Instruments and controls5
Page 153 of 418
NOTElWhen the headlamps are turned off by the
automatic on/off control with the ignition
switch in the “ON” position, the front fog lamps (if so equipped) and rear fog lamps al-
so go off. When the headlamps are subse- quently turned back on by the automatic
on/off control, the front fog lamps also come on but the rear fog lamp stays off. If you wish to turn the rear fog lamp back on, oper- ate the switch again.
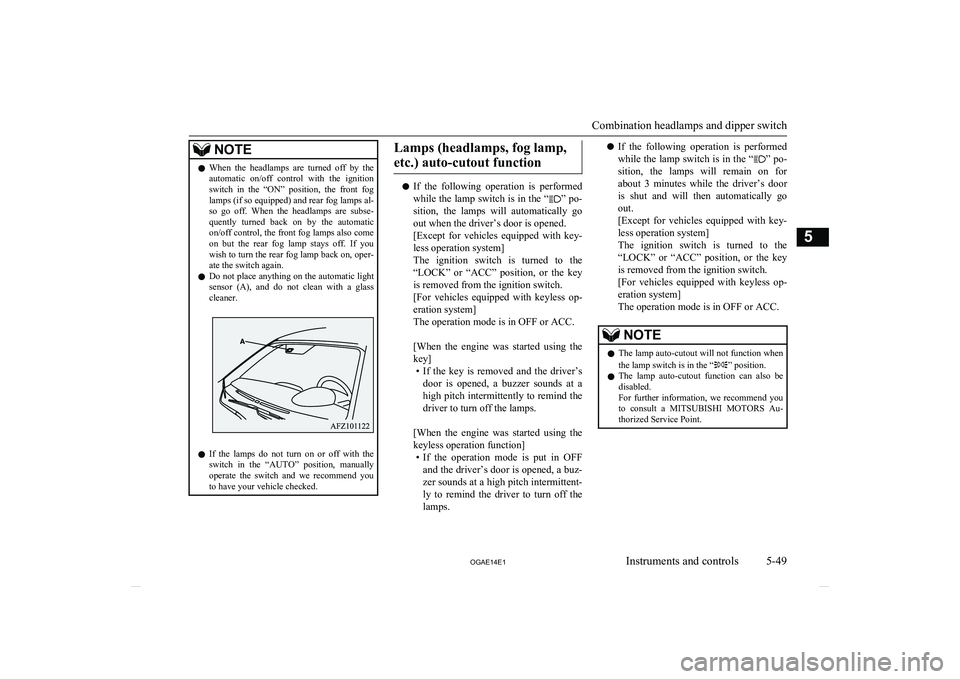
l Do not place anything on the automatic light
sensor (A), and do not clean with a glass
cleaner.
l If the lamps do not turn on or off with the
switch in the “AUTO” position, manually
operate the switch and we recommend you
to have your vehicle checked.
Lamps (headlamps, fog lamp,
etc.) auto-cutout function
l If the following operation is performed
while the lamp switch is in the “” po-
sition, the lamps will automatically go
out when the driver’s door is opened.
[Except for vehicles equipped with key-
less operation system]
The ignition switch is turned to the
“LOCK” or “ACC” position, or the key is removed from the ignition switch.
[For vehicles equipped with keyless op- eration system]
The operation mode is in OFF or ACC.
[When the engine was started using the
key] • If the key is removed and the driver’s
door is opened, a buzzer sounds at a high pitch intermittently to remind the driver to turn off the lamps.
[When the engine was started using the
keyless operation function] • If the operation mode is put in OFF
and the driver’s door is opened, a buz- zer sounds at a high pitch intermittent-
ly to remind the driver to turn off the lamps.
l If the following operation is performed
while the lamp switch is in the “” po-
sition, the lamps will remain on for
about 3 minutes while the driver’s door
is shut and will then automatically go out.
[Except for vehicles equipped with key-
less operation system]
The ignition switch is turned to the
“LOCK” or “ACC” position, or the key is removed from the ignition switch.
[For vehicles equipped with keyless op- eration system]
The operation mode is in OFF or ACC.NOTEl The lamp auto-cutout will not function when
the lamp switch is in the “” position.
l The lamp auto-cutout function can also be
disabled.
For further information, we recommend you
to consult a MITSUBISHI MOTORS Au-
thorized Service Point.
Combination headlamps and dipper switch
5-49
OGAE14E1Instruments and controls5
Page 168 of 418
Economical drivingE00600101076
For economical driving, there are some tech- nical requirements that have to be met. Theprerequisite for low fuel consumption is a
properly adjusted engine. In order to achieve longer life of the vehicle and the most eco- nomical operation, we recommend you tohave the vehicle checked at regular intervals in accordance with the service standards.
Fuel economy and generation of exhaust gas
and noise are highly influenced by personal
driving habits as well as the particular operat- ing conditions. The following points shouldbe observed in order to minimize wear of
brakes, tyres and engine as well as to reduce
environmental pollution.
Starting the engine
Avoid sudden acceleration and sudden starts,
as they will increase fuel consumption.
Shifting
Shift only at an appropriate speed and engine speed. Always use the highest shift position
possible.
Selecting the 4WD drive mode
(4WD vehicles)
The drive mode-selector should be set to
“2WD” when driving on normal roads and
express ways to obtain best possible fuel
economy.
City traffic
Frequent starting and stopping increases the
average fuel consumption. Use roads with smooth traffic flow whenever possible. When driving on congested roads, avoid use of a
low shift position at high engine speeds.
Idling
The vehicle consumes fuel even during
idling. Avoid extended idling whenever pos- sible.
Speed
At higher vehicle speed, more fuel is con- sumed. Avoid driving at full speed. Even a
slight release of the accelerator pedal will save a significant amount of fuel.
Tyre inflation pressure
Check the tyre inflation pressures at regular
intervals. Low tyre inflation pressure increa-ses road resistance and fuel consumption. In addition, low tyre pressures adversely affect
tyre wear and driving stability.
Cargo loads
Do not drive with unnecessary articles in the
luggage compartment. Especially during city
driving where frequent starting and stopping is necessary, the increased weight of the ve-
hicle will greatly affect fuel consumption. Al-
so avoid driving with unnecessary luggage or carriers, etc., on the roof; the increased air re- sistance will increase fuel consumption.
Cold engine starting
Starting of a cold engine consumes more fuel.
Unnecessary fuel consumption is also caused by keeping a hot engine running. After the
engine is started, commence driving as soon
as possible.
Air conditioning
The use of the air conditioning will increase the fuel consumption.
Economical driving
6-02 OGAE14E1Starting and driving6
Page 184 of 418
CAUTIONlContinuing to drive with the DPF warning
display and check engine warning lamp illu- minating could result in engine trouble and
DPF damage.Turbocharger operation*
E00611200083CAUTIONlDo not run the engine at high speeds (for ex-
ample, by revving it or by accelerating rap-
idly) immediately after starting it.
l Do not stop the engine immediately after
high-speed or uphill driving. First allow the
engine to idle to give the turbocharger a
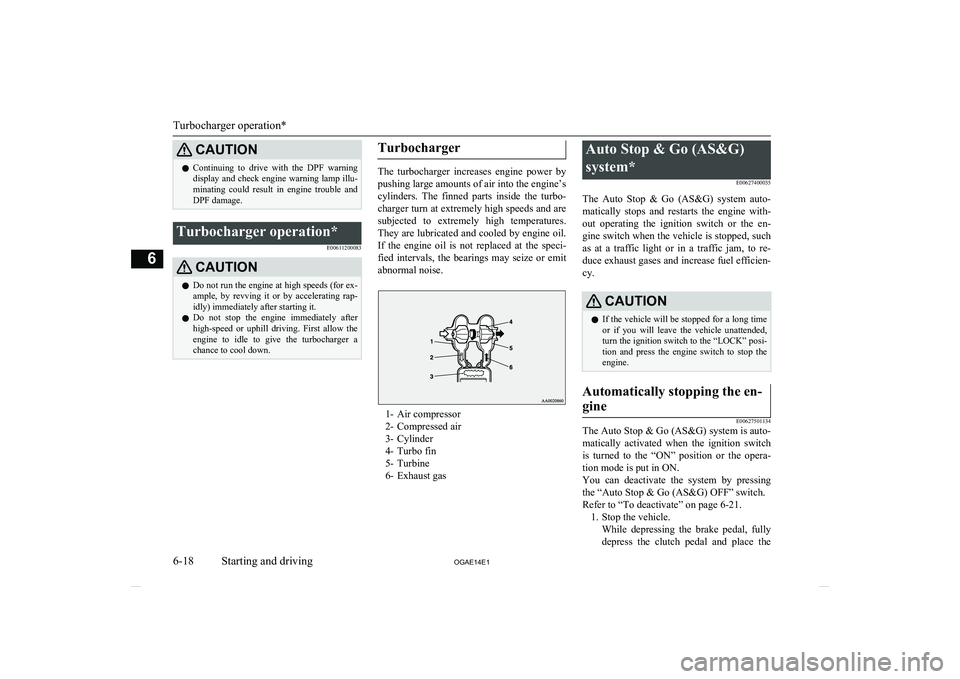
chance to cool down.Turbocharger
The turbocharger increases engine power by
pushing large amounts of air into the engine’s
cylinders. The finned parts inside the turbo- charger turn at extremely high speeds and aresubjected to extremely high temperatures.
They are lubricated and cooled by engine oil.
If the engine oil is not replaced at the speci- fied intervals, the bearings may seize or emit
abnormal noise.
1- Air compressor
2- Compressed air
3- Cylinder
4- Turbo fin
5- Turbine
6- Exhaust gas
Auto Stop & Go (AS&G)
system* E00627400035
The Auto Stop & Go (AS&G) system auto- matically stops and restarts the engine with- out operating the ignition switch or the en-gine switch when the vehicle is stopped, such
as at a traffic light or in a traffic jam, to re- duce exhaust gases and increase fuel efficien- cy.CAUTIONl If the vehicle will be stopped for a long time
or if you will leave the vehicle unattended,
turn the ignition switch to the “LOCK” posi-
tion and press the engine switch to stop the
engine.Automatically stopping the en-
gine
E00627501134
The Auto Stop & Go (AS&G) system is auto- matically activated when the ignition switch is turned to the “ON” position or the opera-
tion mode is put in ON.
You can deactivate the system by pressing the “Auto Stop & Go (AS&G) OFF” switch.
Refer to “To deactivate” on page 6-21. 1. Stop the vehicle. While depressing the brake pedal, fullydepress the clutch pedal and place the
Turbocharger operation*
6-18 OGAE14E1Starting and driving6
Page 206 of 418
WARNINGlImproperly operating this vehicle on or
off-paved roads can cause an accident or
rollover in which you and your passengers
could be seriously injured or killed.
• Follow all instructions and guidelines in
the owner’s manual.
• Keep your speed low and do not drive
faster than conditions allow you to.NOTEl Driving on rough roads can be hard on a ve-
hicle. Before you leave paved roads, be sure all scheduled maintenance and service has
been done, and that you have inspected your vehicle. Pay special attention to the condi- tion of the tyres, and check the tyre pres-
sures.
l MITSUBISHI
MOTORS is not responsible
to the operator for any damage or injury caused or liability incurred by improper and
negligent operation of a vehicle. All techni- ques of vehicle operation depend on the skill and experience of the operator and other par-
ticipating parties. Any deviation from the recommended operating instructions above
is at their own risk.
l Note that the stopping distance required of a
4-wheel drive vehicle differs very little from
that of a 2-wheel drive vehicle. When driv-
ing on a snow-covered road or a slippery, muddy surface, make sure that you keep a
sufficient distance between your vehicle and the one ahead of you.NOTEl The driving posture should be more upright;
adjust the seat to a good position for easy
steering and pedal operation. Be sure to wear
the seat belt.
l After driving on rough roads, check each
part of the vehicle and wash it thoroughlywith water. Refer to the “Inspection andmaintenance following rough road opera-
tion” section and “Maintenance” section.CAUTIONl Setting the drive mode-selector to “4WD
LOCK” to drive on dry paved road will in-
crease fuel consumption, with possible noise generation.
Turning sharp corners
When turning a sharp corner in “4WD
LOCK” position at low speed, a slight differ- ence in steering may be experienced similar
to as if the brakes were applied. This is called tight corner braking and results from each of
the 4 tyres being at a different distance from
the corner. The phenomenon is typical of 4- wheel drive vehicles. If this occurs, either
straighten out the steering wheel, or change to “2WD” or “4WD AUTO” mode.
On snowy or icy roads
Set the drive mode-selector to “4WD AUTO”
or “4WD LOCK” in accordance with the road conditions, and then gradually depress the accelerator pedal for a smooth start.
NOTEl The use of snow tyres is recommended.
l Maintain a safe distance between vehicles,
avoid sudden braking, and use engine brak- ing (downshifting).CAUTIONl Avoid sudden braking, sudden acceleration
and sharp turning. Skidding occurs and con-
trol of the vehicle could be lost.
Driving on sandy or muddy
roads
Set the drive mode-selector to “4WD LOCK”
and then gradually depress the accelerator pedal for a smooth start. Keep the pressure on
the accelerator pedal as constant as possible,
and drive at low speed.
4-wheel drive operation
6-40 OGAE14E1Starting and driving6
Page 207 of 418
CAUTIONlDo not force the vehicle or drive recklessly
on sandy surfaces. In comparison with nor-
mal road surfaces, the engine and other
drive-system components are put under ex- cessive strain when driving on such a sur-
face. This could lead to accidents.
l If the engine coolant temperature display
flashes on the information screen in the mul-
ti-information display or the engine power
drops suddenly while the vehicle is being driven, park your vehicle immediately in asafe place.
Refer to “Engine overheating” on page
8-04 for details and take the required meas-
ures.
WARNINGl When attempting to rock your vehicle out
of a stuck position, be sure that the area
around the vehicle is clear of people and physical objects. The rocking motion may
cause the vehicle to suddenly launch for- ward or backward, causing injury or damage to nearby people or objects.NOTEl Avoid sudden braking, sudden acceleration
and sharp turning; such operations could re-
sult in the vehicle becoming stuck.NOTEl If the vehicle becomes stuck in sandy or
muddy roads, it can often be moved with a
rocking motion. Move the gearshift lever al-
ternately between the 1 st
and “R” (Reverse)
positions ( M/T), the “D” (DRIVE) and “R”
(REVERSE) positions ( A/T or CVT), while
pressing lightly on the accelerator pedal.
l Driving on rough roads can cause rust on the
vehicle; wash the vehicle thoroughly as soon as possible after such use.
Climbing/descending sharp
grades
Your vehicle may not provide sufficient hill
climbing ability and engine braking on steep slopes. Avoid driving on steep slopes even
though the vehicle is a 4-wheel drive vehicle.
Driving through water
E00618900106
If the electrical circuits become wet, further
operation of the vehicle will be impossible;
therefore, avoid driving through water unless absolutely necessary. If driving through wa-ter is unavoidable, use the following proce-
dure:
Check the depth of the water and the terrain before attempting to drive through it. Driveslowly to avoid creating excessive water
splashing.
CAUTIONl Never drive through water that is deep
enough to cover wheel hubs, axles or ex-
haust pipe. Do not change the gearshift lever position ( M/T) or the selector lever position
(A/T or CVT) while driving through water.
Frequent driving through water can adverse-
ly affect the life span of the vehicle; we rec- ommend you to take the necessary measuresto prepare, inspect, and repair the vehicle.
l After driving through water, apply the
brakes to be sure they are functioning prop- erly. If the brakes are wet and not function-
ing properly, dry them out by driving slowly
while lightly depressing the brake pedal. In- spect each part of the vehicle carefully.Inspection and maintenance
following rough roadoperation E00606700338
After operating the vehicle in rough road
conditions, be sure to perform the following inspection and maintenance procedures:
l Check that the vehicle has not been dam-
aged by rocks, gravel, etc.
Inspection and maintenance following rough road operation
6-41
OGAE14E1Starting and driving6
Page 208 of 418
lCarefully wash the vehicle with water.
Drive the vehicle slowly while lightly depressing the brake pedal in order to
dry out the brakes. If the brakes still do not function properly, we recommend
you to have the brakes checked as soon as possible.
l Remove the insects, dried grass, etc.
clogging the radiator core.
l After driving through water, check the
engine, transmission and differential oil. If the oil or grease is milky or cloudy be-
cause of water contamination, it must be
replaced with new oil or grease.
l Check the inside of the vehicle. If water
entry is found, dry the carpet etc.
l Inspect the headlamps, If the headlamp
bulb is flooded with water, we recom-
mend you to have it drained.Cautions on handling of 4-
wheel drive vehicles E00606800818
Tyres and wheels
Since the driving torque can be applied to the
4 wheels, the driving performance of the ve- hicle when operating in 4-wheel drive is
greatly affected by the condition of the tyres.
Pay close attention to the tyres.
l Install only the specified tyres on all
wheels. Refer to “Tyres and wheels” on page 11-12.
l Be sure all 4 tyres and wheels are the
same size and type.
When it is necessary to replace any of
the tyres or wheels, replace all 4 tyres.
l All tyres should be rotated before the
wear difference between the front and
rear tyres is recognizable.
Good vehicle performance cannot be expec- ted if there is a difference in wear between tyres. Refer to “Tyre rotation” on page 10-14.
l Check the tyre inflation pressure regular-
ly.CAUTIONl Always use tyres of the same size, same
type, and same brand, and which have no wear differences. Using tyres of differentsize, type, brands or degree of wear, will in-
crease the differential oil temperature, result-
ing in possible damage to the driving sys-
tem. Further, the drive train will be subjec- ted to excessive loading possibly leading tooil leakage, component seizure, or other seri-
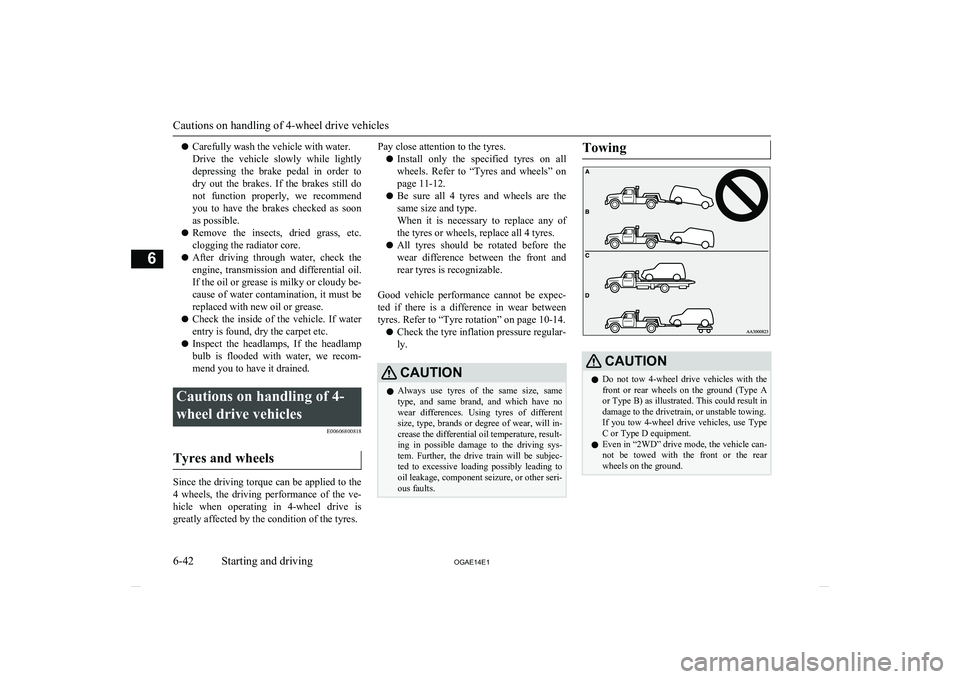
ous faults.TowingCAUTIONl Do not tow 4-wheel drive vehicles with the
front or rear wheels on the ground (Type Aor Type B) as illustrated. This could result in
damage to the drivetrain, or unstable towing.
If you tow 4-wheel drive vehicles, use Type C or Type D equipment.
l Even in “2WD” drive mode, the vehicle can-
not be towed with the front or the rear wheels on the ground.
Cautions on handling of 4-wheel drive vehicles
6-42 OGAE14E1Starting and driving6
Page 209 of 418
Jacking up a 4-wheel drive ve-hicleWARNINGl Do not crank the engine while the vehicle
is jacked up.
The tyre on the ground may turn and the vehicle may roll off the jack.
Clutch operation
Quick or slight clutch engagement made
while the engine is running at high speed will
cause damage to the clutch and transmission because the tractive force is very great.
Operate the pedal slowly and positively.
Braking
E00607001784
All the parts of the brake system are critical
to safety. We recommend you to have the ve- hicle checked at regular intervals according
to the service booklet.
CAUTIONl Avoid driving habits that cause heavy brak-
ing and never “ride” the brakes by resting
your foot on the brake pedal while driving.
It causes brake overheating and fade.Brake system
The service brake is divided into two brake
circuits. And your vehicle is equipped with
power brakes. If one brake circuit fails, the other is available to stop the vehicle. If you
should lose the power assist for some reason, the brakes will still work. In these situations,
even if the brake pedal moves down to the very end of its possible stroke or resists being
depressed, keep depressing the brake pedal
down harder and further than usual; stop
driving as soon as possible and have the brake system repaired.
WARNINGl Do not turn off the engine while your ve-
hicle is in motion. If you turn off the en- gine while driving, the power assistance
for the braking system will stop working and your brakes will not work effectively.
l If the power assist is lost or if either brake
hydraulic system stops working properly,
have your vehicle checked immediately.
Warning display
The brake warning lamp illuminates to indi-
cate a fault in the braking system. A warning
is also displayed on the multi-information display. Refer to “Brake warning lamp” on page 5-44 and “Brake warning display” on
page 5-45.
When brakes are wet
Check the brake system while driving at a
low speed immediately after starting, espe- cially when the brakes are wet, to confirmthey work normally.
A film of water can be formed on the brake
discs and prevent normal braking after driv-
ing in heavy rain or through large puddles, or after the vehicle is washed. If this occurs, dry
the brakes out by driving slowly while lightly depressing the brake pedal.
When driving downhill
It is important to take advantage of the en-
gine braking by shifting to a lower shift posi- tion while driving on steep downhill roads in order to prevent the brakes from overheating.
WARNINGl Do not leave any objects near the brake
pedal or let a floor mat slide under it; do- ing so could prevent the full pedal stroke
that would be necessary in an emergency. Make sure that the pedal can be operatedfreely at all times. Make sure the floor mat is securely held in place.
Braking
6-43
OGAE14E1Starting and driving6
Page 347 of 418
Check body areas facing the road or the tyres
carefully for damage to the paint caused by gravels, etc. The paint code number for your
vehicle can be found on the vehicle informa- tion code plate in the engine compartment.Cleaning plastic parts
E00901300707
Use a sponge or chamois leather.
If a car wax adheres on a grey or black rough surface of the bumper, moulding or lamps, the surface becomes white. In such a case,
wipe it off using lukewarm water and soft cloth or chamois leather.
CAUTIONl Do not use a scrubbing brush or other hard
tools as they may damage the plastic part surface.
l Do not use wax containing compound (pol-
ishing powder) which may damage the plas-
tic part surface.
l Do not bring the plastic parts into contact
with petrol, light oil, brake fluids, engine
oils, greases, paint thinners, and sulphuric acid (battery electrolyte) which may crack,stain or discolour the plastic parts.
If they touch the plastic parts, wipe them off
with soft cloth, chamois or the like and an aqueous solution of neutral detergent thenimmediately rinse the affected parts with
water.Chrome parts
E00901400098
In order to prevent spots and corrosion of
chrome parts, wash with water, dry thorough-
ly, and apply a special protective coating.
This should be done more frequently in win- ter.
Aluminium wheels*
E00901500347
1. Remove dirt using a sponge while sprin-
kling water on the vehicle.
2. Use neutral detergent on any dirt that
cannot be removed easily with water.
Rinse off the neutral detergent after
washing the vehicle.
3. Dry the vehicle thoroughly using a cha-
mois leather or a soft cloth.
CAUTIONl Do not use a brush or other hard implement
on the wheels.
Doing so could scratch the wheels.
l Do not use any cleaner that contains an abra-
sive substance or is acidic or alkaline. Doing
so could cause the coating on the wheels to peel or become discoloured or stained.
l Do not directly apply hot water using a
steam cleaner or by any other means.
l Contact with seawater and road deicer can
cause corrosion. Rinse off such substances as soon as possible.Window glass
E00901600117
The window glass can normally be cleaned
using only a sponge and water.
Glass cleaner can be used to remove oil, grease, dead insects, etc. After washing the
glass, wipe dry with a clean, dry, soft cloth. Never use a cloth that is used for cleaning a
painted surface to clean a window. Wax from
the painted surface could get on the glass and lower glass transparency and visibility.
NOTEl To clean the inside of the rear window, al-
ways use a soft cloth and wipe the window
glass along the demister heater element so as not to cause damage.Wiper blades
E00901700062
Use a soft cloth and glass cleaner to remove
grease, dead insects, etc., from the wiper blades. Replace the wiper blades when they
no longer wipe properly. (Refer to page 10-16.)
Cleaning the exterior of your vehicle
9-05
OGAE14E1Vehicle care9
Page 352 of 418
CAUTIONlNote that the support bar may disengage the
bonnet if the open bonnet is lifted by astrong wind.
l After inserting the support bar into the slot,
make sure the bar supports the bonnet se-
curely from falling down on to your head or body.
To close
1. Unlatch the support bar and clip it in its
holder.
2. Slowly lower the bonnet to a position
about 20 cm above the closed position,
then let it drop.
3. Make sure the bonnet is securely locked
by softly lifting the centre of the bonnet.
CAUTIONl Be careful that hands or fingers are not trap-
ped when closing the bonnet.
l Before driving, make sure that the bonnet is
securely locked. An incompletely locked bonnet can suddenly open while driving.
This can be extremely dangerous.NOTEl If this does not close the bonnet, release it
from a slightly higher position.
l Do not press down the bonnet hard with a
hand as it may damage the bonnet.
l For vehicles equipped with the security
alarm system, if you drive with the bonnet left open, warning display is displayed on the information screen in the multi-informa-tion display.Type 1Type 2Engine oil
E01000404097
To check and refill engine oil
Petrol-powered vehicles
1600 modelsMAX.MIN.1800, 2000 modelsMAX.MIN.
Engine oil
10-04 OGAE14E1Maintenance10