jack points MITSUBISHI ASX 2014 Owner's Manual (in English)
[x] Cancel search | Manufacturer: MITSUBISHI, Model Year: 2014, Model line: ASX, Model: MITSUBISHI ASX 2014Pages: 418, PDF Size: 14.02 MB
Page 249 of 418

4th generation4th generation4th generation4th generation
Handling of DiscsE00735900027
This explains care that should be taken in thehandling of discs.
Important Points on Handling
l Fingerprints or other marks on the read
surface of the disc may result in its con-
tent being more difficult to read. When
holding the disc, grip both edges, or one edge and the centre hole, in order that the read surface is not touched.
l Do not affix paper or stickers, or other-
wise damage the disc.
l Do not forcefully insert a disc if another
is already within the device. This can re- sult in damage to discs, or malfunction.
Cleaning
l Periodically clean the read surface of the
disc. When cleaning, do not wipe in a
circular motion. Instead, wipe gently outwards from the centre of the disc to the outer edge.
l New discs may have burring around the
outer edge or in the hole in the centre.
Ensure you check for these. If there are burrs, these may lead to faulty operation,
therefore ensure these are removed.
Important Points on Storage
l When not using discs, ensure these are
kept in cases, and stored out of direct sunlight.
l If discs are not going to be used for a
long period of time, remove these from
the product.
Disc Playback Environment
In cold environments such as in mid-winter
when the interior of the vehicle is cold, turn- ing the heater on and immediately trying to
use the product may cause condensation (wa-
ter droplets) to form on the disc and internal optical components, and this may prevent the product from operating correctly.
In these conditions, remove the disc, and wait
a short time before use.
Copyright
Actions such as unauthorized reproduction,
broadcast, public performance, or rental of discs that comprise other than personal use are prohibited by law.
Types of Disc That Can Be
Played Back
E00736001064
The following marks are printed on the disc label, package, or jacket.
Handling of Discs
7-15
OGAE14E1For pleasant driving7
Page 331 of 418

CAUTIONlUpon installation of the
T155/90D16 or
T125/90D16 size spare wheel, the ground
clearance is reduced as the tyre is smaller in
diameter than the standard tyre.
When passing over the projections on the
road, take care not to damage the vehicle’s
undercarriage.
l Do not install more than one temporary
spare wheel at the same time.To remove the spare wheel
E00803301130
1. Lift up the luggage floor board.
2. To remove the spare wheel, remove the
installation clamp (A) by turning it anti-
clockwise.NOTEl Put the spare wheel under the vehicle body
near the jack. This makes it safer if the jack slips out of position.To change a tyre
E00803200653
1. If a wheel cover is installed, first remove
the cover. (Refer to “Wheel covers”.)
Then loosen the wheel nuts a quarter
turn with the wheel nut wrench. Do not remove the wheel nuts yet.
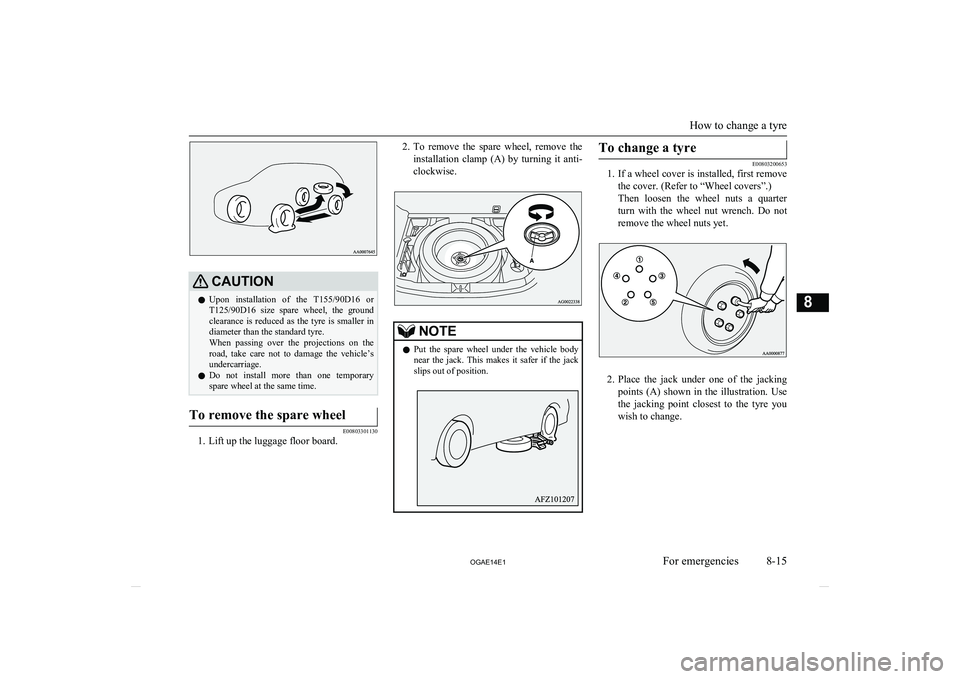
2. Place the jack under one of the jacking
points (A) shown in the illustration. Use
the jacking point closest to the tyre you wish to change.
How to change a tyre
8-15
OGAE14E1For emergencies8