seats MITSUBISHI ASX 2017 Owner's Manual (in English)
[x] Cancel search | Manufacturer: MITSUBISHI, Model Year: 2017, Model line: ASX, Model: MITSUBISHI ASX 2017Pages: 458, PDF Size: 22.98 MB
Page 7 of 458
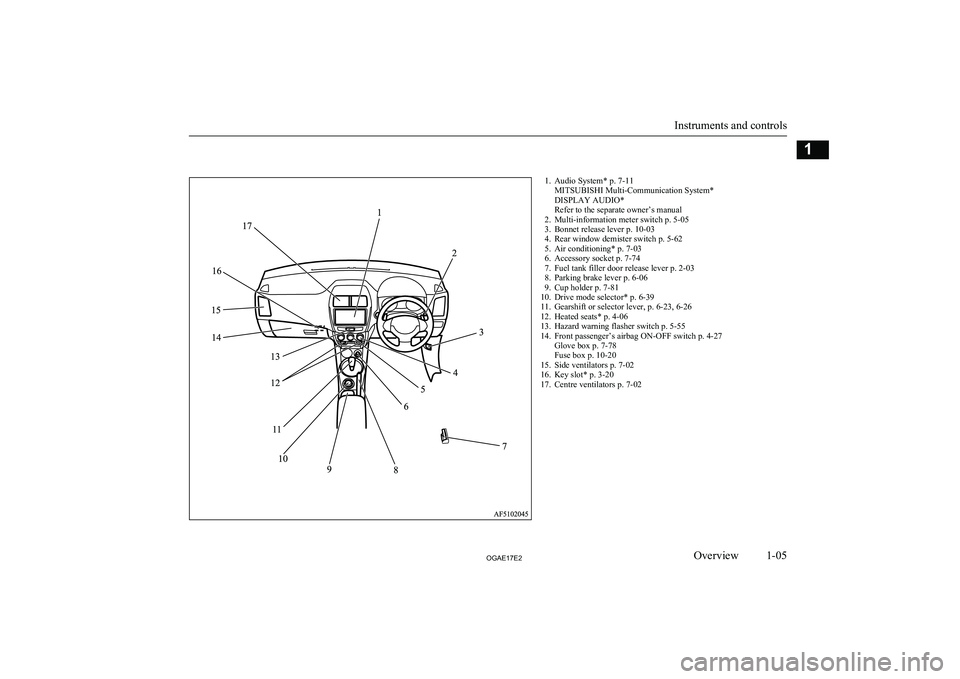
1. Audio System* p. 7-11MITSUBISHI Multi-Communication System*
DISPLAY AUDIO*
Refer to the separate owner’s manual
2. Multi-information meter switch p. 5-05
3. Bonnet release lever p. 10-03
4. Rear window demister switch p. 5-62
5. Air conditioning* p. 7-03
6. Accessory socket p. 7-74
7. Fuel tank filler door release lever p. 2-03
8. Parking brake lever p. 6-06
9. Cup holder p. 7-81
10. Drive mode selector* p. 6-39
11. Gearshift or selector lever, p. 6-23, 6-26
12. Heated seats* p. 4-06
13. Hazard warning flasher switch p. 5-55
14. Front passenger’s airbag ON-OFF switch p. 4-27 Glove box p. 7-78
Fuse box p. 10-20
15. Side ventilators p. 7-02
16. Key slot* p. 3-20
17. Centre ventilators p. 7-02
Instruments and controls
1-05OGAE17E2Overview1
Page 8 of 458
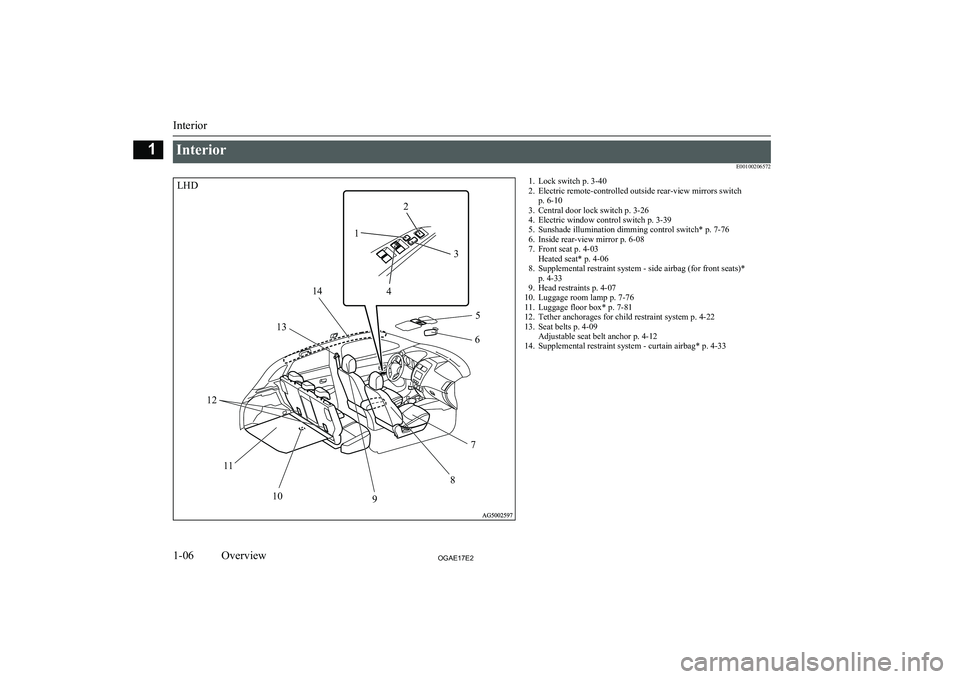
InteriorE001002065721. Lock switch p. 3-402. Electric remote-controlled outside rear-view mirrors switch p. 6-10
3. Central door lock switch p. 3-26
4. Electric window control switch p. 3-39
5. Sunshade illumination dimming control switch* p. 7-76
6. Inside rear-view mirror p. 6-08
7. Front seat p. 4-03 Heated seat* p. 4-06
8. Supplemental restraint system - side airbag (for front seats)* p. 4-33
9. Head restraints p. 4-07
10. Luggage room lamp p. 7-76
11. Luggage floor box* p. 7-81
12. Tether anchorages for child restraint system p. 4-22
13. Seat belts p. 4-09 Adjustable seat belt anchor p. 4-12
14. Supplemental restraint system - curtain airbag* p. 4-33
Interior
1-06OGAE17E2Overview1LHD12
3
4 5
6
7
8
9
10
11
12 13
14
Page 10 of 458
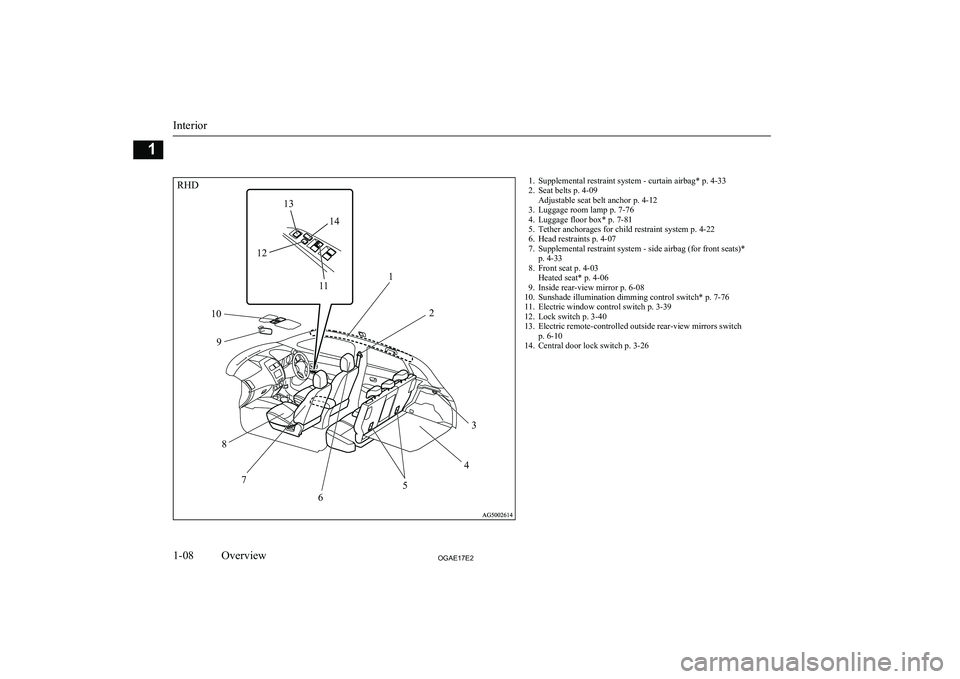
1. Supplemental restraint system - curtain airbag* p. 4-33
2. Seat belts p. 4-09 Adjustable seat belt anchor p. 4-12
3. Luggage room lamp p. 7-76
4. Luggage floor box* p. 7-81
5. Tether anchorages for child restraint system p. 4-22
6. Head restraints p. 4-07
7. Supplemental restraint system - side airbag (for front seats)* p. 4-33
8. Front seat p. 4-03 Heated seat* p. 4-06
9. Inside rear-view mirror p. 6-08
10. Sunshade illumination dimming control switch* p. 7-76
11. Electric window control switch p. 3-39
12. Lock switch p. 3-40
13. Electric remote-controlled outside rear-view mirrors switch p. 6-10
14. Central door lock switch p. 3-26
Interior
1-08OGAE17E2Overview1RHD12
3
4
5
6
7
8
9
10
11
12 13
14
Page 68 of 458

SeatE004001032251-Front seat
lTo adjust forward or backward
® p. 4-03
l To recline the seatback
® p. 4-04
l To adjust seat height (driver’s seat only)
® p. 4-05
l Armrest*
® p. 4-05
l Heated seats*
® p. 4-06
2-Rear seat
l Armrest*
® p. 4-06
Seat
4-02OGAE17E2Seat and seat belts4
Page 69 of 458
Seat adjustmentE00400302073
Adjust the driver’s seat so that you are com- fortable and that you can reach the pedals,
steering wheel, switches etc. while retaining a clear field of vision.WARNINGl Do not attempt to adjust the seat while
driving. This can cause loss of vehicle con- trol and result in an accident. After ad-
justments are made, ensure the seating is locked in position by attempting to move
the seat forward and rearward without
using the adjusting mechanism.
l Do not let children or adults ride in areas
of the vehicle that are not equipped with seats or seat belts. Also, make sure that all
occupants are sitting in their seats and wearing their seat belts, and that children
are sitting in child restraints.
l To minimize the risk of personal injury in
the event of a collision or sudden braking,the seatbacks should always be in the al-
most upright position while the vehicle is in motion. The protection provided by theseat belts may be reduced significantly
when the seatback is reclined. There is greater risk that the passenger will slide
under the seat belt, resulting in serious in- jury, when the seatback is reclined.WARNINGl Do not place objects under the seats. This
could prevent the seat from locking se-curely, and it could lead to an accident. It
may also cause damage to the seat or oth-
er parts.CAUTIONl Make sure the seat is adjusted by an adult or
with adult supervision for correct and safe operation.
l Do not place a cushion or the like between
your back and the seatback while driving.The effectiveness of the head restraints will
be reduced in the event of an accident.
l When sliding the seat rearward, be careful
not to catch your hand or foot.Front seat
E00400400142To adjust forward or back-
ward
E00400501951
Manual type
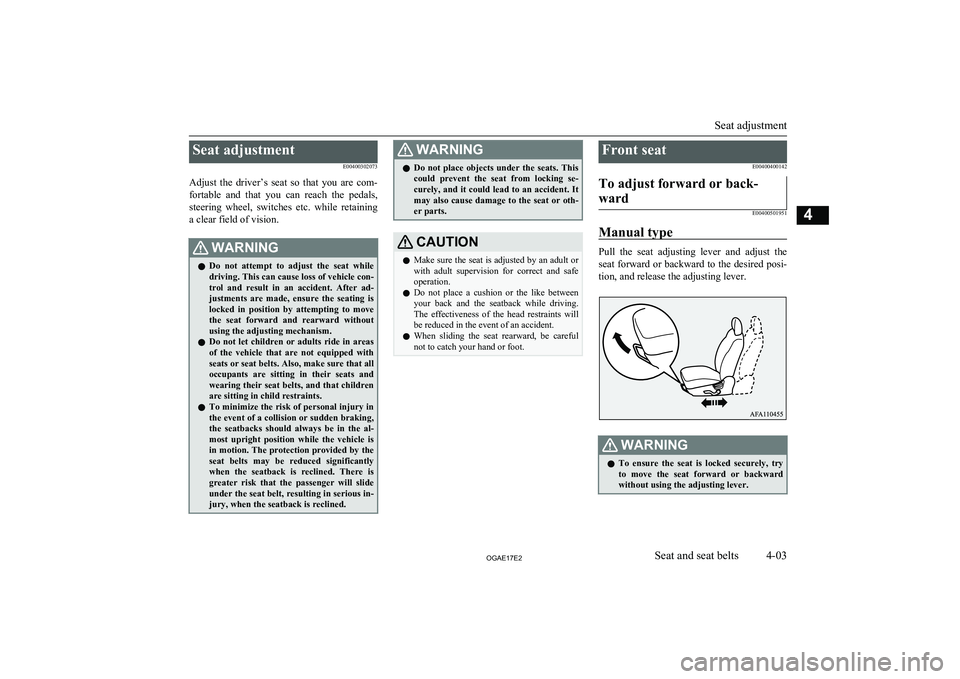
Pull the seat adjusting lever and adjust the seat forward or backward to the desired posi-tion, and release the adjusting lever.
WARNINGl To ensure the seat is locked securely, try
to move the seat forward or backward
without using the adjusting lever.
Seat adjustment
4-03OGAE17E2Seat and seat belts4
Page 72 of 458
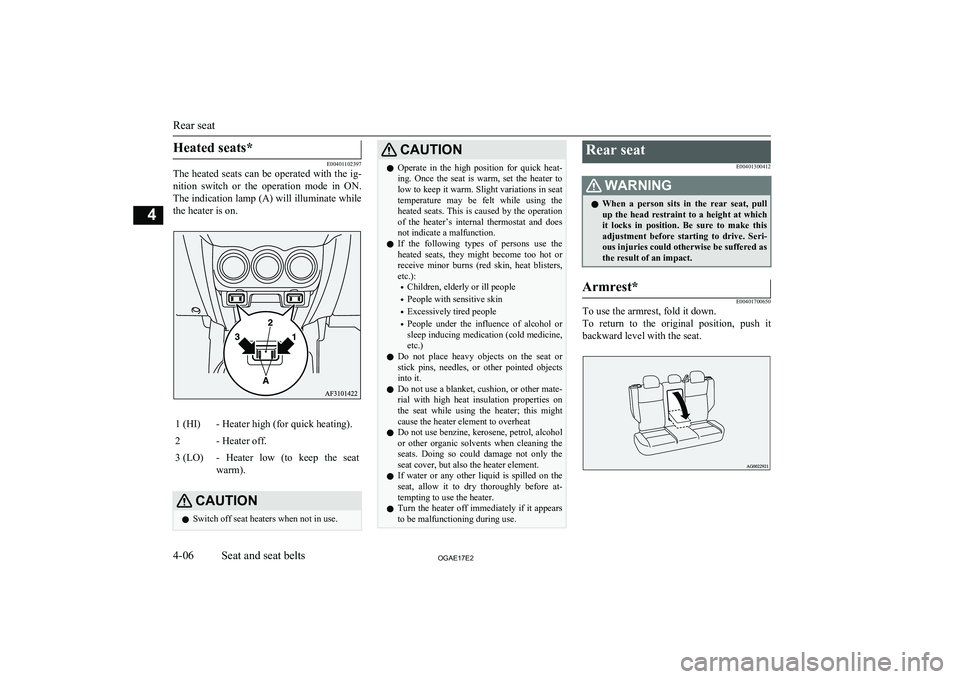
Heated seats*
E00401102397
The heated seats can be operated with the ig-
nition switch or the operation mode in ON.
The indication lamp (A) will illuminate while the heater is on.
1 (HI)- Heater high (for quick heating).2- Heater off.3 (LO)- Heater low (to keep the seat
warm).CAUTIONl Switch off seat heaters when not in use.CAUTIONlOperate in the high position for quick heat-
ing. Once the seat is warm, set the heater to low to keep it warm. Slight variations in seat
temperature may be felt while using the heated seats. This is caused by the operation
of the heater’s internal thermostat and does not indicate a malfunction.
l If the following types of persons use the
heated seats, they might become too hot or receive minor burns (red skin, heat blisters,
etc.):
• Children, elderly or ill people
• People with sensitive skin
• Excessively tired people
• People under the influence of alcohol or
sleep inducing medication (cold medicine, etc.)
l Do not place heavy objects on the seat or
stick pins, needles, or other pointed objects into it.
l Do not use a blanket, cushion, or other mate-
rial with high heat insulation properties on the seat while using the heater; this might
cause the heater element to overheat
l Do not use benzine, kerosene, petrol, alcohol
or other organic solvents when cleaning the seats. Doing so could damage not only the seat cover, but also the heater element.
l If water or any other liquid is spilled on the
seat, allow it to dry thoroughly before at-tempting to use the heater.
l Turn the heater off immediately if it appears
to be malfunctioning during use.Rear seat
E00401300412WARNINGlWhen a person sits in the rear seat, pull
up the head restraint to a height at which
it locks in position. Be sure to make this adjustment before starting to drive. Seri- ous injuries could otherwise be suffered as
the result of an impact.Armrest*
E00401700650
To use the armrest, fold it down.
To return to the original position, push it
backward level with the seat.
Rear seat
4-06OGAE17E2Seat and seat belts4
Page 74 of 458
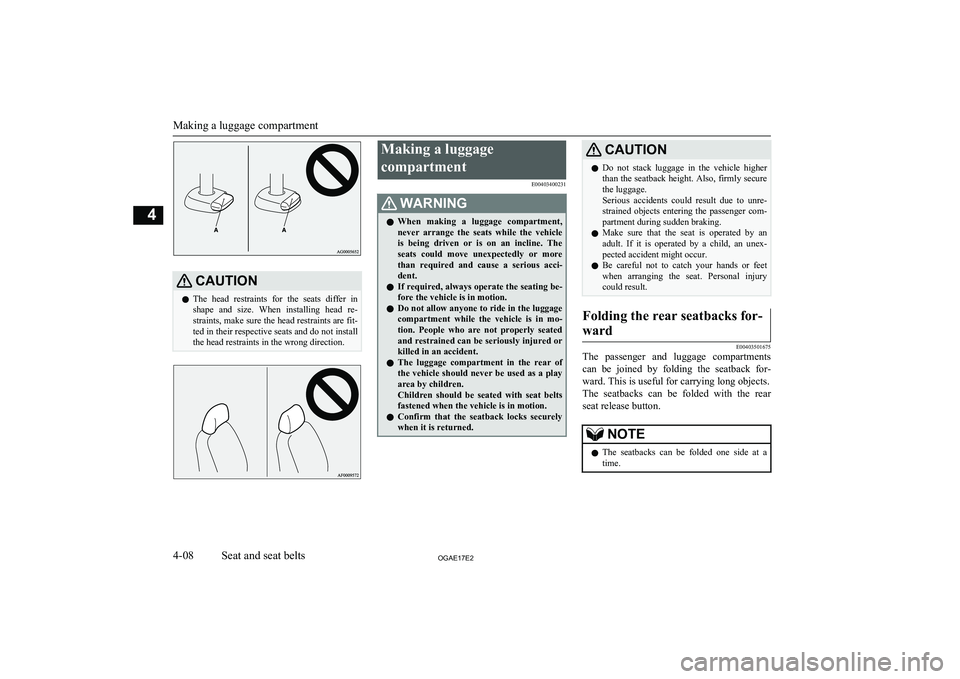
CAUTIONlThe head restraints for the seats differ in
shape and size. When installing head re- straints, make sure the head restraints are fit- ted in their respective seats and do not install
the head restraints in the wrong direction.Making a luggage
compartment E00403400231WARNINGlWhen making a luggage compartment,
never arrange the seats while the vehicle
is being driven or is on an incline. The seats could move unexpectedly or more
than required and cause a serious acci- dent.
l If required, always operate the seating be-
fore the vehicle is in motion.
l Do not allow anyone to ride in the luggage
compartment while the vehicle is in mo-
tion. People who are not properly seated
and restrained can be seriously injured or killed in an accident.
l The luggage compartment in the rear of
the vehicle should never be used as a play area by children.
Children should be seated with seat belts fastened when the vehicle is in motion.
l Confirm that the seatback locks securely
when it is returned.CAUTIONl Do not stack luggage in the vehicle higher
than the seatback height. Also, firmly securethe luggage.
Serious accidents could result due to unre-
strained objects entering the passenger com-
partment during sudden braking.
l Make sure that the seat is operated by an
adult. If it is operated by a child, an unex-
pected accident might occur.
l Be careful not to catch your hands or feet
when arranging the seat. Personal injury could result.Folding the rear seatbacks for-
ward
E00403501675
The passenger and luggage compartments can be joined by folding the seatback for-
ward. This is useful for carrying long objects. The seatbacks can be folded with the rear seat release button.
NOTEl The seatbacks can be folded one side at a
time.
Making a luggage compartment
4-08OGAE17E2Seat and seat belts4
Page 78 of 458

Front passenger seat belt warn-ing lamp*
E00411601284
The front passenger seat belt warning lamp is
located on the instrument panel.
The lamp comes on when a person sits on the front passenger seat but does not fasten the
seat belt. It goes off when the seat belt is sub- sequently fastened.
WARNINGl Do not install any accessory or sticker
that makes the lamp difficult to see.Adjustable seat belt anchor
(front seats)
E00405000329
The seat belt anchor height can be adjusted.
Raise or lower the seat belt anchor (A) while pressing the lock knob (B).DownUp
WARNINGl When adjusting the seat belt anchor, set it
at a position that is sufficiently high so
that the belt will make full contact with your shoulder but will not touch your
neck.3-point type seat belt with 2
buckles
E00414700117
3-point type seat belt with 2 buckles is fitted in the rear centre seating position.
NOTEl You can check if the belt locks by pulling it
forward quickly.To fasten
1. Pull the seat belt out slowly and pass it
through the seat belt guide (A).
NOTEl When the seat belts cannot be pulled out in a
locked condition, pull the belt once forceful-
ly and then return it.
After that, pull the belt out slowly once
again.
2. After making sure that the seat belt is
not twisted, insert the latch plate (B) into
the buckle (C) aligning the marks (D) on
the plate and buckle until a “click” is heard.
Seat belts
4-12OGAE17E2Seat and seat belts4
Page 88 of 458

Installing a child restraint sys-tem to the lower anchorage (ISOFIX child restraint mount-ings) and tether anchorage
E00406901986
Lower anchorage location
Your vehicle’s rear seat is fitted with lower
anchorages for attaching a child restraint sys- tem with ISOFIX mountings.
Tether anchorage locations
There are 2 child restraint anchorage points located on the back of the rear seatbacks.
These are for fastening the child restraint tether straps to the 2 rear seat seating posi-
tions.
WARNINGl Child restraint anchorages are designed
to withstand only those loads imposed by
correctly fitted child restraints. Under no circumstances are they to be used for adult seat belts, harnesses, or for attach-
ing other items or equipment to the vehi- cle.Child restraint system with
ISOFIX mountings
The child restraint system is designed only
for seats that incorporate lower anchorages.
Retain the child restraint system using the lower anchorages.
It is not necessary to retain the child restraint
system using the vehicle’s seat belts.
A- Child restraint system connectors
To install
1. Remove any foreign material in or
around the connectors and ensure the ve- hicle seat belt is in its normal storage po-
sition.
2. Remove the head restraint from the loca-
tion in which you wish to install a child
restraint.
Refer to “Head restraints” on page 4-07.
Child restraint
4-22OGAE17E2Seat and seat belts4
Page 101 of 458

WARNINGlDo not allow any rear seat occupant to
hold onto the seatback of either front seat,
in order to reduce risk of injury from the
deploying side airbags. Special care
should be taken with children.
l Do not place any objects near or in front
of the seatback of either front seat. They could interfere with proper side airbag in-
flation, and also could cause injury if thrown free by side airbag deployment.
l Do not place stickers, labels or additional
trim on the seatback of either front seat.
They could interfere with proper side air- bag inflation.
l Do not install seat covers on seats with
side airbags. Do not re-cover seats that have side airbags. This could interfere
with proper side airbag inflation.
l Do not attach a microphone (A) or any
other device or object around the part where the curtain airbags (B) activate
such as on the windscreen, side door glass, front and rear pillars and roof side or as- sist grips. When the curtain airbags in-
flate, the microphone or other device or
object will be hurled with great force or the curtain airbags may not activate cor-
rectly, resulting in death or serious injury.WARNINGl Do not put a hanger or any heavy or poin-
ted object on the coat hook. If the curtain
airbag was activated, any such item could
be propelled away with great force and could prevent the curtain airbag from in-
flating correctly. Hang clothes directly on the coat hook (without using a hanger).
Make sure there are no heavy or sharp objects in the pockets of clothes that you
hang on the coat hook.
l Never install a rearward facing child re-
straint in the front passenger seat. A for-
ward facing child restraint should be used
in the rear seat whenever possible. If a forward facing child restraint must be used in the front passenger seat, adjust
the seat to the most rearward position,
and ensure that the child stays in the child
restraint and away from the door.WARNINGl Do not allow a child to lean against or
close to the front door even if the child is seated in a child restraint system.
The child’s head should also not be leaned
against or be close to the area where the
side airbags and curtain airbags are loca- ted. It is dangerous if the side airbags andcurtain airbags inflate.
Failure to follow all of these instructions
could lead to serious or fatal injury to the
child.
l We recommend work around and on the
side airbags and curtain airbags system to
be done by a MITSUBISHI MOTORS
Authorized Service Point.
Supplemental restraint system (SRS) - airbag
4-35OGAE17E2Seat and seat belts4