headlamp MITSUBISHI COLT 2008 (in English) User Guide
[x] Cancel search | Manufacturer: MITSUBISHI, Model Year: 2008, Model line: COLT, Model: MITSUBISHI COLT 2008Pages: 450, PDF Size: 14.57 MB
Page 176 of 450
4-10 Starting and driving
4Inside rear-view mirror
E00600800047
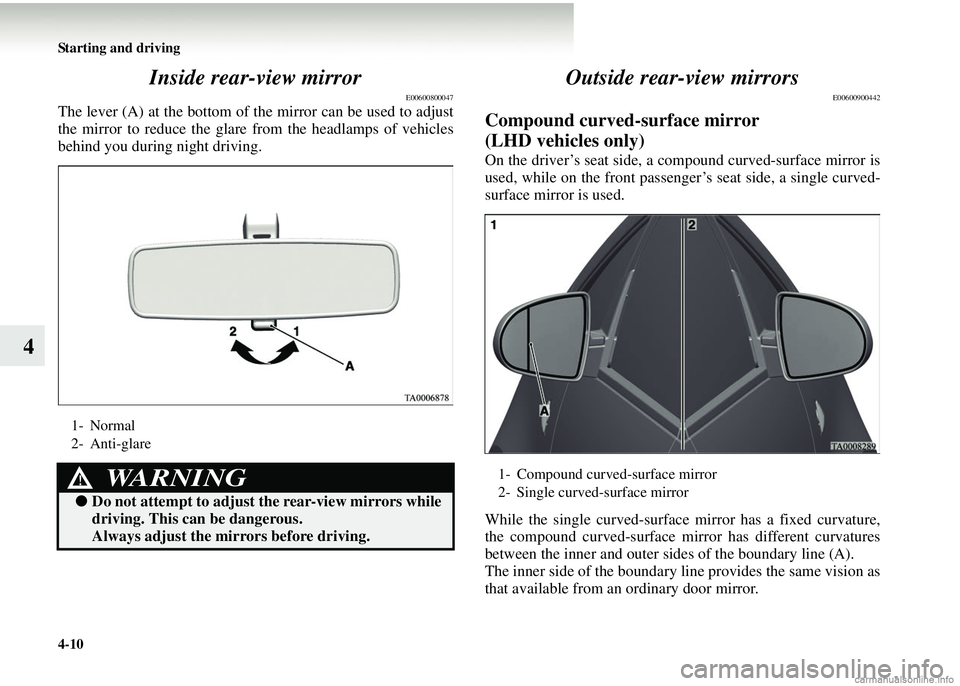
The lever (A) at the bottom of th
e mirror can be used to adjust
the mirror to reduce the glare from the headlamps of vehicles
behind you during night driving.
Outside rear-view mirrors
E00600900442
Compound curved-surface mirror
(LHD vehicles only)
On the driver’s seat side, a co mpound curved-surface mirror is
used, while on the front passenger’s seat side, a single curved-
surface mirror is used.
While the single curved-surface mirror has a fixed curvature,
the compound curved-surface mirror has different curvatures
between the inner and outer sides of the boundary line (A).
The inner side of the boundary line provides the same vision as
that available from an ordinary door mirror.
1- Normal
2- Anti-glare
WARNING!
● Do not attempt to adjust the rear-view mirrors while
driving. This can be dangerous.
Always adjust the mirrors before driving.
1- Compound curved-surface mirror
2- Single curved-surface mirror
Page 180 of 450
4-14 Starting and driving
4Ignition switch
E00601401164
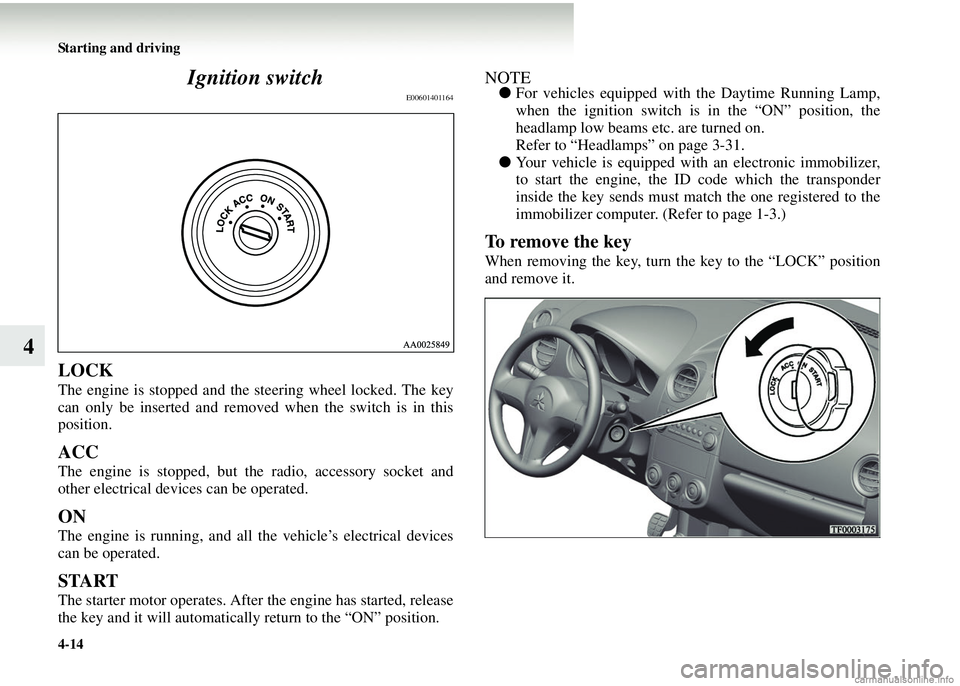
LOCK
The engine is stopped and the
steering wheel locked. The key
can only be inserted and removed when the switch is in this
position.
ACC
The engine is stopped, but th e radio, accessory socket and
other electrical devices can be operated.
ON
The engine is running, and all the vehicle’s electrical devices
can be operated.
START
The starter motor operates. After the engine has started, release
the key and it will automatically return to the “ON” position.
NOTE● For vehicles equipped with the Daytime Running Lamp,
when the ignition switch is in the “ON” position, the
headlamp low beams etc. are turned on.
Refer to “Headlamps” on page 3-31.
● Your vehicle is equipped with an electronic immobilizer,
to start the engine, the ID code which the transponder
inside the key sends must match the one registered to the
immobilizer computer. (Refer to page 1-3.)
To remove the key
When removing the key, turn the key to the “LOCK” position
and remove it.
Page 206 of 450
4-40 Starting and driving
4
●The ABS becomes operative after the vehicle has acceler-
ated to a speed in excess of approximately 10 km/h (6
mph). It stops operat ing when the vehicle decelerates to a
speed below approximately 10 km/h (6 mph).Electric power steering system
E00607400026
The electric power steering system reduces the effort required
to turn the steering wheel. It operates while the engine is run-
ning.
NOTE● If you repeatedly turn the st eering wheel fully to either
side (while parking, for example), a protective function
that prevents the system from overheating will be acti-
vated, making the steering action gradually heavier. In this
event, turn the steering wheel as little as possible for a
while. When the system’s temperature decreases, the
steering action will return to normal.
● If you turn the steering wheel while the vehicle is station-
ary with its headlamps on, the headlamps may grow dim.
This phenomenon does not indicate a fault. The head-
lamps will return to their original brightness after a short
while.
CAUTION!
●Do not stop the engine while driving. With the
engine stopped, the steeri ng action would become
extremely heavy and an une xpected accident might
occur.
Page 375 of 450
Maintenance8-33
8
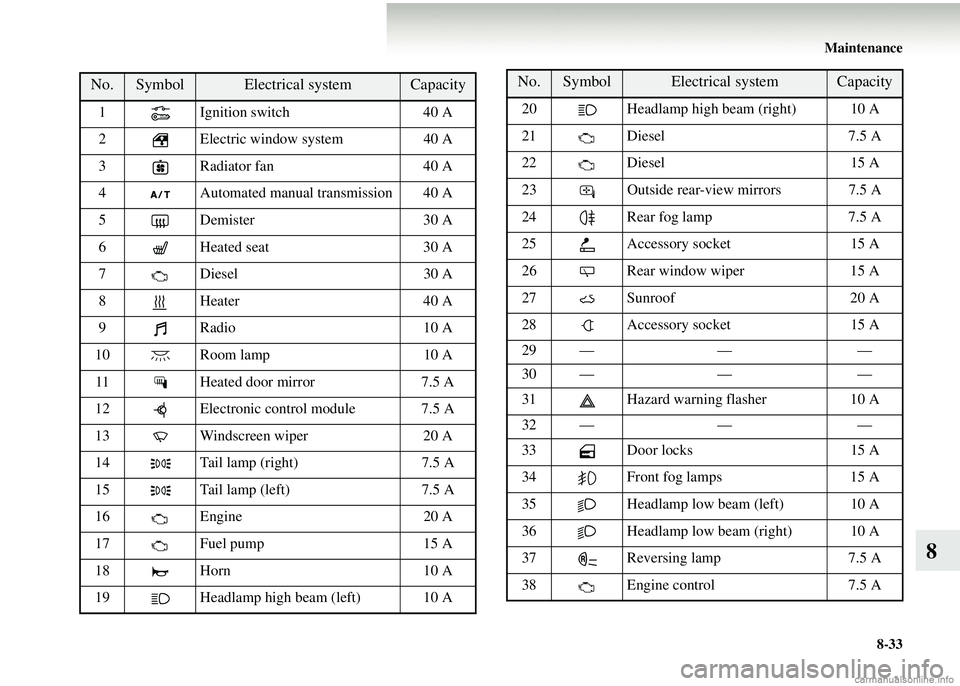
No. Symbol Electrical systemCapacity
1 Ignition switch 40 A
2 Electric window system 40 A
3 Radiator fan 40 A
4 Automated manual transmission 40 A
5 Demister 30 A
6 Heated seat 30 A
7 Diesel 30 A
8 Heater 40 A
9 Radio 10 A
10 Room lamp 10 A
11 Heated door mirror 7.5 A
12 Electronic control module 7.5 A
13 Windscreen wiper20 A
14 Tail lamp (right) 7.5 A
15 Tail lamp (left) 7.5 A
16 Engine 20 A
17 Fuel pump 15 A
18 Horn 10 A
19 Headlamp high beam (left) 10 A 20 Headlamp high beam (right) 10 A
21 Diesel 7.5 A
22 Diesel 15 A
23 Outside rear-view mirrors 7.5 A
24 Rear fog lamp 7.5 A
25 Accessory socket 15 A
26 Rear window wiper 15 A
27 Sunroof 20 A
28 Accessory socket 15 A
29 — ——
30 — ——
31 Hazard warning flasher 10 A
32 — ——
33 Door locks 15 A
34 Front fog lamps 15 A
35 Headlamp low beam (left) 10 A
36 Headlamp low beam (right) 10 A
37 Reversing lamp 7.5 A
38 Engine control 7.5 A
No. Symbol Electrical systemCapacity
Page 383 of 450
Maintenance8-41
8
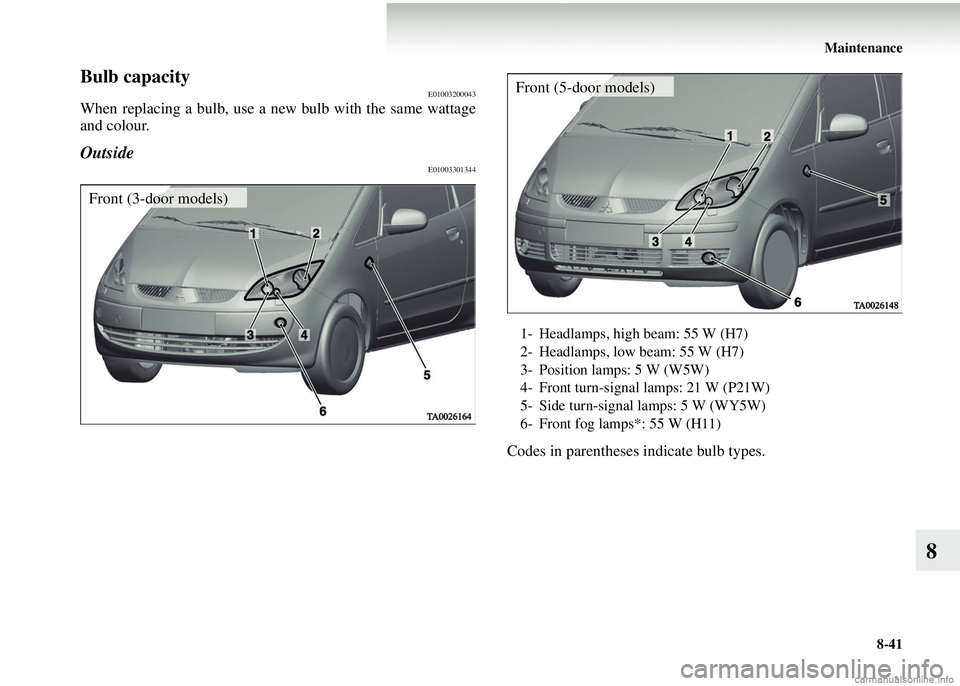
Bulb capacityE01003200043
When replacing a bulb, use a new bulb with the same wattage
and colour.
OutsideE01003301344
Codes in parentheses indicate bulb types.
Front (3-door models)
1- Headlamps, high beam: 55 W (H7)
2- Headlamps, low beam: 55 W (H7)
3- Position lamps: 5 W (W5W)
4- Front turn-signal lamps: 21 W (P21W)
5- Side turn-signal lamps: 5 W (WY5W)
6- Front fog lamps*: 55 W (H11)
Front (5-door models)
Page 386 of 450
8-44 Maintenance
8
HeadlampsE01003500642
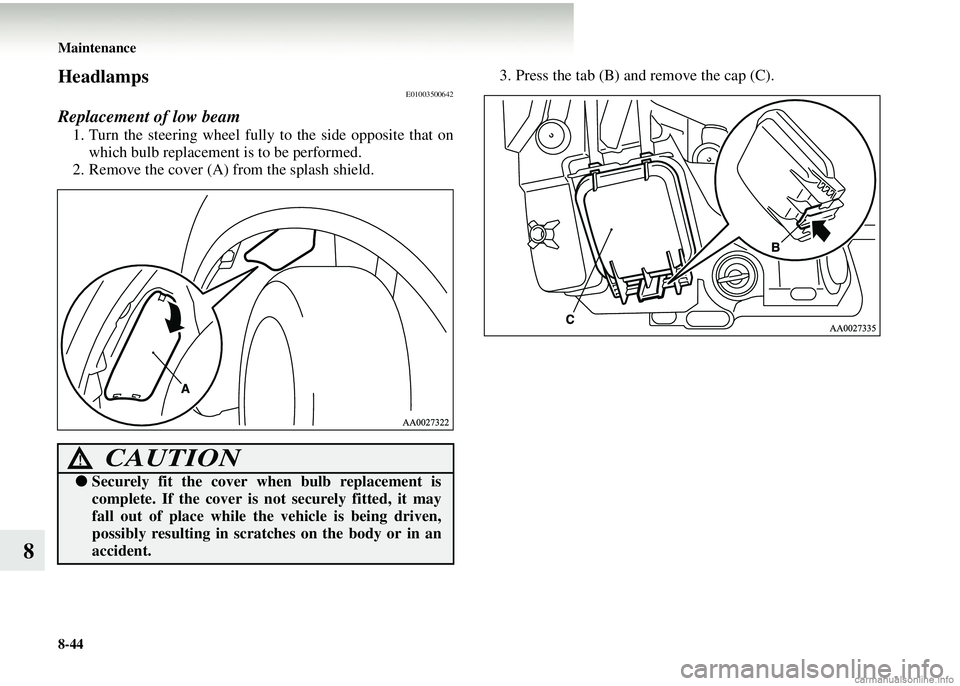
Replacement of low beam
1. Turn the steering wheel fully to the side opposite that onwhich bulb replacement is to be performed.
2. Remove the cover (A) from the splash shield. 3. Press the tab (B) and remove the cap (C).
CAUTION!
●
Securely fit the cover when bulb replacement is
complete. If the cover is no t securely fitted, it may
fall out of place while th e vehicle is being driven,
possibly resulting in scratches on the body or in an
accident.
Page 387 of 450
Maintenance8-45
8
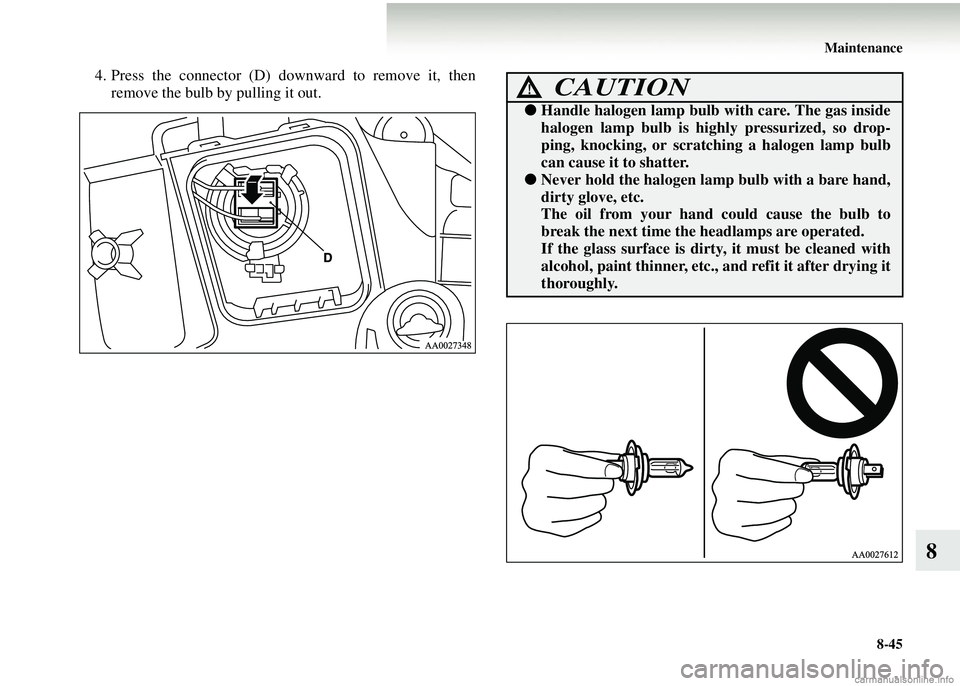
4. Press the connector (D) downward to remove it, thenremove the bulb by pulling it out.CAUTION!
● Handle halogen lamp bulb with care. The gas inside
halogen lamp bulb is highly pressurized, so drop-
ping, knocking, or scratc hing a halogen lamp bulb
can cause it to shatter.
● Never hold the halogen lamp bulb with a bare hand,
dirty glove, etc.
The oil from your hand could cause the bulb to
break the next time th e headlamps are operated.
If the glass surface is dirt y, it must be cleaned with
alcohol, paint thinner, etc., and refit it after drying it
thoroughly.
Page 389 of 450
Maintenance8-47
8
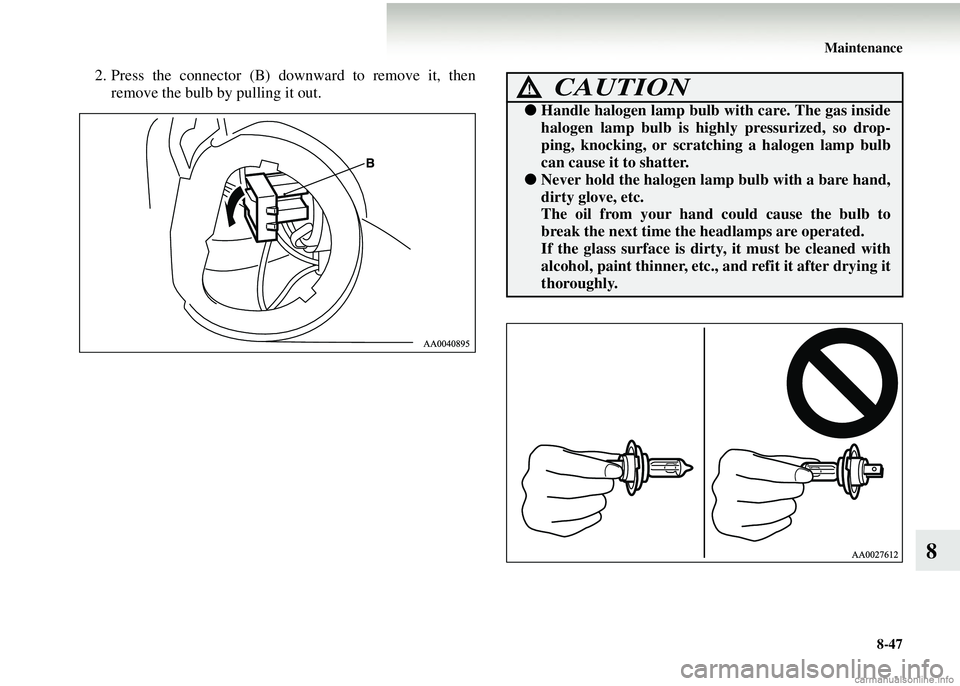
2. Press the connector (B) dow nward to remove it, then
remove the bulb by pulling it out.CAUTION!
● Handle halogen lamp bulb with care. The gas inside
halogen lamp bulb is highly pressurized, so drop-
ping, knocking, or scratc hing a halogen lamp bulb
can cause it to shatter.
● Never hold the halogen lamp bulb with a bare hand,
dirty glove, etc.
The oil from your hand could cause the bulb to
break the next time th e headlamps are operated.
If the glass surface is dirt y, it must be cleaned with
alcohol, paint thinner, etc., and refit it after drying it
thoroughly.
Page 390 of 450
8-48 Maintenance
8
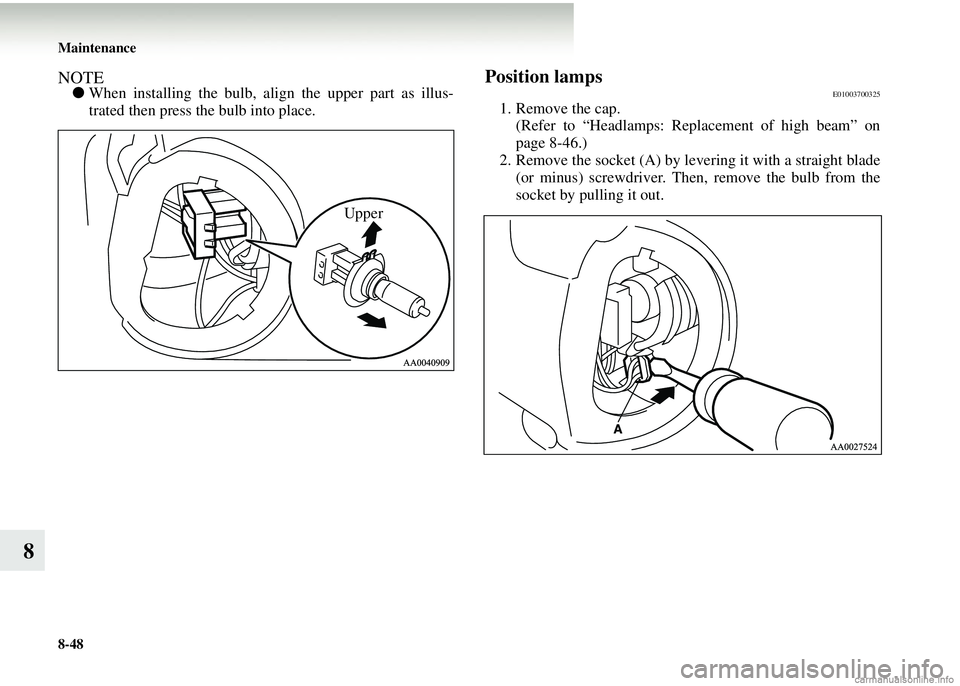
NOTE●When installing the bulb, align the upper part as illus-
trated then press the bulb into place.Position lampsE01003700325
1. Remove the cap.
(Refer to “Headlamps: Re placement of high beam” on
page 8-46.)
2. Remove the socket (A) by leve ring it with a straight blade
(or minus) screwdriver. Then, remove the bulb from the
socket by pulling it out.
Upper
Page 391 of 450
Maintenance8-49
8
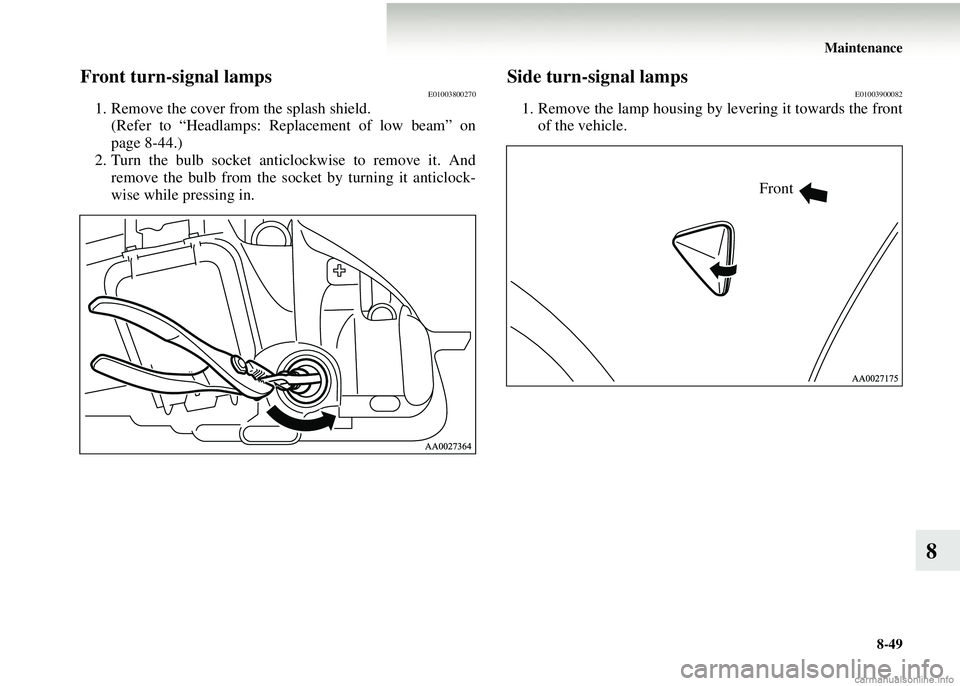
Front turn-signal lampsE01003800270
1. Remove the cover from the splash shield.(Refer to “Headlamps: Replacement of low beam” on
page 8-44.)
2. Turn the bulb socket anticlockwise to remove it. And remove the bulb from the socket by turning it anticlock-
wise while pressing in.
Side turn-signal lampsE01003900082
1. Remove the lamp housing by levering it towards the frontof the vehicle.
Front