CD player MITSUBISHI COLT 2008 Owner's Manual (in English)
[x] Cancel search | Manufacturer: MITSUBISHI, Model Year: 2008, Model line: COLT, Model: MITSUBISHI COLT 2008Pages: 450, PDF Size: 14.57 MB
Page 217 of 450
5
For pleasant driving
Ventilators . . . . . . . . . . . . . . . . . . . . . . . . . . . . . . .5- 2
Heater* . . . . . . . . . . . . . . . . . . . . . . . . . . . . . . . . . .5- 7
Automatic air conditioning* . . . . . . . . . . . . . . . . .5- 13
Important operation tips for the air conditioning . .5- 22
Air purifier . . . . . . . . . . . . . . . . . . . . . . . . . . . . . . .5- 23
LW/MW/FM electronic tuning radio with CD player* . . . . . . . . . . . . . . . . . . . . . . . . .5- 24
Steering wheel remote control switch* . . . . . . . . .5- 52
Error codes . . . . . . . . . . . . . . . . . . . . . . . . . . . . . . .5- 54
Handling compact discs . . . . . . . . . . . . . . . . . . . . .5- 56
Antenna . . . . . . . . . . . . . . . . . . . . . . . . . . . . . . . . .5- 59
Sun visors . . . . . . . . . . . . . . . . . . . . . . . . . . . . . . . .5- 59
Vanity mirror . . . . . . . . . . . . . . . . . . . . . . . . . . . . .5- 60
Accessory socket . . . . . . . . . . . . . . . . . . . . . . . . . .5- 60
Interior lamps . . . . . . . . . . . . . . . . . . . . . . . . . . . . .5- 61
Storage spaces . . . . . . . . . . . . . . . . . . . . . . . . . . . .5- 64
Cup holder . . . . . . . . . . . . . . . . . . . . . . . . . . . . . . .5- 69
Rear shelf panel* . . . . . . . . . . . . . . . . . . . . . . . . . .5- 70
Coat hooks* . . . . . . . . . . . . . . . . . . . . . . . . . . . . . .5- 72
Luggage hooks (5-door models)* . . . . . . . . . . . . .5- 72
Luggage net (5-door models)* . . . . . . . . . . . . . . . .5- 73
Page 240 of 450
5-24 For pleasant driving
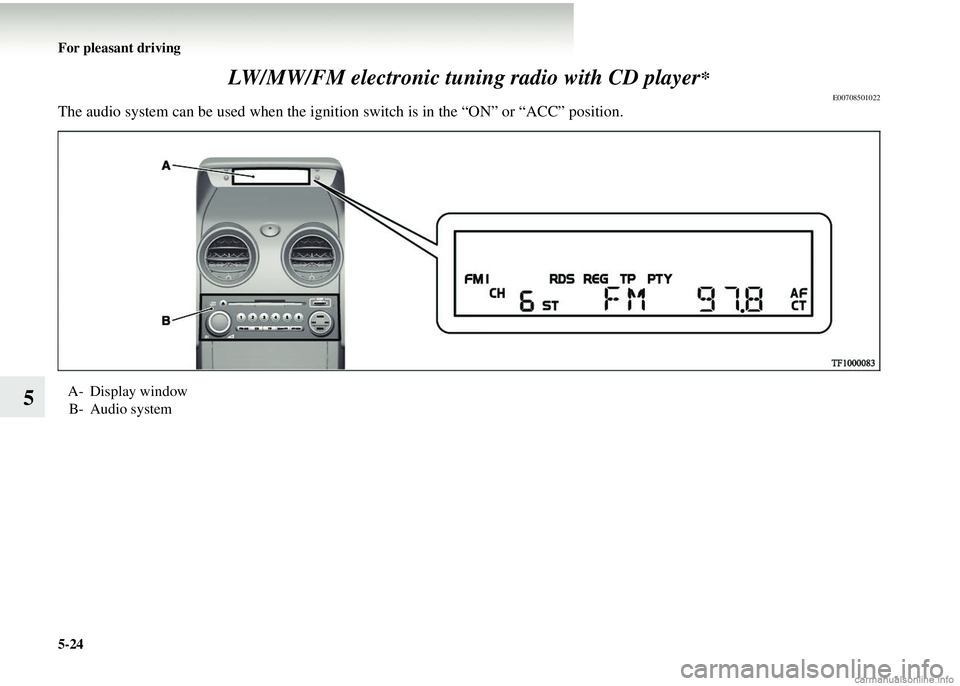
5LW/MW/FM electronic tuni
ng radio with CD player
*
E00708501022
The audio system can be used when the igni tion switch is in the “ON” or “ACC” position.
A- Display window
B- Audio system
Page 258 of 450
5-42 For pleasant driving
5
To listen to a CDE00709601017
With a CD player1. Insert the disc with the label facing up.
When a disc is inserted, the DISC indicator (10) will come
on and the CD player will be gin playing even if the radio
is being used. The CD player will also start playback
when the CD button (5) is pressed with a disc in the player
even if the radio is being used.
2. To adjust the volume and tone, refer to “To adjust the vol- ume” on page 5-27 and “To adjust the tone” on page 5-27.
3. When an 8 cm compact disc is used, the adapter is not
needed for playback. Insert th e disc in the centre of the
disc-loading slot.
NOTE● For information concerning the handling of compact
discs, refer to “Handling of compact discs” on page 5-56.
To fast forward/reverse the disc
To fast forward or reverse, use either the TRACK button
(8 or 9).
Fast forward
You can fast forward by holding down the TRACK button (9)
for more than 1 second.
Fast reverse
You can fast reverse by holding down the TRACK button (8)
for more than 1 second.
To select a desired track
You can select by using the TRACK button (8 or 9).
Track up
Press the TRACK butt on (9) until the desired track is reached.
The TRACK indicator (13) will display the number of the
selected track.
Track down
Press the TRACK butt on (8) until the desired track is reached.
The TRACK indicator (13) will display the number of the
selected track.
NOTE● Pressing the TRACK button (8) once during the song will
cause the CD to restart playing from the beginning of the
song.
Page 259 of 450
For pleasant driving5-43
5
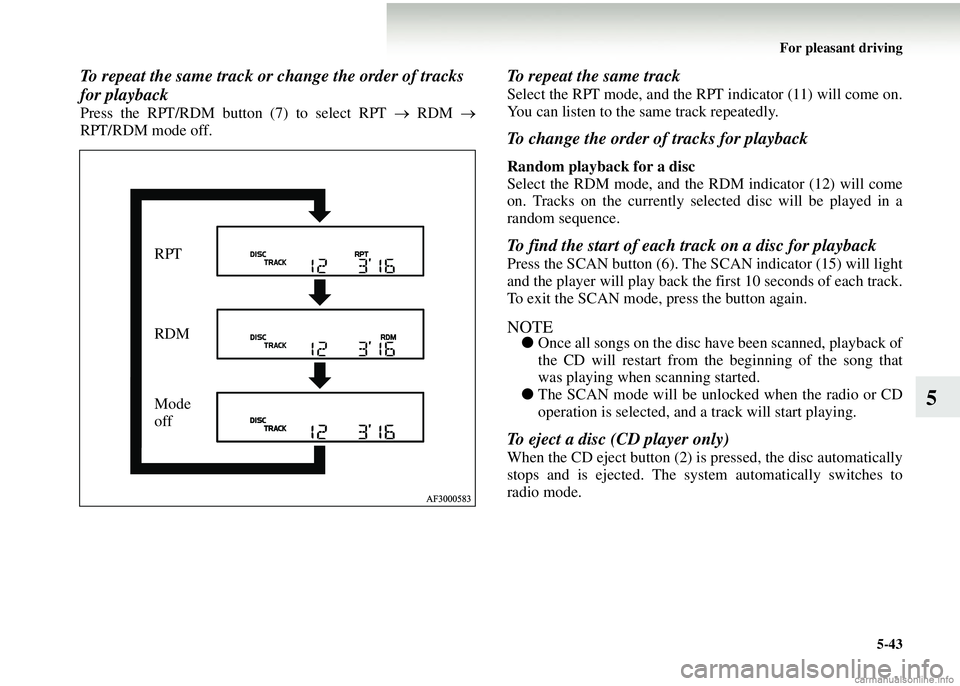
To repeat the same track or change the order of tracks
for playback
Press the RPT/RDM button (7) to select RPT → RDM →
RPT/RDM mode off.
To repeat the same track
Select the RPT mode, and the RPT indicator (11) will come on.
You can listen to the same track repeatedly.
To change the order of tracks for playback
Random playback for a disc
Select the RDM mode, and the RDM indicator (12) will come
on. Tracks on the currently select ed disc will be played in a
random sequence.
To find the start of each track on a disc for playback
Press the SCAN button (6). The SCAN indicator (15) will light
and the player will play back the first 10 seconds of each track.
To exit the SCAN mode, press the button again.
NOTE● Once all songs on the disc have been scanned, playback of
the CD will restart from the beginning of the song that
was playing when scanning started.
● The SCAN mode will be unlocked when the radio or CD
operation is selected, and a track will start playing.
To eject a disc (CD player only)
When the CD eject button (2) is pressed, the disc automatically
stops and is ejected. The syst em automatically switches to
radio mode.
RPT
RDM
Mode
off
Page 261 of 450
For pleasant driving5-45
5
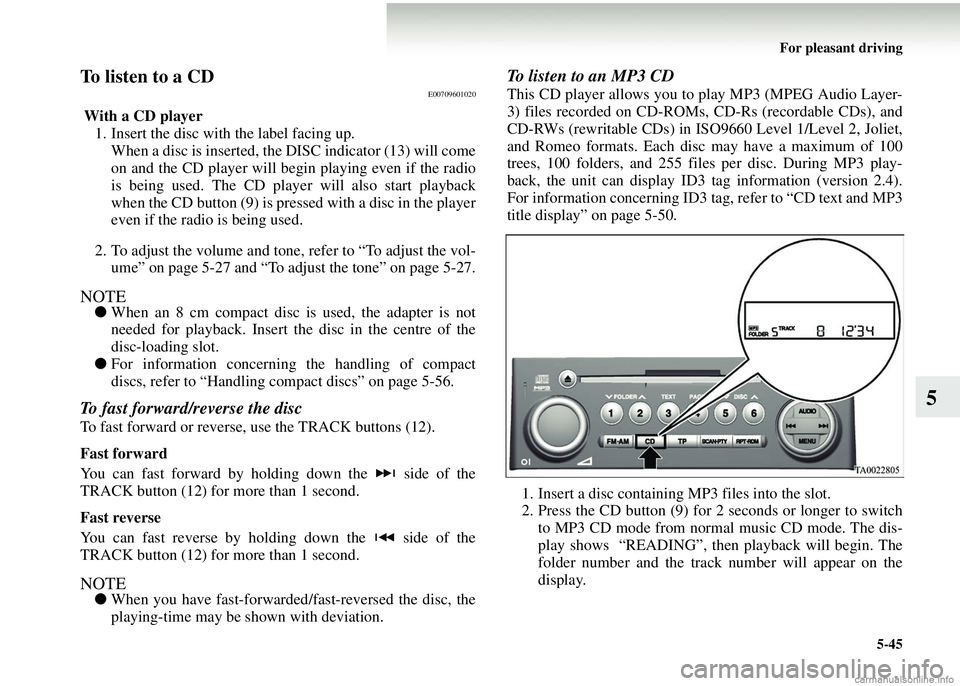
To listen to a CDE00709601020
With a CD player1. Insert the disc with the label facing up.
When a disc is inserted, the DISC indicator (13) will come
on and the CD player will begin playing even if the radio
is being used. The CD player will also start playback
when the CD button (9) is pres sed with a disc in the player
even if the radio is being used.
2. To adjust the volume and tone, refer to “To adjust the vol- ume” on page 5-27 and “To adjust the tone” on page 5-27.
NOTE● When an 8 cm compact disc is used, the adapter is not
needed for playback. Insert th e disc in the centre of the
disc-loading slot.
● For information concerning the handling of compact
discs, refer to “Handling co mpact discs” on page 5-56.
To fast forward/reverse the disc
To fast forward or reverse, use the TRACK buttons (12).
Fast forward
You can fast forward by holding down the side of the
TRACK button (12) for more than 1 second.
Fast reverse
You can fast reverse by holding down the side of the
TRACK button (12) for more than 1 second.
NOTE●When you have fast-forwarded /fast-reversed the disc, the
playing-time may be shown with deviation.
To listen to an MP3 CD
This CD player allows you to play MP3 (MPEG Audio Layer-
3) files recorded on CD-ROMs, CD-Rs (recordable CDs), and
CD-RWs (rewritable CDs) in ISO9660 Level 1/Level 2, Joliet,
and Romeo formats. Each disc may have a maximum of 100
trees, 100 folders, and 255 files per disc. During MP3 play-
back, the unit can display ID3 tag information (version 2.4).
For information concerning ID3 ta g, refer to “CD text and MP3
title display” on page 5-50.
1. Insert a disc containing MP3 files into the slot.
2. Press the CD button (9) for 2 seconds or longer to switch to MP3 CD mode from normal music CD mode. The dis-
play shows “READING”, then playback will begin. The
folder number and the track number will appear on the
display.
Page 263 of 450
For pleasant driving5-47
5
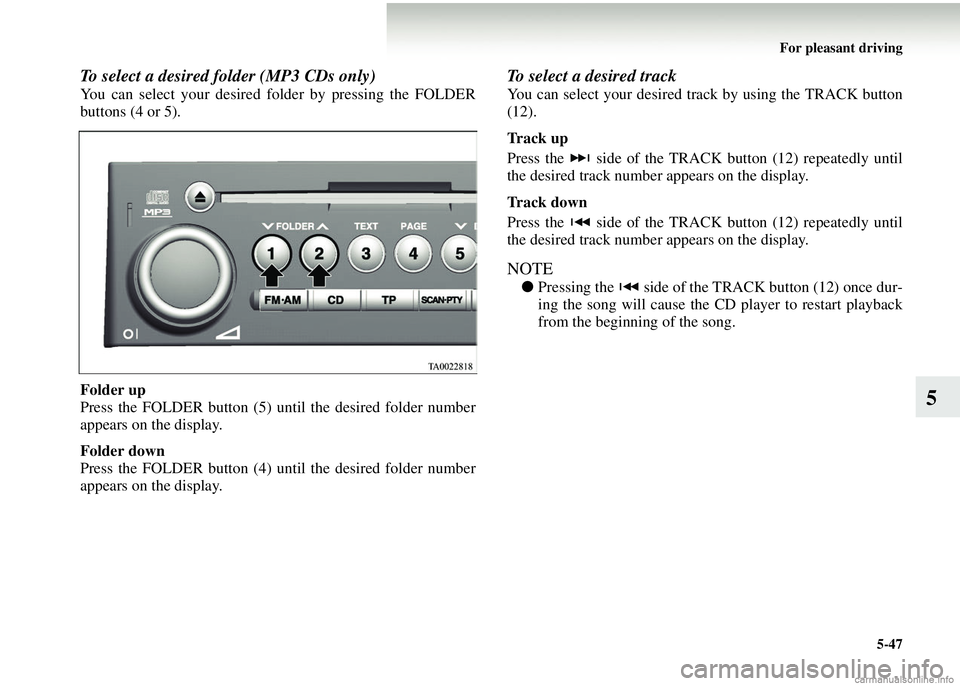
To select a desired folder (MP3 CDs only)
You can select your desired fo lder by pressing the FOLDER
buttons (4 or 5).
Folder up
Press the FOLDER button (5) until the desired folder number
appears on the display.
Folder down
Press the FOLDER button (4) until the desired folder number
appears on the display.
To select a desired track
You can select your desired track by using the TRACK button
(12).
Track up
Press the side of the TRACK button (12) repeatedly until
the desired track number appears on the display.
Track down
Press the side of the TRACK button (12) repeatedly until
the desired track number appears on the display.
NOTE
●Pressing the side of the TRACK button (12) once dur-
ing the song will cause the CD player to restart playback
from the beginning of the song.
Page 265 of 450
For pleasant driving5-49
5
NOTE●With a disc that contains both CD-DA and MP3 files, the
random mode causes only files of the same format (CD-
DA only or MP3 files only) to be played in a random
sequence.
To find the start of each track on a disc for playback
Press the SCAN button (10). “SCAN” will appear on the dis-
play and the CD player will play back the first 10 seconds of
each track on the selected disc.
The track number will blink while the scan mode is selected.
To exit the scan mode, press the SCAN button again.
NOTE●Once all tracks on the disc have been scanned, playback
of the disc will restart from the beginning of the track that
was playing when scanning started.
● The scan mode will be canceled when radio or CD opera-
tion is selected.
● With a disc that contains both CD-DA and MP3 files, the
scan mode causes only files of the same format (CD-DA
only or MP3 files only) to be played.
To eject a disc
When the CD eject button (2) is pressed, the disc automatically
stops and is ejected. The syst em automatically switches to
radio mode.
Page 266 of 450
5-50 For pleasant driving
5
CD text and MP3 title displayE00725000070
This CD player can display CD text and MP3 titles including
ID3 tag information (version 2.4).
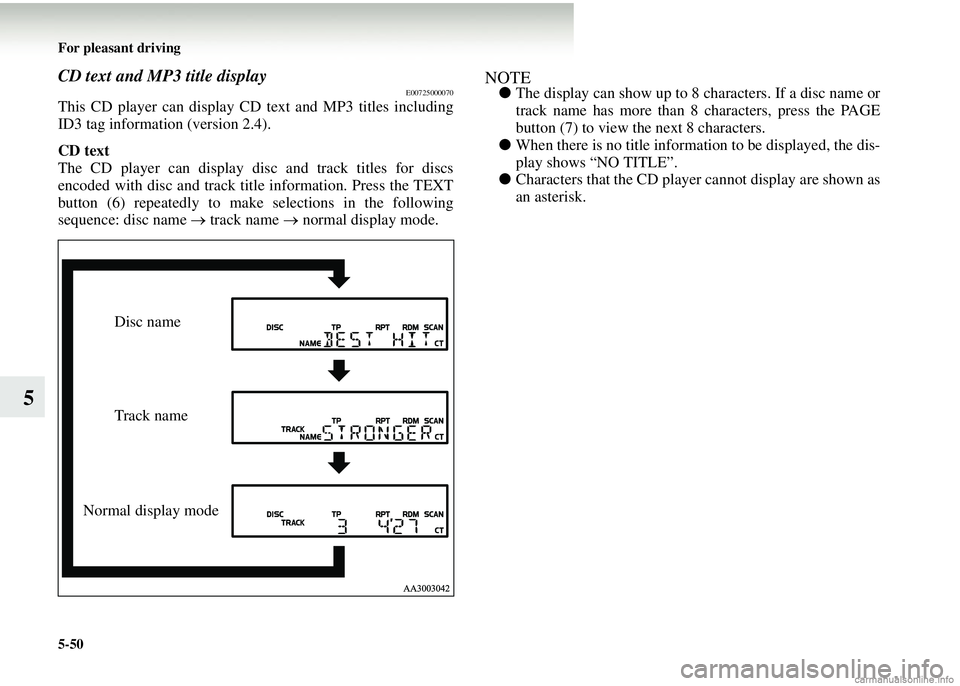
CD text
The CD player can display disc and track titles for discs
encoded with disc and track title information. Press the TEXT
button (6) repeatedly to make selections in the following
sequence: disc name → track name → normal display mode.
NOTE● The display can show up to 8 characters. If a disc name or
track name has more than 8 characters, press the PAGE
button (7) to view th e next 8 characters.
● When there is no title informat ion to be displayed, the dis-
play shows “NO TITLE”.
● Characters that the CD player cannot display are shown as
an asterisk.
Disc name
Track name
Normal display mode
Page 267 of 450
For pleasant driving5-51
5
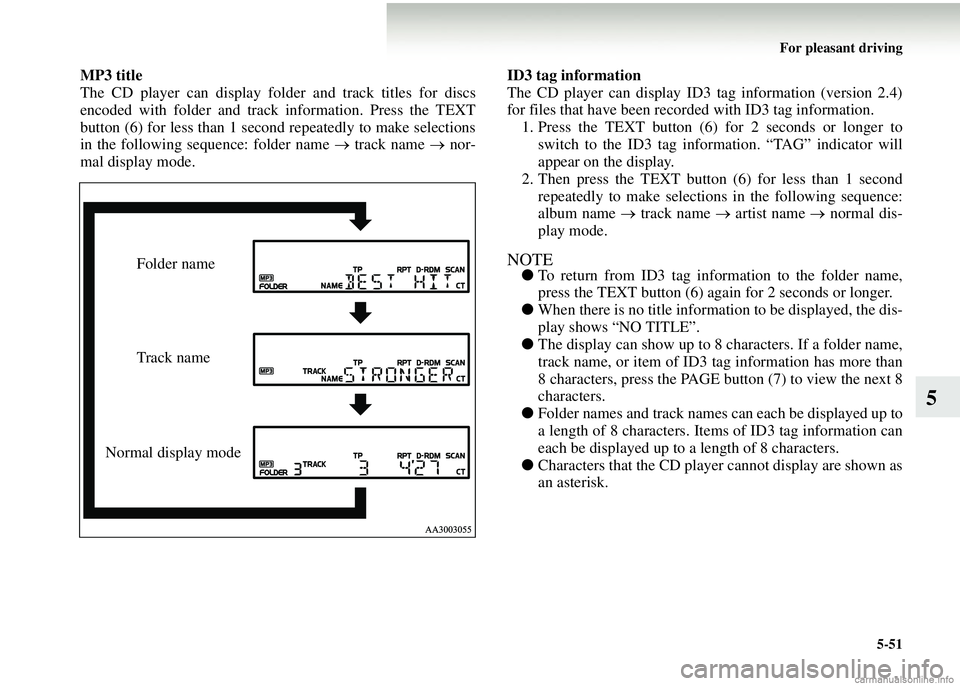
MP3 title
The CD player can display fold er and track titles for discs
encoded with folder and track information. Press the TEXT
button (6) for less than 1 second repeatedly to make selections
in the following sequence: folder name → track name → nor-
mal display mode. ID3 tag information
The CD player can display ID3 tag information (version 2.4)
for files that have been record
ed with ID3 tag information.
1. Press the TEXT button (6) for 2 seconds or longer to switch to the ID3 tag information. “TAG” indicator will
appear on the display.
2. Then press the TEXT button (6) for less than 1 second
repeatedly to make selections in the following sequence:
album name → track name → artist name → normal dis-
play mode.
NOTE● To return from ID3 tag information to the folder name,
press the TEXT button (6) again for 2 seconds or longer.
● When there is no title information to be displayed, the dis-
play shows “NO TITLE”.
● The display can show up to 8 characters. If a folder name,
track name, or item of ID3 tag information has more than
8 characters, press the PAGE bu tton (7) to view the next 8
characters.
● Folder names and track names can each be displayed up to
a length of 8 characters. Item s of ID3 tag information can
each be displayed up to a length of 8 characters.
● Characters that the CD player cannot display are shown as
an asterisk.Folder name
Track name
Normal display mode
Page 269 of 450
For pleasant driving5-53
5
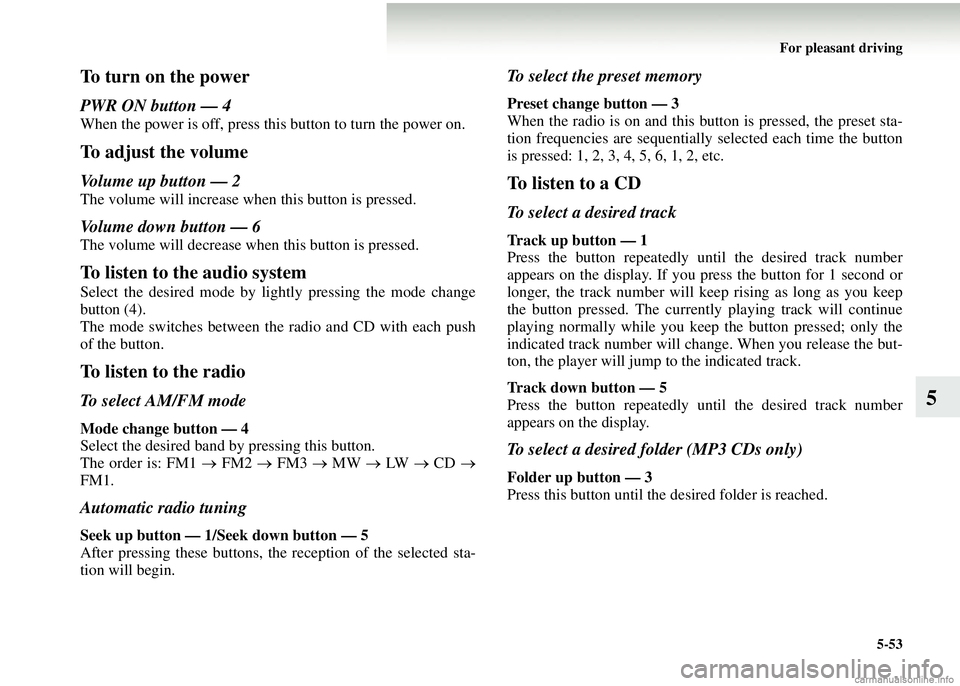
To turn on the power
PWR ON button — 4
When the power is off, press this button to turn the power on.
To adjust the volume
Volume up button — 2
The volume will increase when this button is pressed.
Volume down button — 6
The volume will decrease when this button is pressed.
To listen to the audio system
Select the desired mode by lightly pressing the mode change
button (4).
The mode switches between the radio and CD with each push
of the button.
To listen to the radio
To select AM/FM mode
Mode change button — 4
Select the desired band by pressing this button.
The order is: FM1 → FM2 → FM3 → MW → LW → CD →
FM1.
Automatic radio tuning
Seek up button — 1/S eek down button — 5
After pressing these buttons, th e reception of the selected sta-
tion will begin.
To select the preset memory
Preset change button — 3
When the radio is on and this bu tton is pressed, the preset sta-
tion frequencies are sequentiall y selected each time the button
is pressed: 1, 2, 3, 4, 5, 6, 1, 2, etc.
To listen to a CD
To select a desired track
Track up button — 1
Press the button repeatedly until the desired track number
appears on the display. If you press the button for 1 second or
longer, the track number will keep rising as long as you keep
the button pressed. The currentl y playing track will continue
playing normally while you keep the button pressed; only the
indicated track number will change. When you release the but-
ton, the player will jump to the indicated track.
Track down button — 5
Press the button repeatedly until the desired track number
appears on the display.
To select a desired folder (MP3 CDs only)
Folder up button — 3
Press this button until the desired folder is reached.