buttons MITSUBISHI COLT 2008 Owner's Manual (in English)
[x] Cancel search | Manufacturer: MITSUBISHI, Model Year: 2008, Model line: COLT, Model: MITSUBISHI COLT 2008Pages: 450, PDF Size: 14.57 MB
Page 139 of 450
Instruments and controls3-19
3
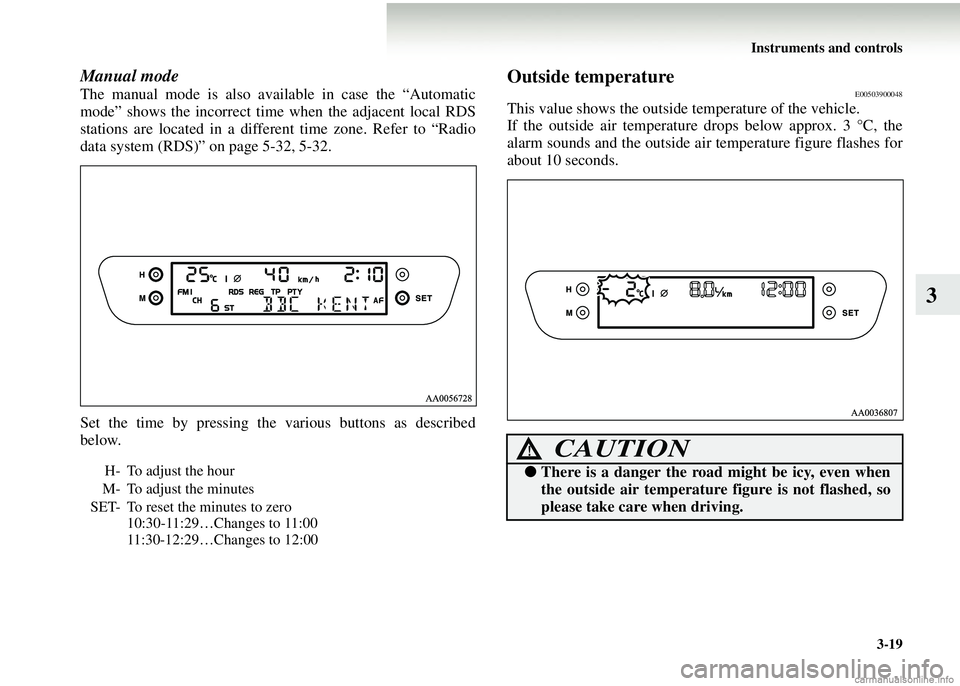
Manual mode
The manual mode is also available in case the “Automatic
mode” shows the incorrect time when the adjacent local RDS
stations are located in a different time zone. Refer to “Radio
data system (RDS)” on page 5-32, 5-32.
Set the time by pressing the various buttons as described
below.
Outside temperatureE00503900048
This value shows the outside temperature of the vehicle.
If the outside air temperature drops below approx. 3 °C, the
alarm sounds and the outside ai r temperature figure flashes for
about 10 seconds.
H- To adjust the hour
M- To adjust the minutes
SET- To reset the minutes to zero 10:30-11:29…Changes to 11:00
11:30-12:29…Changes to 12:00
CAUTION!
●There is a danger the road might be icy, even when
the outside air temperature figure is not flashed, so
please take care when driving.
Page 242 of 450
5-26 For pleasant driving
5
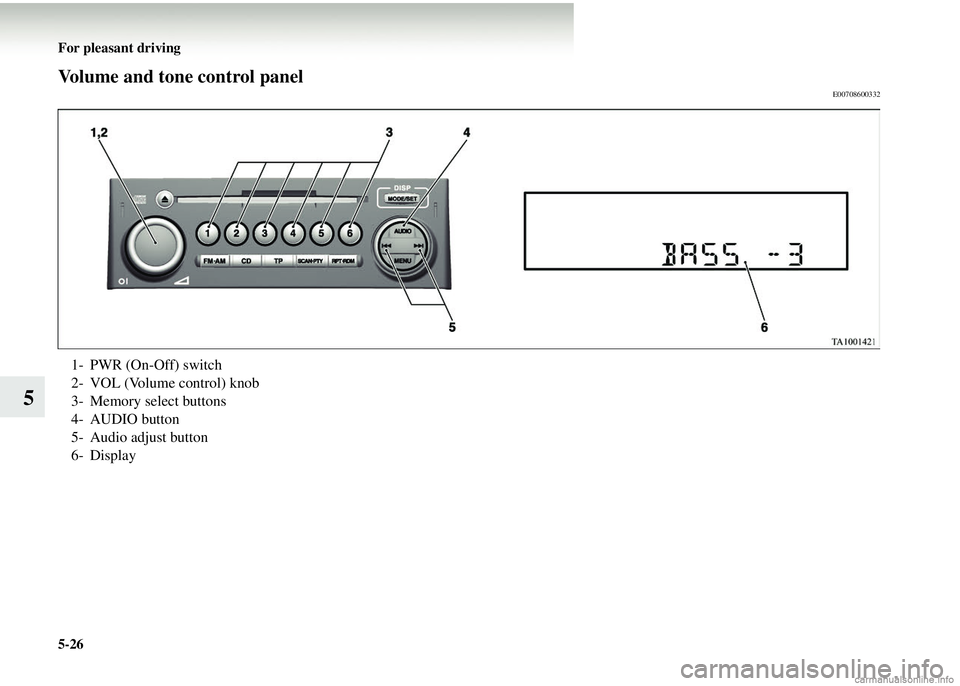
Volume and tone control panelE00708600332
1- PWR (On-Off) switch
2- VOL (Volume control) knob
3- Memory select buttons
4- AUDIO button
5- Audio adjust button
6- Display
Page 244 of 450
5-28 For pleasant driving
5
To enter audio tone settings into the memory
It is possible to enter the audio adjustment condition (BASS,
TRE, FADE, BAL) into the memory.1. Make the desired adjustments in the audio adjust mode.
Refer to “To adjust the tone” on page 5-27.
2. In the audio adjust mode, press and hold one of the mem- ory select buttons (3) [1-6]. When you hear a bleep, the
memorization is complete. The display will show the but-
ton number [SOUND1-SOUND6] for which the settings
were memorized.
3. In future, when you gently press the memory select button in the audio adjust mode, the audio adjustment condition
memorized for that button will take effect.
Page 245 of 450
For pleasant driving5-29
5
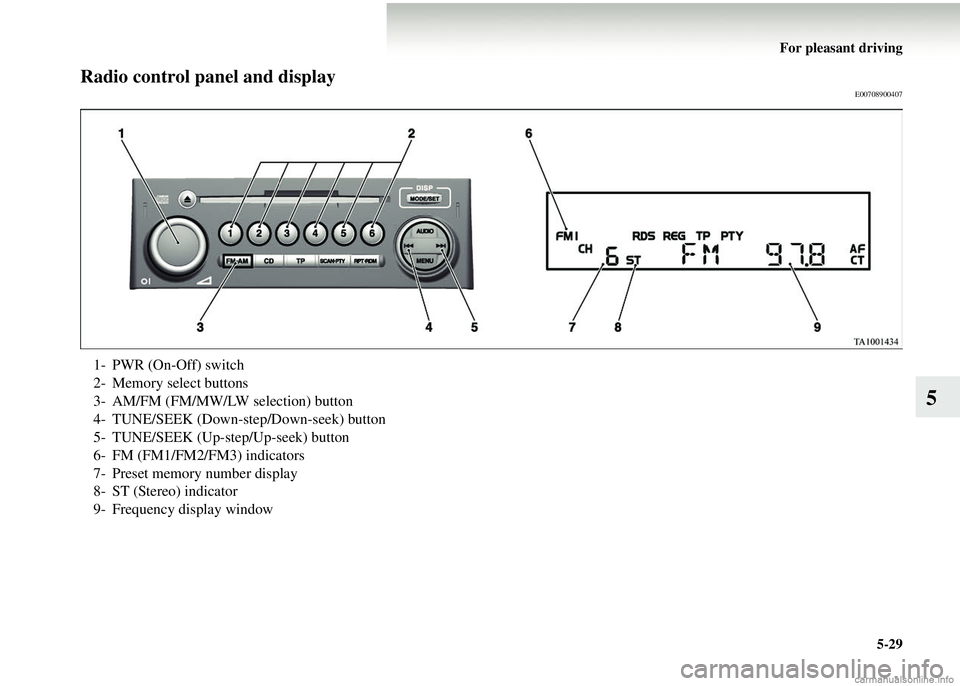
Radio control panel and displayE00708900407
1- PWR (On-Off) switch
2- Memory select buttons
3- AM/FM (FM/MW/LW selection) button
4- TUNE/SEEK (Down-step/Down-seek) button
5- TUNE/SEEK (Up-step/Up-seek) button
6- FM (FM1/FM2/FM3) indicators
7- Preset memory number display
8- ST (Stereo) indicator
9- Frequency display window
Page 246 of 450
5-30 For pleasant driving
5
To listen to the radioE00709000346
1. Press the PWR switch (1) to turn the audio system on andoff.
Press the AM/FM button (3) to turn on the radio if a CD is
being played.
2. Press the AM/FM button (3) to select the desired band.
3. Press the TUNE/SEEK button (4 or 5) to tune to a station,
or press one of the memory select buttons (2) to recall a
station memorised for that button.
To tune the radioE00709100073
Automatic tuning
After keeping the TUNE/SEEK button (4 or 5) depressed until
it beeps, release the button, an d the selected station reception
will start.
Manual tuning
The frequency changes every time the TUNE/SEEK button (4
or 5) is pressed. Press the button to select the desired station.
To enter frequencies into the memoryE00716100525
Manual setting
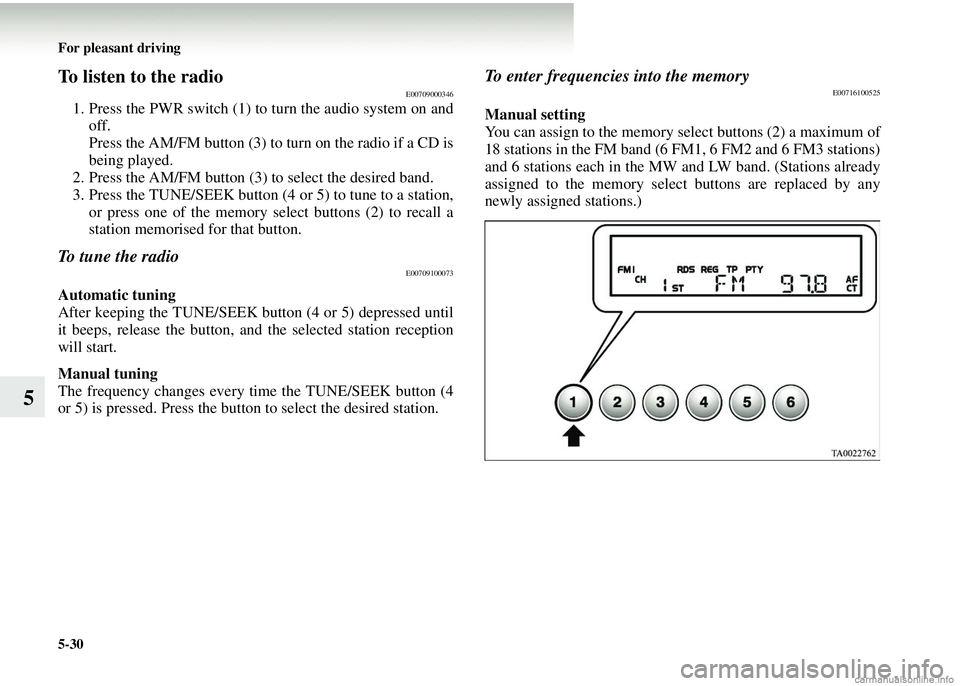
You can assign to the memory select buttons (2) a maximum of
18 stations in the FM band (6 FM1, 6 FM2 and 6 FM3 stations)
and 6 stations each in the MW and LW band. (Stations already
assigned to the memory select buttons are replaced by any
newly assigned stations.)
Page 247 of 450
For pleasant driving5-31
5
Follow the steps described below.1. Press either the TUNE/SEEK button (4 or 5) to tune the frequency to be entered in the memory.
2. Press one of the memory select buttons (2) for 2 seconds or longer. The sound will be momentarily interrupted
while the frequency is being entered into the memory.
The number of the button corresponding to the entry in the
memory and the frequency are displayed.
3. The preset memory setting is retrieved by pressing the
button and then releasing it within 2 seconds.
Automatic setting
With the method, all manually set stations in the band currently
selected for reception are replaced with stations in the same
band that are automatically selected in order of signal strength.
The radio automatically selects 6 stations in the FM band (FM3
station only) and 6 stations each in the MW and LW band.
Follow the steps described below. 1. With the radio mode selected, hold down the AM/FM but- ton (3) for 2 seconds or longer. The 6 stations with the
best signal strength will automatically be assigned to the
memory select buttons (2), wi th the lowest-frequency sta-
tion being assigned to the lowest-number button.
2. When you subsequently press a memory select button to select a channel number, the ra dio will begin receiving the
station assigned to that number.
NOTE● If you press the AM/FM button (3) for 2 seconds or longer
while tuning in the FM1 or FM2 band, the radio will auto-
matically switch to the FM 3 band, where the automatic
seeking/storing will be activated.
Page 248 of 450
5-32 For pleasant driving
5
Radio data system (RDS)E00709200133
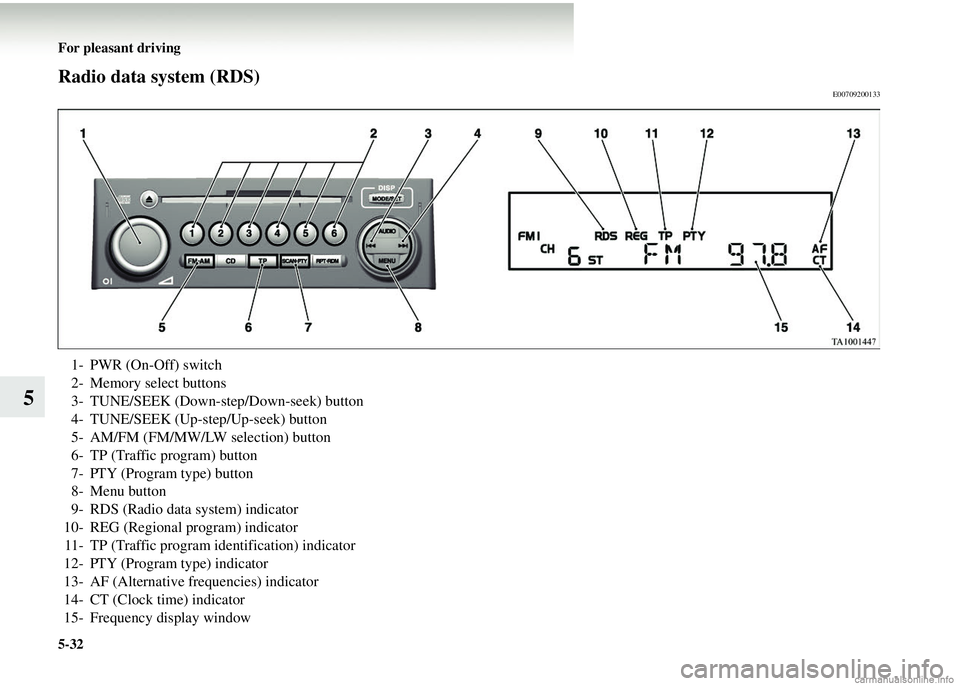
1- PWR (On-Off) switch
2- Memory select buttons
3- TUNE/SEEK (Down-step/Down-seek) button
4- TUNE/SEEK (Up-step/Up-seek) button
5- AM/FM (FM/MW/LW selection) button
6- TP (Traffic program) button
7- PTY (Program type) button
8- Menu button
9- RDS (Radio data system) indicator
10- REG (Regional program) indicator 11- TP (Traffic program identification) indicator
12- PTY (Program type) indicator
13- AF (Alternative frequencies) indicator
14- CT (Clock time) indicator
15- Frequency display window
Page 251 of 450
For pleasant driving5-35
5
NOTE●If the TUNE/SEEK button (3 or 4) is pressed for more
than 1 second, the radio will try to find out another broad-
cast of the same program t ype as currently selected.
● If no station is found with your desired PTY, the display
will show “EMPTY” for about 5 seconds and the radio
will return to the previous station.
How to enter PTYs in the memoryE00721400034
As many as 6 PTYs can be entered in the memory.
Follow the steps described below.
1. Press either the TUNE/SEEK button (3 or 4) to tune the PTY to be entered in the memory.
2. Press one of the memory select buttons (2) for 2 seconds
or longer. The sound will be momentarily interrupted
while the PTY is being entered into the memory. The
number of the button corresponding to the entry into the
memory and the PTY are displayed.
3. The preset memory setting is retrieved by pressing the button and then releasing it within about 2 seconds.
To change the language of PTY displayE00721500110
You can select your favourite language among English, French,
German, Swedish, Spanish and Italian.
1. Press the “MENU” button (A ) to select the language of
PTY display mode.
Refer to “Function setup mode” on page 5-38.
2. Press the audio adjust button (B) to select a language.
NOTE● After selecting a mode, you can leave the function setup
mode by taking either of the following steps:
• Press the “MENU” button (A ) for at least 2 seconds.
• Make no entry for 7 seconds.
Page 261 of 450
For pleasant driving5-45
5
To listen to a CDE00709601020
With a CD player1. Insert the disc with the label facing up.
When a disc is inserted, the DISC indicator (13) will come
on and the CD player will begin playing even if the radio
is being used. The CD player will also start playback
when the CD button (9) is pres sed with a disc in the player
even if the radio is being used.
2. To adjust the volume and tone, refer to “To adjust the vol- ume” on page 5-27 and “To adjust the tone” on page 5-27.
NOTE● When an 8 cm compact disc is used, the adapter is not
needed for playback. Insert th e disc in the centre of the
disc-loading slot.
● For information concerning the handling of compact
discs, refer to “Handling co mpact discs” on page 5-56.
To fast forward/reverse the disc
To fast forward or reverse, use the TRACK buttons (12).
Fast forward
You can fast forward by holding down the side of the
TRACK button (12) for more than 1 second.
Fast reverse
You can fast reverse by holding down the side of the
TRACK button (12) for more than 1 second.
NOTE●When you have fast-forwarded /fast-reversed the disc, the
playing-time may be shown with deviation.
To listen to an MP3 CD
This CD player allows you to play MP3 (MPEG Audio Layer-
3) files recorded on CD-ROMs, CD-Rs (recordable CDs), and
CD-RWs (rewritable CDs) in ISO9660 Level 1/Level 2, Joliet,
and Romeo formats. Each disc may have a maximum of 100
trees, 100 folders, and 255 files per disc. During MP3 play-
back, the unit can display ID3 tag information (version 2.4).
For information concerning ID3 ta g, refer to “CD text and MP3
title display” on page 5-50.
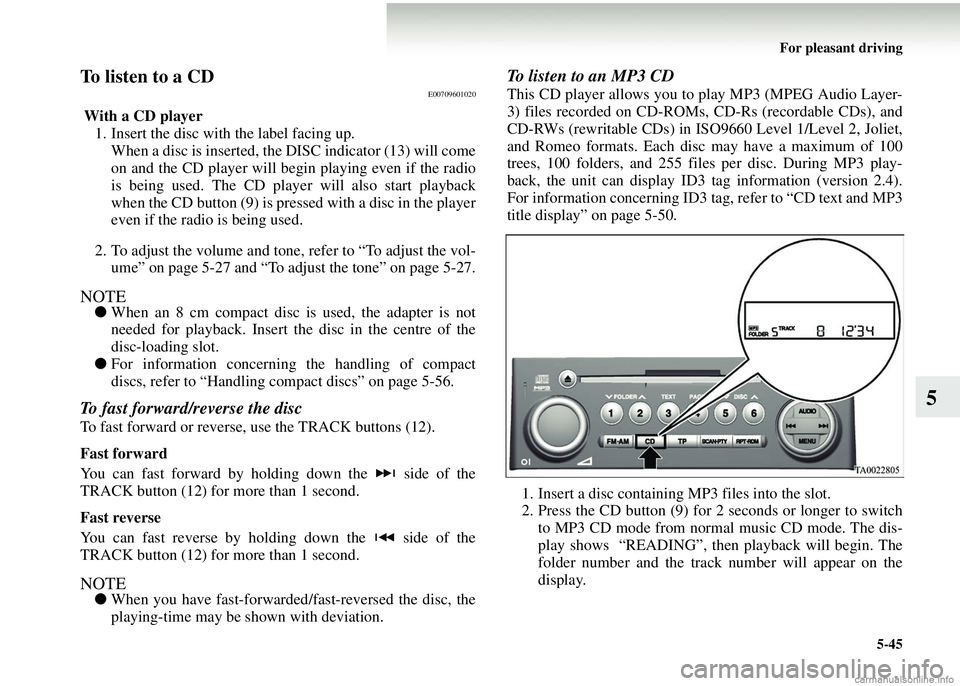
1. Insert a disc containing MP3 files into the slot.
2. Press the CD button (9) for 2 seconds or longer to switch to MP3 CD mode from normal music CD mode. The dis-
play shows “READING”, then playback will begin. The
folder number and the track number will appear on the
display.
Page 263 of 450
For pleasant driving5-47
5
To select a desired folder (MP3 CDs only)
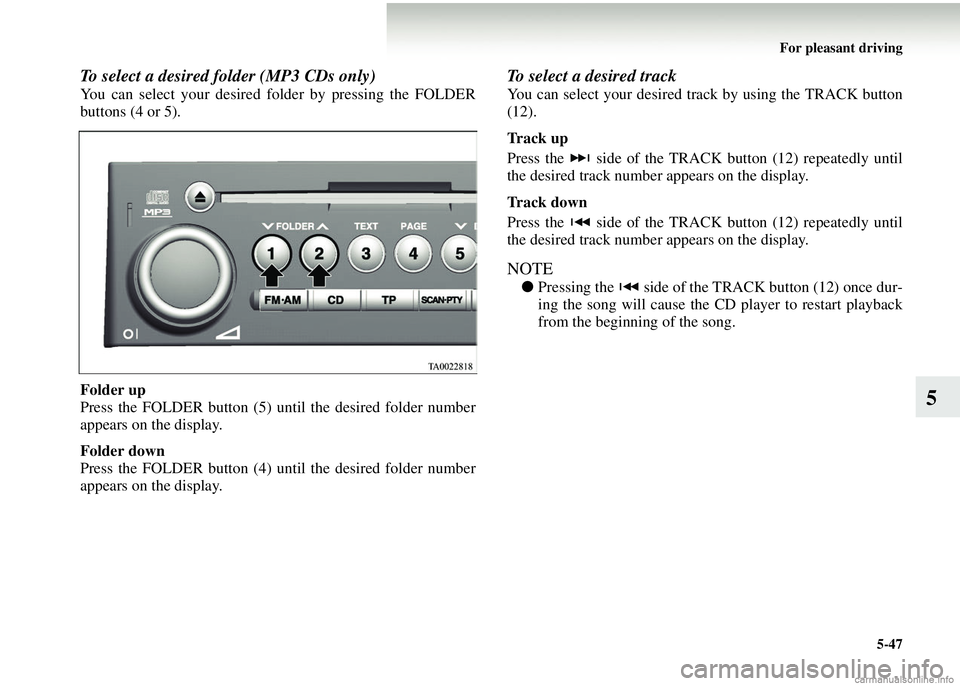
You can select your desired fo lder by pressing the FOLDER
buttons (4 or 5).
Folder up
Press the FOLDER button (5) until the desired folder number
appears on the display.
Folder down
Press the FOLDER button (4) until the desired folder number
appears on the display.
To select a desired track
You can select your desired track by using the TRACK button
(12).
Track up
Press the side of the TRACK button (12) repeatedly until
the desired track number appears on the display.
Track down
Press the side of the TRACK button (12) repeatedly until
the desired track number appears on the display.
NOTE
●Pressing the side of the TRACK button (12) once dur-
ing the song will cause the CD player to restart playback
from the beginning of the song.