check engine light MITSUBISHI COLT 2008 Owner's Manual (in English)
[x] Cancel search | Manufacturer: MITSUBISHI, Model Year: 2008, Model line: COLT, Model: MITSUBISHI COLT 2008Pages: 450, PDF Size: 14.57 MB
Page 152 of 450
3-32 Instruments and controls
3
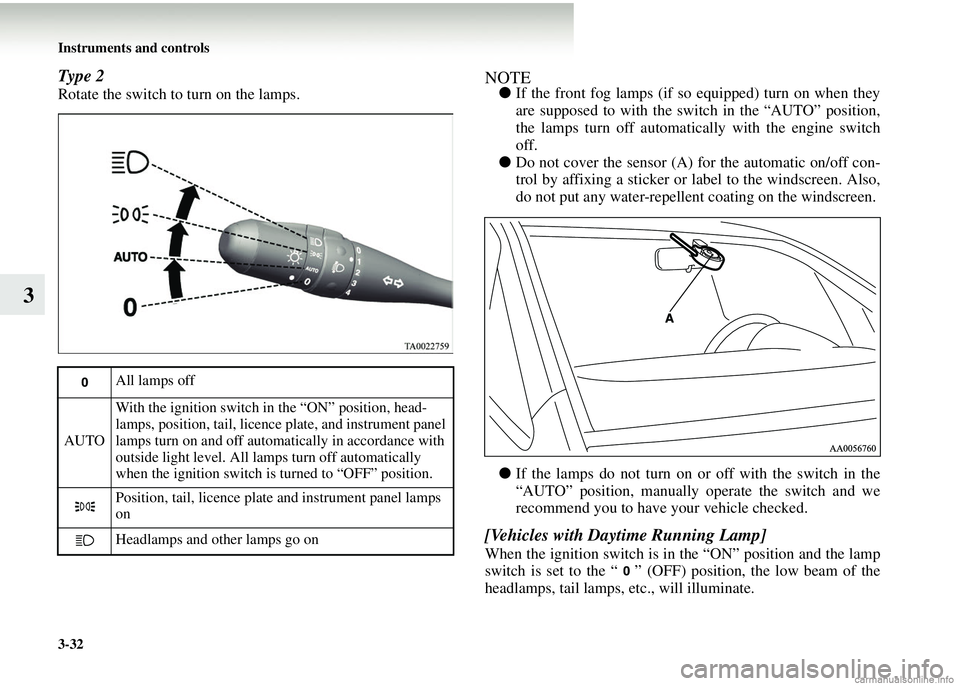
Type 2
Rotate the switch to turn on the lamps.
NOTE●If the front fog lamps (if so equipped) turn on when they
are supposed to with the switch in the “AUTO” position,
the lamps turn off automatically with the engine switch
off.
● Do not cover the sensor (A) for the automatic on/off con-
trol by affixing a sticker or label to the windscreen. Also,
do not put any water-repellent coating on the windscreen.
● If the lamps do not turn on or off with the switch in the
“AUTO” position, manually operate the switch and we
recommend you to have your vehicle checked.
[Vehicles with Daytime Running Lamp]
When the ignition switch is in the “ON” position and the lamp
switch is set to the “ ” (OFF) position, the low beam of the
headlamps, tail lamps, etc., will illuminate.
All lamps off
AUTO With the ignition switch in the “ON” position, head-
lamps, position, tail, licence plate, and instrument panel
lamps turn on and off automatically in accordance with
outside light level. All lamps turn off automatically
when the ignition switch is turned to “OFF” position.
Position, tail, licence plate and instrument panel lamps
on
Headlamps and other lamps go on
Page 168 of 450
4-2 Starting and driving
4Economical driving
E00600100763
For economical driving, there ar
e some technical requirements
that have to be met. The prerequisite for low fuel consumption
is a properly adjusted engine. In order to achieve longer life of
the vehicle and the most economical operation, we recommend
that you to have the vehicle checked at regular intervals in
accordance with the service standards.
Fuel economy and generation of exhaust gas and noise are
greatly influenced by personal driving habits as well as the par-
ticular operating conditions. The following points should be
observed in order to minimize w ear of brakes, tyres and engine
as well as to reduce environmental pollution.
Starting
Avoid rapid acceleration and sudden starts; such operation will
result in higher fuel consumption.
Shifting
Shift only at an appropriate speed and engine speed. Always
use the highest gear possible.
City traffic
Frequent starting and stopping increases the average fuel con-
sumption. Use roads with smooth traffic flow whenever possi-
ble. When driving on congested roads, avoid use of a low gear
at high engine speeds.
Idling
The vehicle consumes fuel even when idling. Avoid extended
idling whenever possible.
Speed
The higher the vehicle speed, the more fuel is consumed. Avoid
driving at full speed. Even a slight release of the accelerator
pedal will save a significant amount of fuel.
Tyre inflation pressure
Check the tyre inflation pressure s at regular intervals. Low tyre
inflation pressure increases ro ad resistance and fuel consump-
tion. In addition, low tyre pres sures adversely affect tyre wear
and driving stability.
Load
Do not drive with unnecessary articles in the luggage compart-
ment. Especially during city dr iving, where frequent starting
and stopping is necessary, the increased weight of the vehicle
will greatly affect fuel consum ption. Avoid driving with unnec-
essary luggage, etc., on the ro of; the increased air resistance
will increase fuel consumption.
Cold engine starting
Starting a cold engine consumes more fuel.
Unnecessary fuel consumption is also caused by keeping a hot
engine running. After the engine has started, commence driv-
ing as soon as possible.
Air conditioning*
The use of the air conditioning will increase fuel consumption.
Page 201 of 450
Starting and driving4-35
4
Braking
E00607000947
All parts of the brake system ar
e critical for safety. We recom-
mend that you have the vehicl e checked at regular intervals
according to the service booklet.
Brake system
The service brake is divided into two brake circuits so that if
one brake circuit fails, the othe r one is available to stop the
vehicle. In this situation, ev en if the brake pedal moves down
to the very end of its possible stroke, keep it pressed down
hard; stop driving as soon as possible and have the brake sys-
tem repaired.
Power brakes
Your vehicle is equipped with power brakes for more braking
force with less brake pedal effort.
Your brakes are designed to oper ate at full capacity, even if the
power assist is not being used.
If the power assist is not being used, the effort needed to press
the brake pedal is greater.
If you should loose the power assist for some reason, the
brakes will still work. If the power brake unit or either
of the two brake hydraulic sys-
tems stops working properly, the rest of the brake system will
still work, but the vehicle will not slow down as quickly.
You will know this has happened if you find you need to press
the brake down further or harder when slowing down or stop-
ping, or if the brake warning lamp comes on.
Wa r n i n g l a m p
The brake warning lamp will illuminate to indicate a fault in
the braking system. Read “Brake warning lamp” on page 3-9.
When brakes are wet
Check the brake system while dr iving at a low speed immedi-
ately after starting, especially wh en the brakes are wet, to con-
firm they work normally.
A film of water can be formed on the brake discs or brake
drums and prevent normal braki ng after driving in heavy rain
or through large puddles, or after the vehicle has been washed.
If this occurs, dry the brakes out by driving slowly while
lightly depressing the brake pedal.
CAUTION!
● Avoid driving habits that cause heavy braking and
never “ride” the brakes by resting your foot on the
brake pedal while driving.
This causes brake overheating and fade.WARNING!
● Never coast downhill with the engine OFF. Keep the
engine running whenever your vehicle is in motion.
If you turn off the engine while driving, the power
brake booster will stop working and your brakes
will not work as well.
● If the power assist is lost or if either brake hydraulic
system stops working properly, have your vehicle
checked immediately.
Page 204 of 450
4-38 Starting and driving
4
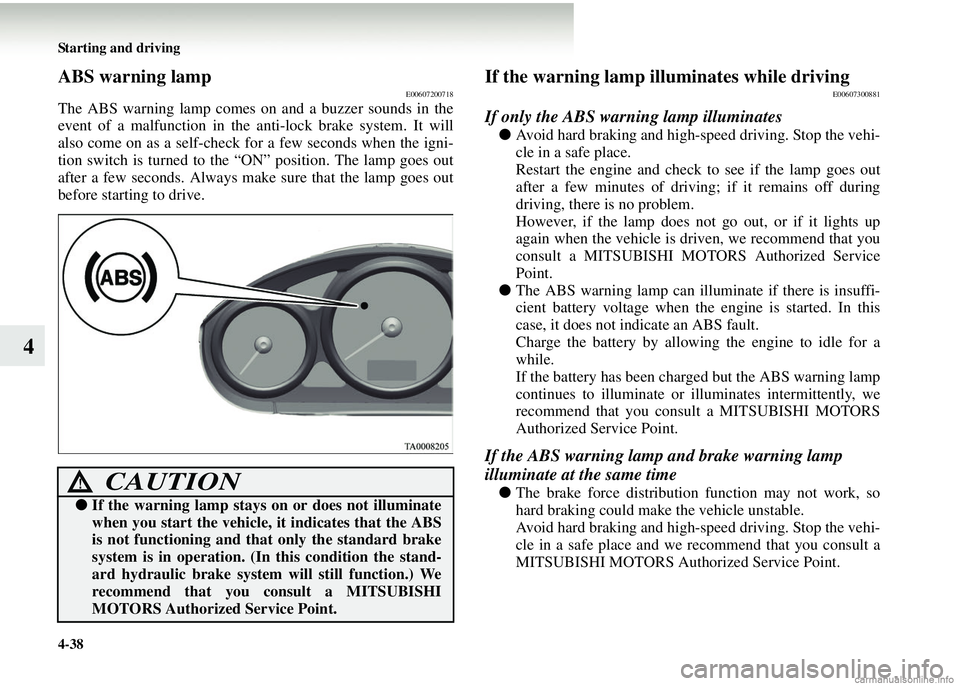
ABS warning lampE00607200718
The ABS warning lamp comes on and a buzzer sounds in the
event of a malfunction in the anti-lock brake system. It will
also come on as a self-check for a few seconds when the igni-
tion switch is turned to the “ON” position. The lamp goes out
after a few seconds. Always make sure that the lamp goes out
before starting to drive.
If the warning lamp illuminates while drivingE00607300881
If only the ABS warning lamp illuminates
● Avoid hard braking and high-speed driving. Stop the vehi-
cle in a safe place.
Restart the engine and check to see if the lamp goes out
after a few minutes of driving; if it remains off during
driving, there is no problem.
However, if the lamp does not go out, or if it lights up
again when the vehicle is dr iven, we recommend that you
consult a MITSUBISHI MOTORS Authorized Service
Point.
● The ABS warning lamp can illuminate if there is insuffi-
cient battery voltage when the engine is started. In this
case, it does not indicate an ABS fault.
Charge the battery by allowing the engine to idle for a
while.
If the battery has been charged but the ABS warning lamp
continues to illuminate or illuminates intermittently, we
recommend that you cons ult a MITSUBISHI MOTORS
Authorized Service Point.
If the ABS warning lamp and brake warning lamp
illuminate at the same time
● The brake force distribution function may not work, so
hard braking could make the vehicle unstable.
Avoid hard braking and high-speed driving. Stop the vehi-
cle in a safe place and we recommend that you consult a
MITSUBISHI MOTORS Authorized Service Point.CAUTION!
●If the warning lamp stays on or does not illuminate
when you start the vehicle, it indicates that the ABS
is not functioning and that only the standard brake
system is in operation. (I n this condition the stand-
ard hydraulic brake system will still function.) We
recommend that you consult a MITSUBISHI
MOTORS Authorized Service Point.
Page 340 of 450
7-6 Vehicle care
7
During cold weather
The salt and other chemicals spread on the roads in some areas
in winter can have a harmful effect on the vehicle body. You
should therefore wash the ve hicle as often as possible in
accordance with our care instruc tions. It is recommended to
have a preservative applied an d the underfloor protection
checked before and after the cold weather season.
After washing your vehicle, wipe off all waterdrops from the
rubber parts around the doors to prevent the doors from freez-
ing.
NOTE● To prevent freezing of the w eatherstripping on the doors,
bonnet, etc., they should be treated with silicone spray.
WaxingE00901000528
Waxing the vehicle will help prev ent the adherence of dust and
road chemicals to the paintwor k. Apply a wax solution after
washing the vehicle, or at least once every three months to
assist displacing of water.
Do not wax your vehicle in direct sunlight. You should wax
after the surfaces have cooled.
PolishingE00901100011
The vehicle should only be polished if the paintwork has
become stained or lost its lustre. Matt-finish parts and plastic
bumpers must not be polished, polishing these parts will stain
them or damage their finish.
Damaged paintE00901200012
Small cracks and scratches in th e paint coat should be touched
up as soon as possible with MITSUBISHI touch-up paint to
prevent corrosion.
Check body areas facing the road or the tyres carefully for
damage to the paint coat caused by flying stones, etc. The paint
code number for your vehicle can be found on the vehicle
information code plate in the engine compartment.
CAUTION!
●Waxes containing high abrasive compounds should
not be used. Such waxes rem ove rust and stain effec-
tively from the paintwork but they are harmful to
the lustre of the painted surface.
Further, they are harmful to glossy surfaces such as
grille, garnish, mouldings, etc.
● Do not use petrol or paint thinners to remove road
tar or other contamination on the vehicle surface.
●Do not apply wax on areas with a black mat coating
as it can cause uneven disc olouration, patches, blurs,
etc. If stained with wax, wipe off immediately with a
soft cloth and warm water.
CAUTION!
Page 354 of 450
8-12 Maintenance
8
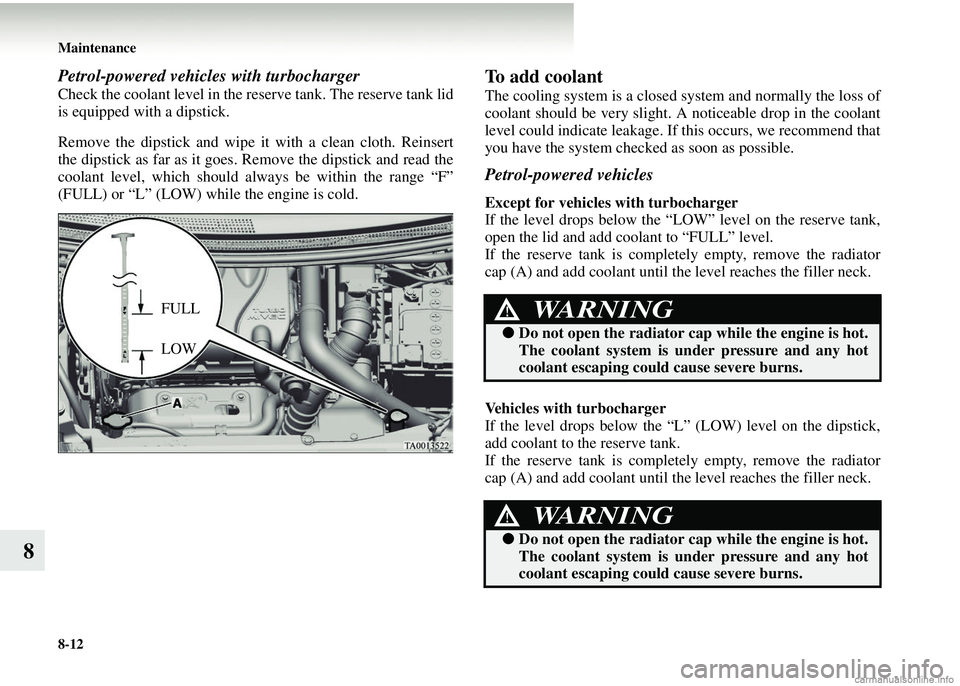
Petrol-powered vehicles with turbocharger
Check the coolant level in the reserve tank. The reserve tank lid
is equipped with a dipstick.
Remove the dipstick and wipe it with a clean cloth. Reinsert
the dipstick as far as it goes. Remove the dipstick and read the
coolant level, which should always be within the range “F”
(FULL) or “L” (LOW) while the engine is cold.
To add coolant
The cooling system is a closed system and normally the loss of
coolant should be very slight. A noticeable drop in the coolant
level could indicate leakage. If this occurs, we recommend that
you have the system checked as soon as possible.
Petrol-powered vehicles
Except for vehicles with turbocharger
If the level drops below the “LOW” level on the reserve tank,
open the lid and add coolant to “FULL” level.
If the reserve tank is completely empty, remove the radiator
cap (A) and add coolant until the level reaches the filler neck.
Vehicles with turbocharger
If the level drops below the “L” (LOW) level on the dipstick,
add coolant to the reserve tank.
If the reserve tank is completely empty, remove the radiator
cap (A) and add coolant until the level reaches the filler neck.
FULL
LOWWARNING!
● Do not open the radiator ca p while the engine is hot.
The coolant system is u nder pressure and any hot
coolant escaping coul d cause severe burns.
WARNING!
●Do not open the radiator ca p while the engine is hot.
The coolant system is u nder pressure and any hot
coolant escaping coul d cause severe burns.