ECO mode MITSUBISHI COLT 2009 10.G User Guide
[x] Cancel search | Manufacturer: MITSUBISHI, Model Year: 2009, Model line: COLT, Model: MITSUBISHI COLT 2009 10.GPages: 273, PDF Size: 17.28 MB
Page 123 of 273
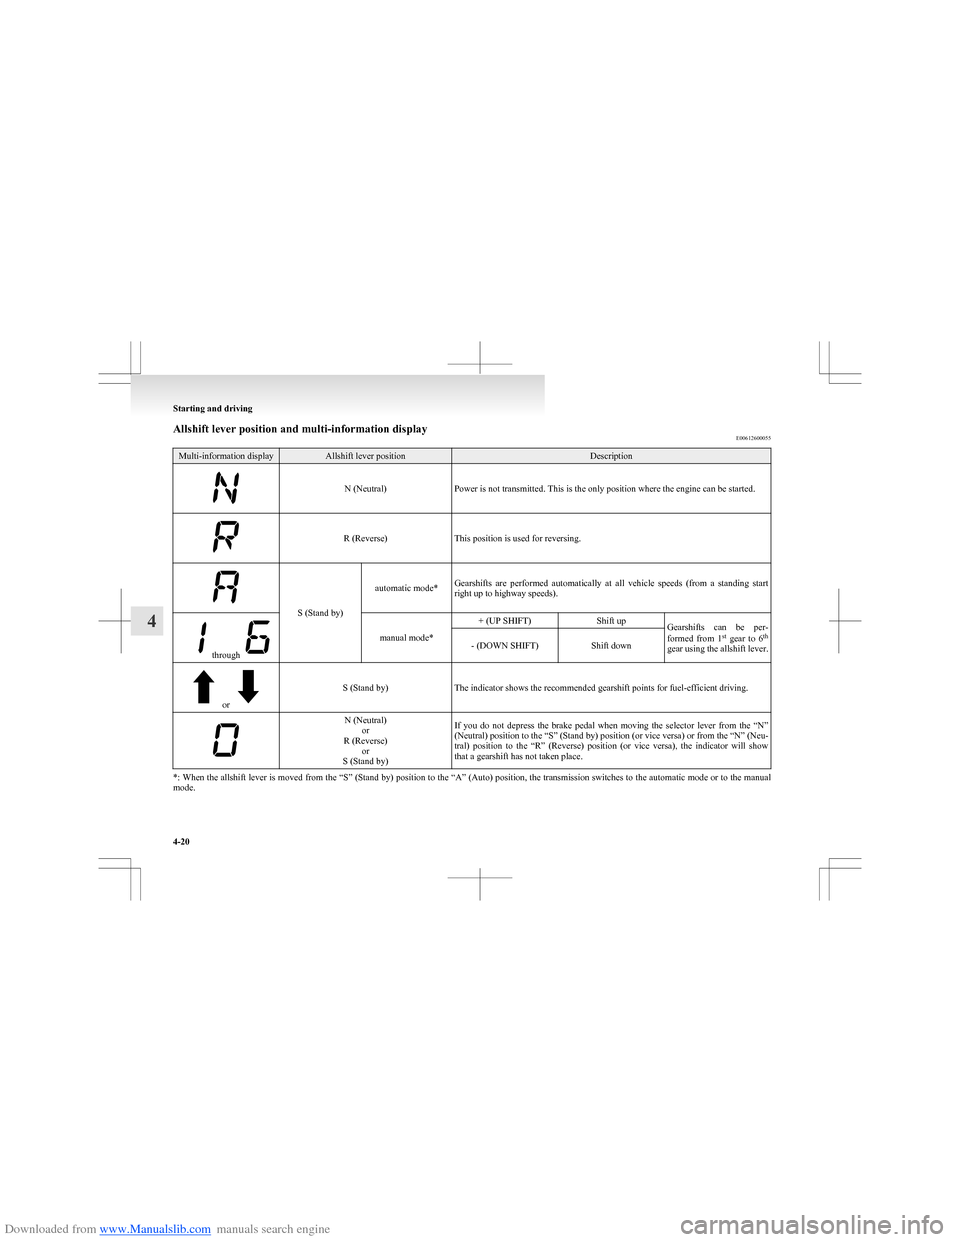
Downloaded from www.Manualslib.com manuals search engine Allshift lever position and multi-information displayE00612600055Multi-information displayAllshift lever positionDescription
N (Neutral)Power is not transmitted. This is the only position where the engine can be started.R (Reverse)This position is used for reversing.
S (Stand by)
automatic mode*Gearshifts are performed automatically at all vehicle speeds (from a standing start
right up to highway speeds).
through
manual mode*
+ (UP SHIFT)Shift upGearshifts can be per-
formed from 1 st
gear to 6 th
gear using the allshift lever.- (DOWN SHIFT)Shift down
or
S (Stand by)The indicator shows the recommended gearshift points for fuel-efficient driving.
N (Neutral) or
R (Reverse) or
S (Stand by)If you do not depress the brake pedal when moving the selector lever from the “N”
(Neutral) position to the “S” (Stand by) position (or vice versa) or from the “N” (Neu-
tral) position to the “R” (Reverse) position (or vice versa), the indicator will show
that a gearshift has not taken place.
*: When the allshift lever is moved from the “S” (Stand by) position to the “A” (Auto) position, the transmission switches to the automatic mode or to the manual
mode.
Starting and driving
4-20
4
Page 126 of 273
Downloaded from www.Manualslib.com manuals search engine NOTEl If the brake pedal is not depressed when the
allshift lever is moved, a gearshift will not
take place. At this time, the driver is notified
by a “0” on the multi-information display. De-
press the brake pedal to cause the gearshift to
take place. The multi-information display
will show the selected gearshift position.
3. Choose between the automatic mode and man-
ual mode with the allshift lever. Refer to
“ Choosing between automatic mode and man-
ual mode” on page 4-21.
4. Confirm safety around the vehicle, then re-
lease the parking brake.
5. Start moving by gradually easing off the
brake pedal while gently applying pressure
to the accelerator pedal.
NOTE l When driving away on a slippery road, push
the allshift lever forward into the “+ (UP
SHIFT)” position from the “S” (Stand by) po-
sition. This causes the transmission to shift in-
to the 2 nd
gear which is better for smooth driv-
ing away on a slippery road. At this time, the
multi-information display shows “2”. Push
the allshift lever to the “- (DOWN SHIFT)”
side to shift back to the 1 st
gear.
Starting from a standstill on an uphill slope 1.To prevent unwanted movement of the vehi-
cle, release the brake pedal while leaving the
parking brake applied.
2. Gently apply pressure to the accelerator ped-
al. As you feel the vehicle starts to move, re-
lease the parking brake and pull away.CAUTIONl When pulling away from a standstill on
an uphill slope, be sure to start with the
parking brake applied. If you released
the brake pedal without the parking
brake applied, therefore, the vehicle
would roll backward, possibly causing an
accident.Driving E00613200058WARNINGlNever move the allshift lever to the “N”
(NEUTRAL) position while driving. A se-
rious accident could occur since you will
lose engine braking.
Automatic mode
Drive with the allshift lever in the “S” (Stand by)
position. Gearshifts will take place automatically in
accordance with the vehicle speed.
Manual mode
Select appropriate gears using the allshift lever. Al-
ways select the gear that suits the speed at which
you wish to drive.
NOTE
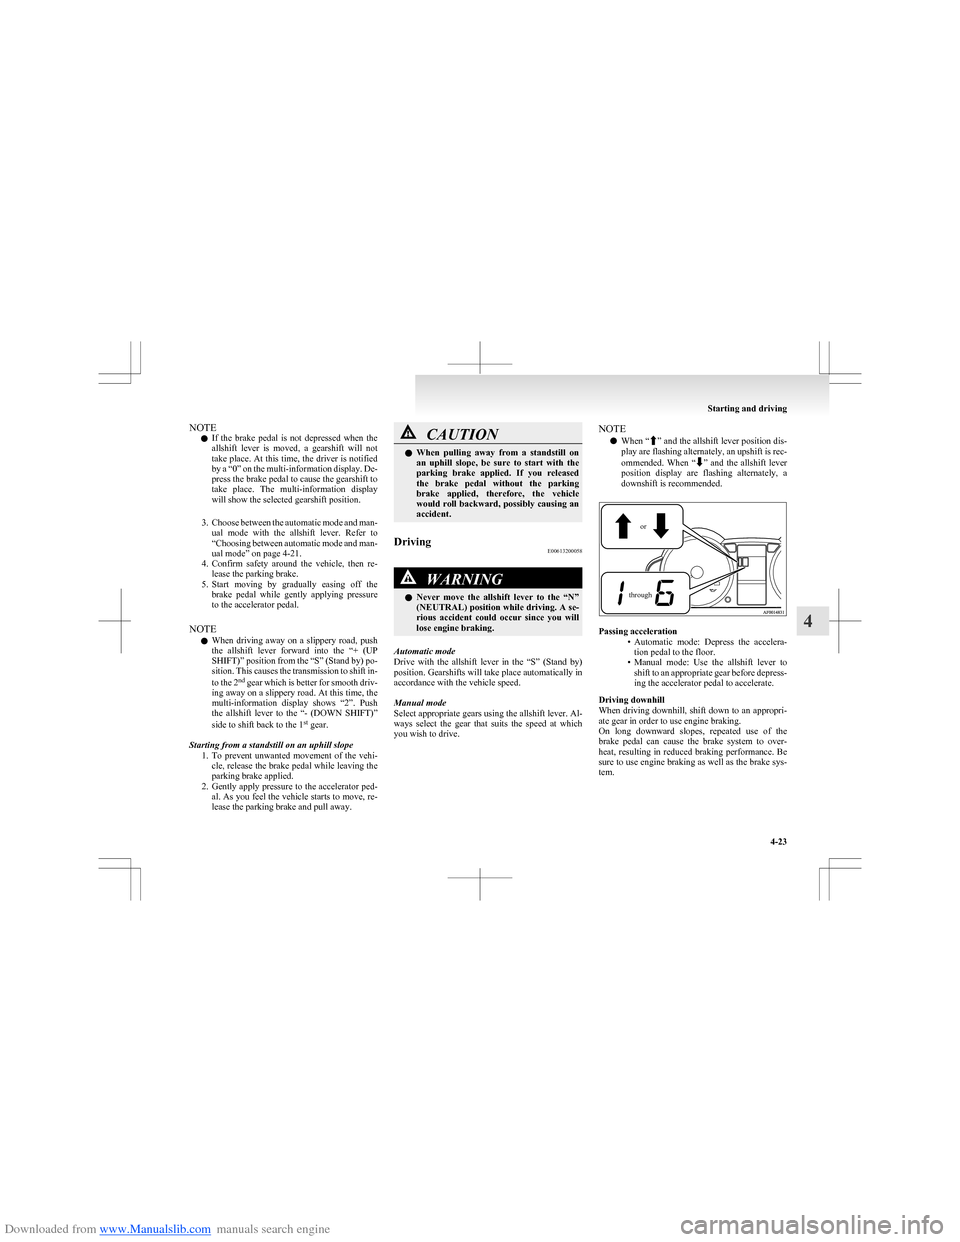
l When “
”
and the allshift lever position dis-
play are flashing alternately, an upshift is rec-
ommended. When “
” and the allshift lever
position display are flashing alternately, a
downshift is recommended.
orthrough
Passing acceleration
•Automatic mode: Depress the accelera-
tion pedal to the floor.
• Manual mode: Use the allshift lever to
shift to an appropriate gear before depress-
ing the accelerator pedal to accelerate.
Driving downhill
When driving downhill, shift down to an appropri-
ate gear in order to use engine braking.
On long downward slopes, repeated use of the
brake pedal can cause the brake system to over-
heat, resulting in reduced braking performance. Be
sure to use engine braking as well as the brake sys-
tem.
Starting and driving
4-23
4
Page 134 of 273
Downloaded from www.Manualslib.com manuals search engine CAUTIONlWhen driving a vehicle on a snowy or icy
road, be sure to install snow tyres and
drive the vehicle at moderate speeds.
NOTE
l When moving out of mud or fresh snow, press-
ing the accelerator pedal may not allow the
engine speed to increase.
Active stability control system (ASC) E00612000091
The Active Stability Control system (ASC) is de-
signed to help maintain the vehicle’s control in slip-
pery conditions, or during rapid steering manoeu-
vres. It works by controlling the engine output and
brake on each wheel.
NOTE l The Active Stability Control system (ASC)
functions at speeds of approximately
10 km/h (6 mph) or higher.
Traction control system (TCL)/Active
stability control system (ASC) indica-
tion lamp E00612100119
The Traction Control System (TCL) and Active Sta-
bility Control system (ASC) share the same indica-
tion lamp.
The indication lamp should illuminate when the ig-
nition switch is turned to the “ON” position, and
should go off after a few seconds. Always make
sure that the lamp goes off before begining to drive.
If the indication lamp stays on or does not illumi-
nate when the ignition switch is turned to the “ON”
position, we recommend you to consult a
MITSUBISHI MOTORS Authorized Service Point.
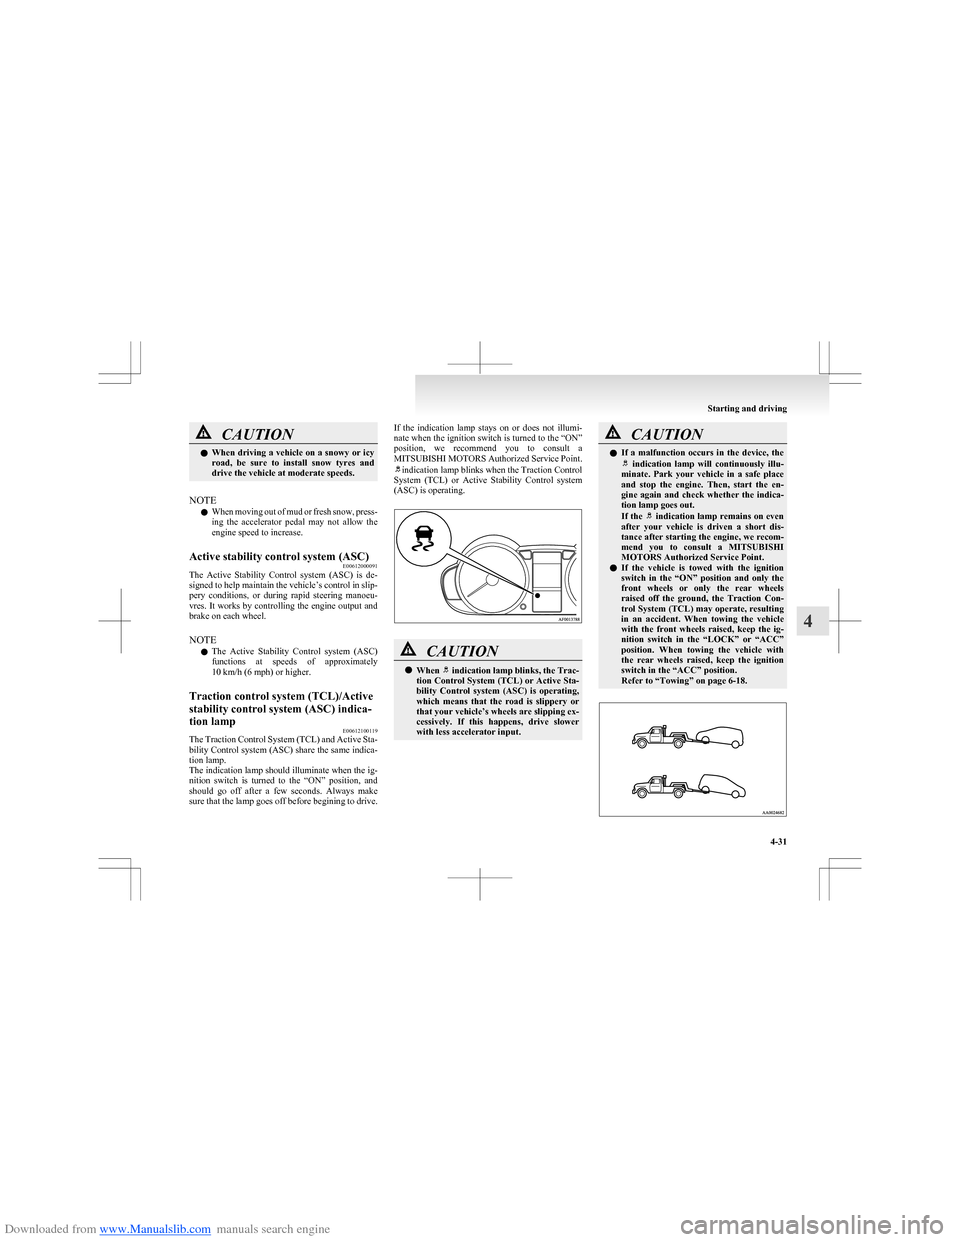
indication lamp blinks when the Traction Control
System (TCL) or Active Stability Control system
(ASC) is operating.
CAUTIONl When indication lamp blinks, the Trac-
tion Control System (TCL) or Active Sta-
bility Control system (ASC) is operating,
which means that the road is slippery or
that your vehicle’s wheels are slipping ex-
cessively. If this happens, drive slower
with less accelerator input.CAUTIONl If a malfunction occurs in the device, the indication lamp will continuously illu-
minate. Park your vehicle in a safe place
and stop the engine. Then, start the en-
gine again and check whether the indica-
tion lamp goes out.
If the
indication lamp remains on even
after your vehicle is driven a short dis-
tance after starting the engine, we recom-
mend you to consult a MITSUBISHI
MOTORS Authorized Service Point.
l If the vehicle is towed with the ignition
switch in the “ON” position and only the
front wheels or only the rear wheels
raised off the ground, the Traction Con-
trol System (TCL) may operate, resulting
in an accident. When towing the vehicle
with the front wheels raised, keep the ig-
nition switch in the “LOCK” or “ACC”
position. When towing the vehicle with
the rear wheels raised, keep the ignition
switch in the “ACC” position.
Refer to “Towing” on page 6-18.
Starting and driving
4-31
4
Page 141 of 273
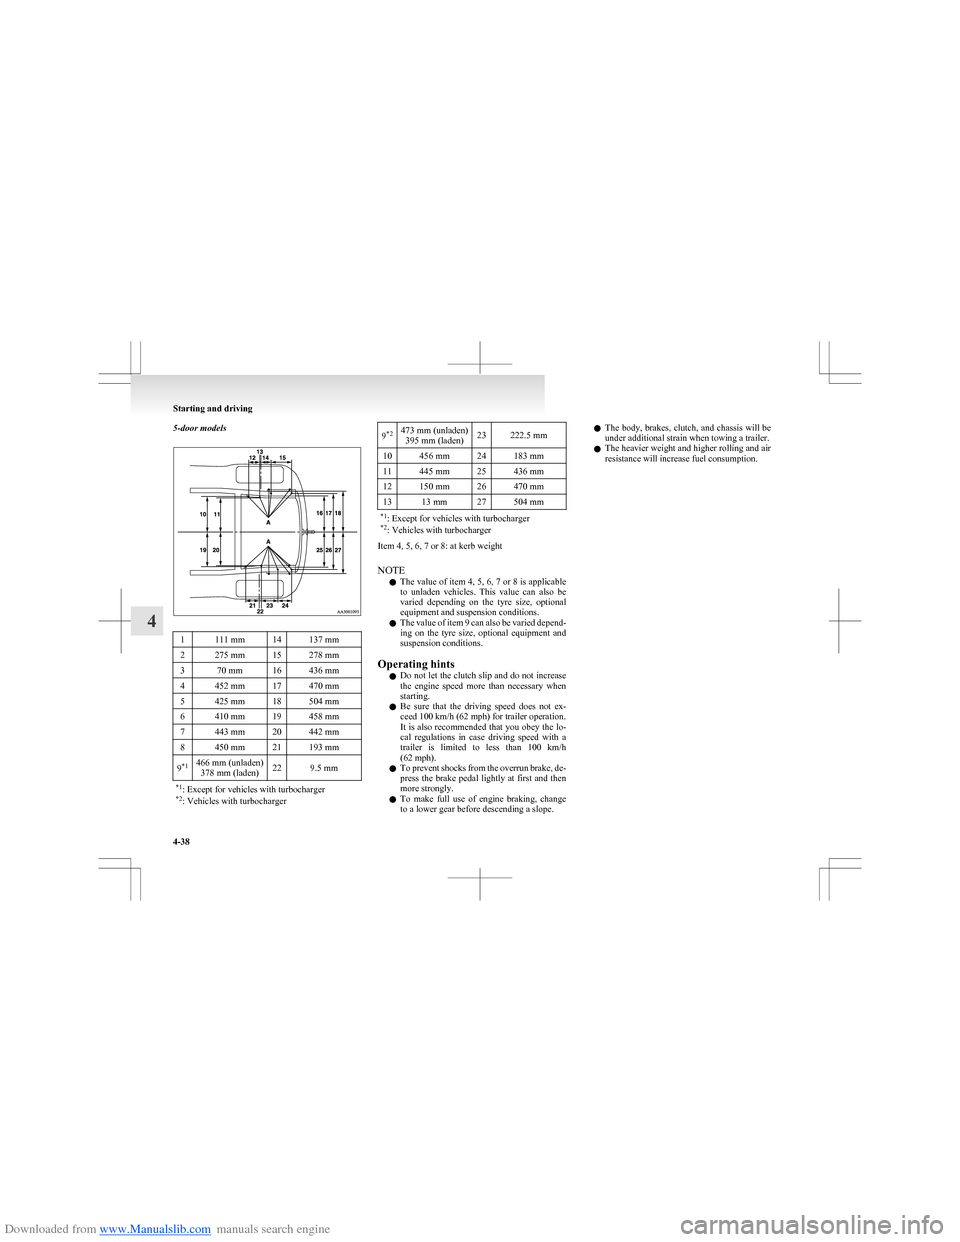
Downloaded from www.Manualslib.com manuals search engine 5-door models1111 mm14137 mm2275 mm15278 mm370 mm16436 mm4452 mm17470 mm5425 mm18504 mm6410 mm19458 mm7443 mm20442 mm8450 mm21193 mm9*1466 mm (unladen)
378 mm (laden)229.5 mm*1 : Except for vehicles with turbocharger
*2 : Vehicles with turbocharger9*2473 mm (unladen)
395 mm (laden)23222.5 mm10456 mm24183 mm11445 mm25436 mm12150 mm26470 mm1313 mm27504 mm*1 : Except for vehicles with turbocharger
*2 : Vehicles with turbocharger
Item 4, 5, 6, 7 or 8: at kerb weight
NOTE l The value of item 4, 5, 6, 7 or 8 is applicable
to unladen vehicles. This value can also be
varied depending on the tyre size, optional
equipment and suspension conditions.
l The value of item 9 can also be varied depend-
ing on the tyre size, optional equipment and
suspension conditions.
Operating hints l Do not let the clutch slip and do not increase
the engine speed more than necessary when
starting.
l Be sure that the driving speed does not ex-
ceed 100 km/h (62 mph) for trailer operation.
It is also recommended that you obey the lo-
cal regulations in case driving speed with a
trailer is limited to less than 100 km/h
(62 mph).
l To prevent shocks from the overrun brake, de-
press the brake pedal lightly at first and then
more strongly.
l To make full use of engine braking, change
to a lower gear before descending a slope.
l The body, brakes, clutch, and chassis will be
under additional strain when towing a trailer.
l The heavier weight and higher rolling and air
resistance will increase fuel consumption.
Starting and driving
4-38
4
Page 146 of 273
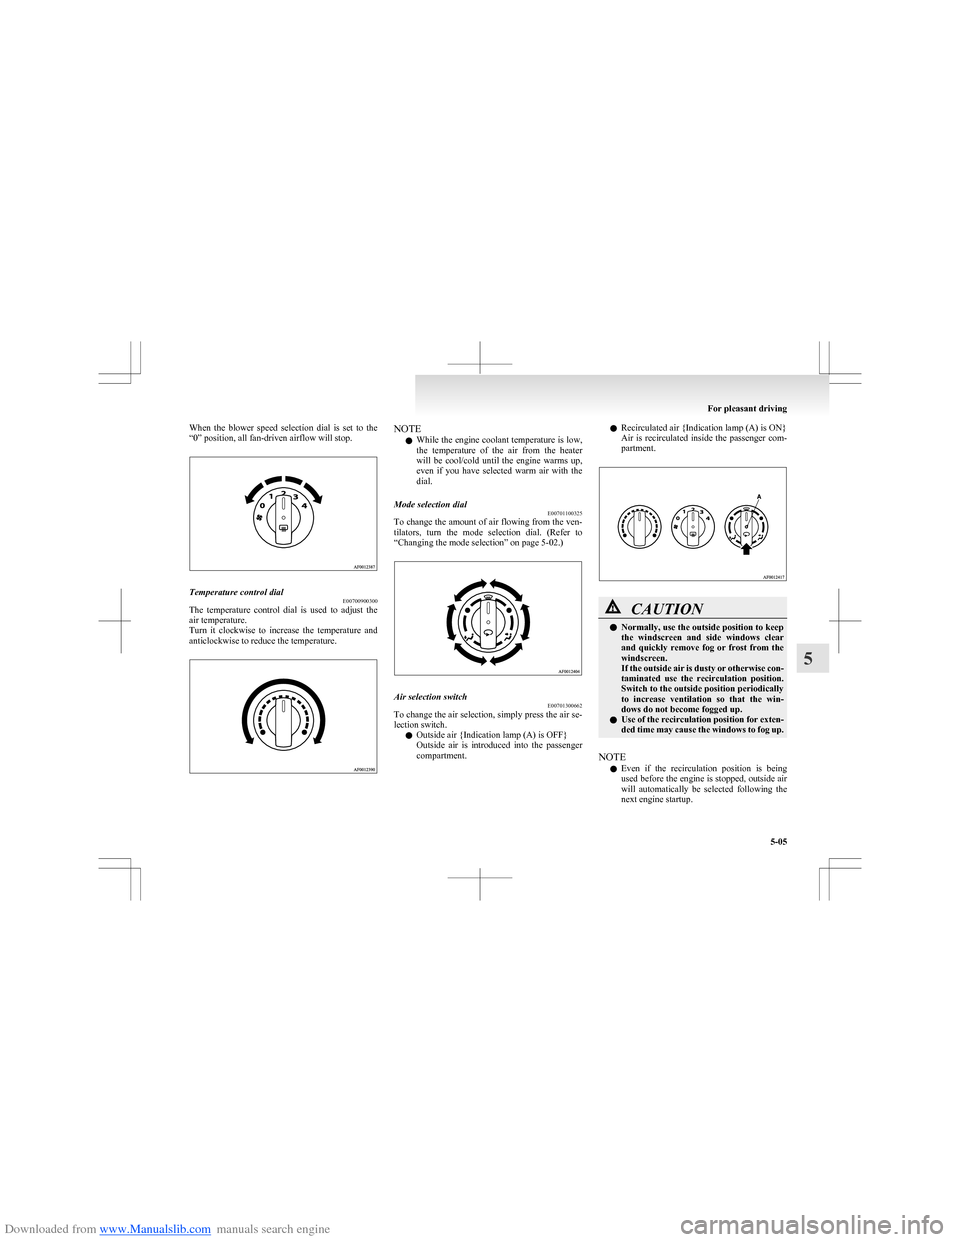
Downloaded from www.Manualslib.com manuals search engine When the blower speed selection dial is set to the
“0” position, all fan-driven airflow will stop.Temperature control dial E00700900300
The temperature control dial is used to adjust the
air temperature.
Turn it clockwise to increase the temperature and
anticlockwise to reduce the temperature.
NOTE
l While the engine coolant temperature is low,
the temperature of the air from the heater
will be cool/cold until the engine warms up,
even if you have selected warm air with the
dial.Mode selection dial E00701100325
To change the amount of air flowing from the ven-
tilators, turn the mode selection dial. (Refer to
“Changing the mode selection” on page 5-02.)
Air selection switch E00701300662
To change the air selection, simply press the air se-
lection switch.
l Outside air {Indication lamp (A) is OFF}
Outside air is introduced into the passenger
compartment.
l Recirculated air {Indication lamp (A) is ON}
Air is recirculated inside the passenger com-
partment.CAUTIONl Normally, use the outside position to keep
the windscreen and side windows clear
and quickly remove fog or frost from the
windscreen.
If the outside air is dusty or otherwise con-
taminated use the recirculation position.
Switch to the outside position periodically
to increase ventilation so that the win-
dows do not become fogged up.
l Use of the recirculation position for exten-
ded time may cause the windows to fog up.
NOTE
l Even if the recirculation position is being
used before the engine is stopped, outside air
will automatically be selected following the
next engine startup.
For pleasant driving
5-05
5
Page 150 of 273
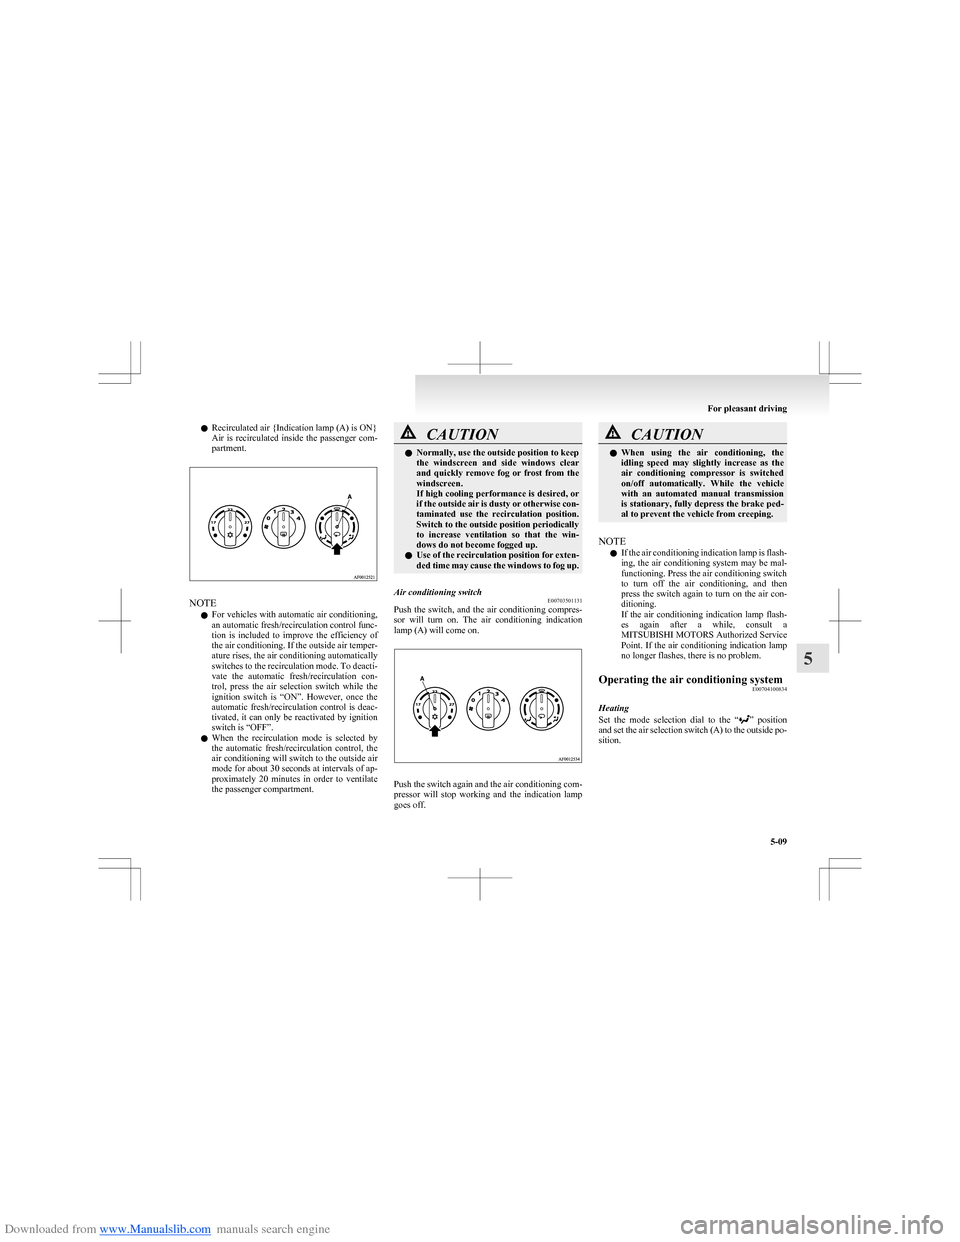
Downloaded from www.Manualslib.com manuals search engine lRecirculated air {Indication lamp (A) is ON}
Air is recirculated inside the passenger com-
partment.
NOTE
l For vehicles with automatic air conditioning,
an automatic fresh/recirculation control func-
tion is included to improve the efficiency of
the air conditioning. If the outside air temper-
ature rises, the air conditioning automatically
switches to the recirculation mode. To deacti-
vate the automatic fresh/recirculation con-
trol, press the air selection switch while the
ignition switch is “ON”. However, once the
automatic fresh/recirculation control is deac-
tivated, it can only be reactivated by ignition
switch is “OFF”.
l When the recirculation mode is selected by
the automatic fresh/recirculation control, the
air conditioning will switch to the outside air
mode for about 30 seconds at intervals of ap-
proximately 20 minutes in order to ventilate
the passenger compartment.
CAUTIONl Normally, use the outside position to keep
the windscreen and side windows clear
and quickly remove fog or frost from the
windscreen.
If high cooling performance is desired, or
if the outside air is dusty or otherwise con-
taminated use the recirculation position.
Switch to the outside position periodically
to increase ventilation so that the win-
dows do not become fogged up.
l Use of the recirculation position for exten-
ded time may cause the windows to fog up.Air conditioning switch E00703501131
Push the switch, and the air conditioning compres-
sor will turn on. The air conditioning indication
lamp (A) will come on.
Push the switch again and the air conditioning com-
pressor will stop working and the indication lamp
goes off.
CAUTIONl When using the air conditioning, the
idling speed may slightly increase as the
air conditioning compressor is switched
on/off automatically. While the vehicle
with an automated manual transmission
is stationary, fully depress the brake ped-
al to prevent the vehicle from creeping.
NOTE
l If the air conditioning indication lamp is flash-
ing, the air conditioning system may be mal-
functioning. Press the air conditioning switch
to turn off the air conditioning, and then
press the switch again to turn on the air con-
ditioning.
If the air conditioning indication lamp flash-
es again after a while, consult a
MITSUBISHI MOTORS Authorized Service
Point. If the air conditioning indication lamp
no longer flashes, there is no problem.
Operating the air conditioning system E00704100834
Heating
Set the mode selection dial to the “
” position
and set the air selection switch (A) to the outside po-
sition.
For pleasant driving
5-09
5
Page 151 of 273
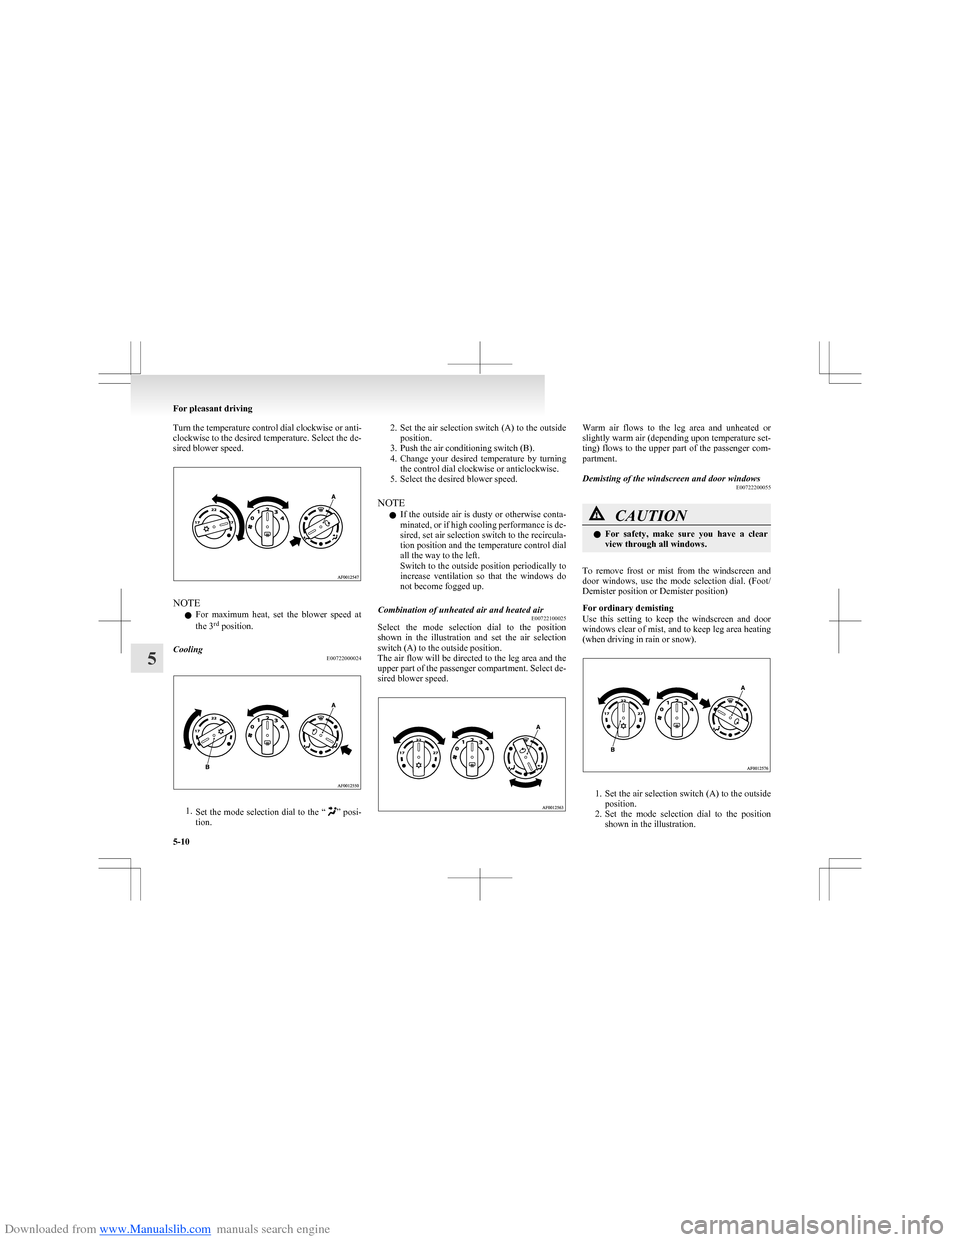
Downloaded from www.Manualslib.com manuals search engine Turn the temperature control dial clockwise or anti-
clockwise to the desired temperature. Select the de-
sired blower speed.
NOTE
l For maximum heat, set the blower speed at
the 3 rd
position.
Cooling
E00722000024
1.Set the mode selection dial to the “” posi-
tion.
2. Set the air selection switch (A) to the outside
position.
3. Push the air conditioning switch (B).
4. Change your desired temperature by turning
the control dial clockwise or anticlockwise.
5. Select the desired blower speed.
NOTE l If the outside air is dusty or otherwise conta-
minated, or if high cooling performance is de-
sired, set air selection switch to the recircula-
tion position and the temperature control dial
all the way to the left.
Switch to the outside position periodically to
increase ventilation so that the windows do
not become fogged up.Combination of unheated air and heated air E00722100025
Select the mode selection dial to the position
shown in the illustration and set the air selection
switch (A) to the outside position.
The air flow will be directed to the leg area and the
upper part of the passenger compartment. Select de-
sired blower speed.
Warm air flows to the leg area and unheated or
slightly warm air (depending upon temperature set-
ting) flows to the upper part of the passenger com-
partment.Demisting of the windscreen and door windows E00722200055CAUTIONlFor safety, make sure you have a clear
view through all windows.
To remove frost or mist from the windscreen and
door windows, use the mode selection dial. (Foot/
Demister position or Demister position)
For ordinary demisting
Use this setting to keep the windscreen and door
windows clear of mist, and to keep leg area heating
(when driving in rain or snow).
1. Set the air selection switch (A) to the outside
position.
2. Set the mode selection dial to the position
shown in the illustration.
For pleasant driving
5-10
5
Page 152 of 273
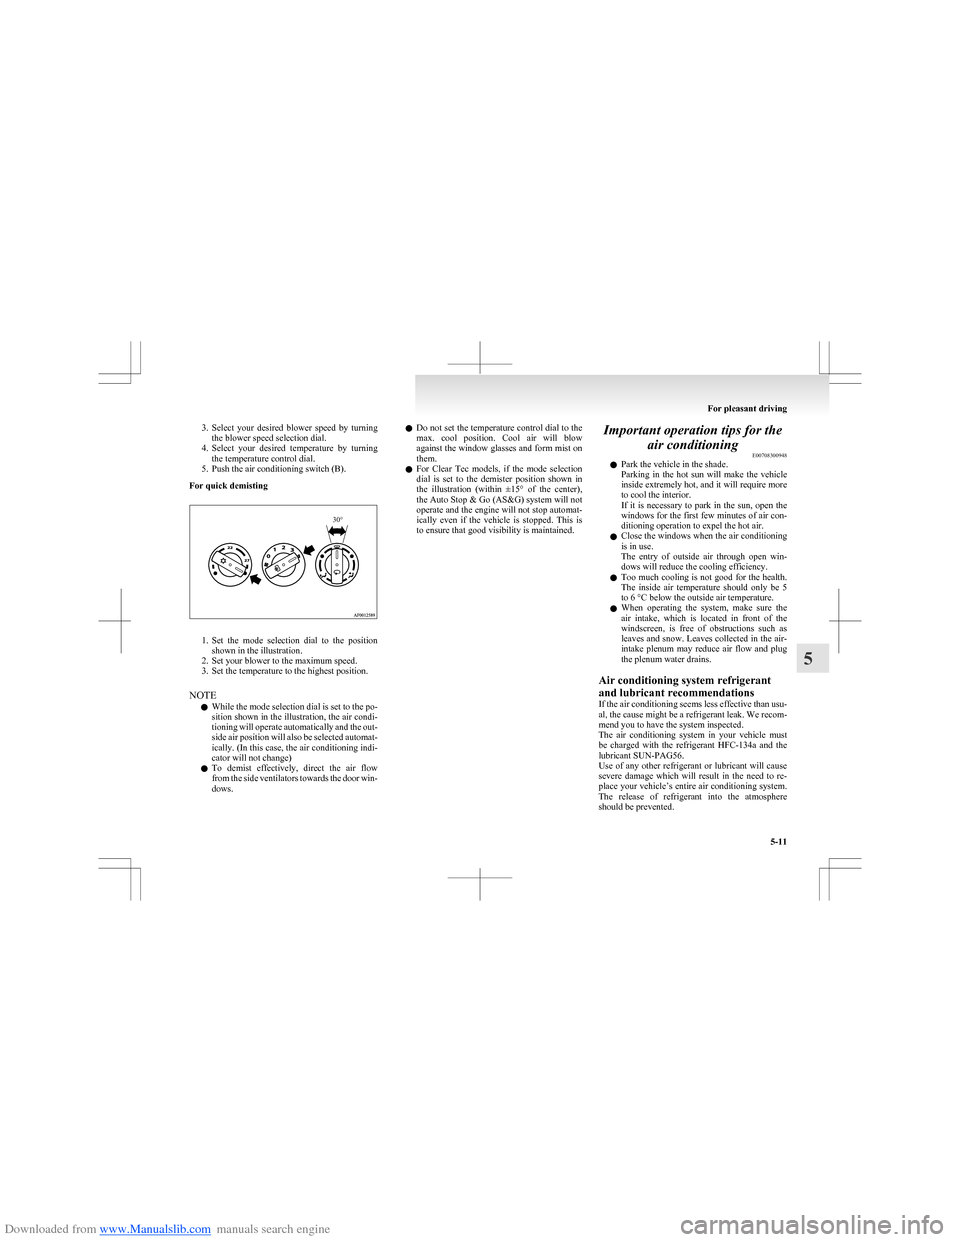
Downloaded from www.Manualslib.com manuals search engine 3.Select your desired blower speed by turning
the blower speed selection dial.
4. Select your desired temperature by turning
the temperature control dial.
5. Push the air conditioning switch (B).
For quick demisting
1. Set the mode selection dial to the position
shown in the illustration.
2. Set your blower to the maximum speed.
3. Set the temperature to the highest position.
NOTE l While the mode selection dial is set to the po-
sition shown in the illustration, the air condi-
tioning will operate automatically and the out-
side air position will also be selected automat-
ically. (In this case, the air conditioning indi-
cator will not change)
l To demist effectively, direct the air flow
from the side ventilators towards the door win-
dows.
l Do not set the temperature control dial to the
max. cool position. Cool air will blow
against the window glasses and form mist on
them.
l For Clear Tec models, if the mode selection
dial is set to the demister position shown in
the illustration (within ±15° of the center),
the Auto Stop & Go (AS&G) system will not
operate and the engine will not stop automat-
ically even if the vehicle is stopped. This is
to ensure that good visibility is maintained.Important operation tips for the
air conditioning E00708300948
l Park the vehicle in the shade.
Parking in the hot sun will make the vehicle
inside extremely hot, and it will require more
to cool the interior.
If it is necessary to park in the sun, open the
windows for the first few minutes of air con-
ditioning operation to expel the hot air.
l Close the windows when the air conditioning
is in use.
The entry of outside air through open win-
dows will reduce the cooling efficiency.
l Too much cooling is not good for the health.
The inside air temperature should only be 5
to 6 °C below the outside air temperature.
l When operating the system, make sure the
air intake, which is located in front of the
windscreen, is free of obstructions such as
leaves and snow. Leaves collected in the air-
intake plenum may reduce air flow and plug
the plenum water drains.
Air conditioning system refrigerant
and lubricant recommendations
If the air conditioning seems less effective than usu-
al, the cause might be a refrigerant leak. We recom-
mend you to have the system inspected.
The air conditioning system in your vehicle must
be charged with the refrigerant HFC-134a and the
lubricant SUN-PAG56.
Use of any other refrigerant or lubricant will cause
severe damage which will result in the need to re-
place your vehicle’s entire air conditioning system.
The release of refrigerant into the atmosphere
should be prevented.
For pleasant driving
5-11
530°
Page 153 of 273
Downloaded from www.Manualslib.com manuals search engine It is recommended that the refrigerant be recovered
and recycled for further use.
During a long period of disuse
The air conditioning should be operated for at least
five minutes each week, even in cold weather. This
is to prevent poor lubrication of the compressor in-
ternal parts and to maintain the air conditioning in
the best operating condition.Air purifier E00708400024
An air filter has been incorporated into this air con-
ditioning so that dirt and dust are cleaned from the
air.
Replace the air filter periodically as its ability to
clean the air will be reduced as it collects pollen
and dirt. For the maintenance interval, refer to the
“SERVICE BOOKLET”.
NOTE l Operation in certain conditions such as driv-
ing on a dusty road and frequent use of the
air conditioning can lead to reduction of serv-
ice life of the filter. When the air flow rate
suddenly drops or when the windscreen or
windows start to fog up easily, the air filter
requires replacement.
We recommend you to have it checked.LW/MW/FM electronic tuning
radio with CD player* E00708502175
The audio system can be used when the ignition
switch is in the “ON” or “ACC” position.
NOTE l To listen to the audio system while the en-
gine is stopped, turn the ignition key to the
“ACC” position.
For Clear Tec models, the audio system will
continue to operate if the ignition switch is in
the “ON” position when the engine stops au-
tomatically. However, in some cases, the au-
dio system may stop producing sound or turn
off.
l If a cellular phone is used inside the vehicle,
it may create noise from the audio equip-
ment. This does not mean that anything is
wrong with your audio equipment. In such a
case, use the cellular phone at a place as far
away as possible from the audio equipment.
l If foreign objects or water get into the audio
equipment, or if smoke or a strange odour
comes from it, immediately turn off the au-
dio system. We recommend you to have it
checked. Never try to repair it by yourself.
Avoid continuous usage without inspection
by a qualified person.
For pleasant driving
5-12
5
Page 157 of 273
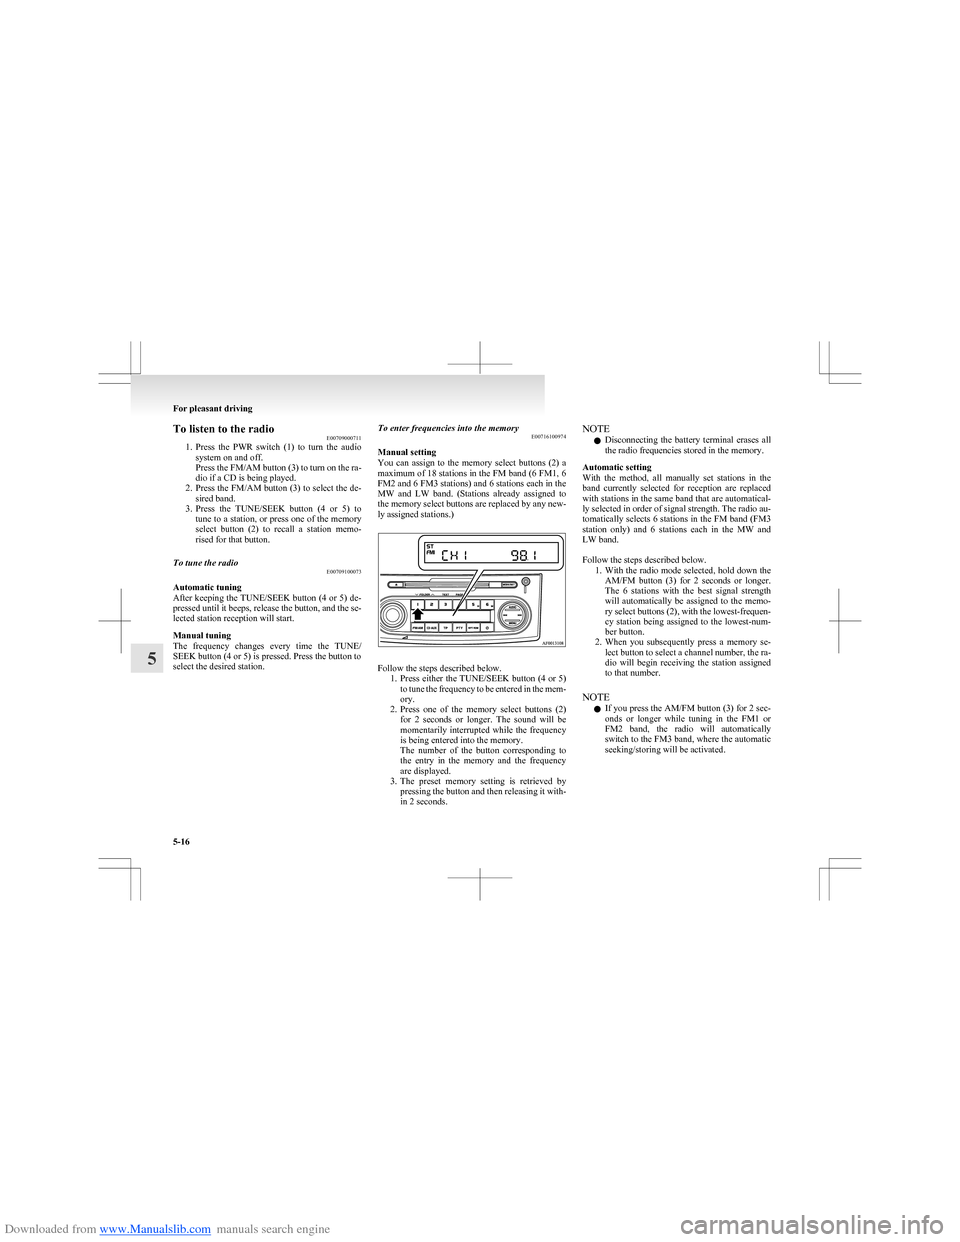
Downloaded from www.Manualslib.com manuals search engine To listen to the radioE00709000711
1. Press the PWR switch (1) to turn the audio
system on and off.
Press the FM/AM button (3) to turn on the ra-
dio if a CD is being played.
2. Press the FM/AM button (3) to select the de-
sired band.
3. Press the TUNE/SEEK button (4 or 5) to
tune to a station, or press one of the memory
select button (2) to recall a station memo-
rised for that button.To tune the radio E00709100073
Automatic tuning
After keeping the TUNE/SEEK button (4 or 5) de-
pressed until it beeps, release the button, and the se-
lected station reception will start.
Manual tuning
The frequency changes every time the TUNE/
SEEK button (4 or 5) is pressed. Press the button to
select the desired station.
To enter frequencies into the memory E00716100974
Manual setting
You can assign to the memory select buttons (2) a
maximum of 18 stations in the FM band (6 FM1, 6
FM2 and 6 FM3 stations) and 6 stations each in the
MW and LW band. (Stations already assigned to
the memory select buttons are replaced by any new-
ly assigned stations.)
Follow the steps described below. 1.Press either the TUNE/SEEK button (4 or 5)
to tune the frequency to be entered in the mem-
ory.
2. Press one of the memory select buttons (2)
for 2 seconds or longer. The sound will be
momentarily interrupted while the frequency
is being entered into the memory.
The number of the button corresponding to
the entry in the memory and the frequency
are displayed.
3. The preset memory setting is retrieved by
pressing the button and then releasing it with-
in 2 seconds.
NOTE
l Disconnecting the battery terminal erases all
the radio frequencies stored in the memory.
Automatic setting
With the method, all manually set stations in the
band currently selected for reception are replaced
with stations in the same band that are automatical-
ly selected in order of signal strength. The radio au-
tomatically selects 6 stations in the FM band (FM3
station only) and 6 stations each in the MW and
LW band.
Follow the steps described below. 1.With the radio mode selected, hold down the
AM/FM button (3) for 2 seconds or longer.
The 6 stations with the best signal strength
will automatically be assigned to the memo-
ry select buttons (2), with the lowest-frequen-
cy station being assigned to the lowest-num-
ber button.
2. When you subsequently press a memory se-
lect button to select a channel number, the ra-
dio will begin receiving the station assigned
to that number.
NOTE l If you press the AM/FM button (3) for 2 sec-
onds or longer while tuning in the FM1 or
FM2 band, the radio will automatically
switch to the FM3 band, where the automatic
seeking/storing will be activated.
For pleasant driving
5-16
5