ECU MITSUBISHI COLT 2011 (in English) User Guide
[x] Cancel search | Manufacturer: MITSUBISHI, Model Year: 2011, Model line: COLT, Model: MITSUBISHI COLT 2011Pages: 274, PDF Size: 17.88 MB
Page 111 of 274
ParkingE00600601521
Parking on a hill
To prevent the vehicle from rolling, follow these
procedures:
Parking on a downhill slope
Turn the front wheels towards the kerb and move
the vehicle forward until the kerb side wheel gently
touches the kerb.
Apply the parking brake and place the gearshift lev-
er into the “R” (Reverse) position (with manual
transmission) or the allshift lever into the “R” (Re-
verse) position (with automated manual transmis-
sion).
If necessary, apply chocks to wheels.
Parking on an uphill slope
Turn the front wheels away from the kerb and
move the vehicle back until the kerb side wheel gen-
tly touches the kerb.
Apply the parking brake and place the gearshift lev-
er into the 1 st
position (with manual transmission)
or the allshift lever into the “S” (Stand by) position
(with automated manual transmission).
If necessary, apply chocks to wheels.
NOTE l If your vehicle has an automated manual trans-
mission, place the allshift lever in the “S”
(Stand by) position or “R” (Reverse) position
before stopping the engine.
If you move the allshift lever after stopping
the engine, a gearshift will not take place.Parking with the engine running
Never leave the engine running while you take a
short sleep/rest. Also, never leave the engine run-
ning in a closed or poorly ventilated place.WARNINGl Leaving the engine running risks injury
or death from accidentally moving the
gearshift lever (manual transmission) or
the allshift lever (automated manual trans-
mission) or the accumulation of toxic ex-
haust fumes on the passenger compart-
ment.
Where you park
Your front bumper can be damaged if you scrape it
over kerbs or parking stop blocks. Be careful when
travelling up or down steep slopes where your bump-
er can scrape the road.
WARNINGl Do not park your vehicle in areas where
combustible materials such as dry grass
or leaves can come in contact with a hot
exhaust, since a fire could occur.
When leaving the vehicle
Always remove the key from the ignition switch
and lock all doors and the tailgate when leaving the
vehicle unattended.
Always try to park your vehicle in a well lit area.
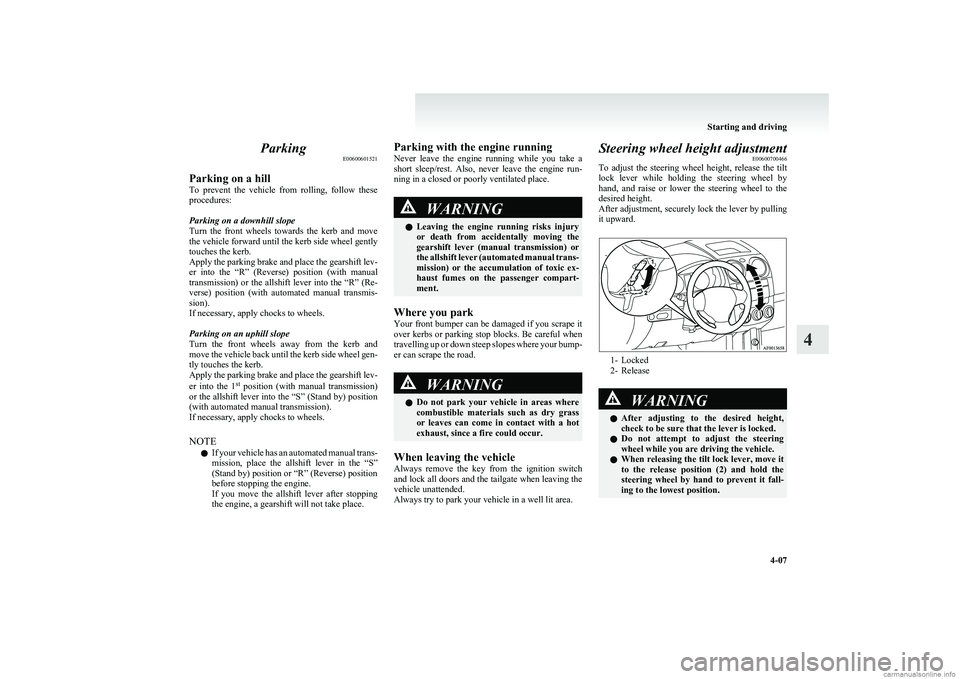
Steering wheel height adjustment E00600700466
To adjust the steering wheel height, release the tilt
lock lever while holding the steering wheel by
hand, and raise or lower the steering wheel to the
desired height.
After adjustment, securely lock the lever by pulling
it upward.
1- Locked
2- Release
WARNINGl After adjusting to the desired height,
check to be sure that the lever is locked.
l Do not attempt to adjust the steering
wheel while you are driving the vehicle.
l When releasing the tilt lock lever, move it
to the release position (2) and hold the
steering wheel by hand to prevent it fall-
ing to the lowest position.
Starting and driving
4-07
4
Page 128 of 274
WARNINGlHard engine braking can cause the tyres
to slip on the road surface, possibly lead-
ing to a serious accident.Waiting E00613300059
1.With the allshift lever in the “S” (Stand by)
position, firmly depress the brake pedal.
2. If necessary, apply the parking brake.
CAUTIONl On an uphill slope, the transmission’s
creep effect may not stop the vehicle from
rolling backward if the brakes are not ap-
plied. There is no creep effect while
2 nd
gear is selected. When stopping, be
sure to depress the brake pedal and se-
curely apply the parking brake.
l Do not attempt to hold the vehicle in
place on an uphill road in 1st
gear by de-
pressing on the accelerator pedal. The
transmission could malfunction if you do.
3. When you are stationary for a long period
(for example, when stuck in a traffic jam),
place the allshift lever in the “N” (Neutral)
position.
CAUTIONl Continue to pay attention to the vehicle
while stationary. If you allow your atten-
tion to wander and the allshift lever is in
any position other than “N” (Neutral),
the vehicle could move suddenly and un-
expectedly.
4. When you are ready to start moving again,
first confirm that the allshift lever is in the
“S” (Stand by) position or “R” (Reverse) po-
sition and that an “A”, “1”, or “R” is shown
on the multi-information display.
NOTE l During vehicle operation, the transmission au-
tomatically shifts down when the vehicle
speed decreases. It selects 1st
gear just before
the vehicle reaches a standstill.
CAUTIONl The actions described below cause rapid
clutch wear and can cause clutch dam-
age. Do not perform them. •Depressing the brake and accelerator
pedals at the same time.
• Holding the vehicle in place on an up-
hill road by depressing the accelerator
pedal (and not depressing the brake
pedal) with 1 st
gear selected.Parking
E00613400034
1. Bring the vehicle to a complete stop.
2.While depressing the brake pedal, securely
apply the parking brake.
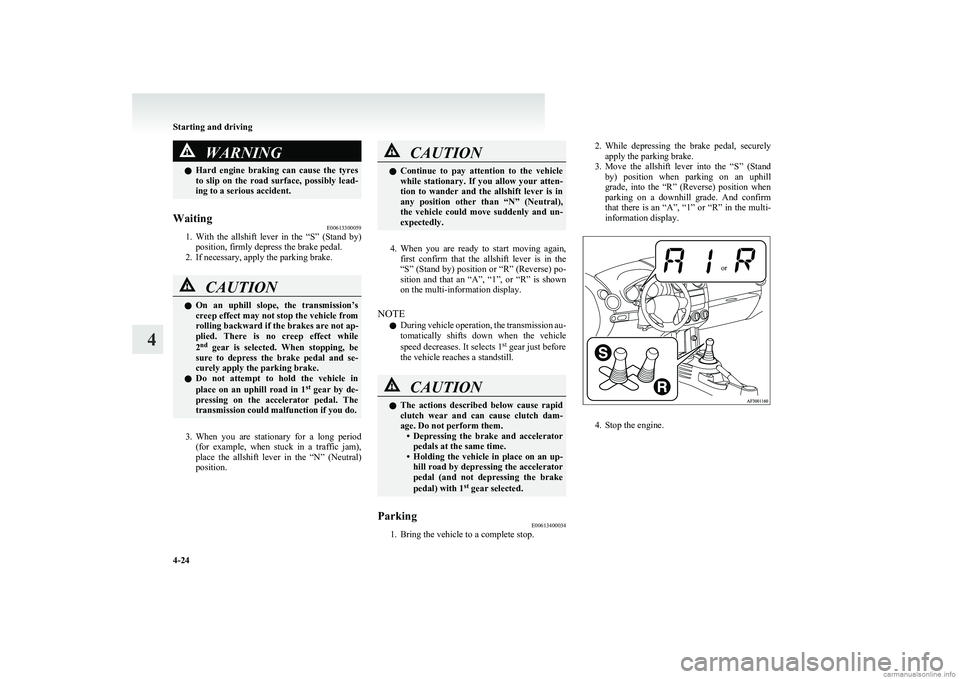
3. Move the allshift lever into the “S” (Stand
by) position when parking on an uphill
grade, into the “R” (Reverse) position when
parking on a downhill grade. And confirm
that there is an “A”, “1” or “R” in the multi-
information display.or
4. Stop the engine.
Starting and driving
4-24
4
Page 130 of 274
WARNINGlDo not leave any objects near the brake
pedal or let a floor mat slide under it; do-
ing so could prevent the full pedal stroke
that would be necessary in an emergency.
Make sure that the pedal can be operated
freely at all times. Make sure the floor
mat is securely held in place.
Brake pads and linings
l With new brake pads or linings, avoid where
possible sudden full application of the brakes
for the first 200 km (124 miles) of driving.
l The disc brakes are provided with a warning
device which emits a shrieking metallic
sound while braking if the brake pads have
reached their wear limit.
If you hear this sound, have the brake pads re-
placed immediately.
WARNINGl Driving with worn brake pads will make
it harder to stop, and can cause an acci-
dent.Emergency stop signal system E00626000021
This is a device that reduces the possibility of rear
end collisions by the rapid and automatic blinking
of the hazard warning lamps to alert vehicles ap-
proaching from behind during sudden braking.
When the emergency stop signal system operates,
the hazard warning indication lamp in the instru-
ment cluster blinks rapidly at the same time.CAUTIONl If the ABS warning lamp or TCL/ASC in-
dication lamp is illuminated, the emergen-
cy stop signal system may not operate. Re-
fer to “ABS warning lamp” on page
4-28.
Refer to “Traction control system (TCL)/
Active stability control system (ASC) indi-
cation lamp” on page 4-31.
NOTE
l [
Activating condition for the emergency stop
signal system]
It activates when all of the following condi-
tions are met. •The vehicle speed is approximately
55 km/h (34 mph) or higher.
• The brake pedal has been depressed, and
the system judges that it was sudden brak-
ing from the vehicle deceleration and the
operating condition of the anti-lock brake
system (ABS).
[ Deactivating condition for the emergency
stop signal system]
It deactivates when one of the following con-
ditions is met. • The brake pedal is released.
• The hazard warning flasher switch is
pressed.
• The system judges that it was not sudden
braking from the vehicle deceleration and
the operating condition of the anti-lock
brake system (ABS).
Starting and driving
4-26
4
Page 183 of 274
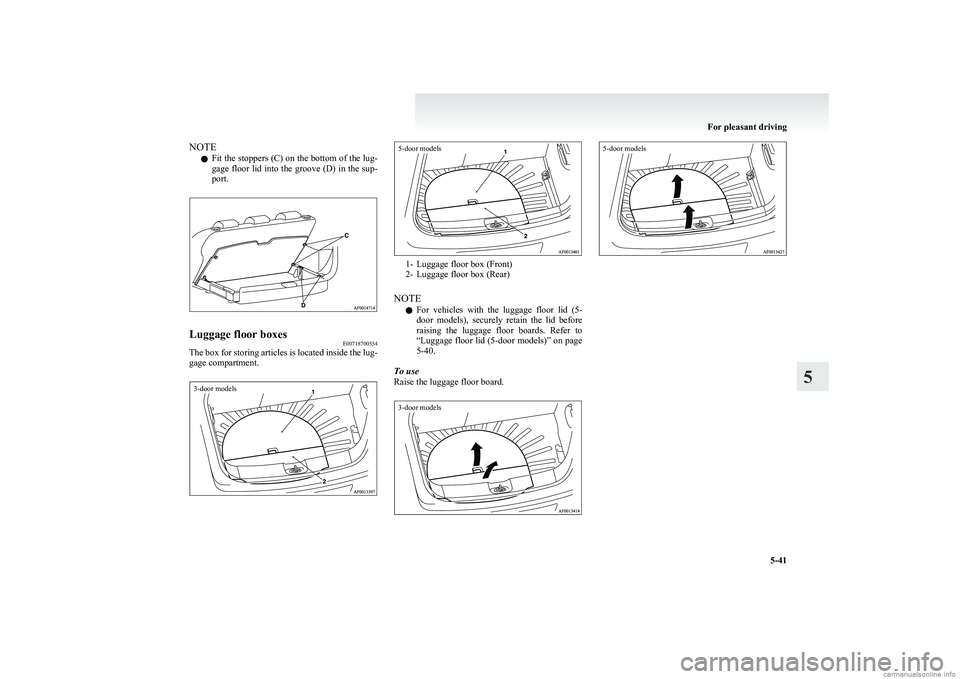
NOTEl Fit the stoppers (C) on the bottom of the lug-
gage floor lid into the groove (D) in the sup-
port.Luggage floor boxes E00718700554
The box for storing articles is located inside the lug-
gage compartment.
3-door models5-door models
1- Luggage floor box (Front)
2- Luggage floor box (Rear)
NOTE l For vehicles with the luggage floor lid (5-
door models), securely retain the lid before
raising the luggage floor boards. Refer to
“ Luggage floor lid (5-door models)” on page
5-40.
To use
Raise the luggage floor board.
3-door models5-door models
For pleasant driving
5-41
5
Page 194 of 274
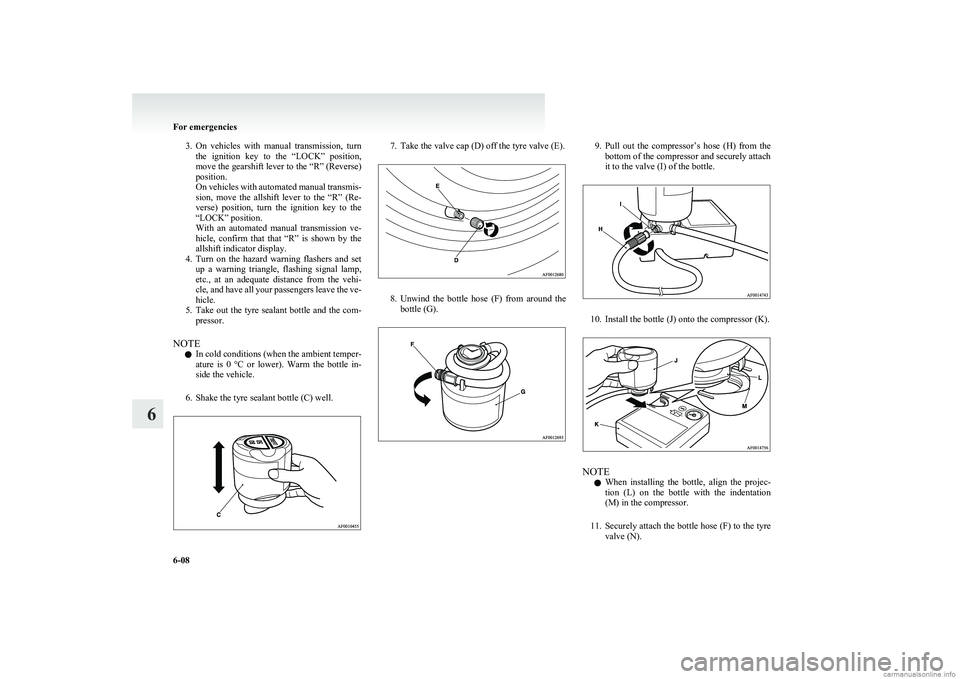
3.On vehicles with manual transmission, turn
the ignition key to the “LOCK” position,
move the gearshift lever to the “R” (Reverse)
position.
On vehicles with automated manual transmis-
sion, move the allshift lever to the “R” (Re-
verse) position, turn the ignition key to the
“LOCK” position.
With an automated manual transmission ve-
hicle, confirm that that “R” is shown by the
allshift indicator display.
4. Turn on the hazard warning flashers and set
up a warning triangle, flashing signal lamp,
etc., at an adequate distance from the vehi-
cle, and have all your passengers leave the ve-
hicle.
5. Take out the tyre sealant bottle and the com-
pressor.
NOTE l In cold conditions (when the ambient temper-
ature is 0 °C or lower). Warm the bottle in-
side the vehicle.
6. Shake the tyre sealant bottle (C) well.7. Take the valve cap (D) off the tyre valve (E).
8. Unwind the bottle hose (F) from around the
bottle (G).
9. Pull out the compressor’s hose (H) from the
bottom of the compressor and securely attach
it to the valve (I) of the bottle.
10. Install the bottle (J) onto the compressor (K).
NOTE
l When installing the bottle, align the projec-
tion (L) on the bottle with the indentation
(M) in the compressor.
11. Securely attach the bottle hose (F) to the tyre
valve (N).
For emergencies
6-08
6
Page 200 of 274
CAUTIONlThe compact spare tyre should not be
used on any other wheels, nor should
standard tyres, snow tyres, wheel covers
or trim rings be used with the compact
spare wheel. If such use is attempted, dam-
age to these items or other vehicle compo-
nents may occur.
l Upon installation of the compact spare
tyre, the overall vehicle height is lowered
slightly as the tyre is smaller in diameter
than the standard tyre. When passing
over the projections on the road, take
care not to drive the vehicle with the
same feeling as used in driving with the
standard tyre on.
l Do not install more than one compact
spare wheel at the same time.
l When the tread wear indicators appear,
the tyre must be replaced.
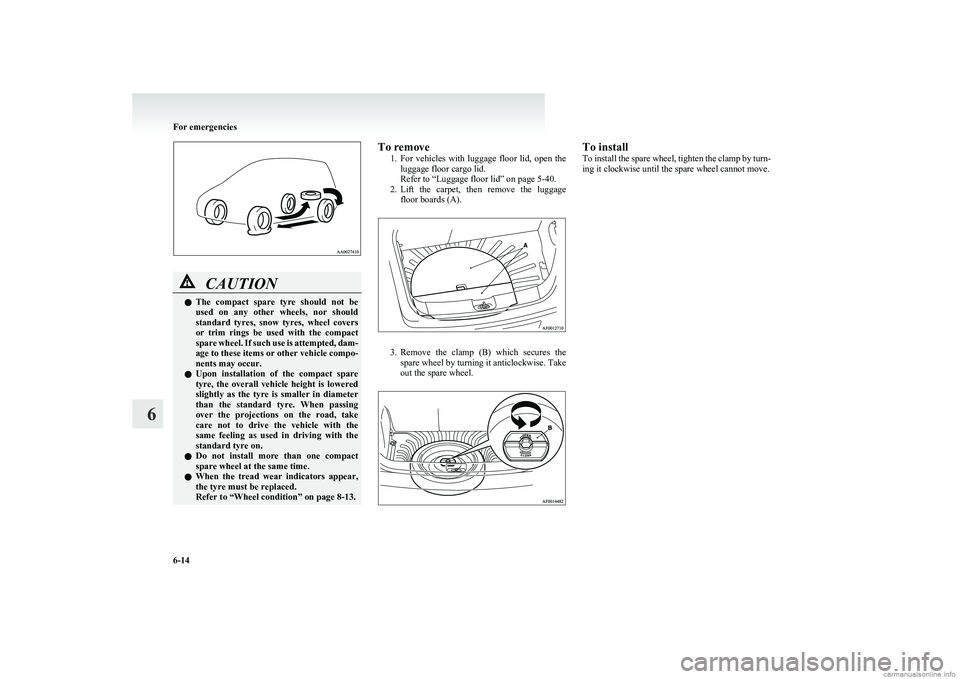
Refer to “Wheel condition” on page 8-13.To remove
1.For vehicles with luggage floor lid, open the
luggage floor cargo lid.
Refer to “Luggage floor lid” on page 5-40.
2. Lift the carpet, then remove the luggage
floor boards (A).
3. Remove the clamp (B) which secures the
spare wheel by turning it anticlockwise. Take
out the spare wheel.
To install
To install the spare wheel, tighten the clamp by turn-
ing it clockwise until the spare wheel cannot move.
For emergencies
6-14
6
Page 205 of 274
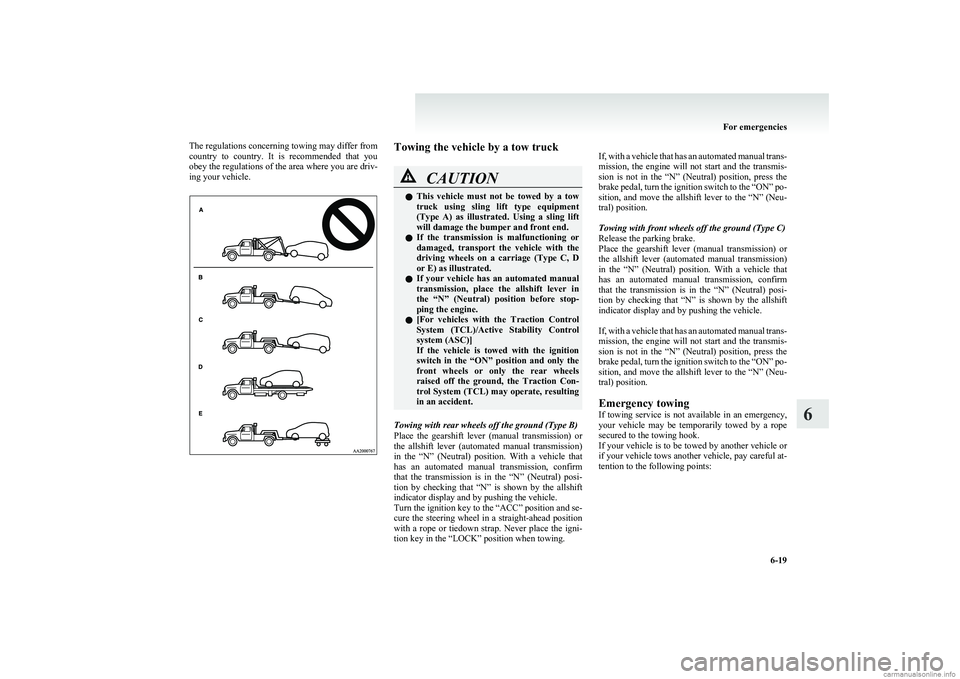
The regulations concerning towing may differ from
country to country. It is recommended that you
obey the regulations of the area where you are driv-
ing your vehicle.Towing the vehicle by a tow truckCAUTIONl This vehicle must not be towed by a tow
truck using sling lift type equipment
(Type A) as illustrated. Using a sling lift
will damage the bumper and front end.
l If the transmission is malfunctioning or
damaged, transport the vehicle with the
driving wheels on a carriage (Type C, D
or E) as illustrated.
l If your vehicle has an automated manual
transmission, place the allshift lever in
the “N” (Neutral) position before stop-
ping the engine.
l [
For vehicles with the Traction Control
System (TCL)/Active Stability Control
system (ASC)]
If the vehicle is towed with the ignition
switch in the “ON” position and only the
front wheels or only the rear wheels
raised off the ground, the Traction Con-
trol System (TCL) may operate, resulting
in an accident.
Towing with rear wheels off the ground (Type B)
Place the gearshift lever (manual transmission) or
the allshift lever (automated manual transmission)
in the “N” (Neutral) position. With a vehicle that
has an automated manual transmission, confirm
that the transmission is in the “N” (Neutral) posi-
tion by checking that “N” is shown by the allshift
indicator display and by pushing the vehicle.
Turn the ignition key to the “ACC” position and se-
cure the steering wheel in a straight-ahead position
with a rope or tiedown strap. Never place the igni-
tion key in the “LOCK” position when towing.
If, with a vehicle that has an automated manual trans-
mission, the engine will not start and the transmis-
sion is not in the “N” (Neutral) position, press the
brake pedal, turn the ignition switch to the “ON” po-
sition, and move the allshift lever to the “N” (Neu-
tral) position.
Towing with front wheels off the ground (Type C)
Release the parking brake.
Place the gearshift lever (manual transmission) or
the allshift lever (automated manual transmission)
in the “N” (Neutral) position. With a vehicle that
has an automated manual transmission, confirm
that the transmission is in the “N” (Neutral) posi-
tion by checking that “N” is shown by the allshift
indicator display and by pushing the vehicle.
If, with a vehicle that has an automated manual trans-
mission, the engine will not start and the transmis-
sion is not in the “N” (Neutral) position, press the
brake pedal, turn the ignition switch to the “ON” po-
sition, and move the allshift lever to the “N” (Neu-
tral) position.
Emergency towing
If towing service is not available in an emergency,
your vehicle may be temporarily towed by a rope
secured to the towing hook.
If your vehicle is to be towed by another vehicle or
if your vehicle tows another vehicle, pay careful at-
tention to the following points:
For emergencies
6-19
6
Page 206 of 274
CAUTIONlIf your vehicle has an automated manual
transmission, place the allshift lever in
the “N” (Neutral) position before stop-
ping the engine.
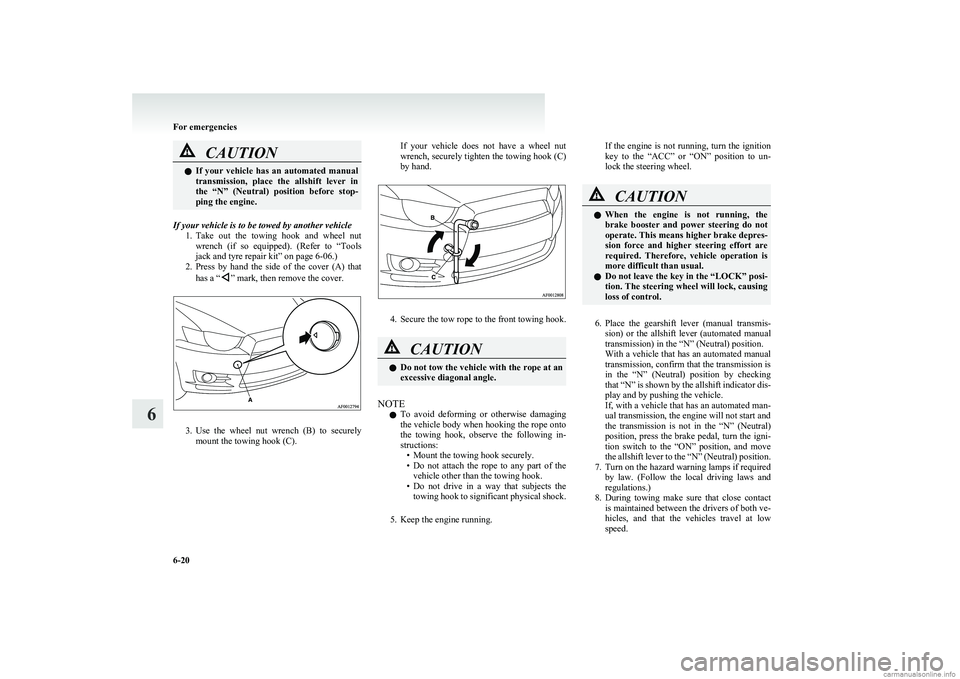
If your vehicle is to be towed by another vehicle
1.Take out the towing hook and wheel nut
wrench (if so equipped). (Refer to “Tools
jack and tyre repair kit” on page 6-06.)
2. Press by hand the side of the cover (A) that
has a “
” mark, then remove the cover.
3. Use the wheel nut wrench (B) to securely
mount the towing hook (C).
If your vehicle does not have a wheel nut
wrench, securely tighten the towing hook (C)
by hand.
4. Secure the tow rope to the front towing hook.
CAUTIONl Do not tow the vehicle with the rope at an
excessive diagonal angle.
NOTE
l To avoid deforming or otherwise damaging
the vehicle body when hooking the rope onto
the towing hook, observe the following in-
structions: • Mount the towing hook securely.
• Do not attach the rope to any part of the
vehicle other than the towing hook.
• Do not drive in a way that subjects the
towing hook to significant physical shock.
5. Keep the engine running.
If the engine is not running, turn the ignition
key to the “ACC” or “ON” position to un-
lock the steering wheel.CAUTIONl When the engine is not running, the
brake booster and power steering do not
operate. This means higher brake depres-
sion force and higher steering effort are
required. Therefore, vehicle operation is
more difficult than usual.
l Do not leave the key in the “LOCK” posi-
tion. The steering wheel will lock, causing
loss of control.
6. Place the gearshift lever (manual transmis-
sion) or the allshift lever (automated manual
transmission) in the “N” (Neutral) position.
With a vehicle that has an automated manual
transmission, confirm that the transmission is
in the “N” (Neutral) position by checking
that “N” is shown by the allshift indicator dis-
play and by pushing the vehicle.
If, with a vehicle that has an automated man-
ual transmission, the engine will not start and
the transmission is not in the “N” (Neutral)
position, press the brake pedal, turn the igni-
tion switch to the “ON” position, and move
the allshift lever to the “N” (Neutral) position.
7. Turn on the hazard warning lamps if required by law. (Follow the local driving laws and
regulations.)
8. During towing make sure that close contact
is maintained between the drivers of both ve-
hicles, and that the vehicles travel at low
speed.
For emergencies
6-20
6
Page 207 of 274
WARNINGlTo prevent entry of exhaust gas from the
towing vehicle, set your air selection
switch to the recirculation position.CAUTIONl The person in the vehicle being towed
must pay attention to the brake lamps of
the towing vehicle and make sure the
rope never becomes slack.
l Avoid sudden braking, sudden accelera-
tion and sharp turning; such operation
could cause damage to the towing hooks
or the tow rope.
People in the vicinity could be injured as
a result.
l When towing or being towed down a long
slope, the brakes may overheat reducing
the effectiveness. In this situation, have
your vehicle transported by a tow truck.
9. When finished towing, remove the towing
hook, and stow it in the specified location.
(Refer to “Tools jack and tyre repair kit” on
page 6-06.)
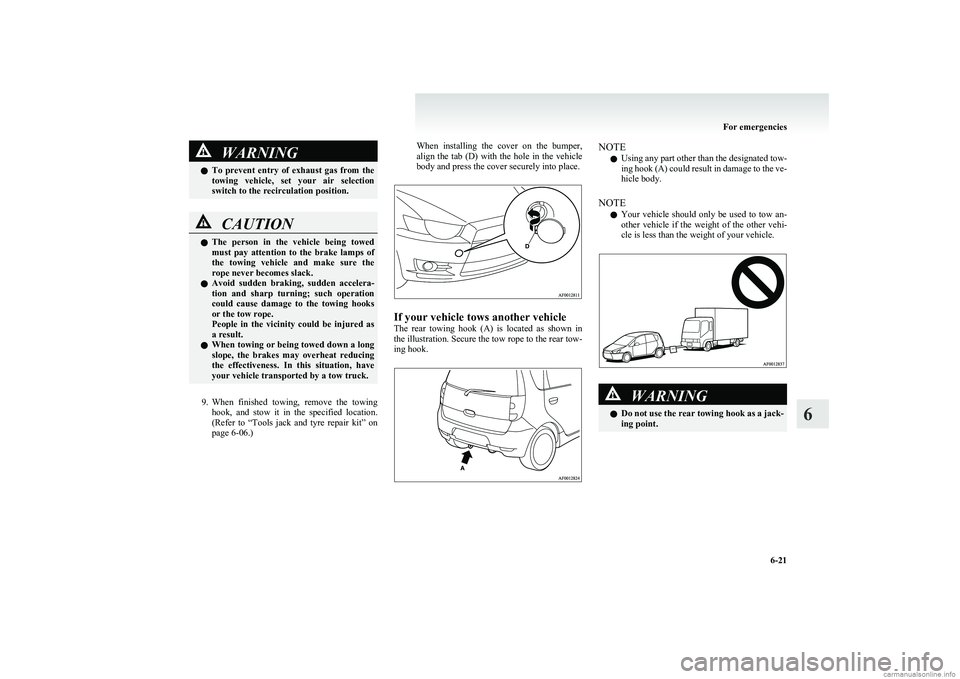
When installing the cover on the bumper,
align the tab (D) with the hole in the vehicle
body and press the cover securely into place.
If your vehicle tows another vehicle
The rear towing hook (A) is located as shown in
the illustration. Secure the tow rope to the rear tow-
ing hook.
NOTE
l Using any part other than the designated tow-
ing hook (A) could result in damage to the ve-
hicle body.
NOTE l Your vehicle should only be used to tow an-
other vehicle if the weight of the other vehi-
cle is less than the weight of your vehicle.WARNINGl Do not use the rear towing hook as a jack-
ing point.
For emergencies
6-21
6
Page 218 of 274
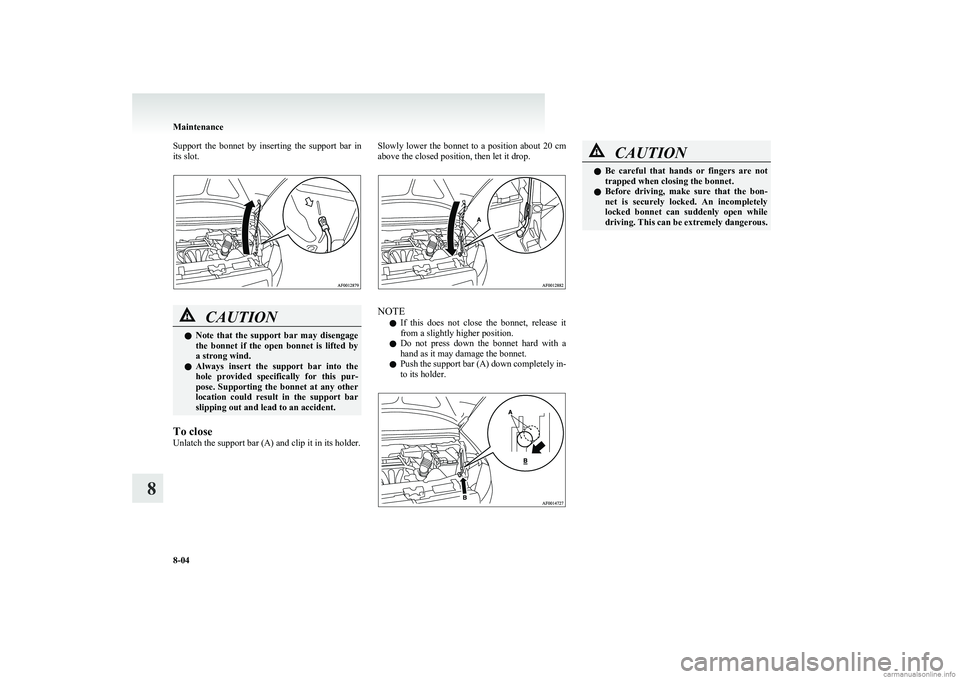
Support the bonnet by inserting the support bar in
its slot.CAUTIONl Note that the support bar may disengage
the bonnet if the open bonnet is lifted by
a strong wind.
l Always insert the support bar into the
hole provided specifically for this pur-
pose. Supporting the bonnet at any other
location could result in the support bar
slipping out and lead to an accident.
To close
Unlatch the support bar (A) and clip it in its holder.
Slowly lower the bonnet to a position about 20 cm
above the closed position, then let it drop.
NOTE
l If this does not close the bonnet, release it
from a slightly higher position.
l Do not press down the bonnet hard with a
hand as it may damage the bonnet.
l Push the support bar (A) down completely in-
to its holder.
CAUTIONl Be careful that hands or fingers are not
trapped when closing the bonnet.
l Before driving, make sure that the bon-
net is securely locked. An incompletely
locked bonnet can suddenly open while
driving. This can be extremely dangerous.
Maintenance
8-04
8