engine MITSUBISHI COLT 2011 (in English) Workshop Manual
[x] Cancel search | Manufacturer: MITSUBISHI, Model Year: 2011, Model line: COLT, Model: MITSUBISHI COLT 2011Pages: 274, PDF Size: 17.88 MB
Page 188 of 274
If the vehicle breaks downE00800101254
If the vehicle breaks down on the road, move it to
the shoulder and use the hazard warning flashers and/
or the warning triangle etc.
Refer to “Hazard warning flasher switch” on page
3-23.
If the engine stops/fails
Vehicle operation and control are affected if the en-
gine stops.
Before moving the vehicle to a safe area, be aware
of the following:
l The brake booster becomes inoperative and
the pedal effort will increase. Press down the
brake pedal harder than usual.
l Since the power steering system is no longer
operative, the steering wheel feels heavy
when turning it.Emergency starting E00800501900
If the engine cannot be started because the battery
is weak or dead, the battery from another vehicle
can be used with jumper cables to start the engine.WARNINGl To start the engine using jumper cables
connected to another vehicle, perform the
correct procedures according to the in-
struction below. Incorrect procedures
could result in a fire or explosion or dam-
age to the vehicles.
1. Get the vehicles close enough so the jumper
cables can reach, but be sure the vehicles
aren’t touching each other.
If they are, it could cause a ground connec-
tion you don’t want. The vehicle will not
start, and the bad grounding could damage
the electrical systems.
CAUTIONl Check the other vehicle. It must have a 12-
volt battery.
If the other system isn’t 12-volt, shorting
can damage both vehicles.2. You could be injured if the vehicles move.
Set the parking brake firmly on each vehicle.
Put an automatic transmission in “P”
(PARK) or a manual transmission and an au-
tomated manual transmission in “N” (Neu-
tral). With an automated manual transmis-
sion vehicle, confirm that “N” is shown by
the allshift indicator display. Turn off the ig-
nition switch.WARNINGl Turn off the ignition on both vehicles be-
forehand. Make sure that the cables or
your clothes cannot be caught by the fan
or drive belt. Personal injury could result.
NOTE
l Turn off all lamps, heater and other electrical
loads. This will avoid sparks and help save
both batteries.
3. Make sure battery electrolyte is at the proper
level. Refer to “Battery” on page 8-10.
WARNINGl If electrolyte fluid is not visible, or ap-
pears to be frozen, Do Not Attempt Jump
Starting!
A battery might rupture or explode if the
temperature is below the freezing point
or if it is not filled to the proper level.
For emergencies
6-02
6
Page 189 of 274
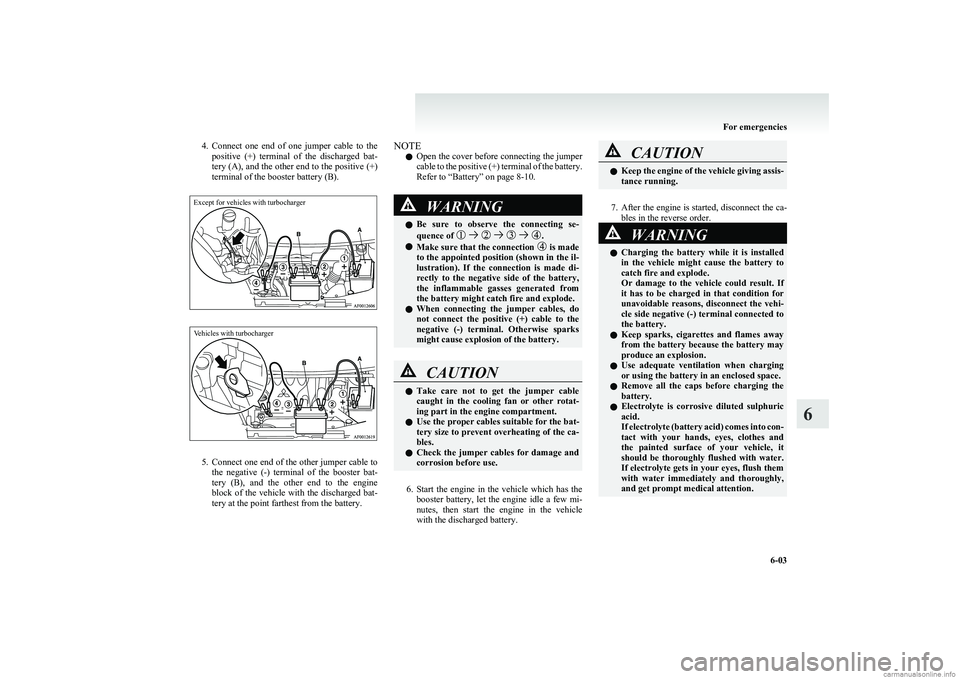
4.Connect one end of one jumper cable to the
positive (+) terminal of the discharged bat-
tery (A), and the other end to the positive (+)
terminal of the booster battery (B).Except for vehicles with turbochargerVehicles with turbocharger
5. Connect one end of the other jumper cable to
the negative (-) terminal of the booster bat-
tery (B), and the other end to the engine
block of the vehicle with the discharged bat-
tery at the point farthest from the battery.
NOTE
l Open the cover before connecting the jumper
cable to the positive (+) terminal of the battery.
Refer to “Battery” on page 8-10.WARNINGl Be sure to observe the connecting se-
quence of .
l Make sure that the connection is made
to the appointed position (shown in the il-
lustration). If the connection is made di-
rectly to the negative side of the battery,
the inflammable gasses generated from
the battery might catch fire and explode.
l When connecting the jumper cables, do
not connect the positive (+) cable to the
negative (-) terminal. Otherwise sparks
might cause explosion of the battery.
CAUTIONl Take care not to get the jumper cable
caught in the cooling fan or other rotat-
ing part in the engine compartment.
l Use the proper cables suitable for the bat-
tery size to prevent overheating of the ca-
bles.
l Check the jumper cables for damage and
corrosion before use.
6. Start the engine in the vehicle which has the
booster battery, let the engine idle a few mi-
nutes, then start the engine in the vehicle
with the discharged battery.
CAUTIONl Keep the engine of the vehicle giving assis-
tance running.
7. After the engine is started, disconnect the ca-
bles in the reverse order.
8.
WARNINGl Charging the battery while it is installed
in the vehicle might cause the battery to
catch fire and explode.
Or damage to the vehicle could result. If
it has to be charged in that condition for
unavoidable reasons, disconnect the vehi-
cle side negative (-) terminal connected to
the battery.
l Keep sparks, cigarettes and flames away
from the battery because the battery may
produce an explosion.
l Use adequate ventilation when charging
or using the battery in an enclosed space.
l Remove all the caps before charging the
battery.
l Electrolyte is corrosive diluted sulphuric
acid.
If electrolyte (battery acid) comes into con-
tact with your hands, eyes, clothes and
the painted surface of your vehicle, it
should be thoroughly flushed with water.
If electrolyte gets in your eyes, flush them
with water immediately and thoroughly,
and get prompt medical attention.
For emergencies
6-03
6
Page 190 of 274
CAUTIONlDo not attempt to start the engine by pull-
ing or pushing the vehicle.
It could damage your vehicle.
l Always wear protective eye goggles when
working near the battery.
l Keep the battery out of the reach of chil-
dren.
NOTE
l If the vehicle is put in motion without fully
charging the battery, it might cause the loss
of smooth engine operation and the anti-lock
brake warning lamp to illuminate. Refer to
“ Anti-lock brake system (ABS)” on page
4-27.
l For Clear Tec models, press the “Auto Stop
& Go (AS&G) OFF” switch to deactivate the
Auto Stop & Go (AS&G) system and pre-
vent the engine from automatically stopping
before the battery is sufficiently charged. Re-
fer to “To deactivate” on page 4-16.
Engine overheating E00800601839
If the high coolant temperature warning lamp flash-
es during the engine is running, the engine may be
overheating. If this occurs, take the following cor-
rective measures: 1. Stop the vehicle in a safe place.
2. Check whether steam is coming from the en-
gine compartment.
[ If steam does not come from the engine com-
partment]
With the engine still running, raise the bon-
net to ventilate the engine compartment.
NOTE l For Clear Tec models, press the “Auto Stop
& Go (AS&G) OFF” switch to deactivate the
Auto Stop & Go (AS&G) system before stop-
ping the vehicle. Refer to “To deactivate” on
page 4-16.
[If steam is coming from the engine compart-
ment]
Stop the engine, and when the steam stops,
raise the bonnet to ventilate the engine com-
partment. Restart the engine.WARNINGl Do not open the bonnet while steam is com-
ing from the engine compartment. It
could cause steam or hot water to spurt
out, causing burns. Hot water could spurt
out even when there is no steam coming
out, and some parts will be very hot. Be
very careful when opening the bonnet.WARNINGl Be careful of hot steam, which could blow
off the reserve tank cap.
l Do not attempt to remove the radiator
cap while the engine is hot.
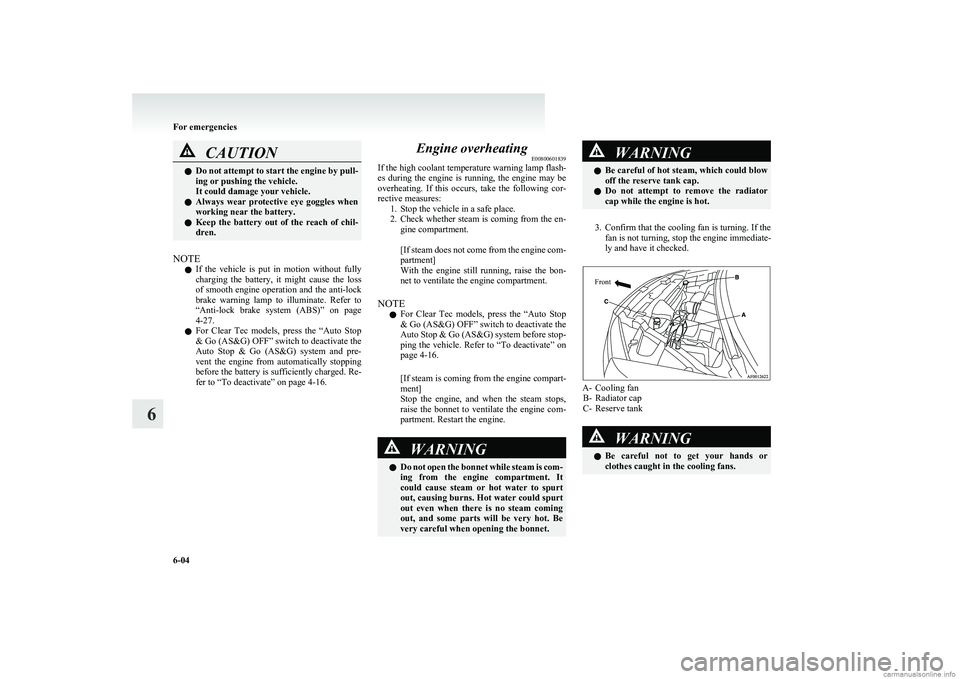
3. Confirm that the cooling fan is turning. If the
fan is not turning, stop the engine immediate-
ly and have it checked.
Front
A- Cooling fan B- Radiator cap
C- Reserve tank
WARNINGl Be careful not to get your hands or
clothes caught in the cooling fans.
For emergencies
6-04
6
Page 191 of 274
4.After the engine coolant temperature has drop-
ped to the normal temperature, stop the engine.
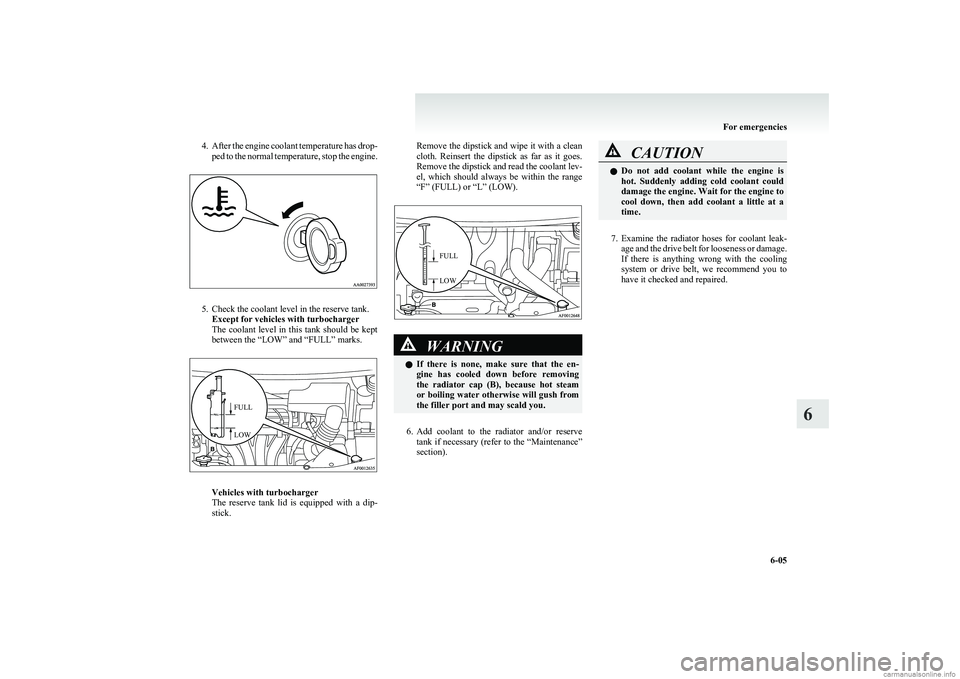
5. Check the coolant level in the reserve tank. Except for vehicles with turbocharger
The coolant level in this tank should be kept
between the “LOW” and “FULL” marks.
FULLLOW
Vehicles with turbocharger
The reserve tank lid is equipped with a dip-
stick.
Remove the dipstick and wipe it with a clean
cloth. Reinsert the dipstick as far as it goes.
Remove the dipstick and read the coolant lev-
el, which should always be within the range
“F” (FULL) or “L” (LOW).FULLLOW
WARNINGl If there is none, make sure that the en-
gine has cooled down before removing
the radiator cap (B), because hot steam
or boiling water otherwise will gush from
the filler port and may scald you.
6. Add coolant to the radiator and/or reserve
tank if necessary (refer to the “Maintenance”
section).
CAUTIONl Do not add coolant while the engine is
hot. Suddenly adding cold coolant could
damage the engine. Wait for the engine to
cool down, then add coolant a little at a
time.
7. Examine the radiator hoses for coolant leak-
age and the drive belt for looseness or damage.
If there is anything wrong with the cooling
system or drive belt, we recommend you to
have it checked and repaired.
For emergencies
6-05
6
Page 199 of 274
WARNINGlStop jacking up the vehicle as soon as the
tyre is raised off the ground. It is danger-
ous to raise the vehicle any higher.
l Do not get under your vehicle while using
the jack.
l Do not bump the raised vehicle or leave it
sitting on the jack for a long time. Both
are very dangerous.
l Do not use a jack except the one that
came with your vehicle.
l The jack should not be used for any pur-
pose other than to change a tyre.
l No one should be in your vehicle when us-
ing the jack.
l Do not start or run the engine while your
vehicle is on the jack.
l Do not turn the raised wheel. The tyres
still on the ground could turn and make
your vehicle fall off the jack.Spare wheel* E00801101394
Check the air pressure of the spare tyre frequently
and make sure it is ready for emergency use at any
time.
Maintaining the spare wheel at the highest speci-
fied air pressure will ensure that it can always be
used under any conditions (city/high-speed driving,
varying load weight, etc.).
The spare wheel is stored beneath the luggage floor
board of the luggage compartment.
Compact spare wheel
The compact spare tyre is designed to save space in
the luggage compartment and its lighter weight
makes it easier to use if a flat tyre occurs.CAUTIONl The pressure should be periodically
checked and maintained at the specified
pressure while the tyre is stowed.
Driving with an insufficient tyre pressure
can lead to an accident. If you have no
choice but to drive with an insufficient
tyre pressure, keep your speed down and
inflate the tyre to the correct pressure as
soon as possible. (Refer to “Tyre inflation
pressures” on page 8-12.)
l The compact spare wheel is for tempora-
ry use only and should be removed as
soon as the original wheel can be re-
paired or replaced.
l The vehicle must not be driven at speeds
in excess of 80 km/h (50 mph) while using
the compact spare wheel.CAUTIONl The compact spare tyre is not as good as
a standard tyre in controllability and sta-
bility. When the compact spare tyre is
used, avoid quick starts, sudden braking
and sharp steering.
l Avoid driving through automatic vehicle
washers and over obstacles that could pos-
sibly damage the vehicle’s undercarriage.
Because the compact spare wheel is small-
er than the original wheel, the ground
clearance is slightly reduced.
l The compact spare wheel is specifically de-
signed for your vehicle and it should not
be used on any other vehicle.
l Do not use tyre chains with your compact
spare wheel. Because of the smaller tyre
size, a tyre chain will not fit properly.
This could cause damage to the wheel
and result in loss of the chain.
If a front tyre becomes flat when using
tyre chains, first replace a rear wheel
with the compact spare wheel and then
use the removed rear wheel to replace the
flat front wheel so that you can continue
to use the chains.
For emergencies
6-13
6
Page 204 of 274
CAUTIONlUse the wheel nut wrench until the wheel
cover comes completely off. If you try to
use your hands, they may be hurt by the
edge of the wheel cover.
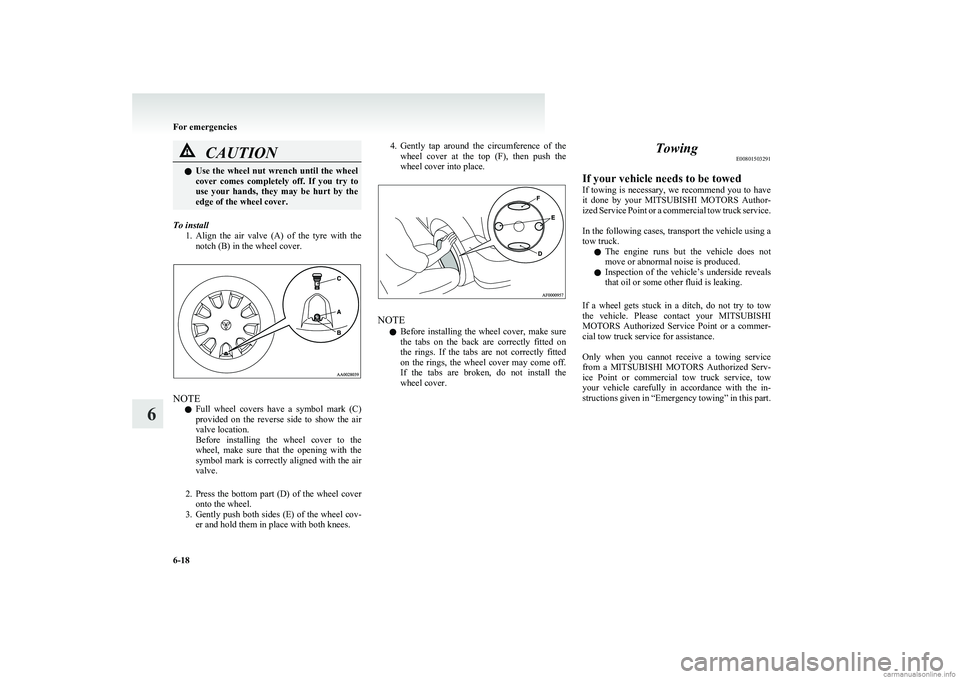
To install
1.Align the air valve (A) of the tyre with the
notch (B) in the wheel cover.
NOTE
l Full wheel covers have a symbol mark (C)
provided on the reverse side to show the air
valve location.
Before installing the wheel cover to the
wheel, make sure that the opening with the
symbol mark is correctly aligned with the air
valve.
2. Press the bottom part (D) of the wheel cover
onto the wheel.
3. Gently push both sides (E) of the wheel cov-
er and hold them in place with both knees.
4. Gently tap around the circumference of the
wheel cover at the top (F), then push the
wheel cover into place.
NOTE
l Before installing the wheel cover, make sure
the tabs on the back are correctly fitted on
the rings. If the tabs are not correctly fitted
on the rings, the wheel cover may come off.
If the tabs are broken, do not install the
wheel cover.
Towing E00801503291
If your vehicle needs to be towed
If towing is necessary, we recommend you to have
it done by your MITSUBISHI MOTORS Author-
ized Service Point or a commercial tow truck service.
In the following cases, transport the vehicle using a
tow truck.
l The engine runs but the vehicle does not
move or abnormal noise is produced.
l Inspection of the vehicle’s underside reveals
that oil or some other fluid is leaking.
If a wheel gets stuck in a ditch, do not try to tow
the vehicle. Please contact your MITSUBISHI
MOTORS Authorized Service Point or a commer-
cial tow truck service for assistance.
Only when you cannot receive a towing service
from a MITSUBISHI MOTORS Authorized Serv-
ice Point or commercial tow truck service, tow
your vehicle carefully in accordance with the in-
structions given in “Emergency towing” in this part.
For emergencies
6-18
6
Page 205 of 274
The regulations concerning towing may differ from
country to country. It is recommended that you
obey the regulations of the area where you are driv-
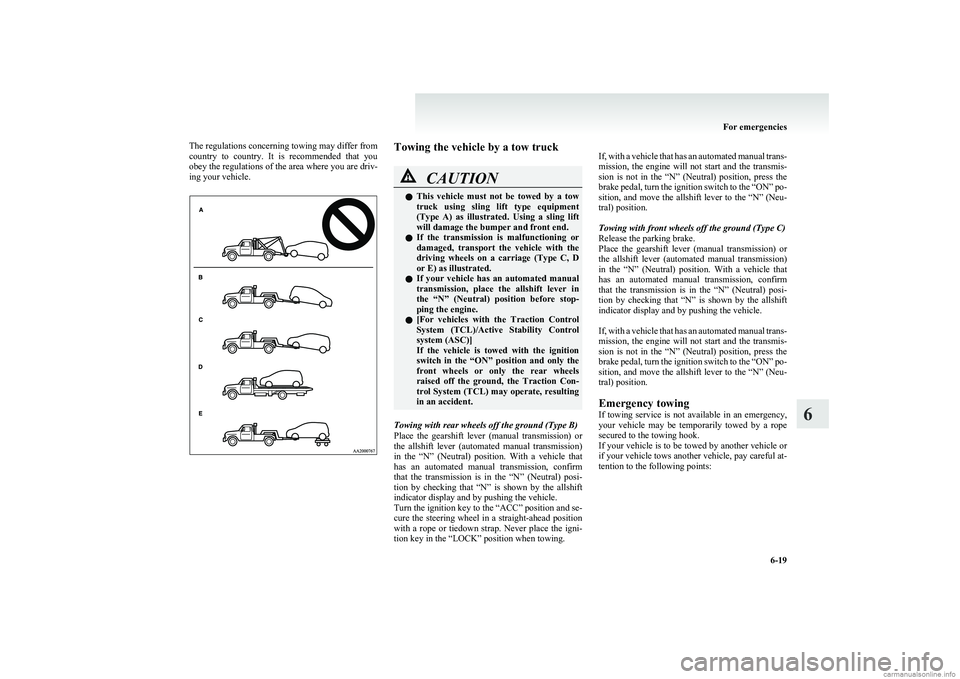
ing your vehicle.Towing the vehicle by a tow truckCAUTIONl This vehicle must not be towed by a tow
truck using sling lift type equipment
(Type A) as illustrated. Using a sling lift
will damage the bumper and front end.
l If the transmission is malfunctioning or
damaged, transport the vehicle with the
driving wheels on a carriage (Type C, D
or E) as illustrated.
l If your vehicle has an automated manual
transmission, place the allshift lever in
the “N” (Neutral) position before stop-
ping the engine.
l [
For vehicles with the Traction Control
System (TCL)/Active Stability Control
system (ASC)]
If the vehicle is towed with the ignition
switch in the “ON” position and only the
front wheels or only the rear wheels
raised off the ground, the Traction Con-
trol System (TCL) may operate, resulting
in an accident.
Towing with rear wheels off the ground (Type B)
Place the gearshift lever (manual transmission) or
the allshift lever (automated manual transmission)
in the “N” (Neutral) position. With a vehicle that
has an automated manual transmission, confirm
that the transmission is in the “N” (Neutral) posi-
tion by checking that “N” is shown by the allshift
indicator display and by pushing the vehicle.
Turn the ignition key to the “ACC” position and se-
cure the steering wheel in a straight-ahead position
with a rope or tiedown strap. Never place the igni-
tion key in the “LOCK” position when towing.
If, with a vehicle that has an automated manual trans-
mission, the engine will not start and the transmis-
sion is not in the “N” (Neutral) position, press the
brake pedal, turn the ignition switch to the “ON” po-
sition, and move the allshift lever to the “N” (Neu-
tral) position.
Towing with front wheels off the ground (Type C)
Release the parking brake.
Place the gearshift lever (manual transmission) or
the allshift lever (automated manual transmission)
in the “N” (Neutral) position. With a vehicle that
has an automated manual transmission, confirm
that the transmission is in the “N” (Neutral) posi-
tion by checking that “N” is shown by the allshift
indicator display and by pushing the vehicle.
If, with a vehicle that has an automated manual trans-
mission, the engine will not start and the transmis-
sion is not in the “N” (Neutral) position, press the
brake pedal, turn the ignition switch to the “ON” po-
sition, and move the allshift lever to the “N” (Neu-
tral) position.
Emergency towing
If towing service is not available in an emergency,
your vehicle may be temporarily towed by a rope
secured to the towing hook.
If your vehicle is to be towed by another vehicle or
if your vehicle tows another vehicle, pay careful at-
tention to the following points:
For emergencies
6-19
6
Page 206 of 274
CAUTIONlIf your vehicle has an automated manual
transmission, place the allshift lever in
the “N” (Neutral) position before stop-
ping the engine.
If your vehicle is to be towed by another vehicle
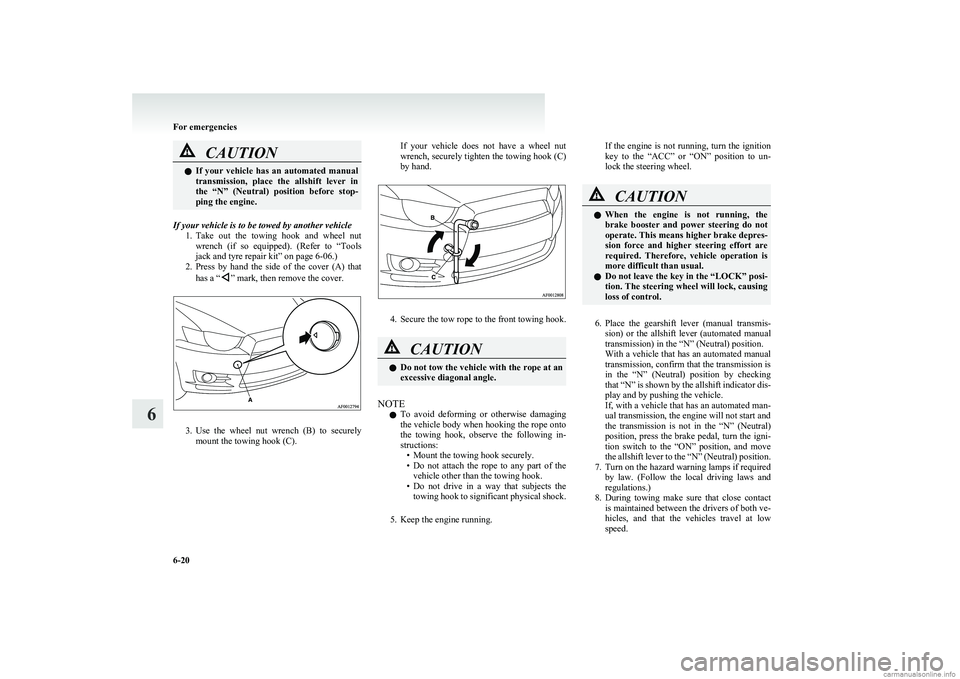
1.Take out the towing hook and wheel nut
wrench (if so equipped). (Refer to “Tools
jack and tyre repair kit” on page 6-06.)
2. Press by hand the side of the cover (A) that
has a “
” mark, then remove the cover.
3. Use the wheel nut wrench (B) to securely
mount the towing hook (C).
If your vehicle does not have a wheel nut
wrench, securely tighten the towing hook (C)
by hand.
4. Secure the tow rope to the front towing hook.
CAUTIONl Do not tow the vehicle with the rope at an
excessive diagonal angle.
NOTE
l To avoid deforming or otherwise damaging
the vehicle body when hooking the rope onto
the towing hook, observe the following in-
structions: • Mount the towing hook securely.
• Do not attach the rope to any part of the
vehicle other than the towing hook.
• Do not drive in a way that subjects the
towing hook to significant physical shock.
5. Keep the engine running.
If the engine is not running, turn the ignition
key to the “ACC” or “ON” position to un-
lock the steering wheel.CAUTIONl When the engine is not running, the
brake booster and power steering do not
operate. This means higher brake depres-
sion force and higher steering effort are
required. Therefore, vehicle operation is
more difficult than usual.
l Do not leave the key in the “LOCK” posi-
tion. The steering wheel will lock, causing
loss of control.
6. Place the gearshift lever (manual transmis-
sion) or the allshift lever (automated manual
transmission) in the “N” (Neutral) position.
With a vehicle that has an automated manual
transmission, confirm that the transmission is
in the “N” (Neutral) position by checking
that “N” is shown by the allshift indicator dis-
play and by pushing the vehicle.
If, with a vehicle that has an automated man-
ual transmission, the engine will not start and
the transmission is not in the “N” (Neutral)
position, press the brake pedal, turn the igni-
tion switch to the “ON” position, and move
the allshift lever to the “N” (Neutral) position.
7. Turn on the hazard warning lamps if required by law. (Follow the local driving laws and
regulations.)
8. During towing make sure that close contact
is maintained between the drivers of both ve-
hicles, and that the vehicles travel at low
speed.
For emergencies
6-20
6
Page 208 of 274
Operation under adverse drivingconditions E00801701840
If your vehicle becomes stuck in sand,
mud or snow
If the vehicle becomes stuck in snow, sand, or
mud, it can often be moved by a rocking motion.
For vehicle with manual transmission, move the
gearshift lever alternately between 1 st
and Reverse,
while applying slight pressure to the accelerator ped-
al.
With an automated manual transmission vehicle,
place the allshift lever in the “A” (automatic mode)
position to select automatic mode or select 1 st
or
2 nd
gear in the manual mode or place the allshift lev-
er in the “R” (Reverse) position for reverse. Con-
firm that there is an “A”, “1”, “2” or “R” in the all-
shift indicator display, then gently press the acceler-
ator pedal. Do not press the accelerator pedal while
moving the allshift lever.
Avoid racing the engine or spinning the wheels. Pro-
longed efforts to free a stuck vehicle may result in
overheating and transmission failure. Allow the en-
gine to idle for a few minutes to let the transmis-
sion cool between rocking attempts.
If the vehicle remains stuck after several rocking at-
tempts, seek other assistance.WARNINGl When attempting to rock your vehicle out
of a stuck position, be sure that the area
around the vehicle is clear of people and
physical objects. The rocking motion may
cause the vehicle to suddenly launch for-
ward or backward, causing injury or dam-
age to nearby people or objects.
On a flooded road
l Avoid flooded roads. Water could enter the
brake discs, resulting in temporarily ineffec-
tive brakes. In such cases, lightly depress the
brake pedal to see if the brakes operate prop-
erly. If they do not, lightly depress the pedal
several times while driving in order to dry
the brake pads.
l When driving in rain or on a road with many
puddles a layer of water may form between
the tyres and the road surface.
This reduces a tyre’s frictional resistance on
the road, resulting in loss of steering stability
and braking capability.
To cope with this, observe the following items:
(a)Drive your vehicle at slow speed. (b)Do not drive on worn tyres. Always
maintain the specified tyre inflation
pressures.
On a snow-covered or frozen road
l When driving on a snow-covered or frozen
road, it is recommended that you use snow
tyres or tyre chains.
Refer to the “Snow tyres” and “Tyre chains”
sections.
l Avoid high-speed operation, sudden acceler-
ation, abrupt brake application and sharp cor-
nering.
l Depressing the brake pedal during travel on
snowy or icy roads may cause tyre slippage
and skidding. When traction between the
tyres and the road is reduced the wheels may
skid and the vehicle cannot readily be
brought to a stop by conventional braking
techniques. Braking will differ, depending
upon whether you have anti-lock brake sys-
tem (ABS). As your vehicle is equipped with
anti-lock brake system (ABS), brake by press-
ing the brake pedal hard, and keeping it press-
ed.
l Allow extra distance between your vehicle
and the vehicle in front of you, and avoid sud-
den braking.
On a bumpy or rutted road l Drive as slow as possible when driving on
bumpy or rutted roads.CAUTIONl The impact on tyres and/or wheels when
driving on a bumpy or rutted road can
damage the tyre and/or wheel.
For emergencies
6-22
6
Page 211 of 274
NOTEl If genuine leather is wet with water or is wash-
ed in water, wipe off water as quickly as pos-
sible with a dry, soft cloth. If left damp, mil-
dew may grow.
l The genuine leather surface may be damaged
if a nylon brush or synthetic fibre is rubbed
hard against it.
l Organic solvents such as benzine, kerosene,
alcohol and petrol, acid or alkaline solvents
may discolour the genuine leather surface.
Be sure to use neutral detergents.
l Remove dirty patches or oil substances quick-
ly as they can stain genuine leather.
l The genuine leather surface may harden and
shrink if it is exposed to direct sun for long
hours. When your vehicle is parked, place it
in the shade as much as possible.
l When the temperature of the vehicle interior
rises in summer, vinyl products left on the
genuine leather seat may deteriorate and
stick to the seat.Cleaning the exterior of your
vehicle E00900700010
If the following is left on your vehicle, it may
cause corrosion, discolouration and stains, wash
the vehicle as soon as possible.
l Seawater, anti-freeze for road use.
l Soot and dust, iron powder from factories,
chemical substance (acids, alkalis, coal-tar,
etc.).
l Droppings from birds, carcasses of insects,
tree sap, etc.Washing E00900902351
Chemicals contained in the dirt and dust picked up
from the road surface can damage the paint coat
and body of your vehicle if left in prolonged contact.
Frequent washing and waxing is the best way to pro-
tect your vehicle from this damage. This will also
be effective in protecting it from environmental el-
ements such as rain, snow, salt air, etc.
Do not wash the vehicle in direct sunlight. Park the
vehicle in the shade and spray it with water to re-
move dust. Next, using an ample amount of clean
water and a car washing brush or sponge, wash the
vehicle from top to bottom.
Use a mild car washing soap if necessary. Rinse
thoroughly and wipe dry with a soft cloth. After
washing the vehicle, carefully clean the joints and
flanges of the doors, bonnet, etc., where dirt is like-
ly to remain.
CAUTIONl When washing the under side of your ve-
hicle or wheel, be careful not to injure
your hands.
l If your vehicle has rain sensor wipers,
place the wiper switch lever in the “
”
(OFF) position to deactivate the rain sen-
sor before washing the vehicle. Other-
wise, the wipers will operate in the pres-
ence of water spray on the windscreen
and may get damaged as a result.
l Refrain from using a car wash as its brush-
es may scratch the paint surface, causing
it to lose its gloss.
Scratches will be especially visible on
darker coloured vehicles.
l Never spray or splash water on the electri-
cal components in the engine compart-
ment, as this may adversely affect engine
starting.
Exercise caution also when washing the
underbody; be careful not to spray water
into the engine compartment.
l Some types of hot water washing equip-
ment apply high pressure and heat to the
vehicle. They may cause heat distortion
and damage to the vehicle resin parts and
may result in flooding of the vehicle inte-
rior. Therefore; observe the following. •Maintain a distance of approx. 50 cm
or more between the vehicle body and
the washing nozzle.
• When washing around the door glass,
hold the nozzle at a distance of more
than 50 cm and at right angles to the
glass surface.
Vehicle care
7-03
7