heater MITSUBISHI COLT 2011 Owner's Manual (in English)
[x] Cancel search | Manufacturer: MITSUBISHI, Model Year: 2011, Model line: COLT, Model: MITSUBISHI COLT 2011Pages: 274, PDF Size: 17.88 MB
Page 8 of 274
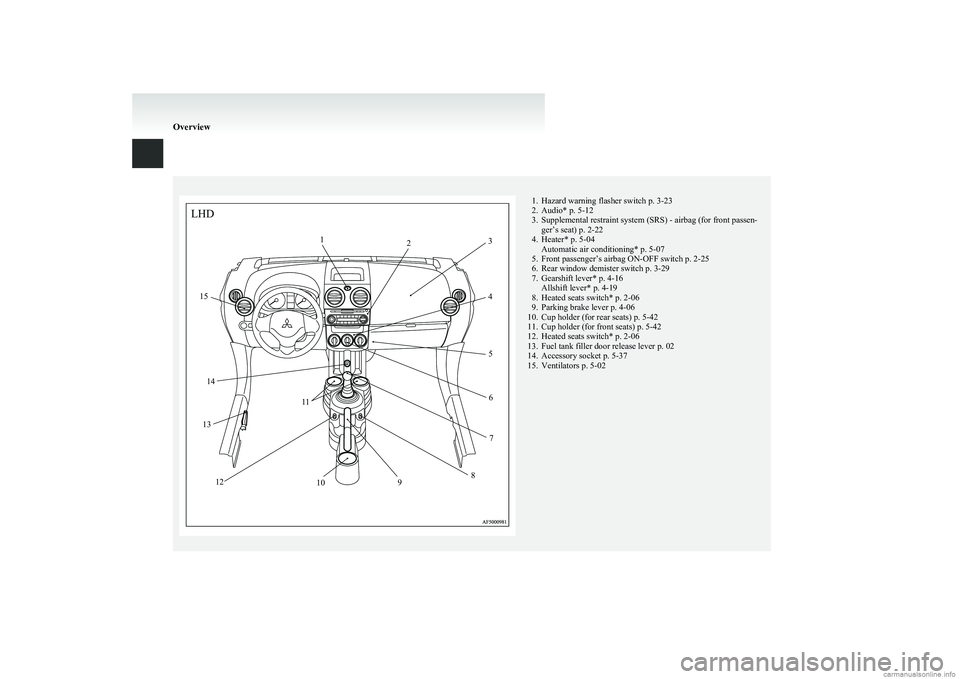
1. Hazard warning flasher switch p. 3-23
2. Audio* p. 5-12
3. Supplemental restraint system (SRS) - airbag (for front passen- ger’s seat) p. 2-22
4. Heater* p. 5-04 Automatic air conditioning* p. 5-07
5. Front passenger’s airbag ON-OFF switch p. 2-25
6. Rear window demister switch p. 3-29
7. Gearshift lever* p. 4-16 Allshift lever* p. 4-19
8. Heated seats switch* p. 2-06
9. Parking brake lever p. 4-06
10. Cup holder (for rear seats) p. 5-42
11. Cup holder (for front seats) p. 5-42
12. Heated seats switch* p. 2-06
13. Fuel tank filler door release lever p. 02
14. Accessory socket p. 5-37
15. Ventilators p. 5-02
OverviewLHD123
4
5 67
8
9
10
12 11
13 14
15
Page 9 of 274
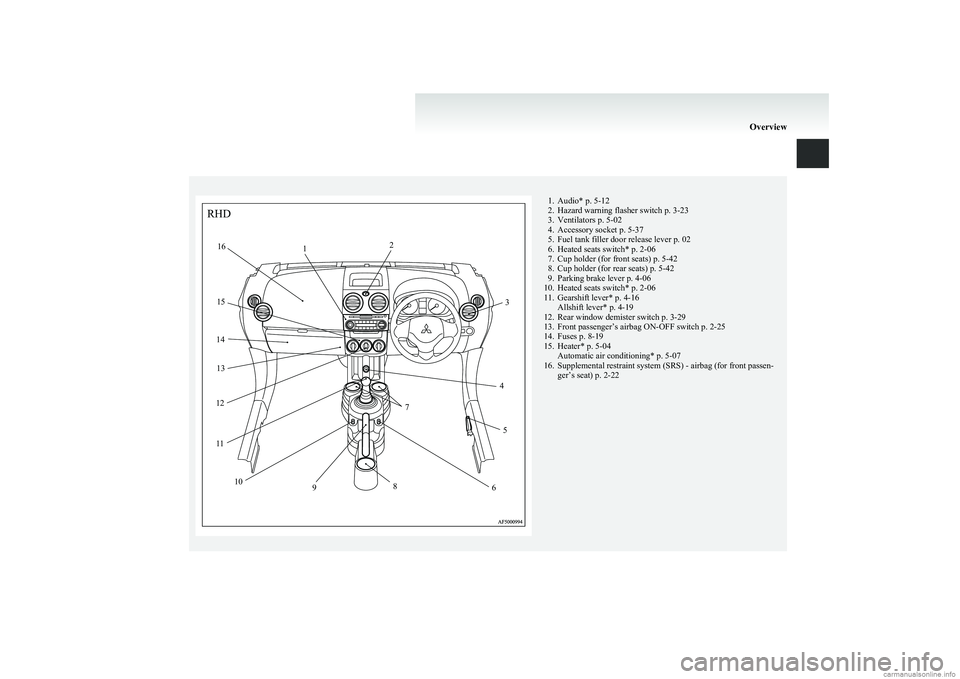
1. Audio* p. 5-12
2. Hazard warning flasher switch p. 3-23
3. Ventilators p. 5-02
4. Accessory socket p. 5-37
5. Fuel tank filler door release lever p. 02
6. Heated seats switch* p. 2-06
7. Cup holder (for front seats) p. 5-42
8. Cup holder (for rear seats) p. 5-42
9. Parking brake lever p. 4-06
10. Heated seats switch* p. 2-06
11. Gearshift lever* p. 4-16 Allshift lever* p. 4-19
12. Rear window demister switch p. 3-29
13. Front passenger’s airbag ON-OFF switch p. 2-25
14. Fuses p. 8-19
15. Heater* p. 5-04 Automatic air conditioning* p. 5-07
16. Supplemental restraint system (SRS) - airbag (for front passen- ger’s seat) p. 2-22
OverviewRHD12
3
4 5
6
8 7
9
10
11
12
13
14 15 16
Page 46 of 274
Heated seats*E00401100625
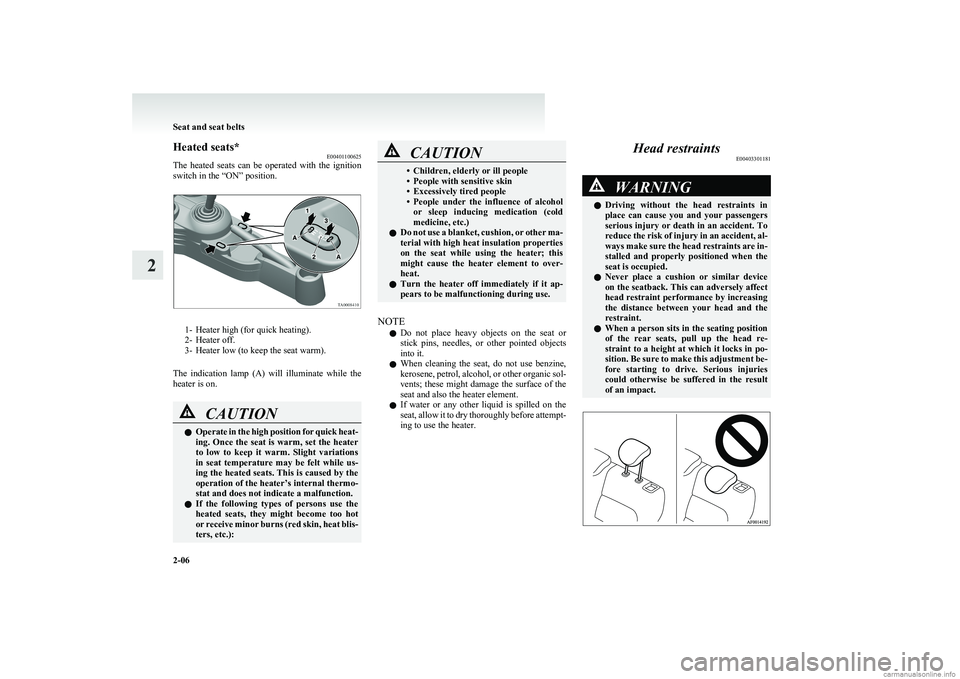
The heated seats can be operated with the ignition
switch in the “ON” position.
1- Heater high (for quick heating).
2- Heater off.
3- Heater low (to keep the seat warm).
The indication lamp (A) will illuminate while the
heater is on.
CAUTIONl Operate in the high position for quick heat-
ing. Once the seat is warm, set the heater
to low to keep it warm. Slight variations
in seat temperature may be felt while us-
ing the heated seats. This is caused by the
operation of the heater’s internal thermo-
stat and does not indicate a malfunction.
l If the following types of persons use the
heated seats, they might become too hot
or receive minor burns (red skin, heat blis-
ters, etc.):CAUTION• Children, elderly or ill people
• People with sensitive skin
• Excessively tired people
• People under the influence of alcohol
or sleep inducing medication (cold
medicine, etc.)
l Do not use a blanket, cushion, or other ma-
terial with high heat insulation properties
on the seat while using the heater; this
might cause the heater element to over-
heat.
l Turn the heater off immediately if it ap-
pears to be malfunctioning during use.
NOTE
l Do not place heavy objects on the seat or
stick pins, needles, or other pointed objects
into it.
l When cleaning the seat, do not use benzine,
kerosene, petrol, alcohol, or other organic sol-
vents; these might damage the surface of the
seat and also the heater element.
l If water or any other liquid is spilled on the
seat, allow it to dry thoroughly before attempt-
ing to use the heater.
Head restraints E00403301181WARNINGlDriving without the head restraints in
place can cause you and your passengers
serious injury or death in an accident. To
reduce the risk of injury in an accident, al-
ways make sure the head restraints are in-
stalled and properly positioned when the
seat is occupied.
l Never place a cushion or similar device
on the seatback. This can adversely affect
head restraint performance by increasing
the distance between your head and the
restraint.
l When a person sits in the seating position
of the rear seats, pull up the head re-
straint to a height at which it locks in po-
sition. Be sure to make this adjustment be-
fore starting to drive. Serious injuries
could otherwise be suffered in the result
of an impact.
Seat and seat belts
2-06
2
Page 104 of 274
CAUTIONlTo avoid unnecessary discharge of the bat-
tery, do not use the rear window demister
during starting of the engine or when the
engine is not running. Turn the demister
off immediately after the window is clear.
l When cleaning the inside of the rear win-
dow, use a soft cloth and wipe gently
along the heater wires, being careful not
to damage the wires.
l Do not allow objects to touch the inside of
the rear window glass, damaged or bro-
ken wires may result.Horn switch E00508000581
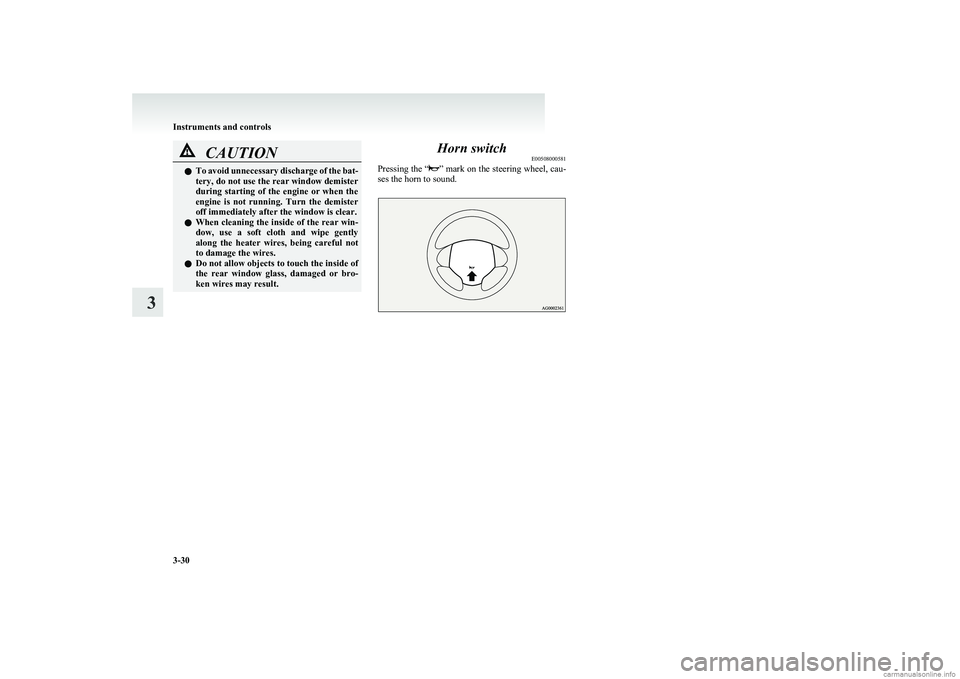
Pressing the “
” mark on the steering wheel, cau-
ses the horn to sound.Instruments and controls
3-30
3
Page 113 of 274
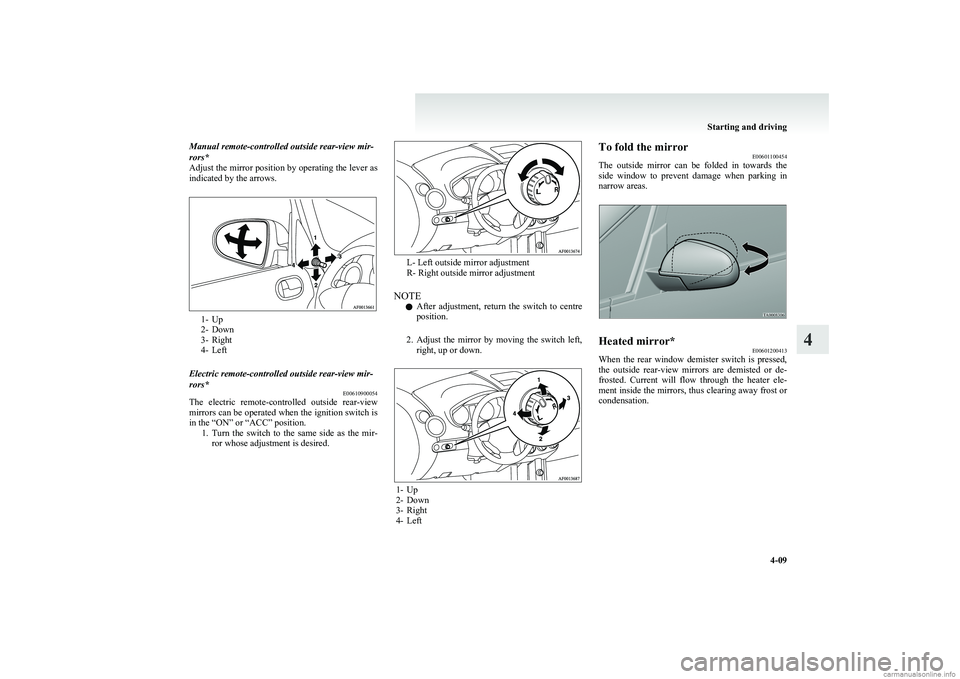
Manual remote-controlled outside rear-view mir-
rors*
Adjust the mirror position by operating the lever as
indicated by the arrows.
1- Up
2- Down
3- Right
4- Left
Electric remote-controlled outside rear-view mir-
rors* E00610900054
The electric remote-controlled outside rear-view
mirrors can be operated when the ignition switch is
in the “ON” or “ACC” position. 1.Turn the switch to the same side as the mir-
ror whose adjustment is desired.
L- Left outside mirror adjustment
R- Right outside mirror adjustment
NOTE l After adjustment, return the switch to centre
position.
2. Adjust the mirror by moving the switch left,
right, up or down.
1- Up
2- Down
3- Right
4- Left
To fold the mirror E00601100454
The outside mirror can be folded in towards the
side window to prevent damage when parking in
narrow areas.Heated mirror* E00601200413
When the rear window demister switch is pressed,
the outside rear-view mirrors are demisted or de-
frosted. Current will flow through the heater ele-
ment inside the mirrors, thus clearing away frost or
condensation.
Starting and driving
4-09
4
Page 114 of 274
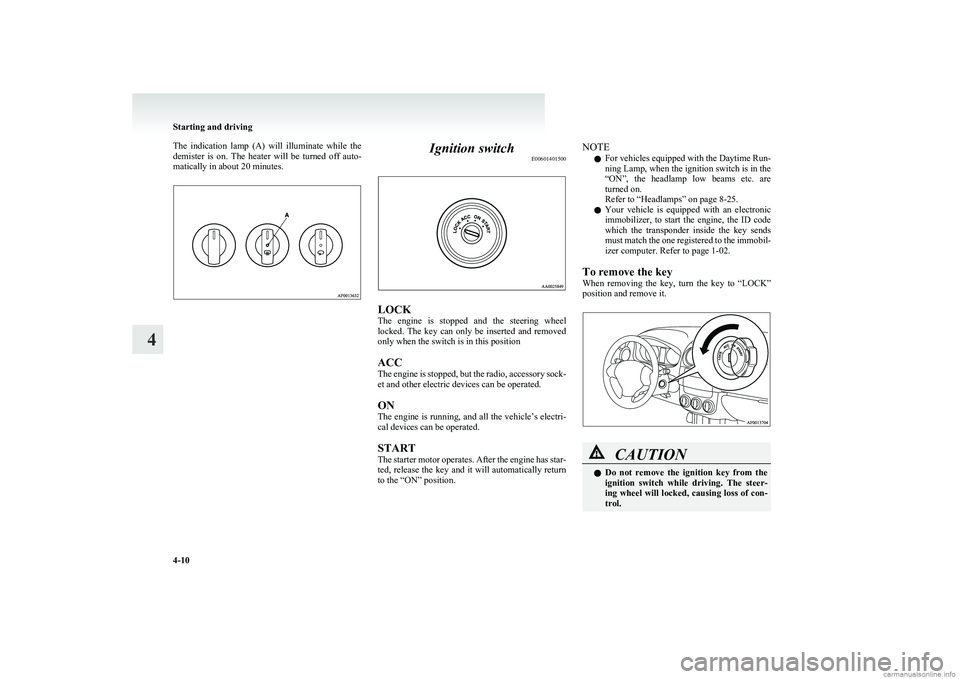
The indication lamp (A) will illuminate while the
demister is on. The heater will be turned off auto-
matically in about 20 minutes.Ignition switch E00601401500
LOCK
The engine is stopped and the steering wheel
locked. The key can only be inserted and removed
only when the switch is in this position
ACC
The engine is stopped, but the radio, accessory sock-
et and other electric devices can be operated.
ON
The engine is running, and all the vehicle’s electri-
cal devices can be operated.
START
The starter motor operates. After the engine has star-
ted, release the key and it will automatically return
to the “ON” position.
NOTE
l For vehicles equipped with the Daytime Run-
ning Lamp, when the ignition switch is in the
“ON”, the headlamp low beams etc. are
turned on.
Refer to “Headlamps” on page 8-25.
l Your vehicle is equipped with an electronic
immobilizer, to start the engine, the ID code
which the transponder inside the key sends
must match the one registered to the immobil-
izer computer. Refer to page 1-02.
To remove the key
When removing the key, turn the key to “LOCK”
position and remove it.CAUTIONl Do not remove the ignition key from the
ignition switch while driving. The steer-
ing wheel will locked, causing loss of con-
trol.
Starting and driving
4-10
4
Page 143 of 274
Ventilators.................................................................................... 5-02
Heater*..........................................................................................5-04
Automatic air conditioning* ......................................................... 5-07
Important operation tips for the air conditioning..........................5-11
Air purifier .................................................................................... 5-12
LW/MW/FM electronic tuning radio with CD player* ................5-12
To use the external audio input function ......................................5-27
Steering wheel audio remote control switches* ...........................5-28
Error codes .................................................................................... 5-30
Handling of compact discs ........................................................... 5-32
Antenna ......................................................................................... 5-33
Digital clock* ............................................................................... 5-34
Sun visors ..................................................................................... 5-36
Vanity mirror ................................................................................ 5-37
Accessory socket .......................................................................... 5-37
Interior lamps ................................................................................ 5-38
Storage spaces...............................................................................5-39
Cup holder .................................................................................... 5-42
Rear shelf panel* .......................................................................... 5-42
Coat hooks* .................................................................................. 5-43For pleasant driving5
Page 146 of 274
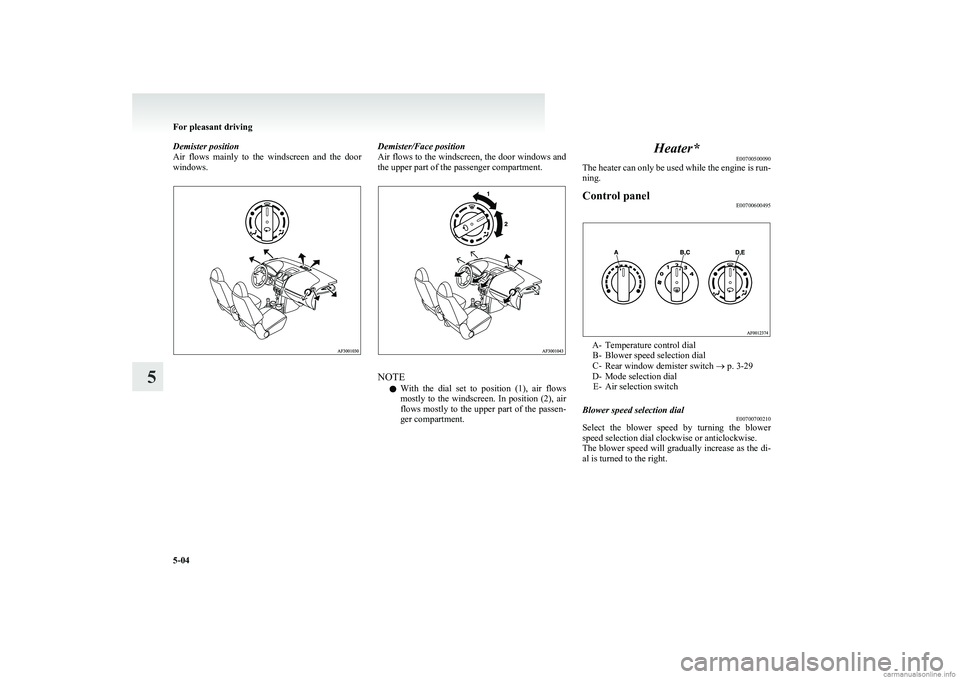
Demister position
Air flows mainly to the windscreen and the door
windows.Demister/Face position
Air flows to the windscreen, the door windows and
the upper part of the passenger compartment.
NOTE
l With the dial set to position (1), air flows
mostly to the windscreen. In position (2), air
flows mostly to the upper part of the passen-
ger compartment.
Heater* E00700500090
The heater can only be used while the engine is run-
ning.Control panel E00700600495
A- Temperature control dial
B- Blower speed selection dial
C- Rear window demister switch ® p. 3-29
D- Mode selection dial E- Air selection switch
Blower speed selection dial E00700700210
Select the blower speed by turning the blower
speed selection dial clockwise or anticlockwise.
The blower speed will gradually increase as the di-
al is turned to the right.
For pleasant driving
5-04
5
Page 147 of 274
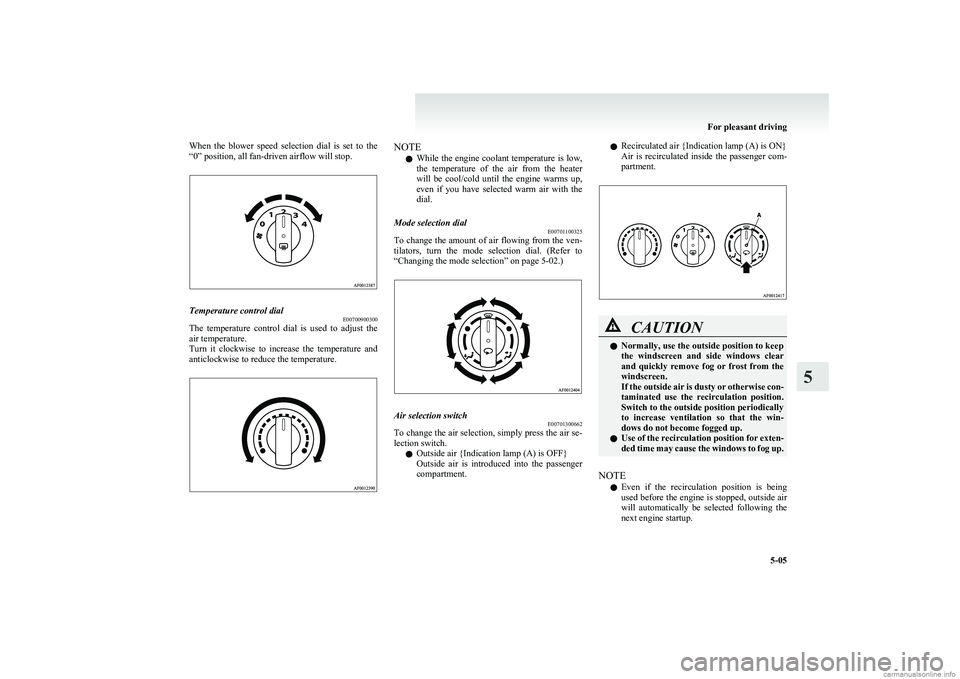
When the blower speed selection dial is set to the
“0” position, all fan-driven airflow will stop.Temperature control dial E00700900300
The temperature control dial is used to adjust the
air temperature.
Turn it clockwise to increase the temperature and
anticlockwise to reduce the temperature.
NOTE
l While the engine coolant temperature is low,
the temperature of the air from the heater
will be cool/cold until the engine warms up,
even if you have selected warm air with the
dial.Mode selection dial E00701100325
To change the amount of air flowing from the ven-
tilators, turn the mode selection dial. (Refer to
“Changing the mode selection” on page 5-02.)
Air selection switch E00701300662
To change the air selection, simply press the air se-
lection switch.
l Outside air {Indication lamp (A) is OFF}
Outside air is introduced into the passenger
compartment.
l Recirculated air {Indication lamp (A) is ON}
Air is recirculated inside the passenger com-
partment.CAUTIONl Normally, use the outside position to keep
the windscreen and side windows clear
and quickly remove fog or frost from the
windscreen.
If the outside air is dusty or otherwise con-
taminated use the recirculation position.
Switch to the outside position periodically
to increase ventilation so that the win-
dows do not become fogged up.
l Use of the recirculation position for exten-
ded time may cause the windows to fog up.
NOTE
l Even if the recirculation position is being
used before the engine is stopped, outside air
will automatically be selected following the
next engine startup.
For pleasant driving
5-05
5
Page 148 of 274
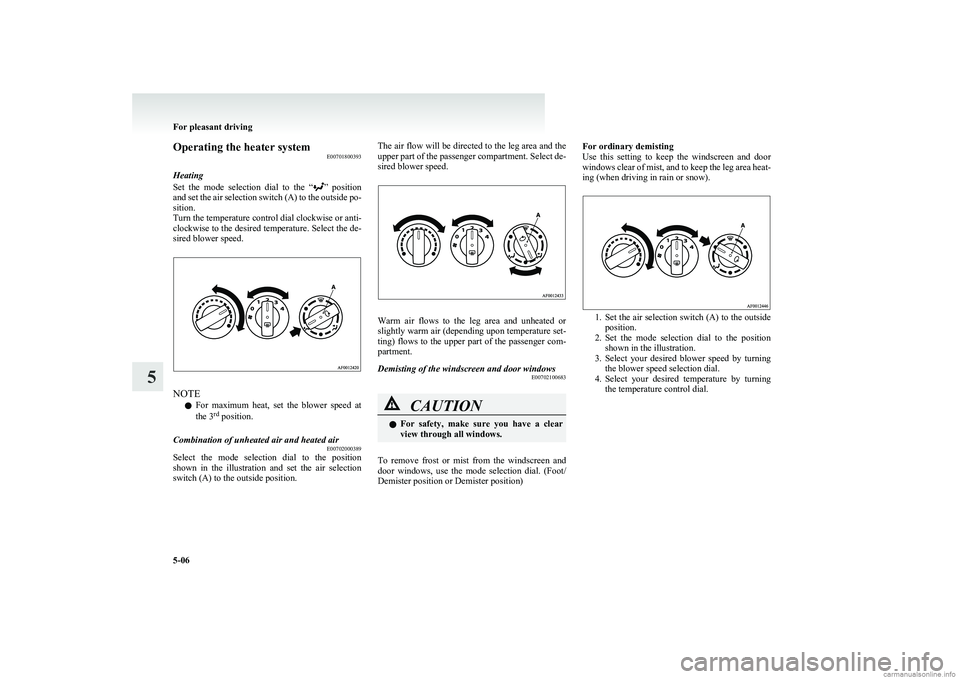
Operating the heater systemE00701800393
Heating
Set the mode selection dial to the “
” position
and set the air selection switch (A) to the outside po-
sition.
Turn the temperature control dial clockwise or anti-
clockwise to the desired temperature. Select the de-
sired blower speed.
NOTE
l For maximum heat, set the blower speed at
the 3 rd
position.
Combination of unheated air and heated air
E00702000389
Select the mode selection dial to the position
shown in the illustration and set the air selection
switch (A) to the outside position.
The air flow will be directed to the leg area and the
upper part of the passenger compartment. Select de-
sired blower speed.
Warm air flows to the leg area and unheated or
slightly warm air (depending upon temperature set-
ting) flows to the upper part of the passenger com-
partment.
Demisting of the windscreen and door windows E00702100683CAUTIONlFor safety, make sure you have a clear
view through all windows.
To remove frost or mist from the windscreen and
door windows, use the mode selection dial. (Foot/
Demister position or Demister position)
For ordinary demisting
Use this setting to keep the windscreen and door
windows clear of mist, and to keep the leg area heat-
ing (when driving in rain or snow).
1. Set the air selection switch (A) to the outside
position.
2. Set the mode selection dial to the position
shown in the illustration.
3. Select your desired blower speed by turning
the blower speed selection dial.
4. Select your desired temperature by turning
the temperature control dial.
For pleasant driving
5-06
5