head bolt MITSUBISHI ECLIPSE 1991 Owner's Manual
[x] Cancel search | Manufacturer: MITSUBISHI, Model Year: 1991, Model line: ECLIPSE, Model: MITSUBISHI ECLIPSE 1991Pages: 1216, PDF Size: 67.42 MB
Page 395 of 1216

ENGINE <2.0L DOHC Engine> - Camshaft and Rocker Arm9-111_ Front of engine (Timing belt side)
0 Co@
6EN0192
MD998306Oil seal
-
Y-II6ENI01946EN030’
1(2) Tighten the bearing caps in the order shown two to
three times by torquing progressively.
Tighten to specification in the final sequence.
(3) Check to be sure that the rocker arm is correctly placedon the lash adjuster and valve stem end.
5. INSTALLATION OF CAMSHAFT OIL SEAL
(1) Install the special tool, Guide, on the camshaft.
(2) Apply oil to the oil seal and insert the seal along the
Guide until it contacts the cylinder head.
(3) Using the special tool, Installer, press-fit the oil seal intothe cylinder head.
2. INSTALLATION OF CAMSHAFT SPROCKET
Using a wrench hold the camshaft at its hexagon (betweenthe
No.2 and No.3 journals) and tighten the bolt to
specification.Caution
Locking the camshaft sprocket with a tool damages the
sprocket.1. INSTALLATION OF CRANK ANGLE SENSOR
(1) Locate the dowel pin on the sprocket side of the intake
camshaft at top.
(2) Align the punch mark on the crank angle sensor housingwith the notch in plate.
NOTE
The crank angle sensor can be installed even when thepunch mark is positioned opposite the notch; however,
the position results in incorrect fuel injection and
ignition timings.
(3) Install the crank angle sensor on the cylinder head.
Page 396 of 1216
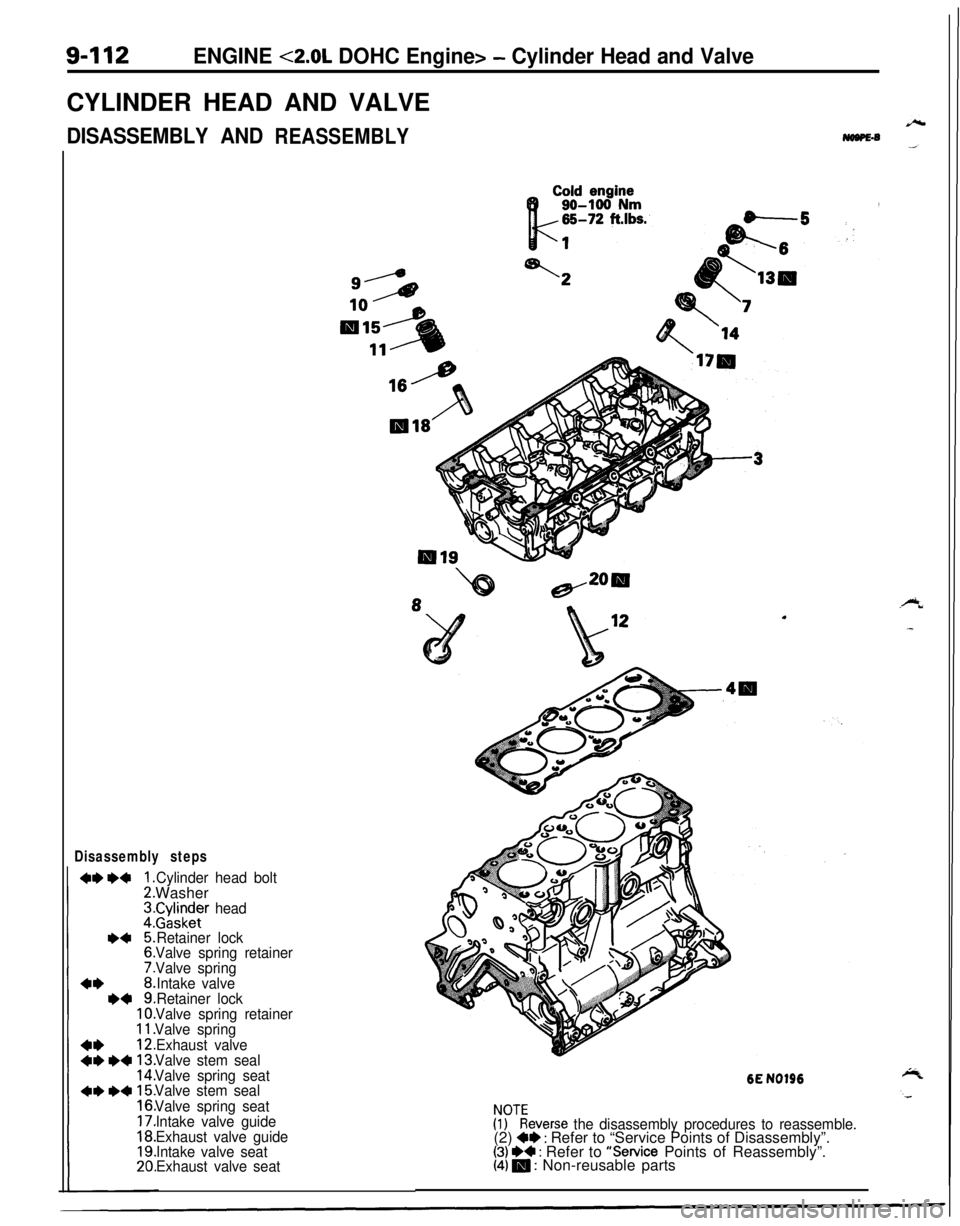
9-112ENGINE <2.0L DOHC Engine> - Cylinder Head and ValveCYLINDER HEAD AND VALVE
DISASSEMBLY ANDREASSEMBLYNewlie6
Disassembly steps
Cylinder head boltWasher
r$!$zr head
Retainer lock
Valve spring retainer
Valve spring
Intake valve
Retainer lock
Valve spring retainer
Valve spring
Exhaust valve
Valve stem seal
Valve spring seat
Valve stem seal
Valve spring seat
Intake valve guide
Exhaust valve guide
Intake valve seat
Exhaust valve seat
.
6E NO196
!??everse the disassembly procedures to reassemble.(2) +e : Refer to “Service Points of Disassembly”.(3) H : Refer to “Service Points of Reassembly”.(4) m : Non-reusable parts
Page 397 of 1216
ENGINE <2.0L DOHC Engine> - Cylinder Head and Valve9-l 13
.
.
a Front of engine (Timing belt side)
6EN0211
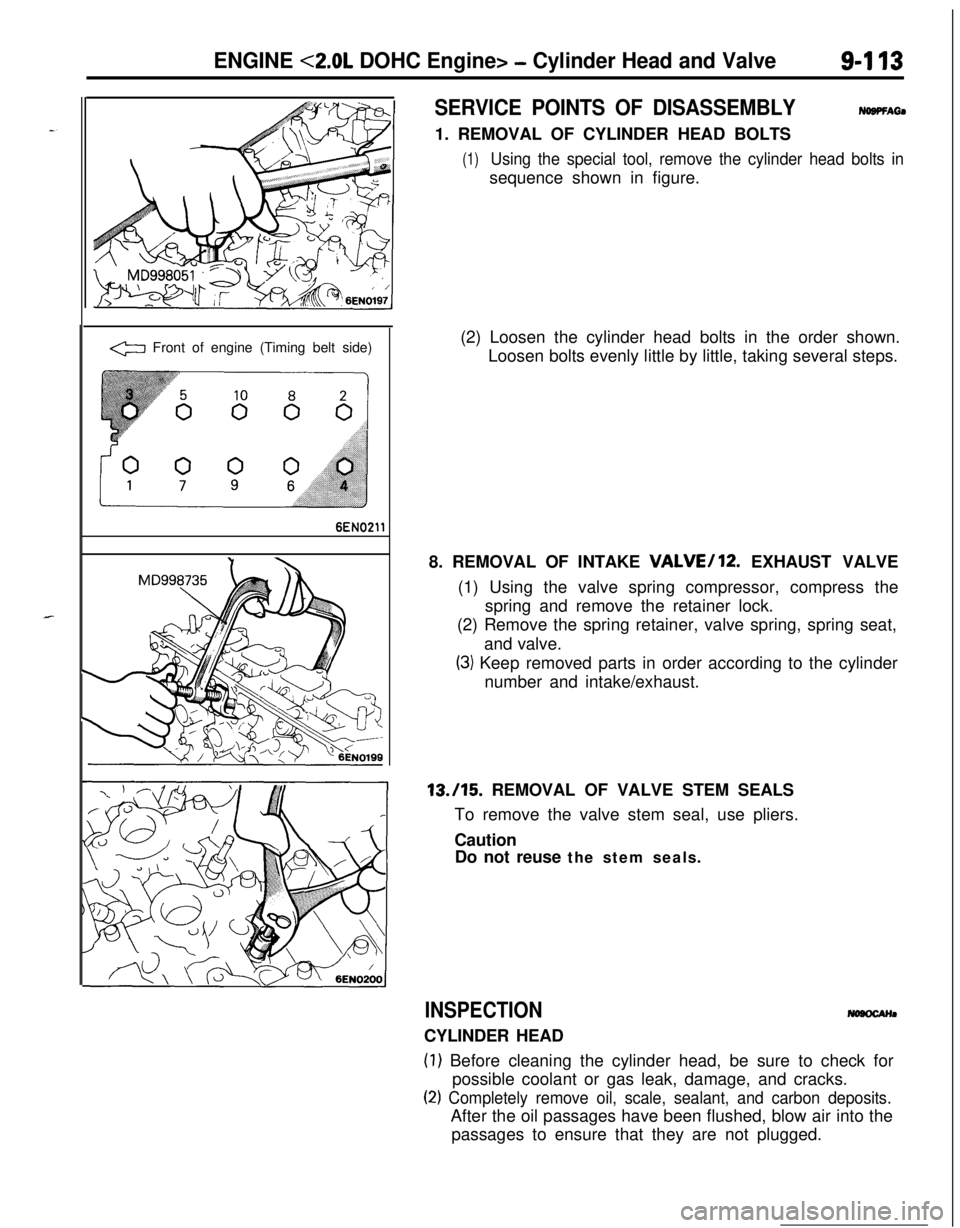
SERVICE POINTS OF DISASSEMBLYNOBPFAti1. REMOVAL OF CYLINDER HEAD BOLTS
(1)Using the special tool, remove the cylinder head bolts insequence shown in figure.
(2) Loosen the cylinder head bolts in the order shown.
Loosen bolts evenly little by little, taking several steps.
8. REMOVAL OF INTAKE
VALVE/12. EXHAUST VALVE
(1) Using the valve spring compressor, compress the
spring and remove the retainer lock.
(2) Remove the spring retainer, valve spring, spring seat,
and valve.
(3) Keep removed parts in order according to the cylinder
number and intake/exhaust.13./15. REMOVAL OF VALVE STEM SEALS
To remove the valve stem seal, use pliers.
Caution
Do not reuse the stem seals.
INSPECTIONCYLINDER HEAD
(1) Before cleaning the cylinder head, be sure to check for
possible coolant or gas leak, damage, and cracks.
(2) Completely remove oil, scale, sealant, and carbon deposits.After the oil passages have been flushed, blow air into the
passages to ensure that they are not plugged.
Page 400 of 1216
9416
I
ENGINE <2.0L DOHC Engine> - Cylinder Head and Valve
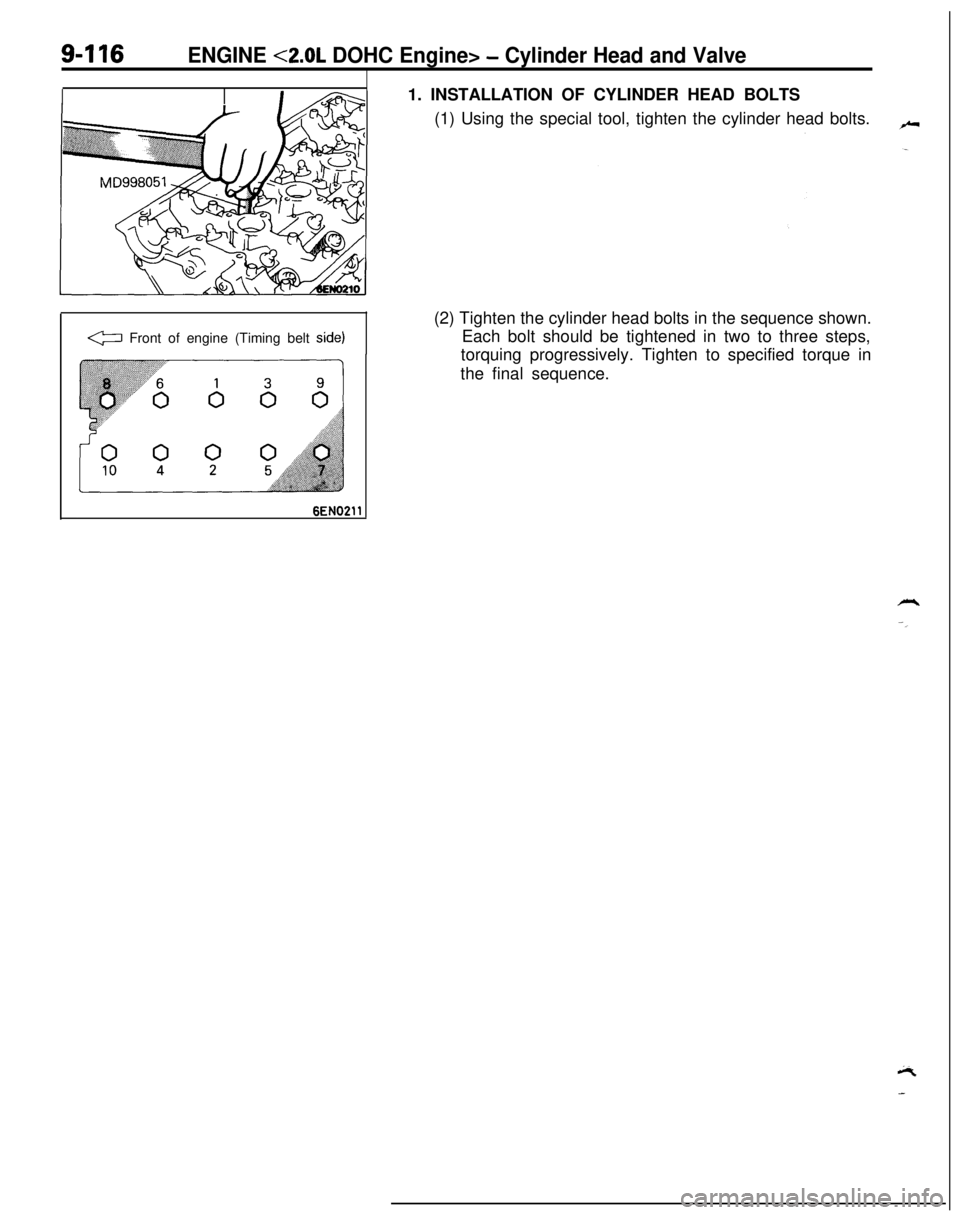
I1. INSTALLATION OF CYLINDER HEAD BOLTS
(1) Using the special tool, tighten the cylinder head bolts.
G Front of engine (Timing belt side)(2) Tighten the cylinder head bolts in the sequence shown.
Each bolt should be tightened in two to three steps,
torquing progressively. Tighten to specified torque in
the final sequence.
Page 664 of 1216
19-16STEERING - Steering Wheel and Shaft
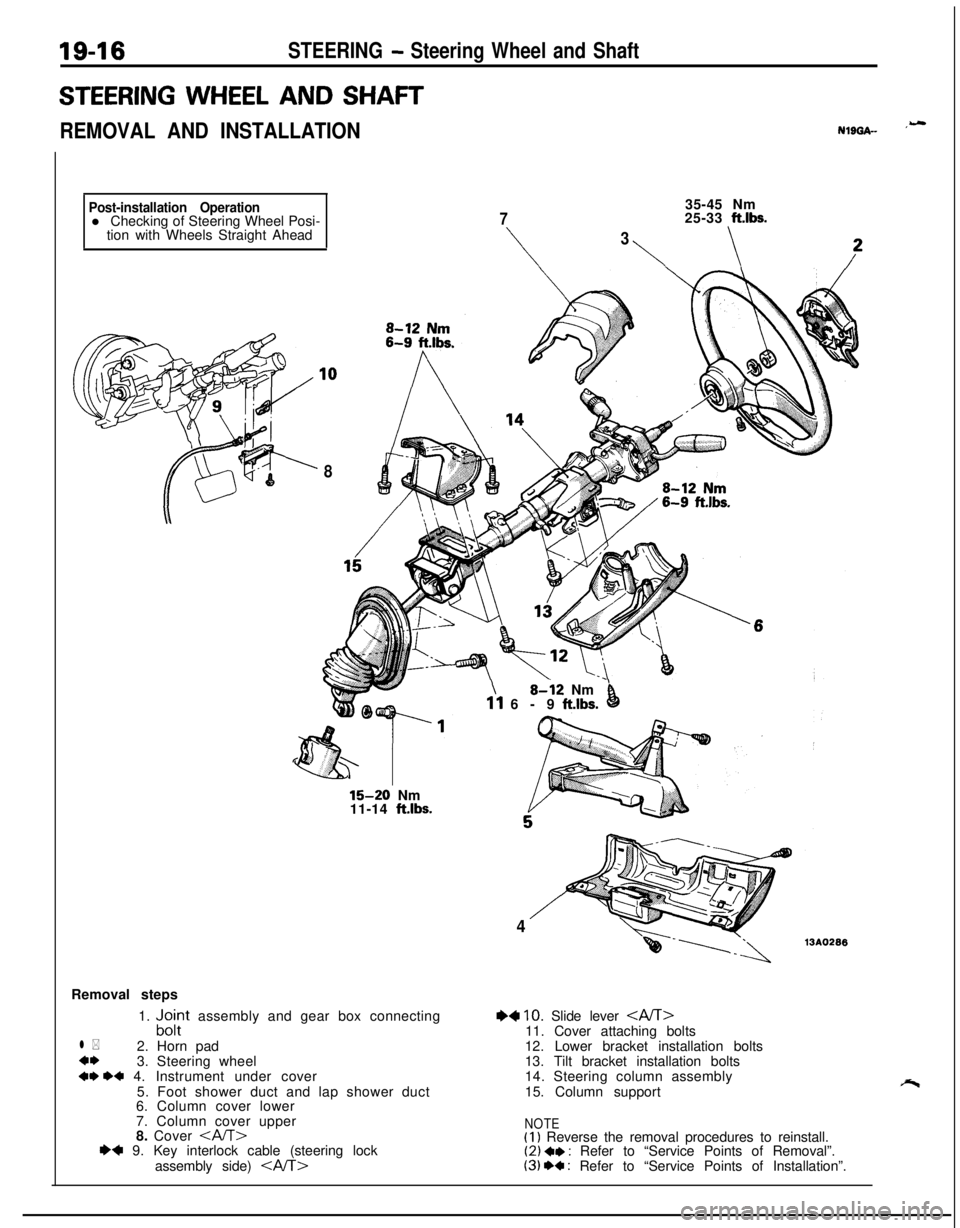
STEERING WHEEL AND SHAFT
REMOVAL AND INSTALLATIONNlL)GA- ‘-
Post-installation Operationl Checking of Steering Wheel Posi-
tion with Wheels Straight Ahead
835-45 Nm
725-33 ft.lbs.
\
3
\\
15-20 Nm
11-14 ft.lbs.Removal steps
1.
“,c$t assembly and gear box connecting
l *2. Horn pad
4*3. Steering wheel
+* ++ 4. Instrument under cover
5. Foot shower duct and lap shower duct
6. Column cover lower
7. Column cover upper
8. Cover
assembly side)
\8-i2 Nm’11 6-9 ft.lbs.0
413AO296
+4 10. Slide lever 11. Cover attaching bolts
12. Lower bracket installation bolts
13. Tilt bracket installation bolts
14. Steering column assembly
15. Column support
NOTE(I) Reverse the removal procedures to reinstall.(2) a* : Refer to “Service Points of Removal”.(3) +a : Refer to “Service Points of Installation”.
Page 668 of 1216
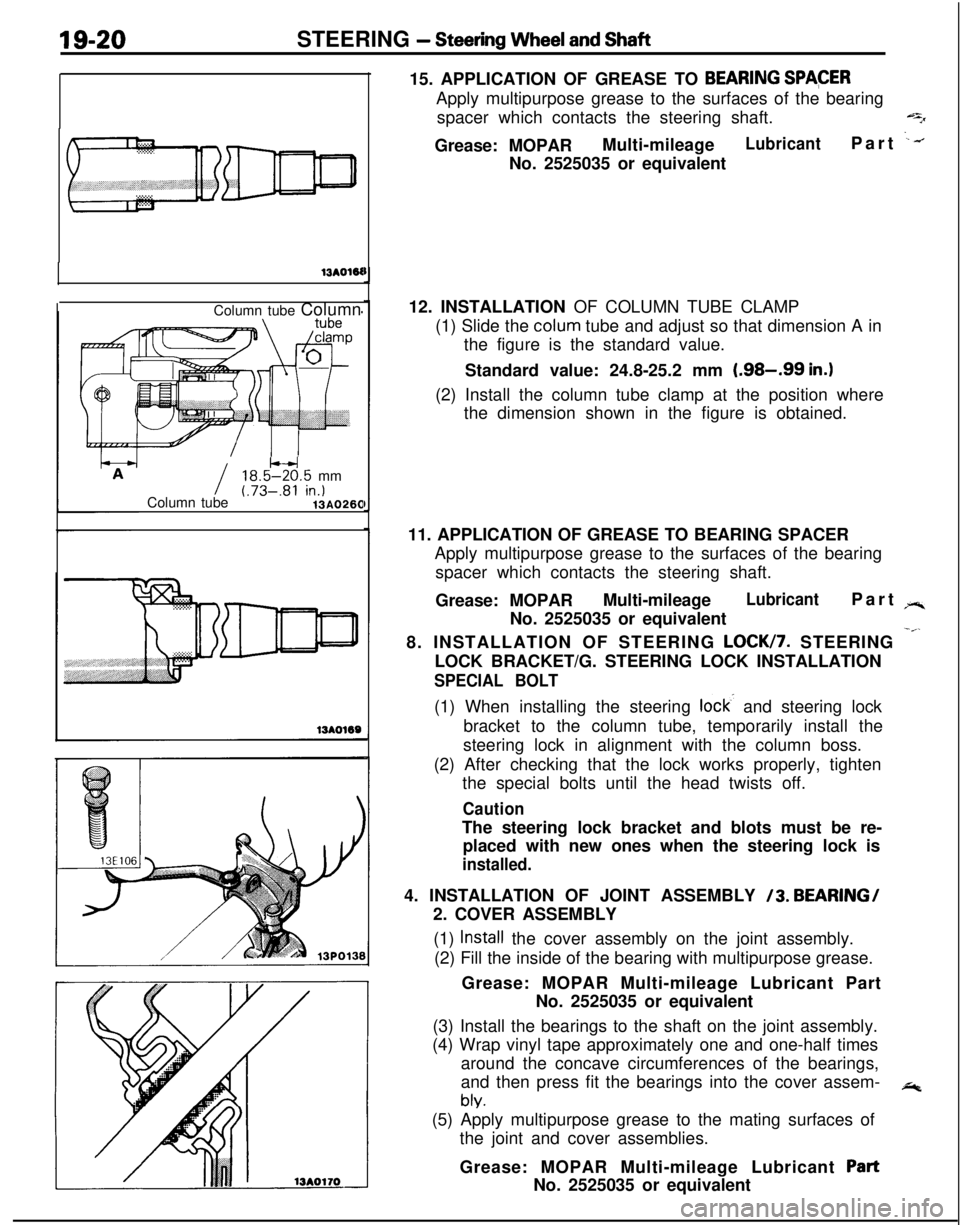
19-20STEERING - Steering Wheel and Shaft
13AOWColumn tube Column
I18.5W.5 mm
Column tube(.73-.81 in.)13AO26015. APPLICATION OF GREASE TO
BEARING SPACERApply multipurpose grease to the surfaces of the bearing
spacer which contacts the steering shaft.
qGrease: MOPARMulti-mileage
LubricantPart .--.No. 2525035 or equivalent
12. INSTALLATION OF COLUMN TUBE CLAMP
(1) Slide the colum tube and adjust so that dimension A in
the figure is the standard value.
Standard value: 24.8-25.2 mm
(.98-.99 in.)(2) Install the column tube clamp at the position where
the dimension shown in the figure is obtained.
11. APPLICATION OF GREASE TO BEARING SPACER
Apply multipurpose grease to the surfaces of the bearing
spacer which contacts the steering shaft.
Grease: MOPARMulti-mileage
LubricantPart rr.No. 2525035 or equivalent
8. INSTALLATION OF STEERING
LOCK/7. STEERING -”LOCK BRACKET/G. STEERING LOCK INSTALLATION
SPECIAL BOLT(1) When installing the steering
lock- and steering lock
bracket to the column tube, temporarily install the
steering lock in alignment with the column boss.
(2) After checking that the lock works properly, tighten
the special bolts until the head twists off.
CautionThe steering lock bracket and blots must be re-
placed with new ones when the steering lock is
installed.4. INSTALLATION OF JOINT ASSEMBLY
/3. BEARING/
2. COVER ASSEMBLY
(1)
Install the cover assembly on the joint assembly.
(2) Fill the inside of the bearing with multipurpose grease.
Grease: MOPAR Multi-mileage Lubricant Part
No. 2525035 or equivalent
(3) Install the bearings to the shaft on the joint assembly.
(4) Wrap vinyl tape approximately one and one-half times
around the concave circumferences of the bearings,
and then press fit the bearings into the cover assem-
*
bly.(5) Apply multipurpose grease to the mating surfaces of
the joint and cover assemblies.
Grease: MOPAR Multi-mileage Lubricant
PartNo. 2525035 or equivalent
Page 676 of 1216
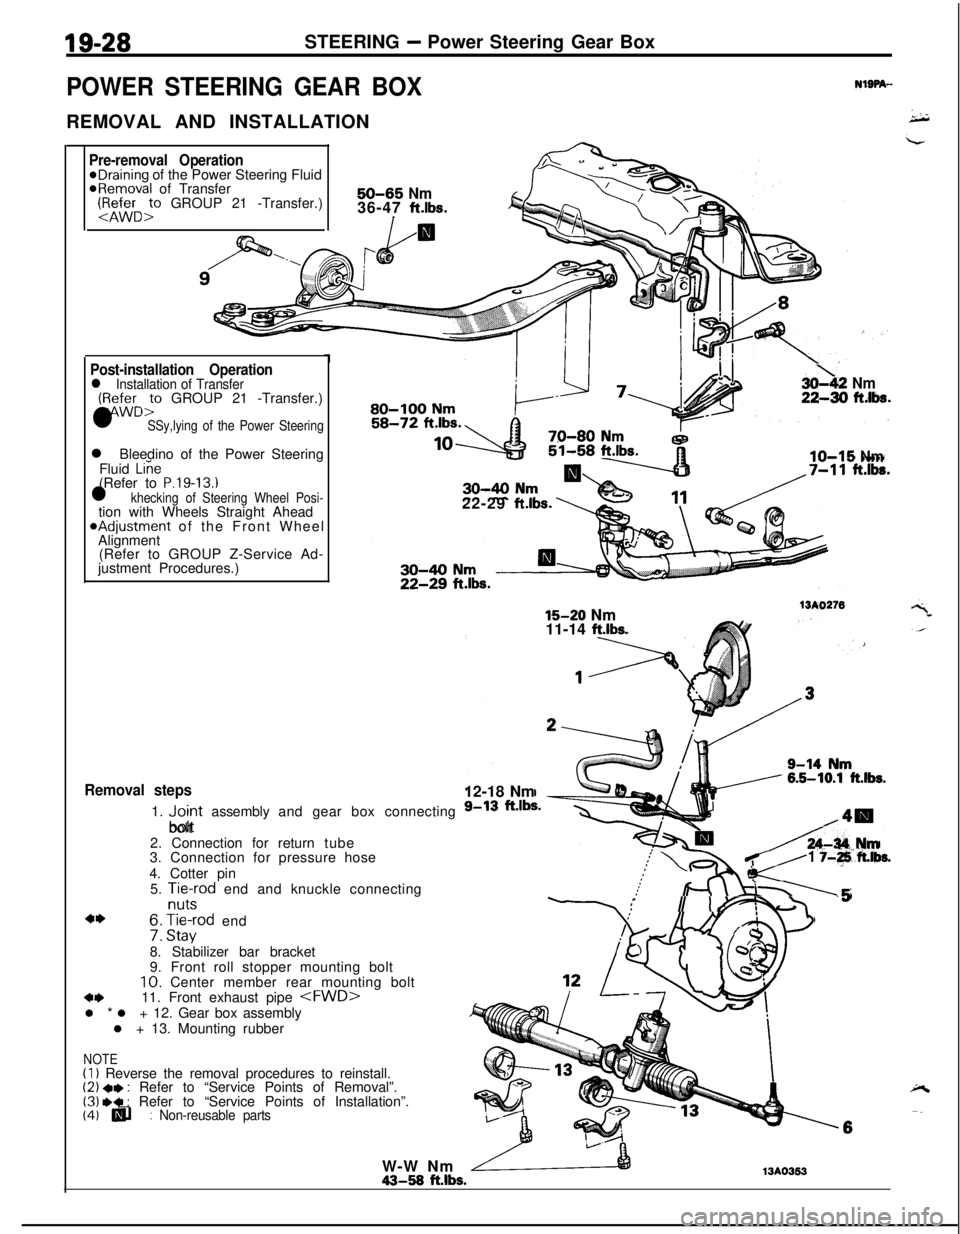
19-28STEERING - Power Steering Gear Box
POWER STEERING GEAR BOXREMOVAL AND INSTALLATION
-
NlSPA--
Pre-removal Operation@Draining of the Power Steering Fluid@Removal of Transfer:1&&r:, GROUP 21 -Transfer.)50-65 Nm36-47 ft.lbs.
I/a
Post-installation Operationl Installation of Transfer(:zD:” GROUP 21 -Transfer.)
l SSy,lying of the Power Steeringl Bleedino of the Power Steering
Fluid
Liie(Refer to P.19-13.1l khecking of Steering Wheel Posi-tion with Wheels Straight Ahead*Adjustment of the Front Wheel
Alignment
(Refer to GROUP Z-Service Ad-
justment Procedures.)
Removal steps1.
“,;;rt assembly and gear box connecting
bolt
2. Connection for return tube
3. Connection for pressure hose
4. Cotter pin
5.
Aft-cd end and knuckle connecting
4I)f3: H,“a:od end
8. Stabilizer bar bracket
9. Front roll stopper mounting bolt10. Center member rear mounting bolt
4411. Front exhaust pipe
l + 13. Mounting rubber
(I) Reverse the removal procedures to reinstall.(2) +e : Refer to “Service Points of Removal”.(3) .* : Refer to “Service Points of Installation”.(4) q : Non-reusable parts(4) lli
3oh2 Nm22-30 ftlba.^a-aa I.au-IUU NrnI
IO-15 Nm22-29
ft.lbs.
15-20 Nm15-20 Nm
11-14 ft.lbs.
13A027612-18 Nm
A-34 IUm
K-
1 j-+ft.lbs.
:II I-.5
/ .2!
i!!1
NOTEW-W Nm43-58
ft.lbs.13A0353
Page 704 of 1216
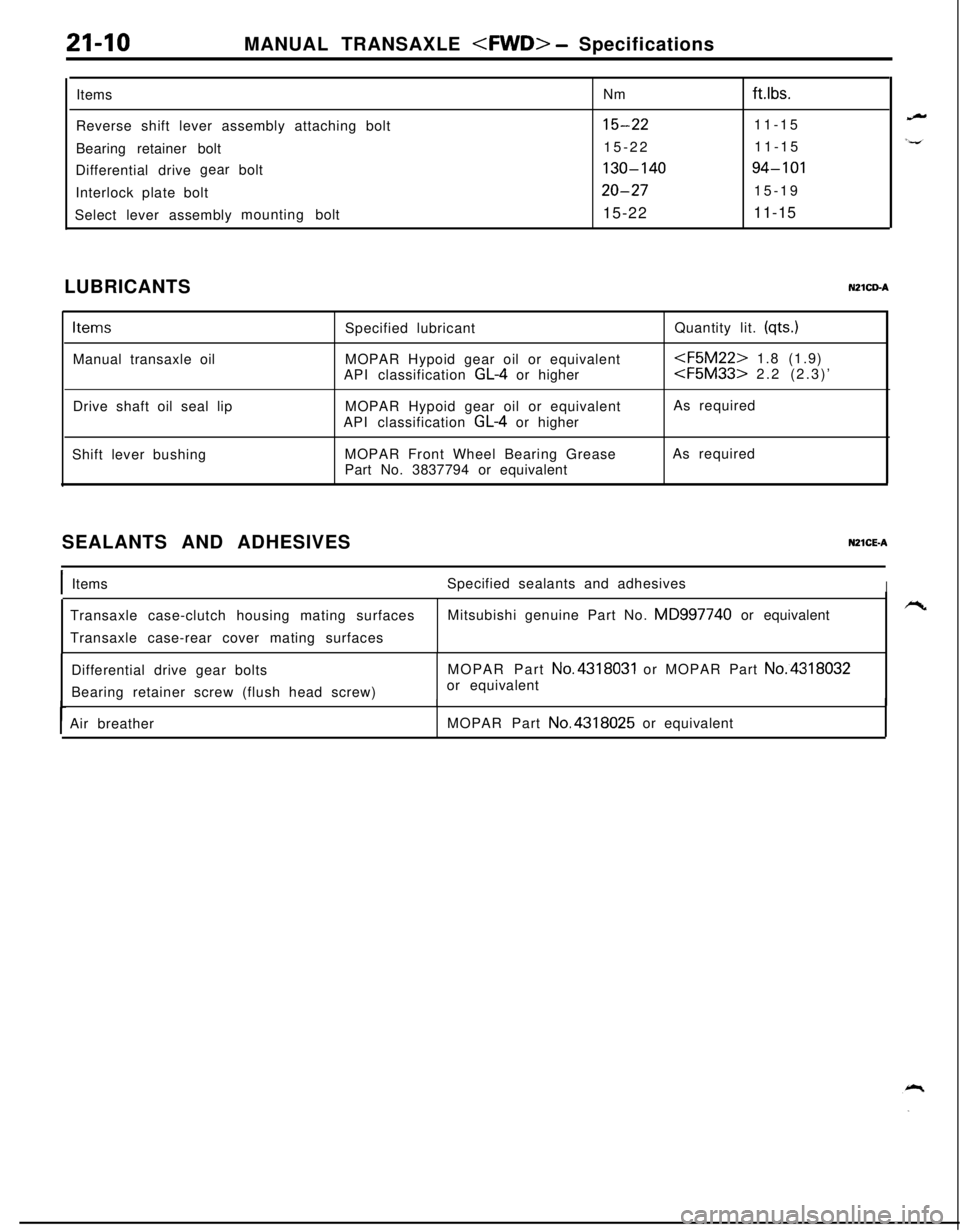
MANUAL TRANSAXLE
ItemsNm
ftlbs.Reverse shift lever assembly attaching bolt
15-2211-15
Bearing retainer bolt15-2211-15
Differential drivegear
bolt
130-14094-101Interlock plate bolt
20-2715-19
Select lever assemblymountingbolt15-2211-15
LUBRICANTS
NZlCD-A
ItemsManual transaxle oil
Drive shaft oil seal lipSpecified lubricant
MOPAR Hypoid gear oil or equivalent
API classification GL-4 or higher
MOPAR Hypoid gear oil or equivalent
API classification GL-4 or higherQuantity lit. (qts.)
As required
Shift lever bushingMOPAR Front Wheel Bearing Grease
Part No. 3837794 or equivalentAs required
SEALANTS AND ADHESIVES
NZlCE-A
IItemsSpecified sealants and adhesivesITransaxle case-clutch housing mating surfacesMitsubishi genuine Part No.
MD997740 or equivalent
Transaxle case-rear cover mating surfaces
Differential drive gear bolts
Bearing retainer screw (flush head screw)MOPAR Part
No.4318031 or MOPAR Part No.4318032or equivalent
Air breather
IMOPAR Part
No.4318025 or equivalent
Page 722 of 1216
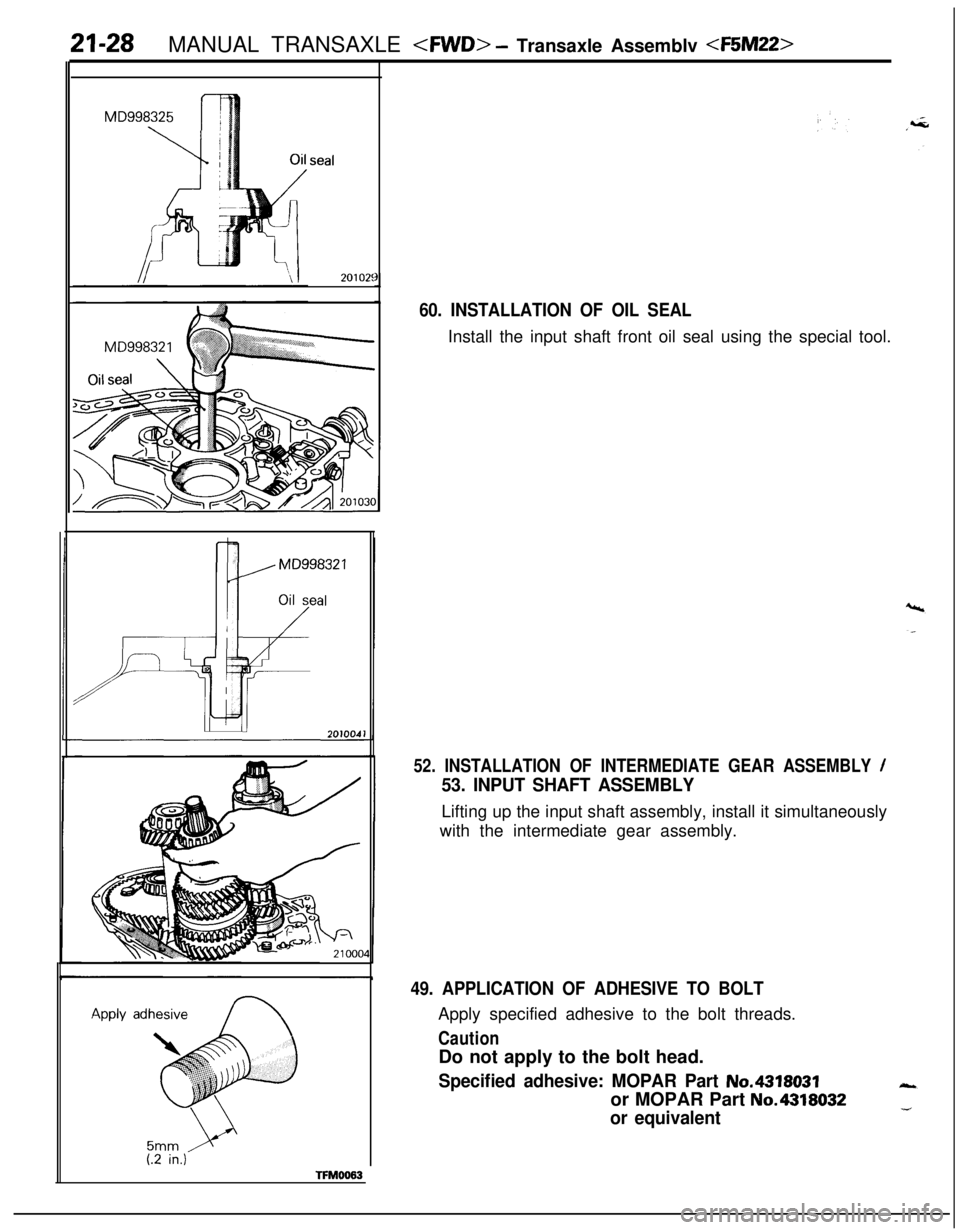
21-28MANUAL TRANSAXLE
seal
201025Apply
adhesive
(.2 in.)TFMOO63
60. INSTALLATION OF OIL SEALInstall the input shaft front oil seal using the special tool.
52. INSTALLATION OF INTERMEDIATE GEAR ASSEMBLY /
53. INPUT SHAFT ASSEMBLYLifting up the input shaft assembly, install it simultaneously
with the intermediate gear assembly.
49. APPLICATION OF ADHESIVE TO BOLTApply specified adhesive to the bolt threads.
CautionDo not apply to the bolt head.
Specified adhesive: MOPAR Part No.4318031or MOPAR Part
No.4318032
or equivalent
Page 732 of 1216
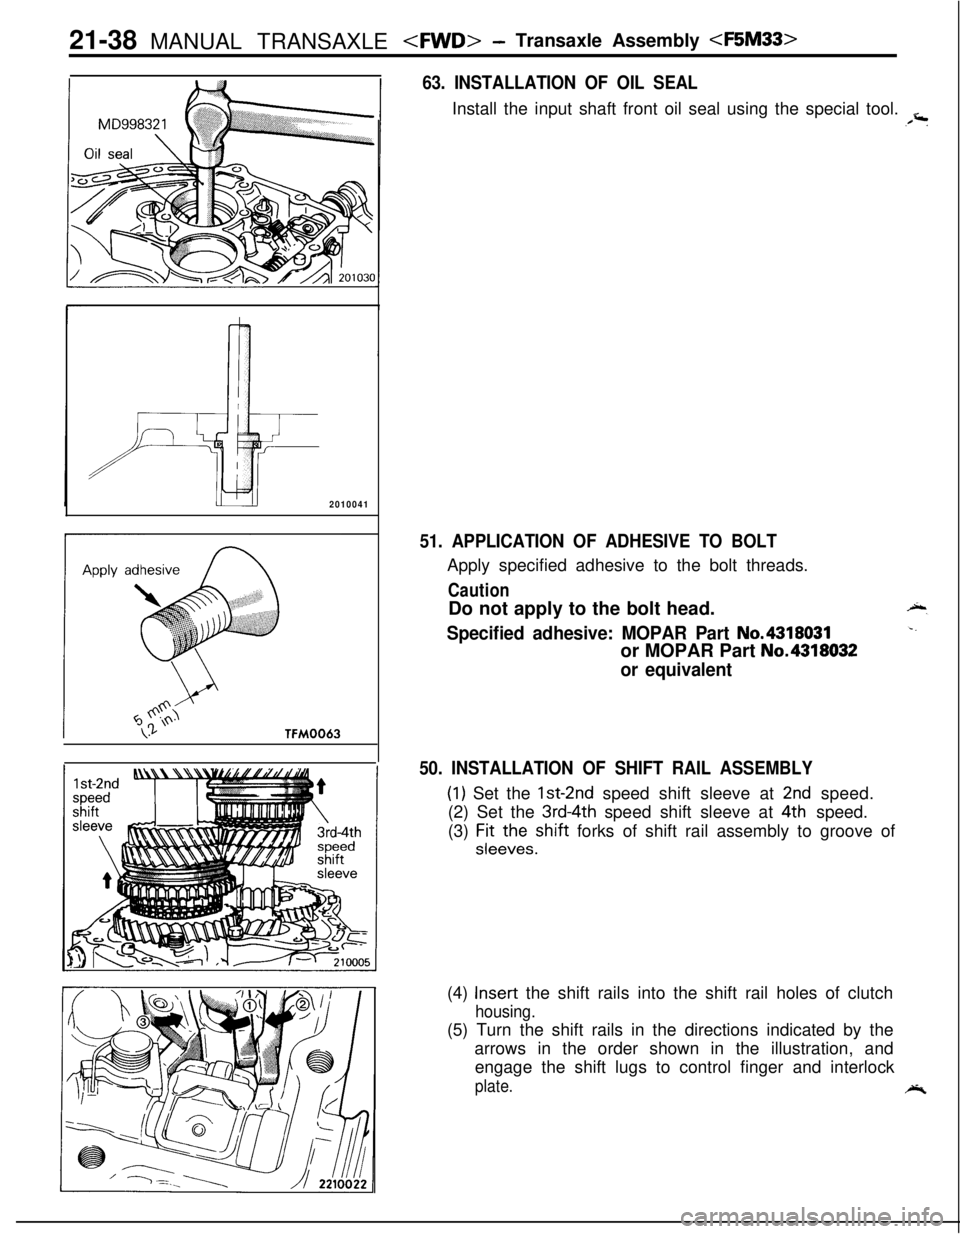
21-38 MANUAL TRANSAXLE
63. INSTALLATION OF OIL SEALInstall the input shaft front oil seal using the special tool.
,,=
2010041
51. APPLICATION OF ADHESIVE TO BOLTApply specified adhesive to the bolt threads.
CautionDo not apply to the bolt head.
Specified adhesive: MOPAR Part No.4318031or MOPAR Part
No.4318032
or equivalent
50. INSTALLATION OF SHIFT RAIL ASSEMBLY
(1) Set the lst-2nd speed shift sleeve at 2nd speed.
(2) Set the
3rd-4th speed shift sleeve at 4th speed.
(3) FJtt~~~shift forks of shift rail assembly to groove of
(4)
Insert the shift rails into the shift rail holes of clutch
housing.(5) Turn the shift rails in the directions indicated by the
arrows in the order shown in the illustration, and
engage the shift lugs to control finger and interlock
plate.A