door lock MITSUBISHI ENDEAVOR 2004 Service Repair Manual
[x] Cancel search | Manufacturer: MITSUBISHI, Model Year: 2004, Model line: ENDEAVOR, Model: MITSUBISHI ENDEAVOR 2004Pages: 3870, PDF Size: 98.47 MB
Page 278 of 3870
On-vehicle Deployment 1. Before proceeding, see
AIR BAG SAFETY PRECAUTIONS
. Move vehicle
to an isolated area. Open all doors and windows. Disconnect and shield
negative battery cable end. Disconnect positive battery cable. Remove battery
from vehicle. Wait at least 60 seconds before continuing.
2. To deploy driver-side air bag module, remove steering column lower cover.
Disconnect lower clockspring Yellow 4-pin connector. Cut harness side of
connector from wire harness and strip ends of driver-side air bag module wires
on harness side of clockspring connector. See
WIRING DIAGRAMS
.
3. To deploy passenger-side air bag module, remove glove box and glove box
outer case. Disconnect passenger-side air bag module Red connector.
4. To deploy side impact air bag module, disconnect appropriate side impact air
bag module Red connector, located under front seat.
5. To deploy seat belt pretensioner, disconnect appropriate seat belt pretensioner
connector, located at seat belt pretensioner.
6. Fabricate a de
ployment harness usin
g two wires at least 20 feet
(6.1 m
) in
WARNING:Air bag modules and seat belt pretensioners make
loud noises during deployment. Air bag module and
seat belt pretensioner deployment could cause
personal injury. Always deploy components
outdoors and away from people. Never deploy air
bag modules with trim cover face down.
NOTE: If vehicle is to be scrapped, perform On-vehicle
deployment. See ON
-VEHICLE DEPLOYMENT
. If vehicle
will continue to be operated, perform Off-vehicle
Deployment. See OFF
-VEHICLE DEPLOYMENT
.
NOTE: Driver-side and passenger-side air bag modules will be
either single-stage or dual-stage. Consult wiring
diagrams to ensure correct wires are cut and spliced
prior to deployment. See WIRING DIAGRAMS
.
2004 Mitsubishi Endeavor Limited
2004 ACCESSORIES/SAFETY EQUIPMENT Mitsubishi - Air Bag Restraint Systems
Page 992 of 3870
2004 BODY & ACCESSORIES
Door - Endeavor
GENERAL DESCRIPTION OPERATION CENTRAL DOOR LOCKING SYSTEM The central door locking system operates the door lock actuator to lock or unlock
the doors and liftgate using the door lock switch built into the front power window
(main or sub) switch or key built into the driver's side door outside handle. The
system has the following operations and features:
All doors and liftgate can be locked using the door lock switch built into the
front power window (main or sub) switch. Insert the key into the driver's key cylinder and turn once to the unlock side to
unlock the driver's door. Turn the key once again to the unlock side to unlock
all doors and the liftgate. The key reminder function automatically unlocks all doors and liftgate when
door lock operation is performed and the front doors are opened while the key
is inserted into the ignition switch.
POWER WINDOWS When the power window (main or sub) switch is operated, the door windows will
open or close. This system has the following operations and features:
A power window lock switch on the power window main switch prevents the
door window glass from opening/closing with the front passenger's and rear
power window sub switch. The power window of the door window glass can be opened/closed for 30
seconds with the timer function after the ignition switch is turned OFF. (The
timer expires if the front door < LH or RH> is opened when the timer is in
operation). The power window main switch contains a one-touch down switch that will
automatically open the driver's side door window only.
2004 Mitsubishi Endeavor LS
2004 BODY & ACCESSORIES Door - Endeavor
2004 Mitsubishi Endeavor LS
2004 BODY & ACCESSORIES Door - Endeavor
Page 993 of 3870
CENTRAL DOOR LOCKING SYSTEM DIAGNOSIS The central door locking system is controlled by the simplified wiring system
(SWS). Refer to SYMPTOM CHART
.
POWER WINDOW DIAGNOSIS The power window is controlled by the simplified wiring system (SWS). Refer to
SYMPTOM CHART
.
DOOR DIAGNOSIS INTRODUCTION TO GLASS AND DOOR DIAGNOSIS Glass and door faults include water leaks and improper opening and closing. Causes
for these faults can include faults in the glass, weatherstrip, drain hole, waterproof
film or door installation. GLASS AND DOOR DIAGNOSTIC TROUBLESHOOTING STRATEGY Use these steps to plan your diagnostic strategy. If you follow them carefully, you
will be sure that you have exhausted most of the possible ways to find a glass and
door fault.
1. Gather information from the customer.
2. Verify that the condition described by the customer exists.
3. Find the malfunction by following the Symptom Chart.
4. Verify malfunction is eliminated. SYMPTOM CHART SYMPTOM REFERENCE SYMPTOM
INSPECTION
PROCEDURE
REFERENCE PAGE
Water leak through door
window glass
1
INSPECTION
PROCEDURE 1: Water
Leak Throu
gh Door
Window Glass
2004 Mitsubishi Endeavor LS
2004 BODY & ACCESSORIES Door - Endeavor
Page 998 of 3870
STEP 2. Check for lock cable damage.
Q: Is the lock rod damaged?
YES: Repair or replace the lock cable, then go to Step 4 .
NO: Go to Step 3.
STEP 3. Check the door handle flexibility (amount of movement of handle
required to open door).
Q: Is the door handle flexibility good?
YES: Go to Step 4.
NO: Check the door outside handle and inside handle (Refer to DOOR
OUTSIDE HANDLE PLAY CHECK
and DOOR INSIDE HANDLE
PLAY CHECK
). Then go to Step 4.
STEP 4. Retest the system.
Q: Does the door open easily?
YES: The procedure is complete.
NO: Return to Step 1 .
INSPECTION PROCEDURE 6: Door Does Not Open or Close Completely DIAGNOSIS
STEP 1. Check the door hinge position.
Q: Is the door hinge correct?
YES: Go to Step 2.
NO: Adjust the door hinge (Refer to DOOR FIT ADJUSTMENT
).
Then go to Step 4 .
STEP 2. Check the door for damage.
Q: Is the door in
good condition?
2004 Mitsubishi Endeavor LS
2004 BODY & ACCESSORIES Door - Endeavor
Page 1009 of 3870
3. If the door is stiff to lock and unlock:
1. Adjustment by using the striker (toward the inside of the vehicle and
vertical direction)
Install an a
ppropriate bolt instead of the striker mountin
g bolt, and use
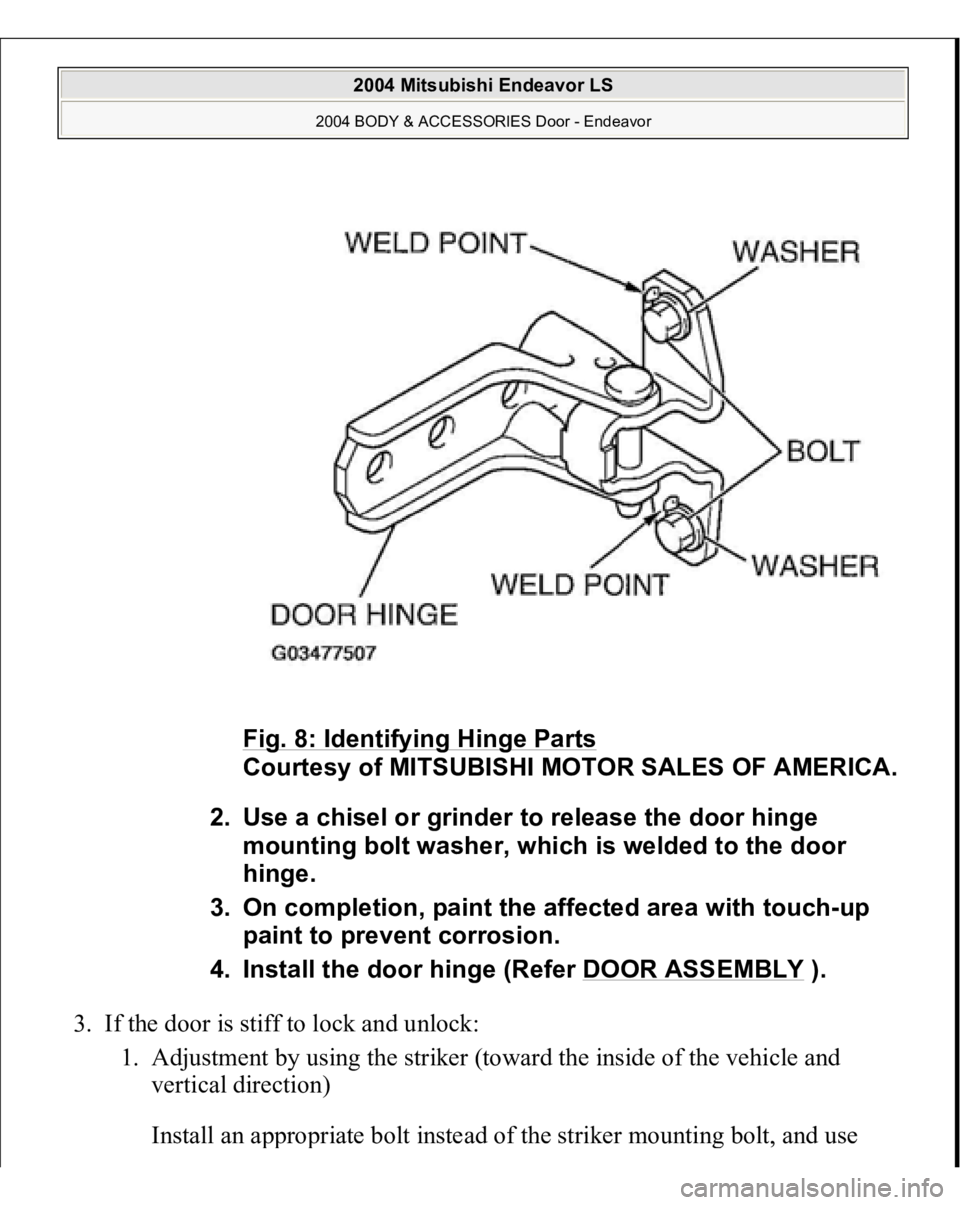
Fig. 8: Identifying Hinge Parts
Courtesy of MITSUBISHI MOTOR SALES OF AMERICA.
2. Use a chisel or grinder to release the door hinge
mounting bolt washer, which is welded to the door
hinge.
3. On completion, paint the affected area with touch-up
paint to prevent corrosion.
4. Install the door hinge (Refer DOOR ASSEMBLY
).
2004 Mitsubishi Endeavor LS
2004 BODY & ACCESSORIES Door - Endeavor
Page 1010 of 3870
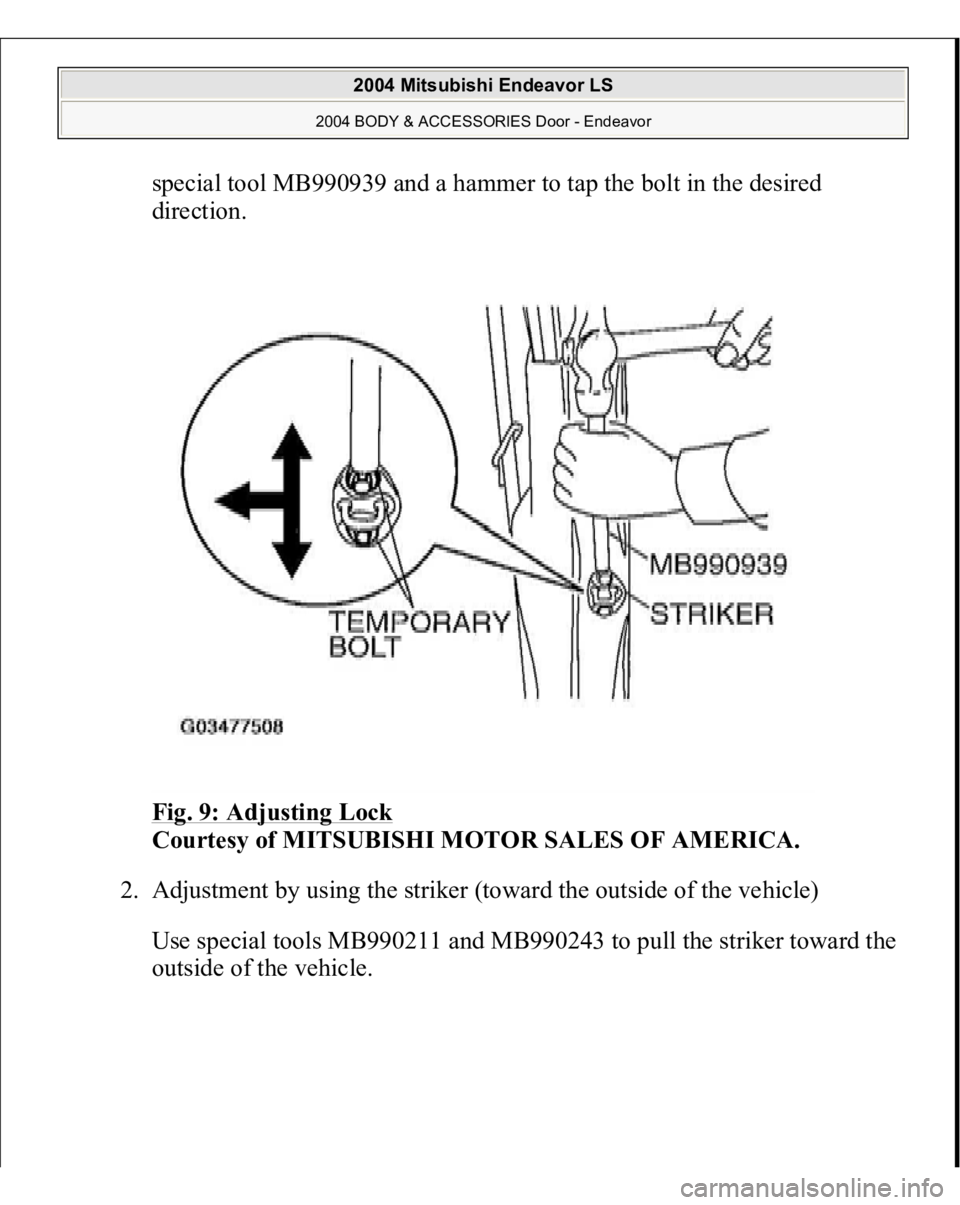
special tool MB990939 and a hammer to tap the bolt in the desired
direction.
Fig. 9: Adjusting Lock
Courtesy of MITSUBISHI MOTOR SALES OF AMERICA.
2. Adjustment by using the striker (toward the outside of the vehicle)
Use special tools MB990211 and MB990243 to pull the striker toward the
outside of the vehicle.
2004 Mitsubishi Endeavor LS
2004 BODY & ACCESSORIES Door - Endeavor
Page 1017 of 3870
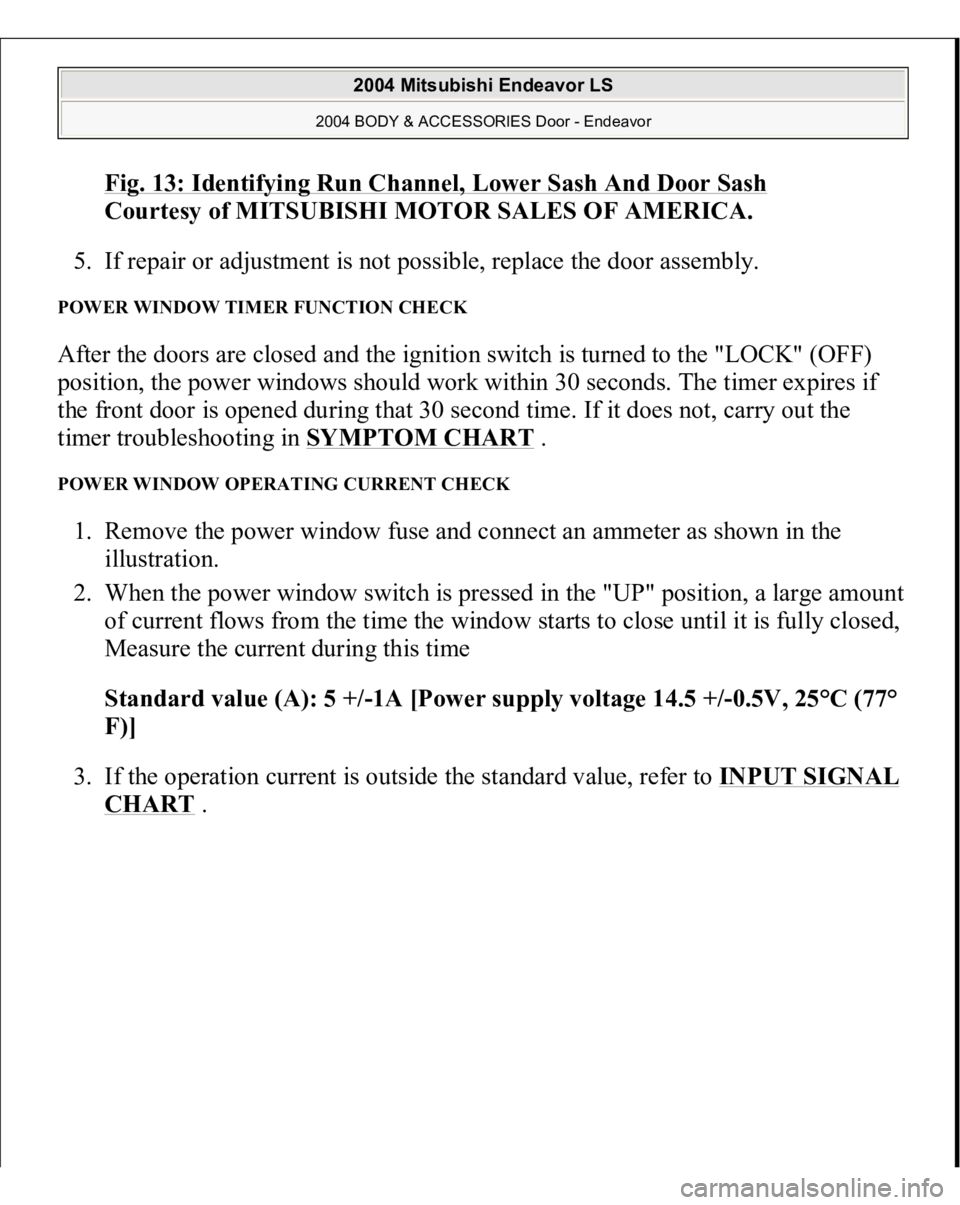
Fig. 13: Identifying Run Channel, Lower Sash And Door Sas
h
Courtesy of MITSUBISHI MOTOR SALES OF AMERICA.
5. If repair or adjustment is not possible, replace the door assembly.
POWER WINDOW TIMER FUNCTION CHECK After the doors are closed and the ignition switch is turned to the "LOCK" (OFF)
position, the power windows should work within 30 seconds. The timer expires if
the front door is opened during that 30 second time. If it does not, carry out the
timer troubleshooting in SYMPTOM CHART
.
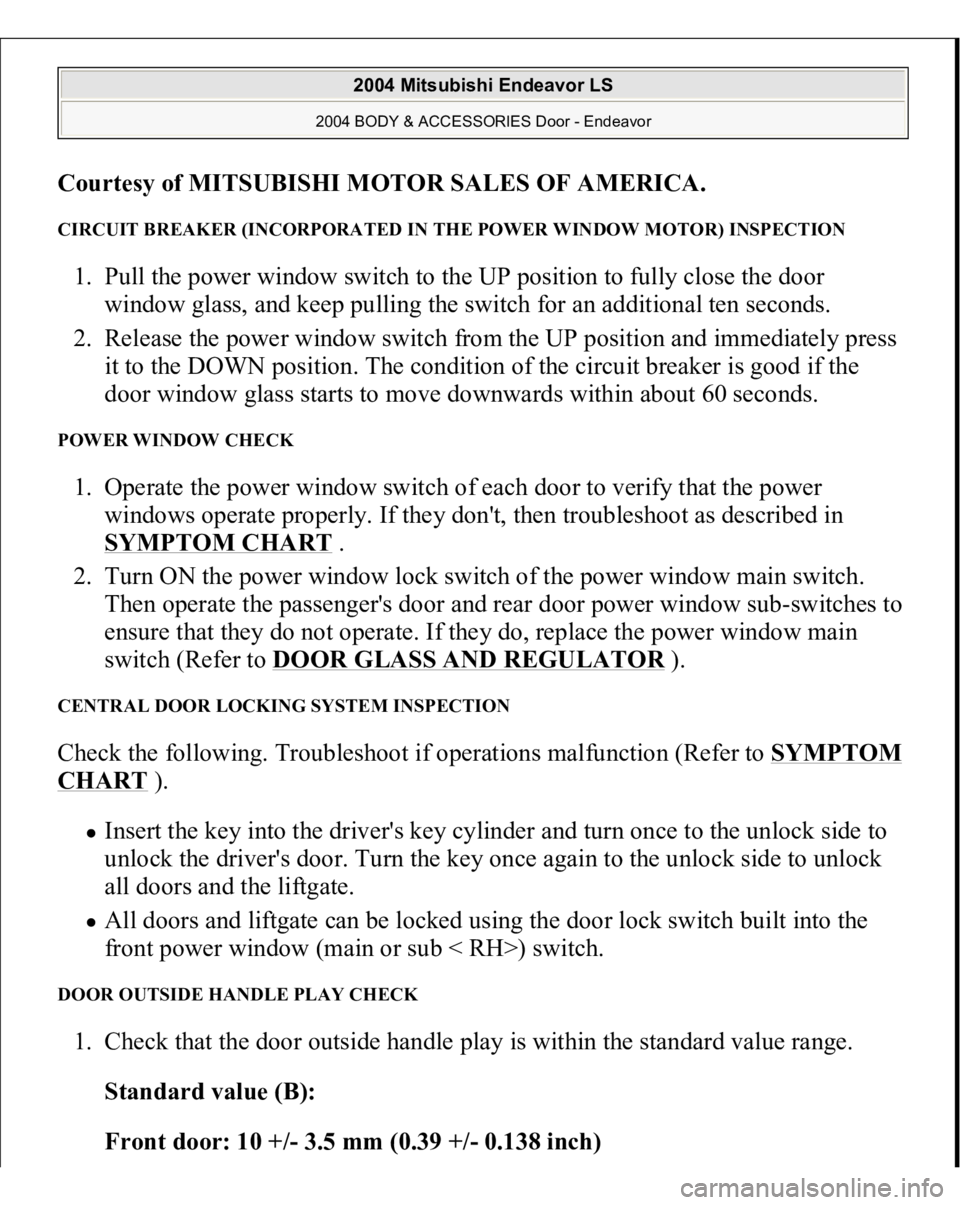
POWER WINDOW OPERATING CURRENT CHECK 1. Remove the power window fuse and connect an ammeter as shown in the
illustration.
2. When the power window switch is pressed in the "UP" position, a large amoun
t
of current flows from the time the window starts to close until it is fully closed,
Measure the current during this time
Standard value (A): 5 +/-1A [Power supply voltage 14.5 +/-0.5V, 25°C (77°
F)]
3. If the operation current is outside the standard value, refer to INPUT SIGNAL
CHART
.
2004 Mitsubishi Endeavor LS
2004 BODY & ACCESSORIES Door - Endeavor
Page 1021 of 3870
Courtesy of MITSUBISHI MOTOR SALES OF AMERICA
.
CIRCUIT BREAKER (INCORPORATED IN THE POWER WINDOW MOTOR) INSPECTION 1. Pull the power window switch to the UP position to fully close the door
window glass, and keep pulling the switch for an additional ten seconds.
2. Release the power window switch from the UP position and immediately press
it to the DOWN position. The condition of the circuit breaker is good if the
door window glass starts to move downwards within about 60 seconds. POWER WINDOW CHECK 1. Operate the power window switch of each door to verify that the power
windows operate properly. If they don't, then troubleshoot as described in
SYMPTOM CHART
.
2. Turn ON the power window lock switch of the power window main switch.
Then operate the passenger's door and rear door power window sub-switches to
ensure that they do not operate. If they do, replace the power window main
switch (Refer to DOOR GLASS AND REGULATOR
).
CENTRAL DOOR LOCKING SYSTEM INSPECTION Check the following. Troubleshoot if operations malfunction (Refer to SYMPTOM CHART
).
Insert the key into the driver's key cylinder and turn once to the unlock side to
unlock the driver's door. Turn the key once again to the unlock side to unlock
all doors and the liftgate. All doors and liftgate can be locked using the door lock switch built into the
front power window (main or sub < RH>) switch.
DOOR OUTSIDE HANDLE PLAY CHECK 1. Check that the door outside handle play is within the standard value range.
Standard value (B):
Front door: 10 +/- 3.5 mm (0.39 +/- 0.138 inch)
2004 Mitsubishi Endeavor LS
2004 BODY & ACCESSORIES Door - Endeavor
Page 1035 of 3870
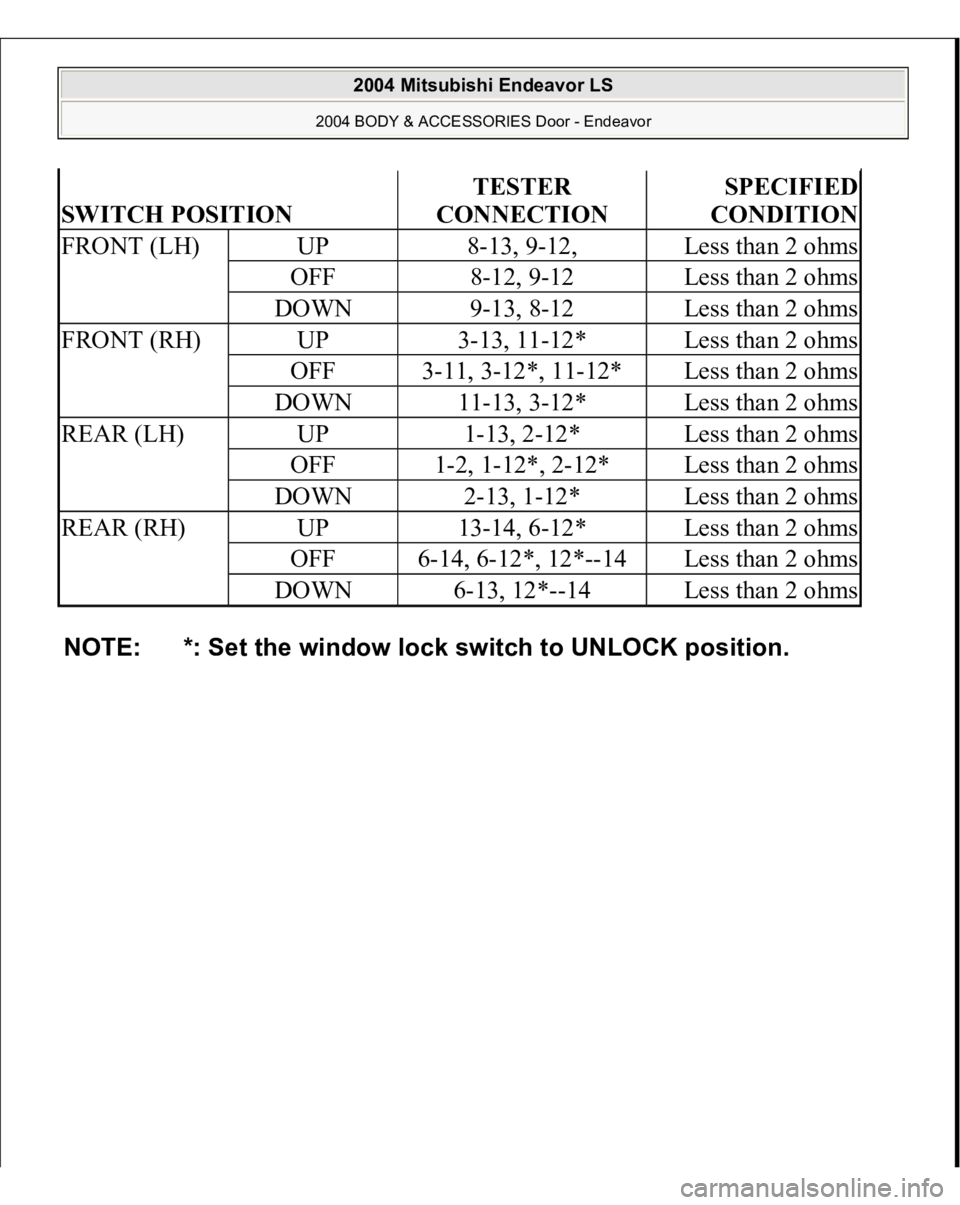
SWITCH POSITION
TESTER
CONNECTION
SPECIFIED
CONDITION
FRONT (LH)
UP
8-13, 9-12,
Less than 2 ohms
OFF
8-12, 9-12
Less than 2 ohms
DOWN
9-13, 8-12
Less than 2 ohms
FRONT (RH)
UP
3-13, 11-12*
Less than 2 ohms
OFF
3-11, 3-12*, 11-12*
Less than 2 ohms
DOWN
11-13, 3-12*
Less than 2 ohms
REAR (LH)
UP
1-13, 2-12*
Less than 2 ohms
OFF
1-2, 1-12*, 2-12*
Less than 2 ohms
DOWN
2-13, 1-12*
Less than 2 ohms
REAR (RH)
UP
13-14, 6-12*
Less than 2 ohms
OFF
6-14, 6-12*, 12*--14
Less than 2 ohms
DOWN
6-13, 12*--14
Less than 2 ohms
NOTE: *: Set the window lock switch to UNLOCK position.
2004 Mitsubishi Endeavor LS
2004 BODY & ACCESSORIES Door - Endeavor
Page 1045 of 3870
Courtesy of MITSUBISHI MOTOR SALES OF AMERICA
.
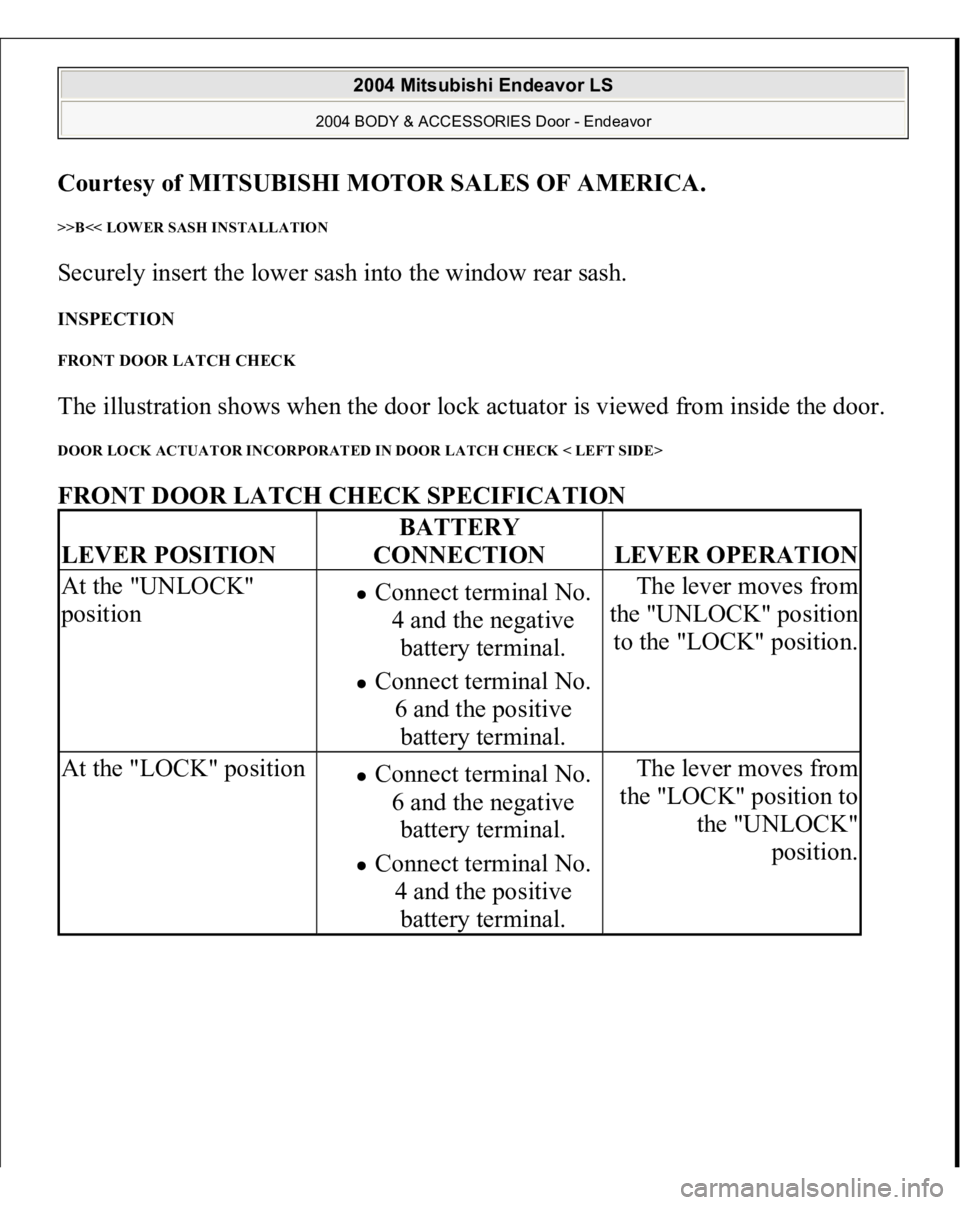
>>B<< LOWER SASH INSTALLATION Securely insert the lower sash into the window rear sash. INSPECTION FRONT DOOR LATCH CHECK The illustration shows when the door lock actuator is viewed from inside the door. DOOR LOCK ACTUATOR INCORPORATED IN DOOR LATCH CHECK < LEFT SIDE> FRONT DOOR LATCH CHECK SPECIFICATION LEVER POSITION
BATTERY
CONNECTION
LEVER OPERATION
At the "UNLOCK"
position
Connect terminal No.
4 and the negative
battery terminal. Connect terminal No.
6 and the positive
battery terminal.
The lever moves from
the "UNLOCK" position
to the "LOCK" position.
At the "LOCK" position
Connect terminal No.
6 and the negative
battery terminal. Connect terminal No.
4 and the positive
battery terminal.
The lever moves from
the "LOCK" position to
the "UNLOCK"
position.
2004 Mitsubishi Endeavor LS
2004 BODY & ACCESSORIES Door - Endeavor