stop start MITSUBISHI GALANT 1989 Service User Guide
[x] Cancel search | Manufacturer: MITSUBISHI, Model Year: 1989, Model line: GALANT, Model: MITSUBISHI GALANT 1989Pages: 1273, PDF Size: 37.62 MB
Page 174 of 1273
13-32
FUEL SYSTEM
FUEL TANK AND FUEL LINEMlBEAAA
Symptom Probable cause Remedy
Engtne malfunctions
Bent or kinked fuel pipe or hose Repair or replace3ue to insufficient fuel
SUPPlYClogged fuel pipe or hoseClean or replace
Clogged fuel filter or in-tank fuel filter Replace
Water in fuel filter Replace the fuel filter or clean the fuel tank
and fuel line
Dirty or rusted fuel tank interior Malfunctioning fuel pump
(Clogged filter in the pump) Clean or replace
Replace
Evaporative emission Mispiping of vapor line
Correct
control system malfunc-
tions (When fuel tank Disconnect vapor line piping joint Correct
filler tube cap is re- moved, pressure releas-
Folded, bent, cracked or clogged vapor line Replace
ng noise is heard) Faulty fuel tank filler tube cap
Malfunctioning fuel tank pressure control
valve Replace
Replace
LL
m ~~ : Paper clip-
F l!;“I /yFp- -
izd--_7-01
A0086SERVICE ADJUSTMENT PROCEDURES
CURB IDLE SPEED INSPECTION
MlBFHAFt
(1) The vehicle should be prepared as follows before the inspection.
lEngine coolant temperature: 85-95°C (185-203°F)
l Lights, electric cooling fan and accessories: OFF
l Transaxle: Neutral
(P for vehicles with an automatic
transaxle)
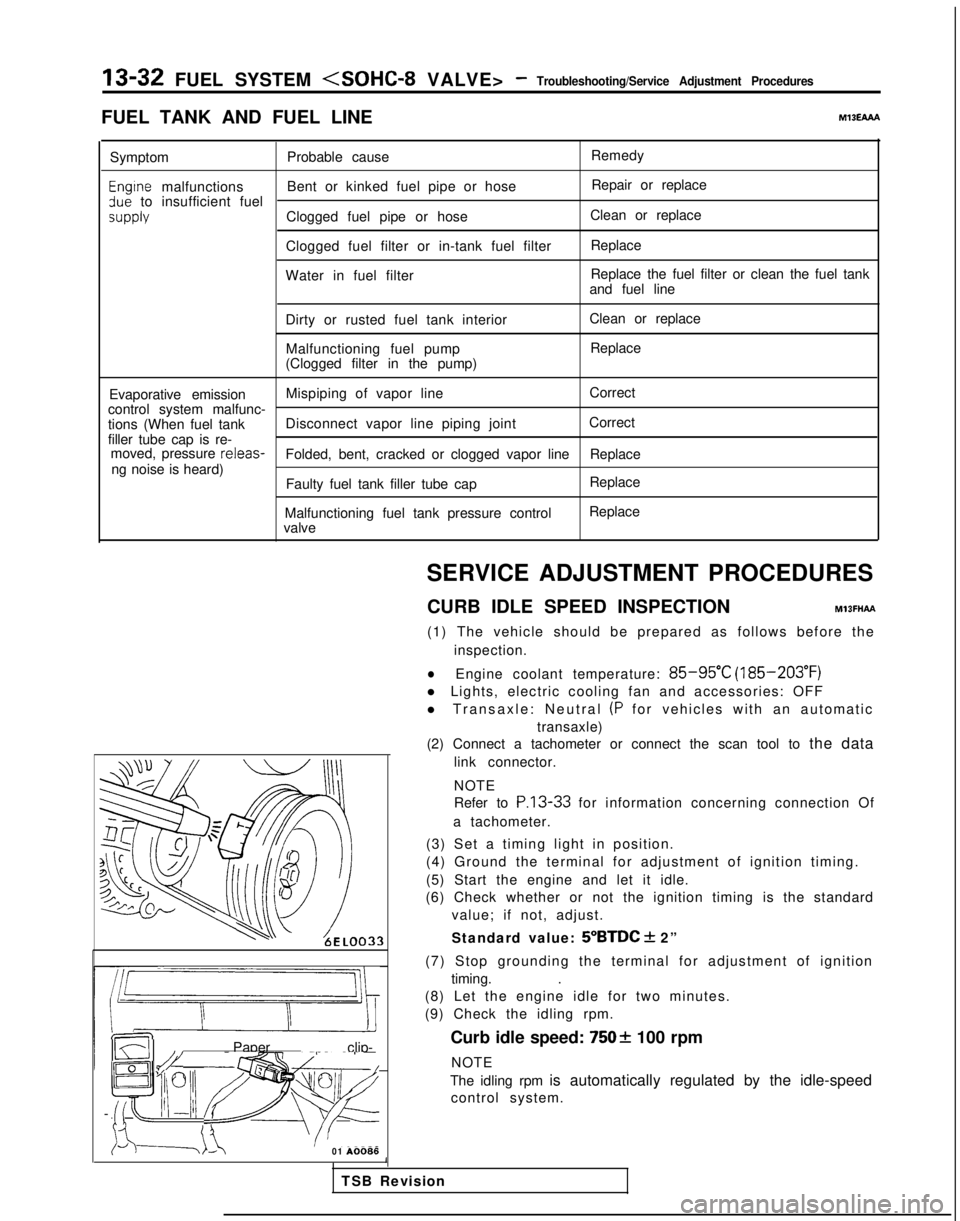
(2) Connect a tachometer or connect the scan tool to the data
link connector.
NOTE
Refer to
P.13-33 for information concerning connection Of
a tachometer.
(3) Set a timing light in position.
(4) Ground the terminal for adjustment of ignition timing.
(5) Start the engine and let it idle.
(6) Check whether or not the ignition timing is the standard
value; if not, adjust.
Standard value:
5”BTDC + 2”
(7) Stop grounding the terminal for adjustment of ignition timing. .
(8) Let the engine idle for two minutes.
(9) Check the idling rpm.
Curb idle speed:
7502 100 rpm
NOTE
The idling rpm is automatically regulated by the idle-speed control system.
1
TSB Revision
Page 176 of 1273
13-34 FUEL SYSTEM
(5) Switch ON the ignition switch (but do not start the engine)and leave as if for 15 seconds or longer.
NOTE
When the ignition switch is switched ON, the idle speed
control plunger extends to the fast-idle opening degree,
and, after 15 seconds have passed, contracts to the initialposition and stops there.
Initial position: the suitable idling position at which the idle speed control motor position sensor output
voltage is
0.9V.
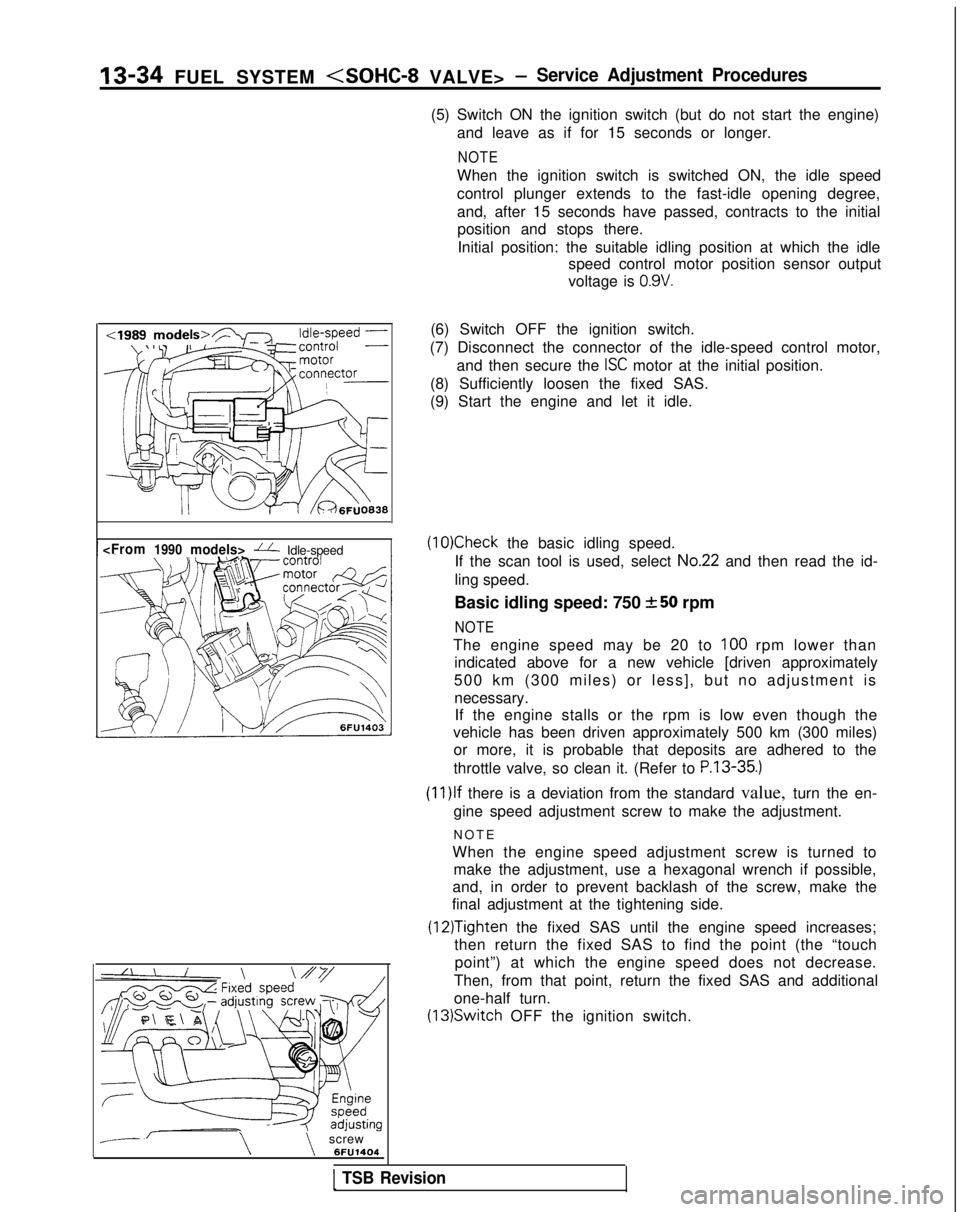
--\\screw 6FU1404(6) Switch OFF the ignition switch.
(7) Disconnect the connector of the idle-speed control motor, and then secure the
ISC motor at the initial position.
(8) Sufficiently loosen the fixed SAS.
(9) Start the engine and let it idle.
(10)Check the basic idling speed.
If the scan tool is used, select
No.22 and then read the id-
ling speed.
Basic idling speed: 750
+-50 rpm
NOTE
The engine speed may be 20 to 100 rpm lower than
indicated above for a new vehicle [driven approximately
500 km (300 miles) or less], but no adjustment is necessary.If the engine stalls or the rpm is low even though the
vehicle has been driven approximately 500 km (300 miles) or more, it is probable that deposits are adhered to the
throttle valve, so clean it. (Refer to
P.13-35.)
(1l)lf there is a deviation from the standard value, turn the en-
gine speed adjustment screw to make the adjustment.
NOT
E
When the engine speed adjustment screw is turned to make the adjustment, use a hexagonal wrench if possible,
and, in order to prevent backlash of the screw, make the
final adjustment at the tightening side.
(12)Tighten the fixed SAS until the engine speed increases;
then return the fixed SAS to find the point (the “touch
point”) at which the engine speed does not decrease.
Then, from that point, return the fixed SAS and additional
one-half turn. (13)Switch
OFF the ignition switch.
1 TSB Revision
Page 177 of 1273
FUEL SYSTEM
(14)Adjust the play of the accelerator cable. (Refer to P.13-
329.)
(15)Connect the idle-speed control motor’s connector.
(16)Adjust the throttle-position sensor.
(17)Start the engine again and let it run at idle speed for about
ten minutes; check to be sure that the idling condition is
normal.
THROTTLE BODY (THROTTLE VALVE AREA)
CLEANING
MllFlCK
(1)Start the engine and warm it up until the temperature of the
engine coolant reaches
80°C (176°F) or higher; then stop
the engine.
(2) Disconnect the air intake hose at the throttle body side.
(3) Spray cleaning liquid (from the intake port of the throttle body) onto the valve, and then leave as is for about fiveminutes.
(4) Start the engine and race it a few times; then let it run at idle speed for about one minute.
NOTE
If the engine idling speed is unstable (or the engine stalls),
let the engine run with the throttle valve slightly open.
(5) If deposits are not removed from the throttle valve, repeat steps (3) and (4).
(6) Connect the air intake hose.
(7) Using the scan tool, erase the diagnostic trouble code, or disconnect the battery’s ground cable for ten seconds orlonger and then reconnect it.
(8) Adjust the basic idle speed (engine speed adjusting screw). (Refer to
P.13-33.)
(9) Adjust the throttle position sensor.
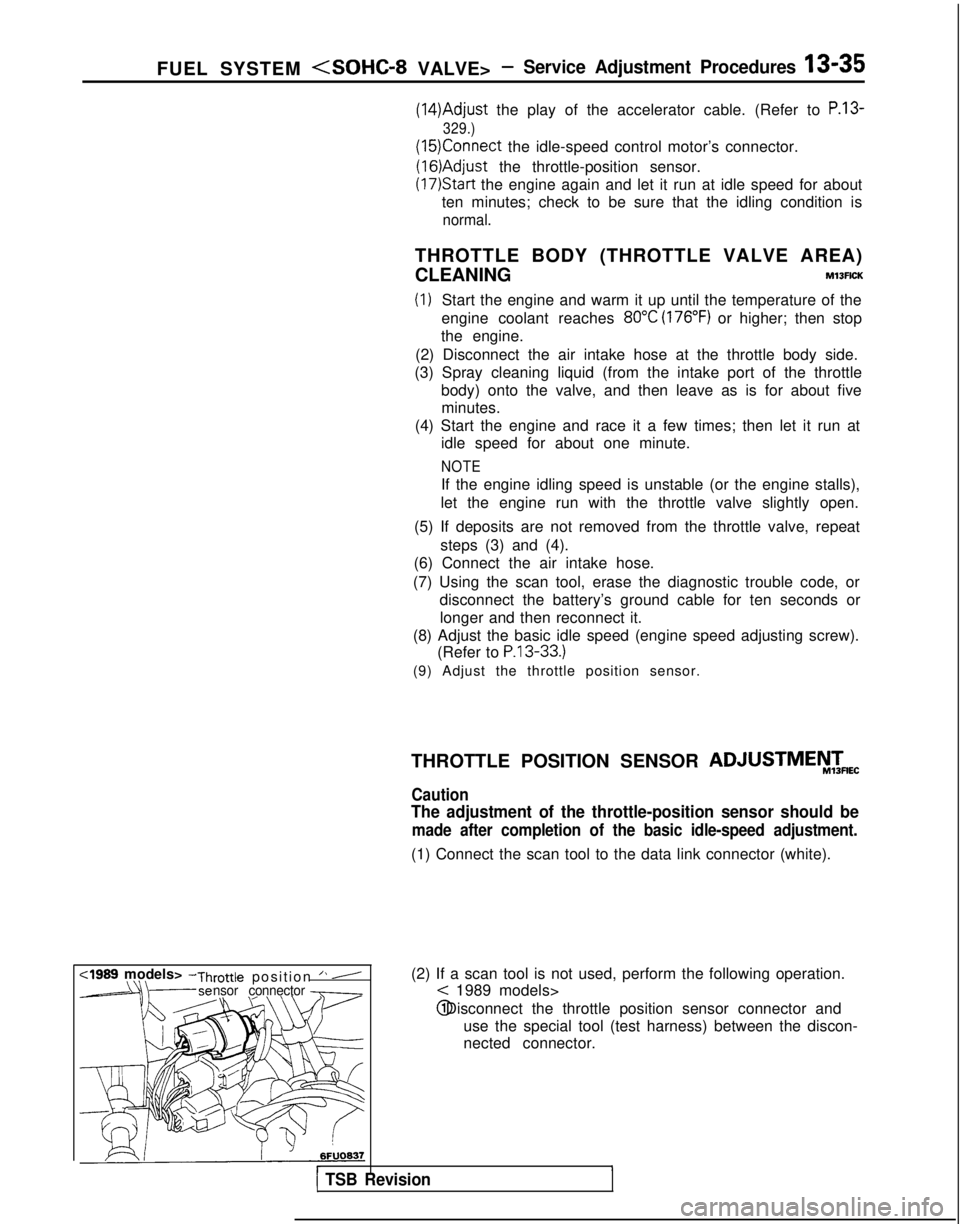
(2) If a scan tool is not used, perform the following operation.
< 1989 models> @ Disconnect the throttle position sensor connector and
use the special tool (test harness) between the discon-
nected connector.
r1 TSB Revision
THROTTLE POSITION SENSOR ADJUSTMEiW&
Caution
The adjustment of the throttle-position sensor should be
made after completion of the basic idle-speed adjustment.
(1) Connect the scan tool to the data link connector (white).
,
Page 178 of 1273
13-36 FUEL SYSTEM
:I989 models>
M
D9684783FUO179
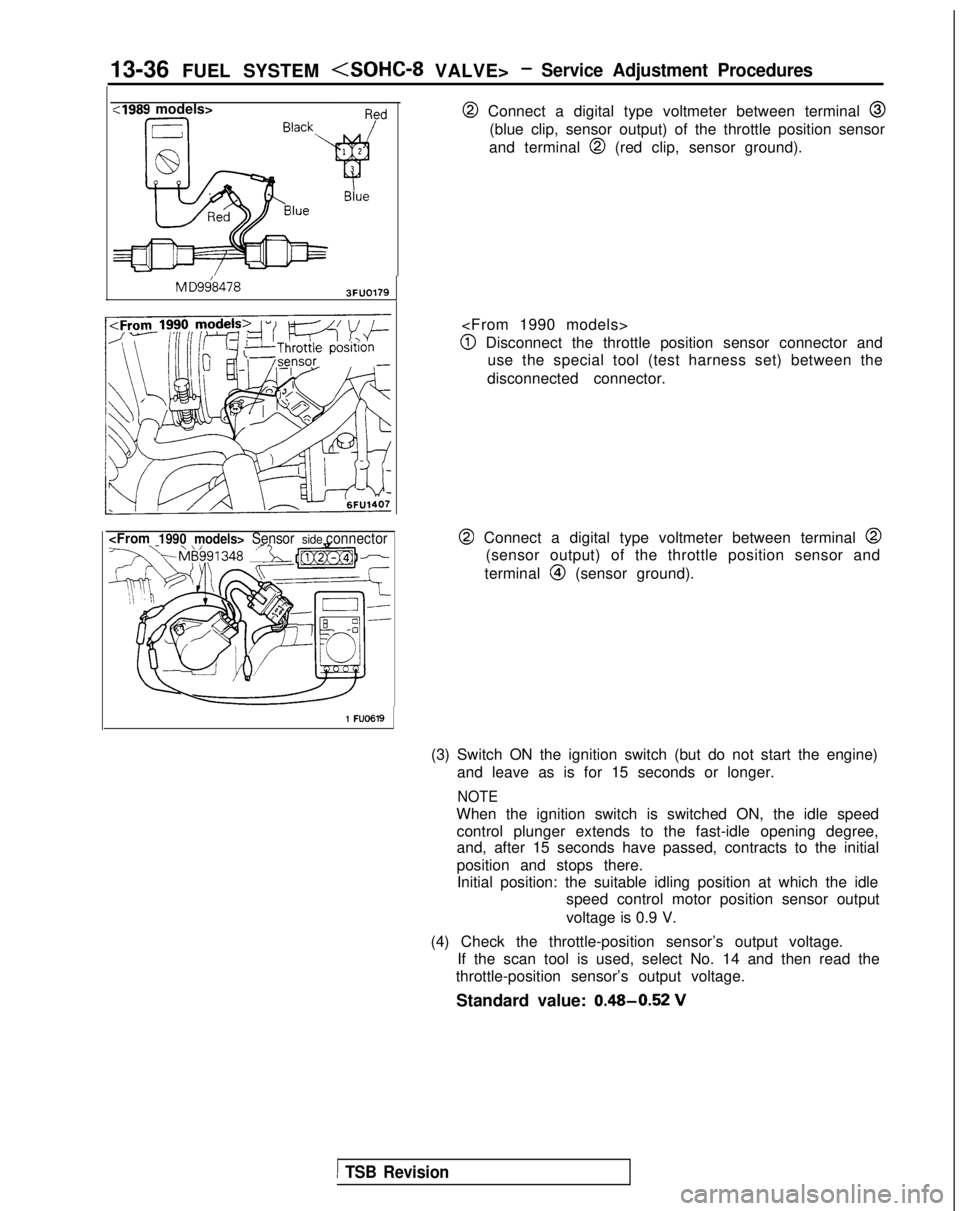
@ Connect a digital type voltmeter between terminal @
(blue clip, sensor output) of the throttle position sensor
and terminal
@I (red clip, sensor ground).
@I Disconnect the throttle position sensor connector and use the special tool (test harness set) between the
disconnected connector.
@ Connect a digital type voltmeter between terminal @
(sensor output) of the throttle position sensor and
terminal
@I (sensor ground).
1 FU0619
(3) Switch ON the ignition switch (but do not start the engine) and leave as is for 15 seconds or longer.
NOTE
When the ignition switch is switched ON, the idle speedcontrol plunger extends to the fast-idle opening degree,
and, after 15 seconds have passed, contracts to the initial
position and stops there.Initial position: the suitable idling position at which the idle speed control motor position sensor output
voltage is 0.9 V.
(4) Check the throttle-position sensor’s output voltage. If the scan tool is used, select No. 14 and then read the
throttle-position sensor’s output voltage.
Standard value: 0.48-0.52
V
1 TSB Revision
Page 219 of 1273
FUEL SYSTEM
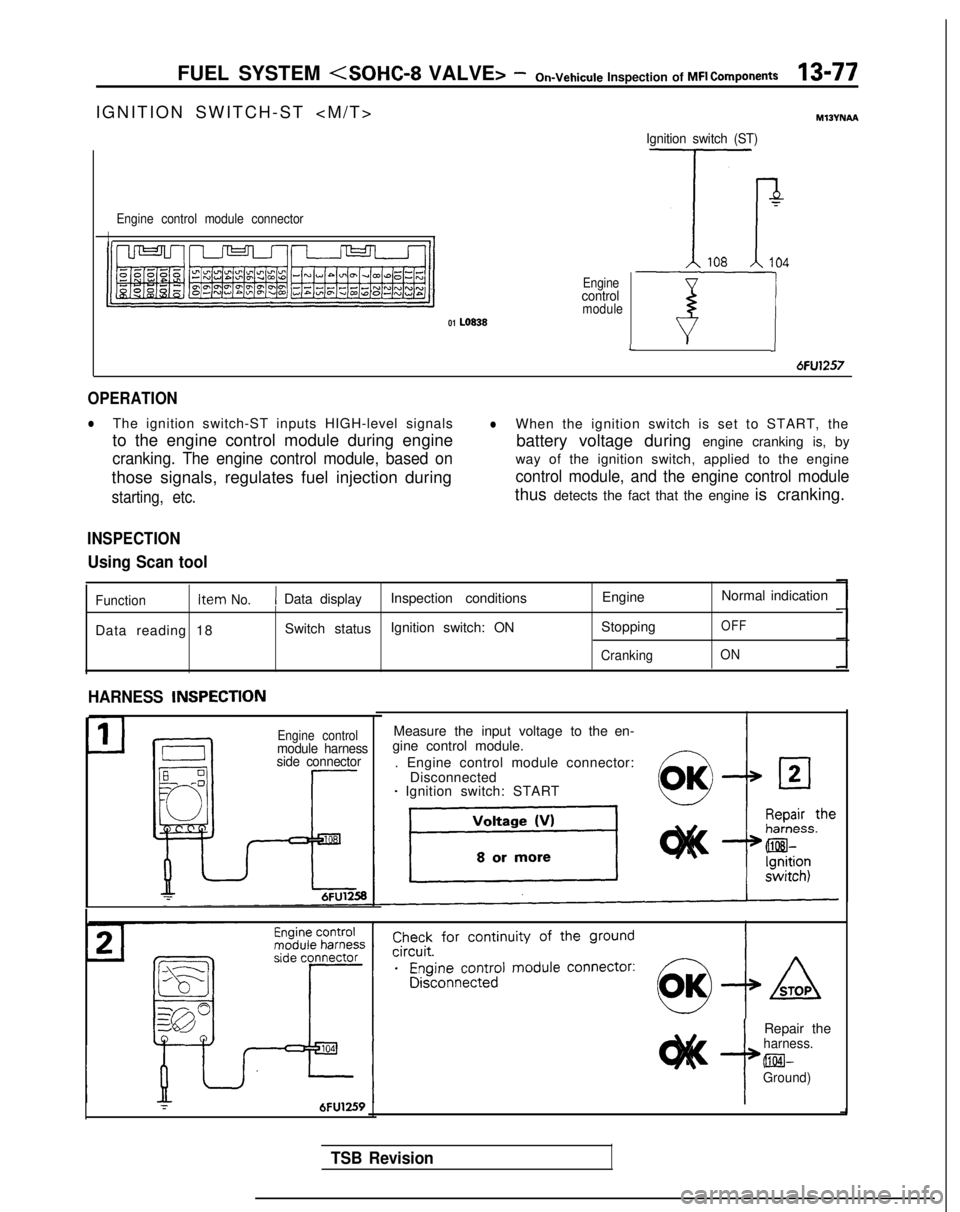
IGNITION SWITCH-ST
>
Engine control module connector
II
Enginecontrolmodule01 LO838
Ignition switch (ST)
7
Tr108104
T-7JL
6FU1257
OPERATION
lThe ignition switch-ST inputs HIGH-level signalslWhen the ignition switch is set to START, the
to the engine control module during engine battery voltage during engine cranking is, by
cranking. The engine control module, based onway of the ignition switch, applied to the engine
those signals, regulates fuel injection during
control module, and the engine control module
starting, etc.thus detects the fact that the engine is cranking.
INSPECTION
Using Scan tool
Function Item No.1 Data display
Inspection conditions EngineNormal indication
Data reading 18 Switch status
Ignition switch: ON
Stopping
OFF
CrankingON
HARNESS INSPECTlON
Engine controlmodule harness
side connector
Measure the input voltage to the en-
gine control module.
. Engine control module connector: Disconnected
- Ignition switch: START
r6FU1259i
Repair theharness. @El-
Ground)
TSB Revision
Page 221 of 1273
FUEL SYSTEM
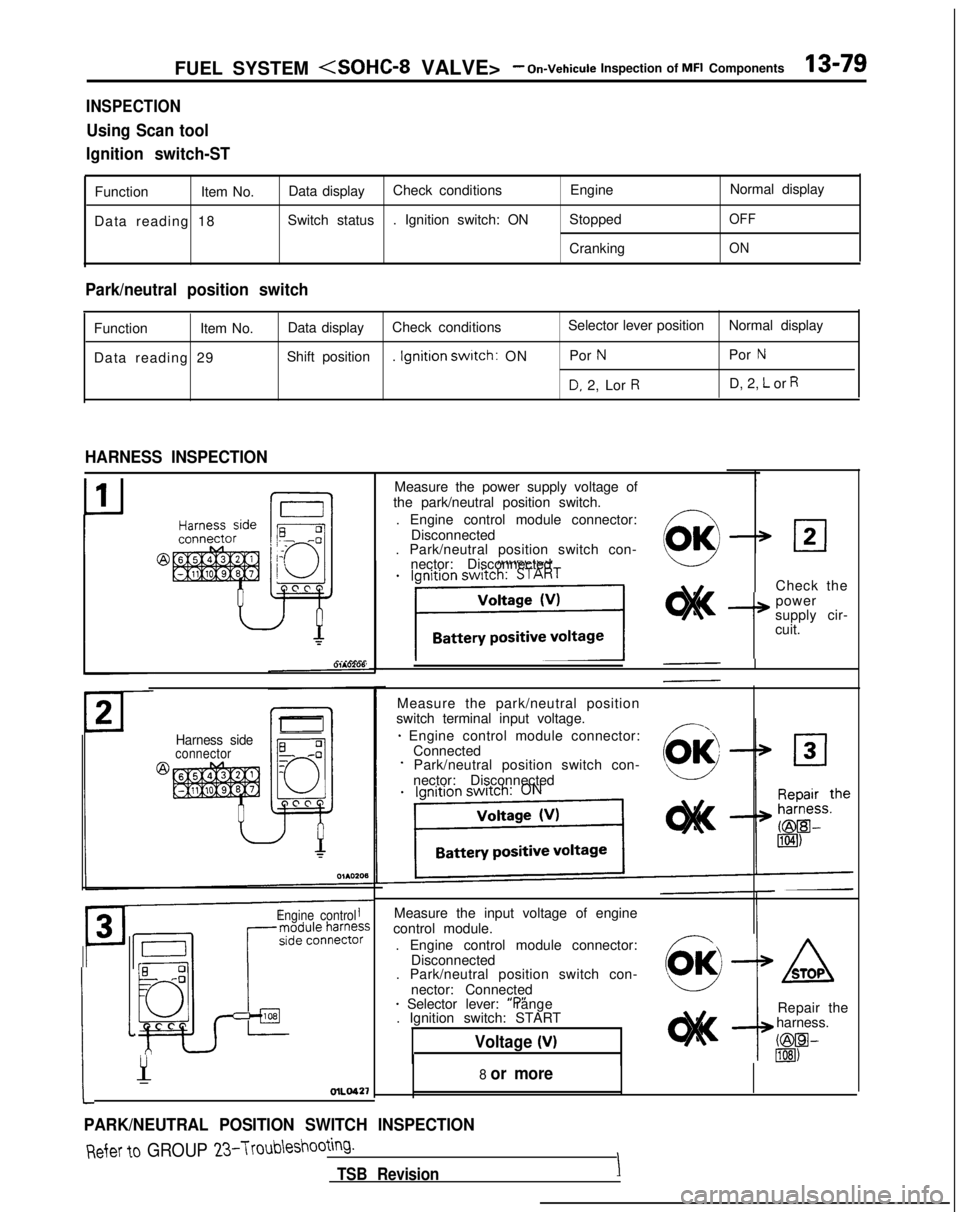
INSPECTION
Using Scan tool
Ignition switch-ST
Function Item No.Data display Check conditions
EngineNormal display
Data reading 18 Switch status
. Ignition switch: ON Stopped
OFF
CrankingON
Park/neutral position switch
Function
Item No.Data display
Check conditions Selector lever position
Normal display
Data reading 29 Shift position
. Ignition
swatch: ON Por NPor N
D, 2, Lor RD, 2, L or R
HARNESS INSPECTION
Harness sideconnector
Engine control
Measure the input voltage of engine
control module.
. Engine control module connector: Disconnected
. Park/neutral position switch con-
nector: Connected
* Selector lever: “P” range
. Ignition switch: START
Voltage (V)
:
1
Y-OlLO42’f
PARK/NEUTRAL POSITION SWITCH INSPECTION
Measure the power supply voltage of
the park/neutral position switch.
. Engine control module connector: Disconnected
. Park/neutral position switch con-
nector: Disconnected
Check the
I+
power
supply cir-
cuit.
Measure the park/neutral position
switch terminal input voltage.
* Engine control module connector: ConnectedPark/neutral position switch con-
nector: Disconnected
8 or more
ASTOP
Repair the
harness.
C@W lIEI)
Refer to GROUP 23-Troubleshooting.
TSB RevisionI
Page 244 of 1273
13-102 FUEL SYSTEM
- On-Vehicule Inspection of MFI Components
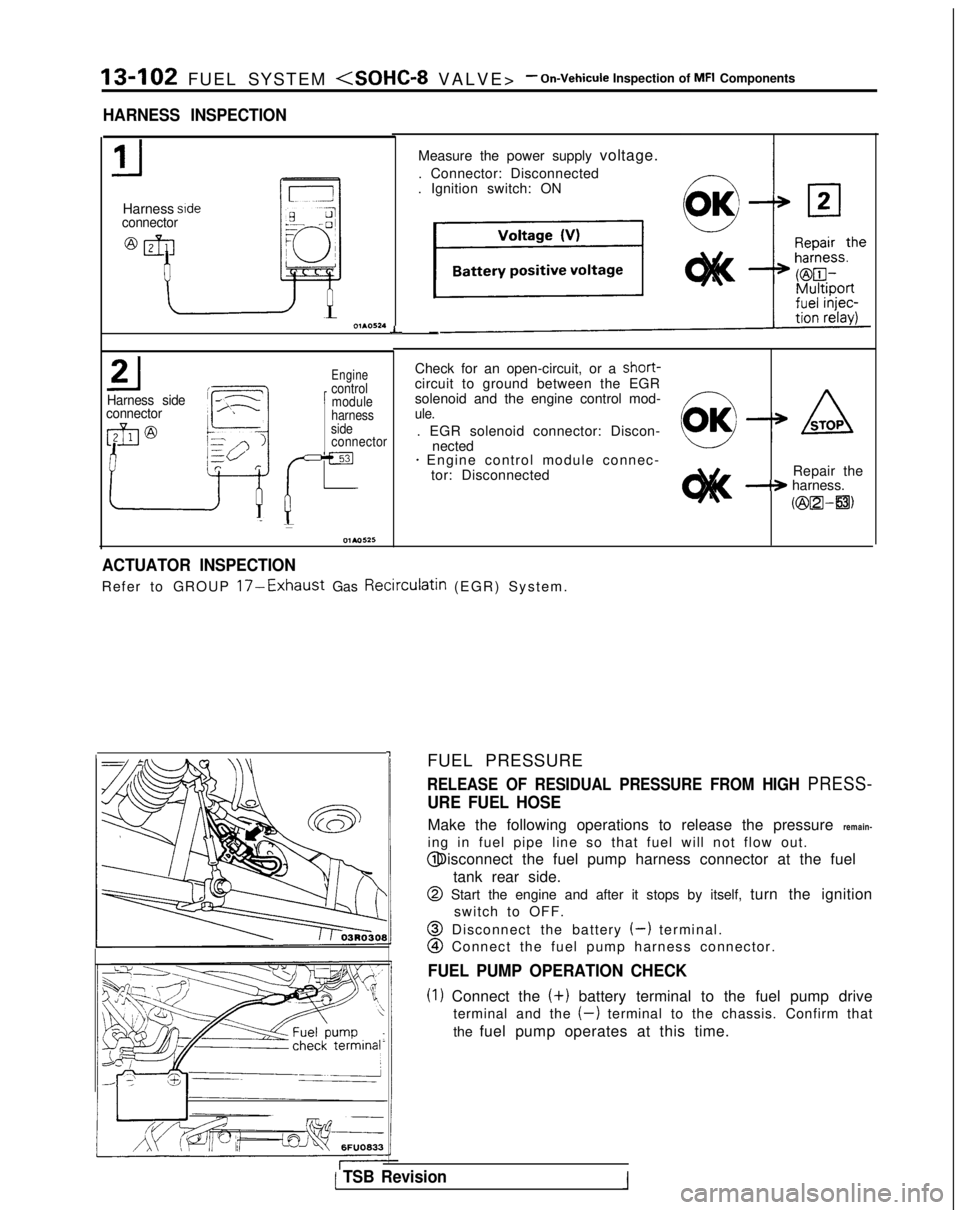
HARNESS INSPECTION
Harness sideconnector
L
Harness side
connector
Engine
1
control module
Check for an open-circuit, or a short-
circuit to ground between the EGR
solenoid and the engine control mod-
harnessule.side. EGR solenoid connector: Discon-connectornected+ Engine control module connec- tor: Disconnected Repair the
-+ harness.
Kzix2l-a)
-I
Measure the power supply voltage.
. Connector: Disconnected
. Ignition switch: ON
-
ACTUATOR INSPECTION
Refer to GROUP 17-Exhaust Gas Recirculatin (EGR) System
.
FUEL PRESSURE
RELEASE OF RESIDUAL PRESSURE FROM HIGH PRESS-
URE FUEL HOSE
Make the following operations to release the pressure remain-
ing in fuel pipe line so that fuel will not flow out. @ Disconnect the fuel pump harness connector at the fuel
tank rear side.
@ Start the engine and after it stops by itself, turn the ignitionswitch to OFF.
@ Disconnect the battery (-) terminal.
@I Connect the fuel pump harness connector.
FUEL PUMP OPERATION CHECK
(1) Connect the (+)
battery terminal to the fuel pump drive
terminal and the
(-) terminal to the chassis. Confirm that
the fuel pump operates at this time.
( TSB Revision1
Page 245 of 1273
FUEL SYSTEM
TSB Revision
---
I g$qfq, tcJ-s6FUO633
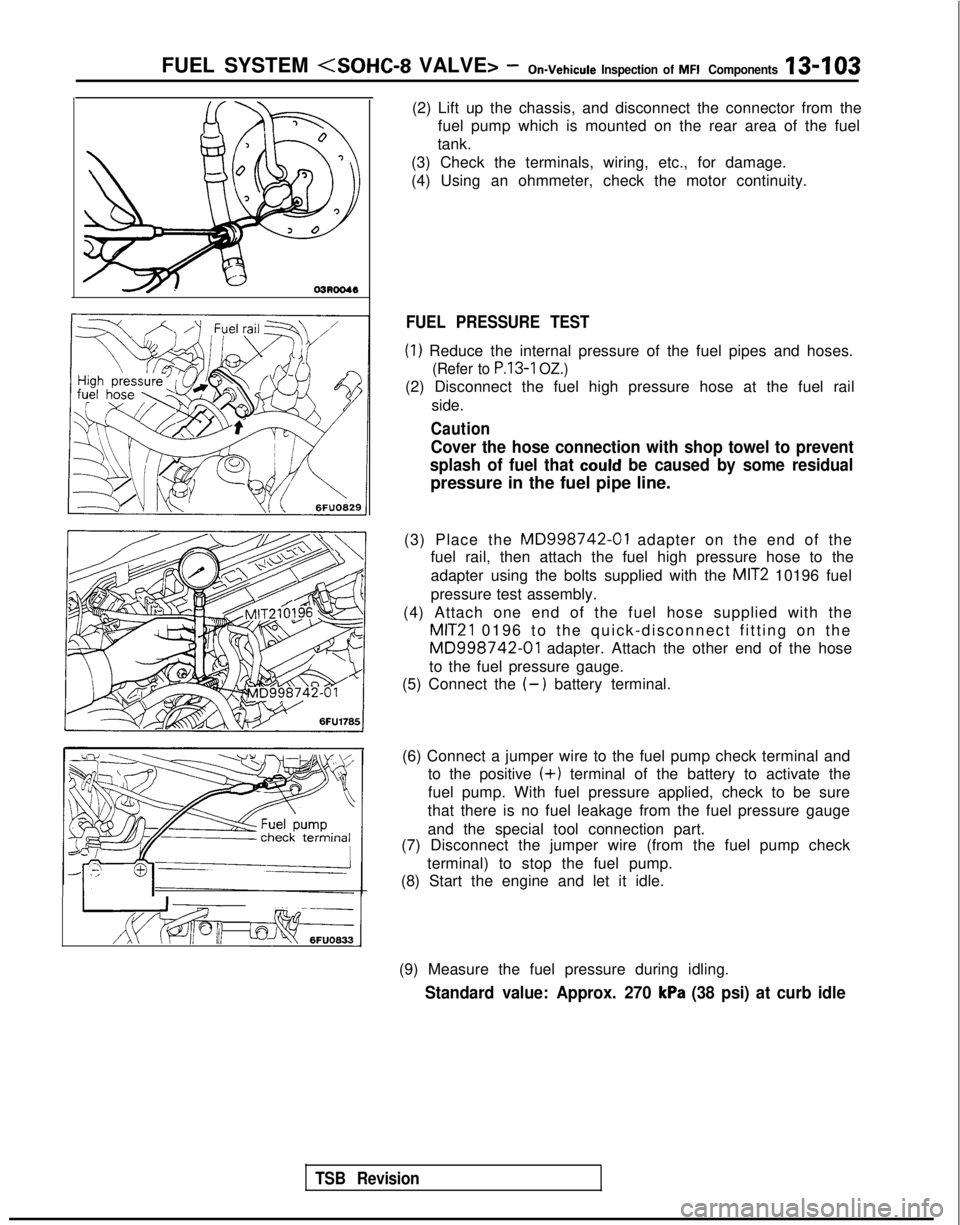
(2) Lift up the chassis, and disconnect the connector from the
fuel pump which is mounted on the rear area of the fuel
tank.
(3) Check the terminals, wiring, etc., for damage.
(4) Using an ohmmeter, check the motor continuity.
FUEL PRESSURE TEST
(1) Reduce the internal pressure of the fuel pipes and hoses.
(Refer to P.13-1 OZ.)
(2) Disconnect the fuel high pressure hose at the fuel rail
side.
Caution
Cover the hose connection with shop towel to prevent
splash of fuel that
could be caused by some residual
pressure in the fuel pipe line.
(3) Place the
MD998742-01 adapter on the end of the
fuel rail, then attach the fuel high pressure hose to the
adapter using the bolts supplied with the
MIT2 10196 fuel
pressure test assembly.
(4) Attach one end of the fuel hose supplied with the
MIT21 0196 to the quick-disconnect fitting on the
MD998742-01 adapter. Attach the other end of the hose
to the fuel pressure gauge.
(5) Connect the
(-) battery terminal.
(6) Connect a jumper wire to the fuel pump check terminal and to the positive
(+) terminal of the battery to activate the
fuel pump. With fuel pressure applied, check to be sure
that there is no fuel leakage from the fuel pressure gauge
and the special tool connection part.
(7) Disconnect the jumper wire (from the fuel pump check
terminal) to stop the fuel pump.
(8) Start the engine and let it idle.
(9) Measure the fuel pressure during idling.
Standard value: Approx. 270 kPa (38 psi) at curb idle
Page 265 of 1273

l EGR valve control vacuumFUEL SYSTEM <SOHC-l6 VALVE> - Troubleshooting13423
NOTE1.Replace the engine control module if a diagnostic trouble code is output\
although the inspectio")
Check item (Remedy)
l EGR valve control vacuumFUEL SYSTEM
NOTE1.Replace the engine control module if a diagnostic trouble code is output\
although the inspection reveals that there
is no problem with the check items.
2.The code numbers will be displayed in order, starting from the lowest.
TROUBLESHOOTING TABLE
NOTE *:
The failsafe/back-up function is in operation.
DE;;;zic On-board
diagnostic
code No. item Diagnostic content
Major causeRemarks (trouble
phenomenon, etc.)
EngineThe engine control module--l Engine stop
control itself is abnormal. l Impossible start
module
11Oxygen
sensor Though the air/fuel mixture
(1) The oxygen sensor is troubled.
l Deterioration of
ratio closed loop control is (2) Open-circuit, short-circuit or exhaust gas
operated, the signal voltage of improper connector contact purifying
the oxygen sensor does not occurs in the oxygen sensor performance*
vary (to be lean/rich). circuit.
(3) The fuel pressure is improper. l Deterioration of
(4) The injector is troubled. exhaust gas
(5) Air is sucked through the purifying
gasket clearance, etc. performance*
(6) The engine control module is l Abnormal start
troubled. l Unstable idling
l Abnormal
acceleration
12Volume
air flow
sensor Though the engine is running,
(1) Volume air flow sensor is l Abnormal
the signal frequency of the air troubled. acceleration*
flow sensor is 1
OHz or less. (2) Open-circuit, short-circuit or l Unstable idling*
improper connector contact
occurs in the volume air flow
sensor circuit.
(3) The engine control module is l Inappropriate idle
troubled. speed*
TSB Revision
Page 266 of 1273
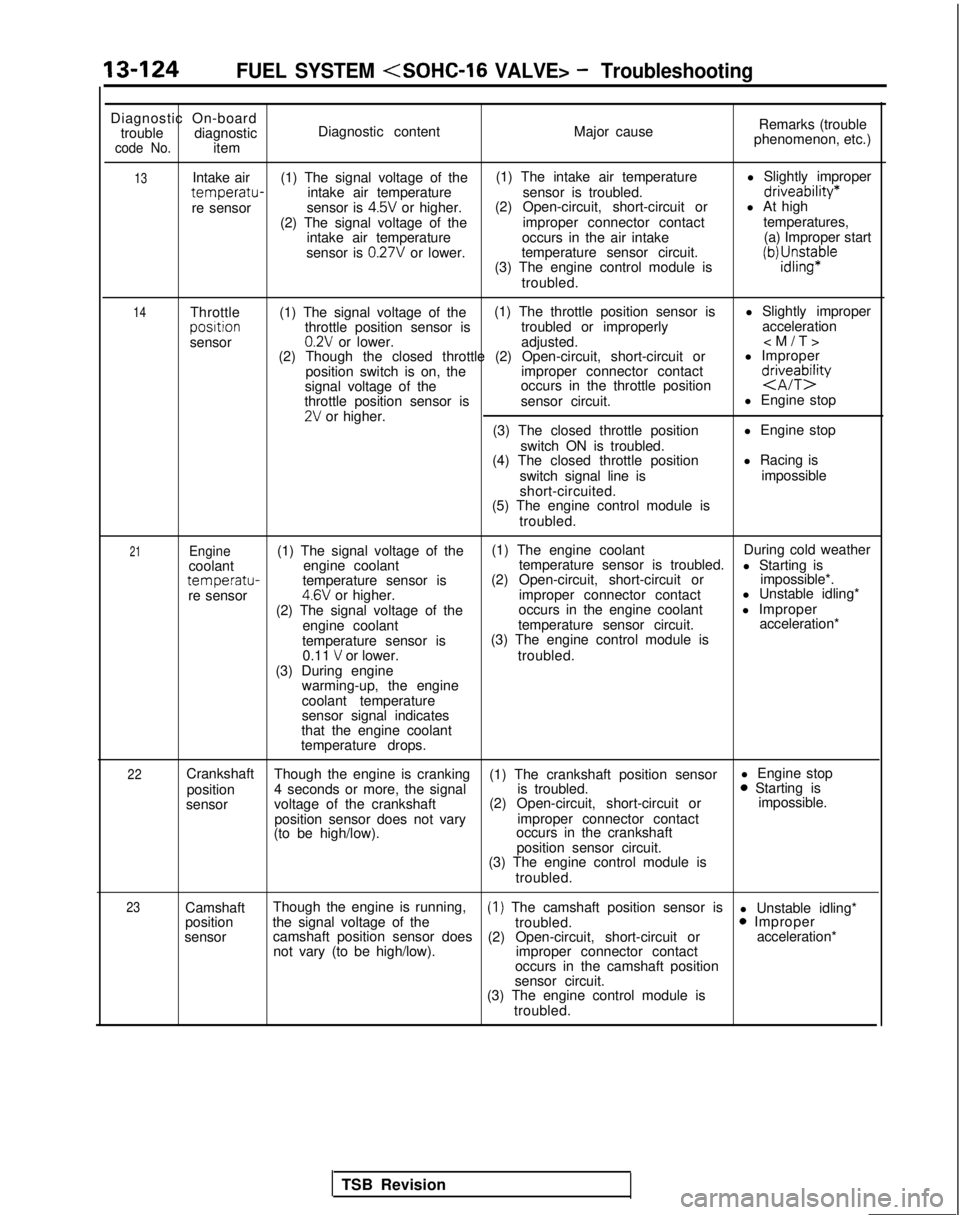
13-124FUEL SYSTEM
Diagnostic On-board
trouble diagnostic
code No.item Diagnostic content
Major causeRemarks (trouble
phenomenon, etc.)
13
14Intake air (1) The signal voltage of the (1) The intake air temperature
l Slightly impropertemperatu-intake air temperature
sensor is troubled.driveability*
re sensorsensor is 4.5V or higher.(2) Open-circuit, short-circuit or
l At high
(2) The signal voltage of the improper connector contacttemperatures,
intake air temperature occurs in the air intake (a) Improper start
sensor is
0.27V or lower. temperature sensor circuit.
(3) The engine control module isiWJ;sn$aple
troubled.
Throttle (1) The signal voltage of the (1) The throttle position sensor is
l Slightly improperposltion
throttle position sensor is troubled or improperly acceleration
sensor
0.2V or lower. adjusted.
(2) Though the closed throttle (2) Open-circuit, short-circuit or l Improper
position switch is on, the improper connector contact
signal voltage of the occurs in the throttle position
d&eTbQ
throttle position sensor is
sensor circuit. l Engine stop2V or higher.
(3) The closed throttle position l Engine stop
switch ON is troubled.
(4) The closed throttle position l Racing is
switch signal line is impossible
short-circuited.
(5) The engine control module is
troubled.
21Engine(1) The signal voltage of the (1) The engine coolant
During cold weather
coolant engine coolant temperature sensor is troubled.
l Starting is
temperatu-temperature sensor is(2) Open-circuit, short-circuit or
impossible*.
re sensor4.6V or higher. improper connector contact l Unstable idling*
(2) The signal voltage of the occurs in the engine coolant
l Improper
engine coolant temperature sensor circuit. acceleration*
temperature sensor is (3) The engine control module is
0.11
V or lower. troubled.
(3) During engine warming-up, the engine
coolant temperature
sensor signal indicates
that the engine coolant
temperature drops.
22Crankshaft Though the engine is cranking (1) The crankshaft position sensor l Engine stop
position 4 seconds or more, the signal is troubled.0 Starting is
sensor voltage of the crankshaft (2) Open-circuit, short-circuit or impossible.
position sensor does not vary improper connector contact
(to be high/low). occurs in the crankshaft
position sensor circuit.
(3) The engine control module is
troubled.
23Camshaft Though the engine is running,(1) The camshaft position sensor is
l Unstable idling*
position the signal voltage of the
troubled.0 Improper
sensor camshaft position sensor does
(2) Open-circuit, short-circuit or acceleration*
not vary (to be high/low). improper connector contact
occurs in the camshaft position
sensor circuit.
(3) The engine control module is
troubled.
TSB Revision