display MITSUBISHI GRANDIS 2010 Owner's Manual (in English)
[x] Cancel search | Manufacturer: MITSUBISHI, Model Year: 2010, Model line: GRANDIS, Model: MITSUBISHI GRANDIS 2010Pages: 273, PDF Size: 21.01 MB
Page 5 of 273
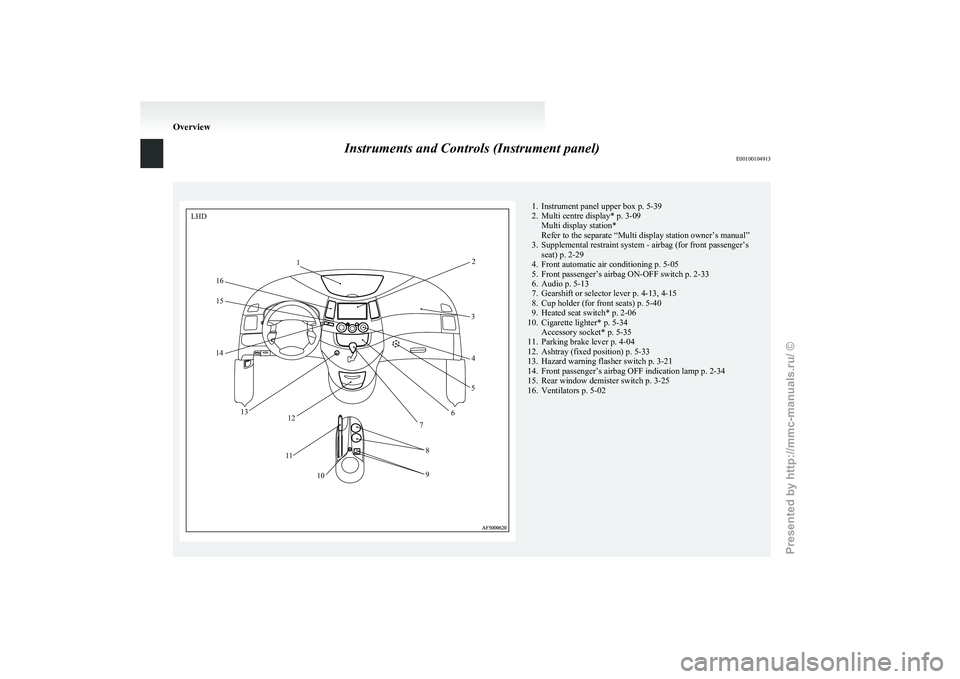
Instruments and Controls (Instrument panel)
E001001049131. Instrument panel upper box p. 5-39
2.
Multi centre display* p. 3-09Multi display station*
Refer to the separate “Multi display station owner’s manual”
3. Supplemental restraint system - airbag (for front passenger’s seat) p. 2-29
4. Front automatic air conditioning p. 5-05
5. Front passenger’s airbag ON-OFF switch p. 2-33
6. Audio p. 5-13
7. Gearshift or selector lever p. 4-13, 4-15
8. Cup holder (for front seats) p. 5-40
9. Heated seat switch* p. 2-06
10. Cigarette lighter* p. 5-34 Accessory socket* p. 5-35
11. Parking brake lever p. 4-04
12. Ashtray (fixed position) p. 5-33
13. Hazard warning flasher switch p. 3-21
14. Front passenger’s airbag OFF indication lamp p. 2-34
15. Rear window demister switch p. 3-25
16. Ventilators p. 5-02 OverviewLHD
1 2
3 4
5
6
7
8
9
10
1
1
12
13
14
15
16
Presented by http://mmc-manuals.ru/ \251
Page 6 of 273
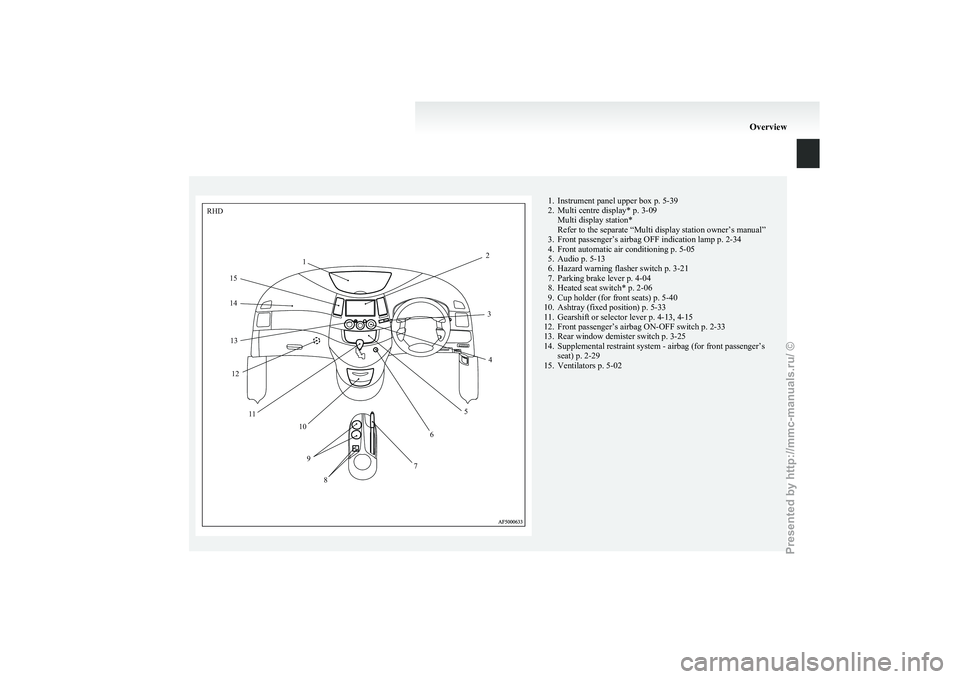
1. Instrument panel upper box p. 5-39
2.
Multi centre display* p. 3-09Multi display station*
Refer to the separate “Multi display station owner’s manual”
3. Front passenger’s airbag OFF indication lamp p. 2-34
4. Front automatic air conditioning p. 5-05
5. Audio p. 5-13
6. Hazard warning flasher switch p. 3-21
7. Parking brake lever p. 4-04
8. Heated seat switch* p. 2-06
9. Cup holder (for front seats) p. 5-40
10. Ashtray (fixed position) p. 5-33
11. Gearshift or selector lever p. 4-13, 4-15
12. Front passenger’s airbag ON-OFF switch p. 2-33
13. Rear window demister switch p. 3-25
14. Supplemental restraint system - airbag (for front passenger’s seat) p. 2-29
15. Ventilators p. 5-02 OverviewRHD
1 2
34
5
6
7
8
9
10
1
1
12
13
14
15
Presented by http://mmc-manuals.ru/ \251
Page 23 of 273
Keyless entry system*
E00300302115
Press
the remote control switch, and all doors and
the tailgate will be locked or unlocked as desired. It
is also possible to operate the outside rear-view mir-
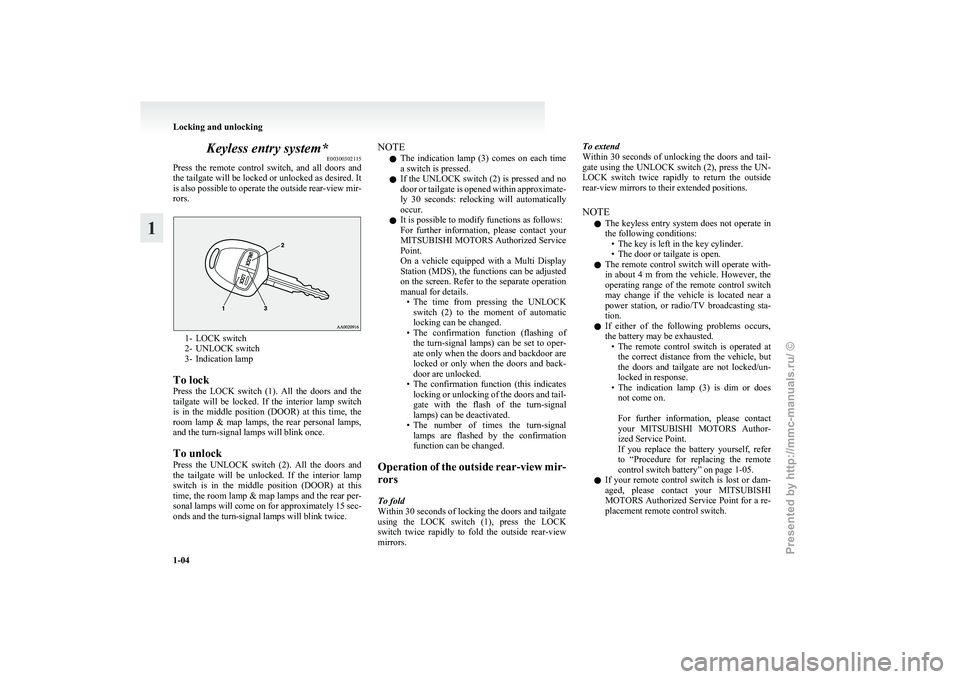
rors. 1- LOCK switch
2-
UNLOCK switch
3- Indication lamp
To lock
Press the LOCK switch (1). All the doors and the
tailgate will be locked. If the interior lamp switch
is in the middle position (DOOR) at this time, the
room lamp & map lamps, the rear personal lamps,
and the turn-signal lamps will blink once.
To unlock
Press the UNLOCK switch (2). All the doors and
the tailgate will be unlocked. If the interior lamp
switch is in the middle position (DOOR) at this
time, the room lamp & map lamps and the rear per-
sonal lamps will come on for approximately 15 sec-
onds and the turn-signal lamps will blink twice. NOTE
l The
indication lamp (3) comes on each time
a switch is pressed.
l If the UNLOCK switch (2) is pressed and no
door or tailgate is opened within approximate-
ly 30 seconds: relocking will automatically
occur.
l It is possible to modify functions as follows:
For further information, please contact your
MITSUBISHI MOTORS Authorized Service
Point.
On a vehicle equipped with a Multi Display
Station (MDS), the functions can be adjusted
on the screen. Refer to the separate operation
manual for details.
• The time from pressing the UNLOCKswitch (2) to the moment of automatic
locking can be changed.
• The confirmation function (flashing of the turn-signal lamps) can be set to oper-
ate only when the doors and backdoor are
locked or only when the doors and back-
door are unlocked.
• The confirmation function (this indicates locking or unlocking of the doors and tail-
gate with the flash of the turn-signal
lamps) can be deactivated.
• The number of times the turn-signal lamps are flashed by the confirmation
function can be changed.
Operation of the outside rear-view mir-
rors
To fold
Within 30 seconds of locking the doors and tailgate
using the LOCK switch (1), press the LOCK
switch twice rapidly to fold the outside rear-view
mirrors. To extend
Within
30 seconds of unlocking the doors and tail-
gate using the UNLOCK switch (2), press the UN-
LOCK switch twice rapidly to return the outside
rear-view mirrors to their extended positions.
NOTE
l The keyless entry system does not operate in
the following conditions:
• The key is left in the key cylinder.
• The door or tailgate is open.
l The remote control switch will operate with-
in about 4 m from the vehicle. However, the
operating range of the remote control switch
may change if the vehicle is located near a
power station, or radio/TV broadcasting sta-
tion.
l If either of the following problems occurs,
the battery may be exhausted.
• The remote control switch is operated atthe correct distance from the vehicle, but
the doors and tailgate are not locked/un-
locked in response.
• The indication lamp (3) is dim or does not come on.
For further information, please contact
your MITSUBISHI MOTORS Author-
ized Service Point.
If you replace the battery yourself, refer
to “Procedure for replacing the remote
control switch battery” on page 1-05.
l If your remote control switch is lost or dam-
aged, please contact your MITSUBISHI
MOTORS Authorized Service Point for a re-
placement remote control switch. Locking and unlocking
1-04
1
Presented by http://mmc-manuals.ru/ \251
Page 78 of 273
Instruments...................................................................................
3-02
Indication and warning lamps .......................................................3-05
Indication lamps ........................................................................... 3-06
Warning lamps .............................................................................. 3-06
Multi centre display ...................................................................... 3-09
Combination headlamps and dipper switch ..................................3-18
Headlamp levelling ....................................................................... 3-19
Turn/Lane-change signals.............................................................3-21
Hazard warning flasher switch ..................................................... 3-21
Fog lamp switch............................................................................3-22
Wiper and washer switch .............................................................. 3-23
Headlamp washer switch* ............................................................ 3-25
Rear window demister switch.......................................................3-25
Horn switch...................................................................................3-26 Instruments and controls
3
Presented by http://mmc-manuals.ru/ \251
Page 80 of 273
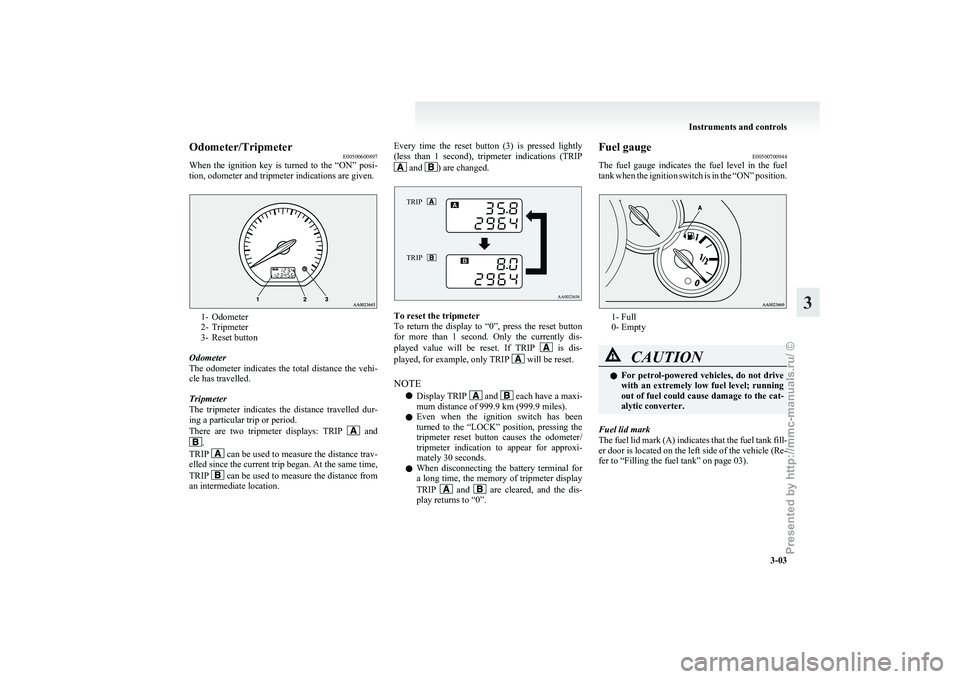
Odometer/Tripmeter
E00500600897
When
the ignition key is turned to the “ON” posi-
tion, odometer and tripmeter indications are given. 1- Odometer
2-
Tripmeter
3- Reset button
Odometer
The odometer indicates the total distance the vehi-
cle has travelled.
Tripmeter
The tripmeter indicates the distance travelled dur-
ing a particular trip or period.
There are two tripmeter displays: TRIP and
.
TRIP can be used to measure the distance trav-
elled
since the current trip began. At the same time,
TRIP can be used to measure the distance from
an intermediate location. Every time the reset button (3) is pressed lightly
(less
than 1 second), tripmeter indications (TRIP and ) are changed.
TRIP
TRIP To reset the tripmeter
To
return the display to “0”, press the reset button
for more than 1 second. Only the currently dis-
played value will be reset. If TRIP is dis-
played, for example, only TRIP will be reset.
NOTE l Display TRIP and each have a maxi-
mum distance of 999.9 km (999.9 miles).
l Even
when the ignition switch has been
turned to the “LOCK” position, pressing the
tripmeter reset button causes the odometer/
tripmeter indication to appear for approxi-
mately 30 seconds.
l When disconnecting the battery terminal for
a long time, the memory of tripmeter display
TRIP and are cleared, and the dis-
play returns to “0”. Fuel gauge
E00500700944
The
fuel gauge indicates the fuel level in the fuel
tank when the ignition switch is in the “ON” position. 1- Full
0- Empty
CAUTION
l
For
petrol-powered vehicles, do not drive
with an extremely low fuel level; running
out of fuel could cause damage to the cat-
alytic converter.
Fuel lid mark
The
fuel lid mark (A) indicates that the fuel tank fill-
er door is located on the left side of the vehicle (Re-
fer to “Filling the fuel tank” on page 03). Instruments and controls
3-03 3
Presented by http://mmc-manuals.ru/ \251
Page 86 of 273
CAUTION
l
If you continue driving with
low engine oil level or with this
warning lamp illuminated, en-
gine seizure may occur.
NOTE l The
oil pressure warning lamp
should not be treated as an indica-
tion of the engine’s oil level. The
oil level must be checked using
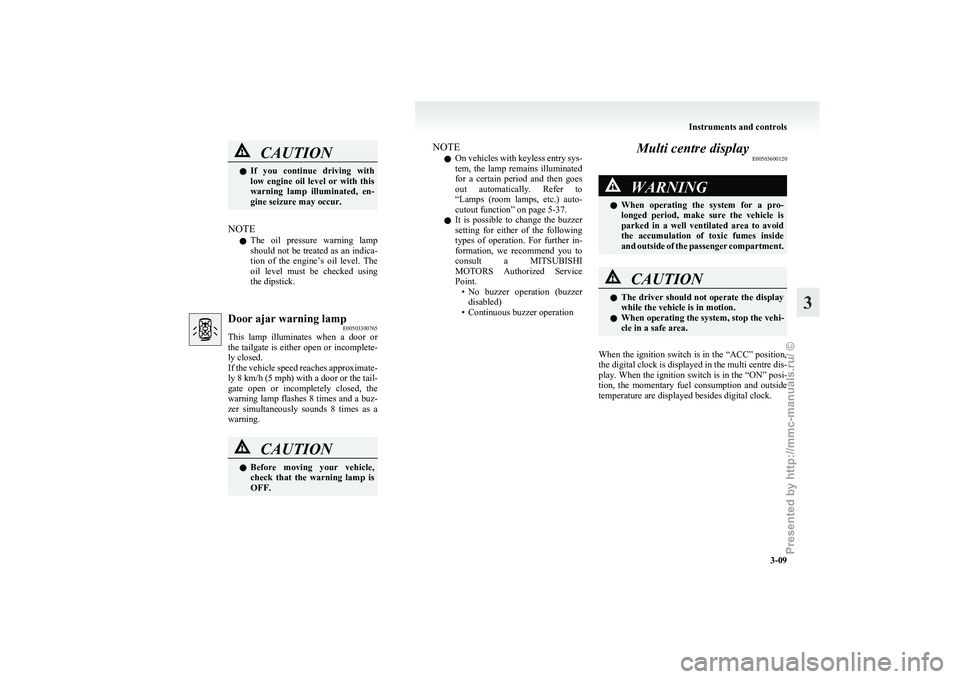
the dipstick. Door ajar warning lamp
E00503300765
This
lamp illuminates when a door or
the tailgate is either open or incomplete-
ly closed.
If the vehicle speed reaches approximate-
ly 8 km/h (5 mph) with a door or the tail-
gate open or incompletely closed, the
warning lamp flashes 8 times and a buz-
zer simultaneously sounds 8 times as a
warning. CAUTION
l
Before
moving your vehicle,
check that the warning lamp is
OFF. NOTE
l On
vehicles with keyless entry sys-
tem, the lamp remains illuminated
for a certain period and then goes
out automatically. Refer to
“Lamps (room lamps, etc.) auto-
cutout function” on page 5-37.
l It is possible to change the buzzer
setting for either of the following
types of operation. For further in-
formation, we recommend you to
consult a MITSUBISHI
MOTORS Authorized Service
Point.
• No buzzer operation (buzzerdisabled)
• Continuous buzzer operation Multi centre display
E00503600120 WARNING
l When
operating the system for a pro-
longed period, make sure the vehicle is
parked in a well ventilated area to avoid
the accumulation of toxic fumes inside
and outside of the passenger compartment. CAUTION
l
The
driver should not operate the display
while the vehicle is in motion.
l When operating the system, stop the vehi-
cle in a safe area.
When the ignition switch is in the “ACC” position,
the
digital clock is displayed in the multi centre dis-
play. When the ignition switch is in the “ON” posi-
tion, the momentary fuel consumption and outside
temperature are displayed besides digital clock. Instruments and controls
3-09 3
Presented by http://mmc-manuals.ru/ \251
Page 87 of 273
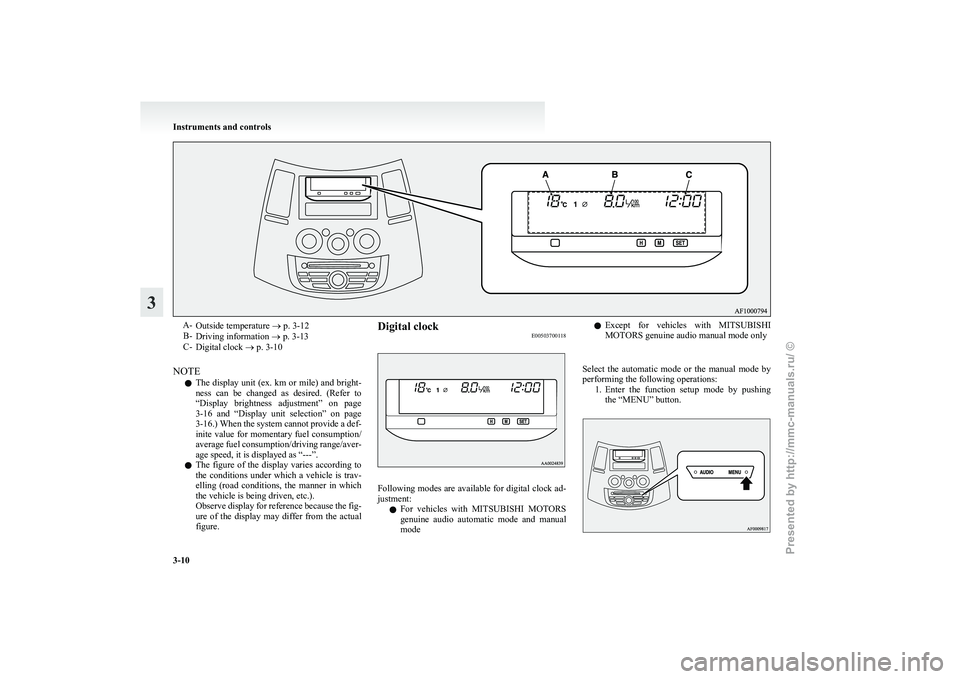
A-
Outside temperature ® p. 3-12
B- Driving information ® p. 3-13
C- Digital clock ® p. 3-10
NOTE l The display unit (ex. km or mile) and bright-
ness can be changed as desired. (Refer to
“Display brightness adjustment” on page
3-16 and “Display unit selection” on page
3-16.) When the system cannot provide a def-
inite value for momentary fuel consumption/
average fuel consumption/driving range/aver-
age speed, it is displayed as “---”.
l The figure of the display varies according to
the conditions under which a vehicle is trav-
elling (road conditions, the manner in which
the vehicle is being driven, etc.).
Observe display for reference because the fig-
ure of the display may differ from the actual
figure. Digital clock
E00503700118 Following modes are available for digital clock ad-
justment:
l For
vehicles with MITSUBISHI MOTORS
genuine audio automatic mode and manual
mode l
Except
for vehicles with MITSUBISHI
MOTORS genuine audio manual mode only
Select the automatic mode or the manual mode by
performing the following operations: 1. Enter the function setup mode by pushingthe “MENU” button. Instruments and controls
3-10
3
Presented by http://mmc-manuals.ru/ \251
Page 88 of 273
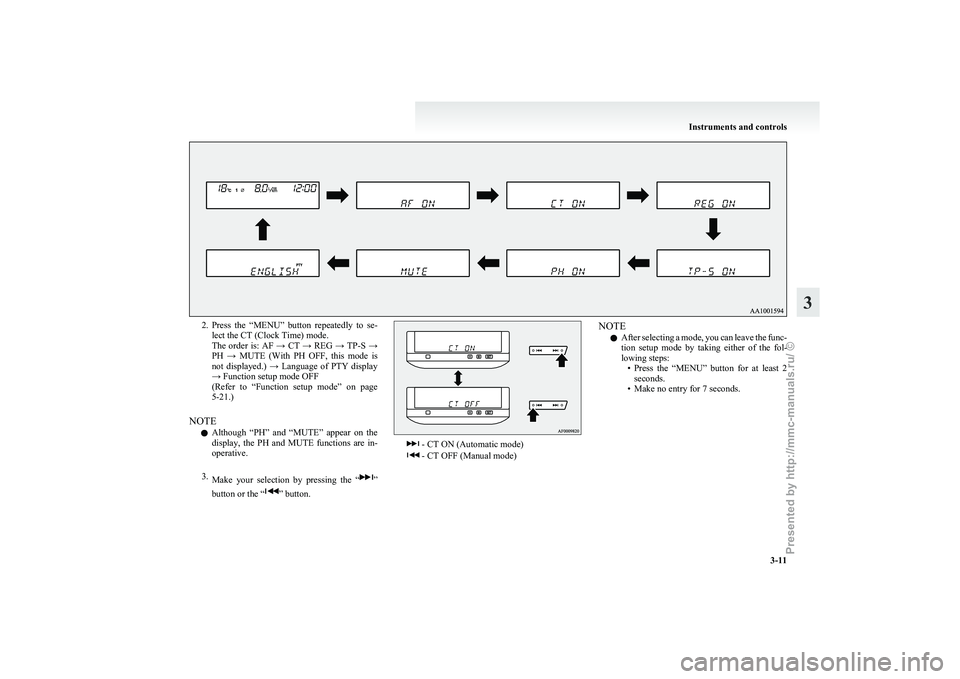
2. Press the “MENU” button repeatedly to se-
lect the CT (Clock Time) mode.
The order is: AF → CT → REG → TP-S →
PH → MUTE (With PH OFF, this mode is
not displayed.) → Language of PTY display
→ Function setup mode OFF
(Refer to “Function setup mode” on page
5-21.)
NOTE l Although “PH” and “MUTE” appear on the
display, the PH and MUTE functions are in-
operative.
3. Make your selection by pressing the “ ”
button or the “ ” button. - CT ON (Automatic mode)
- CT OFF (Manual mode)NOTE
l After
selecting a mode, you can leave the func-
tion setup mode by taking either of the fol-
lowing steps: • Press the “MENU” button for at least 2seconds.
• Make no entry for 7 seconds. Instruments and controls
3-11 3
Presented by http://mmc-manuals.ru/ \251
Page 89 of 273
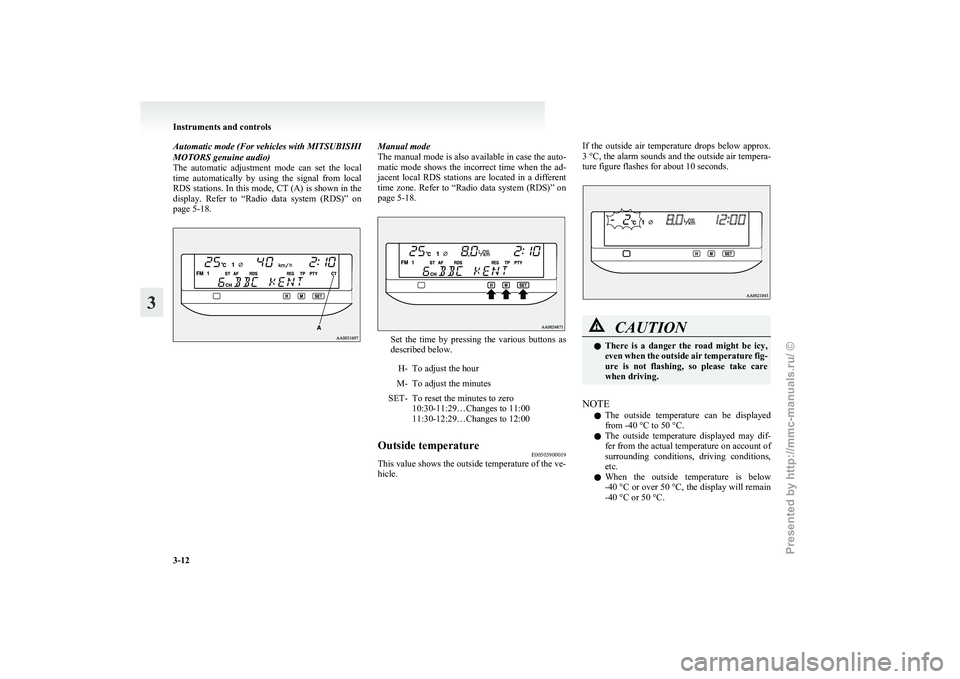
Automatic mode (For vehicles with MITSUBISHI
MOTORS genuine audio)
The
automatic adjustment mode can set the local
time automatically by using the signal from local
RDS stations. In this mode, CT (A) is shown in the
display. Refer to “Radio data system (RDS)” on
page 5-18. Manual mode
The
manual mode is also available in case the auto-
matic mode shows the incorrect time when the ad-
jacent local RDS stations are located in a different
time zone. Refer to “Radio data system (RDS)” on
page 5-18. Set the time by pressing the various buttons as
described below.
H- To adjust the hour
M- To adjust the minutes
SET- To reset the minutes to zero 10:30-11:29…Changes to 11:00
11:30-12:29…Changes to 12:00
Outside temperature E00503900019
This value shows the outside temperature of the ve-
hicle. If the outside air temperature drops below approx.
3 °C,
the alarm sounds and the outside air tempera-
ture figure flashes for about 10 seconds. CAUTION
l
There
is a danger the road might be icy,
even when the outside air temperature fig-
ure is not flashing, so please take care
when driving.
NOTE l The
outside temperature can be displayed
from -40 °C to 50 °C.
l The outside temperature displayed may dif-
fer from the actual temperature on account of
surrounding conditions, driving conditions,
etc.
l When the outside temperature is below
-40 °C or over 50 °C, the display will remain
-40 °C or 50 °C. Instruments and controls
3-12
3
Presented by http://mmc-manuals.ru/ \251
Page 90 of 273
Driving information
E00509000067
For vehicles with MITSUBISHI MOTORS genu-
ine audio
The
momentary fuel consumption, average fuel con-
sumption, driving range and average speed can be
displayed.
When the ignition switch is turned to the “ON” po-
sition, the display shows the 4 items sequentially
and returns to the original display that is shown be-
fore the ignition switch was last turned to the
“OFF” position.
NOTE
l If the “DISP” button is pressed while the dis-
play is scrolling through the sequence men-
tioned above, the display stops scrolling and
shows the item that was shown before the ig-
nition switch was last turned to the “OFF” po-
sition.
Except for vehicles with MITSUBISHI MOTORS
genuine audio
Only the momentary fuel consumption can be dis-
played. Refer to “Momentary fuel consumption”
on page 3-13.
Change of driving information (For vehicles with
MITSUBISHI MOTORS
genuine audio)E00509100068
Every time the “DISP” button is pressed lightly
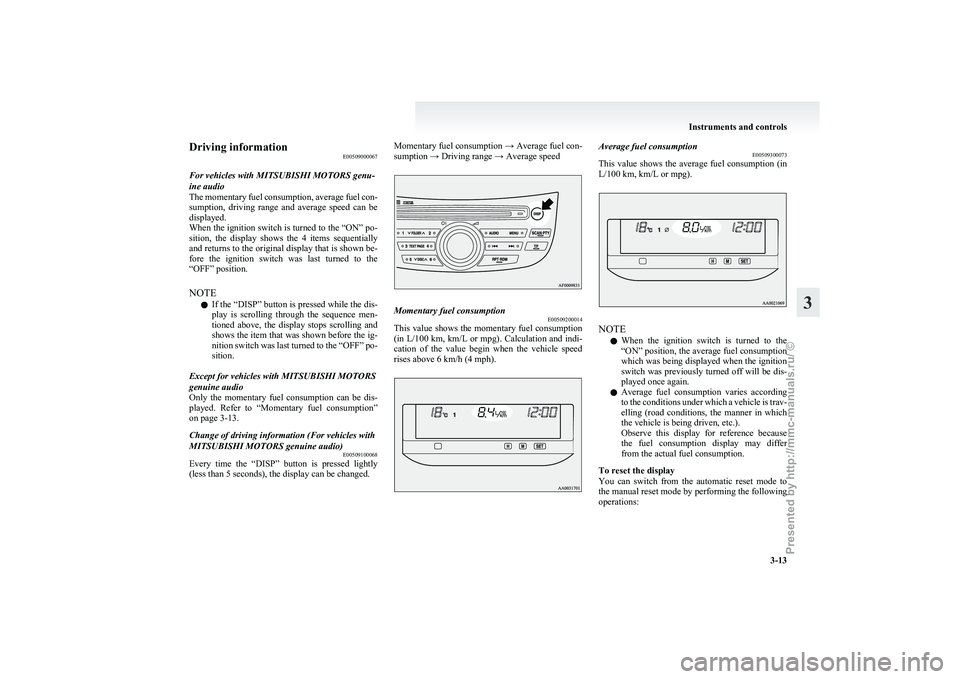
(less than 5 seconds), the display can be changed. Momentary fuel consumption → Average fuel con-
sumption → Driving range → Average speed
Momentary fuel consumption
E00509200014
This value shows the momentary fuel consumption
(in
L/100 km, km/L or mpg). Calculation and indi-
cation of the value begin when the vehicle speed
rises above 6 km/h (4 mph). Average fuel consumption
E00509300073
This
value shows the average fuel consumption (in
L/100 km, km/L or mpg). NOTE
l When
the ignition switch is turned to the
“ON” position, the average fuel consumption
which was being displayed when the ignition
switch was previously turned off will be dis-
played once again.
l Average fuel consumption varies according
to the conditions under which a vehicle is trav-
elling (road conditions, the manner in which
the vehicle is being driven, etc.).
Observe this display for reference because
the fuel consumption display may differ
from the actual fuel consumption.
To reset the display
You can switch from the automatic reset mode to
the manual reset mode by performing the following
operations: Instruments and controls
3-13 3
Presented by http://mmc-manuals.ru/ \251