ignition MITSUBISHI GRANDIS 2010 Owner's Manual (in English)
[x] Cancel search | Manufacturer: MITSUBISHI, Model Year: 2010, Model line: GRANDIS, Model: MITSUBISHI GRANDIS 2010Pages: 273, PDF Size: 21.01 MB
Page 3 of 273
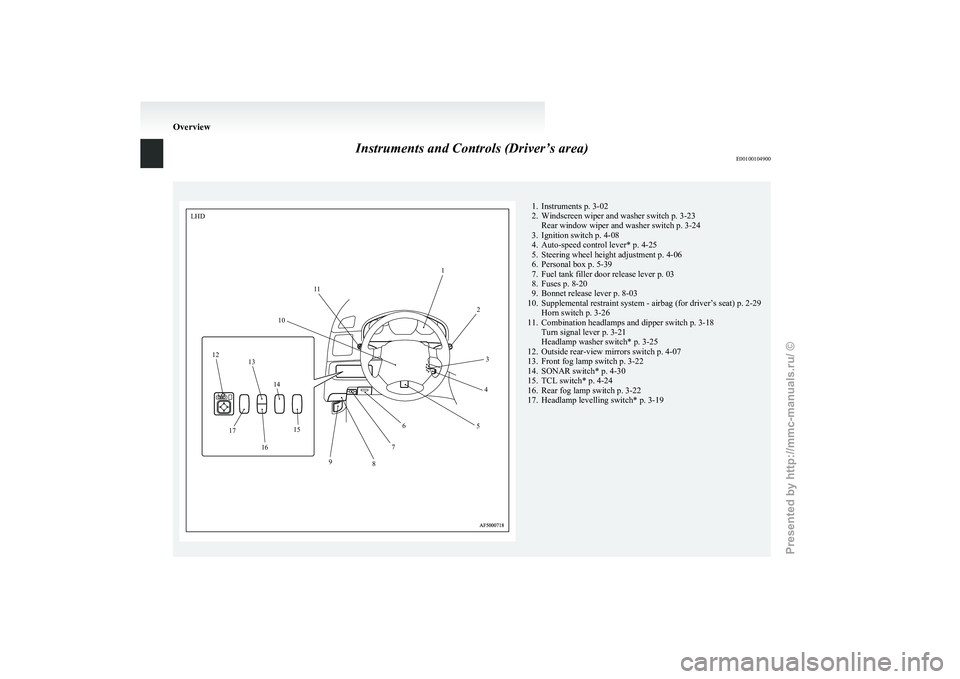
Instruments and Controls (Driver’s area)
E00100104900 1. Instruments p. 3-02
2.
Windscreen wiper and washer switch p. 3-23Rear window wiper and washer switch p. 3-24
3. Ignition switch p. 4-08
4. Auto-speed control lever* p. 4-25
5. Steering wheel height adjustment p. 4-06
6. Personal box p. 5-39
7. Fuel tank filler door release lever p. 03
8. Fuses p. 8-20
9. Bonnet release lever p. 8-03
10. Supplemental restraint system - airbag (for driver’s seat) p. 2-29 Horn switch p. 3-26
11. Combination headlamps and dipper switch p. 3-18 Turn signal lever p. 3-21
Headlamp washer switch* p. 3-25
12. Outside rear-view mirrors switch p. 4-07
13. Front fog lamp switch p. 3-22
14. SONAR switch* p. 4-30
15. TCL switch* p. 4-24
16. Rear fog lamp switch p. 3-22
17. Headlamp levelling switch* p. 3-19 OverviewLHD
12
3
4
5
6
7
8
9
10
1
1
12 13
14
17 1615
Presented by http://mmc-manuals.ru/ \251
Page 4 of 273
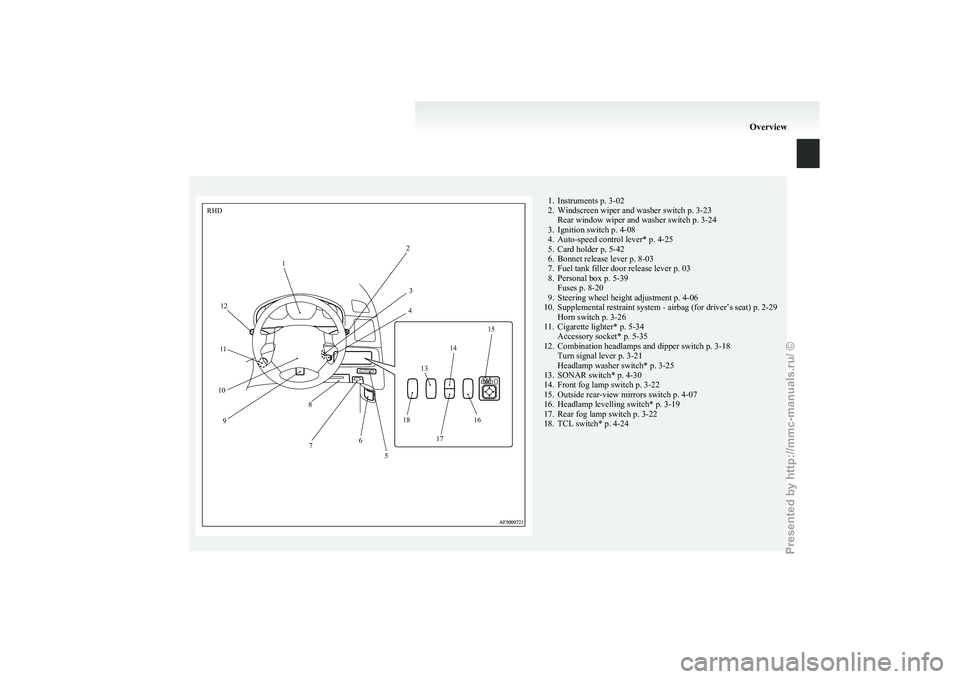
1. Instruments p. 3-02
2.
Windscreen wiper and washer switch p. 3-23Rear window wiper and washer switch p. 3-24
3. Ignition switch p. 4-08
4. Auto-speed control lever* p. 4-25
5. Card holder p. 5-42
6. Bonnet release lever p. 8-03
7. Fuel tank filler door release lever p. 03
8. Personal box p. 5-39 Fuses p. 8-20
9. Steering wheel height adjustment p. 4-06
10. Supplemental restraint system - airbag (for driver’s seat) p. 2-29 Horn switch p. 3-26
11. Cigarette lighter* p. 5-34 Accessory socket* p. 5-35
12. Combination headlamps and dipper switch p. 3-18 Turn signal lever p. 3-21
Headlamp washer switch* p. 3-25
13. SONAR switch* p. 4-30
14. Front fog lamp switch p. 3-22
15. Outside rear-view mirrors switch p. 4-07
16. Headlamp levelling switch* p. 3-19
17. Rear fog lamp switch p. 3-22
18. TCL switch* p. 4-24 Overview1
RHD
2
3
4
5
6
7
8
9
10 1
1
12
1314
15
16
17
18
Presented by http://mmc-manuals.ru/ \251
Page 28 of 273
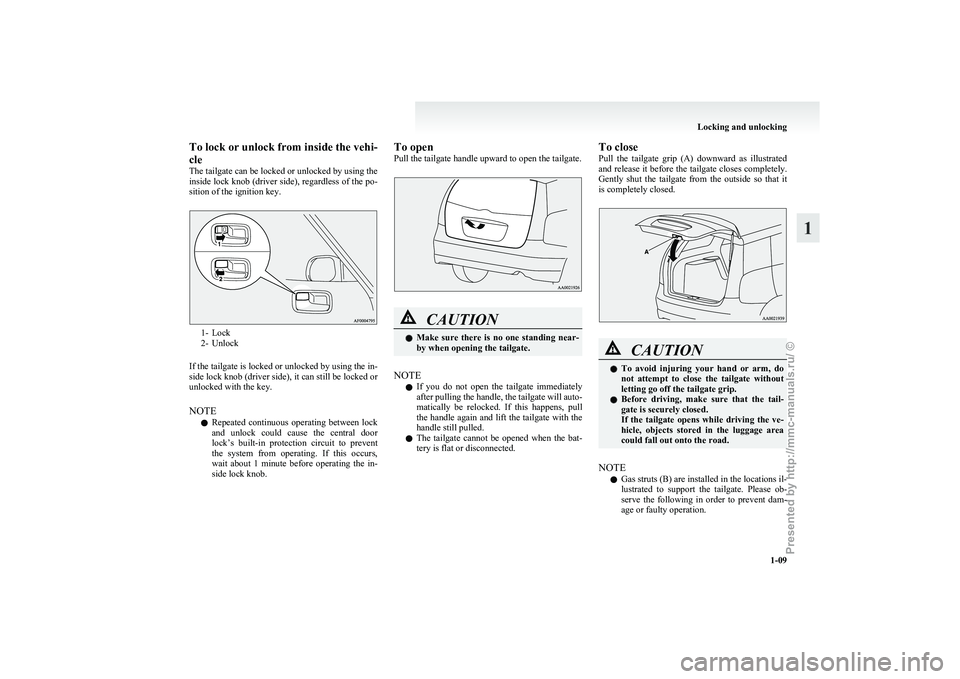
To lock or unlock from inside the vehi-
cle
The
tailgate can be locked or unlocked by using the
inside lock knob (driver side), regardless of the po-
sition of the ignition key. 1- Lock
2-
Unlock
If the tailgate is locked or unlocked by using the in-
side lock knob (driver side), it can still be locked or
unlocked with the key.
NOTE l Repeated continuous operating between lock
and unlock could cause the central door
lock’s built-in protection circuit to prevent
the system from operating. If this occurs,
wait about 1 minute before operating the in-
side lock knob. To open
Pull the tailgate handle upward to open the tailgate.
CAUTION
l
Make sure there is no one standing near-
by when opening the tailgate.
NOTE l If
you do not open the tailgate immediately
after pulling the handle, the tailgate will auto-
matically be relocked. If this happens, pull
the handle again and lift the tailgate with the
handle still pulled.
l The tailgate cannot be opened when the bat-
tery is flat or disconnected. To close
Pull
the tailgate grip (A) downward as illustrated
and release it before the tailgate closes completely.
Gently shut the tailgate from the outside so that it
is completely closed. CAUTION
l
To
avoid injuring your hand or arm, do
not attempt to close the tailgate without
letting go off the tailgate grip.
l Before driving, make sure that the tail-
gate is securely closed.
If the tailgate opens while driving the ve-
hicle, objects stored in the luggage area
could fall out onto the road.
NOTE l Gas struts (B) are installed in the locations il-
lustrated
to support the tailgate. Please ob-
serve the following in order to prevent dam-
age or faulty operation. Locking and unlocking
1-09 1
Presented by http://mmc-manuals.ru/ \251
Page 30 of 273
CAUTION
l
Always keep the release lever lid on tail-
gate closed when driving so that your lug-
gage cannot accidentally bump against
the lever and open the tailgate. Electric window control
E00302200042
The electric windows can only be operated with the
ignition switch in the “ON” position.
Electric window control switch E00302300144
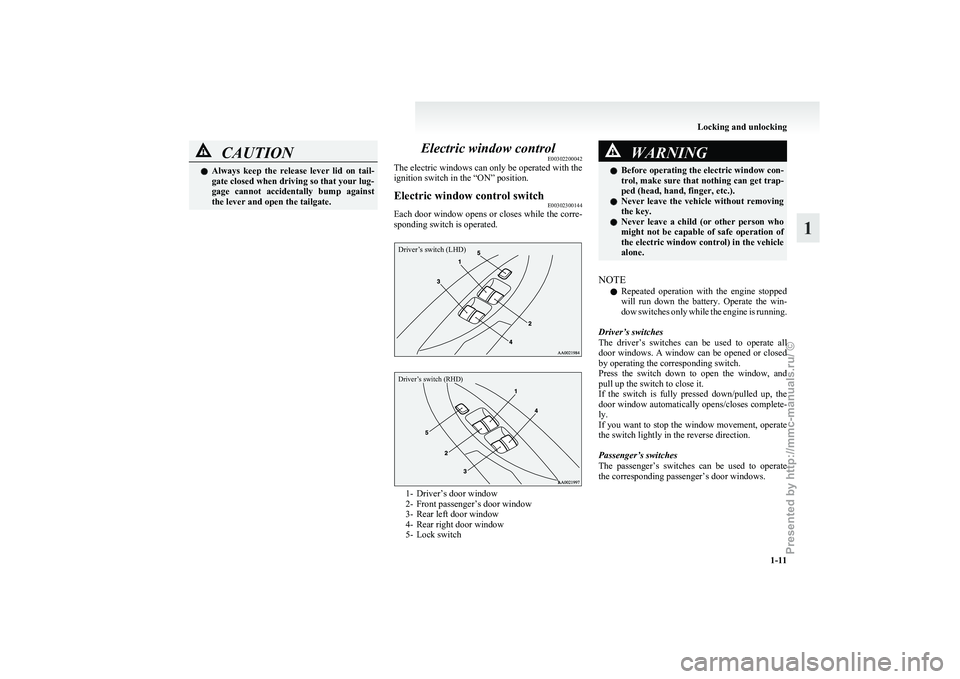
Each door window opens or closes while the corre-
sponding switch is operated.
Driver’s switch (LHD)
Driver’s switch (RHD) 1- Driver’s door window
2-
Front passenger’s door window
3- Rear left door window
4- Rear right door window
5- Lock switch WARNING
l Before
operating the electric window con-
trol, make sure that nothing can get trap-
ped (head, hand, finger, etc.).
l Never leave the vehicle without removing
the key.
l Never leave a child (or other person who
might not be capable of safe operation of
the electric window control) in the vehicle
alone.
NOTE l Repeated
operation with the engine stopped
will run down the battery. Operate the win-
dow switches only while the engine is running.
Driver’s switches
The driver’s switches can be used to operate all
door windows. A window can be opened or closed
by operating the corresponding switch.
Press the switch down to open the window, and
pull up the switch to close it.
If the switch is fully pressed down/pulled up, the
door window automatically opens/closes complete-
ly.
If you want to stop the window movement, operate
the switch lightly in the reverse direction.
Passenger’s switches
The passenger’s switches can be used to operate
the corresponding passenger’s door windows. Locking and unlocking
1-11 1
Presented by http://mmc-manuals.ru/ \251
Page 31 of 273
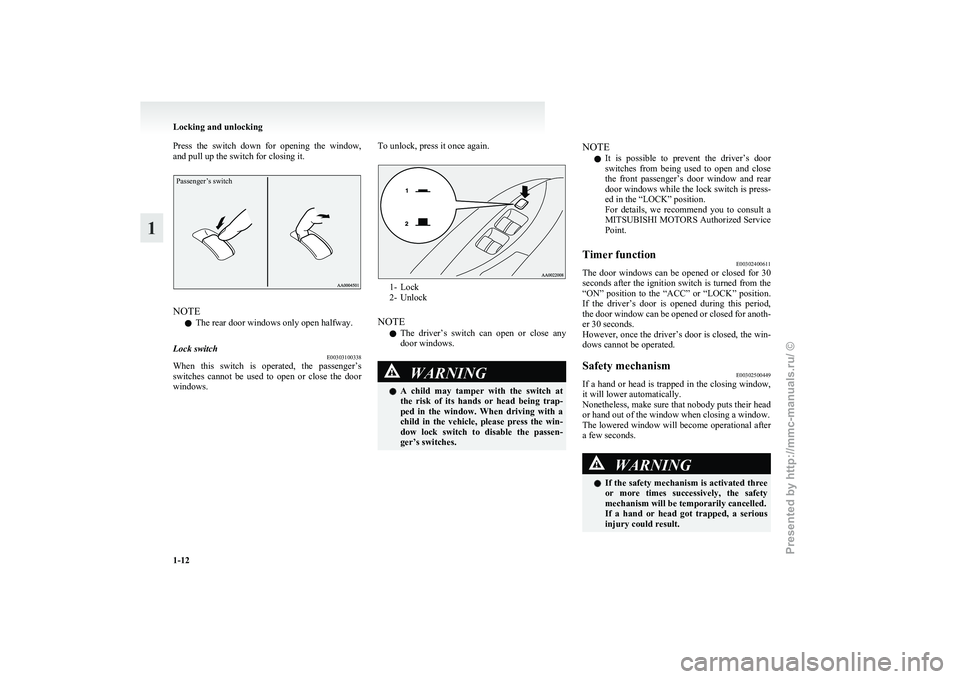
Press the switch down for opening the window,
and pull up the switch for closing it.Passenger’s switch
NOTE
l The rear door windows only open halfway.
Lock switch E00303100338
When this switch is operated, the passenger’s
switches
cannot be used to open or close the door
windows. To unlock, press it once again. 1- Lock
2-
Unlock
NOTE l The driver’s switch can open or close any
door windows. WARNING
l A
child may tamper with the switch at
the risk of its hands or head being trap-
ped in the window. When driving with a
child in the vehicle, please press the win-
dow lock switch to disable the passen-
ger’s switches. NOTE
l It
is possible to prevent the driver’s door
switches from being used to open and close
the front passenger’s door window and rear
door windows while the lock switch is press-
ed in the “LOCK” position.
For details, we recommend you to consult a
MITSUBISHI MOTORS Authorized Service
Point.
Timer function E00302400611
The door windows can be opened or closed for 30
seconds
after the ignition switch is turned from the
“ON” position to the “ACC” or “LOCK” position.
If the driver’s door is opened during this period,
the door window can be opened or closed for anoth-
er 30 seconds.
However, once the driver’s door is closed, the win-
dows cannot be operated.
Safety mechanism E00302500449
If a hand or head is trapped in the closing window,
it will lower automatically.
Nonetheless,
make sure that nobody puts their head
or hand out of the window when closing a window.
The lowered window will become operational after
a few seconds. WARNING
l If
the safety mechanism is activated three
or more times successively, the safety
mechanism will be temporarily cancelled.
If a hand or head got trapped, a serious
injury could result. Locking and unlocking
1-12
1
Presented by http://mmc-manuals.ru/ \251
Page 41 of 273
To recline the seatback
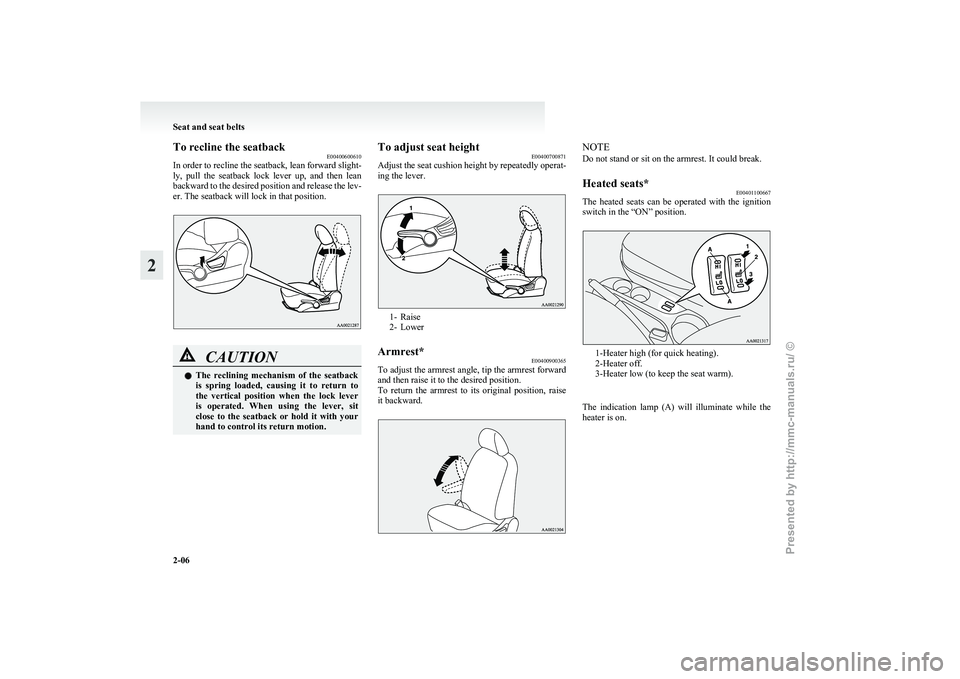
E00400600610
In
order to recline the seatback, lean forward slight-
ly, pull the seatback lock lever up, and then lean
backward to the desired position and release the lev-
er. The seatback will lock in that position. CAUTION
l
The
reclining mechanism of the seatback
is spring loaded, causing it to return to
the vertical position when the lock lever
is operated. When using the lever, sit
close to the seatback or hold it with your
hand to control its return motion. To adjust seat height
E00400700871
Adjust
the seat cushion height by repeatedly operat-
ing the lever. 1- Raise
2-
Lower
Armrest* E00400900365
To adjust the armrest angle, tip the armrest forward
and then raise it to the desired position.
To
return the armrest to its original position, raise
it backward. NOTE
Do not stand or sit on the armrest. It could break.
Heated seats*
E00401100667
The heated seats can be operated with the ignition
switch in the “ON” position. 1-Heater high (for quick heating).
2-Heater off.
3-Heater low (to keep the seat warm).
The
indication lamp (A) will illuminate while the
heater is on. Seat and seat belts
2-06
2
Presented by http://mmc-manuals.ru/ \251
Page 54 of 273
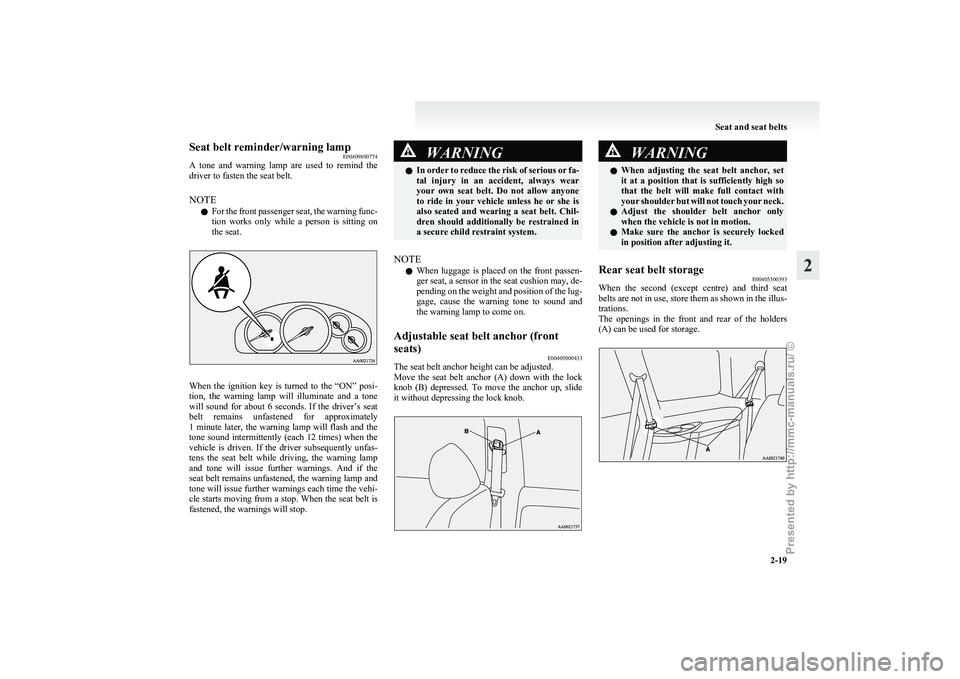
Seat belt reminder/warning lamp
E00409800774
A
tone and warning lamp are used to remind the
driver to fasten the seat belt.
NOTE
l For the front passenger seat, the warning func-
tion works only while a person is sitting on
the seat. When the ignition key is turned to the “ON” posi-
tion,
the warning lamp will illuminate and a tone
will sound for about 6 seconds. If the driver’s seat
belt remains unfastened for approximately
1 minute later, the warning lamp will flash and the
tone sound intermittently (each 12 times) when the
vehicle is driven. If the driver subsequently unfas-
tens the seat belt while driving, the warning lamp
and tone will issue further warnings. And if the
seat belt remains unfastened, the warning lamp and
tone will issue further warnings each time the vehi-
cle starts moving from a stop. When the seat belt is
fastened, the warnings will stop. WARNING
l In
order to reduce the risk of serious or fa-
tal injury in an accident, always wear
your own seat belt. Do not allow anyone
to ride in your vehicle unless he or she is
also seated and wearing a seat belt. Chil-
dren should additionally be restrained in
a secure child restraint system.
NOTE l When
luggage is placed on the front passen-
ger seat, a sensor in the seat cushion may, de-
pending on the weight and position of the lug-
gage, cause the warning tone to sound and
the warning lamp to come on.
Adjustable seat belt anchor (front
seats) E00405000433
The seat belt anchor height can be adjusted.
Move
the seat belt anchor (A) down with the lock
knob (B) depressed. To move the anchor up, slide
it without depressing the lock knob. WARNING
l When
adjusting the seat belt anchor, set
it at a position that is sufficiently high so
that the belt will make full contact with
your shoulder but will not touch your neck.
l Adjust the shoulder belt anchor only
when the vehicle is not in motion.
l Make sure the anchor is securely locked
in position after adjusting it.
Rear seat belt storage E00405300393
When the second (except centre) and third seat
belts
are not in use, store them as shown in the illus-
trations.
The openings in the front and rear of the holders
(A) can be used for storage. Seat and seat belts
2-19 2
Presented by http://mmc-manuals.ru/ \251
Page 55 of 273
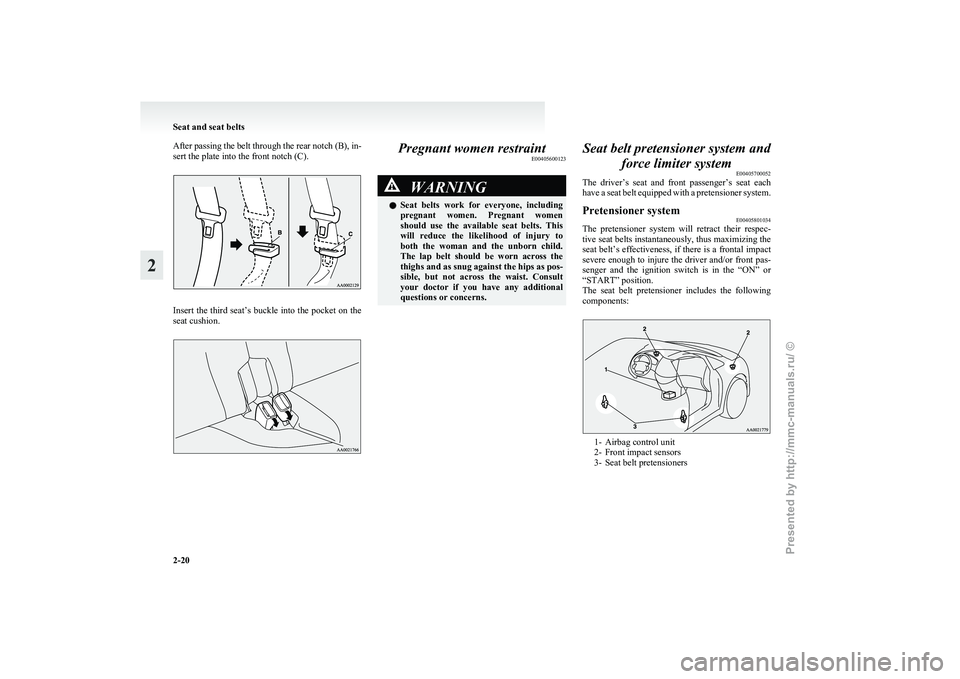
After passing the belt through the rear notch (B), in-
sert the plate into the front notch (C).
Insert the third seat’s buckle into the pocket on the
seat cushion. Pregnant women restraint
E00405600123 WARNING
l Seat belts work for everyone, including
pregnant women. Pregnant women
should use the available seat belts. This
will reduce the likelihood of injury to
both the woman and the unborn child.
The lap belt should be worn across the
thighs and as snug against the hips as pos-
sible, but not across the waist. Consult
your doctor if you have any additional
questions or concerns. Seat belt pretensioner system and
force limiter system E00405700052
The
driver’s seat and front passenger’s seat each
have a seat belt equipped with a pretensioner system.
Pretensioner system E00405801034
The pretensioner system will retract their respec-
tive
seat belts instantaneously, thus maximizing the
seat belt’s effectiveness, if there is a frontal impact
severe enough to injure the driver and/or front pas-
senger and the ignition switch is in the “ON” or
“START” position.
The seat belt pretensioner includes the following
components: 1- Airbag control unit
2-
Front impact sensors
3- Seat belt pretensioners Seat and seat belts
2-20
2
Presented by http://mmc-manuals.ru/ \251
Page 67 of 273
WARNING
l Extreme Hazard!
Do
not use a rearward facing child re-
straint on a seat protected by an airbag in
front of it! How the Supplemental Restraint Sys-
tem works
E00407300935
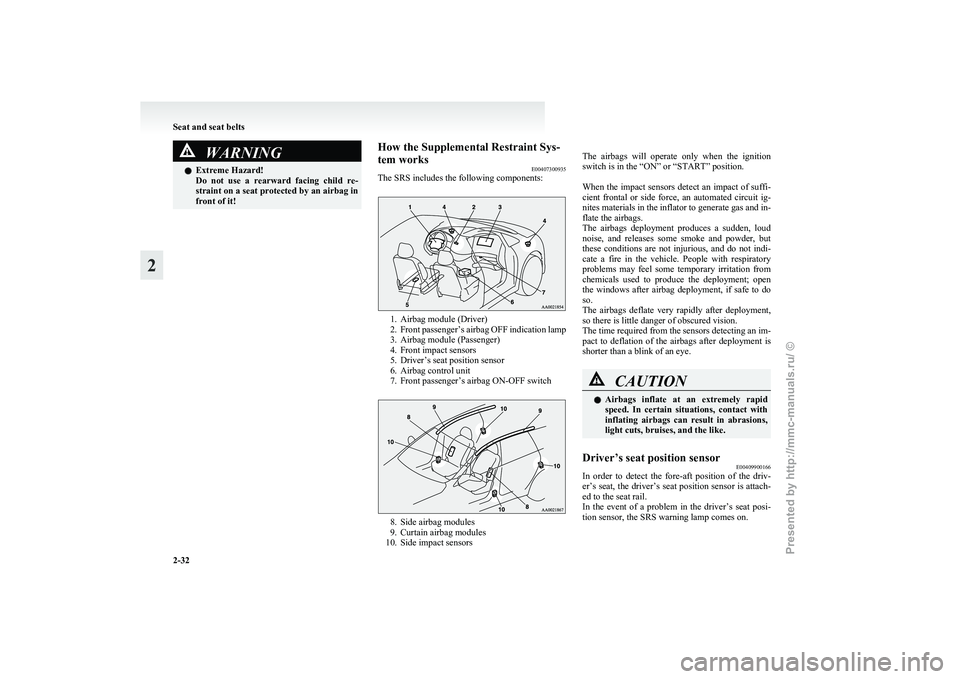
The SRS includes the following components: 1. Airbag module (Driver)
2. Front
passenger’s airbag OFF indication lamp
3. Airbag module (Passenger)
4. Front impact sensors
5. Driver’s seat position sensor
6. Airbag control unit
7. Front passenger’s airbag ON-OFF switch 8. Side airbag modules
9.
Curtain airbag modules
10. Side impact sensors
The
airbags will operate only when the ignition
switch is in the “ON” or “START” position.
When the impact sensors detect an impact of suffi-
cient frontal or side force, an automated circuit ig-
nites materials in the inflator to generate gas and in-
flate the airbags.
The airbags deployment produces a sudden, loud
noise, and releases some smoke and powder, but
these conditions are not injurious, and do not indi-
cate a fire in the vehicle. People with respiratory
problems may feel some temporary irritation from
chemicals used to produce the deployment; open
the windows after airbag deployment, if safe to do
so.
The airbags deflate very rapidly after deployment,
so there is little danger of obscured vision.
The time required from the sensors detecting an im-
pact to deflation of the airbags after deployment is
shorter than a blink of an eye. CAUTION
l
Airbags
inflate at an extremely rapid
speed. In certain situations, contact with
inflating airbags can result in abrasions,
light cuts, bruises, and the like.
Driver’s seat position sensor E00409900166
In order to detect the fore-aft position of the driv-
er’s
seat, the driver’s seat position sensor is attach-
ed to the seat rail.
In the event of a problem in the driver’s seat posi-
tion sensor, the SRS warning lamp comes on. Seat and seat belts
2-32
2
Presented by http://mmc-manuals.ru/ \251
Page 68 of 273
WARNING
l If the SRS warning lamp comes on, we rec-
ommend you to have the vehicle inspec-
ted by a MITSUBISHI MOTORS Author-
ized Service Point as soon as possible.
l Please observe the following instructions
to ensure that the driver’s seat position
sensor can sense the seat position correct-
ly. Otherwise, the dual stage airbags may
not operate correctly.
• Adjust the seat to the correct position,and sit correctly with your back
against the seatback.
Refer to “Front seat” on page 2-05.
• Do not have the seatback reclined more than necessary when driving.
• Do not place metallic objects or lug- gage under the seat.
l If the vehicle suffers a severe impact, we
recommend you to have the sensor inspec-
ted by a MITSUBISHI MOTORS Author-
ized Service Point as soon as possible.
Front passenger’s airbag ON-OFF
switch E00410100214
The front passenger’s airbag ON-OFF
switch can
be used to disable the front passenger’s airbag. If
you have a rearward facing child restraint system
that cannot be fitted to any seat other than the front
passenger seat, be sure to turn OFF the front passen-
ger’s airbag ON-OFF switch before using it. (Refer
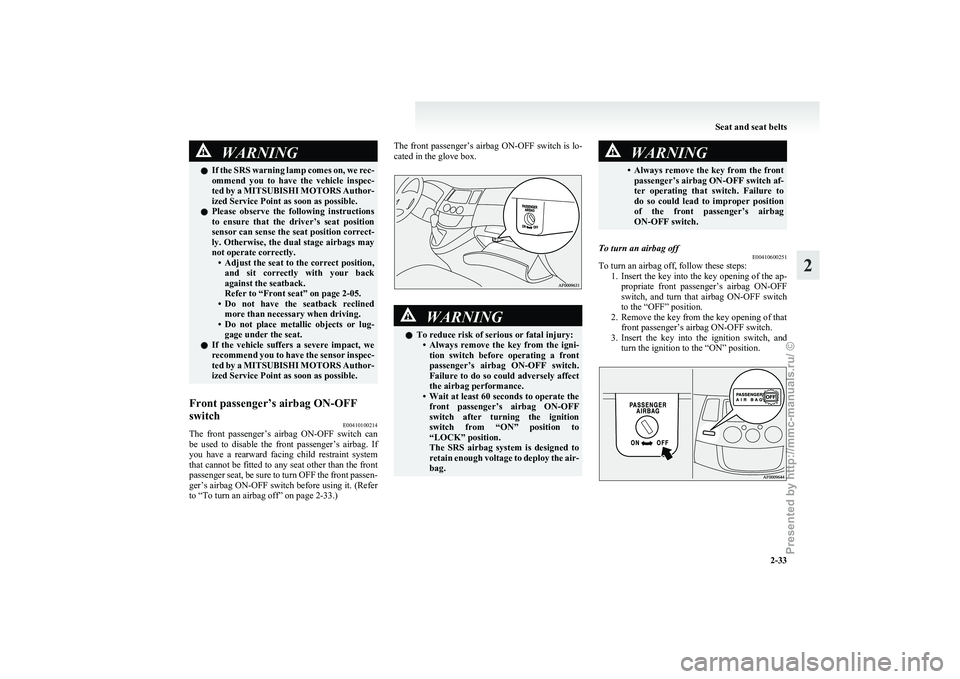
to “To turn an airbag off” on page 2-33.) The front passenger’s airbag ON-OFF
switch is lo-
cated in the glove box. WARNING
l To reduce risk of serious or fatal injury:
• Always
remove the key from the igni-
tion switch before operating a front
passenger’s airbag ON-OFF switch.
Failure to do so could adversely affect
the airbag performance.
• Wait at least 60 seconds to operate the front passenger’s airbag ON-OFF
switch after turning the ignition
switch from “ON” position to
“LOCK” position.
The SRS airbag system is designed to
retain enough voltage to deploy the air-
bag. WARNING
• Always
remove the key from the front passenger’s airbag ON-OFF switch af-
ter operating that switch. Failure to
do so could lead to improper position
of the front passenger’s airbag
ON-OFF switch.
To turn an airbag off E00410600251
To turn an airbag off, follow these steps:
1. Insert
the key into the key opening of the ap-
propriate front passenger’s airbag ON-OFF
switch, and turn that airbag ON-OFF switch
to the “OFF” position.
2. Remove the key from the key opening of that front passenger’s airbag ON-OFF switch.
3. Insert the key into the ignition switch, and turn the ignition to the “ON” position. Seat and seat belts
2-33 2
Presented by http://mmc-manuals.ru/ \251