MITSUBISHI I-MIEV 2011 Owners Manual
I-MIEV 2011
MITSUBISHI
MITSUBISHI
https://www.carmanualsonline.info/img/19/58142/w960_58142-0.png
MITSUBISHI I-MIEV 2011 Owners Manual
Trending: bonnet, change wheel, run flat, ECU, turn signal, seat, flat tire
Page 171 of 193
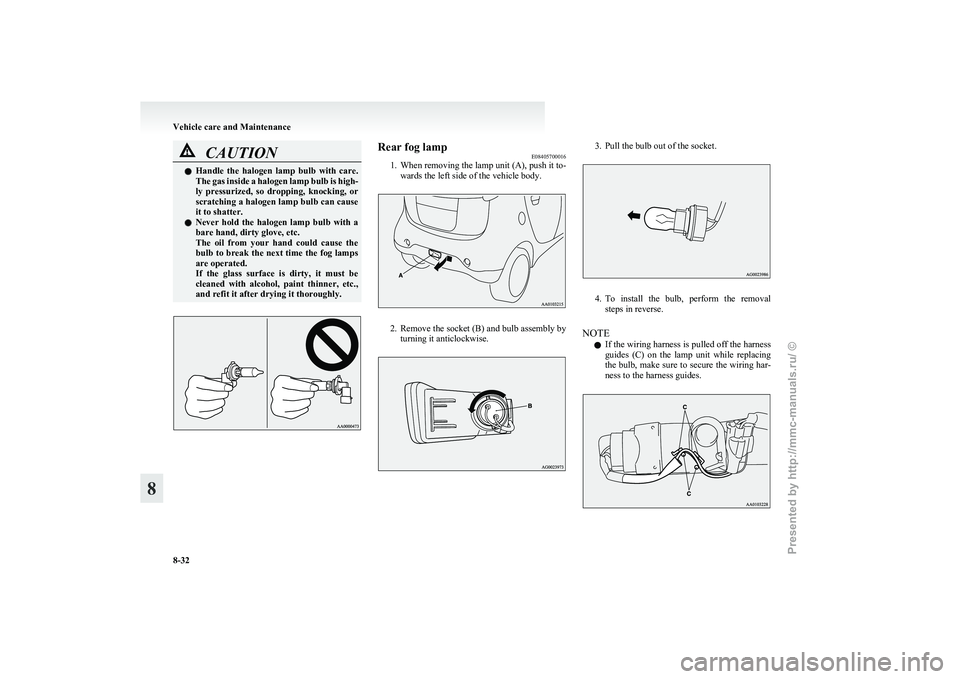
CAUTION
l
Handle the halogen lamp bulb with care.
The gas inside a halogen lamp bulb is high-
ly pressurized, so dropping, knocking, or
scratching a halogen lamp bulb can cause
it to shatter.
l Never hold the halogen lamp bulb with a
bare hand, dirty glove, etc.
The oil from your hand could cause the
bulb to break the next time the fog lamps
are operated.
If the glass surface is dirty, it must be
cleaned with alcohol, paint thinner, etc.,
and refit it after drying it thoroughly. Rear fog lamp
E08405700016
1.
When removing the lamp unit (A), push it to-wards the left side of the vehicle body. 2. Remove
the socket (B) and bulb assembly by
turning it anticlockwise. 3. Pull the bulb out of the socket.
4. To
install the bulb, perform the removal
steps in reverse.
NOTE l If the wiring harness is pulled off the harness
guides (C) on the lamp unit while replacing
the bulb, make sure to secure the wiring har-
ness to the harness guides. Vehicle care and Maintenance
8-32
8
Presented by http://mmc-manuals.ru/ \251
Page 172 of 193
l
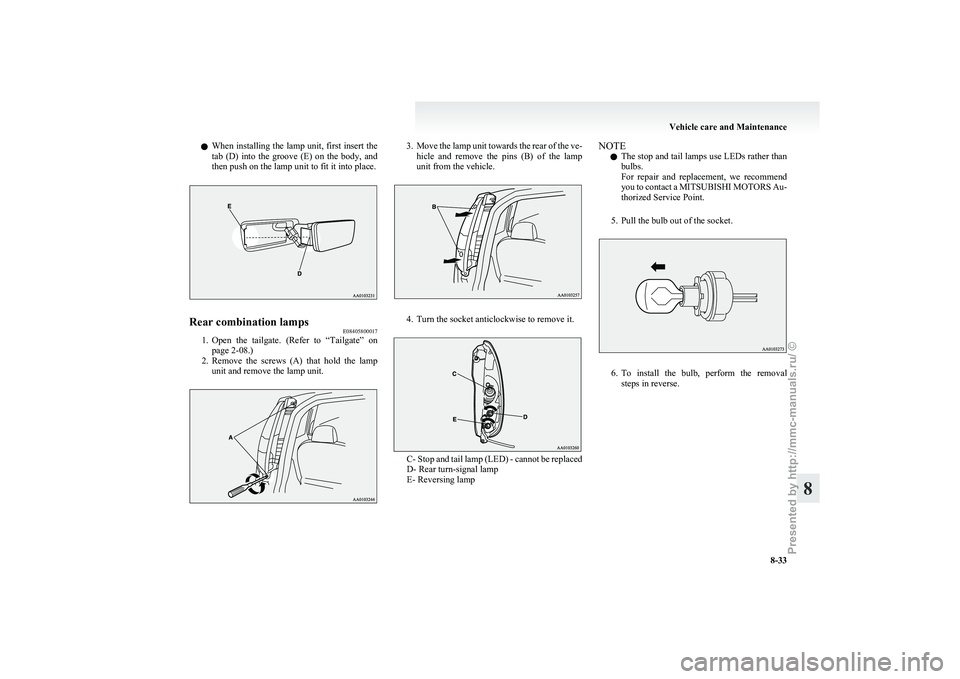
When installing the lamp unit, first insert the
tab (D) into the groove (E) on the body, and
then push on the lamp unit to fit it into place. Rear combination lamps
E08405800017
1. Open
the tailgate. (Refer to “Tailgate” on
page 2-08.)
2. Remove the screws (A) that hold the lamp unit and remove the lamp unit. 3. Move
the lamp unit towards the rear of the ve-
hicle and remove the pins (B) of the lamp
unit from the vehicle. 4. Turn the socket anticlockwise to remove it.
C- Stop and tail lamp (LED) - cannot be replaced
D- Rear turn-signal lamp
E- Reversing lampNOTE
l The
stop and tail lamps use LEDs rather than
bulbs.
For repair and replacement, we recommend
you to contact a MITSUBISHI MOTORS Au-
thorized Service Point.
5. Pull the bulb out of the socket. 6. To
install the bulb, perform the removal
steps in reverse. Vehicle care and Maintenance
8-33 8
Presented by http://mmc-manuals.ru/ \251
Page 173 of 193
High-mounted stop lamp
E08406000016
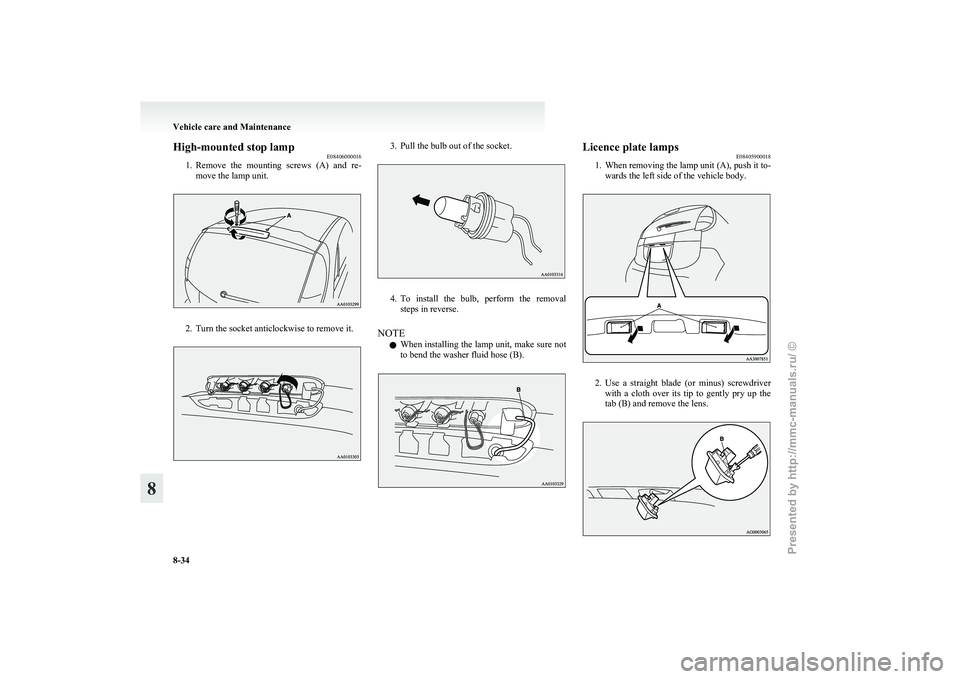
1. Remove
the mounting screws (A) and re-
move the lamp unit. 2. Turn the socket anticlockwise to remove it. 3. Pull the bulb out of the socket.
4. To
install the bulb, perform the removal
steps in reverse.
NOTE l When installing the lamp unit, make sure not
to bend the washer fluid hose (B). Licence plate lamps
E08405900018
1.
When removing the lamp unit (A), push it to-wards the left side of the vehicle body. 2. Use
a straight blade (or minus) screwdriver
with a cloth over its tip to gently pry up the
tab (B) and remove the lens. Vehicle care and Maintenance
8-34
8
Presented by http://mmc-manuals.ru/ \251
Page 174 of 193
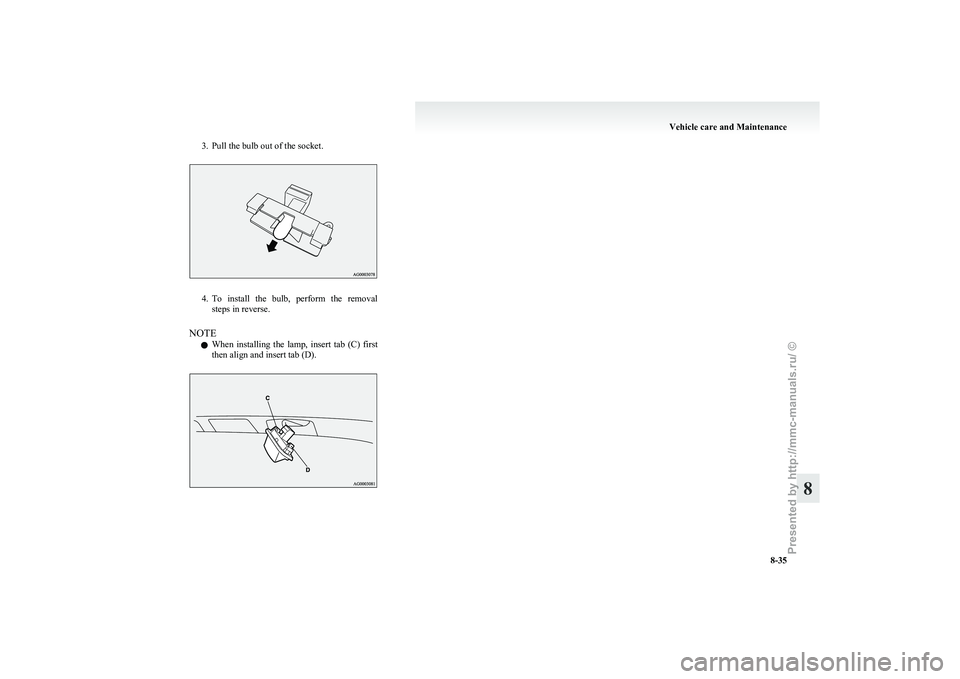
3. Pull the bulb out of the socket.
4. To install the bulb, perform the removal
steps in reverse.
NOTE l When installing the lamp, insert tab (C) first
then align and insert tab (D). Vehicle care and Maintenance
8-35 8
Presented by http://mmc-manuals.ru/ \251
Page 175 of 193
Presented by http://mmc-manuals.ru/ \251
Page 176 of 193
Vehicle labeling
............................................................................ 9-02
Vehicle dimensions....................................................................... 9-03
Electric motor specifications ........................................................ 9-04
Low voltage electrical system ...................................................... 9-04
Tyres and wheels.......................................................................... 9-05
Electric energy consumption ........................................................ 9-06
Refill capacities ............................................................................ 9-07Specifications
9
Presented by http://mmc-manuals.ru/ \251
Page 177 of 193
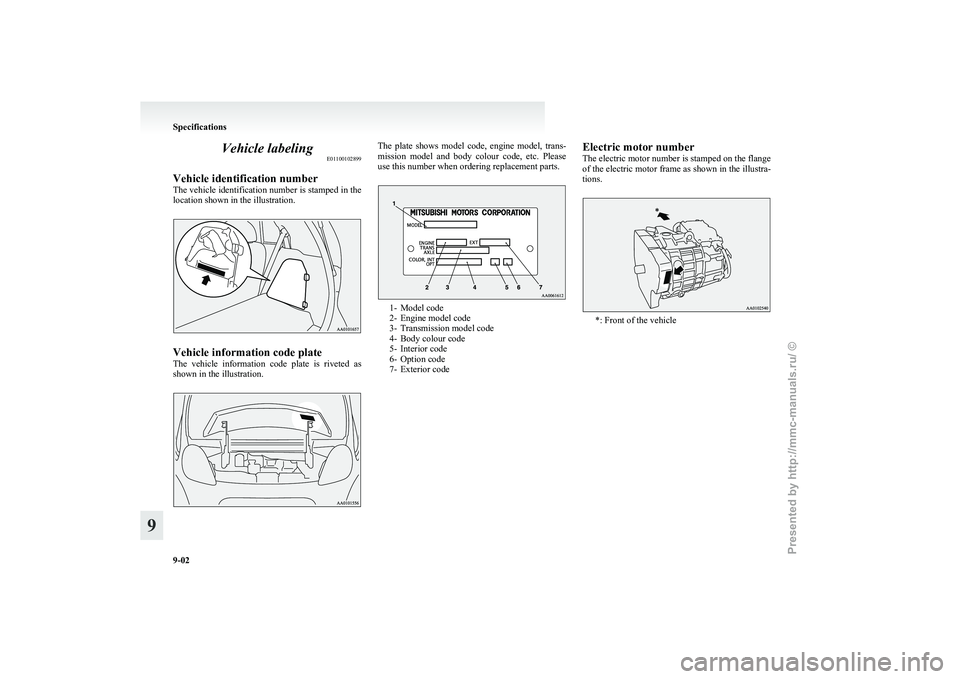
Vehicle labeling
E01100102899
Vehicle identification number
The
vehicle identification number is stamped in the
location shown in the illustration. Vehicle information code plate
The
vehicle information code plate is riveted as
shown in the illustration. The plate shows model code, engine model, trans-
mission
model and body colour code, etc. Please
use this number when ordering replacement parts. 1- Model code
2-
Engine model code
3- Transmission model code
4- Body colour code
5- Interior code
6- Option code
7- Exterior code Electric motor number
The electric motor number is stamped on the flange
of
the electric motor frame as shown in the illustra-
tions. *: Front of the vehicleSpecifications
9-02
9
Presented by http://mmc-manuals.ru/ \251
Page 178 of 193
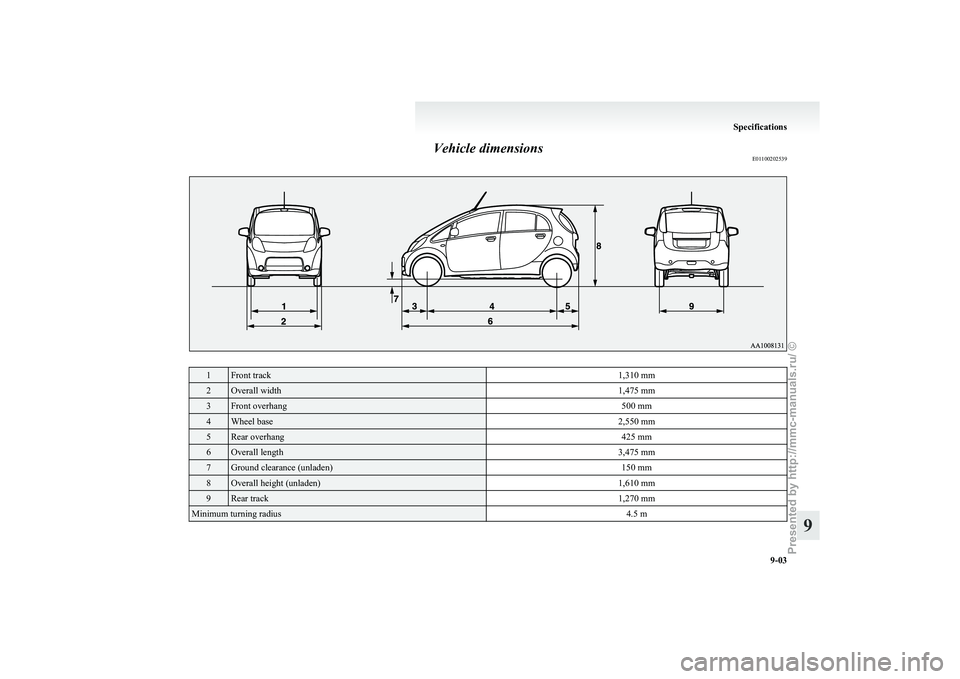
Vehicle dimensions
E011002025391 Front track
1,310 mm2 Overall width
1,475 mm3 Front overhang
500 mm4 Wheel base
2,550 mm5 Rear overhang
425 mm6 Overall length
3,475 mm7 Ground clearance (unladen)
150 mm8 Overall height (unladen)
1,610 mm9 Rear track
1,270 mmMinimum turning radius
4.5 m Specifications
9-03 9
Presented by http://mmc-manuals.ru/ \251
Page 179 of 193
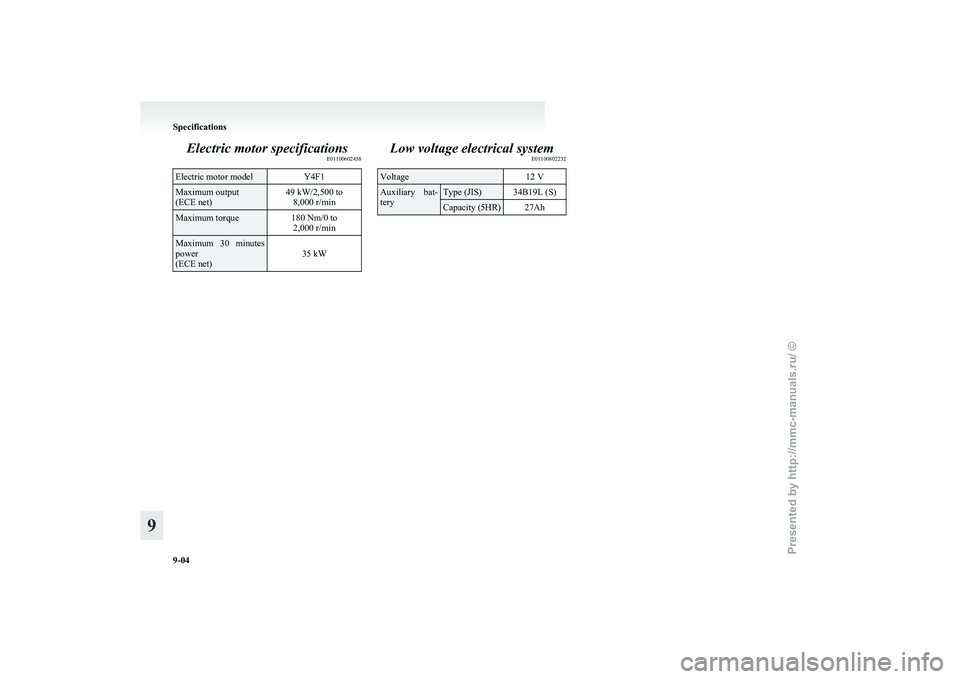
Electric motor specifications
E01100602458Electric motor model
Y4F1Maximum output
(ECE net)
49 kW/2,500 to
8,000 r/min Maximum torque
180 Nm/0 to
2,000 r/min Maximum 30 minutes
power
(ECE net)
35 kW Low voltage electrical system
E01100802232 Voltage
12 V Auxiliary bat-
tery Type (JIS) 34B19L (S)
Capacity (5HR) 27AhSpecifications
9-04
9
Presented by http://mmc-manuals.ru/ \251
Page 180 of 193
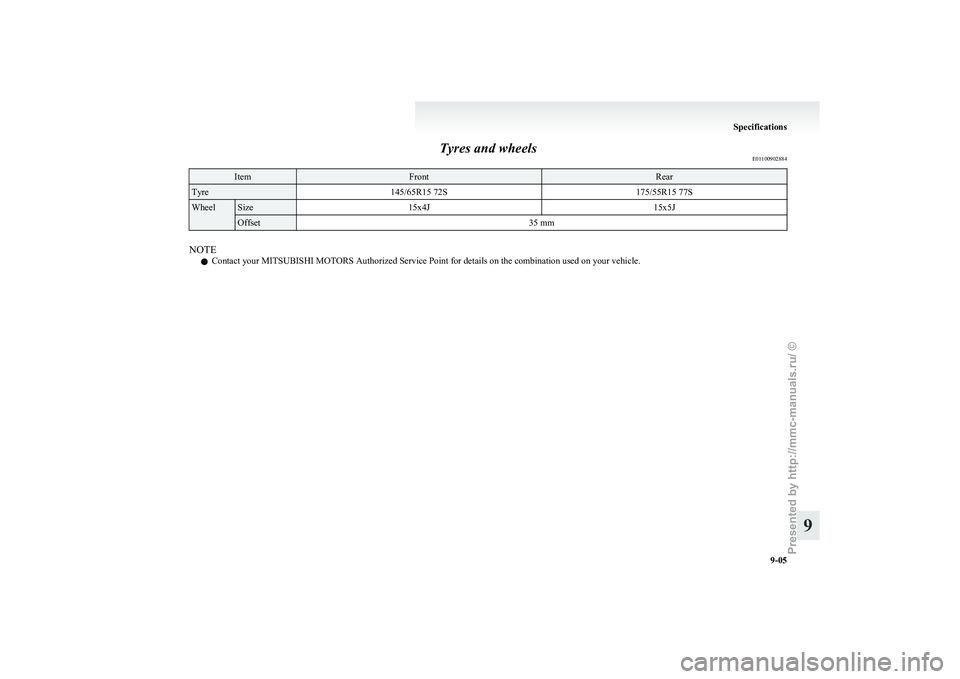
Tyres and wheels
E01100902884Item Front Rear
Tyre
145/65R15 72S 175/55R15 77SWheel Size
15x4J 15x5JOffset
35 mmNOTE
l Contact your MITSUBISHI MOTORS Authorized Service Point for details on the combination used on your vehicle. Specifications
9-05 9
Presented by http://mmc-manuals.ru/ \251
Trending: tyre pressure, radiator, steering wheel adjustment, instrument panel, jump start, oil type, reset

