headlamp MITSUBISHI I-MIEV 2011 User Guide
[x] Cancel search | Manufacturer: MITSUBISHI, Model Year: 2011, Model line: I-MIEV, Model: MITSUBISHI I-MIEV 2011Pages: 193, PDF Size: 12.2 MB
Page 104 of 193
If the ABS warning lamp and brake warning
lamp illuminate at the same time
The
ABS and brake force distribution function may
not work, so hard braking could make the vehicle
unstable.
Avoid hard braking and high-speed driving. Stop
the vehicle in a safe place and we recommend you
to have it checked.
NOTE
l The warning lamp may be illuminated when
the electric motor unit is started while the aux-
iliary battery voltage is low, but this is not an
ABS malfunction.
When the traction battery is charged, the aux-
iliary battery is charged at the same time, and
the warning lamp will go out.
If the warning lamp does not go out or illumi-
nates from time to time even after the battery
is charged, have the vehicle inspected at a
MITSUBISHI MOTORS Authorized Service
Point. After driving on icy roads
E00618800176
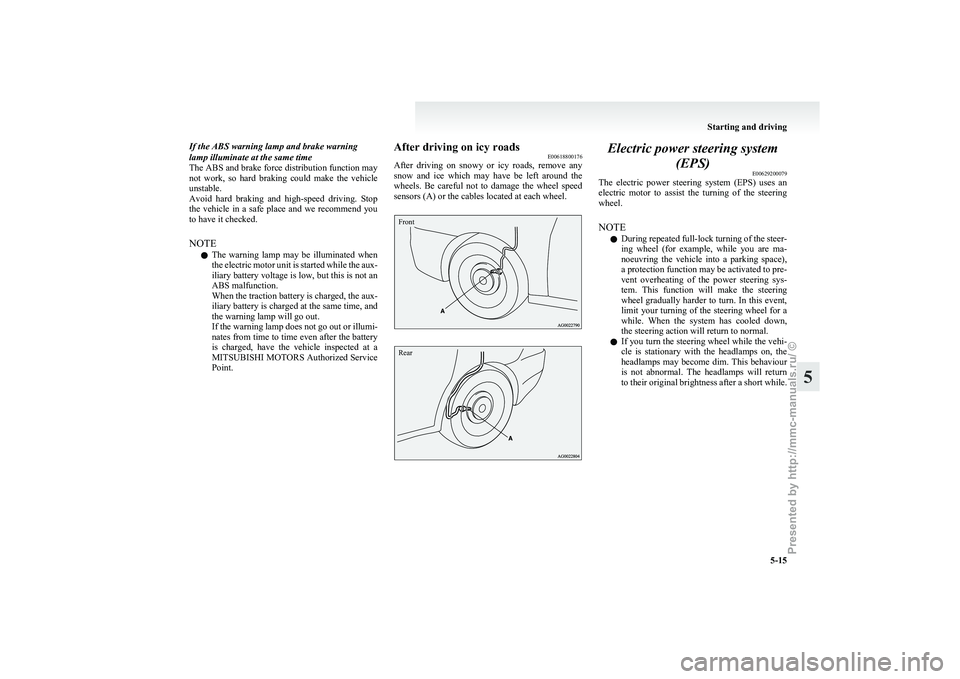
After
driving on snowy or icy roads, remove any
snow and ice which may have be left around the
wheels. Be careful not to damage the wheel speed
sensors (A) or the cables located at each wheel.
Front
Rear Electric power steering system
(EPS) E00629200079
The
electric power steering system (EPS) uses an
electric motor to assist the turning of the steering
wheel.
NOTE
l During repeated full-lock turning of the steer-
ing wheel (for example, while you are ma-
noeuvring the vehicle into a parking space),
a protection function may be activated to pre-
vent overheating of the power steering sys-
tem. This function will make the steering
wheel gradually harder to turn. In this event,
limit your turning of the steering wheel for a
while. When the system has cooled down,
the steering action will return to normal.
l If you turn the steering wheel while the vehi-
cle is stationary with the headlamps on, the
headlamps may become dim. This behaviour
is not abnormal. The headlamps will return
to their original brightness after a short while. Starting and driving
5-15 5
Presented by http://mmc-manuals.ru/ \251
Page 161 of 193
l
The table above shows the main equipment
corresponding to each fuse.
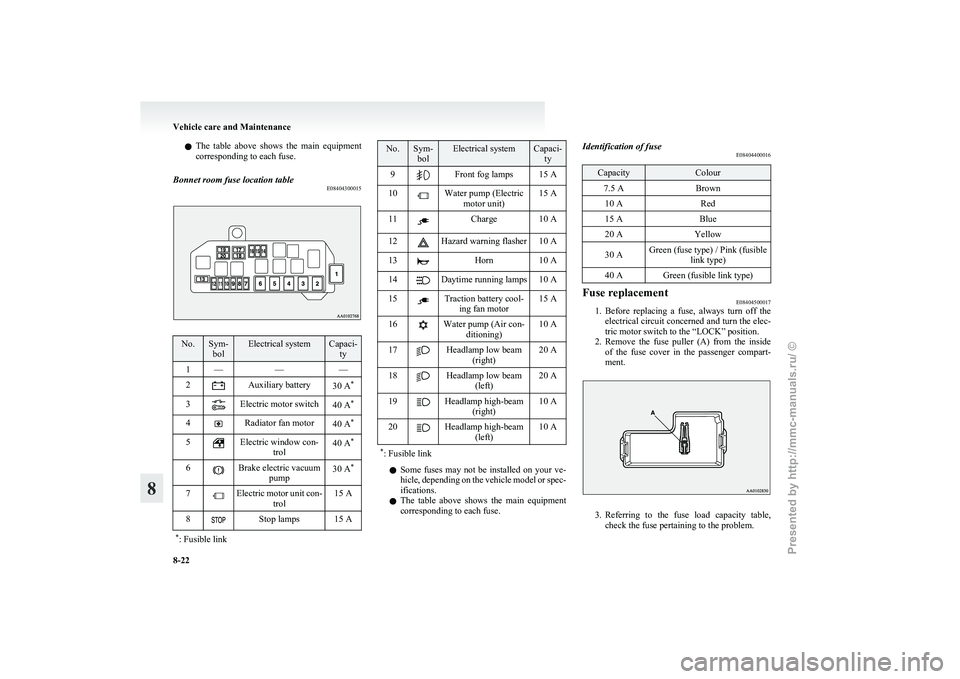
Bonnet room fuse location table E08404300015No. Sym-
bol Electrical system Capaci-
ty
1 — ——
2 Auxiliary battery
30 A*
3 Electric motor switch
40 A*
4 Radiator fan motor
40 A*
5 Electric window con-
trol 40 A
*
6 Brake electric vacuum
pump 30 A
*
7 Electric motor unit con-
trol 15 A
8 Stop lamps 15 A
* : Fusible link No. Sym-
bol Electrical system Capaci-
ty
9 Front fog lamps 15 A
10 Water pump (Electric
motor unit) 15 A
11 Charge 10 A
12 Hazard warning flasher 10 A
13 Horn 10 A
14 Daytime running lamps 10 A
15 Traction battery cool-
ing fan motor 15 A
16 Water pump (Air con-
ditioning) 10 A
17 Headlamp low beam
(right) 20 A
18 Headlamp low beam
(left) 20 A
19 Headlamp high-beam
(right) 10 A
20 Headlamp high-beam
(left) 10 A
* : Fusible link l
Some
fuses may not be installed on your ve-
hicle, depending on the vehicle model or spec-
ifications.
l The table above shows the main equipment
corresponding to each fuse. Identification of fuse
E08404400016 Capacity Colour
7.5 A Brown
10 A Red
15 A Blue
20 A Yellow
30 A Green (fuse type) / Pink (fusible
link type)
40 A Green (fusible link type) Fuse replacement
E08404500017
1. Before
replacing a fuse, always turn off the
electrical circuit concerned and turn the elec-
tric motor switch to the “LOCK” position.
2. Remove the fuse puller (A) from the inside of the fuse cover in the passenger compart-
ment. 3. Referring
to the fuse load capacity table,
check the fuse pertaining to the problem. Vehicle care and Maintenance
8-22
8
Presented by http://mmc-manuals.ru/ \251
Page 163 of 193
Outside
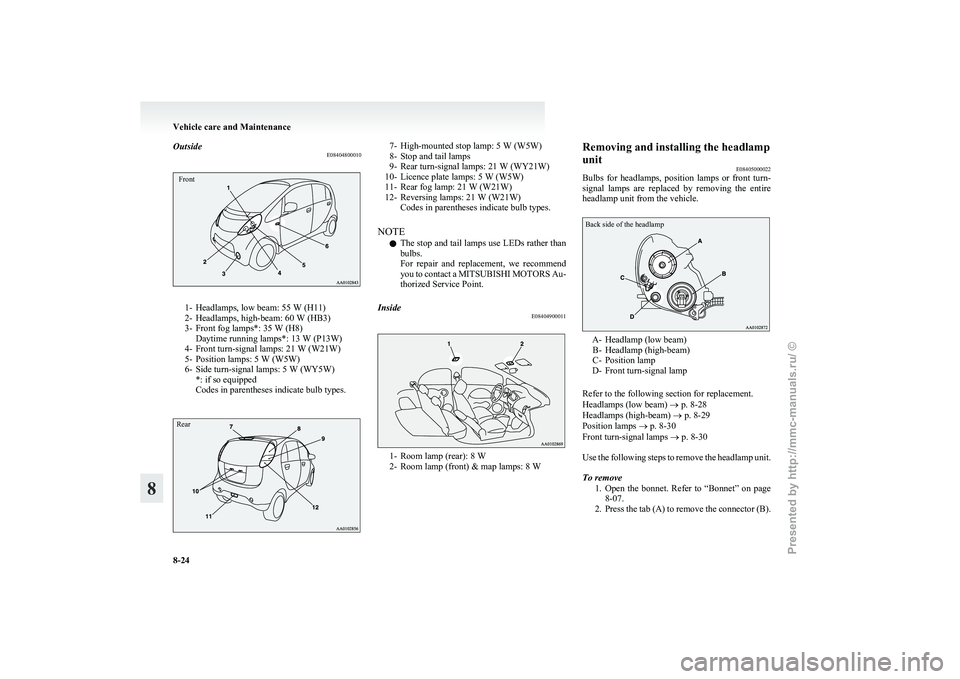
E08404800010Front1- Headlamps, low beam: 55 W (H11)
2-
Headlamps, high-beam: 60 W (HB3)
3- Front fog lamps*: 35 W (H8) Daytime running lamps*: 13 W (P13W)
4- Front turn-signal lamps: 21 W (W21W)
5- Position lamps: 5 W (W5W)
6- Side turn-signal lamps: 5 W (WY5W) *: if so equipped
Codes in parentheses indicate bulb types.
Rear 7- High-mounted stop lamp: 5 W (W5W)
8-
Stop and tail lamps
9- Rear turn-signal lamps: 21 W (WY21W)
10- Licence plate lamps: 5 W (W5W)
11- Rear fog lamp: 21 W (W21W)
12- Reversing lamps: 21 W (W21W) Codes in parentheses indicate bulb types.
NOTE l The stop and tail lamps use LEDs rather than
bulbs.
For repair and replacement, we recommend
you to contact a MITSUBISHI MOTORS Au-
thorized Service Point.
Inside E08404900011 1- Room lamp (rear): 8 W
2-
Room lamp (front) & map lamps: 8 W Removing and installing the headlamp
unit
E08405000022
Bulbs
for headlamps, position lamps or front turn-
signal lamps are replaced by removing the entire
headlamp unit from the vehicle.
Back side of the headlamp A- Headlamp (low beam)
B-
Headlamp (high-beam)
C- Position lamp
D- Front turn-signal lamp
Refer to the following section for replacement.
Headlamps (low beam) ® p. 8-28
Headlamps (high-beam) ® p. 8-29
Position lamps ® p. 8-30
Front turn-signal lamps ® p. 8-30
Use the following steps to remove the headlamp unit.
To remove
1. Open the bonnet. Refer to “Bonnet” on page8-07.
2. Press the tab (A) to remove the connector (B). Vehicle care and Maintenance
8-24
8
Presented by http://mmc-manuals.ru/ \251
Page 164 of 193
NOTE
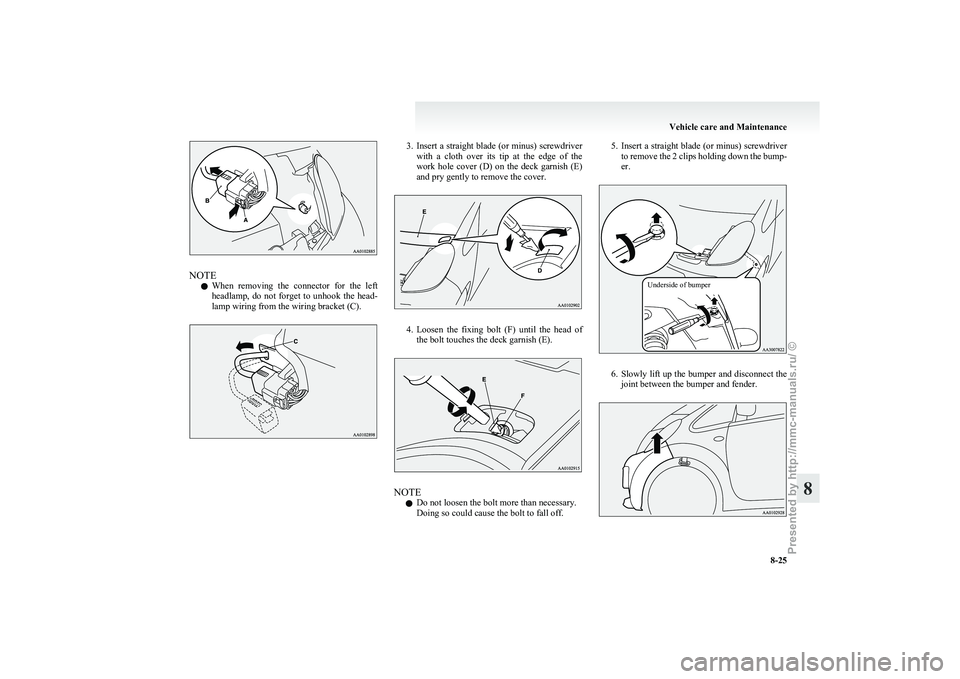
l When
removing the connector for the left
headlamp, do not forget to unhook the head-
lamp wiring from the wiring bracket (C). 3. Insert
a straight blade (or minus) screwdriver
with a cloth over its tip at the edge of the
work hole cover (D) on the deck garnish (E)
and pry gently to remove the cover. 4. Loosen
the fixing bolt (F) until the head of
the bolt touches the deck garnish (E). NOTE
l Do not loosen the bolt more than necessary.
Doing so could cause the bolt to fall off. 5. Insert
a straight blade (or minus) screwdriver
to remove the 2 clips holding down the bump-
er.
Underside of bumper 6. Slowly
lift up the bumper and disconnect the
joint between the bumper and fender. Vehicle care and Maintenance
8-25 8
Presented by http://mmc-manuals.ru/ \251
Page 165 of 193
NOTE
l When
disconnecting the joint, be careful not
to damage surrounding parts.
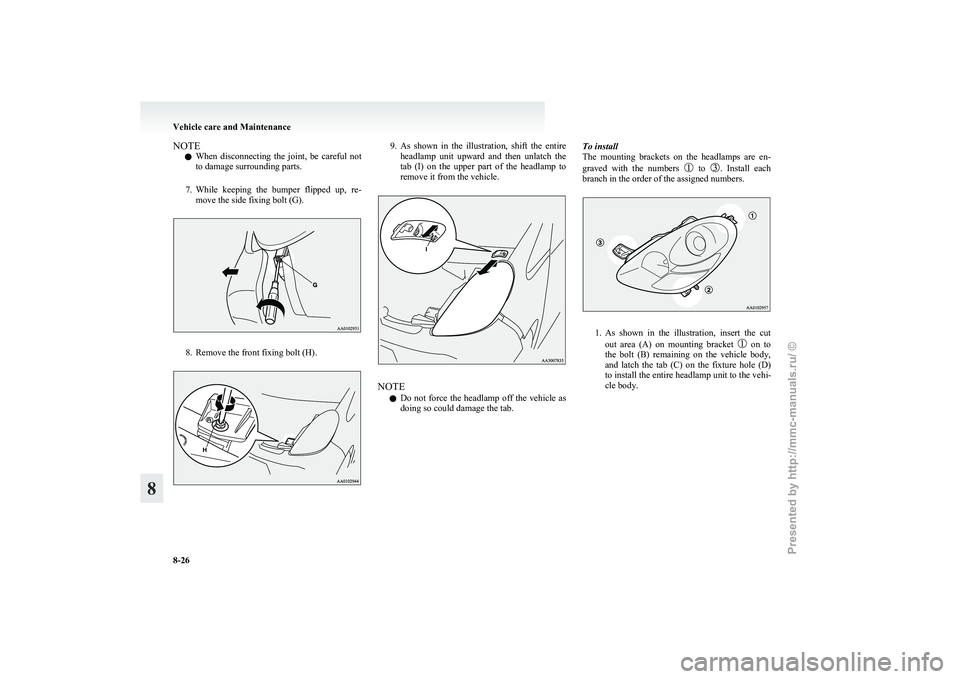
7. While keeping the bumper flipped up, re- move the side fixing bolt (G). 8. Remove the front fixing bolt (H). 9. As shown in the illustration, shift the entire
headlamp unit upward and then unlatch the
tab (I) on the upper part of the headlamp to
remove it from the vehicle. NOTE
l Do
not force the headlamp off the vehicle as
doing so could damage the tab. To install
The
mounting brackets on the headlamps are en-
graved with the numbers to . Install each
branch in the order of the assigned numbers. 1. As
shown in the illustration, insert the cut
out area (A) on mounting bracket on to
the
bolt (B) remaining on the vehicle body,
and latch the tab (C) on the fixture hole (D)
to install the entire headlamp unit to the vehi-
cle body. Vehicle care and Maintenance
8-26
8
Presented by http://mmc-manuals.ru/ \251
Page 166 of 193
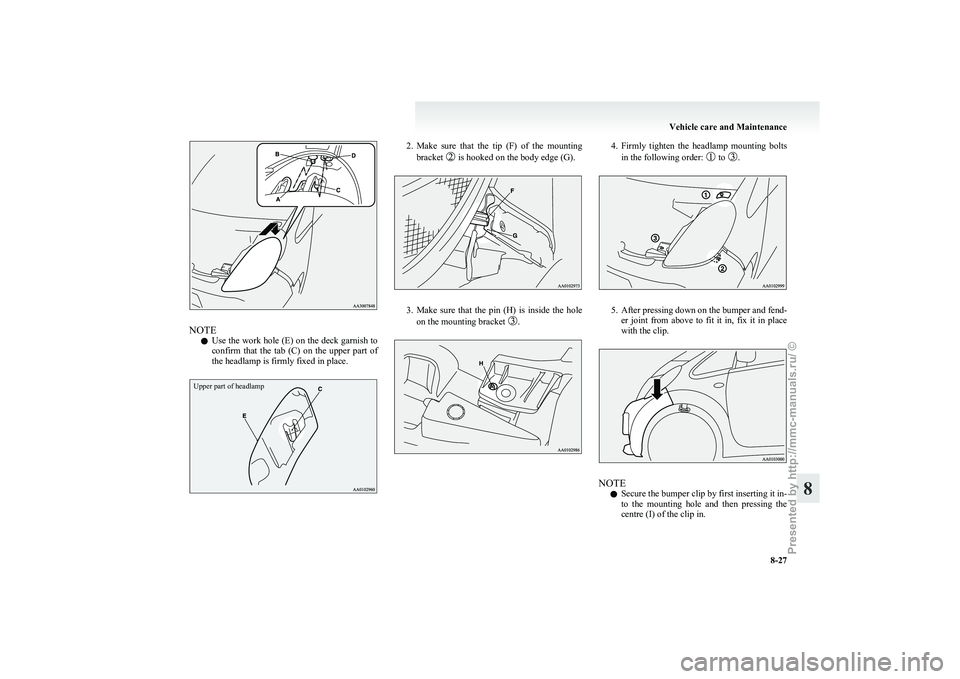
NOTE
l Use
the work hole (E) on the deck garnish to
confirm that the tab (C) on the upper part of
the headlamp is firmly fixed in place.
Upper part of headlamp 2. Make
sure that the tip (F) of the mounting
bracket is hooked on the body edge (G).
3. Make
sure that the pin (H) is inside the hole
on the mounting bracket . 4. Firmly
tighten the headlamp mounting bolts
in the following order: to .
5. After
pressing down on the bumper and fend-
er joint from above to fit it in, fix it in place
with the clip. NOTE
l Secure
the bumper clip by first inserting it in-
to the mounting hole and then pressing the
centre (I) of the clip in. Vehicle care and Maintenance
8-27 8
Presented by http://mmc-manuals.ru/ \251
Page 167 of 193
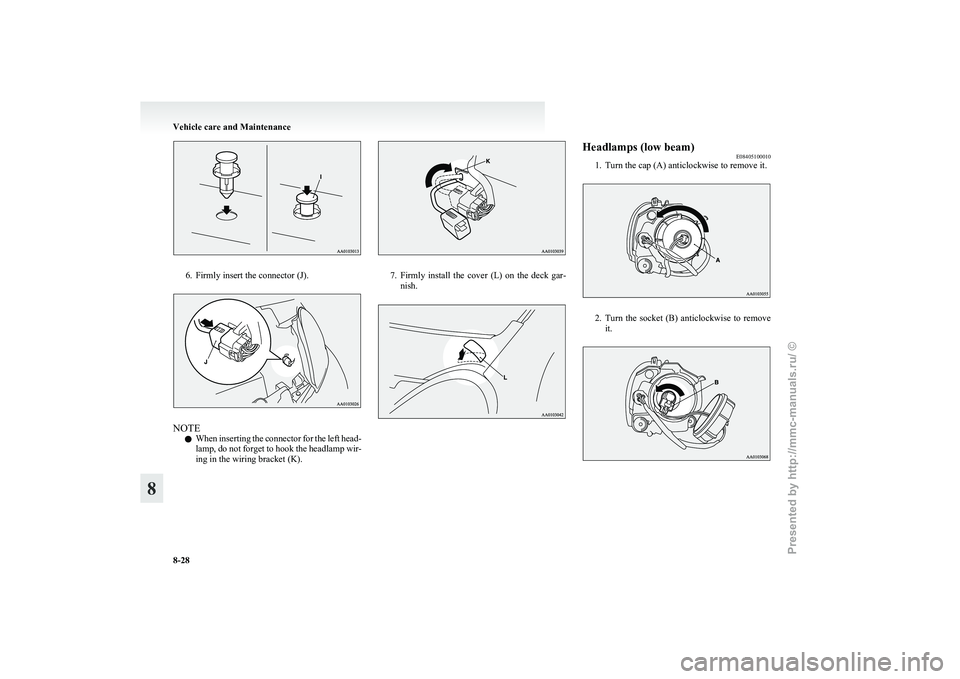
6. Firmly insert the connector (J).
NOTE
l When
inserting the connector for the left head-
lamp, do not forget to hook the headlamp wir-
ing in the wiring bracket (K). 7. Firmly
install the cover (L) on the deck gar-
nish. Headlamps (low beam)
E08405100010
1.
Turn the cap (A) anticlockwise to remove it. 2. Turn
the socket (B) anticlockwise to remove
it. Vehicle care and Maintenance
8-28
8
Presented by http://mmc-manuals.ru/ \251
Page 168 of 193
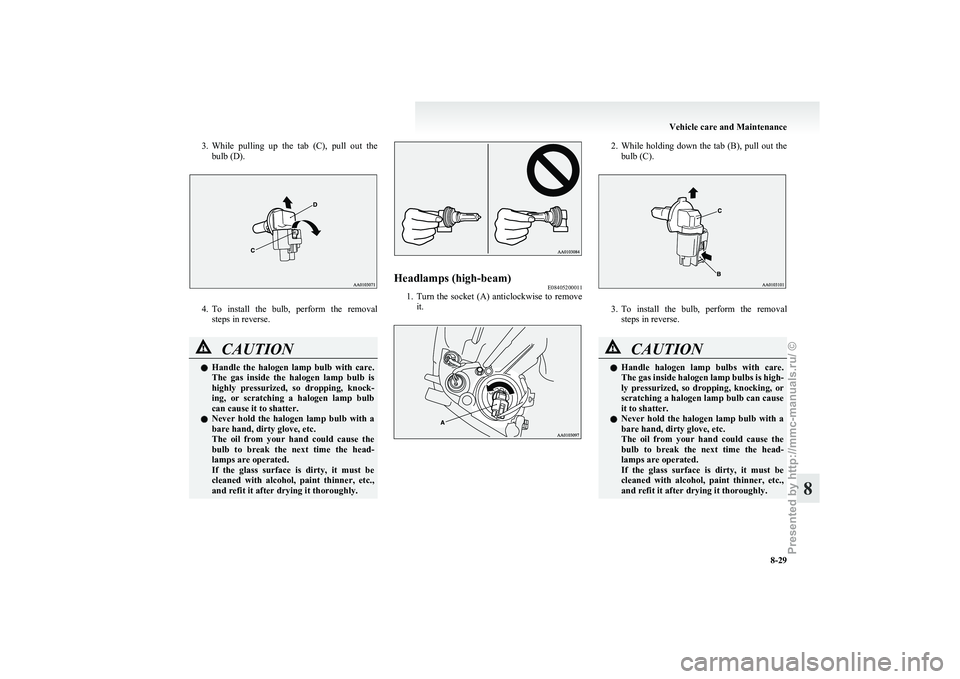
3. While pulling up the tab (C), pull out the
bulb (D). 4. To
install the bulb, perform the removal
steps in reverse. CAUTION
l
Handle
the halogen lamp bulb with care.
The gas inside the halogen lamp bulb is
highly pressurized, so dropping, knock-
ing, or scratching a halogen lamp bulb
can cause it to shatter.
l Never hold the halogen lamp bulb with a
bare hand, dirty glove, etc.
The oil from your hand could cause the
bulb to break the next time the head-
lamps are operated.
If the glass surface is dirty, it must be
cleaned with alcohol, paint thinner, etc.,
and refit it after drying it thoroughly. Headlamps (high-beam)
E08405200011
1. Turn
the socket (A) anticlockwise to remove
it. 2. While
holding down the tab (B), pull out the
bulb (C). 3. To
install the bulb, perform the removal
steps in reverse. CAUTION
l
Handle
halogen lamp bulbs with care.
The gas inside halogen lamp bulbs is high-
ly pressurized, so dropping, knocking, or
scratching a halogen lamp bulb can cause
it to shatter.
l Never hold the halogen lamp bulb with a
bare hand, dirty glove, etc.
The oil from your hand could cause the
bulb to break the next time the head-
lamps are operated.
If the glass surface is dirty, it must be
cleaned with alcohol, paint thinner, etc.,
and refit it after drying it thoroughly. Vehicle care and Maintenance
8-29 8
Presented by http://mmc-manuals.ru/ \251
Page 184 of 193
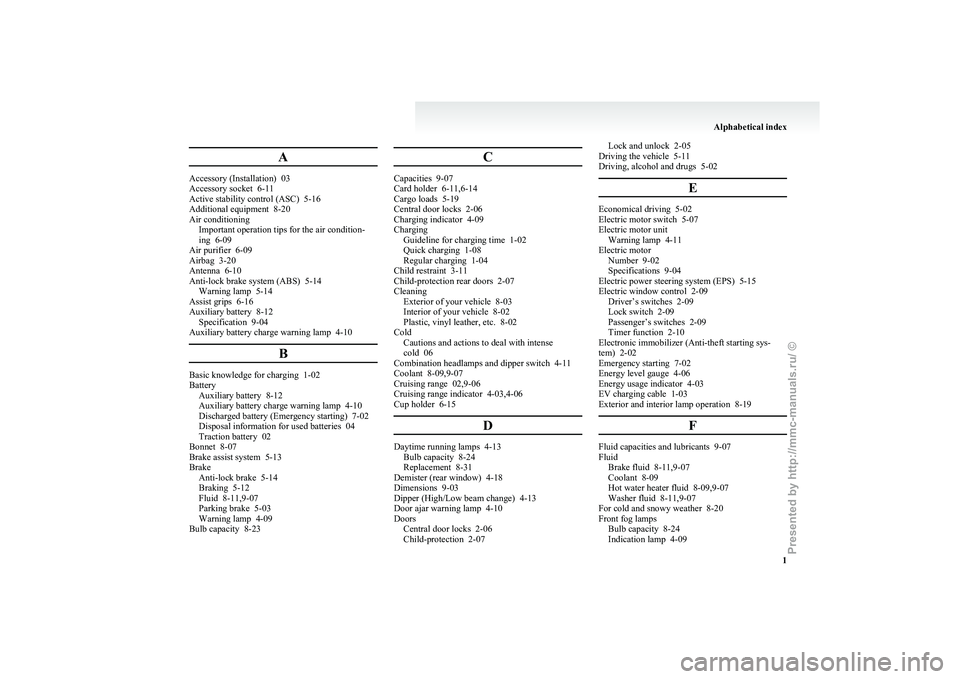
A
Accessory (Installation) 03
Accessory socket 6-11
Active stability control (ASC)
5-16
Additional equipment 8-20
Air conditioning Important operation tips for the air condition-
ing 6-09
Air purifier 6-09
Airbag 3-20
Antenna 6-10
Anti-lock brake system (ABS) 5-14 Warning lamp 5-14
Assist grips 6-16
Auxiliary battery 8-12 Specification 9-04
Auxiliary battery charge warning lamp 4-10
BBasic knowledge for charging 1-02
Battery
Auxiliary battery
8-12
Auxiliary battery charge warning lamp 4-10
Discharged battery (Emergency starting) 7-02
Disposal information for used batteries 04
Traction battery 02
Bonnet 8-07
Brake assist system 5-13
Brake Anti-lock brake 5-14
Braking 5-12
Fluid 8-11,9-07
Parking brake 5-03
Warning lamp 4-09
Bulb capacity 8-23 CCapacities 9-07
Card holder 6-11,6-14
Cargo loads 5-19
Central door locks 2-06
Charging indicator
4-09
Charging Guideline for charging time 1-02
Quick charging 1-08
Regular charging 1-04
Child restraint 3-11
Child-protection rear doors 2-07
Cleaning Exterior of your vehicle 8-03
Interior of your vehicle 8-02
Plastic, vinyl leather, etc. 8-02
Cold Cautions and actions to deal with intense
cold 06
Combination headlamps and dipper switch 4-11
Coolant 8-09,9-07
Cruising range 02,9-06
Cruising range indicator 4-03,4-06
Cup holder 6-15
D Daytime running lamps 4-13
Bulb capacity
8-24
Replacement 8-31
Demister (rear window) 4-18
Dimensions 9-03
Dipper (High/Low beam change) 4-13
Door ajar warning lamp 4-10
Doors Central door locks 2-06
Child-protection 2-07 Lock and unlock 2-05
Driving the vehicle
5-11
Driving, alcohol and drugs 5-02
E Economical driving 5-02
Electric motor switch
5-07
Electric motor unit Warning lamp 4-11
Electric motor Number 9-02
Specifications 9-04
Electric power steering system (EPS) 5-15
Electric window control 2-09 Driver’s switches 2-09
Lock switch 2-09
Passenger’s switches 2-09
Timer function 2-10
Electronic immobilizer (Anti-theft starting sys-
tem) 2-02
Emergency starting 7-02
Energy level gauge 4-06
Energy usage indicator 4-03
EV charging cable 1-03
Exterior and interior lamp operation 8-19
F Fluid capacities and lubricants 9-07
Fluid
Brake fluid 8-11,9-07
Coolant 8-09
Hot water heater fluid
8-09,9-07
Washer fluid 8-11,9-07
For cold and snowy weather 8-20
Front fog lamps Bulb capacity 8-24
Indication lamp 4-09 Alphabetical index
1
Presented by http://mmc-manuals.ru/ \251
Page 185 of 193

Replacement 8-31
Switch 4-15
Front room lamp Bulb capacity
8-24
Front seat 3-03
Front turn-signal lamps Bulb capacity 8-24
Replacement 8-30
Fuel Modification/alterations to the electrical sys-
tems 04
Fuses 8-20
Fusible links 8-20
GGauges 4-02,4-08
General maintenance
8-19
General vehicle data 9-03
Genuine parts 04
Glove box 6-14
HHazard warning flasher switch 4-15
Hazard warning indication lamps
4-09
Head restraints 3-07
Headlamp levelling switch 4-13
Headlamps Bulb capacity 8-24
Headlamp flasher 4-13
Replacement 8-24,8-28,8-29
Switch 4-11
Heat Cautions and actions to deal with intense
heat 05
Heated mirror 5-07
Heated seat 3-04
High-beam indication lamp 4-09 High-mounted stop lamp
Bulb capacity
8-24
Replacement 8-34
Hinges and latches lubrication 8-19
Horn switch 4-19
Hot water heater fluid 8-09,9-07
I i-MiEV 02
Cruising range 02
Main features 02
Traction battery
02
If the vehicle breaks down 7-02
Indication and warning lamps 4-08
Indication lamps 4-09
Inside rear-view mirror 5-05
Inspection and maintenance following rough road
operation 5-12
Instruments 4-02
Intense cold Cautions and actions 06
Intense heat Cautions and actions 05
Interior lamps 6-12
J Jump starting (Emergency starting) 7-02
K Keyless entry system 2-03
Keys 2-02
L Labeling 9-02
Lamp monitor buzzer
4-12 Lamps (headlamps, fog lamp, etc.) auto-cutout func-
tion 4-12
Licence plate lamps
Bulb capacity
8-24
Replacement 8-34
Low voltage electrical system 9-04
Lubricants 9-07
M Map lamps 6-12,6-13
Bulb capacity
8-24
Meter illumination control 4-03,4-06
Mirror Inside rear-view mirror 5-05
Outside rear-view mirrors 5-05
Modification/alterations to the electrical sys-
tems 04
O Odometer 4-03,4-04
Oil
Transmission oil 9-07
Operation under adverse driving conditions
7-12
Outside rear-view mirrors 5-05
P Parking 5-04
Parking brake 5-03
Position lamps Bulb capacity
8-24
Indication lamp 4-09
Replacement 8-30
Power down warning lamp 4-11
Precautions to observe when using wipers and wash-
ers 4-18
Pregnant women restraint 3-10 Alphabetical index
2
Presented by http://mmc-manuals.ru/ \251