open bonnet MITSUBISHI I-MIEV 2011 Owners Manual
[x] Cancel search | Manufacturer: MITSUBISHI, Model Year: 2011, Model line: I-MIEV, Model: MITSUBISHI I-MIEV 2011Pages: 193, PDF Size: 12.2 MB
Page 5 of 193
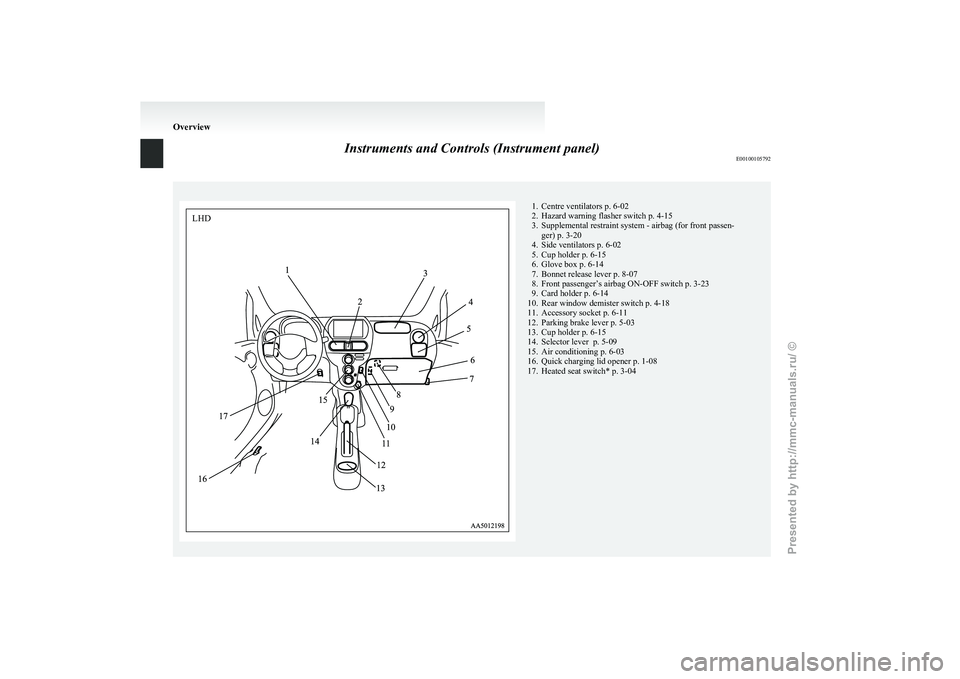
Instruments and Controls (Instrument panel)
E001001057921. Centre ventilators p. 6-02
2.
Hazard warning flasher switch p. 4-15
3. Supplemental restraint system - airbag (for front passen- ger) p. 3-20
4. Side ventilators p. 6-02
5. Cup holder p. 6-15
6. Glove box p. 6-14
7. Bonnet release lever p. 8-07
8. Front passenger’s airbag ON-OFF switch p. 3-23
9. Card holder p. 6-14
10. Rear window demister switch p. 4-18
11. Accessory socket p. 6-11
12. Parking brake lever p. 5-03
13. Cup holder p. 6-15
14. Selector lever p. 5-09
15. Air conditioning p. 6-03
16. Quick charging lid opener p. 1-08
17. Heated seat switch* p. 3-04 OverviewLHD
Presented by http://mmc-manuals.ru/ \251
Page 6 of 193
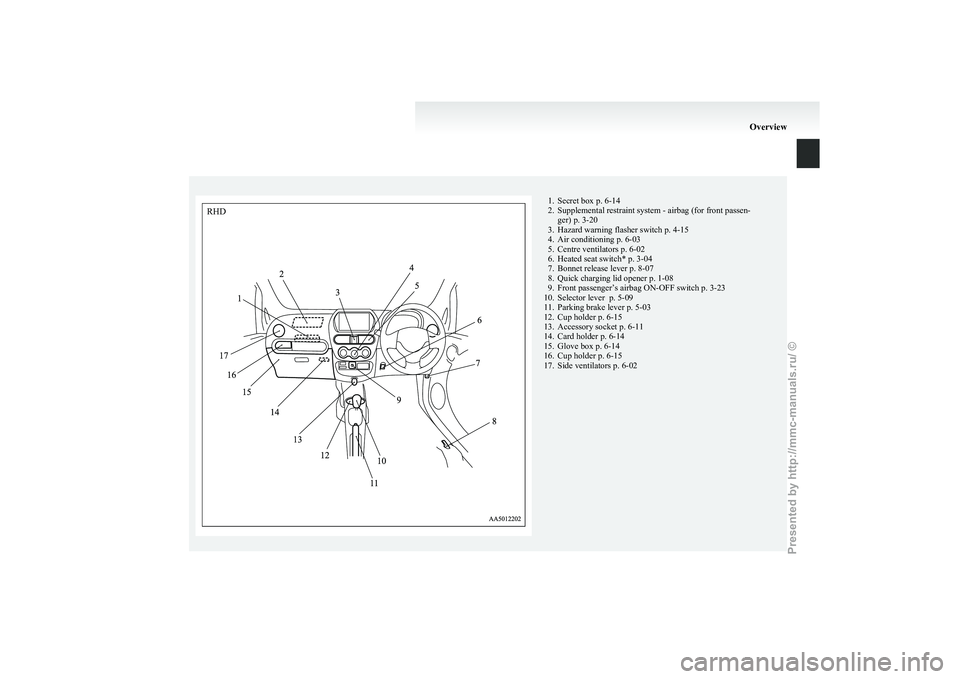
1. Secret box p. 6-14
2.
Supplemental restraint system - airbag (for front passen-ger) p. 3-20
3. Hazard warning flasher switch p. 4-15
4. Air conditioning p. 6-03
5. Centre ventilators p. 6-02
6. Heated seat switch* p. 3-04
7. Bonnet release lever p. 8-07
8. Quick charging lid opener p. 1-08
9. Front passenger’s airbag ON-OFF switch p. 3-23
10. Selector lever p. 5-09
11. Parking brake lever p. 5-03
12. Cup holder p. 6-15
13. Accessory socket p. 6-11
14. Card holder p. 6-14
15. Glove box p. 6-14
16. Cup holder p. 6-15
17. Side ventilators p. 6-02 OverviewRHD
Presented by http://mmc-manuals.ru/ \251
Page 24 of 193
WARNING
• Make sure to use the EV charging ca- ble that comes with the vehicle.
• Do not charge another vehicle using the attached EV charging cable.
Doing so the cable may be heated and
this might result in fire.
• Make sure to use an outlet that is pro- tected from water entering.
• Do not perform charging with the body cover.
• Do not remove and insert plugs with wet hands.
• Do not charge the battery if there is a risk of lightning.
l If abnormal smells are detected or the ve-
hicle produces smoke, quickly stop charg-
ing.
l Do not perform charging at a poorly ven-
tilated place with surroundings covered.
Keep sparks, cigarettes, and flames away
from the auxiliary battery.
Flammable gas generated from the auxili-
ary battery in charging may be filled in a
building, resulting in explosion.
If charging is inevitably required, venti-
late the area well.
l Grasp the regular charging plug when
connecting or disconnecting the EV charg-
ing cable.
Grasping the cable could cause an elec-
tric shock, short circuit, and/or fire. CAUTION
l
Do not perform charging from other pow-
er source like a generator. Doing so could
cause a malfunction.
l During charging, the cooling fans inside
the bonnet room may automatically be op-
erated even if the electric motor switch is
in the “LOCK” position.
Keep your hands away from the cooling
fan during charging.
NOTE l The
on board charger is only for rated AC
220-240 V outlets.
l When connecting or disconnecting the regu-
lar charging plug, insert/pull out the plug
straight.
Also, do not incline or twist the plug.
Doing so could cause a bad connection or mal-
function.
l Make sure to lock the doors to prevent theft,
etc. during charging.
Charging from rated AC 220-240 V
outlet E08301000023
1. Fully
apply the parking brake and place the
selector lever to the “P” (PARK) position.
2. Stop the electric devices such as lamps and turn the electric motor switch to the “LOCK”
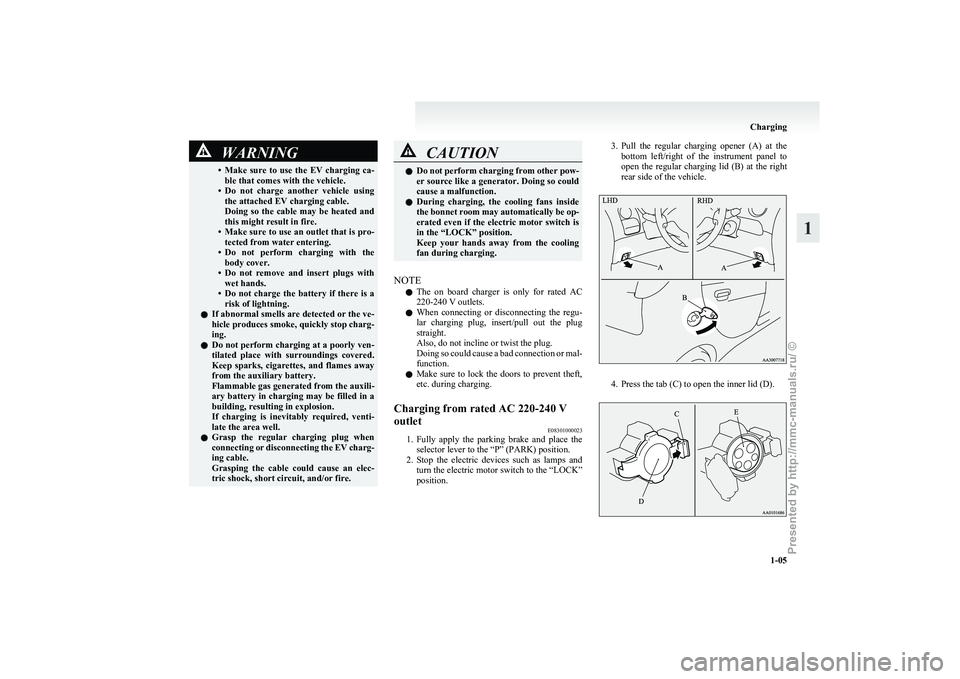
position. 3. Pull
the regular charging opener (A) at the
bottom left/right of the instrument panel to
open the regular charging lid (B) at the right
rear side of the vehicle. 4. Press the tab (C) to open the inner lid (D). Charging
1-05 1
Presented by http://mmc-manuals.ru/ \251
Page 142 of 193
NOTE
l If
genuine leather is wet with water or is wash-
ed in water, wipe off water as quickly as pos-
sible with a dry, soft cloth. If left damp, mil-
dew may grow.
l The genuine leather surface may be damaged
if a nylon brush or synthetic fibre is rubbed
hard against it.
l Organic solvents such as benzine, kerosene,
alcohol and petrol, acid or alkaline solvents
may discolour the genuine leather surface.
Be sure to use neutral detergents.
l Remove dirty patches or oil substances quick-
ly as they can stain genuine leather.
l The genuine leather surface may harden and
shrink if it is exposed to direct sun for long
hours. When your vehicle is parked, place it
in the shade as much as possible. Cleaning the exterior of your
vehicle E08400600010
If
the following is left on your vehicle, it may
cause corrosion, discolouration and stains, wash
the vehicle as soon as possible.
l Seawater, road deicing products.
l Soot and dust, iron powder from factories,
chemical substance (acids, alkalis, coal-tar,
etc.).
l Droppings from birds, carcasses of insects,
tree sap, etc.
Washing E08400700011
Chemicals contained in the dirt and dust picked up
from
the road surface can damage the paint coat
and body of your vehicle if left in prolonged contact.
Frequent washing and waxing is the best way to pro-
tect your vehicle from this damage. This will also
be effective in protecting it from environmental el-
ements such as rain, snow, salt air, etc.
Do not wash the vehicle in direct sunlight. Park the
vehicle in the shade and spray it with water to re-
move dust. Next, using an ample amount of clean
water and a car washing brush or sponge, wash the
vehicle from top to bottom.
Use a mild car washing soap if necessary. Rinse
thoroughly and wipe dry with a soft cloth. After
washing the vehicle, carefully clean the joints and
flanges of the doors, bonnet and other sections
where dirt is likely to remain. WARNING
l Do
not wash the vehicle while charging
the traction battery.
Doing so could cause fire or an electric
shock.
l Before washing the vehicle, make sure
that the charging lid and the inner lid are
completely closed.
If the lid is open, the charging unit is ex-
posed to water, resulting in fire or an elec-
tric shock.
l Do not pour water inside the electric mo-
tor unit room. Doing so could cause fire
or an electric shock.
l When washing the vehicle, turn the elec-
tric motor switch to the “LOCK” position.
l Do not use a high pressure washing ma-
chine to clean the underneath of the vehi-
cle.
Doing so might cause the electric motor
unit problem or malfunction.
l When washing the underside of your vehi-
cle or wheel, be careful not to injure your
hands.
l Refrain from excessively using a car wash
as its brushes may scratch the paint sur-
face, causing it to lose its gloss. Scratches
will be especially visible on darker col-
oured vehicles.
l Never spray or splash water on the electri-
cal components in the bonnet room.
Exercise caution also when washing the
underbody; be careful not to spray water
into the bonnet room.
l Some types of hot water washing equip-
ment apply high pressure and heat to the Vehicle care and Maintenance
8-03 8
Presented by http://mmc-manuals.ru/ \251
Page 145 of 193
Service precautions
E08401700018
Adequate
care of your vehicle at regular intervals
serves to preserve the value and appearance as long
as possible.
Maintenance items as described in this owner’s man-
ual can be performed by the owner.
We recommend you to have the periodic inspection
and maintenance performed by a MITSUBISHI
MOTORS Authorized Service Point or another spe-
cialist.
In the event a malfunction or a problem is discov-
ered, we recommend you to have it checked and re-
paired. Follow the instructions and cautions for
each of the various procedures. WARNING
l Do
not touch any components in the elec-
tric motor unit room other than the re-
serve tank. There are no components re-
quiring inspection other than the reserve
tank. Never remove or disassemble the
component which generates high voltage,
high voltage wire (orange) and its connec-
tor. Doing so could result in serious in-
jury that may risk your life.
These components are affixed with the la-
bel indicating precautions for handling.
Follow the instructions on the label.
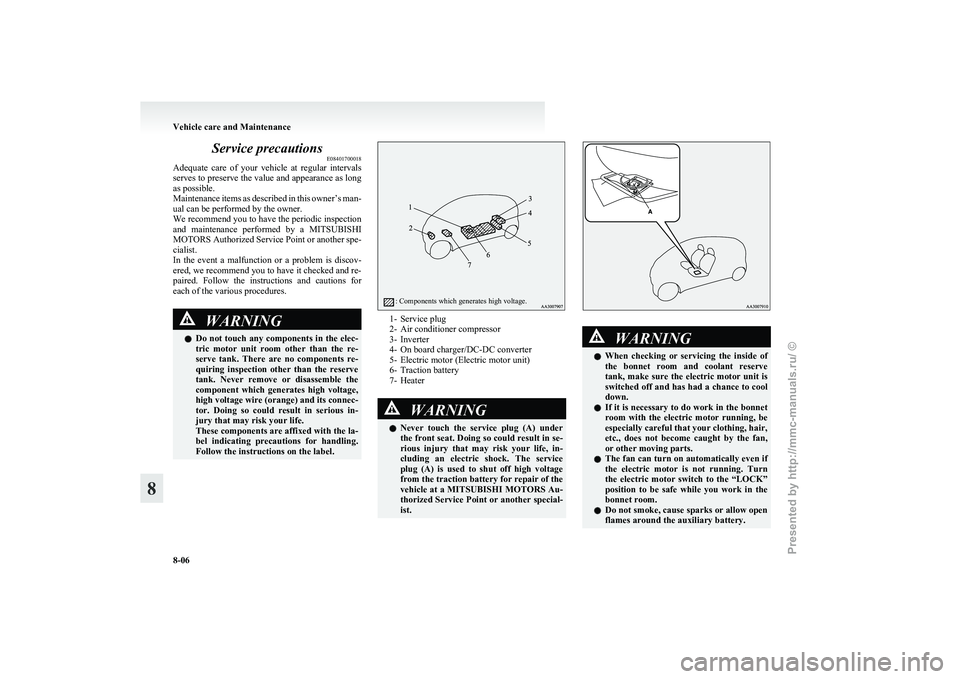
: Components which generates high voltage. 1- Service plug
2-
Air conditioner compressor
3- Inverter
4- On board charger/DC-DC converter
5- Electric motor (Electric motor unit)
6- Traction battery
7- Heater WARNING
l Never
touch the service plug (A) under
the front seat. Doing so could result in se-
rious injury that may risk your life, in-
cluding an electric shock. The service
plug (A) is used to shut off high voltage
from the traction battery for repair of the
vehicle at a MITSUBISHI MOTORS Au-
thorized Service Point or another special-
ist. WARNING
l When
checking or servicing the inside of
the bonnet room and coolant reserve
tank, make sure the electric motor unit is
switched off and has had a chance to cool
down.
l If it is necessary to do work in the bonnet
room with the electric motor running, be
especially careful that your clothing, hair,
etc., does not become caught by the fan,
or other moving parts.
l The fan can turn on automatically even if
the electric motor is not running. Turn
the electric motor switch to the “LOCK”
position to be safe while you work in the
bonnet room.
l Do not smoke, cause sparks or allow open
flames around the auxiliary battery. Vehicle care and Maintenance
8-06
8
Presented by http://mmc-manuals.ru/ \251
Page 146 of 193
WARNING
l Be extremely cautious when working
around the auxiliary battery. It contains
poisonous and corrosive sulphuric acid.
l Improper handling of components and
materials used in the vehicle can endan-
ger your personal safety. We recommend
you to consult a specialist for necessary in-
formation. CAUTION
l
The
components inside the electric motor
unit room might be very hot to touch.
To avoid being burnt, make sure all com-
ponents have sufficiently cooled before be-
ginning an inspection.
These components are affixed with the la-
bel indicating precautions for handling.
Follow the instructions on the label.
l When replacing the auxiliary battery, re-
move the connected positive (+) and nega-
tive (-) terminals after turning the electric
motor switch to the “LOCK” position
and waiting at least 1 minute. If the auxil-
iary battery terminal is removed just af-
ter the electric motor switch is turned to
the “LOCK” position, this may cause dam-
age to components of the electric motor
unit. Bonnet
E08402000018
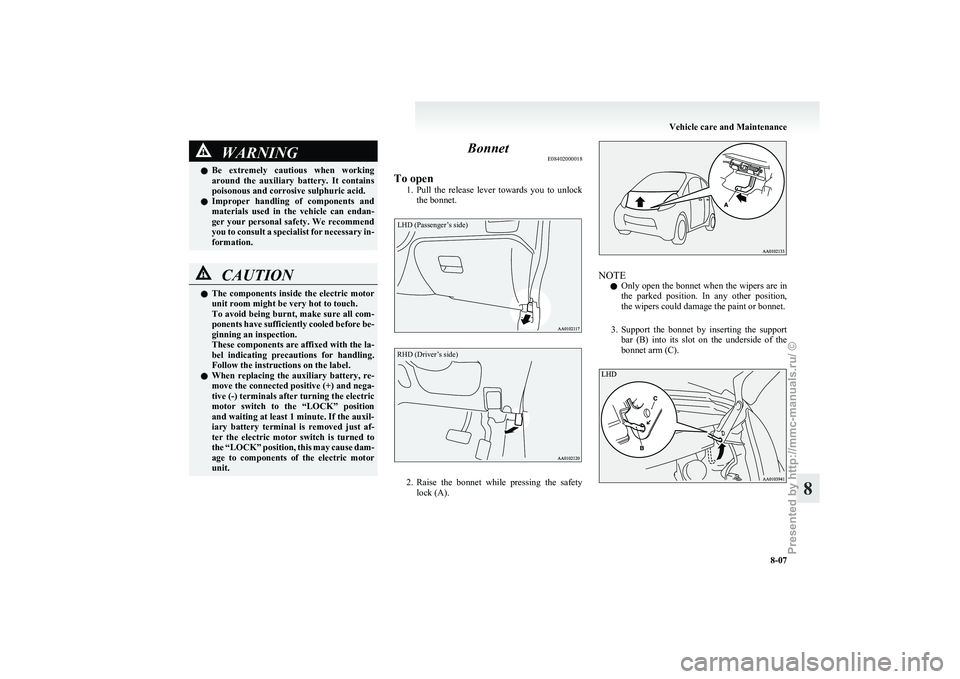
To open 1. Pull
the release lever towards you to unlock
the bonnet.
LHD (Passenger’s side)
RHD (Driver’s side) 2. Raise
the bonnet while pressing the safety
lock (A). NOTE
l Only
open the bonnet when the wipers are in
the parked position. In any other position,
the wipers could damage the paint or bonnet.
3. Support the bonnet by inserting the support bar (B) into its slot on the underside of the
bonnet arm (C). Vehicle care and Maintenance
8-07 8
Presented by http://mmc-manuals.ru/ \251
Page 147 of 193
CAUTION
l
Note that the support bar may disengage
the bonnet if the open bonnet is lifted by
a strong wind.
l After inserting the support bar into the
slot, make sure the bar supports the bon-
net securely from falling down on to your
head or body.
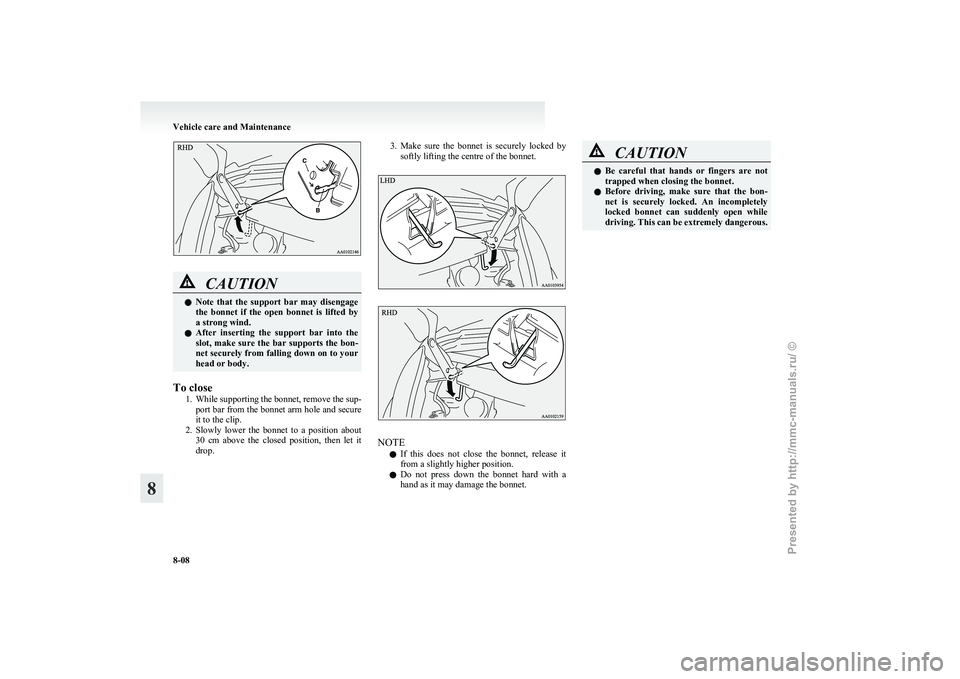
To close 1. While
supporting the bonnet, remove the sup-
port bar from the bonnet arm hole and secure
it to the clip.
2. Slowly lower the bonnet to a position about 30 cm above the closed position, then let it
drop. 3. Make
sure the bonnet is securely locked by
softly lifting the centre of the bonnet. NOTE
l If
this does not close the bonnet, release it
from a slightly higher position.
l Do not press down the bonnet hard with a
hand as it may damage the bonnet. CAUTION
l
Be
careful that hands or fingers are not
trapped when closing the bonnet.
l Before driving, make sure that the bon-
net is securely locked. An incompletely
locked bonnet can suddenly open while
driving. This can be extremely dangerous. Vehicle care and Maintenance
8-08
8
Presented by http://mmc-manuals.ru/ \251
Page 163 of 193
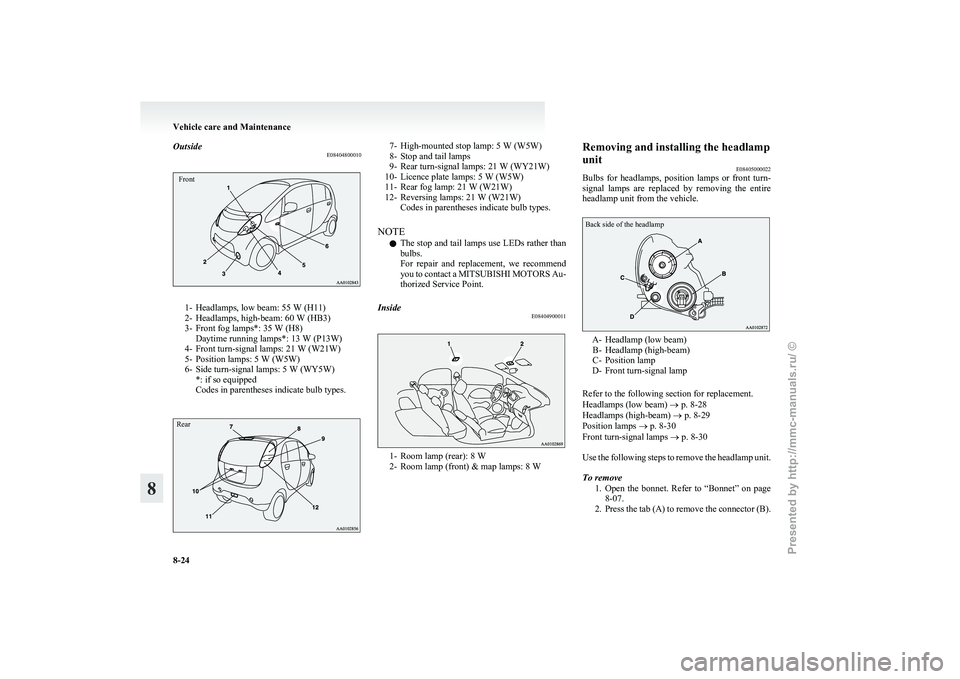
Outside
E08404800010Front1- Headlamps, low beam: 55 W (H11)
2-
Headlamps, high-beam: 60 W (HB3)
3- Front fog lamps*: 35 W (H8) Daytime running lamps*: 13 W (P13W)
4- Front turn-signal lamps: 21 W (W21W)
5- Position lamps: 5 W (W5W)
6- Side turn-signal lamps: 5 W (WY5W) *: if so equipped
Codes in parentheses indicate bulb types.
Rear 7- High-mounted stop lamp: 5 W (W5W)
8-
Stop and tail lamps
9- Rear turn-signal lamps: 21 W (WY21W)
10- Licence plate lamps: 5 W (W5W)
11- Rear fog lamp: 21 W (W21W)
12- Reversing lamps: 21 W (W21W) Codes in parentheses indicate bulb types.
NOTE l The stop and tail lamps use LEDs rather than
bulbs.
For repair and replacement, we recommend
you to contact a MITSUBISHI MOTORS Au-
thorized Service Point.
Inside E08404900011 1- Room lamp (rear): 8 W
2-
Room lamp (front) & map lamps: 8 W Removing and installing the headlamp
unit
E08405000022
Bulbs
for headlamps, position lamps or front turn-
signal lamps are replaced by removing the entire
headlamp unit from the vehicle.
Back side of the headlamp A- Headlamp (low beam)
B-
Headlamp (high-beam)
C- Position lamp
D- Front turn-signal lamp
Refer to the following section for replacement.
Headlamps (low beam) ® p. 8-28
Headlamps (high-beam) ® p. 8-29
Position lamps ® p. 8-30
Front turn-signal lamps ® p. 8-30
Use the following steps to remove the headlamp unit.
To remove
1. Open the bonnet. Refer to “Bonnet” on page8-07.
2. Press the tab (A) to remove the connector (B). Vehicle care and Maintenance
8-24
8
Presented by http://mmc-manuals.ru/ \251