remote control MITSUBISHI iMiEV 2013 (in English) User Guide
[x] Cancel search | Manufacturer: MITSUBISHI, Model Year: 2013, Model line: iMiEV, Model: MITSUBISHI iMiEV 2013Pages: 258, PDF Size: 13 MB
Page 52 of 258
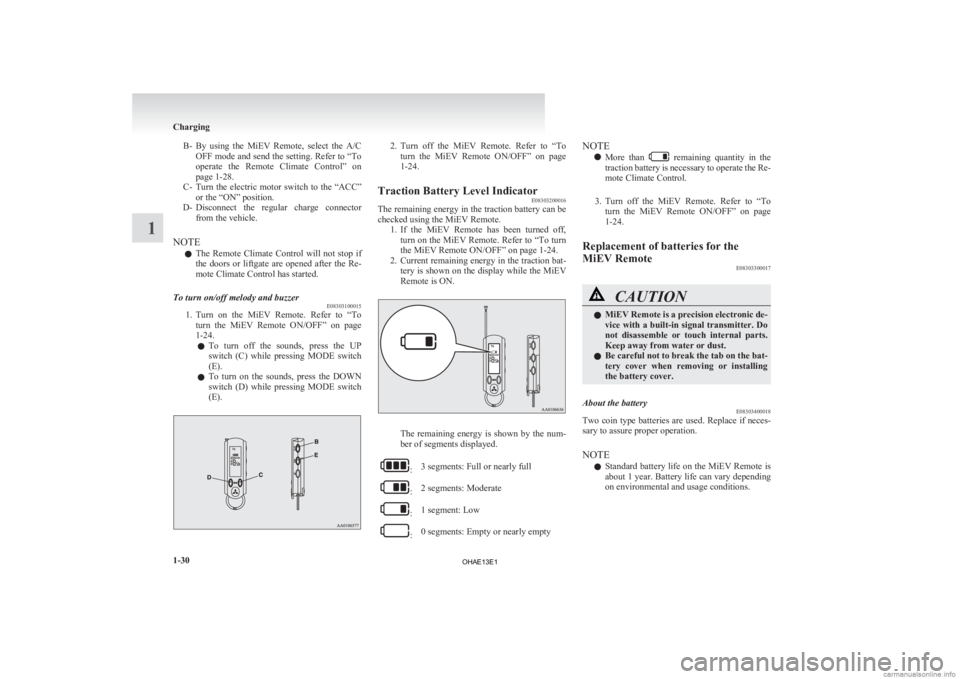
B- By using the MiEV Remote, select the A/C
OFF mode and send the setting. Refer to “To
operate the Remote Climate Control” on
page 1-28.
C- Turn the electric motor switch to the “ACC” or the “ON” position.
D- Disconnect the regular charge connector from the vehicle.
NOTE l The Remote Climate Control will not stop if
the doors or liftgate are opened after the Re-
mote Climate Control has started.
To turn on/off melody and buzzer E08303100015
1. Turn
on the MiEV Remote. Refer to “To
turn the MiEV Remote ON/OFF” on page
1-24.
l To turn off the sounds, press the UP
switch (C) while pressing MODE switch
(E).
l To turn on the sounds, press the DOWN
switch (D) while pressing MODE switch
(E). 2. Turn
off the MiEV Remote. Refer to “To
turn the MiEV Remote ON/OFF” on page
1-24.
Traction Battery Level Indicator E08303200016
The remaining energy in the traction battery can be
checked using the MiEV Remote.
1. If
the MiEV Remote has been turned off,
turn on the MiEV Remote. Refer to “To turn
the MiEV Remote ON/OFF” on page 1-24.
2. Current remaining energy in the traction bat- tery is shown on the display while the MiEV
Remote is ON. The remaining energy is shown by the num-
ber of segments displayed.
:
3 segments: Full or nearly full :
2 segments: Moderate :
1 segment: Low :
0 segments: Empty or nearly empty NOTE
l More
than remaining quantity in the
traction
battery is necessary to operate the Re-
mote Climate Control.
3. Turn off the MiEV Remote. Refer to “To turn the MiEV Remote ON/OFF” on page
1-24.
Replacement of batteries for the
MiEV Remote E08303300017 CAUTION
l
MiEV
Remote is a precision electronic de-
vice with a built-in signal transmitter. Do
not disassemble or touch internal parts.
Keep away from water or dust.
l Be careful not to break the tab on the bat-
tery cover when removing or installing
the battery cover.
About the battery E08303400018
Two coin type batteries are used. Replace if neces-
sary to assure proper operation.
NOTE
l Standard
battery life on the MiEV Remote is
about 1 year. Battery life can vary depending
on environmental and usage conditions. Charging
1-30
1
OHAE13E1
Page 57 of 258
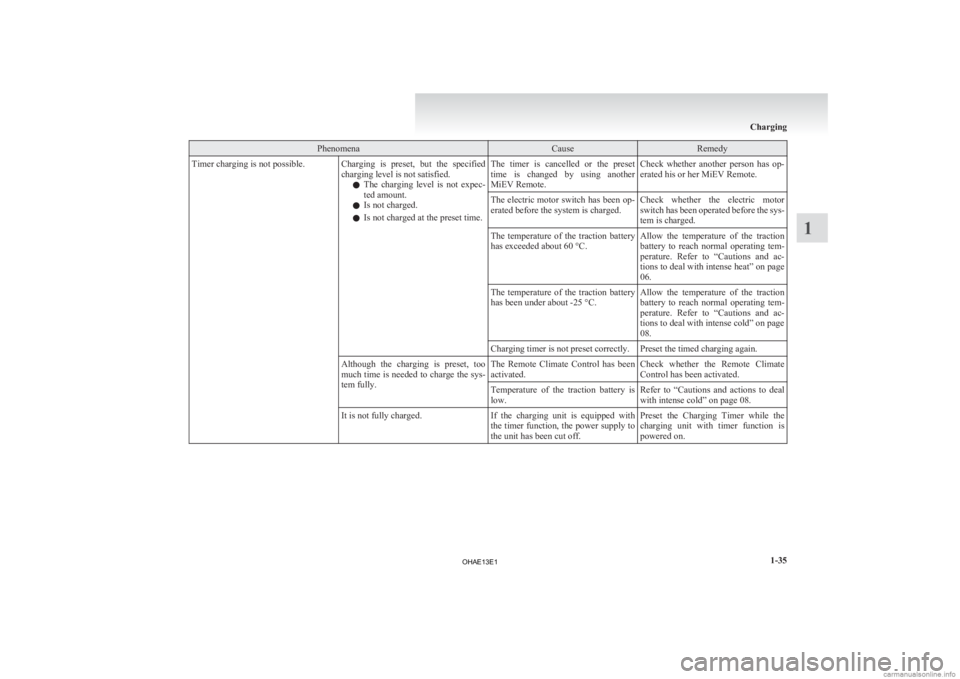
Phenomena Cause Remedy
Timer charging is not possible. Charging is preset, but the specified charging level is not satisfied.
l The
charging level is not expec-
ted amount.
l Is not charged.
l Is not charged at the preset time. The timer is cancelled or the preset
time
is changed by using another
MiEV Remote. Check whether another person has op-
erated his or her MiEV Remote.
The electric motor switch has been op-
erated before the system is charged. Check whether the electric motor
switch
has been operated before the sys-
tem is charged.
The temperature of the traction battery
has exceeded about 60 °C. Allow the temperature of the traction
battery
to reach normal operating tem-
perature. Refer to “Cautions and ac-
tions to deal with intense heat” on page
06.
The temperature of the traction battery
has been under about -25 °C. Allow the temperature of the traction
battery
to reach normal operating tem-
perature. Refer to “Cautions and ac-
tions to deal with intense cold” on page
08.
Charging timer is not preset correctly. Preset the timed charging again.
Although the charging is preset, too
much
time is needed to charge the sys-
tem fully. The Remote Climate Control has been
activated.
Check whether the Remote Climate
Control has been activated.
Temperature of the traction battery is
low. Refer to “Cautions
and actions to deal
with intense cold” on page 08.
It is not fully charged. If the charging unit is equipped with
the
timer function, the power supply to
the unit has been cut off. Preset the Charging Timer while the
charging
unit with timer function is
powered on. Charging
1-35 1
OHAE13E1
Page 58 of 258
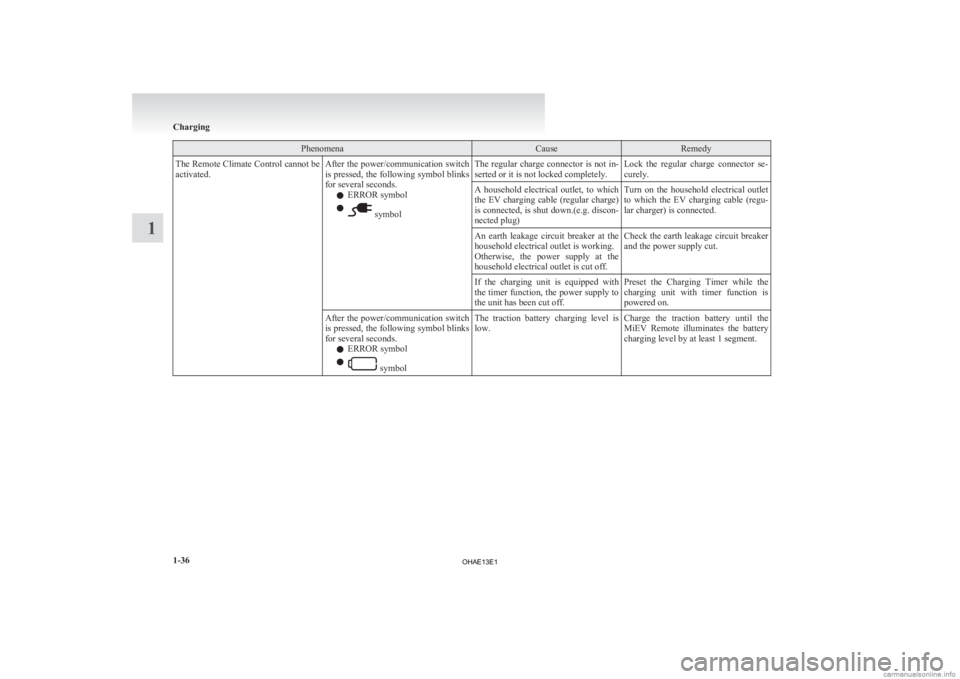
Phenomena Cause Remedy
The Remote Climate Control cannot be
activated. After the power/communication switch
is
pressed, the following symbol blinks
for several seconds.
l ERROR symbol
l symbol
The regular charge connector is not in-
serted or it is not locked completely.
Lock the regular charge connector se-
curely.
A household electrical outlet, to which
the
EV charging cable (regular charge)
is connected, is shut down.(e.g. discon-
nected plug) Turn on the household electrical outlet
to
which the EV charging cable (regu-
lar charger) is connected.
An earth leakage circuit breaker at the
household electrical outlet is working.
Otherwise,
the power supply at the
household electrical outlet is cut off. Check the earth leakage circuit breaker
and the power supply cut.
If the charging unit is equipped with
the
timer function, the power supply to
the unit has been cut off. Preset the Charging Timer while the
charging
unit with timer function is
powered on.
After the power/communication switch
is
pressed, the following symbol blinks
for several seconds.
l ERROR symbol
l symbol
The traction battery charging level is
low.
Charge the traction battery until the
MiEV
Remote illuminates the battery
charging level by at least 1 segment. Charging
1-36
1
OHAE13E1
Page 59 of 258
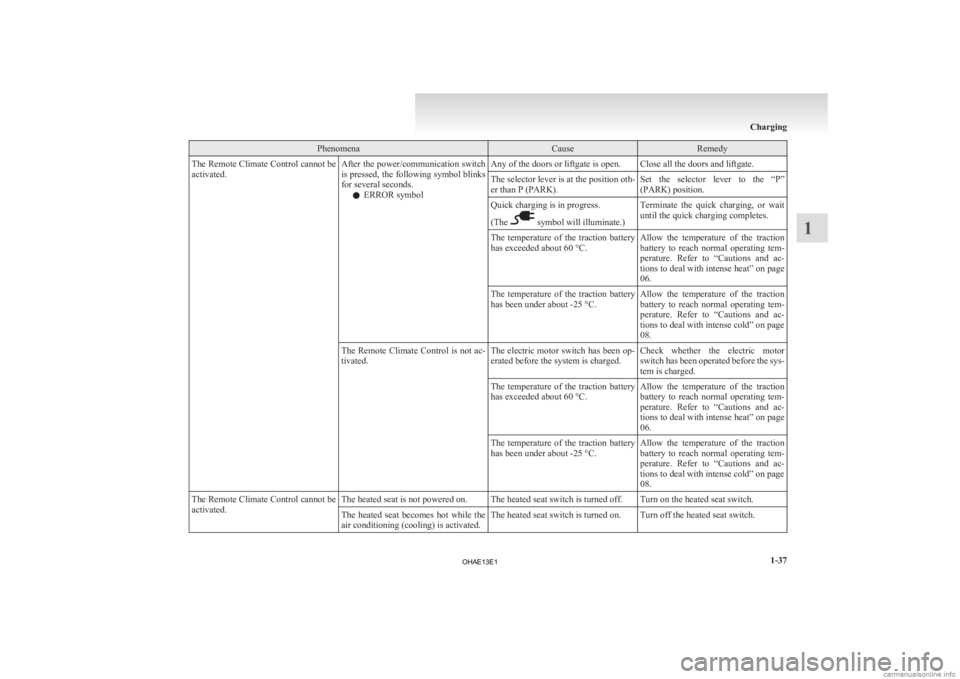
Phenomena Cause Remedy
The Remote Climate Control cannot be
activated. After the power/communication switch
is
pressed, the following symbol blinks
for several seconds.
l ERROR symbol Any of the doors or liftgate is open. Close all the doors and liftgate.
The selector lever is at the position oth-
er than P (PARK).
Set the selector lever to the “P”
(PARK) position.
Quick charging is in progress.
(The symbol will illuminate.)
Terminate the quick charging, or wait
until the quick charging completes.
The temperature of the traction battery
has exceeded about 60 °C. Allow the temperature of the traction
battery
to reach normal operating tem-
perature. Refer to “Cautions and ac-
tions to deal with intense heat” on page
06.
The temperature of the traction battery
has been under about -25 °C. Allow the temperature of the traction
battery
to reach normal operating tem-
perature. Refer to “Cautions and ac-
tions to deal with intense cold” on page
08.
The Remote Climate Control is not ac-
tivated. The electric motor switch has been op-
erated before the system is charged.Check whether the electric motor
switch
has been operated before the sys-
tem is charged.
The temperature of the traction battery
has exceeded about 60 °C. Allow the temperature of the traction
battery
to reach normal operating tem-
perature. Refer to “Cautions and ac-
tions to deal with intense heat” on page
06.
The temperature of the traction battery
has been under about -25 °C. Allow the temperature of the traction
battery
to reach normal operating tem-
perature. Refer to “Cautions and ac-
tions to deal with intense cold” on page
08.
The Remote Climate Control cannot be
activated. The heated seat is not powered on. The heated seat switch is turned off. Turn on the heated seat switch.
The heated seat becomes hot while the
air conditioning (cooling) is activated.The heated seat switch is turned on. Turn off the heated seat switch. Charging
1-37 1
OHAE13E1
Page 63 of 258
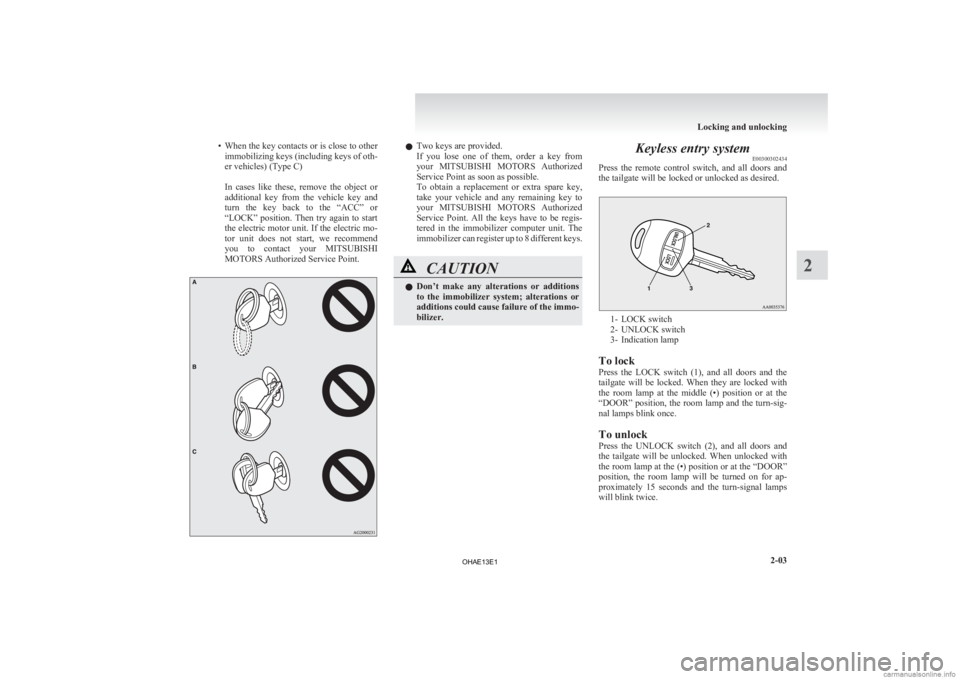
• When the key contacts or is close to other
immobilizing keys (including keys of oth-
er vehicles) (Type C)
In cases like these, remove the object or
additional key from the vehicle key and
turn the key back to the “ACC” or
“LOCK” position. Then try again to start
the electric motor unit. If the electric mo-
tor unit does not start, we recommend
you to contact your MITSUBISHI
MOTORS Authorized Service Point. l
Two keys are provided.
If
you lose one of them, order a key from
your MITSUBISHI MOTORS Authorized
Service Point as soon as possible.
To obtain a replacement or extra spare key,
take your vehicle and any remaining key to
your MITSUBISHI MOTORS Authorized
Service Point. All the keys have to be regis-
tered in the immobilizer computer unit. The
immobilizer can register up to 8 different keys. CAUTION
l
Don’t
make any alterations or additions
to the immobilizer system; alterations or
additions could cause failure of the immo-
bilizer. Keyless entry system
E00300302434
Press
the remote control switch, and all doors and
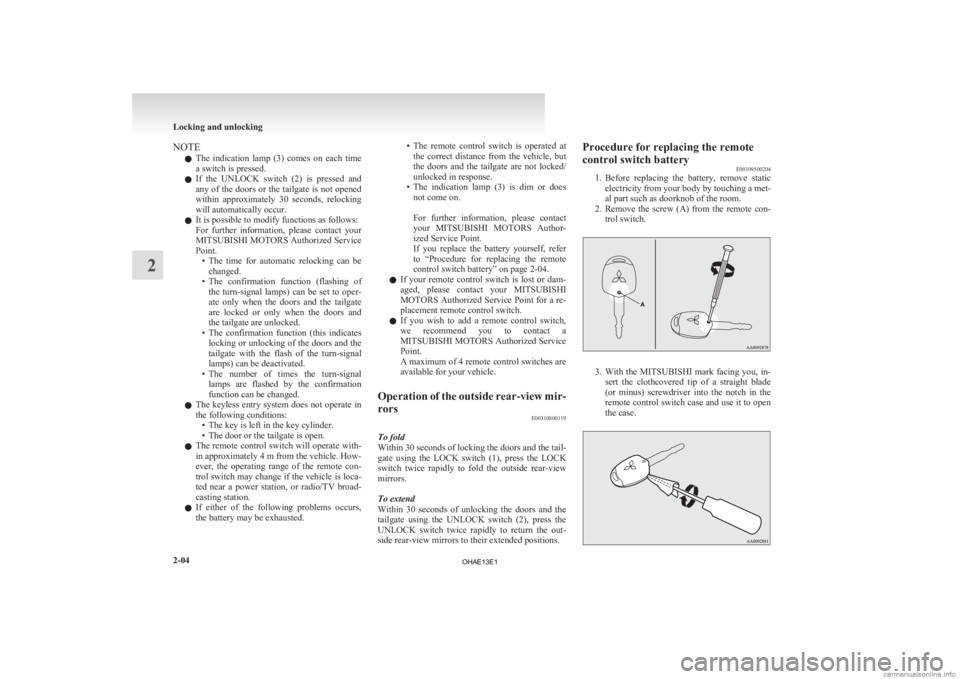
the tailgate will be locked or unlocked as desired. 1- LOCK switch
2-
UNLOCK switch
3- Indication lamp
To lock
Press the LOCK switch (1), and all doors and the
tailgate will be locked. When they are locked with
the room lamp at the middle (•) position or at the
“DOOR” position, the room lamp and the turn-sig-
nal lamps blink once.
To unlock
Press the UNLOCK switch (2), and all doors and
the tailgate will be unlocked. When unlocked with
the room lamp at the (•) position or at the “DOOR”
position, the room lamp will be turned on for ap-
proximately 15 seconds and the turn-signal lamps
will blink twice. Locking and unlocking
2-03 2
OHAE13E1
Page 64 of 258
NOTE
l The
indication lamp (3) comes on each time
a switch is pressed.
l If the UNLOCK switch (2) is pressed and
any of the doors or the tailgate is not opened
within approximately 30 seconds, relocking
will automatically occur.
l It is possible to modify functions as follows:
For further information, please contact your
MITSUBISHI MOTORS Authorized Service
Point.
• The time for automatic relocking can bechanged.
• The confirmation function (flashing of the turn-signal lamps) can be set to oper-
ate only when the doors and the tailgate
are locked or only when the doors and
the tailgate are unlocked.
• The confirmation function (this indicates locking or unlocking of the doors and the
tailgate with the flash of the turn-signal
lamps) can be deactivated.
• The number of times the turn-signal lamps are flashed by the confirmation
function can be changed.
l The keyless entry system does not operate in
the following conditions:
• The key is left in the key cylinder.
• The door or the tailgate is open.
l The remote control switch will operate with-
in approximately 4 m from the vehicle. How-
ever, the operating range of the remote con-
trol switch may change if the vehicle is loca-
ted near a power station, or radio/TV broad-
casting station.
l If either of the following problems occurs,
the battery may be exhausted. • The remote control switch is operated at
the correct distance from the vehicle, but
the doors and the tailgate are not locked/
unlocked in response.
• The indication lamp (3) is dim or does not come on.
For further information, please contact
your MITSUBISHI MOTORS Author-
ized Service Point.
If you replace the battery yourself, refer
to “Procedure for replacing the remote
control switch battery” on page 2-04.
l If your remote control switch is lost or dam-
aged, please contact your MITSUBISHI
MOTORS Authorized Service Point for a re-
placement remote control switch.
l If you wish to add a remote control switch,
we recommend you to contact a
MITSUBISHI MOTORS Authorized Service
Point.
A maximum of 4 remote control switches are
available for your vehicle.
Operation of the outside rear-view mir-
rors E00310800119
To fold
Within
30 seconds of locking the doors and the tail-
gate using the LOCK switch (1), press the LOCK
switch twice rapidly to fold the outside rear-view
mirrors.
To extend
Within 30 seconds of unlocking the doors and the
tailgate using the UNLOCK switch (2), press the
UNLOCK switch twice rapidly to return the out-
side rear-view mirrors to their extended positions. Procedure for replacing the remote
control switch battery
E00309500204
1. Before
replacing the battery, remove static
electricity from your body by touching a met-
al part such as doorknob of the room.
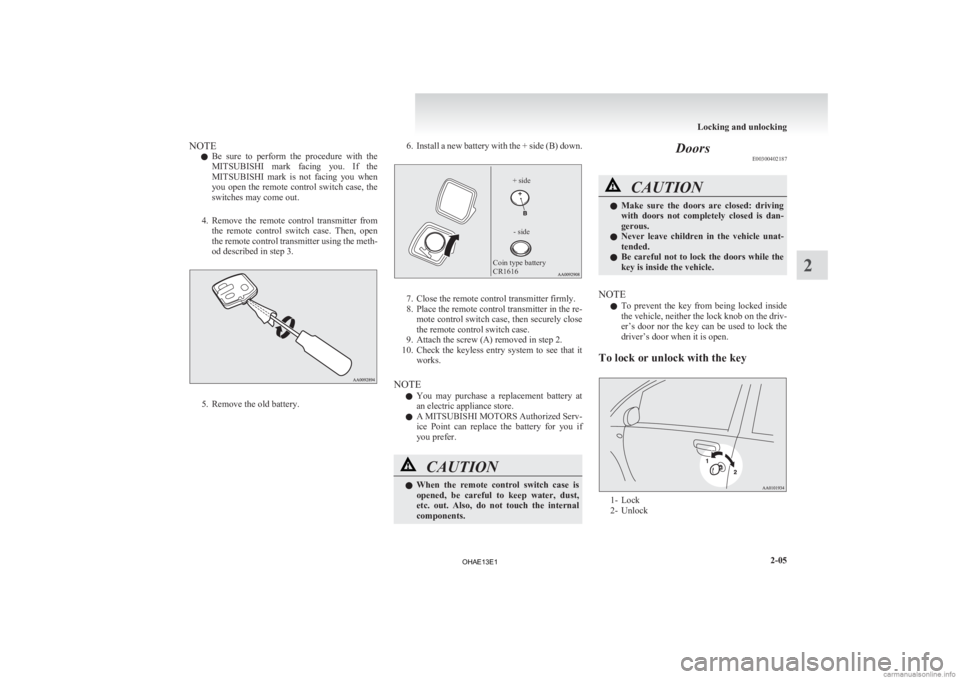
2. Remove the screw (A) from the remote con- trol switch. 3. With
the MITSUBISHI mark facing you, in-
sert the clothcovered tip of a straight blade
(or minus) screwdriver into the notch in the
remote control switch case and use it to open
the case. Locking and unlocking
2-04
2
OHAE13E1
Page 65 of 258
NOTE
l Be
sure to perform the procedure with the
MITSUBISHI mark facing you. If the
MITSUBISHI mark is not facing you when
you open the remote control switch case, the
switches may come out.
4. Remove the remote control transmitter from the remote control switch case. Then, open
the remote control transmitter using the meth-
od described in step 3. 5. Remove the old battery. 6. Install a new battery with the + side (B) down.
Coin type battery
CR1616
- side
+ side 7. Close the remote control transmitter firmly.
8.
Place the remote control transmitter in the re-mote control switch case, then securely close
the remote control switch case.
9. Attach the screw (A) removed in step 2.
10. Check the keyless entry system to see that it works.
NOTE l You may purchase a replacement battery at
an electric appliance store.
l A MITSUBISHI MOTORS Authorized Serv-
ice Point can replace the battery for you if
you prefer. CAUTION
l
When
the remote control switch case is
opened, be careful to keep water, dust,
etc. out. Also, do not touch the internal
components. Doors
E00300402187 CAUTION
l
Make
sure the doors are closed: driving
with doors not completely closed is dan-
gerous.
l Never leave children in the vehicle unat-
tended.
l Be careful not to lock the doors while the
key is inside the vehicle.
NOTE l To
prevent the key from being locked inside
the vehicle, neither the lock knob on the driv-
er’s door nor the key can be used to lock the
driver’s door when it is open.
To lock or unlock with the key 1- Lock
2-
Unlock Locking and unlocking
2-05 2
OHAE13E1
Page 126 of 258
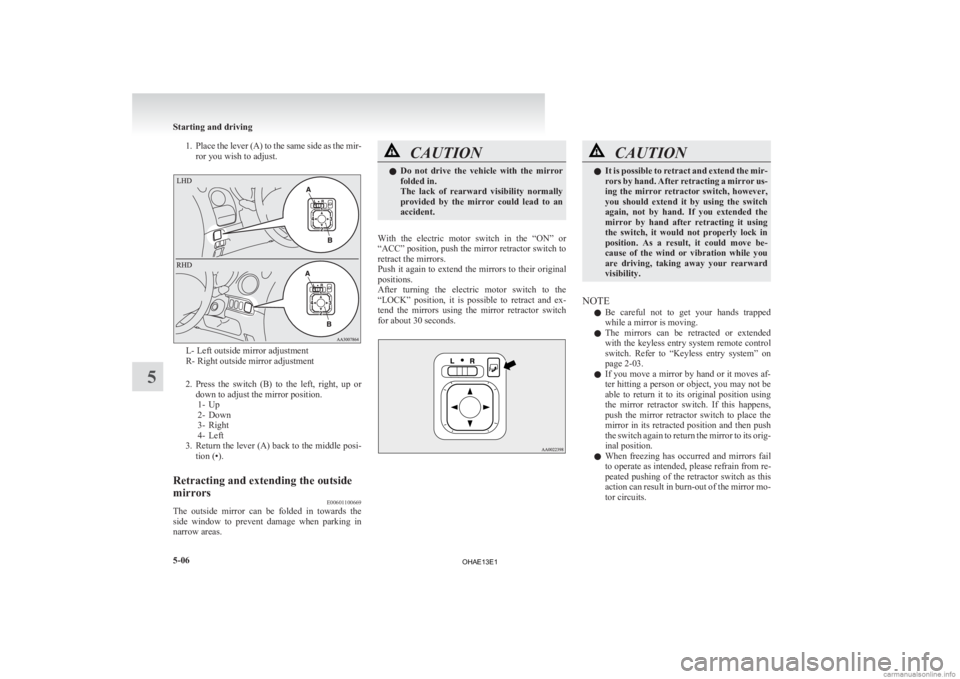
1. Place the lever (A) to the same side as the mir-
ror you wish to adjust. L- Left outside mirror adjustment
R- Right outside mirror adjustment
2. Press
the switch (B) to the left, right, up or
down to adjust the mirror position. 1- Up
2- Down
3- Right
4- Left
3. Return the lever (A) back to the middle posi- tion (•).
Retracting and extending the outside
mirrors E00601100669
The outside mirror can be folded in towards the
side
window to prevent damage when parking in
narrow areas. CAUTION
l
Do
not drive the vehicle with the mirror
folded in.
The lack of rearward visibility normally
provided by the mirror could lead to an
accident.
With the electric motor switch in the “ON” or
“ACC”
position, push the mirror retractor switch to
retract the mirrors.
Push it again to extend the mirrors to their original
positions.
After turning the electric motor switch to the
“LOCK” position, it is possible to retract and ex-
tend the mirrors using the mirror retractor switch
for about 30 seconds. CAUTION
l
It
is possible to retract and extend the mir-
rors by hand. After retracting a mirror us-
ing the mirror retractor switch, however,
you should extend it by using the switch
again, not by hand. If you extended the
mirror by hand after retracting it using
the switch, it would not properly lock in
position. As a result, it could move be-
cause of the wind or vibration while you
are driving, taking away your rearward
visibility.
NOTE l Be
careful not to get your hands trapped
while a mirror is moving.
l The mirrors can be retracted or extended
with the keyless entry system remote control
switch. Refer to “Keyless entry system” on
page 2-03.
l If you move a mirror by hand or it moves af-
ter hitting a person or object, you may not be
able to return it to its original position using
the mirror retractor switch. If this happens,
push the mirror retractor switch to place the
mirror in its retracted position and then push
the switch again to return the mirror to its orig-
inal position.
l When freezing has occurred and mirrors fail
to operate as intended, please refrain from re-
peated pushing of the retractor switch as this
action can result in burn-out of the mirror mo-
tor circuits. Starting and driving
5-06
5
OHAE13E1
Page 143 of 258
Ventilators
.................................................................................... 6-02
Air conditioning ............................................................................ 6-03
Important operation tips for the air conditioning
..........................6-09
Air purifier.................................................................................... 6-09
Remote Climate Control ............................................................... 6-10
LW/MW/FM electronic tuning radio with CD player* ................6-10
To play tracks from USB device* ................................................6-20
Error codes.................................................................................... 6-26
Error codes (iPod)......................................................................... 6-27
Error codes (USB memory device) ..............................................6-28
Handling of compact discs ........................................................... 6-29
Antenna......................................................................................... 6-30
Digital clock* ............................................................................... 6-31
Link System* ................................................................................ 6-33
USB input terminal* ..................................................................... 6-33
Sun visors..................................................................................... 6-35
Accessory socket.......................................................................... 6-36
Interior lamps ................................................................................ 6-37
Storage spaces...............................................................................6-39
Cup holder.................................................................................... 6-40
Assist grips................................................................................... 6-41For pleasant driving
6
OHAE13E1
Page 152 of 258
Remote Climate Control
E00735400035
You
can run the air conditioning in advance of us-
ing the vehicle.
For details, refer to “Remote Climate Control” on
page 1-28. LW/MW/FM electronic tuning
radio with CD player* E00708502250
The
audio system can be used when the electric mo-
tor switch is in the “ON” or “ACC” position.
NOTE
l To listen to the audio system while the elec-
tric motor unit is stopped, turn the electric mo-
tor switch to the “ACC” position.
l If a cellular phone is used inside the vehicle,
it may create noise from the audio equip-
ment. This does not mean that anything is
wrong with your audio equipment. In such a
case, use the cellular phone at a place as far
away as possible from the audio equipment.
l If foreign objects or water get into the audio
equipment, or if smoke or a strange odour
comes from it, immediately turn off the au-
dio system. We recommend you to have it
checked. Never try to repair it by yourself.
Avoid continuous usage without inspection
by a qualified person. Volume and tone control panel
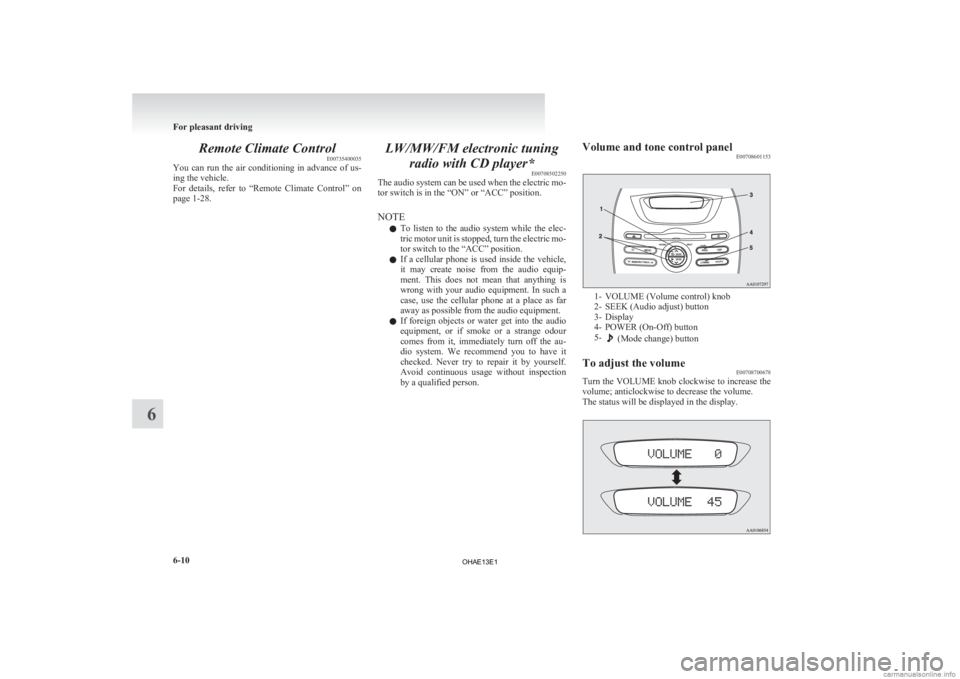
E00708601153 1- VOLUME (Volume control) knob
2-
SEEK (Audio adjust) button
3- Display
4- POWER (On-Off) button
5- (Mode change) button
To adjust the volume E00708700678
Turn the VOLUME knob clockwise to increase the
volume; anticlockwise to decrease the volume.
The status will be displayed in the display. For pleasant driving
6-10
6
OHAE13E1