instrument panel MITSUBISHI iMiEV 2013 Owner's Manual (in English)
[x] Cancel search | Manufacturer: MITSUBISHI, Model Year: 2013, Model line: iMiEV, Model: MITSUBISHI iMiEV 2013Pages: 258, PDF Size: 13 MB
Page 6 of 258
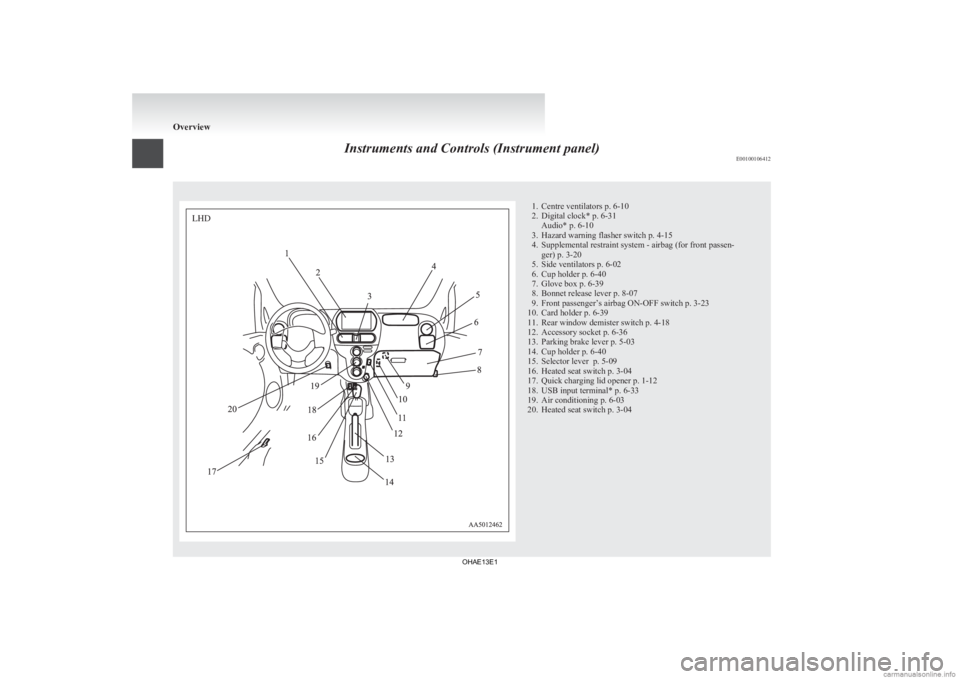
Instruments and Controls (Instrument panel)
E001001064121. Centre ventilators p. 6-10
2.
Digital clock* p. 6-31Audio* p. 6-10
3. Hazard warning flasher switch p. 4-15
4. Supplemental restraint system - airbag (for front passen- ger) p. 3-20
5. Side ventilators p. 6-02
6. Cup holder p. 6-40
7. Glove box p. 6-39
8. Bonnet release lever p. 8-07
9. Front passenger’s airbag ON-OFF switch p. 3-23
10. Card holder p. 6-39
11. Rear window demister switch p. 4-18
12. Accessory socket p. 6-36
13. Parking brake lever p. 5-03
14. Cup holder p. 6-40
15. Selector lever p. 5-09
16. Heated seat switch p. 3-04
17. Quick charging lid opener p. 1-12
18. USB input terminal* p. 6-33
19. Air conditioning p. 6-03
20. Heated seat switch p. 3-04 OverviewLHD
OHAE13E1
Page 31 of 258
CAUTION
l
Do not perform charging from other pow-
er source like a generator. Doing so could
cause a malfunction.
NOTE l If
the charge connector is not easily connec-
ted to the charge port due to foreign material
entering, never force the connection. Doing
so could damage the charging equipment or
the vehicle. Contact a MITSUBISHI
MOTORS Authorized Service Point.
l The on board charger is only for rated AC
220-240 V outlets.
l When connecting or disconnecting the regu-
lar charge connector, insert/pull out the con-
nector straight.
Also, do not incline or twist the connector.
Doing so could cause a bad connection or mal-
function.
l Make sure to lock the doors to prevent theft,
etc. during charging.
Charging from rated AC 220-240 V
outlet E08301000065
1. Fully
apply the parking brake and place the
selector lever to the “P” (PARK) position.
2. Stop the electric devices such as lamps and turn the electric motor switch to the “LOCK”
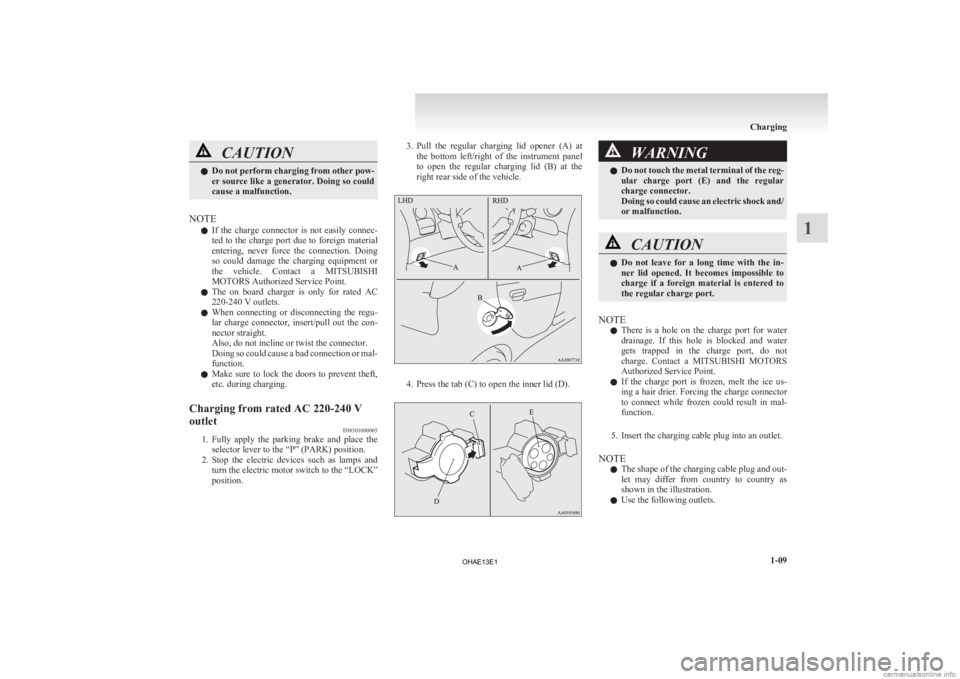
position. 3. Pull
the regular charging lid opener (A) at
the bottom left/right of the instrument panel
to open the regular charging lid (B) at the
right rear side of the vehicle. 4. Press the tab (C) to open the inner lid (D). WARNING
l Do
not touch the metal terminal of the reg-
ular charge port (E) and the regular
charge connector.
Doing so could cause an electric shock and/
or malfunction. CAUTION
l
Do
not leave for a long time with the in-
ner lid opened. It becomes impossible to
charge if a foreign material is entered to
the regular charge port.
NOTE l There
is a hole on the charge port for water
drainage. If this hole is blocked and water
gets trapped in the charge port, do not
charge. Contact a MITSUBISHI MOTORS
Authorized Service Point.
l If the charge port is frozen, melt the ice us-
ing a hair drier. Forcing the charge connector
to connect while frozen could result in mal-
function.
5. Insert the charging cable plug into an outlet.
NOTE l The shape of the charging cable plug and out-
let may differ from country to country as
shown in the illustration.
l Use the following outlets. Charging
1-09 1
OHAE13E1
Page 78 of 258
Seat belts
E00404800636
To
protect you and your passengers in the event of
an accident, it is most important that the seat belts
be worn correctly while driving.
The front seat belts have a pretensioner system.
These belts are used the same way as a convention-
al seat belt.
Refer to “Seat belt pretensioner system and force
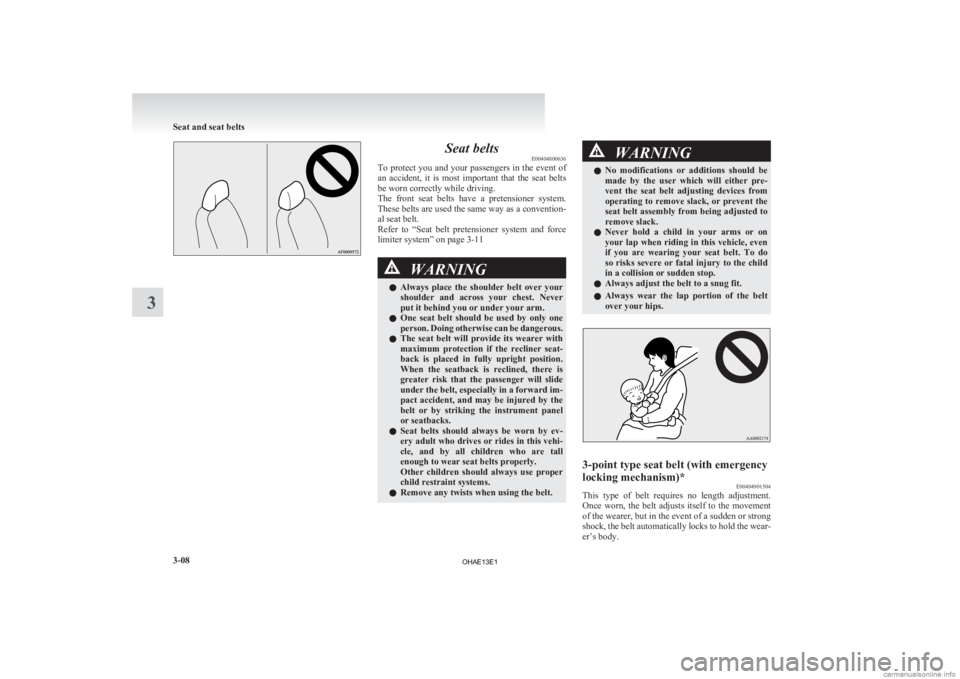
limiter system” on page 3-11 WARNING
l Always
place the shoulder belt over your
shoulder and across your chest. Never
put it behind you or under your arm.
l One seat belt should be used by only one
person. Doing otherwise can be dangerous.
l The seat belt will provide its wearer with
maximum protection if the recliner seat-
back is placed in fully upright position.
When the seatback is reclined, there is
greater risk that the passenger will slide
under the belt, especially in a forward im-
pact accident, and may be injured by the
belt or by striking the instrument panel
or seatbacks.
l Seat belts should always be worn by ev-
ery adult who drives or rides in this vehi-
cle, and by all children who are tall
enough to wear seat belts properly.
Other children should always use proper
child restraint systems.
l Remove any twists when using the belt. WARNING
l No
modifications or additions should be
made by the user which will either pre-
vent the seat belt adjusting devices from
operating to remove slack, or prevent the
seat belt assembly from being adjusted to
remove slack.
l Never hold a child in your arms or on
your lap when riding in this vehicle, even
if you are wearing your seat belt. To do
so risks severe or fatal injury to the child
in a collision or sudden stop.
l Always adjust the belt to a snug fit.
l Always wear the lap portion of the belt
over your hips. 3-point type seat belt (with emergency
locking mechanism)*
E00404901504
This type of belt requires no length adjustment.
Once
worn, the belt adjusts itself to the movement
of the wearer, but in the event of a sudden or strong
shock, the belt automatically locks to hold the wear-
er’s body. Seat and seat belts
3-08
3
OHAE13E1
Page 79 of 258
NOTE
l You
can check if the belt locks by pulling it
forward quickly.
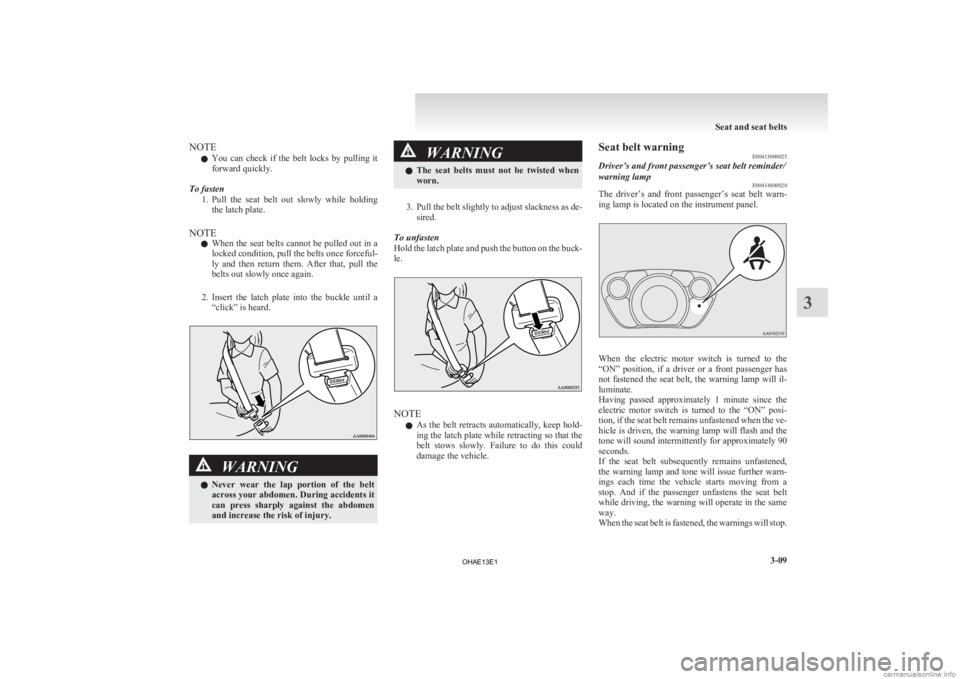
To fasten 1. Pull the seat belt out slowly while holdingthe latch plate.
NOTE l When the seat belts cannot be pulled out in a
locked condition, pull the belts once forceful-
ly and then return them. After that, pull the
belts out slowly once again.
2. Insert the latch plate into the buckle until a “click” is heard. WARNING
l Never
wear the lap portion of the belt
across your abdomen. During accidents it
can press sharply against the abdomen
and increase the risk of injury. WARNING
l The
seat belts must not be twisted when
worn.
3. Pull
the belt slightly to adjust slackness as de- sired.
To unfasten
Hold the latch plate and push the button on the buck-
le. NOTE
l As
the belt retracts automatically, keep hold-
ing the latch plate while retracting so that the
belt stows slowly. Failure to do this could
damage the vehicle. Seat belt warning
E00413000025
Driver’s and front passenger’s seat belt reminder/
warning lamp E00414800020
The driver’s and front passenger’s seat belt warn-
ing lamp is located on the instrument panel. When the electric motor switch is turned to the
“ON”
position, if a driver or a front passenger has
not fastened the seat belt, the warning lamp will il-
luminate.
Having passed approximately 1 minute since the
electric motor switch is turned to the “ON” posi-
tion, if the seat belt remains unfastened when the ve-
hicle is driven, the warning lamp will flash and the
tone will sound intermittently for approximately 90
seconds.
If the seat belt subsequently remains unfastened,
the warning lamp and tone will issue further warn-
ings each time the vehicle starts moving from a
stop. And if the passenger unfastens the seat belt
while driving, the warning will operate in the same
way.
When the seat belt is fastened, the warnings will stop. Seat and seat belts
3-09 3
OHAE13E1
Page 80 of 258
NOTE
l For
the front passenger seat, the warning func-
tion works only while a person is sitting on
the seat.
l When luggage is placed on the front passen-
ger seat, a sensor in the seat cushion may, de-
pending on the weight and position of the lug-
gage, cause the warning tone to sound and
the warning lamp to come on.
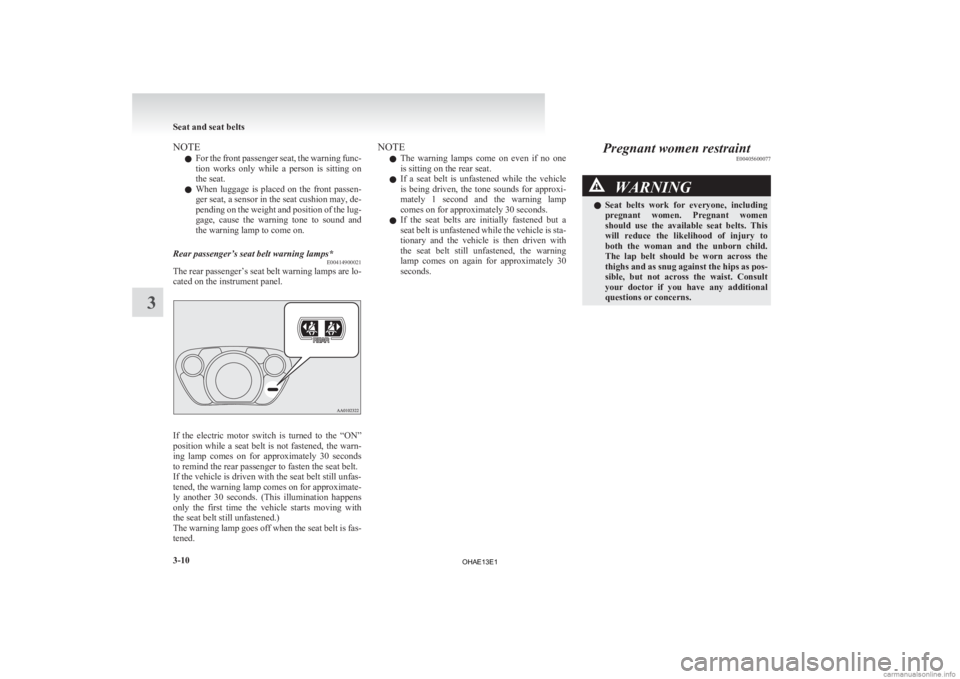
Rear passenger’s seat belt warning lamps* E00414900021
The rear passenger’s seat belt warning lamps are lo-
cated on the instrument panel. If the electric motor switch is turned to the “ON”
position
while a seat belt is not fastened, the warn-
ing lamp comes on for approximately 30 seconds
to remind the rear passenger to fasten the seat belt.
If the vehicle is driven with the seat belt still unfas-
tened, the warning lamp comes on for approximate-
ly another 30 seconds. (This illumination happens
only the first time the vehicle starts moving with
the seat belt still unfastened.)
The warning lamp goes off when the seat belt is fas-
tened. NOTE
l The
warning lamps come on even if no one
is sitting on the rear seat.
l If a seat belt is unfastened while the vehicle
is being driven, the tone sounds for approxi-
mately 1 second and the warning lamp
comes on for approximately 30 seconds.
l If the seat belts are initially fastened but a
seat belt is unfastened while the vehicle is sta-
tionary and the vehicle is then driven with
the seat belt still unfastened, the warning
lamp comes on again for approximately 30
seconds. Pregnant women restraint
E00405600077 WARNING
l Seat
belts work for everyone, including
pregnant women. Pregnant women
should use the available seat belts. This
will reduce the likelihood of injury to
both the woman and the unborn child.
The lap belt should be worn across the
thighs and as snug against the hips as pos-
sible, but not across the waist. Consult
your doctor if you have any additional
questions or concerns. Seat and seat belts
3-10
3
OHAE13E1
Page 91 of 258
How the Supplemental Restraint Sys-
tem works
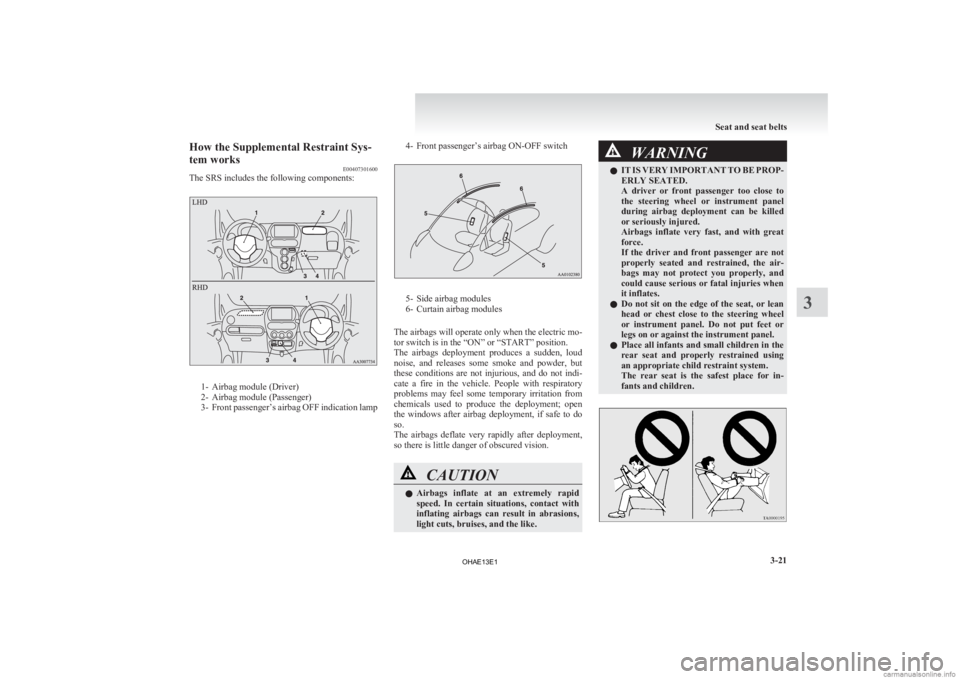
E00407301600
The SRS includes the following components: 1- Airbag module (Driver)
2-
Airbag module (Passenger)
3- Front passenger’s airbag OFF indication lamp 4- Front passenger’s airbag ON-OFF switch 5- Side airbag modules
6-
Curtain airbag modules
The airbags will operate only when the electric mo-
tor switch is in the “ON” or “START” position.
The airbags deployment produces a sudden, loud
noise, and releases some smoke and powder, but
these conditions are not injurious, and do not indi-
cate a fire in the vehicle. People with respiratory
problems may feel some temporary irritation from
chemicals used to produce the deployment; open
the windows after airbag deployment, if safe to do
so.
The airbags deflate very rapidly after deployment,
so there is little danger of obscured vision. CAUTION
l
Airbags
inflate at an extremely rapid
speed. In certain situations, contact with
inflating airbags can result in abrasions,
light cuts, bruises, and the like. WARNING
l IT
IS VERY IMPORTANT TO BE PROP-
ERLY SEATED.
A driver or front passenger too close to
the steering wheel or instrument panel
during airbag deployment can be killed
or seriously injured.
Airbags inflate very fast, and with great
force.
If the driver and front passenger are not
properly seated and restrained, the air-
bags may not protect you properly, and
could cause serious or fatal injuries when
it inflates.
l Do not sit on the edge of the seat, or lean
head or chest close to the steering wheel
or instrument panel. Do not put feet or
legs on or against the instrument panel.
l Place all infants and small children in the
rear seat and properly restrained using
an appropriate child restraint system.
The rear seat is the safest place for in-
fants and children. Seat and seat belts
3-21 3
OHAE13E1
Page 94 of 258
WARNING
• Turn ON the front passenger’s airbag ON-OFF switch immediately after re-
moving a child restraint system from
the front passenger seat.
• If the indication lamp does not come on when the front passenger’s airbag
ON-OFF switch is turned OFF, do not
fit a child restraint system to the front
passenger seat. We recommend you to
have the system inspected by a
MITSUBISHI MOTORS Authorized
Service Point.
• If the indication lamp remains on when the front passenger’s airbag ON-
OFF switch is turned ON, do not al-
low anyone to sit on the front passen-
ger seat. We recommend you to have
the system inspected by a
MITSUBISHI MOTORS Authorized
Service Point.
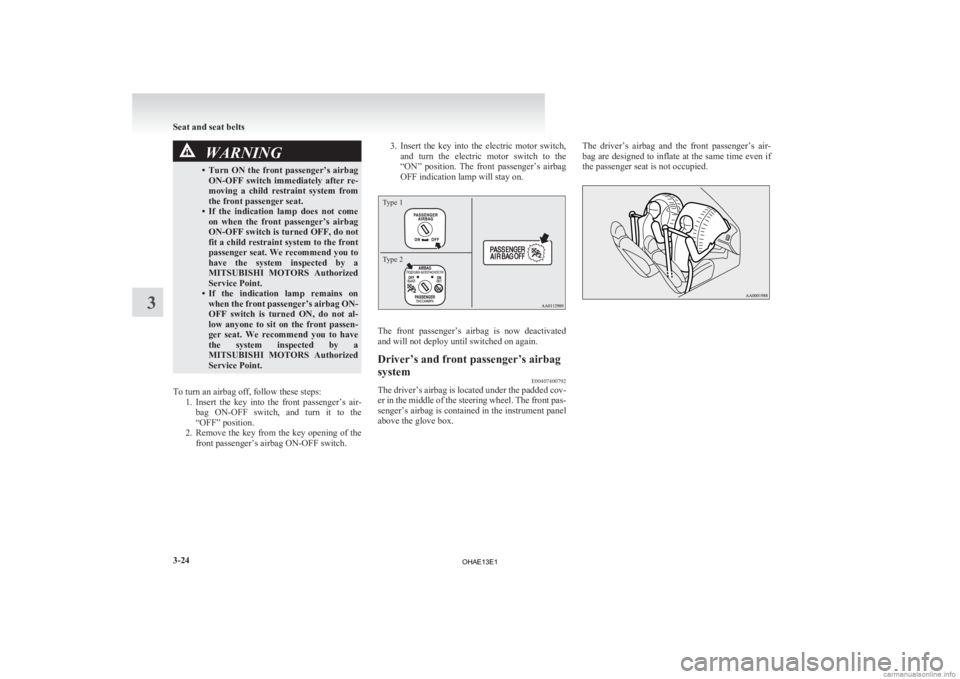
To turn an airbag off, follow these steps: 1. Insert
the key into the front passenger’s air-
bag ON-OFF switch, and turn it to the
“OFF” position.
2. Remove the key from the key opening of the front passenger’s airbag ON-OFF switch. 3. Insert
the key into the electric motor switch,
and turn the electric motor switch to the
“ON” position. The front passenger’s airbag
OFF indication lamp will stay on.
Type 1
Type 2 The front passenger’s airbag is now deactivated
and will not deploy until switched on again.
Driver’s and front passenger’s airbag
system
E00407400792
The driver’s airbag is located under the padded cov-
er
in the middle of the steering wheel. The front pas-
senger’s airbag is contained in the instrument panel
above the glove box. The driver’s airbag and the front passenger’s air-
bag
are designed to inflate at the same time even if
the passenger seat is not occupied. Seat and seat belts
3-24
3
OHAE13E1
Page 96 of 258
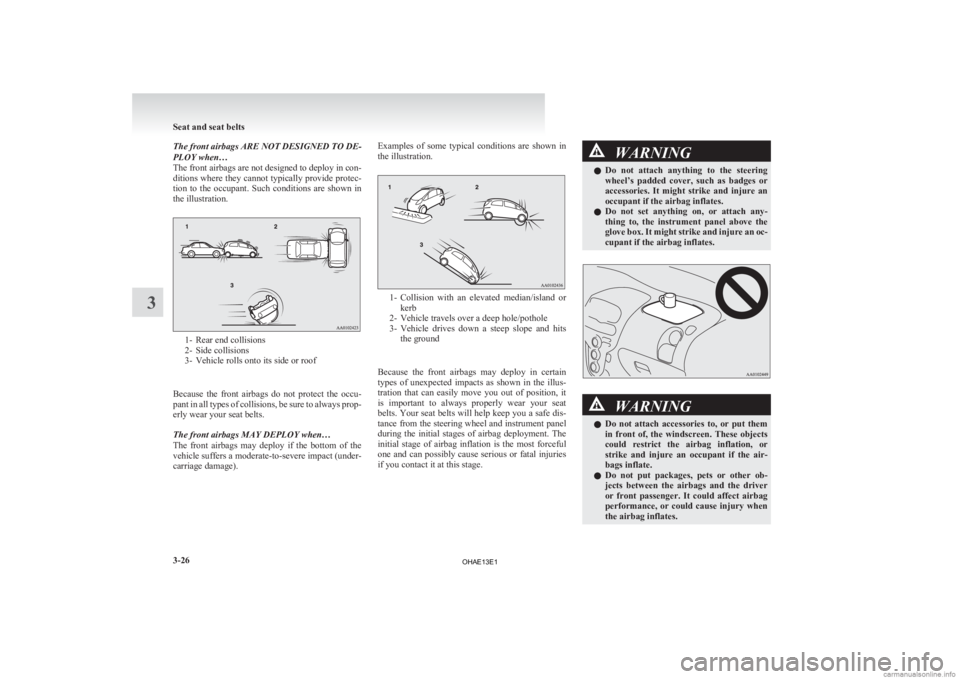
The front airbags ARE NOT DESIGNED TO DE-
PLOY when…
The
front airbags are not designed to deploy in con-
ditions where they cannot typically provide protec-
tion to the occupant. Such conditions are shown in
the illustration. 1- Rear end collisions
2-
Side collisions
3- Vehicle rolls onto its side or roof
Because the front airbags do not protect the occu-
pant in all types of collisions, be sure to always prop-
erly wear your seat belts.
The front airbags MAY DEPLOY when…
The front airbags may deploy if the bottom of the
vehicle suffers a moderate-to-severe impact (under-
carriage damage). Examples of some typical conditions are shown in
the illustration.
1- Collision
with an elevated median/island or
kerb
2- Vehicle travels over a deep hole/pothole
3- Vehicle drives down a steep slope and hits the ground
Because the front airbags may deploy in certain
types of unexpected impacts as shown in the illus-
tration that can easily move you out of position, it
is important to always properly wear your seat
belts. Your seat belts will help keep you a safe dis-
tance from the steering wheel and instrument panel
during the initial stages of airbag deployment. The
initial stage of airbag inflation is the most forceful
one and can possibly cause serious or fatal injuries
if you contact it at this stage. WARNING
l Do
not attach anything to the steering
wheel’s padded cover, such as badges or
accessories. It might strike and injure an
occupant if the airbag inflates.
l Do not set anything on, or attach any-
thing to, the instrument panel above the
glove box. It might strike and injure an oc-
cupant if the airbag inflates. WARNING
l Do
not attach accessories to, or put them
in front of, the windscreen. These objects
could restrict the airbag inflation, or
strike and injure an occupant if the air-
bags inflate.
l Do not put packages, pets or other ob-
jects between the airbags and the driver
or front passenger. It could affect airbag
performance, or could cause injury when
the airbag inflates. Seat and seat belts
3-26
3
OHAE13E1
Page 99 of 258
WARNING
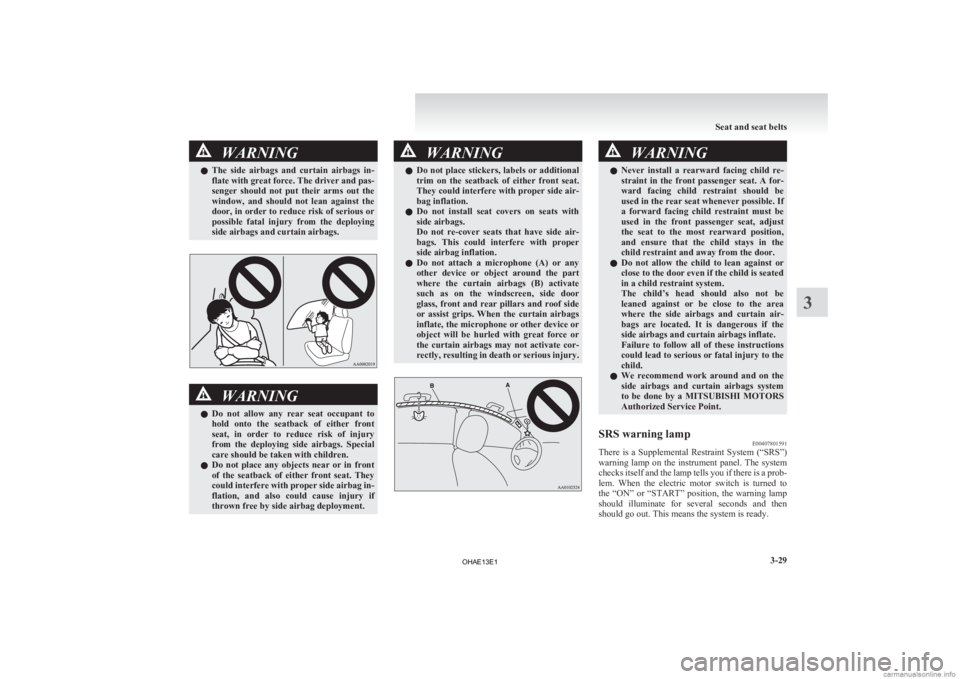
l The side airbags and curtain airbags in-
flate with great force. The driver and pas-
senger should not put their arms out the
window, and should not lean against the
door, in order to reduce risk of serious or
possible fatal injury from the deploying
side airbags and curtain airbags. WARNING
l Do
not allow any rear seat occupant to
hold onto the seatback of either front
seat, in order to reduce risk of injury
from the deploying side airbags. Special
care should be taken with children.
l Do not place any objects near or in front
of the seatback of either front seat. They
could interfere with proper side airbag in-
flation, and also could cause injury if
thrown free by side airbag deployment. WARNING
l Do
not place stickers, labels or additional
trim on the seatback of either front seat.
They could interfere with proper side air-
bag inflation.
l Do not install seat covers on seats with
side airbags.
Do not re-cover seats that have side air-
bags. This could interfere with proper
side airbag inflation.
l Do not attach a microphone (A) or any
other device or object around the part
where the curtain airbags (B) activate
such as on the windscreen, side door
glass, front and rear pillars and roof side
or assist grips. When the curtain airbags
inflate, the microphone or other device or
object will be hurled with great force or
the curtain airbags may not activate cor-
rectly, resulting in death or serious injury. WARNING
l Never install a rearward facing child re-
straint in the front passenger seat. A for-
ward facing child restraint should be
used in the rear seat whenever possible. If
a forward facing child restraint must be
used in the front passenger seat, adjust
the seat to the most rearward position,
and ensure that the child stays in the
child restraint and away from the door.
l Do not allow the child to lean against or
close to the door even if the child is seated
in a child restraint system.
The child’s head should also not be
leaned against or be close to the area
where the side airbags and curtain air-
bags are located. It is dangerous if the
side airbags and curtain airbags inflate.
Failure to follow all of these instructions
could lead to serious or fatal injury to the
child.
l We recommend work around and on the
side airbags and curtain airbags system
to be done by a MITSUBISHI MOTORS
Authorized Service Point.
SRS warning lamp E00407801591
There is a Supplemental Restraint System (“SRS”)
warning
lamp on the instrument panel. The system
checks itself and the lamp tells you if there is a prob-
lem. When the electric motor switch is turned to
the “ON” or “START” position, the warning lamp
should illuminate for several seconds and then
should go out. This means the system is ready. Seat and seat belts
3-29 3
OHAE13E1
Page 112 of 258
OFF All lamps off
AUTO With the electric motor switch
in the “ON” position, head-
lamps, position, tail, licence
plate, and instrument panel
lamps turn on and off automati-
cally in accordance with outside
light
level. All lamps turn off au-
tomatically when the electric
motor switch is turned to the
“OFF” position. Position, tail, licence plate and
instrument panel lamps on
Headlamps and other lamps go
on
NOTE
l The
sensitivity of the automatic on/off con-
trol can be adjusted. For further information,
please contact your MITSUBISHI MOTORS
Authorized Service Point.
l When the headlamps are turned off by the au-
tomatic on/off control with the electric motor
switch in the “ON” position, the front fog
lamps (if so equipped) and rear fog lamps al-
so go off. When the headlamps are subse-
quently turned back on by the automatic on/
off control, the front fog lamps also come on
but the rear fog lamp stays off. If you wish to
turn the rear fog lamp back on, operate the
switch again.
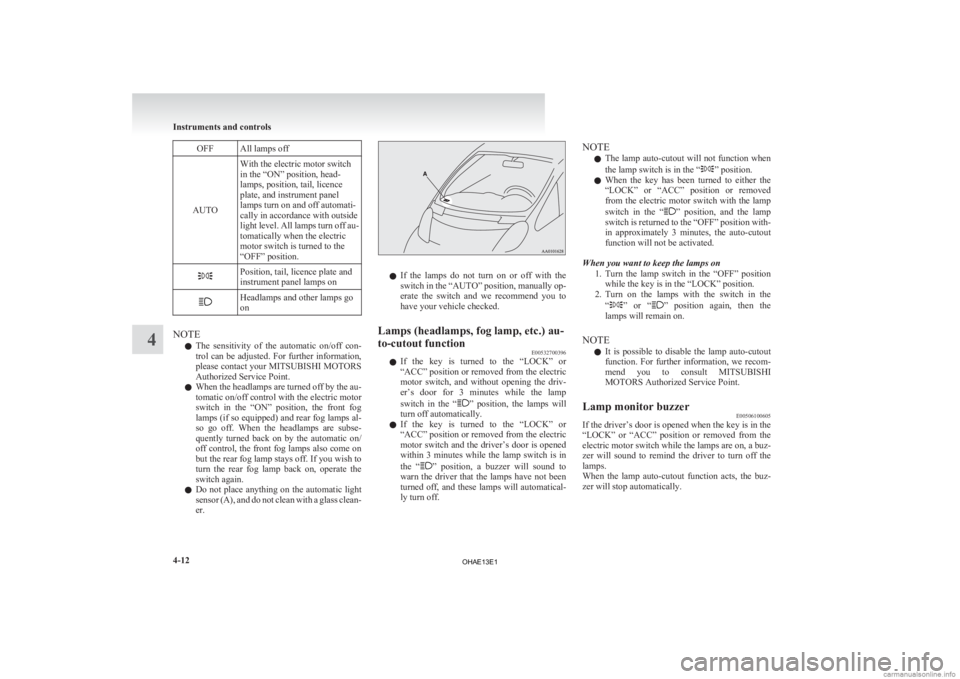
l Do not place anything on the automatic light
sensor (A), and do not clean with a glass clean-
er. l
If
the lamps do not turn on or off with the
switch in the “AUTO” position, manually op-
erate the switch and we recommend you to
have your vehicle checked.
Lamps (headlamps, fog lamp, etc.) au-
to-cutout function E00532700396
l If
the key is turned to the “LOCK” or
“ACC” position or removed from the electric
motor switch, and without opening the driv-
er’s door for 3 minutes while the lamp
switch in the “ ”
position, the lamps will
turn off automatically.
l If the key is turned to the “LOCK” or
“ACC” position or removed from the electric
motor switch and the driver’s door is opened
within 3 minutes while the lamp switch is in
the “ ”
position, a buzzer will sound to
warn the driver that the lamps have not been
turned off, and these lamps will automatical-
ly turn off. NOTE
l The
lamp auto-cutout will not function when
the lamp switch is in the “ ” position.
l When
the key has been turned to either the
“LOCK” or “ACC” position or removed
from the electric motor switch with the lamp
switch in the “ ”
position, and the lamp
switch is returned to the “OFF” position with-
in approximately 3 minutes, the auto-cutout
function will not be activated.
When you want to keep the lamps on 1. Turn the lamp switch in the “OFF” positionwhile the key is in the “LOCK” position.
2. Turn on the lamps with the switch in the
“ ”
or “ ” position again, then the
lamps will remain on.
NOTE l It is possible to disable the lamp auto-cutout
function. For further information, we recom-
mend you to consult MITSUBISHI
MOTORS Authorized Service Point.
Lamp monitor buzzer E00506100605
If the driver’s door is opened when the key is in the
“LOCK”
or “ACC” position or removed from the
electric motor switch while the lamps are on, a buz-
zer will sound to remind the driver to turn off the
lamps.
When the lamp auto-cutout function acts, the buz-
zer will stop automatically. Instruments and controls
4-12
4
OHAE13E1