remote start MITSUBISHI iMiEV 2013 Owner's Manual (in English)
[x] Cancel search | Manufacturer: MITSUBISHI, Model Year: 2013, Model line: iMiEV, Model: MITSUBISHI iMiEV 2013Pages: 258, PDF Size: 13 MB
Page 38 of 258
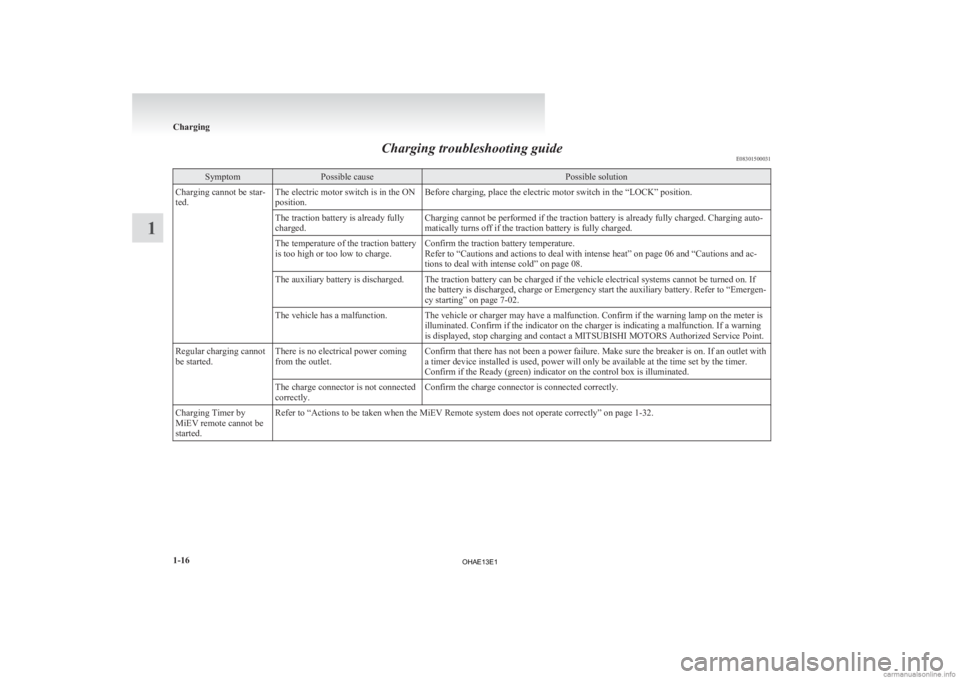
Charging troubleshooting guide
E08301500031Symptom Possible cause Possible solution
Charging cannot be star-
ted. The electric motor switch is in the ON
position. Before charging, place the electric motor switch in the “LOCK” position.
The traction battery is already fully
charged. Charging cannot be performed if the traction battery is already fully charged. Charging auto-
matically turns off if the traction battery is fully charged.
The temperature of the traction battery
is too high or too low to charge. Confirm the traction battery temperature.
Refer to “Cautions and actions to deal with intense heat” on page
06 and “Cautions and ac-
tions to deal with intense cold” on page 08.
The auxiliary battery is discharged. The traction battery can be charged if the vehicle electrical systems cannot be turned on. If the battery is discharged, charge or Emergency start the auxiliary battery. Refer to
“Emergen-
cy starting” on page 7-02.
The vehicle has a malfunction. The vehicle or charger may have a malfunction. Confirm if the warning lamp on the meter is illuminated. Confirm if the indicator on the charger is indicating a malfunction. If a warning
is displayed, stop charging and contact a
MITSUBISHI MOTORS Authorized Service Point.
Regular charging cannot
be started. There is no electrical power coming
from the outlet. Confirm that there has not been a power failure. Make sure the breaker is on. If an outlet with
a timer device installed is used, power will only be available at the time set by the timer.
Confirm if the Ready (green) indicator on the control box is illuminated.
The charge connector is not connected
correctly. Confirm the charge connector is connected correctly.
Charging Timer by
MiEV remote cannot be
started. Refer to “Actions to be taken when the MiEV Remote system does not operate correctly” on page
1-32.Charging
1-16
1
OHAE13E1
Page 46 of 258
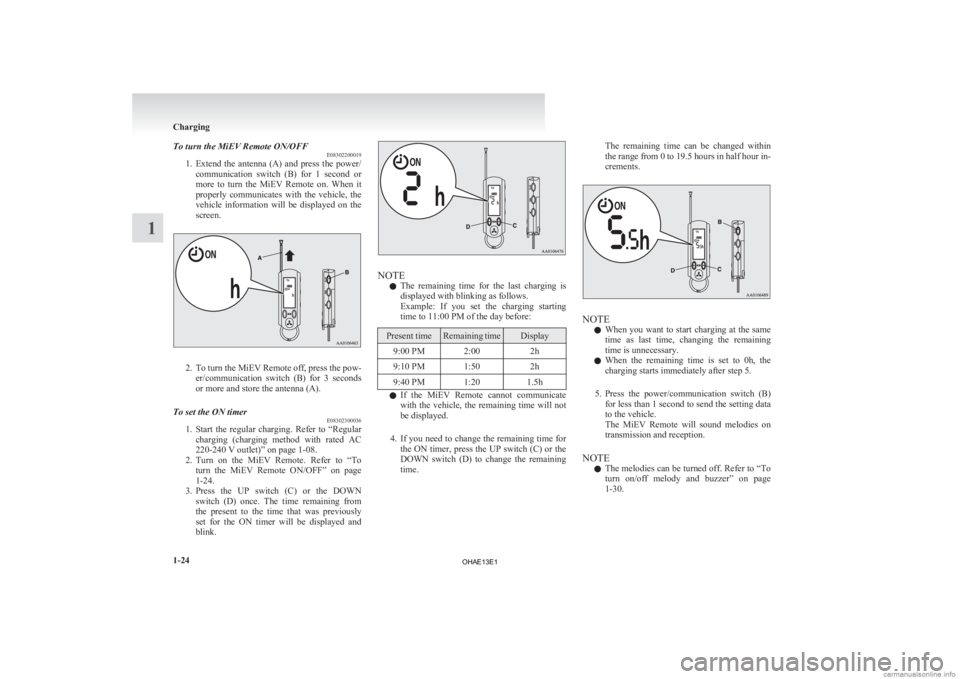
To turn the MiEV Remote ON/OFF
E08302200019
1. Extend
the antenna (A) and press the power/
communication switch (B) for 1 second or
more to turn the MiEV Remote on. When it
properly communicates with the vehicle, the
vehicle information will be displayed on the
screen. 2. To
turn the MiEV Remote off, press the pow-
er/communication switch (B) for 3 seconds
or more and store the antenna (A).
To set the ON timer E08302300036
1. Start
the regular charging. Refer to “Regular
charging (charging method with rated AC
220-240 V outlet)” on page 1-08.
2. Turn on the MiEV Remote. Refer to “To turn the MiEV Remote ON/OFF” on page
1-24.
3. Press the UP switch (C) or the DOWN switch (D) once. The time remaining from
the present to the time that was previously
set for the ON timer will be displayed and
blink. NOTE
l The
remaining time for the last charging is
displayed with blinking as follows.
Example: If you set the charging starting
time to 11:00 PM of the day before: Present time Remaining time Display
9:00 PM 2:00 2h
9:10 PM 1:50 2h
9:40 PM 1:20 1.5h l
If
the MiEV Remote cannot communicate
with the vehicle, the remaining time will not
be displayed.
4. If you need to change the remaining time for the ON timer, press the UP switch (C) or the
DOWN switch (D) to change the remaining
time. The remaining time can be changed within
the
range from 0 to 19.5 hours in half hour in-
crements. NOTE
l When
you want to start charging at the same
time as last time, changing the remaining
time is unnecessary.
l When the remaining time is set to 0h, the
charging starts immediately after step 5.
5. Press the power/communication switch (B) for less than 1 second to send the setting data
to the vehicle.
The MiEV Remote will sound melodies on
transmission and reception.
NOTE l The melodies can be turned off. Refer to “To
turn on/off melody and buzzer” on page
1-30. Charging
1-24
1
OHAE13E1
Page 47 of 258

l
If a communication error occurs or the MiEV
Remote
System is not functioning properly,
the buzzer will sound. Refer to “Display of
MiEV Remote during communicating with
vehicle” on page 1-27.
l If the OFF Timer is unset when setting the
ON timer, the OFF timer will be automatical-
ly set with “fully charged”.
l To set OFF Timer, refer to “To set OFF Tim-
er” on page 1-26.
6. To turn off the MiEV Remote, refer to “To turn the MiEV Remote ON/OFF” on page
1-24.
NOTE l The energy level gauge in the instrument pan-
el on the vehicle will illuminate and the charg-
ing indicator will blink approximately 30 sec-
onds after the vehicle has received the setting
for the ON timer.
After approximately 30 seconds, the energy
level gauge and the charging indicator will go off, and the vehicle will be prepared for
the timer charging.
Energy level gauge
Charging indicator l
Turning
the electric motor switch to the
“ON” position or the “ACC” position will can-
cel the timer charging.
l If the MODE switch is pressed while chang-
ing the ON timer setting, the change will be
cancelled.
l The symbol on the MiEV Remote will
be illuminated while the vehicle is charging.
l If
the charge connector is disconnected be-
fore the time set by the ON timer, the timer
charging is not cancelled. If the charge con-
nector is re-connected again before starting
the charge or setting the charge timers, the
timer charging will resume. To start the charging immediately after the ON
timer has been set
E08302400011
1. Turn
on the MiEV Remote. Refer to “To
turn the MiEV Remote ON/OFF” on page
1-24.
2. Press the UP switch (C) or the DOWN switch (D) once, and the remaining time
from the present to the time set for the ON
timer will be displayed and blink. 3. Change
the remaining time to 0h by pressing
the UP switch (C) or the DOWN switch (D).
4. Press the power/communication switch (B) for less than 1 second to send the setting data
to the vehicle. The MiEV Remote will sound
melodies on transmission and reception. The
charging will start.
Refer to “Regular charging (charging method
with rated AC 220-240 V outlet)” on page
1-08.
5. Turn off the MiEV Remote. Refer to “To turn the MiEV Remote ON/OFF” on page
1-24. Charging
1-25 1
OHAE13E1
Page 49 of 258
for Charging Timer in accordance with the
ON/OFF setting.Energy level gauge
Charging indicatorl
The symbol on the MiEV Remote illu-
minates
while the traction battery is charging.
l The Charging Timer will be cancelled if the
electric motor switch is turned to the “ON”
or “ACC” position.
l Once the traction battery is fully charged, the
charging will end even if this is before the
time set by the OFF timer.
l If the charge connector is disconnected dur-
ing charging, the OFF charging timer will be
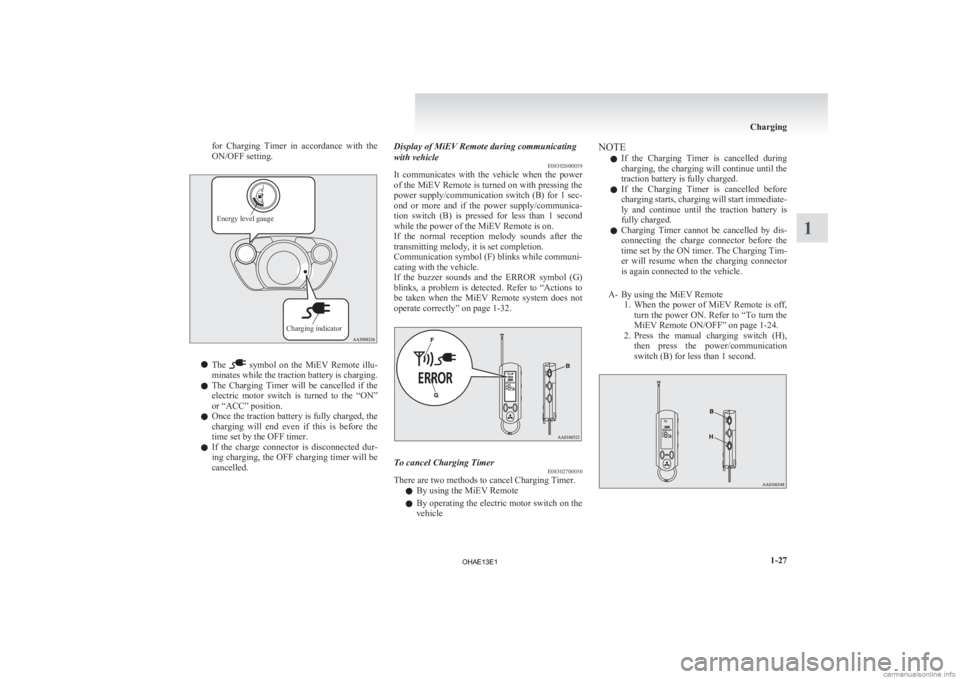
cancelled. Display of MiEV Remote during communicating
with vehicle
E08302600039
It
communicates with the vehicle when the power
of the MiEV Remote is turned on with pressing the
power supply/communication switch (B) for 1 sec-
ond or more and if the power supply/communica-
tion switch (B) is pressed for less than 1 second
while the power of the MiEV Remote is on.
If the normal reception melody sounds after the
transmitting melody, it is set completion.
Communication symbol (F) blinks while communi-
cating with the vehicle.
If the buzzer sounds and the ERROR symbol (G)
blinks, a problem is detected. Refer to “Actions to
be taken when the MiEV Remote system does not
operate correctly” on page 1-32. To cancel Charging Timer
E08302700030
There are two methods to cancel Charging Timer.
l By using the MiEV Remote
l By
operating the electric motor switch on the
vehicle NOTE
l If
the Charging Timer is cancelled during
charging, the charging will continue until the
traction battery is fully charged.
l If the Charging Timer is cancelled before
charging starts, charging will start immediate-
ly and continue until the traction battery is
fully charged.
l Charging Timer cannot be cancelled by dis-
connecting the charge connector before the
time set by the ON timer. The Charging Tim-
er will resume when the charging connector
is again connected to the vehicle.
A- By using the MiEV Remote 1. When the power of MiEV Remote is off,turn the power ON. Refer to “To turn the
MiEV Remote ON/OFF” on page 1-24.
2. Press the manual charging switch (H), then press the power/communication
switch (B) for less than 1 second. Charging
1-27 1
OHAE13E1
Page 51 of 258
WARNING
l Improper charging can result in fire, prop-
erty damage, and serious injury or death.
Carefully read and follow instructions in
“Basic knowledge for charging” on page
1-04 and “Charging method with rated
AC 220-240 V outlet” on page 1-09.
1. Start
charging. Refer to “Charging method with rated AC 220-240 V outlet” on page
1-09.
2. Turn on the MiEV Remote. Refer to “To turn the MiEV Remote ON/OFF” on page
1-24.
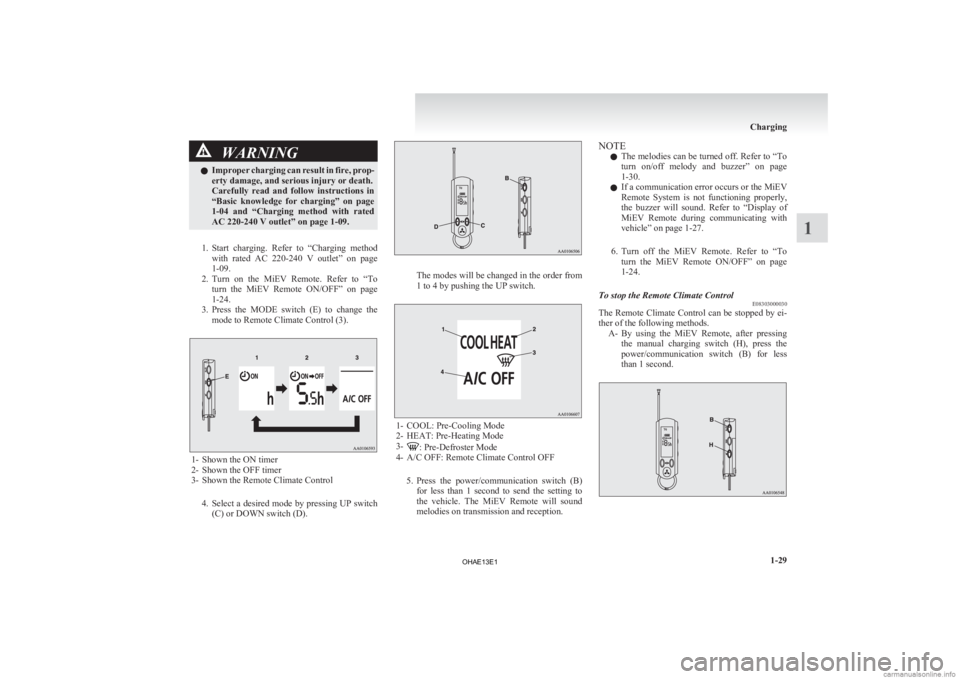
3. Press the MODE switch (E) to change the mode to Remote Climate Control (3). 1- Shown the ON timer
2-
Shown the OFF timer
3- Shown the Remote Climate Control
4. Select a desired mode by pressing UP switch(C) or DOWN switch (D). The modes will be changed in the order from
1 to 4 by pushing the UP switch.
1- COOL: Pre-Cooling Mode
2-
HEAT: Pre-Heating Mode
3- : Pre-Defroster Mode
4-
A/C OFF: Remote Climate Control OFF
5. Press the power/communication switch (B) for less than 1 second to send the setting to
the vehicle. The MiEV Remote will sound
melodies on transmission and reception. NOTE
l The
melodies can be turned off. Refer to “To
turn on/off melody and buzzer” on page
1-30.
l If a communication error occurs or the MiEV
Remote System is not functioning properly,
the buzzer will sound. Refer to “Display of
MiEV Remote during communicating with
vehicle” on page 1-27.
6. Turn off the MiEV Remote. Refer to “To turn the MiEV Remote ON/OFF” on page
1-24.
To stop the Remote Climate Control E08303000030
The Remote Climate Control can be stopped by ei-
ther of the following methods.
A- By
using the MiEV Remote, after pressing
the manual charging switch (H), press the
power/communication switch (B) for less
than 1 second. Charging
1-29 1
OHAE13E1
Page 52 of 258
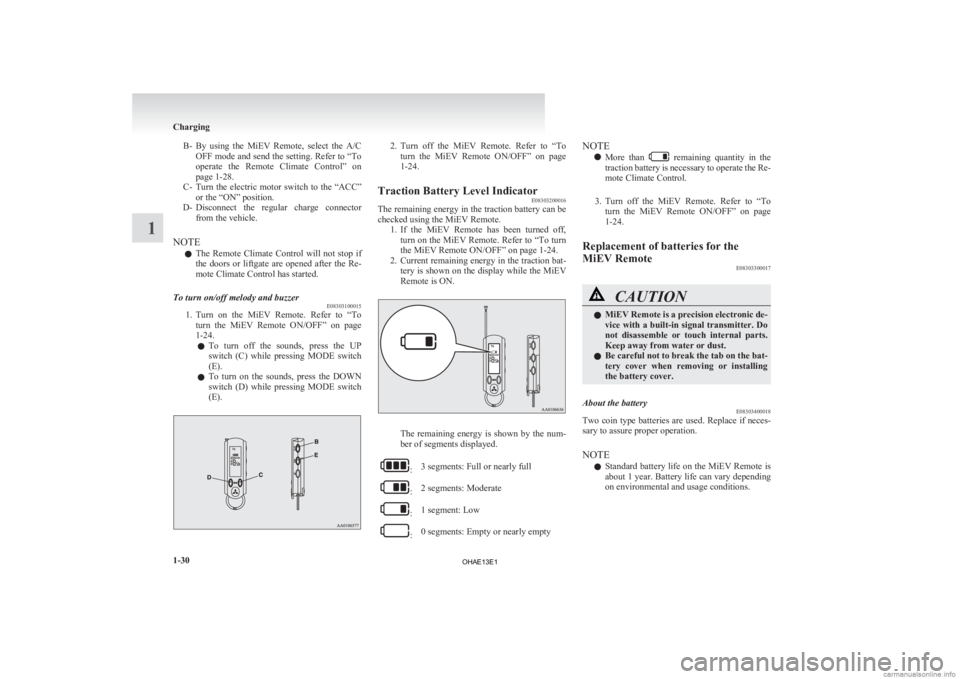
B- By using the MiEV Remote, select the A/C
OFF mode and send the setting. Refer to “To
operate the Remote Climate Control” on
page 1-28.
C- Turn the electric motor switch to the “ACC” or the “ON” position.
D- Disconnect the regular charge connector from the vehicle.
NOTE l The Remote Climate Control will not stop if
the doors or liftgate are opened after the Re-
mote Climate Control has started.
To turn on/off melody and buzzer E08303100015
1. Turn
on the MiEV Remote. Refer to “To
turn the MiEV Remote ON/OFF” on page
1-24.
l To turn off the sounds, press the UP
switch (C) while pressing MODE switch
(E).
l To turn on the sounds, press the DOWN
switch (D) while pressing MODE switch
(E). 2. Turn
off the MiEV Remote. Refer to “To
turn the MiEV Remote ON/OFF” on page
1-24.
Traction Battery Level Indicator E08303200016
The remaining energy in the traction battery can be
checked using the MiEV Remote.
1. If
the MiEV Remote has been turned off,
turn on the MiEV Remote. Refer to “To turn
the MiEV Remote ON/OFF” on page 1-24.
2. Current remaining energy in the traction bat- tery is shown on the display while the MiEV
Remote is ON. The remaining energy is shown by the num-
ber of segments displayed.
:
3 segments: Full or nearly full :
2 segments: Moderate :
1 segment: Low :
0 segments: Empty or nearly empty NOTE
l More
than remaining quantity in the
traction
battery is necessary to operate the Re-
mote Climate Control.
3. Turn off the MiEV Remote. Refer to “To turn the MiEV Remote ON/OFF” on page
1-24.
Replacement of batteries for the
MiEV Remote E08303300017 CAUTION
l
MiEV
Remote is a precision electronic de-
vice with a built-in signal transmitter. Do
not disassemble or touch internal parts.
Keep away from water or dust.
l Be careful not to break the tab on the bat-
tery cover when removing or installing
the battery cover.
About the battery E08303400018
Two coin type batteries are used. Replace if neces-
sary to assure proper operation.
NOTE
l Standard
battery life on the MiEV Remote is
about 1 year. Battery life can vary depending
on environmental and usage conditions. Charging
1-30
1
OHAE13E1
Page 54 of 258
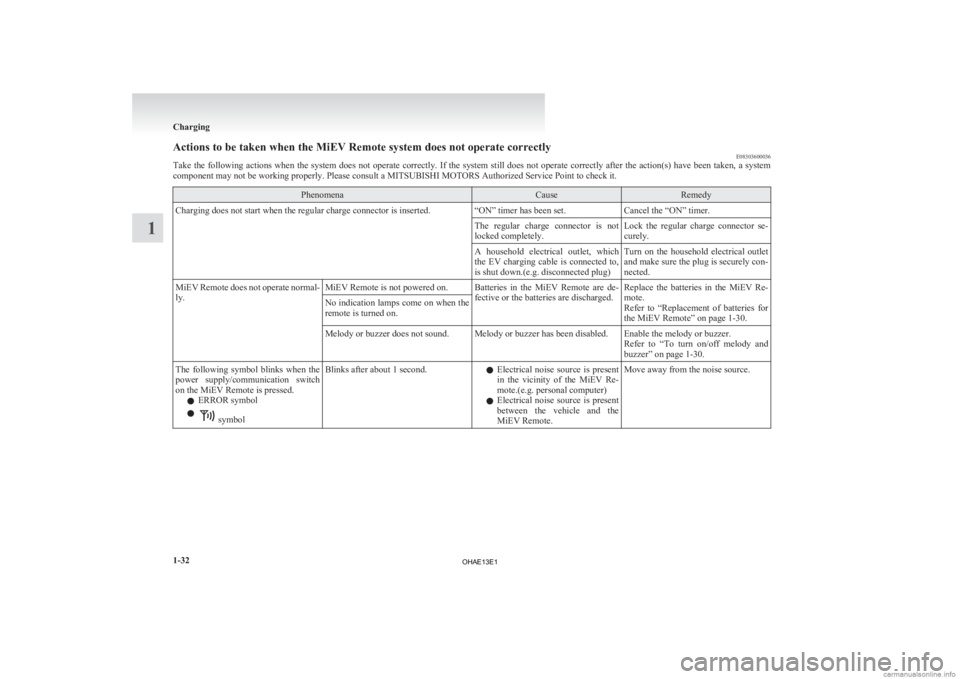
Actions to be taken when the MiEV Remote system does not operate correctly
E08303600036
Take
the following actions when the system does not operate correctly. If the system still does not operate correctly after the action(s) have been taken, a system
component may not be working properly. Please consult a MITSUBISHI MOTORS Authorized Service Point to check it. Phenomena Cause Remedy
Charging does not start when the regular charge connector is inserted. “ON” timer has been set.Cancel the “ON” timer.
The regular charge connector is not
locked completely. Lock the regular charge connector se-
curely.
A household electrical outlet, which
the
EV charging cable is connected to,
is shut down.(e.g. disconnected plug) Turn on the household electrical outlet
and make sure the plug is securely con-
nected.
MiEV Remote does not operate normal-
ly. MiEV Remote is not powered on. Batteries in the MiEV Remote are de-
fective or the batteries are discharged.Replace the batteries in the MiEV Re-
mote.
Refer
to “Replacement of batteries for
the MiEV Remote” on page 1-30.
No indication lamps come on when the
remote is turned on.
Melody or buzzer does not sound. Melody or buzzer has been disabled. Enable the melody or buzzer.
Refer
to “To turn on/off melody and
buzzer” on page 1-30.
The following symbol blinks when the
power
supply/communication switch
on the MiEV Remote is pressed.
l ERROR symbol
l symbol
Blinks after about 1 second.
lElectrical noise source is present
in the vicinity of the MiEV Re-
mote.(e.g. personal computer)
l Electrical noise source is present
between the vehicle and the
MiEV Remote. Move away from the noise source.Charging
1-32
1
OHAE13E1
Page 55 of 258
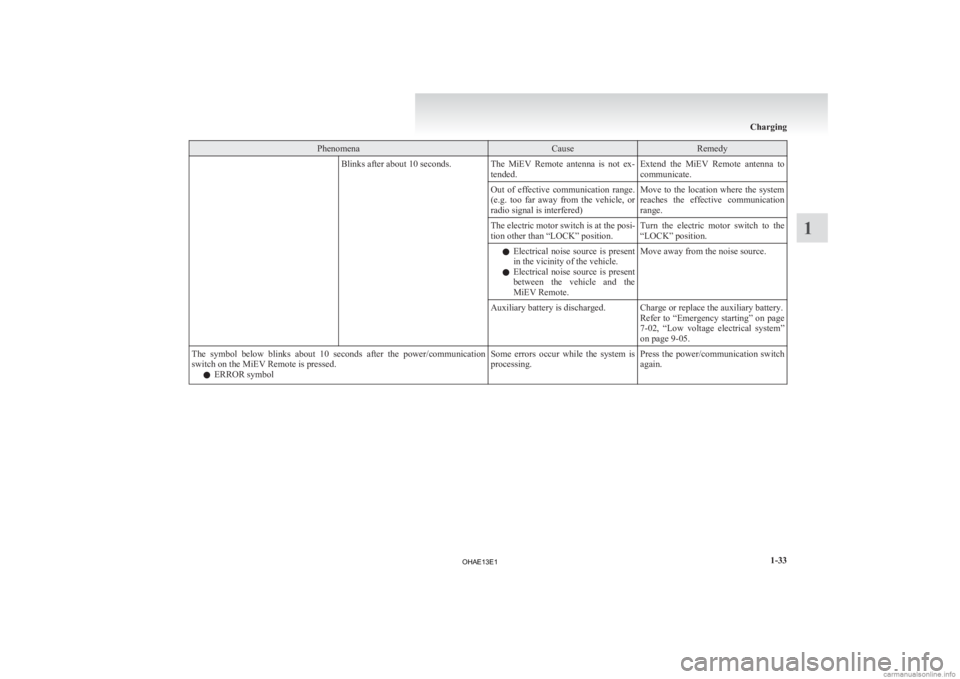
Phenomena Cause Remedy
Blinks after about 10 seconds. The MiEV Remote antenna is not ex-
tended.Extend the MiEV Remote antenna to
communicate.
Out of effective communication range.
(e.g. too far away from the vehicle, or
radio signal is interfered) Move to the location where the system
reaches
the effective communication
range.
The electric motor switch is at the posi-
tion other than “LOCK” position. Turn the electric motor switch to the
“LOCK” position.
l Electrical
noise source is present
in the vicinity of the vehicle.
l Electrical noise source is present
between the vehicle and the
MiEV Remote. Move away from the noise source.
Auxiliary battery is discharged. Charge or replace the auxiliary battery. Refer
to “Emergency starting” on page
7-02, “Low voltage electrical system”
on page 9-05.
The symbol below blinks about 10 seconds after the power/communication
switch on the MiEV Remote is pressed. l ERROR symbol Some errors occur while the system is
processing.
Press the power/communication switch
again. Charging
1-33 1
OHAE13E1
Page 63 of 258
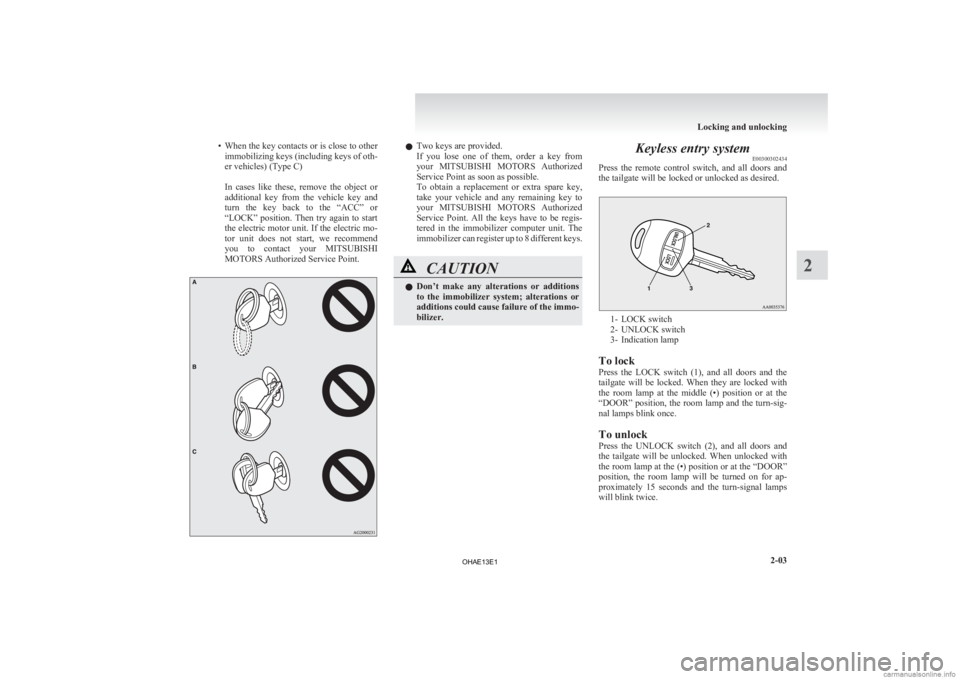
• When the key contacts or is close to other
immobilizing keys (including keys of oth-
er vehicles) (Type C)
In cases like these, remove the object or
additional key from the vehicle key and
turn the key back to the “ACC” or
“LOCK” position. Then try again to start
the electric motor unit. If the electric mo-
tor unit does not start, we recommend
you to contact your MITSUBISHI
MOTORS Authorized Service Point. l
Two keys are provided.
If
you lose one of them, order a key from
your MITSUBISHI MOTORS Authorized
Service Point as soon as possible.
To obtain a replacement or extra spare key,
take your vehicle and any remaining key to
your MITSUBISHI MOTORS Authorized
Service Point. All the keys have to be regis-
tered in the immobilizer computer unit. The
immobilizer can register up to 8 different keys. CAUTION
l
Don’t
make any alterations or additions
to the immobilizer system; alterations or
additions could cause failure of the immo-
bilizer. Keyless entry system
E00300302434
Press
the remote control switch, and all doors and
the tailgate will be locked or unlocked as desired. 1- LOCK switch
2-
UNLOCK switch
3- Indication lamp
To lock
Press the LOCK switch (1), and all doors and the
tailgate will be locked. When they are locked with
the room lamp at the middle (•) position or at the
“DOOR” position, the room lamp and the turn-sig-
nal lamps blink once.
To unlock
Press the UNLOCK switch (2), and all doors and
the tailgate will be unlocked. When unlocked with
the room lamp at the (•) position or at the “DOOR”
position, the room lamp will be turned on for ap-
proximately 15 seconds and the turn-signal lamps
will blink twice. Locking and unlocking
2-03 2
OHAE13E1
Page 126 of 258
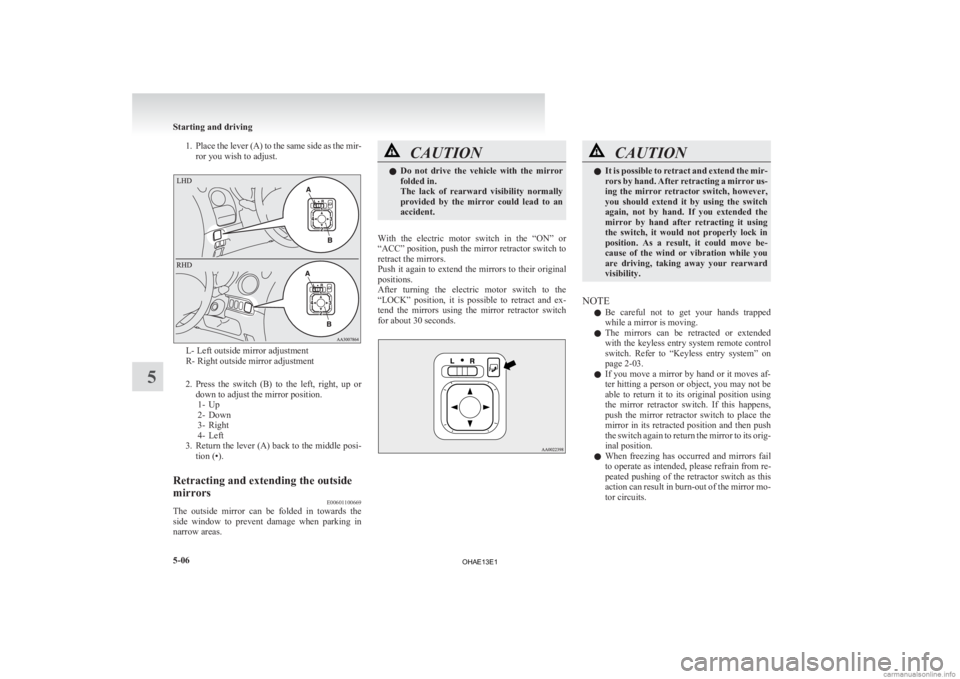
1. Place the lever (A) to the same side as the mir-
ror you wish to adjust. L- Left outside mirror adjustment
R- Right outside mirror adjustment
2. Press
the switch (B) to the left, right, up or
down to adjust the mirror position. 1- Up
2- Down
3- Right
4- Left
3. Return the lever (A) back to the middle posi- tion (•).
Retracting and extending the outside
mirrors E00601100669
The outside mirror can be folded in towards the
side
window to prevent damage when parking in
narrow areas. CAUTION
l
Do
not drive the vehicle with the mirror
folded in.
The lack of rearward visibility normally
provided by the mirror could lead to an
accident.
With the electric motor switch in the “ON” or
“ACC”
position, push the mirror retractor switch to
retract the mirrors.
Push it again to extend the mirrors to their original
positions.
After turning the electric motor switch to the
“LOCK” position, it is possible to retract and ex-
tend the mirrors using the mirror retractor switch
for about 30 seconds. CAUTION
l
It
is possible to retract and extend the mir-
rors by hand. After retracting a mirror us-
ing the mirror retractor switch, however,
you should extend it by using the switch
again, not by hand. If you extended the
mirror by hand after retracting it using
the switch, it would not properly lock in
position. As a result, it could move be-
cause of the wind or vibration while you
are driving, taking away your rearward
visibility.
NOTE l Be
careful not to get your hands trapped
while a mirror is moving.
l The mirrors can be retracted or extended
with the keyless entry system remote control
switch. Refer to “Keyless entry system” on
page 2-03.
l If you move a mirror by hand or it moves af-
ter hitting a person or object, you may not be
able to return it to its original position using
the mirror retractor switch. If this happens,
push the mirror retractor switch to place the
mirror in its retracted position and then push
the switch again to return the mirror to its orig-
inal position.
l When freezing has occurred and mirrors fail
to operate as intended, please refrain from re-
peated pushing of the retractor switch as this
action can result in burn-out of the mirror mo-
tor circuits. Starting and driving
5-06
5
OHAE13E1