transmission MITSUBISHI iMiEV 2013 Owner's Manual (in English)
[x] Cancel search | Manufacturer: MITSUBISHI, Model Year: 2013, Model line: iMiEV, Model: MITSUBISHI iMiEV 2013Pages: 258, PDF Size: 13 MB
Page 14 of 258
Familiarizing yourself with
i-MiEV E00202600016
This
section describes features that the i-MiEV has
as an electric vehicle and gives precautions that
you should observe. It is important. Please read it
carefully.
Main features E00202700059
l Energy
required for driving is only electrici-
ty and fuel supply is not required.
l The traction battery and electric motor unit
are mounted outside the passenger compart-
ment. In this way, passenger space is ob-
tained for riding of four adults.
l With the high performance motor, noise and
vibration during driving are greatly limited
and powerful acceleration can also be ob-
tained.
l With regenerative braking, the traction bat-
tery is automatically charged when the accel-
erator is released.
l The vehicle can be charged from general pow-
er outlets (rated AC 220-240 V).
l Charge with the quick charger for i-MiEV is
also available.
l The creeping behaviour occurs in i-MiEV
like a vehicle with automatic transmission. WARNING
l Always
pay special attention to pedes-
trians.
Even if the Acoustic Vehicle Alerting Sys-
tem (AVAS) sounds, pedestrians may not
notice your vehicle. Refer to “Acoustic Ve-
hicle Alerting System (AVAS)” on page
5-12.
Regenerative braking
It is equivalent to engine braking of an engine vehi-
cle.
If you step off the accelerator pedal during driv-
ing, motion energy is converted into electric energy
using the motor as a power generator.
In this conversion, braking force is generated and
converted electric energy is charged in the traction
battery.
Regenerative braking is stronger in the order of the
selector lever position of “C” (COMFORT), “D”
(DRIVE), “B” (BRAKE).
Put the selector lever to the “B” (BRAKE) or “C”
(COMFORT) position according to the driving con-
dition.
“B”: Strong regenerative braking (For downhill)
“C”: Weak regenerative braking (For long cruising)
NOTE
l If a problem occurs in the electric motor unit,
or if the ABS and/or the ASC have been acti-
vated, the regenerative braking will be restric-
ted. The foot brake will still operate. Traction battery
E00202800050 WARNING
l A
sealed lithium ion high voltage battery
is adopted for i-MiEV. If the lithium ion
battery is improperly disposed of, there is
a risk of severe burns and electrical
shock that may result in serious injury or
death and there is also a risk of environ-
mental damage.
l Never attempt to use the traction battery
for any other purpose.
l It
is the battery to operate the motor (electric
motor unit) and the air conditioning.
In addition to the traction battery, i-MiEV
has the auxiliary battery to operate lamps, wip-
ers, etc.
l Compact, light-weight lithium ion battery
with high energy density is used for the trac-
tion battery.
l The lithium ion battery has the following char-
acteristics. Please read this carefully and
treat the battery paying attention to the fol-
lowing: General information
02
OHAE13E1
Page 46 of 258
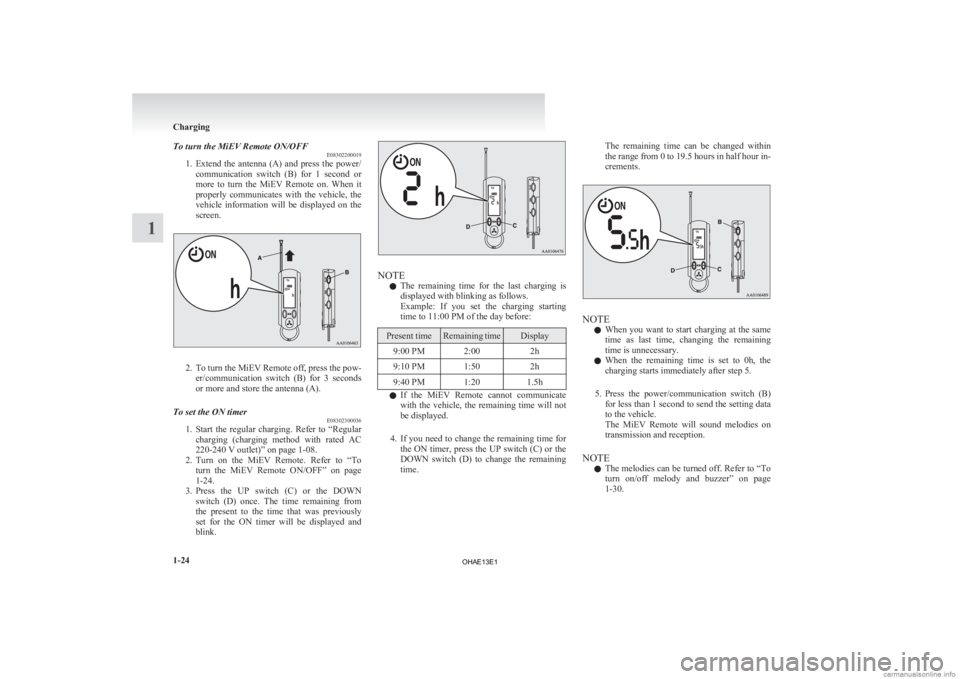
To turn the MiEV Remote ON/OFF
E08302200019
1. Extend
the antenna (A) and press the power/
communication switch (B) for 1 second or
more to turn the MiEV Remote on. When it
properly communicates with the vehicle, the
vehicle information will be displayed on the
screen. 2. To
turn the MiEV Remote off, press the pow-
er/communication switch (B) for 3 seconds
or more and store the antenna (A).
To set the ON timer E08302300036
1. Start
the regular charging. Refer to “Regular
charging (charging method with rated AC
220-240 V outlet)” on page 1-08.
2. Turn on the MiEV Remote. Refer to “To turn the MiEV Remote ON/OFF” on page
1-24.
3. Press the UP switch (C) or the DOWN switch (D) once. The time remaining from
the present to the time that was previously
set for the ON timer will be displayed and
blink. NOTE
l The
remaining time for the last charging is
displayed with blinking as follows.
Example: If you set the charging starting
time to 11:00 PM of the day before: Present time Remaining time Display
9:00 PM 2:00 2h
9:10 PM 1:50 2h
9:40 PM 1:20 1.5h l
If
the MiEV Remote cannot communicate
with the vehicle, the remaining time will not
be displayed.
4. If you need to change the remaining time for the ON timer, press the UP switch (C) or the
DOWN switch (D) to change the remaining
time. The remaining time can be changed within
the
range from 0 to 19.5 hours in half hour in-
crements. NOTE
l When
you want to start charging at the same
time as last time, changing the remaining
time is unnecessary.
l When the remaining time is set to 0h, the
charging starts immediately after step 5.
5. Press the power/communication switch (B) for less than 1 second to send the setting data
to the vehicle.
The MiEV Remote will sound melodies on
transmission and reception.
NOTE l The melodies can be turned off. Refer to “To
turn on/off melody and buzzer” on page
1-30. Charging
1-24
1
OHAE13E1
Page 47 of 258

l
If a communication error occurs or the MiEV
Remote
System is not functioning properly,
the buzzer will sound. Refer to “Display of
MiEV Remote during communicating with
vehicle” on page 1-27.
l If the OFF Timer is unset when setting the
ON timer, the OFF timer will be automatical-
ly set with “fully charged”.
l To set OFF Timer, refer to “To set OFF Tim-
er” on page 1-26.
6. To turn off the MiEV Remote, refer to “To turn the MiEV Remote ON/OFF” on page
1-24.
NOTE l The energy level gauge in the instrument pan-
el on the vehicle will illuminate and the charg-
ing indicator will blink approximately 30 sec-
onds after the vehicle has received the setting
for the ON timer.
After approximately 30 seconds, the energy
level gauge and the charging indicator will go off, and the vehicle will be prepared for
the timer charging.
Energy level gauge
Charging indicator l
Turning
the electric motor switch to the
“ON” position or the “ACC” position will can-
cel the timer charging.
l If the MODE switch is pressed while chang-
ing the ON timer setting, the change will be
cancelled.
l The symbol on the MiEV Remote will
be illuminated while the vehicle is charging.
l If
the charge connector is disconnected be-
fore the time set by the ON timer, the timer
charging is not cancelled. If the charge con-
nector is re-connected again before starting
the charge or setting the charge timers, the
timer charging will resume. To start the charging immediately after the ON
timer has been set
E08302400011
1. Turn
on the MiEV Remote. Refer to “To
turn the MiEV Remote ON/OFF” on page
1-24.
2. Press the UP switch (C) or the DOWN switch (D) once, and the remaining time
from the present to the time set for the ON
timer will be displayed and blink. 3. Change
the remaining time to 0h by pressing
the UP switch (C) or the DOWN switch (D).
4. Press the power/communication switch (B) for less than 1 second to send the setting data
to the vehicle. The MiEV Remote will sound
melodies on transmission and reception. The
charging will start.
Refer to “Regular charging (charging method
with rated AC 220-240 V outlet)” on page
1-08.
5. Turn off the MiEV Remote. Refer to “To turn the MiEV Remote ON/OFF” on page
1-24. Charging
1-25 1
OHAE13E1
Page 48 of 258
To set OFF Timer
E08302500038
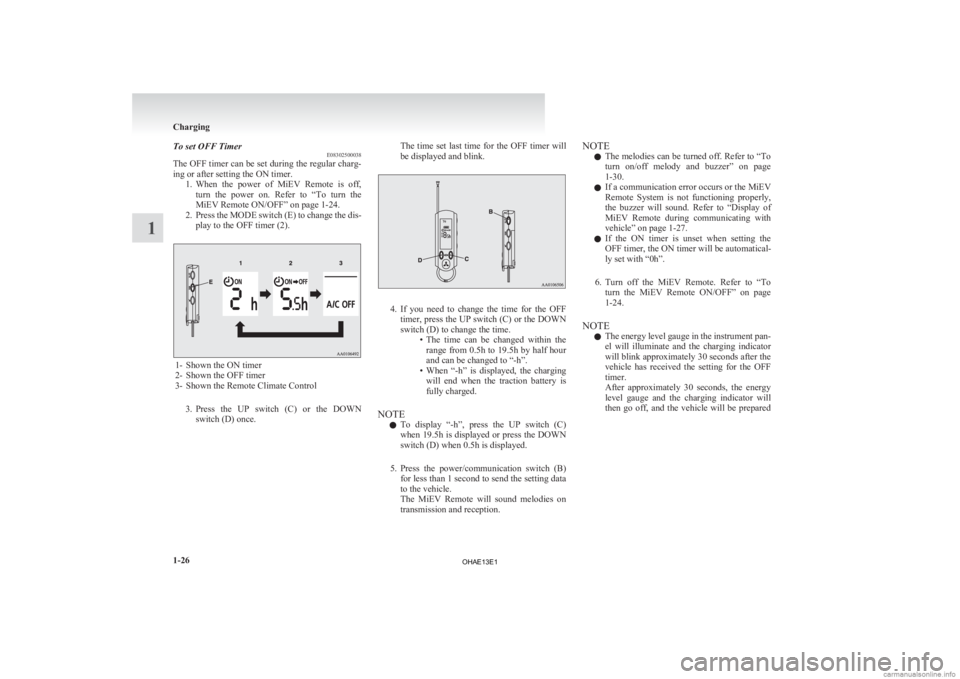
The
OFF timer can be set during the regular charg-
ing or after setting the ON timer. 1. When the power of MiEV Remote is off,turn the power on. Refer to “To turn the
MiEV Remote ON/OFF” on page 1-24.
2. Press the MODE switch (E) to change the dis- play to the OFF timer (2). 1- Shown the ON timer
2-
Shown the OFF timer
3- Shown the Remote Climate Control
3. Press the UP switch (C) or the DOWNswitch (D) once. The time set last time for the OFF timer will
be displayed and blink.
4. If
you need to change the time for the OFF
timer, press the UP switch (C) or the DOWN
switch (D) to change the time. • The time can be changed within therange from 0.5h to 19.5h by half hour
and can be changed to “-h”.
• When “-h” is displayed, the charging will end when the traction battery is
fully charged.
NOTE l To display “-h”, press the UP switch (C)
when 19.5h is displayed or press the DOWN
switch (D) when 0.5h is displayed.
5. Press the power/communication switch (B) for less than 1 second to send the setting data
to the vehicle.
The MiEV Remote will sound melodies on
transmission and reception. NOTE
l The
melodies can be turned off. Refer to “To
turn on/off melody and buzzer” on page
1-30.
l If a communication error occurs or the MiEV
Remote System is not functioning properly,
the buzzer will sound. Refer to “Display of
MiEV Remote during communicating with
vehicle” on page 1-27.
l If the ON timer is unset when setting the
OFF timer, the ON timer will be automatical-
ly set with “0h”.
6. Turn off the MiEV Remote. Refer to “To turn the MiEV Remote ON/OFF” on page
1-24.
NOTE l The energy level gauge in the instrument pan-
el will illuminate and the charging indicator
will blink approximately 30 seconds after the
vehicle has received the setting for the OFF
timer.
After approximately 30 seconds, the energy
level gauge and the charging indicator will
then go off, and the vehicle will be prepared Charging
1-26
1
OHAE13E1
Page 51 of 258
WARNING
l Improper charging can result in fire, prop-
erty damage, and serious injury or death.
Carefully read and follow instructions in
“Basic knowledge for charging” on page
1-04 and “Charging method with rated
AC 220-240 V outlet” on page 1-09.
1. Start
charging. Refer to “Charging method with rated AC 220-240 V outlet” on page
1-09.
2. Turn on the MiEV Remote. Refer to “To turn the MiEV Remote ON/OFF” on page
1-24.
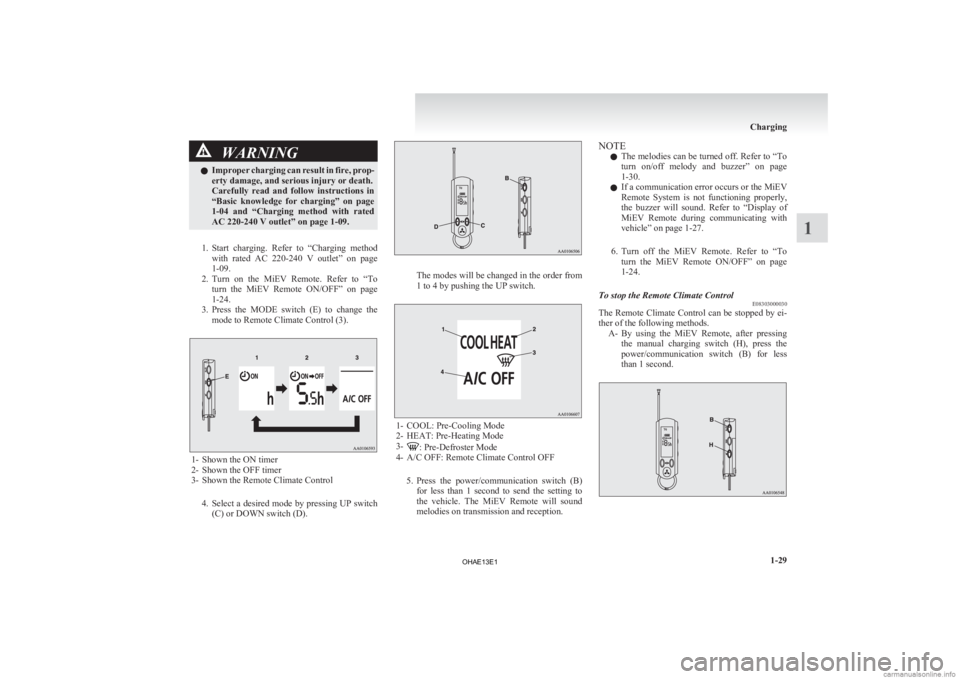
3. Press the MODE switch (E) to change the mode to Remote Climate Control (3). 1- Shown the ON timer
2-
Shown the OFF timer
3- Shown the Remote Climate Control
4. Select a desired mode by pressing UP switch(C) or DOWN switch (D). The modes will be changed in the order from
1 to 4 by pushing the UP switch.
1- COOL: Pre-Cooling Mode
2-
HEAT: Pre-Heating Mode
3- : Pre-Defroster Mode
4-
A/C OFF: Remote Climate Control OFF
5. Press the power/communication switch (B) for less than 1 second to send the setting to
the vehicle. The MiEV Remote will sound
melodies on transmission and reception. NOTE
l The
melodies can be turned off. Refer to “To
turn on/off melody and buzzer” on page
1-30.
l If a communication error occurs or the MiEV
Remote System is not functioning properly,
the buzzer will sound. Refer to “Display of
MiEV Remote during communicating with
vehicle” on page 1-27.
6. Turn off the MiEV Remote. Refer to “To turn the MiEV Remote ON/OFF” on page
1-24.
To stop the Remote Climate Control E08303000030
The Remote Climate Control can be stopped by ei-
ther of the following methods.
A- By
using the MiEV Remote, after pressing
the manual charging switch (H), press the
power/communication switch (B) for less
than 1 second. Charging
1-29 1
OHAE13E1
Page 121 of 258
Economical driving.......................................................................5-02
Driving, alcohol and drugs
........................................................... 5-02
Safe driving techniques ................................................................ 5-03
Parking brake................................................................................ 5-03
Parking.......................................................................................... 5-04
Inside rear-view mirror ................................................................. 5-05
Outside rear-view mirrors ............................................................. 5-05
Electric motor switch .................................................................... 5-07
Steering wheel lock ...................................................................... 5-08
Starting the electric motor unit ..................................................... 5-08
Transmission................................................................................. 5-09
Driving the vehicle ....................................................................... 5-11
Inspection
and maintenance following rough road oper-
ation.......................................................................................... 5-12
Acoustic Vehicle Alerting System (AVAS) .................................5-12
Braking......................................................................................... 5-14
Brake assist system....................................................................... 5-15
Anti-lock brake system (ABS) ..................................................... 5-15
Electric power steering system (EPS) ..........................................5-17
Active stability control (ASC) ...................................................... 5-18
Cargo loads................................................................................... 5-20
Trailer towing ............................................................................... 5-21Starting and driving
5
OHAE13E1
Page 129 of 258
5. Press the brake pedal with your right foot.
Turn the electric motor switch fully, keep it
in the “START” position for one to two sec-
onds, and slowly return it to its original posi-
tion. When you hear the startup sound and
the ready indicator comes on, startup of the
electric motor unit is complete.
NOTE l If the ready indicator does not illuminate, re-
turn the electric motor switch to the “LOCK”
position once. After a while, turn it to the
“START” position to start the electric motor
unit.
l To prevent a careless start, your vehicle is
equipped with electric motor reminder. Refer
to “Electric motor reminder” on page 5-09.
Electric motor reminder E00630700029
If the driver’s door is opened while the key is in
the
“ON” position, the electric motor reminder buz-
zer sounds intermittently to remind the key is in the
electric motor switch.
Selector lever reminder E00630800017
If the driver’s door is opened while the selector lev-
er
is placed into the other positions from the “P”
(PARK) position while the electric motor switch is
on, the selector lever reminder buzzer sounds in the
interval shorter than electric motor reminder buzzer. Transmission
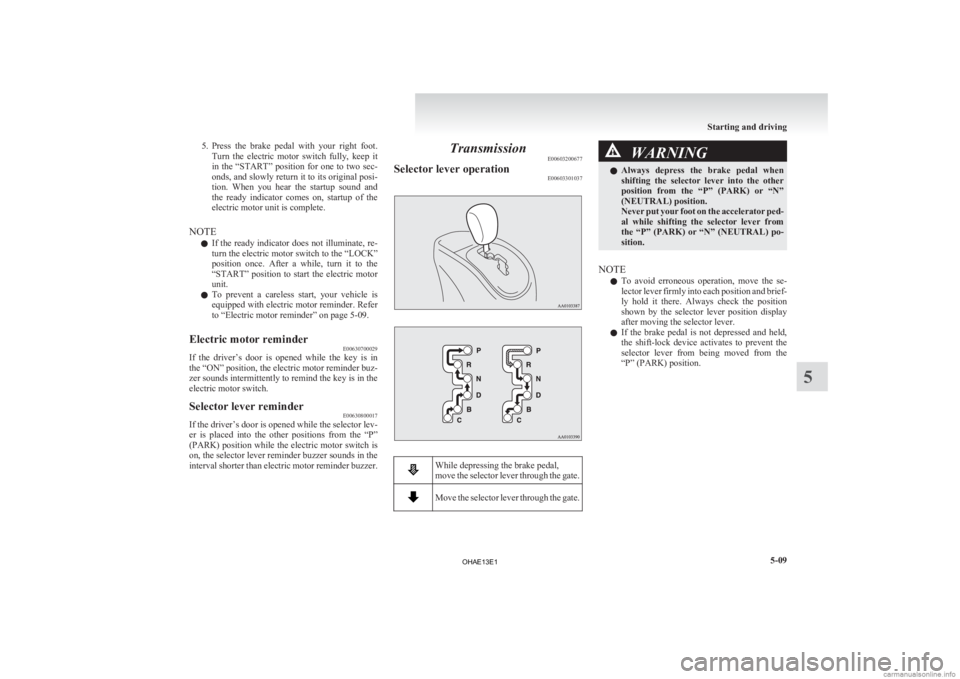
E00603200677
Selector lever operation E00603301037 While depressing the brake pedal,
move
the selector lever through the gate. Move the selector lever through the gate. WARNING
l Always
depress the brake pedal when
shifting the selector lever into the other
position from the “P” (PARK) or “N”
(NEUTRAL) position.
Never put your foot on the accelerator ped-
al while shifting the selector lever from
the “P” (PARK) or “N” (NEUTRAL) po-
sition.
NOTE l To
avoid erroneous operation, move the se-
lector lever firmly into each position and brief-
ly hold it there. Always check the position
shown by the selector lever position display
after moving the selector lever.
l If the brake pedal is not depressed and held,
the shift-lock device activates to prevent the
selector lever from being moved from the
“P” (PARK) position. Starting and driving
5-09 5
OHAE13E1
Page 130 of 258
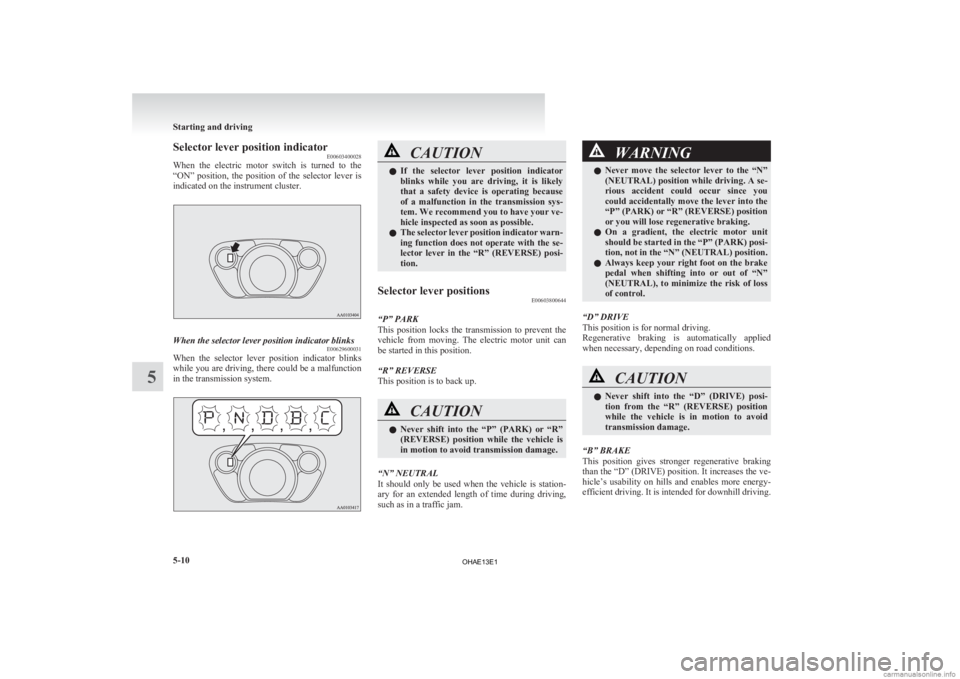
Selector lever position indicator
E00603400028
When
the electric motor switch is turned to the
“ON” position, the position of the selector lever is
indicated on the instrument cluster. When the selector lever position indicator blinks
E00629600031
When the selector lever position indicator blinks
while
you are driving, there could be a malfunction
in the transmission system. CAUTION
l
If
the selector lever position indicator
blinks while you are driving, it is likely
that a safety device is operating because
of a malfunction in the transmission sys-
tem. We recommend you to have your ve-
hicle inspected as soon as possible.
l The selector lever position indicator warn-
ing function does not operate with the se-
lector lever in the “R” (REVERSE) posi-
tion.
Selector lever positions E00603800644
“P” PARK
This
position locks the transmission to prevent the
vehicle from moving. The electric motor unit can
be started in this position.
“R” REVERSE
This position is to back up. CAUTION
l
Never
shift into the “P” (PARK) or “R”
(REVERSE) position while the vehicle is
in motion to avoid transmission damage.
“N” NEUTRAL
It
should only be used when the vehicle is station-
ary for an extended length of time during driving,
such as in a traffic jam. WARNING
l Never
move the selector lever to the “N”
(NEUTRAL) position while driving. A se-
rious accident could occur since you
could accidentally move the lever into the
“P” (PARK) or “R” (REVERSE) position
or you will lose regenerative braking.
l On a gradient, the electric motor unit
should be started in the “P” (PARK) posi-
tion, not in the “N” (NEUTRAL) position.
l Always keep your right foot on the brake
pedal when shifting into or out of “N”
(NEUTRAL), to minimize the risk of loss
of control.
“D” DRIVE
This position is for normal driving.
Regenerative
braking is automatically applied
when necessary, depending on road conditions. CAUTION
l
Never
shift into the “D” (DRIVE) posi-
tion from the “R” (REVERSE) position
while the vehicle is in motion to avoid
transmission damage.
“B” BRAKE
This
position gives stronger regenerative braking
than the “D” (DRIVE) position. It increases the ve-
hicle’s usability on hills and enables more energy-
efficient driving. It is intended for downhill driving. Starting and driving
5-10
5
OHAE13E1
Page 131 of 258
WARNING
l Avoid sudden regenerative braking when
driving on wet or icy roads. Using sudden
regenerative braking under these condi-
tions could cause the vehicle to skid, re-
sulting in a serious accident.
NOTE l When
the traction battery level is nearly full
or the traction battery temperature is low, the
regenerative braking performance may be
weakened. In this case, drive the vehicle at a
low speed.
“C” COMFORT
This position gives weaker regenerative braking
than the “D” (DRIVE) position. It enables relaxed
driving in circumstances in which you do not accel-
erate or decelerate much (for example, suburban
driving). It is intended for long cruising. Driving the vehicle
E00629700016
Operation of the transmission E00629800020 CAUTION
l
Before
selecting a position with the elec-
tric motor unit running and the vehicle
stationary, fully depress the brake pedal
to prevent the vehicle from creeping.
The vehicle will begin to move as soon as
the transmission is engaged, the brakes
should only be released when you are
ready to drive away.
l Depress the brake pedal with the right
foot at all times.
Using the left foot could cause driver move-
ment delay in case of an emergency.
l Operating the accelerator pedal while the
other foot is resting on the brake pedal
will affect braking efficiency and may
cause premature wear of brake pads.
Waiting E00630900018
For short waiting periods, such as at traffic signals
the
vehicle can be left in selector lever position and
held stationary with the service brake.
For longer waiting periods with the electric motor
unit running, place the selector lever in the “N”
(NEUTRAL) position and apply the parking brake,
while holding the vehicle stationary with the serv-
ice brake. CAUTION
l
Never
hold the vehicle stationary while in
transmission on a hill with the accelera-
tor, always apply the parking brake and/
or service brake.
Parking E00631000016
To park the vehicle, first bring it to a complete
stop,
fully engage the parking brake, and then
move the selector lever to the “P” (PARK) position.
If you are going to leave the vehicle unattended, al-
ways switch off the electric motor unit and carry
the key.
NOTE
l On a slope, be sure to apply the parking
brake before moving the selector lever to the
“P” (PARK) position. If you move the selec-
tor lever to the “P” (PARK) position before
applying the parking brake, it may be diffi-
cult to disengage the selector lever from the
“P” (PARK) position when you next drive
the vehicle, requiring application of a strong
force to the selector lever to move it from the
“P” (PARK) position. Starting and driving
5-11 5
OHAE13E1
Page 195 of 258
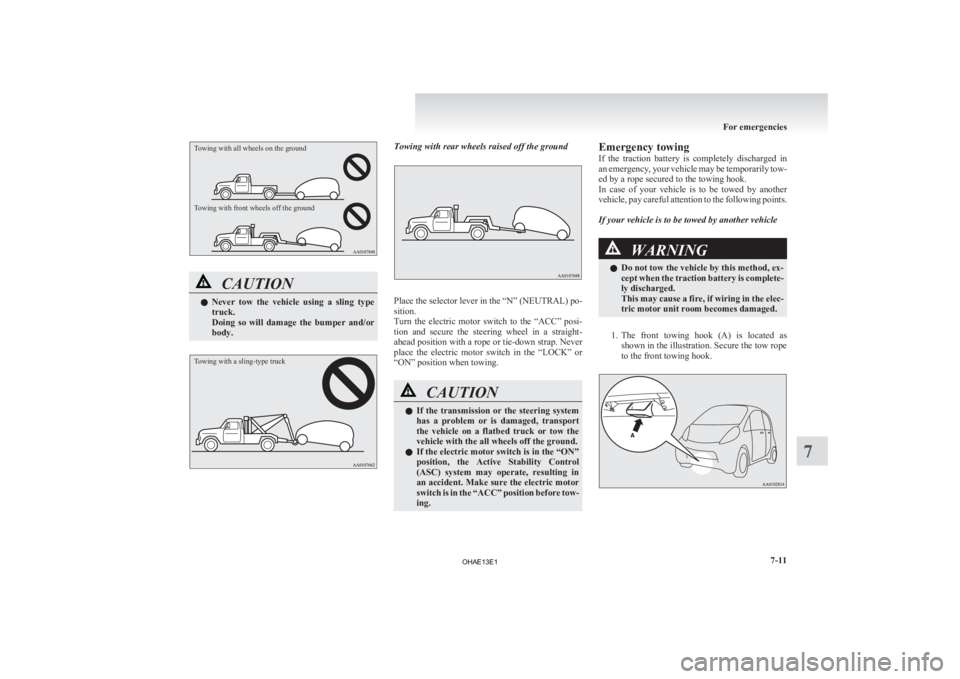
Towing with all wheels on the ground
Towing with front wheels off the groundCAUTION
l
Never
tow the vehicle using a sling type
truck.
Doing so will damage the bumper and/or
body.
Towing with a sling-type truck Towing with rear wheels raised off the ground
Place the selector lever in the “N” (NEUTRAL) po-
sition.
Turn
the electric motor switch to the “ACC” posi-
tion and secure the steering wheel in a straight-
ahead position with a rope or tie-down strap. Never
place the electric motor switch in the “LOCK” or
“ON” position when towing. CAUTION
l
If
the transmission or the steering system
has a problem or is damaged, transport
the vehicle on a flatbed truck or tow the
vehicle with the all wheels off the ground.
l If the electric motor switch is in the “ON”
position, the Active Stability Control
(ASC) system may operate, resulting in
an accident. Make sure the electric motor
switch is in the “ACC” position before tow-
ing. Emergency towing
If
the traction battery is completely discharged in
an emergency, your vehicle may be temporarily tow-
ed by a rope secured to the towing hook.
In case of your vehicle is to be towed by another
vehicle, pay careful attention to the following points.
If your vehicle is to be towed by another vehicle WARNING
l Do not tow the vehicle by this method, ex-
cept
when the traction battery is complete-
ly discharged.
This may cause a fire, if wiring in the elec-
tric motor unit room becomes damaged.
1. The
front towing hook (A) is located as shown in the illustration. Secure the tow rope
to the front towing hook. For emergencies
7-11 7
OHAE13E1