reset MITSUBISHI iMiEV 2016 1.G Owners Manual
[x] Cancel search | Manufacturer: MITSUBISHI, Model Year: 2016, Model line: iMiEV, Model: MITSUBISHI iMiEV 2016 1.GPages: 296, PDF Size: 7.79 MB
Page 47 of 296
Charging troubleshooting guide
General information/Charging 3-33
3
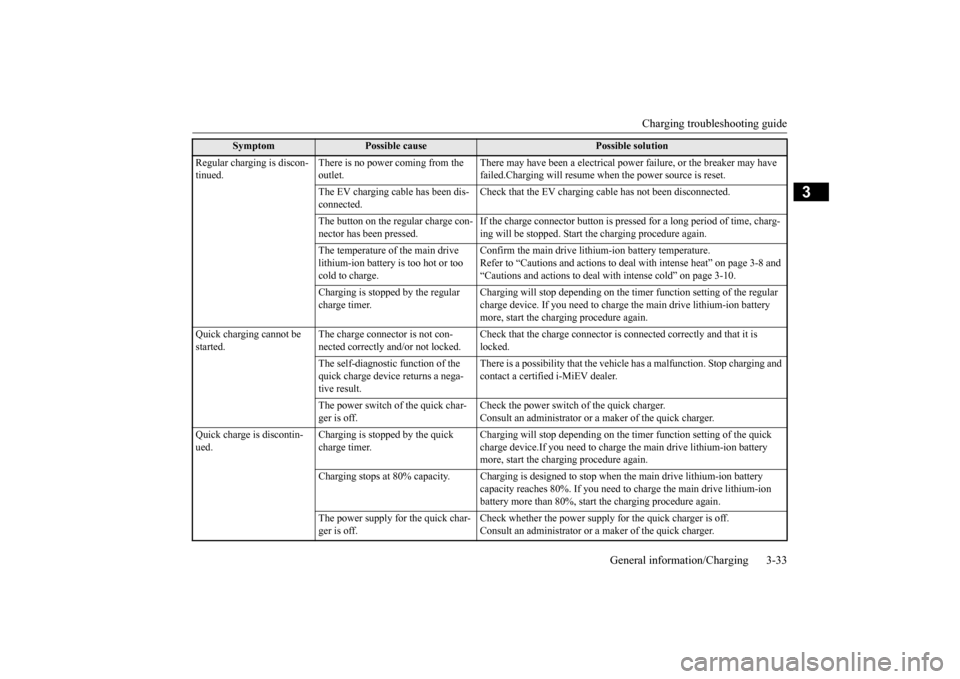
Regular charging is discon- tinued.
There is no power coming from the outlet.
There may have been a el
ectrical power failure,
or the breaker may have
failed.Charging will resume when
the power source is reset.
The EV charging cable has been dis- connected.
Check that the EV charging ca
ble has not been disconnected.
The button on the regular charge con- nector has been pressed.
If the charge connector button is pre
ssed for a long period of time, charg-
ing will be stopped. Start
the charging procedure again.
The temperature of the main drive lithium-ion battery is too hot or too cold to charge.
Confirm the main drive lithium-ion battery temperature. Refer to “Cautions and actions to deal
with intense heat” on page 3-8 and
“Cautions and actions to deal with intense cold” on page 3-10.
Charging is stopped by the regular charge timer.
Charging will stop depending on the
timer function setting of the regular
charge device. If you need to charge
the main drive lithium-ion battery
more, start the charging procedure again.
Quick charging cannot be started.
The charge connector is not con- nected correctly and/or not locked.
Check that the charge connector is
connected correctly and that it is
locked.
The self-diagnostic function of the quick charge device returns a nega- tive result.
There is a possibility that the vehicl
e has a malfunction. Stop charging and
contact a certified i-MiEV dealer.
The power switch of the quick char- ger is off.
Check the power switch of the quick charger. Consult an administrator or
a maker of the quick charger.
Quick charge is discontin- ued.
Charging is stopped by the quick charge timer.
Charging will stop depending on the
timer function setti
ng of the quick
charge device.If you need
to charge the main drive lithium-ion battery
more, start the charging procedure again.
Charging stops at 80% capacity. Cha
rging is designed to stop when th
e main drive lithium-ion battery
capacity reaches 80%. If you need to
charge the main drive lithium-ion
battery more than 80%, start
the charging procedure again.
The power supply for the quick char- ger is off.
Check whether the power supply for the quick charger is off. Consult an administrator or
a maker of the quick charger.
Symptom
Possible cause
Possible solution
BK0220401US.book 33 ページ 2015年6月3日 水曜日 午前7時42分
Page 68 of 296
MiEV Remote System 3-54 General information/Charging
3
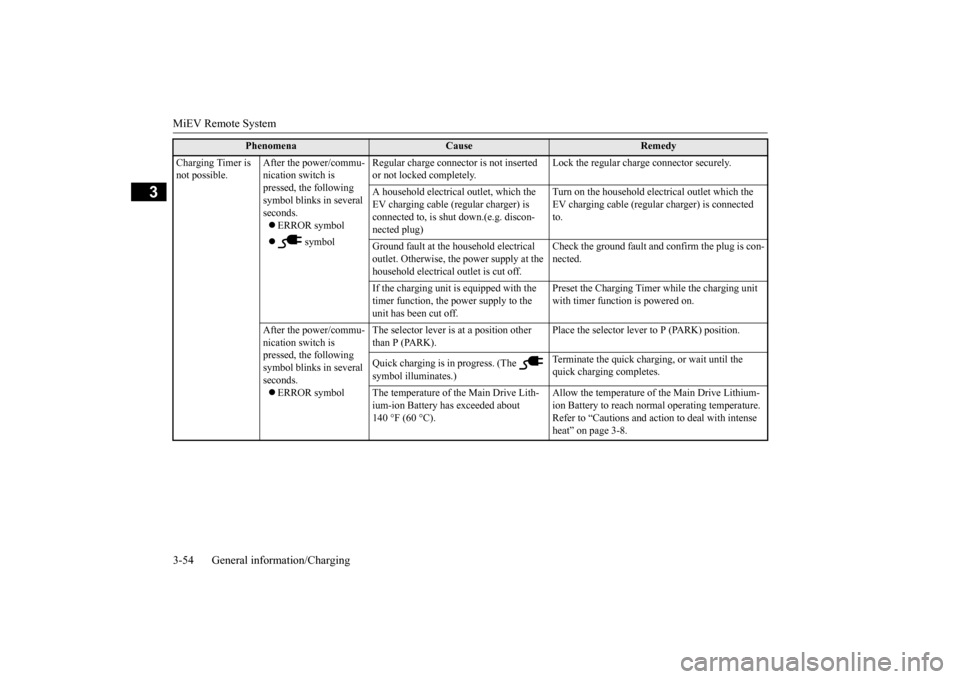
Charging Timer is not possible.
After the power/commu- nication switch is pressed, the following symbol blinks in several seconds. ERROR symbol
symbol
Regular charge connector is not inserted or not locked completely.
Lock the regular charge connector securely.
A household electrical
outlet, which the
EV charging cable (regular charger) is connected to, is shut down.(e.g. discon-nected plug)
Turn on the household electrical outlet which the EV charging cable (regular charger) is connected to.
Ground fault at the h
ousehold electrical
outlet. Otherwise, the power supply at the household electrical
outlet is cut off.
Check the ground fault and confirm the plug is con- nected.
If the charging unit is
equipped with the
timer function, the power supply to the unit has been cut off.
Preset the Charging Timer while the charging unit with timer function is powered on.
After the power/commu- nication switch is pressed, the following symbol blinks in several seconds. ERROR symbol
The selector lever is
at a position other
than P (PARK).
Place the selector leve
r to P (PARK) position.
Quick charging is in progress. (The symbol illuminates.)
quick charging completes.
The temperature of the Main Drive Lith- ium-ion Battery has exceeded about 140 °F (60 °C).
Allow the temperature of the Main Drive Lithium- ion Battery to reach norma
l operating temperature.
Refer to “Cautions and action to deal with intense heat” on page 3-8.
Phenomena
Cause
Remedy
BK0220401US.book 54 ページ 2015年6月3日 水曜日 午前7時42分
Page 69 of 296

MiEV Remote System
General information/Charging 3-55
3
Charging Timer is not possible.
The system is charged although the ON timer is being set.
Backup charging for the Main Drive Lith- ium-ion Battery Wa
rming System has
been operated.
This is not a malfunction.Charging will be termi- nated when the system has been charged enough for the Main Drive Lithium-ion Battery Warming Sys- tem.
Charging is preset, but the specified charging level is not satisfied. The charging level is not expected amount. Is not charged. Is not charged at the preset time.
The timer is cancelled or the preset time is changed by using anot
her MiEV Remote.
Check whether another person has operated his or her MiEV Remote.
The electric motor switch has been oper- ated before the system is charged.
Check whether the electric motor switch has been operated before the system is charged.
The temperature of the Main Drive Lith- ium-ion Battery has exceeded about 140 °F (60 °C).
Allow the temperature of the Main Drive Lithium- ion Battery to reach norm
al operating temperature.
Refer to “Cautions and acti
on to deal with intense
heat” on page 3-8.
Charging Timer is not preset correct
ly. Preset the timed charging again.
Although the charging is preset, too much time is needed to charge the sys- tem fully.
The Remote Climate Control has been activated.
Check whether the Remote Climate Control has been activated.
The Main Drive Lithium-ion Battery Warming System ha
s been operated.
Move the vehicle to a warmer location.
Temperature of the Main Drive Lithium- ion Battery is low.
Refer to “Cautions and acti
on to deal with intense
cold” on page 3-10.
Charging Timer is not possible.
It is not fully charged. If the charging unit is equipped with the
timer function, the power supply to the unit has been cut off.
Preset the Charging Timer while the charging unit with timer function is powered on.
Phenomena
Cause
Remedy
BK0220401US.book 55 ページ 2015年6月3日 水曜日 午前7時42分
Page 70 of 296
MiEV Remote System 3-56 General information/Charging
3
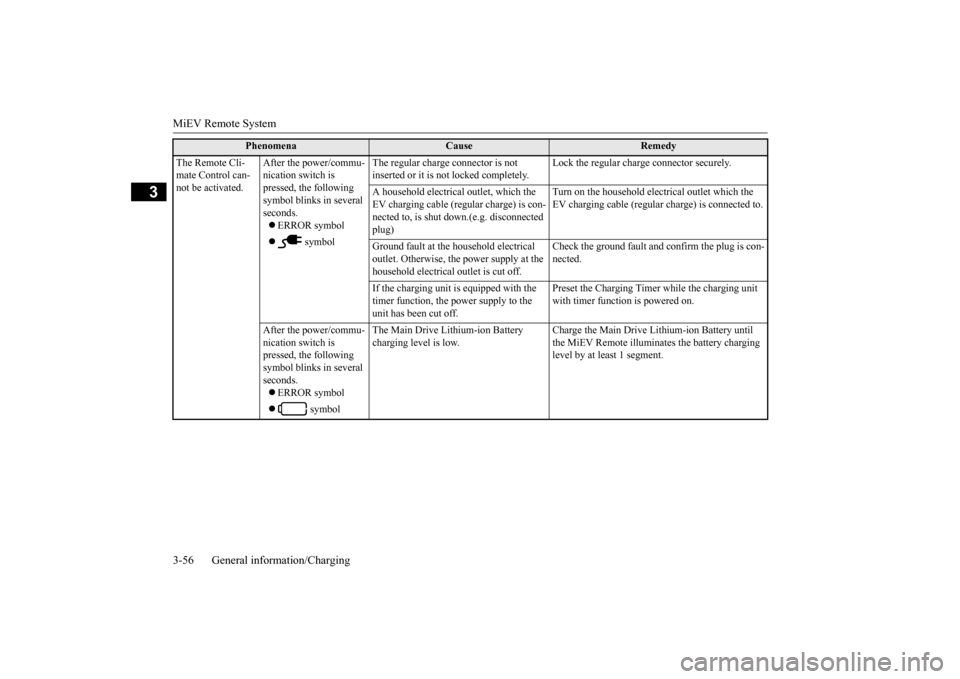
The Remote Cli- mate Control can-not be activated.
After the power/commu- nication switch is pressed, the following symbol blinks in several seconds. ERROR symbol
symbol
The regular charge connector is not inserted or it is not locked completely.
Lock the regular charge connector securely.
A household electrical
outlet, which the
EV charging cable (regu
lar charge) is con-
nected to, is shut down.(e.g. disconnected plug)
Turn on the household electrical outlet which the EV charging cable (regular charge) is connected to.
Ground fault at the h
ousehold electrical
outlet. Otherwise, the power supply at the household electrical
outlet is cut off.
Check the ground fault and confirm the plug is con- nected.
If the charging unit is
equipped with the
timer function, the power supply to the unit has been cut off.
Preset the Charging Timer while the charging unit with timer function is powered on.
After the power/commu- nication switch is pressed, the following symbol blinks in several seconds. ERROR symbol
symbol
The Main Drive Lithium-ion Battery charging level is low.
Charge the Main Drive Lithium-ion Battery until the MiEV Remote illuminates the battery charging level by at least 1 segment.
Phenomena
Cause
Remedy
BK0220401US.book 56 ページ 2015年6月3日 水曜日 午前7時42分
Page 144 of 296
Instrument cluster 5-36 Features and controls
5
N00519000375 N00519100246
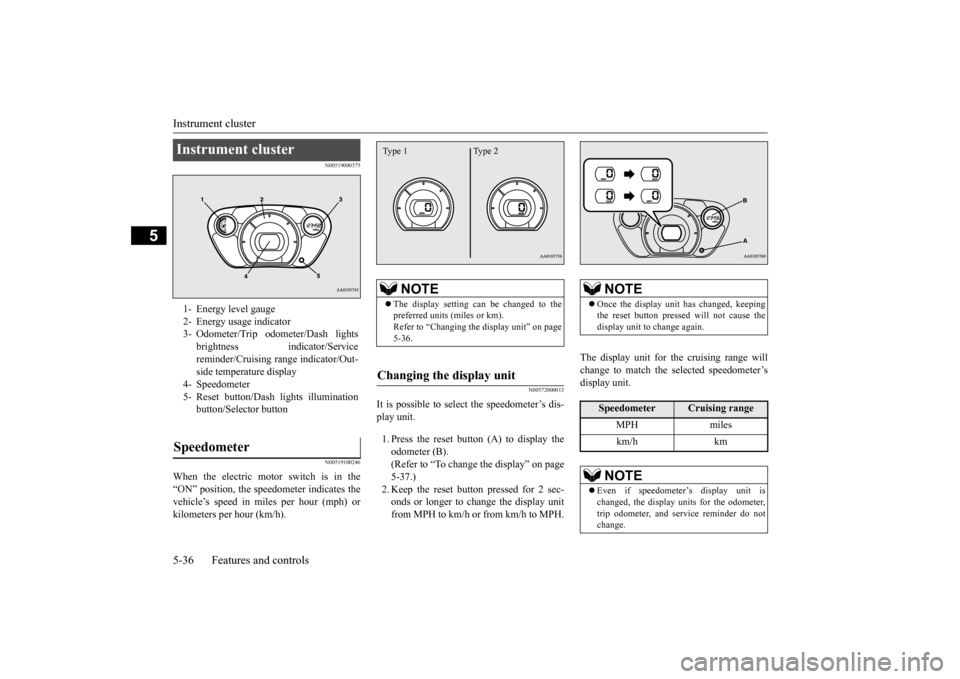
When the electric motor switch is in the “ON” position, the speedometer indicates thevehicle’s speed in mi
les per hour (mph) or
kilometers per hour (km/h).
N00572000013
It is possible to select
the speedometer’s dis-
play unit. 1. Press the reset button (A) to display the odometer (B). (Refer to “To change the display” on page5-37.) 2. Keep the reset button pressed for 2 sec- onds or longer to change the display unitfrom MPH to km/h or from km/h to MPH.
The display unit for the cruising range will change to match the selected speedometer’s display unit.
Instrument cluster 1- Energy level gauge2- Energy usage indicator3- Odometer/Trip odom
eter/Dash lights
brightness indi
cator/Service
reminder/Cruising ra
nge indicator/Out-
side temperature display
4- Speedometer 5- Reset button/Dash
lights illumination
button/Select
or button
Speedometer
NOTE
The display setting can be changed to the preferred units (miles or km).Refer to “Changing the
display unit” on page
5-36.
Changing the display unit Type 1 Type 2
NOTE
Once the display unit
has changed, keeping
the reset button pressed will not cause thedisplay unit to change again.Speedometer
Cruising range
MPH miles km/h km
NOTE
Even if speedometer’s display unit is changed, the display units for the odometer, trip odometer, and service reminder do not change.
BK0220401US.book 36 ページ 2015年6月3日 水曜日 午前7時42分
Page 145 of 296
Instrument cluster
Features and controls 5-37
5
N00572101037
The power consumption of the electric motor, the air conditioning, and power generation by the regenerative brake are indicated.When the ready indicator comes on, the red needle will move to th
e neutral point (A) and
then move to the right or left according to theamount of power consumption or power gen- eration. [When the red needle moves to the right of the neutral point] This indicates that the electric motor unit and/or the air conditioning are consumingelectric energy from the main drive lithium- ion battery. The more the needle moves to the right, themore electrical energy
is being consumed.
[When the red needle moves to the left of the neutral point] This indicates that electric energy is beinggenerated by the regenerative brake and charged to the main dr
ive lithium-ion battery.
The more the needle moves to the left, themore electric energy
is being generated.
N00519501449
Odometer, trip odometer, dash lights bright- ness indicator, service reminder, cruising
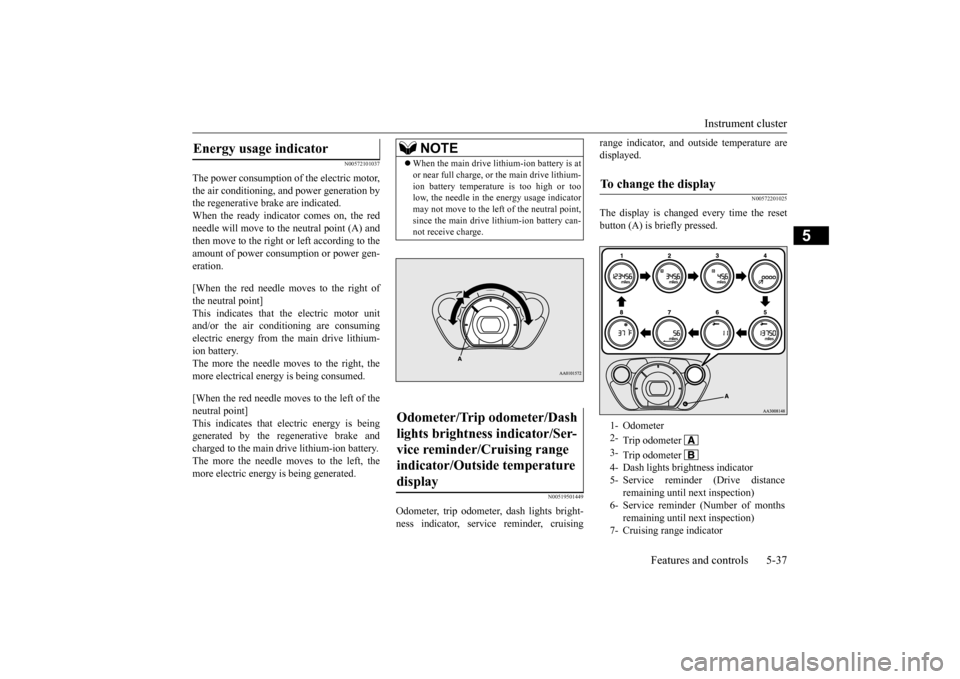
range indicator, and outside temperature are displayed.
N00572201025
The display is changed every time the resetbutton (A) is briefly pressed.
Energy usage indicator
NOTE
When the main drive lithium-ion battery is at or near full charge, or
the main drive lithium-
ion battery temperature is too high or toolow, the needle in the energy usage indicator may not move to the left of the neutral point, since the main drive lithium-ion battery can-not receive charge.
Odometer/Trip odometer/Dash lights brightness indicator/Ser- vice reminder/Cruising range indicator/Outside temperature display
To change the display 1- Odometer 2-
Trip odometer
3-
Trip odometer
4- Dash lights brightness indicator5- Service reminder (Drive distance
remaining until next inspection) remaining until next inspection)
BK0220401US.book 37 ページ 2015年6月3日 水曜日 午前7時42分
Page 146 of 296
Instrument cluster 5-38 Features and controls
5
N00572300016
The odometer indicates the total distance the vehicle has traveled.
N00572400020
The trip odometer shows the distance traveledsince the last time it was reset. There are two trip odometer displays: and
.
Trip odometer can be used to measure the distance traveled since the current trip began. At the same time, Trip odometer can be used to measure the distance from a secondlocation. To zero the counter, press and hold the reset button for more than 1 second. Only the cur-rently displayed va
lue will be reset.
If trip odometer is displayed, for exam-ple, only trip odometer
will be reset.
N00572500021
The service reminder s
hows the driving dis-
tance or number of m
onths remaining until
the next recommended
periodic maintenance
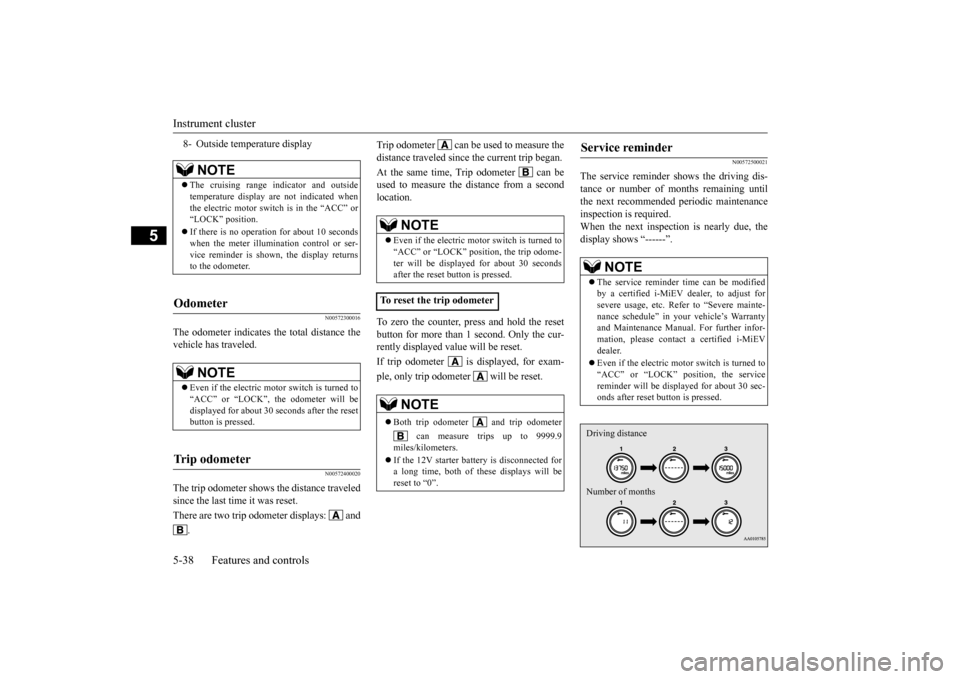
inspection is required. When the next inspection is nearly due, the display shows “------”.
8- Outside temperature display
NOTE
The cruising range indicator and outside temperature display are not indicated whenthe electric motor switch is in the “ACC” or “LOCK” position. If there is no operation for about 10 seconds when the meter illumination control or ser- vice reminder is shown, the display returnsto the odometer.
Odometer
NOTE
Even if the electric mo
tor switch is turned to
“ACC” or “LOCK”, the odometer will be displayed for about 30 se
conds after the reset
button is pressed.
Tr i p o d o m e t e r
NOTE
Even if the electric motor switch is turned to “ACC” or “LOCK” position, the trip odome-ter will be displayed for about 30 seconds after the reset button is pressed.
To reset the trip odometer
NOTE
Both trip odometer and trip odometer
can measure trips up to 9999.9
miles/kilometers. If the 12V starter battery is disconnected for a long time, both of th
ese displays will be
reset to “0”.
Service reminder
NOTE
The service reminder time can be modified by a certified i-MiEV dealer, to adjust for severe usage, etc. Refer to “Severe mainte- nance schedule” in your vehicle’s Warrantyand Maintenance Manual. For further infor- mation, please contac
t a certified i-MiEV
dealer. Even if the electric mo
tor switch is turned to
“ACC” or “LOCK” position, the servicereminder will be disp
layed for about 30 sec-
onds after reset button is pressed.Driving distance Number of months
BK0220401US.book 38 ページ 2015年6月3日 水曜日 午前7時42分
Page 147 of 296
Instrument cluster
Features and controls 5-39
5
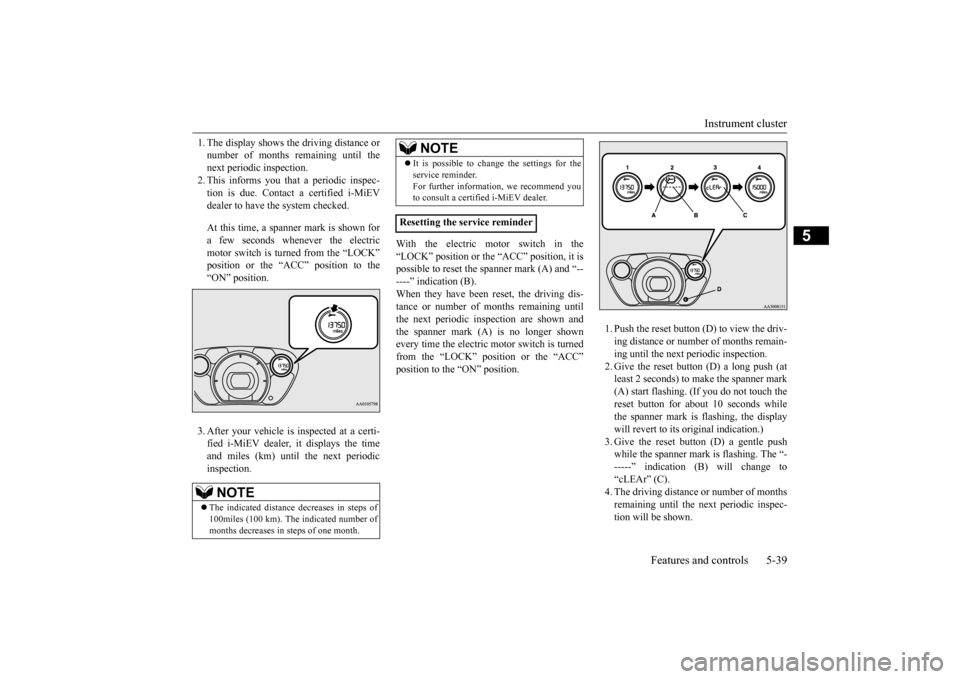
1. The display shows the driving distance or number of months remaining until thenext periodic inspection. 2. This informs you that a periodic inspec- tion is due. Contact a certified i-MiEVdealer to have the system checked. At this time, a spanner mark is shown for a few seconds whenever the electric motor switch is turned from the “LOCK”position or the “ACC” position to the “ON” position. 3. After your vehicle is
inspected at a certi-
fied i-MiEV dealer, it displays the time and miles (km) until
the next periodic
inspection.
With the electric motor switch in the “LOCK” position or the “ACC” position, it is possible to reset the spanner mark (A) and “------” indication (B). When they have been
reset, the driving dis-
tance or number of m
onths remaining until
the next periodic inspection are shown and the spanner mark (A) is no longer shown every time the electric motor switch is turnedfrom the “LOCK” position or the “ACC” position to the “ON” position.
1. Push the reset button (D) to view the driv- ing distance or number of months remain-ing until the next periodic inspection. 2. Give the reset button (D) a long push (at least 2 seconds) to ma
ke the spanner mark
(A) start flashing. (If you do not touch the reset button for about
10 seconds while
the spanner mark is
flashing, the display
will revert to its original indication.) 3. Give the reset button (D) a gentle push while the spanner mark is flashing. The “------” indication (B
) will change to
“cLEAr” (C). 4. The driving distance or number of monthsremaining until the next periodic inspec- tion will be shown.
NOTE
The indicated distance decreases in steps of 100miles (100 km). The indicated number ofmonths decreases in steps of one month.
It is possible to change the settings for the service reminder.For further information, we recommend youto consult a certified i-MiEV dealer.
Resetting the service reminder
NOTE
BK0220401US.book 39 ページ 2015年6月3日 水曜日 午前7時42分
Page 148 of 296
Instrument cluster 5-40 Features and controls
5
N00572600019
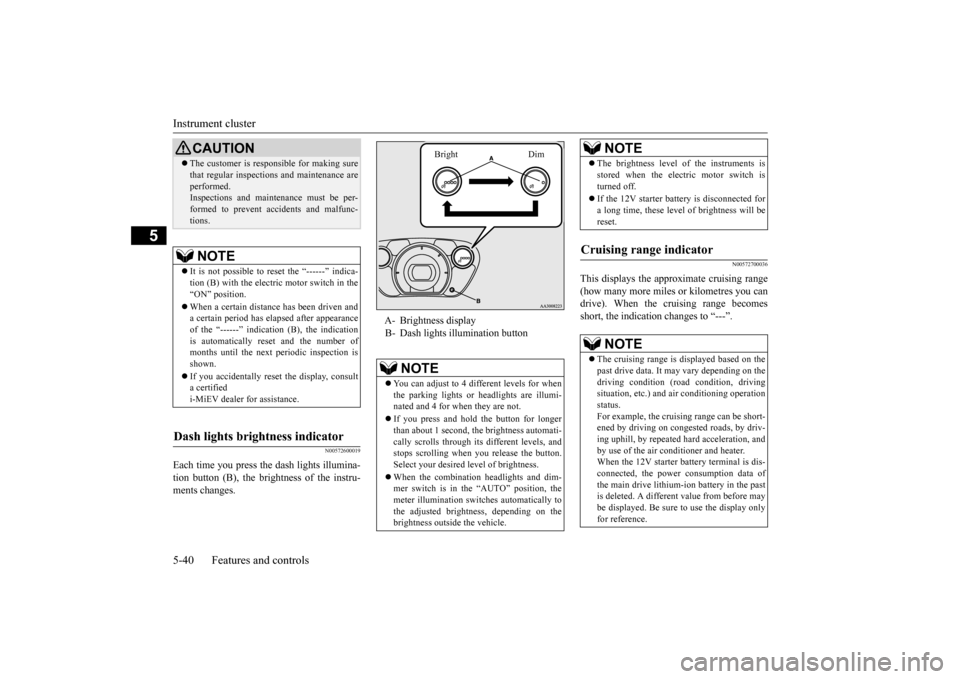
Each time you press the
dash lights illumina-
tion button (B), the brightness of the instru- ments changes.
N00572700036
This displays the approximate cruising range(how many more miles
or kilometres you can
drive). When the cruising range becomes short, the indicatio
n changes to “---”.
CAUTIONThe customer is responsible for making sure that regular inspections
and maintenance are
performed.Inspections and mainte
nance must be per-
formed to prevent accidents and malfunc- tions.NOTE
It is not possible to re
set the “------” indica-
tion (B) with the electric motor switch in the “ON” position. When a certain distance has been driven and a certain period has elapsed after appearance of the “------” indicati
on (B), the indication
is automatically re
set and the number of
months until the next
periodic inspection is
shown. If you accidentally reset
the display, consult
a certified i-MiEV dealer for assistance.
Dash lights brightness indicator
A- Brightness display B- Dash lights illumination button
NOTE
You can adjust to 4 different levels for when the parking lights or
headlights are illumi-
nated and 4 for when they are not. If you press and hold the button for longer than about 1 second, the brightness automati- cally scrolls through its different levels, andstops scrolling when you release the button. Select your desired
level of brightness.
When the combination headlights and dim- mer switch is in the “AUTO” position, the meter illumination switches automatically tothe adjusted brightne
ss, depending on the
brightness outsi
de the vehicle.
Bright Dim
The brightness level
of the instruments is
stored when the electric motor switch isturned off. If the 12V starter battery is disconnected for a long time, these level of brightness will bereset.
Cruising range indicator
NOTE
The cruising range is displayed based on the past drive data. It ma
y vary depending on the
driving condition (road condition, driving situation, etc.) and
air conditioning operation
status.For example, the cruising range can be short- ened by driving on congested roads, by driv- ing uphill, by repeated ha
rd acceleration, and
by use of the air cond
itioner and heater.
When the 12V starter battery terminal is dis- connected, the power consumption data of the main drive lithium-ion battery in the pastis deleted. A differen
t value from before may
be displayed. Be sure
to use the display only
for reference.NOTE
BK0220401US.book 40 ページ 2015年6月3日 水曜日 午前7時42分
Page 230 of 296
General information about your radio 7-28 Comfort controls
7
4. When the time is set, press the clock but- ton to stop the clock display from flash-ing.
N00733900439
Your vehicle’s radio receives both AM andFM stations. The quality of your reception is affected by distance, obstacles, an
d signal interference.
This radio complies with Part 15 of Federal Communications Commission (FCC) Rules (for vehicles sold in U.S.A.). Operation is subject to the following conditions: The device may not cause harmful inter- ference. This device must ac
cept any interference
recieved, including interference that maycause undesirable operation.
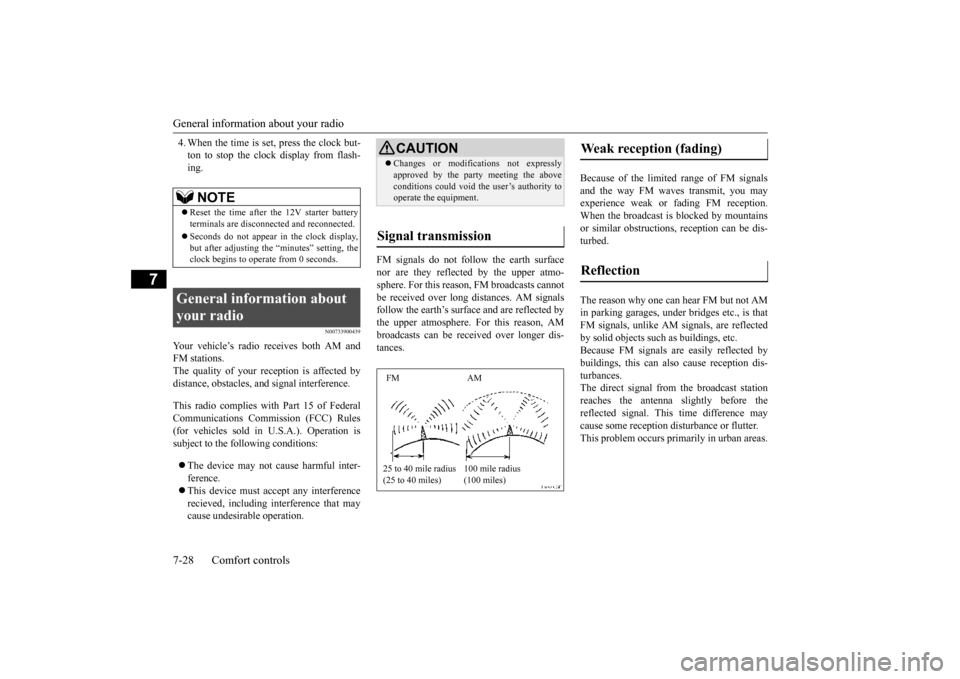
FM signals do not follow the earth surface nor are they reflected by the upper atmo-sphere. For this reason,
FM broadcasts cannot
be received over long distances. AM signals follow the earth’s surface and are reflected bythe upper atmosphere. For this reason, AM broadcasts can be received over longer dis- tances.
Because of the limite
d range of FM signals
and the way FM waves transmit, you may experience weak or fading FM reception.When the broadcast is blocked by mountains or similar obstructions,
reception ca
n be dis-
turbed. The reason why one can hear FM but not AM in parking garages, unde
r bridges etc., is that
FM signals, unlike AM
signals, are reflected
by solid objects such
as buildings, etc.
Because FM signals are easily reflected by buildings, this can also
cause reception dis-
turbances.The direct signal from
the broadcast station
reaches the antenna slightly before the reflected signal. This
time difference may
cause some reception di
sturbance or flutter.
This problem occurs primarily in urban areas.
NOTE
Reset the time after the 12V starter battery terminals are disconnect
ed and reconnected.
Seconds do not appear
in the clock display,
but after adjusting the
“minutes” setting, the
clock begins to opera
te from 0 seconds.
General information about your radio
CAUTION Changes or modifica
tions not expressly
approved by the party meeting the aboveconditions could void th
e user’s authority to
operate the equipment.
Signal transmission FM AM 25 to 40 mile radius (25 to 40 miles)
100 mile radius (100 miles)
Weak reception (fading) Reflection
BK0220401US.book 28 ページ 2015年6月3日 水曜日 午前7時42分