tow MITSUBISHI L200 2010 4.G User Guide
[x] Cancel search | Manufacturer: MITSUBISHI, Model Year: 2010, Model line: L200, Model: MITSUBISHI L200 2010 4.GPages: 369, PDF Size: 30.72 MB
Page 129 of 369
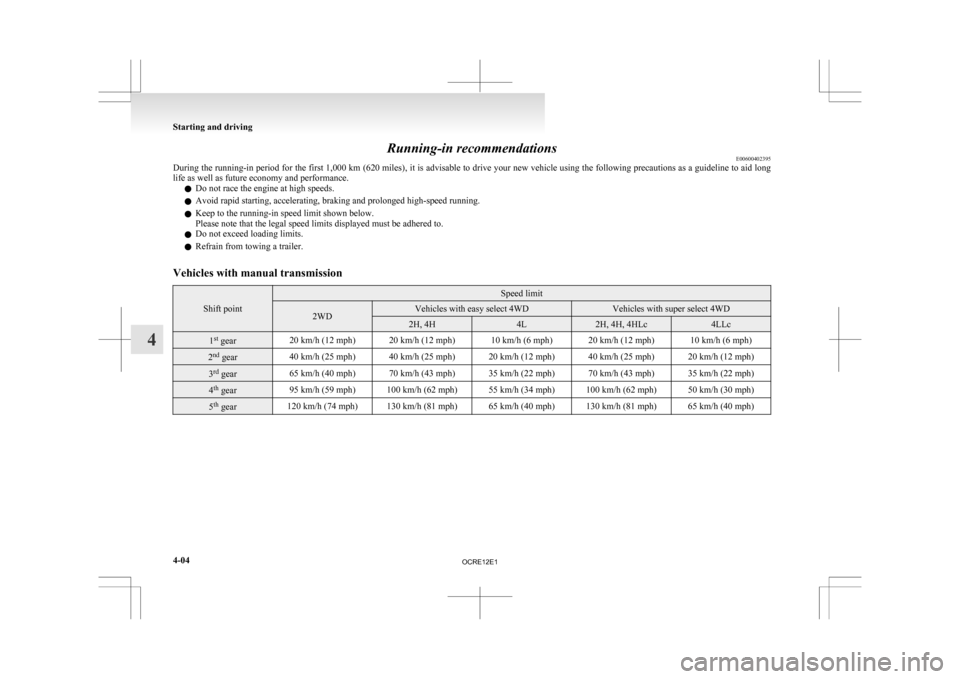
Running-in recommendations
E00600402395
During
the running-in period for the first 1,000 km (620 miles), it is advisable to drive your new vehicle using the following precautions as a guideline to aid long
life as well as future economy and performance.
l Do not race the engine at high speeds.
l Avoid rapid starting, accelerating, braking and prolonged high-speed running.
l Keep to the running-in speed limit shown below.
Please note that the legal speed limits displayed must be adhered to.
l Do not exceed loading limits.
l Refrain from towing a trailer.
Vehicles with manual transmission Shift point Speed limit
2WD Vehicles with easy select 4WD Vehicles with super select 4WD
2H, 4H 4L 2H, 4H, 4HLc 4LLc
1
st
gear 20 km/h (12 mph) 20 km/h (12 mph) 10 km/h (6 mph) 20 km/h (12 mph) 10 km/h (6 mph)2
nd
gear 40 km/h (25 mph) 40 km/h (25 mph) 20 km/h (12 mph) 40 km/h (25 mph) 20 km/h (12 mph)3
rd
gear 65 km/h (40 mph) 70 km/h (43 mph) 35 km/h (22 mph) 70 km/h (43 mph) 35 km/h (22 mph)4
th
gear 95 km/h (59 mph) 100 km/h (62 mph) 55 km/h (34 mph) 100 km/h (62 mph) 50 km/h (30 mph)5
th
gear 120 km/h (74 mph) 130 km/h (81 mph) 65 km/h (40 mph) 130 km/h (81 mph) 65 km/h (40 mph)Starting and driving
4-04
4
OCRE12E1
Page 133 of 369
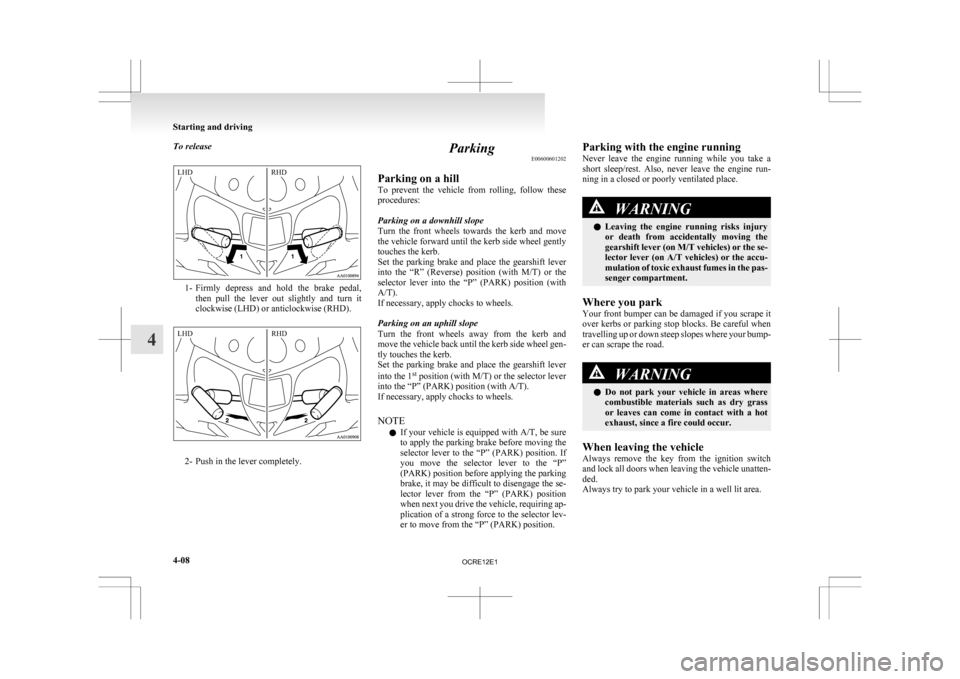
To release
1- Firmly depress and hold the brake pedal,
then pull the lever out slightly and turn it
clockwise (LHD) or anticlockwise (RHD). 2- Push in the lever completely. Parking
E00600601202
Parking on a hill
To
prevent the vehicle from rolling, follow these
procedures:
Parking on a downhill slope
Turn the front wheels towards the kerb and move
the vehicle forward until the kerb side wheel gently
touches the kerb.
Set the parking brake and place the gearshift lever
into the “R” (Reverse) position (with M/T) or the
selector lever into the “P” (PARK) position (with
A/T).
If necessary, apply chocks to wheels.
Parking on an uphill slope
Turn the front wheels away from the kerb and
move the vehicle back until the kerb side wheel gen-
tly touches the kerb.
Set the parking brake and place the gearshift lever
into the 1 st
position (with M/T) or the selector lever
into the “P” (PARK) position (with A/T).
If necessary, apply chocks to wheels.
NOTE
l If your vehicle is equipped with A/T, be sure
to apply the parking brake before moving the
selector lever to the “P” (PARK) position. If
you move the selector lever to the “P”
(PARK) position before applying the parking
brake, it may be difficult to disengage the se-
lector lever from the “P” (PARK) position
when next you drive the vehicle, requiring ap-
plication of a strong force to the selector lev-
er to move from the “P” (PARK) position. Parking with the engine running
Never
leave the engine running while you take a
short sleep/rest. Also, never leave the engine run-
ning in a closed or poorly ventilated place. WARNING
l Leaving
the engine running risks injury
or death from accidentally moving the
gearshift lever (on M/T vehicles) or the se-
lector lever (on A/T vehicles) or the accu-
mulation of toxic exhaust fumes in the pas-
senger compartment.
Where you park
Your
front bumper can be damaged if you scrape it
over kerbs or parking stop blocks. Be careful when
travelling up or down steep slopes where your bump-
er can scrape the road. WARNING
l Do
not park your vehicle in areas where
combustible materials such as dry grass
or leaves can come in contact with a hot
exhaust, since a fire could occur.
When leaving the vehicle
Always
remove the key from the ignition switch
and lock all doors when leaving the vehicle unatten-
ded.
Always try to park your vehicle in a well lit area. Starting and driving
4-08
4LHD RHD LHD RHD
OCRE12E1
Page 135 of 369
Outside rear-view mirrors
E00600900149
To adjust the mirror position E00601000482WARNING
l Do not attempt to adjust the rear-view
mirrors while driving. This can be danger-
ous.
Always adjust the mirrors before driving.
l Your vehicle is equipped with convex
type mirrors.
Please take into consideration, that ob-
jects you see in the mirror will look small-
er and farther away compared to a nor-
mal flat mirror.
Do not use this mirror to estimate dis-
tance of following vehicles when changing
lanes.
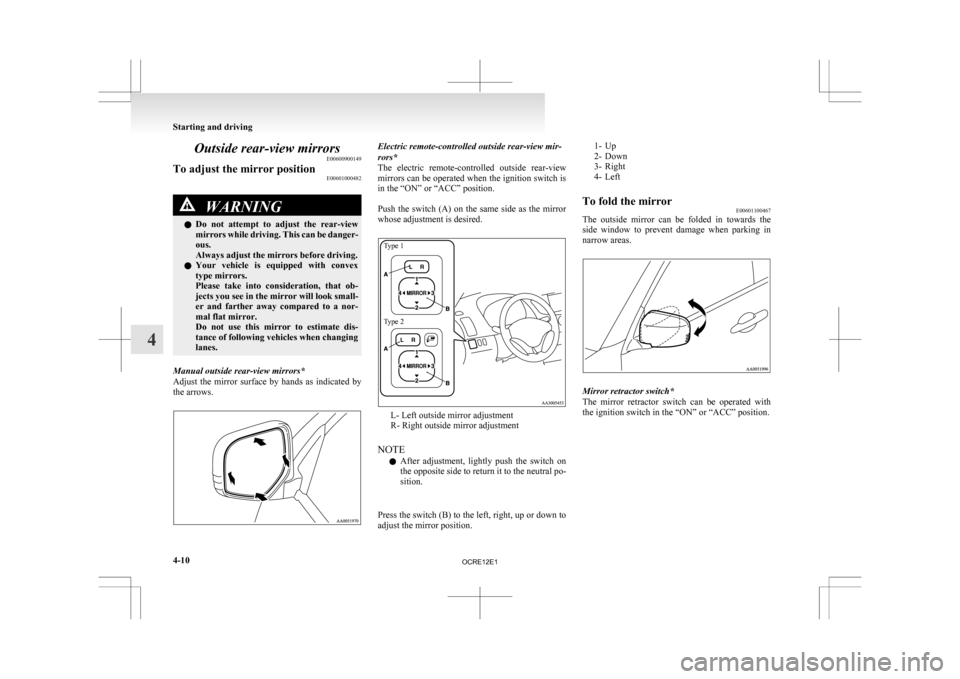
Manual outside rear-view mirrors*
Adjust
the mirror surface by hands as indicated by
the arrows. Electric remote-controlled outside rear-view mir-
rors*
The
electric remote-controlled outside rear-view
mirrors can be operated when the ignition switch is
in the “ON” or “ACC” position.
Push the switch (A) on the same side as the mirror
whose adjustment is desired.
Type 1
Type 2 L- Left outside mirror adjustment
R- Right outside mirror adjustment
NOTE l After
adjustment, lightly push the switch on
the opposite side to return it to the neutral po-
sition.
Press the switch (B) to the left, right, up or down to
adjust the mirror position.
1- Up
2-
Down
3- Right
4- Left
To fold the mirror E00601100467
The outside mirror can be folded in towards the
side
window to prevent damage when parking in
narrow areas. Mirror retractor switch*
The
mirror retractor switch can be operated with
the ignition switch in the “ON” or “ACC” position. Starting and driving
4-10
4
OCRE12E1
Page 167 of 369
CAUTION
l
Always use tyres of the same size, same
type, and same brand, and which have no
wear differences. Using tyres of different
size, type, brands or degree of wear, will
increase the differential oil temperature,
resulting in possible damage to the driv-
ing system. Further, the drive train will
be subjected to excessive loading, possibly
leading to oil leakage, component seizure,
or other serious faults.
Towing
If
towing is necessary, we recommend you to have
it done by your MITSUBISHI MOTORS Author-
ized Service Point or a commercial tow truck service.
In the following cases, transport the vehicle using a
tow truck.
l The engine runs but the vehicle does not
move or abnormal noise is produced.
l Inspection of the vehicle’s underside reveals
that oil or some other fluid is leaking. Only when you cannot receive a towing service
from
a MITSUBISHI MOTORS Authorized Serv-
ice Point or commercial tow truck service, tow
your vehicle carefully in accordance with the in-
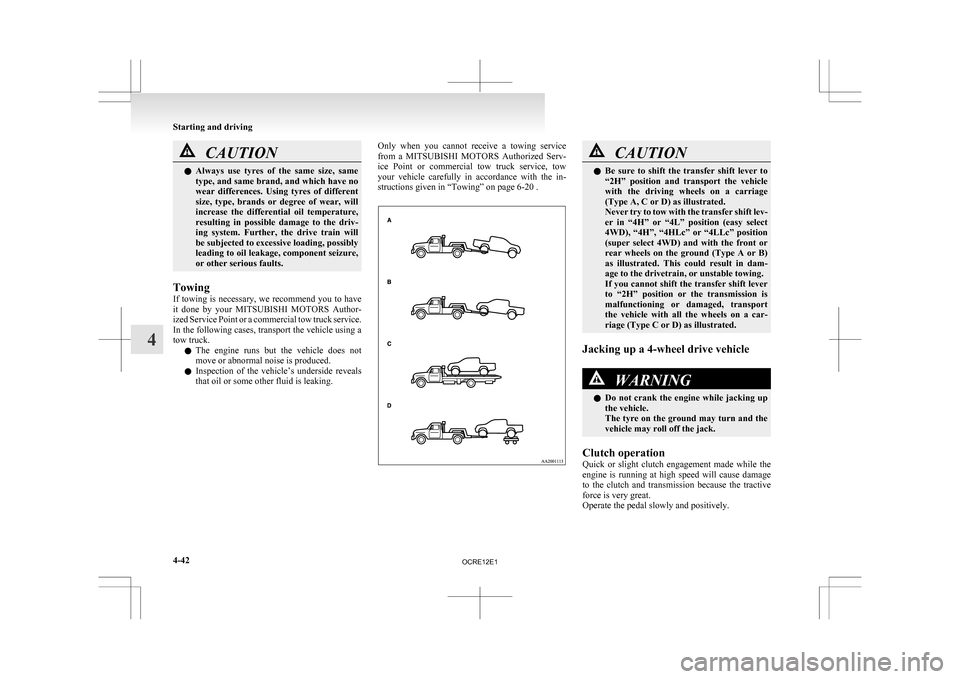
structions given in “Towing” on page 6-20 . CAUTION
l
Be
sure to shift the transfer shift lever to
“2H” position and transport the vehicle
with the driving wheels on a carriage
(Type A, C or D) as illustrated.
Never try to tow with the transfer shift lev-
er in “4H” or “4L” position (easy select
4WD), “4H”, “4HLc” or “4LLc” position
(super select 4WD) and with the front or
rear wheels on the ground (Type A or B)
as illustrated. This could result in dam-
age to the drivetrain, or unstable towing.
If you cannot shift the transfer shift lever
to “2H” position or the transmission is
malfunctioning or damaged, transport
the vehicle with all the wheels on a car-
riage (Type C or D) as illustrated.
Jacking up a 4-wheel drive vehicle WARNING
l Do
not crank the engine while jacking up
the vehicle.
The tyre on the ground may turn and the
vehicle may roll off the jack.
Clutch operation
Quick
or slight clutch engagement made while the
engine is running at high speed will cause damage
to the clutch and transmission because the tractive
force is very great.
Operate the pedal slowly and positively. Starting and driving
4-42
4
OCRE12E1
Page 174 of 369
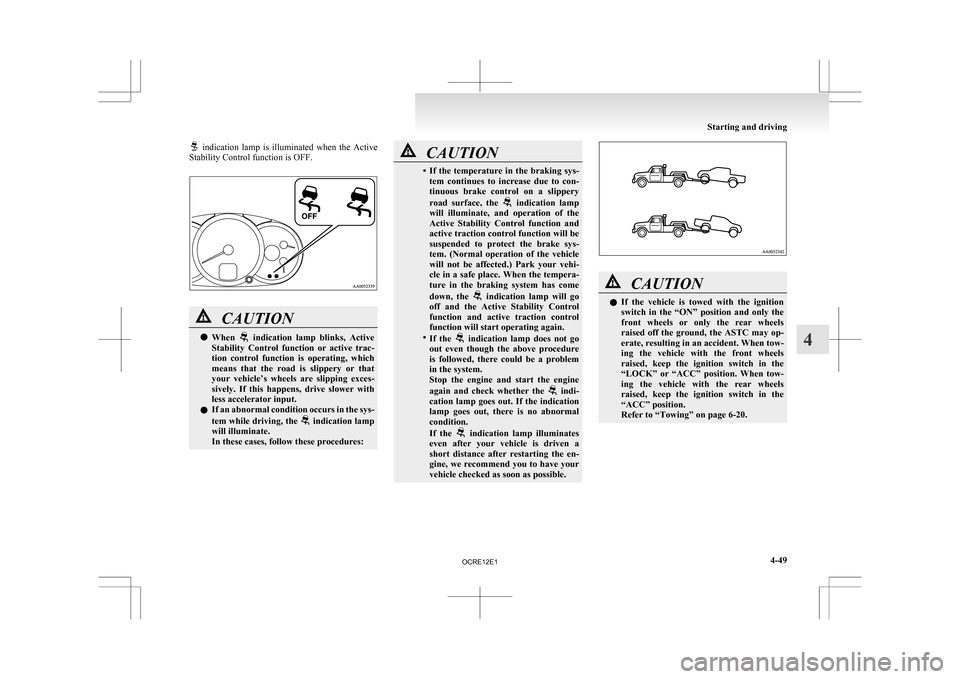
indication lamp is illuminated when the Active
Stability Control function is OFF. CAUTION
l
When indication lamp blinks, Active
Stability
Control function or active trac-
tion control function is operating, which
means that the road is slippery or that
your vehicle’s wheels are slipping exces-
sively. If this happens, drive slower with
less accelerator input.
l If an abnormal condition occurs in the sys-
tem while driving, the indication lamp
will illuminate.
In these cases, follow these procedures: CAUTION
• If
the temperature in the braking sys-
tem continues to increase due to con-
tinuous brake control on a slippery
road surface, the indication lamp
will
illuminate, and operation of the
Active Stability Control function and
active traction control function will be
suspended to protect the brake sys-
tem. (Normal operation of the vehicle
will not be affected.) Park your vehi-
cle in a safe place. When the tempera-
ture in the braking system has come
down, the indication lamp will go
off
and the Active Stability Control
function and active traction control
function will start operating again.
• If the indication lamp does not go
out
even though the above procedure
is followed, there could be a problem
in the system.
Stop the engine and start the engine
again and check whether the indi-
cation
lamp goes out. If the indication
lamp goes out, there is no abnormal
condition.
If the indication lamp illuminates
even
after your vehicle is driven a
short distance after restarting the en-
gine, we recommend you to have your
vehicle checked as soon as possible. CAUTION
l
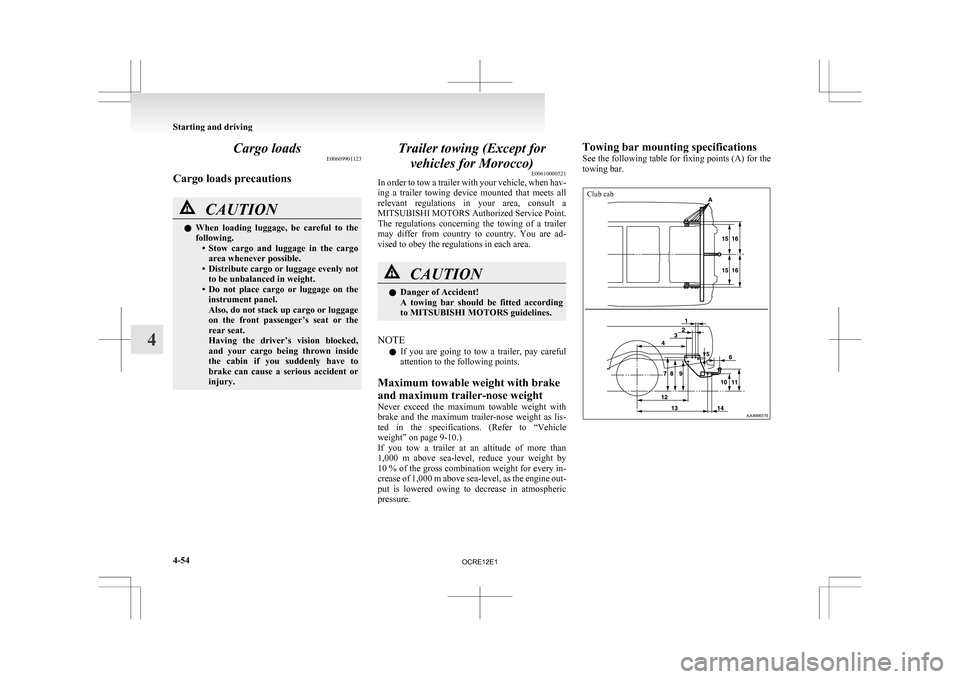
If
the vehicle is towed with the ignition
switch in the “ON” position and only the
front wheels or only the rear wheels
raised off the ground, the ASTC may op-
erate, resulting in an accident. When tow-
ing the vehicle with the front wheels
raised, keep the ignition switch in the
“LOCK” or “ACC” position. When tow-
ing the vehicle with the rear wheels
raised, keep the ignition switch in the
“ACC” position.
Refer to “Towing” on page 6-20. Starting and driving
4-49 4
OCRE12E1
Page 179 of 369
Cargo loads
E00609901123
Cargo loads precautions CAUTION
l
When loading luggage, be careful to the
following. • Stow cargo and luggage in the cargoarea whenever possible.
• Distribute cargo or luggage evenly not to be unbalanced in weight.
• Do not place cargo or luggage on the instrument panel.
Also, do not stack up cargo or luggage
on the front passenger’s seat or the
rear seat.
Having the driver’s vision blocked,
and your cargo being thrown inside
the cabin if you suddenly have to
brake can cause a serious accident or
injury. Trailer towing (Except for
vehicles for Morocco) E00610000521
In
order to tow a trailer with your vehicle, when hav-
ing a trailer towing device mounted that meets all
relevant regulations in your area, consult a
MITSUBISHI MOTORS Authorized Service Point.
The regulations concerning the towing of a trailer
may differ from country to country. You are ad-
vised to obey the regulations in each area. CAUTION
l
Danger of Accident!
A
towing bar should be fitted according
to MITSUBISHI MOTORS guidelines.
NOTE l If
you are going to tow a trailer, pay careful
attention to the following points.
Maximum towable weight with brake
and maximum trailer-nose weight
Never exceed the maximum towable weight with
brake and the maximum trailer-nose weight as lis-
ted in the specifications. (Refer to “Vehicle
weight” on page 9-10.)
If you tow a trailer at an altitude of more than
1,000 m above sea-level, reduce your weight by
10 % of the gross combination weight for every in-
crease of 1,000 m above sea-level, as the engine out-
put is lowered owing to decrease in atmospheric
pressure. Towing bar mounting specifications
See
the following table for fixing points (A) for the
towing bar.
Club cab Starting and driving
4-54
4
OCRE12E1
Page 181 of 369
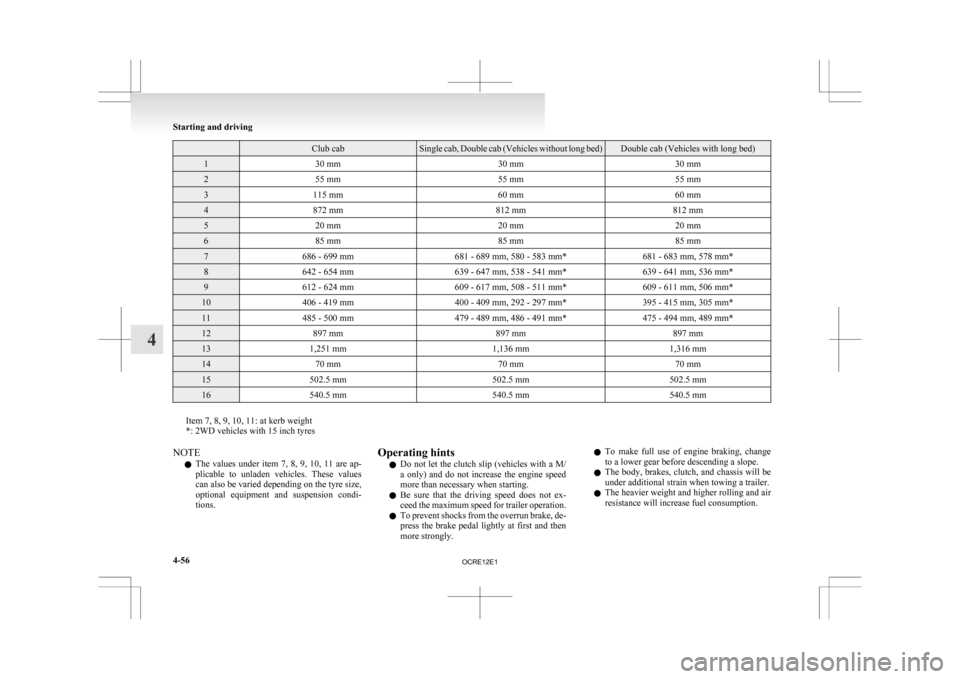
Club cab Single cab, Double cab (Vehicles without long bed) Double cab (Vehicles with long bed)
1
30 mm 30 mm30 mm2
55 mm 55 mm55 mm3
115 mm 60 mm60 mm4
872 mm 812 mm812 mm5
20 mm 20 mm20 mm6
85 mm 85 mm85 mm7
686 - 699 mm 681 - 689 mm, 580 - 583 mm* 681 - 683 mm, 578 mm*8
642 - 654 mm 639 - 647 mm, 538 - 541 mm* 639 - 641 mm, 536 mm*9
612 - 624 mm 609 - 617 mm, 508 - 511 mm* 609 - 611 mm, 506 mm*10
406 - 419 mm 400 - 409 mm, 292 - 297 mm* 395 - 415 mm, 305 mm*11
485 - 500 mm 479 - 489 mm, 486 - 491 mm* 475 - 494 mm, 489 mm*12
897 mm 897 mm897 mm13
1,251 mm 1,136 mm1,316 mm14
70 mm 70 mm70 mm15
502.5 mm 502.5 mm502.5 mm16
540.5 mm 540.5 mm540.5 mmItem 7, 8, 9, 10, 11: at kerb weight
*: 2WD vehicles with 15 inch tyres
NOTE
l The
values under item 7, 8, 9, 10, 11 are ap-
plicable to unladen vehicles. These values
can also be varied depending on the tyre size,
optional equipment and suspension condi-
tions. Operating hints
l Do
not let the clutch slip (vehicles with a M/
a only) and do not increase the engine speed
more than necessary when starting.
l Be sure that the driving speed does not ex-
ceed the maximum speed for trailer operation.
l To prevent shocks from the overrun brake, de-
press the brake pedal lightly at first and then
more strongly. l
To make full use of engine braking, change
to a lower gear before descending a slope.
l The body, brakes, clutch, and chassis will be
under additional strain when towing a trailer.
l The heavier weight and higher rolling and air
resistance will increase fuel consumption. Starting and driving
4-56
4
OCRE12E1
Page 190 of 369
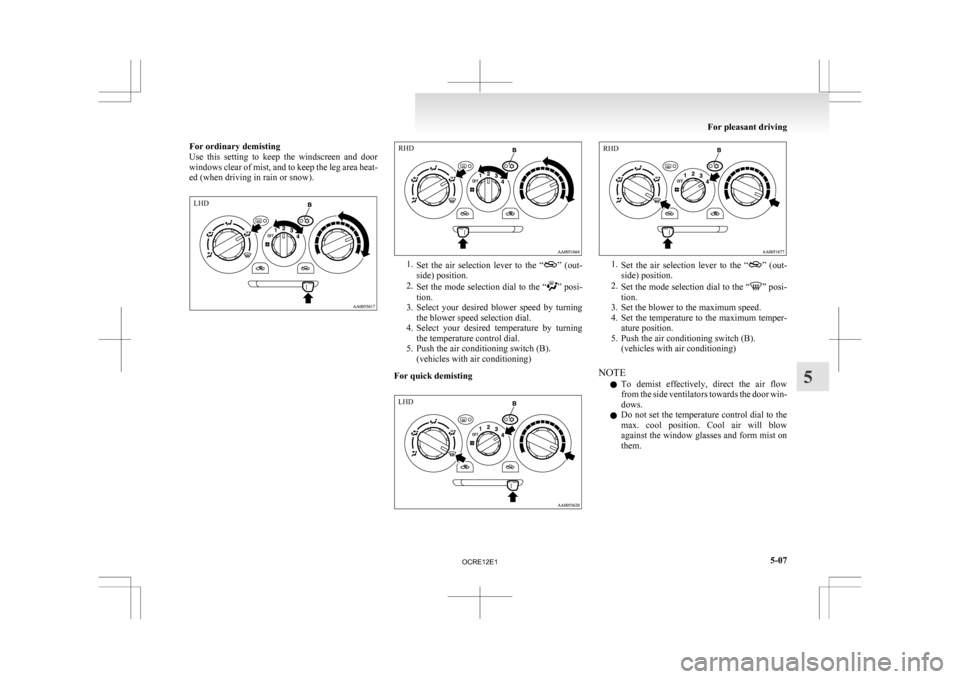
For ordinary demisting
Use
this setting to keep the windscreen and door
windows clear of mist, and to keep the leg area heat-
ed (when driving in rain or snow). 1.
Set
the air selection lever to the “ ” (out-
side) position.
2. Set the mode selection dial to the “ ”
posi-
tion.
3. Select your desired blower speed by turning the blower speed selection dial.
4. Select your desired temperature by turning the temperature control dial.
5. Push the air conditioning switch (B). (vehicles with air conditioning)
For quick demisting 1.
Set
the air selection lever to the “ ” (out-
side) position.
2. Set the mode selection dial to the “ ” posi-
tion.
3.
Set the blower to the maximum speed.
4. Set the temperature to the maximum temper- ature position.
5. Push the air conditioning switch (B). (vehicles with air conditioning)
NOTE l To demist effectively, direct the air flow
from the side ventilators towards the door win-
dows.
l Do not set the temperature control dial to the
max. cool position. Cool air will blow
against the window glasses and form mist on
them. For pleasant driving
5-07 5LHD RHD LHD RHD
OCRE12E1
Page 194 of 369
NOTE
l Set
the temperature at about 22 (Type 1) or
25 (Type 2) under normal conditions.
l When the temperature is set to the highest or
the lowest setting under the AUTO opera-
tion, the air selection, mode selection, blower
speed and the air conditioning will be auto-
matically changed as follows.
Also, if manually operated after an automatic
changeover, manual operation will be selec-
ted.
• Quick Heating (When the temperature isset to the highest setting)
Outside air will be introduced, the air
flow will select foot position, and the air
conditioning will stop.
• Quick Cooling (When the temperature is set to the lowest setting)
Inside air will be recirculated, the air
flow will select face position, and the air
conditioning will operate.
Operating the system in manual mode E00704200040
Blower speed and ventilator mode may be control-
led
manually by setting the blower speed selection
dial and the mode selection dial to the desired posi-
tions. To return to automatic operation, set the dials
to the “AUTO” position.
Demisting of the windscreen and door windows E00704300689CAUTION
l
For
safety, make sure you have a clear
view through all the windows. To remove frost or mist from the windscreen and
door
windows, use the mode selection dial (“ ”
or “ ”).
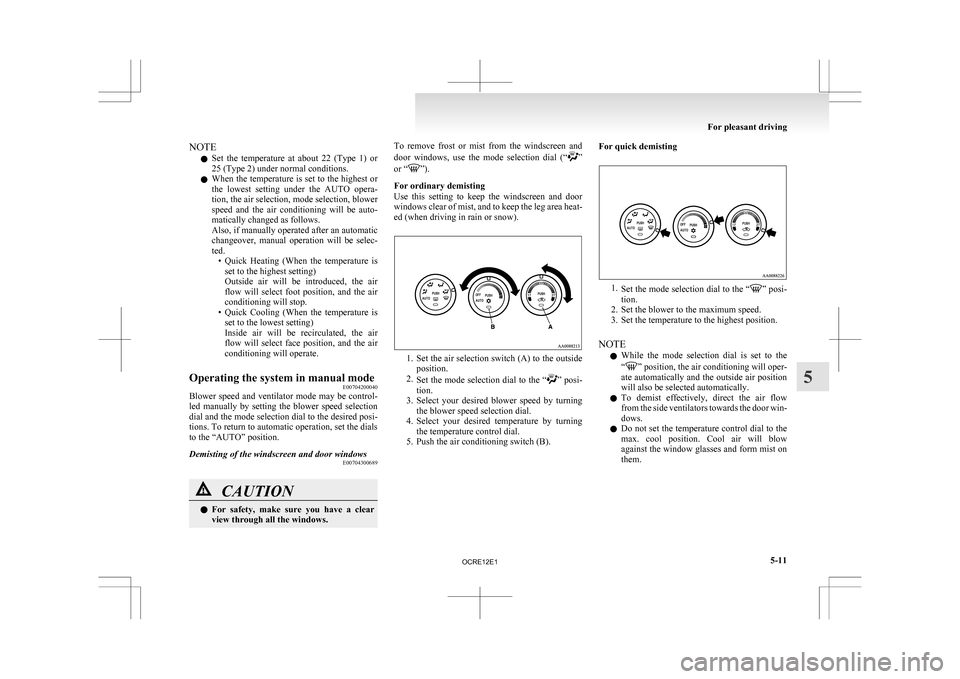
For ordinary demisting
Use
this setting to keep the windscreen and door
windows clear of mist, and to keep the leg area heat-
ed (when driving in rain or snow). 1. Set
the air selection switch (A) to the outside
position.
2. Set the mode selection dial to the “ ”
posi-
tion.
3. Select your desired blower speed by turning the blower speed selection dial.
4. Select your desired temperature by turning the temperature control dial.
5. Push the air conditioning switch (B). For quick demisting
1.
Set
the mode selection dial to the “ ” posi-
tion.
2.
Set the blower to the maximum speed.
3. Set the temperature to the highest position.
NOTE l While the mode selection dial is set to the
“ ”
position, the air conditioning will oper-
ate automatically and the outside air position
will also be selected automatically.
l To demist effectively, direct the air flow
from the side ventilators towards the door win-
dows.
l Do not set the temperature control dial to the
max. cool position. Cool air will blow
against the window glasses and form mist on
them. For pleasant driving
5-11 5
OCRE12E1
Page 232 of 369
l
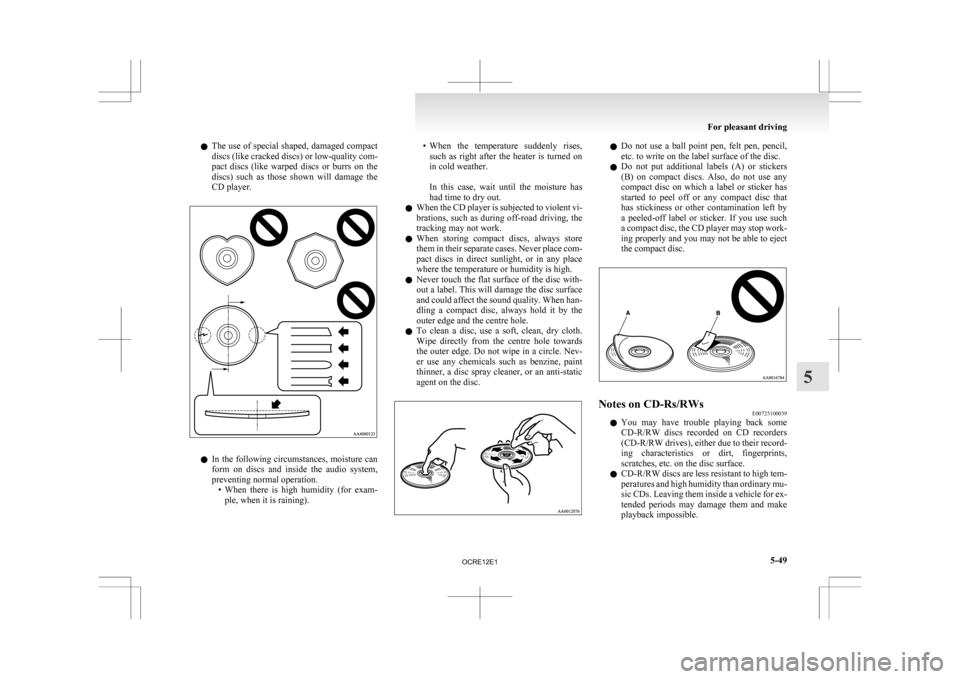
The use of special shaped, damaged compact
discs (like cracked discs) or low-quality com-
pact discs (like warped discs or burrs on the
discs) such as those shown will damage the
CD player. l
In
the following circumstances, moisture can
form on discs and inside the audio system,
preventing normal operation. • When there is high humidity (for exam-ple, when it is raining). • When
the temperature suddenly rises,
such as right after the heater is turned on
in cold weather.
In this case, wait until the moisture has
had time to dry out.
l When the CD player is subjected to violent vi-
brations, such as during off-road driving, the
tracking may not work.
l When storing compact discs, always store
them in their separate cases. Never place com-
pact discs in direct sunlight, or in any place
where the temperature or humidity is high.
l Never touch the flat surface of the disc with-
out a label. This will damage the disc surface
and could affect the sound quality. When han-
dling a compact disc, always hold it by the
outer edge and the centre hole.
l To clean a disc, use a soft, clean, dry cloth.
Wipe directly from the centre hole towards
the outer edge. Do not wipe in a circle. Nev-
er use any chemicals such as benzine, paint
thinner, a disc spray cleaner, or an anti-static
agent on the disc. l
Do not use a ball point pen, felt pen, pencil,
etc. to write on the label surface of the disc.
l Do not put additional labels (A) or stickers
(B) on compact discs. Also, do not use any
compact disc on which a label or sticker has
started to peel off or any compact disc that
has stickiness or other contamination left by
a peeled-off label or sticker. If you use such
a compact disc, the CD player may stop work-
ing properly and you may not be able to eject
the compact disc. Notes on CD-Rs/RWs
E00725100039
l You
may have trouble playing back some
CD-R/RW discs recorded on CD recorders
(CD-R/RW drives), either due to their record-
ing characteristics or dirt, fingerprints,
scratches, etc. on the disc surface.
l CD-R/RW discs are less resistant to high tem-
peratures and high humidity than ordinary mu-
sic CDs. Leaving them inside a vehicle for ex-
tended periods may damage them and make
playback impossible. For pleasant driving
5-49 5
OCRE12E1