air condition MITSUBISHI L200 2011 (in English) User Guide
[x] Cancel search | Manufacturer: MITSUBISHI, Model Year: 2011, Model line: L200, Model: MITSUBISHI L200 2011Pages: 330, PDF Size: 22.34 MB
Page 84 of 330
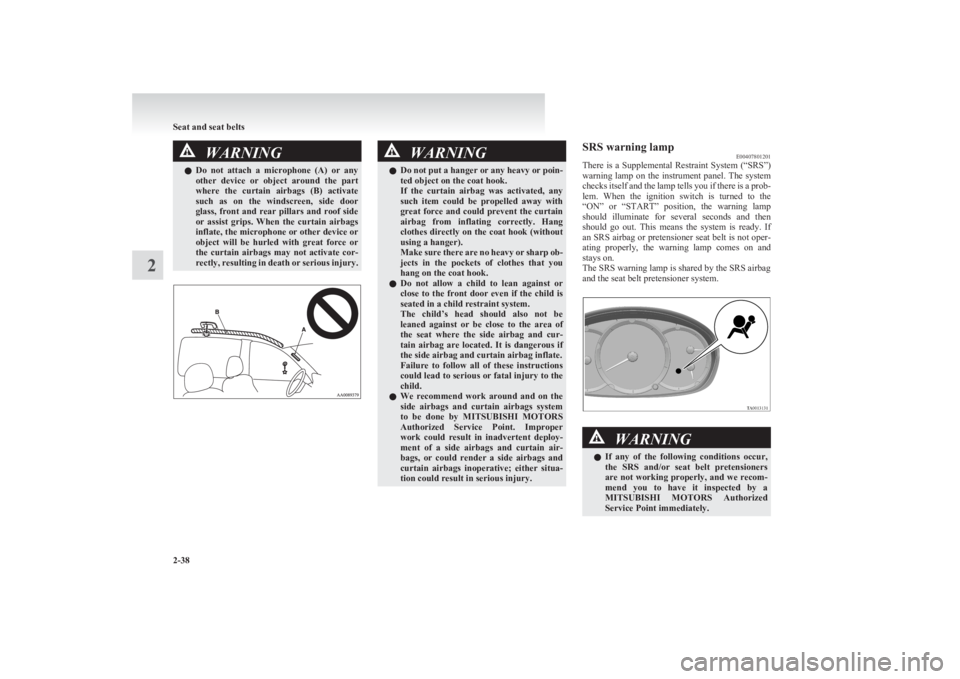
WARNINGlDo not attach a microphone (A) or any
other device or object around the part
where the curtain airbags (B) activate
such as on the windscreen, side door
glass, front and rear pillars and roof side
or assist grips. When the curtain airbags
inflate, the microphone or other device or
object will be hurled with great force or
the curtain airbags may not activate cor-
rectly, resulting in death or serious injury.WARNINGl Do not put a hanger or any heavy or poin-
ted object on the coat hook.
If the curtain airbag was activated, any
such item could be propelled away with
great force and could prevent the curtain
airbag from inflating correctly. Hang
clothes directly on the coat hook (without
using a hanger).
Make sure there are no heavy or sharp ob-
jects in the pockets of clothes that you
hang on the coat hook.
l Do not allow a child to lean against or
close to the front door even if the child is
seated in a child restraint system.
The child’s head should also not be
leaned against or be close to the area of
the seat where the side airbag and cur-
tain airbag are located. It is dangerous if
the side airbag and curtain airbag inflate.
Failure to follow all of these instructions
could lead to serious or fatal injury to the
child.
l We recommend work around and on the
side airbags and curtain airbags system
to be done by MITSUBISHI MOTORS
Authorized Service Point. Improper
work could result in inadvertent deploy-
ment of a side airbags and curtain air-
bags, or could render a side airbags and
curtain airbags inoperative; either situa-
tion could result in serious injury.SRS warning lamp E00407801201
There is a Supplemental Restraint System (“SRS”)
warning lamp on the instrument panel. The system
checks itself and the lamp tells you if there is a prob-
lem. When the ignition switch is turned to the
“ON” or “START” position, the warning lamp
should illuminate for several seconds and then
should go out. This means the system is ready. If
an SRS airbag or pretensioner seat belt is not oper-
ating properly, the warning lamp comes on and
stays on.
The SRS warning lamp is shared by the SRS airbag
and the seat belt pretensioner system.WARNINGl If any of the following conditions occur,
the SRS and/or seat belt pretensioners
are not working properly, and we recom-
mend you to have it inspected by a
MITSUBISHI MOTORS Authorized
Service Point immediately.
Seat and seat belts
2-38
2
Page 128 of 330
Economical drivingE00600100620
For economical driving, there are some technical re-
quirements that have to be met. The prerequisite
for low fuel consumption is a properly adjusted en-
gine. In order to achieve longer life of the vehicle
and the most economical operation, we recommend
you to have the vehicle checked at regular intervals
in accordance with the service standards.
Fuel economy and generation of exhaust gas and
noise are highly influenced by personal driving hab-
its as well as the particular operating conditions.
The following points should be observed in order
to minimize wear of brakes, tyres and engine as
well as to reduce environmental pollution.
Starting
Avoid rapid acceleration and sudden starts; such op-
eration will result in higher fuel consumption.
Shifting
Shift only at an appropriate speed and engine
speed. Always use the highest gear possible.
The transfer shift lever should be set to “2H” when
driving 4WD vehicles on normal roads and express
ways to obtain best possible fuel economy.
City traffic
Frequent starting and stopping increases the aver-
age fuel consumption. Use roads with smooth traf-
fic flow whenever possible. When driving on con-
gested roads, avoid use of a low gear at high en-
gine speeds.
Idling
The vehicle consumes fuel even during idling.
Avoid extended idling whenever possible.Speed
The higher the vehicle speed, the more fuel con-
sumed. Avoid driving at full speed. Even a slight re-
lease of the accelerator pedal will save a significant
amount of fuel.
Tyre inflation pressure
Check the tyre inflation pressures at regular inter-
vals. Low tyre inflation pressure increases road re-
sistance and fuel consumption. In addition, low
tyre pressures adversely affect tyre wear and driv-
ing stability.
Load
Do not drive with unnecessary articles in the cargo
area. Especially during city driving where frequent
starting and stopping is necessary, the increased
weight of the vehicle will greatly affect fuel con-
sumption.
Cold engine starting
Starting of a cold engine consumes more fuel.
Unnecessary fuel consumption is also caused by
keeping a hot engine running. After the engine is
started, commence driving as soon as possible.
Air conditioning*
The use of the air conditioning will increase the
fuel consumption.Driving, alcohol and drugs E00600200012
Driving after drinking alcohol is one of the most fre-
quent causes of accidents.
Your driving ability can be seriously impaired even
with blood alcohol levels far below the legal mini-
mum. If you have been drinking, don’t drive. Ride
with a designated non-drinking driver, call a cab or
a friend, or use public transportation.
Drinking coffee or taking a cold shower will not
make you sober.
Similarly, prescription and nonprescription drugs af-
fect your alertness, perception and reaction time.
Consult with your doctor or pharmacist before driv-
ing while under the influence of any of these medi-
cations.WARNINGl NEVER DRINK AND DRIVE.
Your perceptions are less accurate, your
reflexes are slower and your judgment is
impaired.
Starting and driving
4-02
4
Page 145 of 330
CAUTIONlIf the warning lamp comes on, reduce the
engine speed and stop the vehicle in a safe
area.
Then set the selector lever to “P” (PARK)
position and idle the engine until the warn-
ing lamp goes off.
When the warning lamp goes off, resume
normal driving.
If the warning lamp does not go off, we
recommend you to have your vehicle in-
spected.Operation of the automatic transmis-
sion E00604200515CAUTIONlBefore selecting a gear with the engine
running and the vehicle stationary, fully
depress the brake pedal to prevent the ve-
hicle from creeping.
The vehicle will begin to move as soon as
the gear is engaged, especially when the
engine speed is high, at fast idle or with
the air conditioning operating, the brakes
should only be released when you are
ready to drive away.
l Depress the brake pedal with the right
foot at all times.
Using the left foot could cause driver move-
ment delay in case of an emergency.CAUTIONl To prevent sudden acceleration, never
race the engine when shifting from the
“P” (PARK) or “N” (NEUTRAL) position.
l Operating the accelerator pedal while the
other foot is resting on the brake pedal
will affect braking efficiency and may
cause premature wear of brake pads.
Do not race the engine with brake pedal
pressed.
This can damage the transmission.
l Use the selector lever in the correct shift
position in accordance with driving condi-
tions.
Never coast downhill backward with the
“D” (DRIVE) position or coast forward
with the “R” (REVERSE) position.
The engine stops and the brake pedal ef-
fort or the steering wheel handling weight
increasing could lead to an accident.Passing acceleration E00604500127
To gain extra acceleration in “D” (DRIVE) posi-
tion (when passing another vehicle), push the accel-
erator to the floor. The automatic transmission will
automatically downshift.
Waiting E00604600128
For short waiting periods, such as at traffic signals,
the vehicle can be left in gear and held stationary
with the service brake.
For longer waiting periods with the engine running,
the selector lever should be placed in the “N” (NEU-
TRAL) position.
CAUTIONl Never hold the vehicle stationary on a hill
using the accelerator pedal (without us-
ing the brake pedal). Always apply the
parking brake and/or service brakes.
l Unexpected acceleration may occur if the
selector lever is in a position other than
“P” (PARK) or “N” (NEUTRAL) position.
Prior to moving off after having stopped
the vehicle, make sure that the selector lev-
er is in “D” (DRIVE) position.Parking E00604700246
To park the vehicle, first bring it to a complete
stop, fully engage the parking brake, and then
move the selector lever to the “P” (PARK) position.
If you are going to leave the vehicle unattended, al-
ways switch off the engine and remove the ignition
key.
NOTE l On a slope, be sure to apply the parking
brake before moving the selector lever to the
“P” (PARK) position. If you move the selec-
tor lever to the “P” (PARK) position before
applying the parking brake, it may be diffi-
cult to disengage the selector lever from the
“P” (PARK) position when next you drive
the vehicle, requiring application of a strong
force to the selector lever to move from the
“P” (PARK) position.
Starting and driving
4-19
4
Page 149 of 330
When a malfunction occurs in the au-
tomatic transmission E00615100152When the selector lever position indicator blinksE00615200179
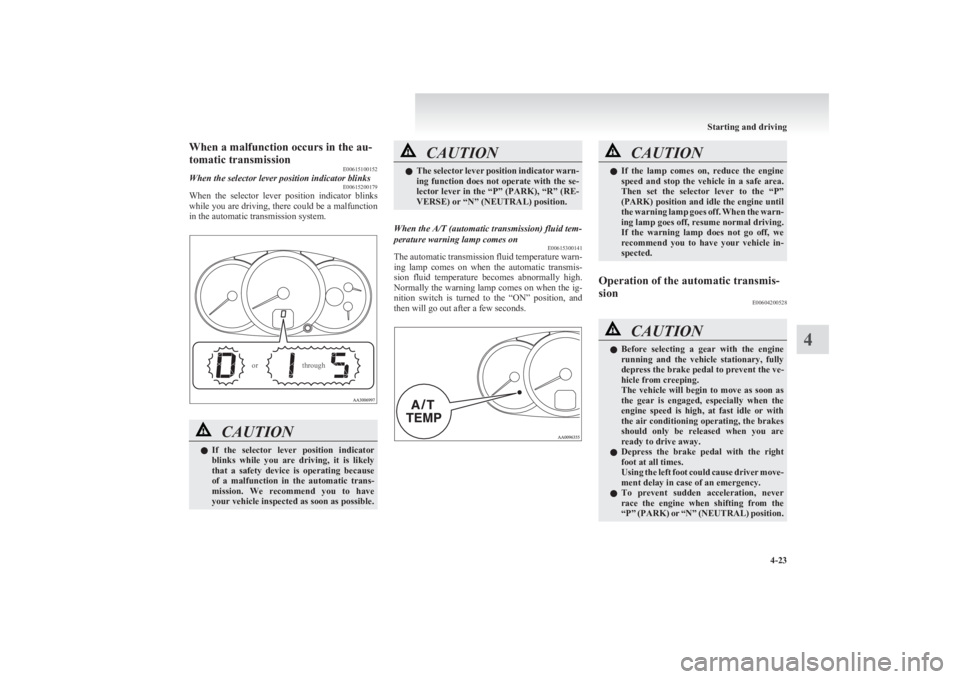
When the selector lever position indicator blinks
while you are driving, there could be a malfunction
in the automatic transmission system.
throughor
CAUTIONl If the selector lever position indicator
blinks while you are driving, it is likely
that a safety device is operating because
of a malfunction in the automatic trans-
mission. We recommend you to have
your vehicle inspected as soon as possible.CAUTIONl The selector lever position indicator warn-
ing function does not operate with the se-
lector lever in the “P” (PARK), “R” (RE-
VERSE) or “N” (NEUTRAL) position.When the A/T (automatic transmission) fluid tem-
perature warning lamp comes on E00615300141
The automatic transmission fluid temperature warn-
ing lamp comes on when the automatic transmis-
sion fluid temperature becomes abnormally high.
Normally the warning lamp comes on when the ig-
nition switch is turned to the “ON” position, and
then will go out after a few seconds.
CAUTIONl If the lamp comes on, reduce the engine
speed and stop the vehicle in a safe area.
Then set the selector lever to the “P”
(PARK) position and idle the engine until
the warning lamp goes off. When the warn-
ing lamp goes off, resume normal driving.
If the warning lamp does not go off, we
recommend you to have your vehicle in-
spected.Operation of the automatic transmis-
sion E00604200528CAUTIONlBefore selecting a gear with the engine
running and the vehicle stationary, fully
depress the brake pedal to prevent the ve-
hicle from creeping.
The vehicle will begin to move as soon as
the gear is engaged, especially when the
engine speed is high, at fast idle or with
the air conditioning operating, the brakes
should only be released when you are
ready to drive away.
l Depress the brake pedal with the right
foot at all times.
Using the left foot could cause driver move-
ment delay in case of an emergency.
l To prevent sudden acceleration, never
race the engine when shifting from the
“P” (PARK) or “N” (NEUTRAL) position.
Starting and driving
4-23
4
Page 183 of 330
Ventilators.................................................................................... 5-02
Heater/Manual air conditioning* ..................................................5-03
Automatic air conditioning* ......................................................... 5-08
Important operation tips for the air conditioning..........................5-12
Air purifier* .................................................................................. 5-12
LW/MW/FM electronic tuning radio with CD player* ................5-13
To use the external audio input function* ....................................5-27
Steering wheel remote control switch* ........................................5-28
Error codes .................................................................................... 5-30
Audio system anti-theft feature .................................................... 5-32
Handling of compact discs ........................................................... 5-32
Antenna ......................................................................................... 5-34
Sun visors ..................................................................................... 5-35
Vanity mirror* .............................................................................. 5-36
Ashtray..........................................................................................5-36
Cigarette lighter ............................................................................ 5-37
Accessory socket* ........................................................................ 5-38
Digital clock* ............................................................................... 5-39
Interior lamps ................................................................................ 5-39
Storage spaces...............................................................................5-41
Cup holder* .................................................................................. 5-44
Bottle holder ................................................................................. 5-45
Convenient hook ........................................................................... 5-46
Coat hook* .................................................................................... 5-46
First-aid kit and warning triangle securing bands* ......................5-46For pleasant driving5
Page 184 of 330
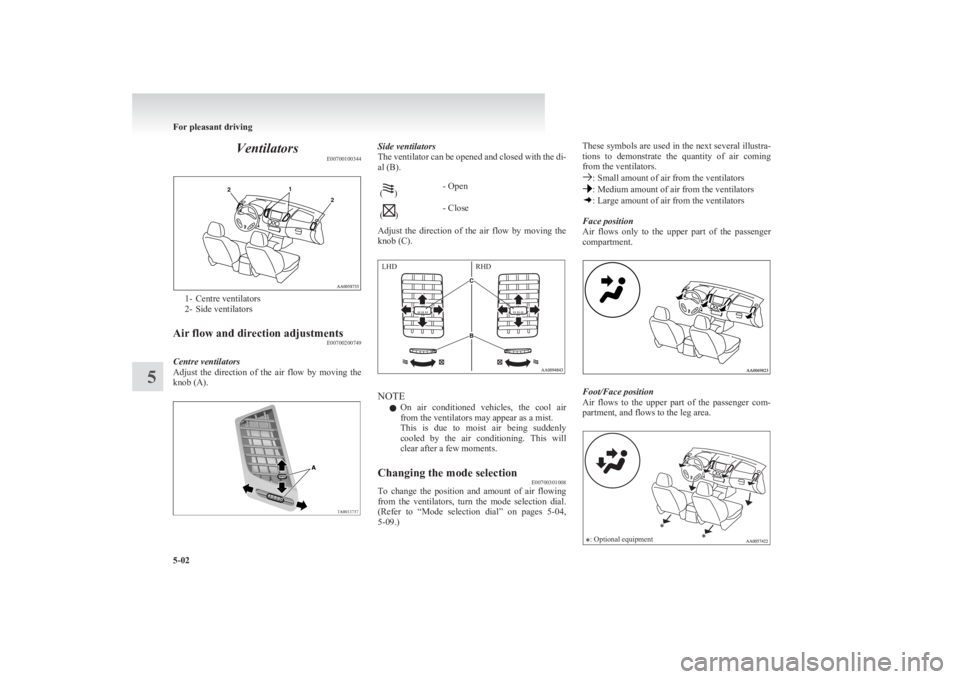
VentilatorsE00700100344
1- Centre ventilators
2- Side ventilators
Air flow and direction adjustments E00700200749
Centre ventilators
Adjust the direction of the air flow by moving the
knob (A).
Side ventilators
The ventilator can be opened and closed with the di-
al (B).()- Open()- Close
Adjust the direction of the air flow by moving the
knob (C).
NOTE
l On air conditioned vehicles, the cool air
from the ventilators may appear as a mist.
This is due to moist air being suddenly
cooled by the air conditioning. This will
clear after a few moments.
Changing the mode selection E00700301008
To change the position and amount of air flowing
from the ventilators, turn the mode selection dial.
(Refer to “Mode selection dial” on pages 5-04,
5-09.)
These symbols are used in the next several illustra-
tions to demonstrate the quantity of air coming
from the ventilators.
: Small amount of air from the ventilators: Medium amount of air from the ventilators: Large amount of air from the ventilators
Face position
Air flows only to the upper part of the passenger
compartment.
Foot/Face position
Air flows to the upper part of the passenger com-
partment, and flows to the leg area.
: Optional equipment
For pleasant driving
5-02
5 LHD RHD
Page 185 of 330
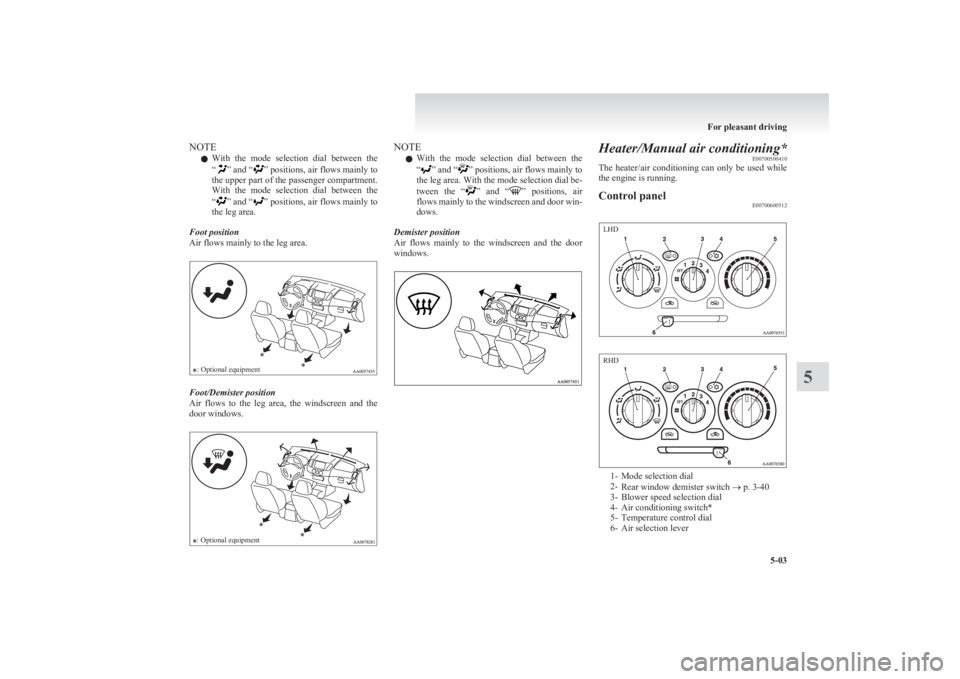
NOTEl With the mode selection dial between the
“
” and “” positions, air flows mainly to
the upper part of the passenger compartment.
With the mode selection dial between the
“
” and “” positions, air flows mainly to
the leg area.
Foot position
Air flows mainly to the leg area.
: Optional equipment
Foot/Demister position
Air flows to the leg area, the windscreen and the
door windows.
: Optional equipmentNOTE
l With the mode selection dial between the
“
” and “” positions, air flows mainly to
the leg area. With the mode selection dial be-
tween the “
” and “” positions, air
flows mainly to the windscreen and door win-
dows.
Demister position
Air flows mainly to the windscreen and the door
windows.
Heater/Manual air conditioning* E00700500410
The heater/air conditioning can only be used while
the engine is running.Control panel E00700600512
1- Mode selection dial
2- Rear window demister switch ® p. 3-40
3- Blower speed selection dial
4- Air conditioning switch*
5- Temperature control dial
6- Air selection lever
For pleasant driving
5-03
5 LHD RHD
Page 187 of 330
CAUTIONlNormally, use the “”
(outside) posi-
tion to keep the windscreen and side win-
dows clear and quickly remove fog or
frost from the windscreen.
If high cooling performance is desired, or
if the outside air is dusty or otherwise con-
taminated, use the “
” (recirculation)
position. Set the air selection lever to the
“
” (outside) position periodically to in-
crease ventilation so that the windows do
not become fogged up.
l Use of the “
”
(recirculation) position
for extended time may cause the windows
to fog up.
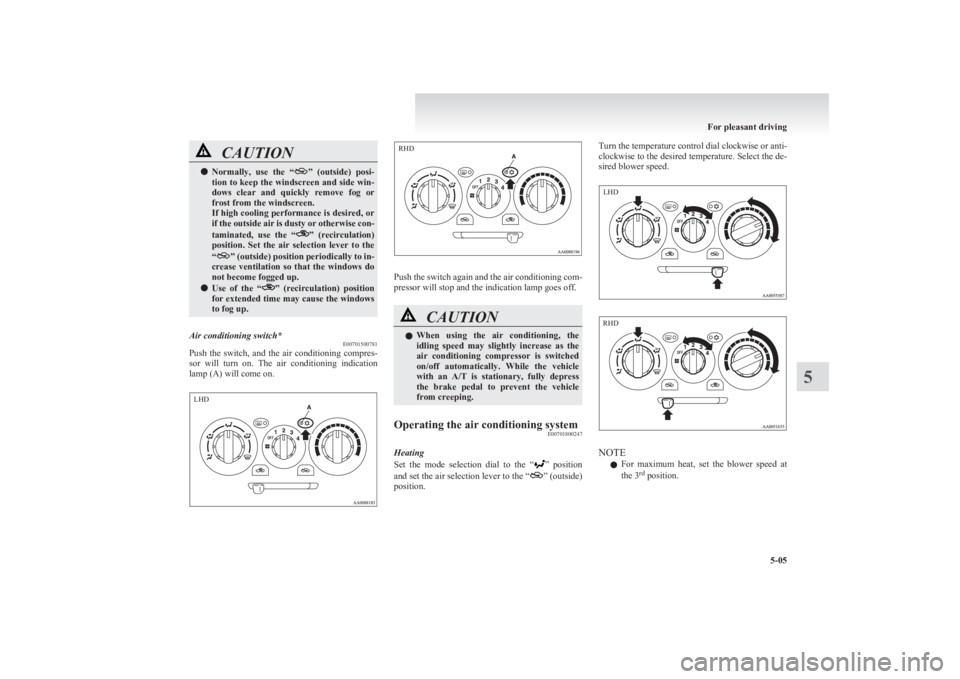
Air conditioning switch* E00701500781
Push the switch, and the air conditioning compres-
sor will turn on. The air conditioning indication
lamp (A) will come on.
Push the switch again and the air conditioning com-
pressor will stop and the indication lamp goes off.
CAUTIONl When using the air conditioning, the
idling speed may slightly increase as the
air conditioning compressor is switched
on/off automatically. While the vehicle
with an A/T is stationary, fully depress
the brake pedal to prevent the vehicle
from creeping.Operating the air conditioning system E00701800247
Heating
Set the mode selection dial to the “
” position
and set the air selection lever to the “” (outside)
position.
Turn the temperature control dial clockwise or anti-
clockwise to the desired temperature. Select the de-
sired blower speed.
NOTE
l For maximum heat, set the blower speed at
the 3 rd
position.
For pleasant driving
5-05
5 LHD RHD LHD RHD
Page 188 of 330
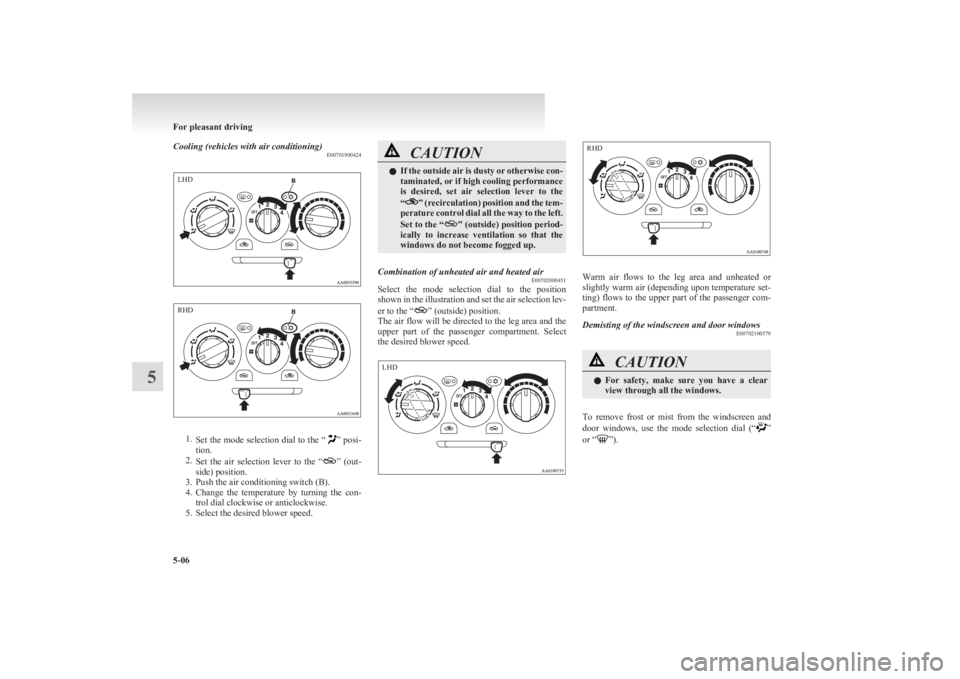
Cooling (vehicles with air conditioning)E00701900424
1.Set the mode selection dial to the “” posi-
tion.
2. Set the air selection lever to the “
” (out-
side) position.
3. Push the air conditioning switch (B).
4. Change the temperature by turning the con-
trol dial clockwise or anticlockwise.
5. Select the desired blower speed.
CAUTIONl If the outside air is dusty or otherwise con-
taminated, or if high cooling performance
is desired, set air selection lever to the
“
” (recirculation) position and the tem-
perature control dial all the way to the left.
Set to the “
” (outside) position period-
ically to increase ventilation so that the
windows do not become fogged up.
Combination of unheated air and heated air E00702000451
Select the mode selection dial to the position
shown in the illustration and set the air selection lev-
er to the “
” (outside) position.
The air flow will be directed to the leg area and the
upper part of the passenger compartment. Select
the desired blower speed.
Warm air flows to the leg area and unheated or
slightly warm air (depending upon temperature set-
ting) flows to the upper part of the passenger com-
partment.
Demisting of the windscreen and door windows E00702100579CAUTIONlFor safety, make sure you have a clear
view through all the windows.
To remove frost or mist from the windscreen and
door windows, use the mode selection dial (“”
or “”).
For pleasant driving
5-06
5LHD RHD LHD RHD
Page 189 of 330
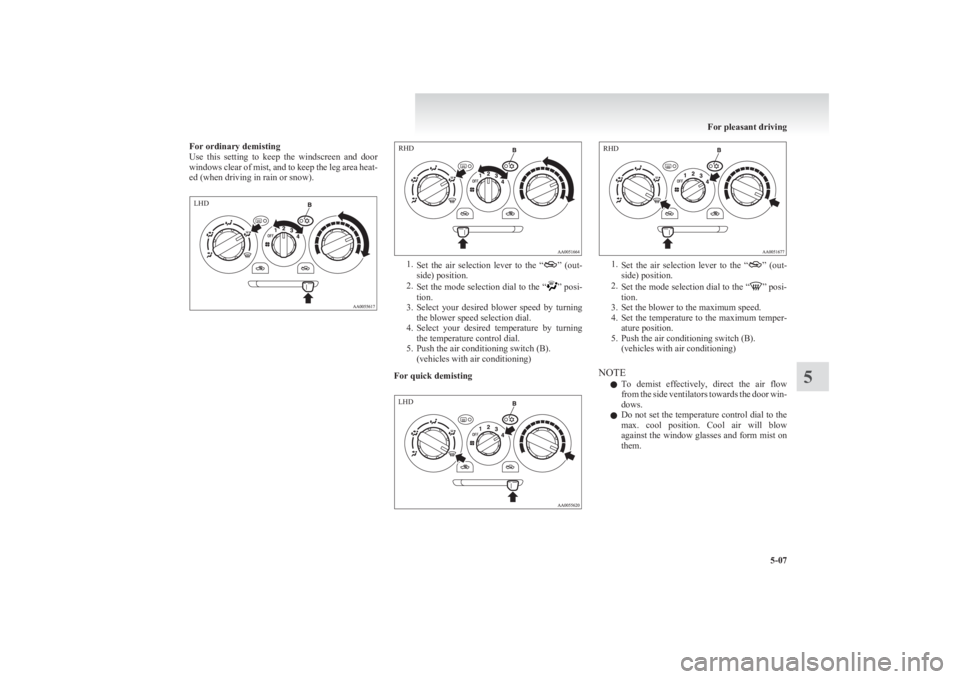
For ordinary demisting
Use this setting to keep the windscreen and door
windows clear of mist, and to keep the leg area heat-
ed (when driving in rain or snow).
1. Set the air selection lever to the “” (out-
side) position.
2. Set the mode selection dial to the “
” posi-
tion.
3. Select your desired blower speed by turning
the blower speed selection dial.
4. Select your desired temperature by turning
the temperature control dial.
5. Push the air conditioning switch (B). (vehicles with air conditioning)
For quick demisting
1. Set the air selection lever to the “” (out-
side) position.
2. Set the mode selection dial to the “
” posi-
tion.
3. Set the blower to the maximum speed.
4. Set the temperature to the maximum temper-
ature position.
5. Push the air conditioning switch (B). (vehicles with air conditioning)
NOTE l To demist effectively, direct the air flow
from the side ventilators towards the door win-
dows.
l Do not set the temperature control dial to the
max. cool position. Cool air will blow
against the window glasses and form mist on
them.
For pleasant driving
5-07
5LHD RHD LHD RHD