heater MITSUBISHI L200 2011 Owner's Manual (in English)
[x] Cancel search | Manufacturer: MITSUBISHI, Model Year: 2011, Model line: L200, Model: MITSUBISHI L200 2011Pages: 330, PDF Size: 22.34 MB
Page 6 of 330
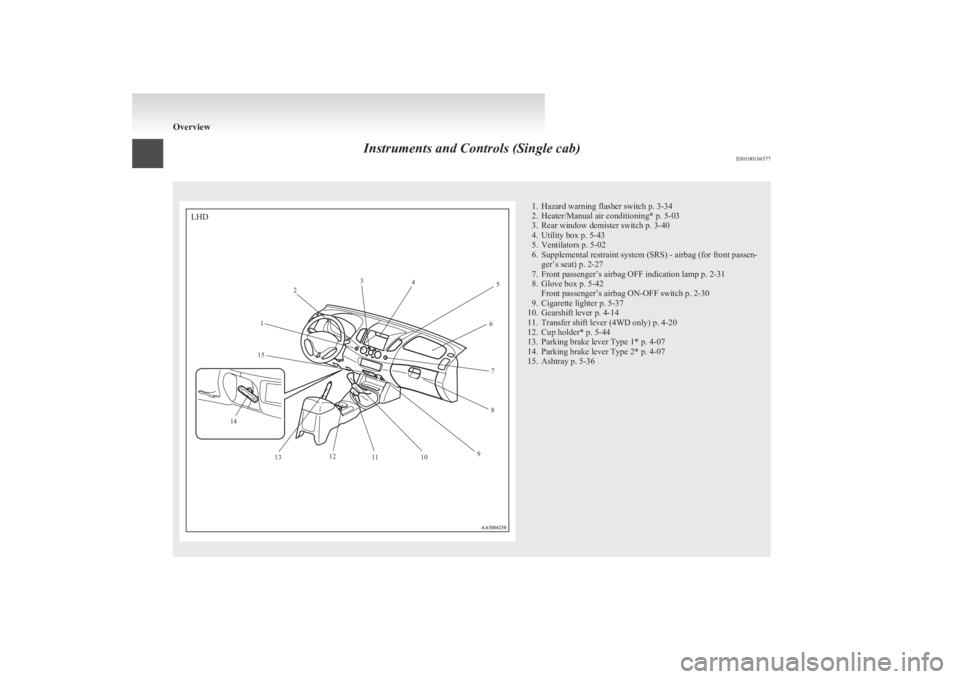
Instruments and Controls (Single cab)E001001045771. Hazard warning flasher switch p. 3-34
2. Heater/Manual air conditioning* p. 5-03
3. Rear window demister switch p. 3-40
4. Utility box p. 5-43
5. Ventilators p. 5-02
6. Supplemental restraint system (SRS) - airbag (for front passen- ger’s seat) p. 2-27
7. Front passenger’s airbag OFF indication lamp p. 2-31
8. Glove box p. 5-42 Front passenger’s airbag ON-OFF switch p. 2-30
9. Cigarette lighter p. 5-37
10. Gearshift lever p. 4-14
11. Transfer shift lever (4WD only) p. 4-20
12. Cup holder* p. 5-44
13. Parking brake lever Type 1* p. 4-07
14. Parking brake lever Type 2* p. 4-07
15. Ashtray p. 5-36
Overview12
3
4
5
6
78
9
10
11
12
13
14 15
LHD
Page 7 of 330
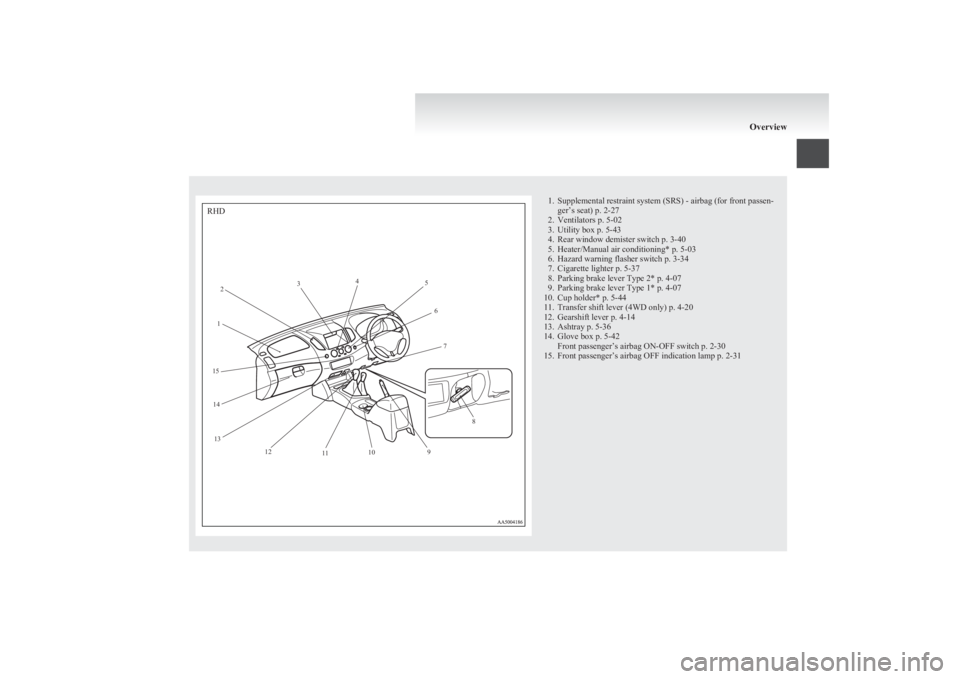
1. Supplemental restraint system (SRS) - airbag (for front passen-ger’s seat) p. 2-27
2. Ventilators p. 5-02
3. Utility box p. 5-43
4. Rear window demister switch p. 3-40
5. Heater/Manual air conditioning* p. 5-03
6. Hazard warning flasher switch p. 3-34
7. Cigarette lighter p. 5-37
8. Parking brake lever Type 2* p. 4-07
9. Parking brake lever Type 1* p. 4-07
10. Cup holder* p. 5-44
11. Transfer shift lever (4WD only) p. 4-20
12. Gearshift lever p. 4-14
13. Ashtray p. 5-36
14. Glove box p. 5-42 Front passenger’s airbag ON-OFF switch p. 2-30
15. Front passenger’s airbag OFF indication lamp p. 2-31
Overview12
3
4
5
6
7
8
9
10
11
12
13
14
15
RHD
Page 8 of 330
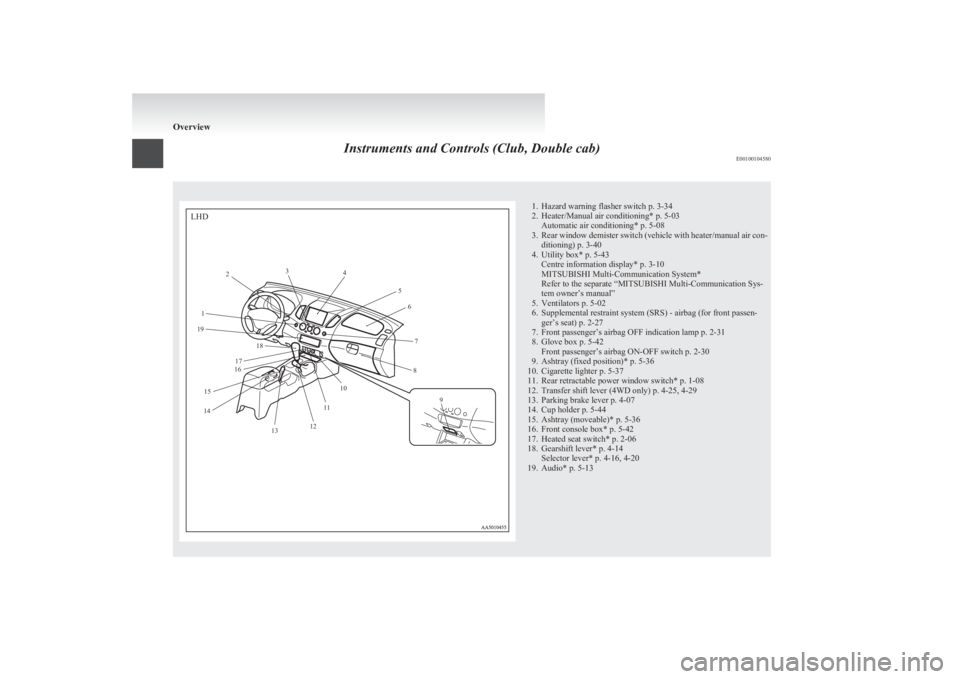
Instruments and Controls (Club, Double cab)E001001045801. Hazard warning flasher switch p. 3-34
2. Heater/Manual air conditioning* p. 5-03 Automatic air conditioning* p. 5-08
3. Rear window demister switch (vehicle with heater/manual air con-
ditioning) p. 3-40
4. Utility box* p. 5-43 Centre information display* p. 3-10
MITSUBISHI Multi-Communication System*
Refer to the separate “MITSUBISHI Multi-Communication Sys-
tem owner’s manual”
5. Ventilators p. 5-02
6. Supplemental restraint system (SRS) - airbag (for front passen- ger’s seat) p. 2-27
7. Front passenger’s airbag OFF indication lamp p. 2-31
8. Glove box p. 5-42 Front passenger’s airbag ON-OFF switch p. 2-30
9. Ashtray (fixed position)* p. 5-36
10. Cigarette lighter p. 5-37
11. Rear retractable power window switch* p. 1-08
12. Transfer shift lever (4WD only) p. 4-25, 4-29
13. Parking brake lever p. 4-07
14. Cup holder p. 5-44
15. Ashtray (moveable)* p. 5-36
16. Front console box* p. 5-42
17. Heated seat switch* p. 2-06
18. Gearshift lever* p. 4-14 Selector lever* p. 4-16, 4-20
19. Audio* p. 5-13
OverviewLHD1 2
3
4
56
7
8
9
10
11
12
13
14 15 16
17 18
19
Page 9 of 330
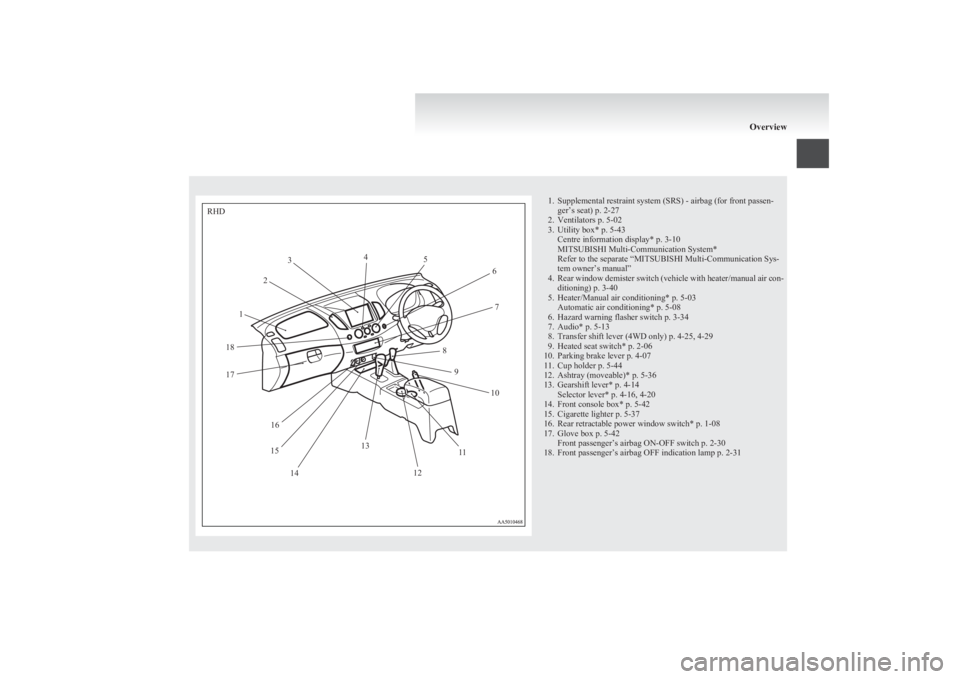
1. Supplemental restraint system (SRS) - airbag (for front passen-ger’s seat) p. 2-27
2. Ventilators p. 5-02
3. Utility box* p. 5-43 Centre information display* p. 3-10
MITSUBISHI Multi-Communication System*
Refer to the separate “MITSUBISHI Multi-Communication Sys-
tem owner’s manual”
4. Rear window demister switch (vehicle with heater/manual air con-
ditioning) p. 3-40
5. Heater/Manual air conditioning* p. 5-03 Automatic air conditioning* p. 5-08
6. Hazard warning flasher switch p. 3-34
7. Audio* p. 5-13
8. Transfer shift lever (4WD only) p. 4-25, 4-29
9. Heated seat switch* p. 2-06
10. Parking brake lever p. 4-07
11. Cup holder p. 5-44
12. Ashtray (moveable)* p. 5-36
13. Gearshift lever* p. 4-14 Selector lever* p. 4-16, 4-20
14. Front console box* p. 5-42
15. Cigarette lighter p. 5-37
16. Rear retractable power window switch* p. 1-08
17. Glove box p. 5-42 Front passenger’s airbag ON-OFF switch p. 2-30
18. Front passenger’s airbag OFF indication lamp p. 2-31
OverviewRHD12
3
4
5
6
7
8 9 10
11
12
13
14
15 16
17
18
Page 52 of 330
When the lever or pedal is used, the seatback will
tilt forward and at the same time the entire seat will
move forward. To return the seat, slide the entire
seat rearward and then raise the seatback rearward
to lock the seat in position.WARNINGl Do not drive the vehicle with the seatback
folded forward. The seat is not retained
position if it is not kept in an upright posi-
tion, so serious injuries could be suffered
in the event of hard braking or a collision.CAUTIONl The reclining mechanism of the seatback
is spring loaded, causing it to return to
the vertical position when the lock lever
is operated. When using the lever, sit
close to the seatback or hold it with your
hand.
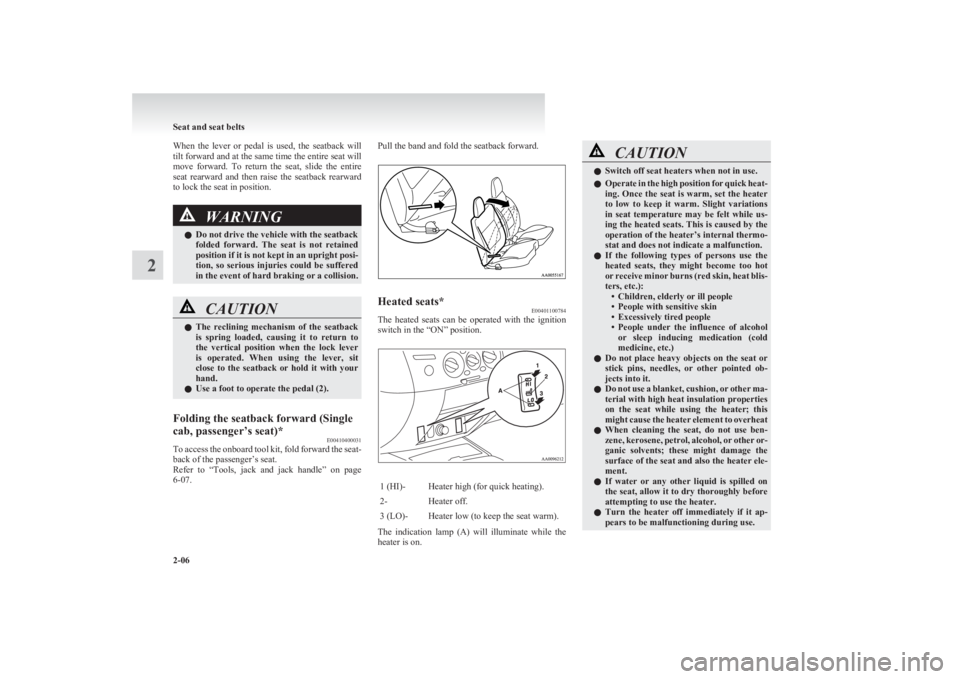
l Use a foot to operate the pedal (2).Folding the seatback forward (Single
cab, passenger’s seat)* E00410400031
To access the onboard tool kit, fold forward the seat-
back of the passenger’s seat.
Refer to “Tools, jack and jack handle” on page
6-07.
Pull the band and fold the seatback forward.Heated seats* E00401100784
The heated seats can be operated with the ignition
switch in the “ON” position.
1 (HI)-Heater high (for quick heating).2-Heater off.3 (LO)-Heater low (to keep the seat warm).
The indication lamp (A) will illuminate while the
heater is on.
CAUTIONl Switch off seat heaters when not in use.
l Operate in the high position for quick heat-
ing. Once the seat is warm, set the heater
to low to keep it warm. Slight variations
in seat temperature may be felt while us-
ing the heated seats. This is caused by the
operation of the heater’s internal thermo-
stat and does not indicate a malfunction.
l If the following types of persons use the
heated seats, they might become too hot
or receive minor burns (red skin, heat blis-
ters, etc.): • Children, elderly or ill people
• People with sensitive skin
• Excessively tired people
• People under the influence of alcohol
or sleep inducing medication (cold
medicine, etc.)
l Do not place heavy objects on the seat or
stick pins, needles, or other pointed ob-
jects into it.
l Do not use a blanket, cushion, or other ma-
terial with high heat insulation properties
on the seat while using the heater; this
might cause the heater element to overheat
l When cleaning the seat, do not use ben-
zene, kerosene, petrol, alcohol, or other or-
ganic solvents; these might damage the
surface of the seat and also the heater ele-
ment.
l If water or any other liquid is spilled on
the seat, allow it to dry thoroughly before
attempting to use the heater.
l Turn the heater off immediately if it ap-
pears to be malfunctioning during use.
Seat and seat belts
2-06
2
Page 126 of 330
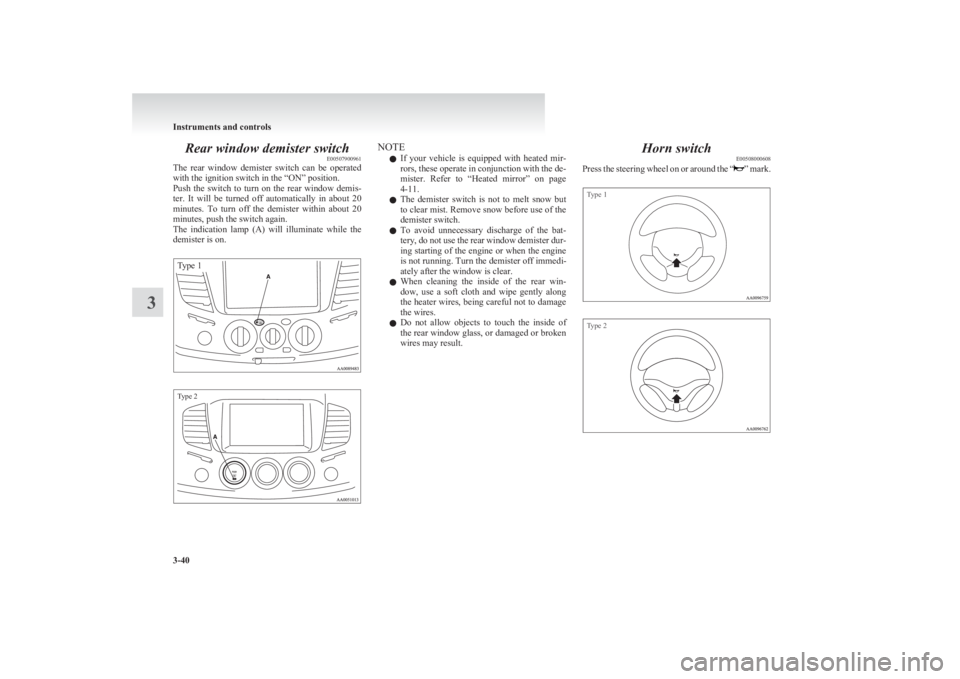
Rear window demister switchE00507900961
The rear window demister switch can be operated
with the ignition switch in the “ON” position.
Push the switch to turn on the rear window demis-
ter. It will be turned off automatically in about 20
minutes. To turn off the demister within about 20
minutes, push the switch again.
The indication lamp (A) will illuminate while the
demister is on.
Type 1Type 2NOTE
l If your vehicle is equipped with heated mir-
rors, these operate in conjunction with the de-
mister. Refer to “Heated mirror” on page
4-11.
l The demister switch is not to melt snow but
to clear mist. Remove snow before use of the
demister switch.
l To avoid unnecessary discharge of the bat-
tery, do not use the rear window demister dur-
ing starting of the engine or when the engine
is not running. Turn the demister off immedi-
ately after the window is clear.
l When cleaning the inside of the rear win-
dow, use a soft cloth and wipe gently along
the heater wires, being careful not to damage
the wires.
l Do not allow objects to touch the inside of
the rear window glass, or damaged or broken
wires may result.Horn switch E00508000608
Press the steering wheel on or around the “
” mark.
Type 1Type 2
Instruments and controls
3-40
3
Page 137 of 330
Push the switch to fold the mirrors inward, and
push the switch again to return them to extended po-
sition.
NOTE
l It is also possible to fold and return the mir-
rors by hand.
l When freezing has occurred and mirrors fail
to operate as intended, please refrain from re-
peated pushing of the retractor switch as this
action can result in burn-out of the mirror mo-
tor circuits.
Heated mirror* E00601200253
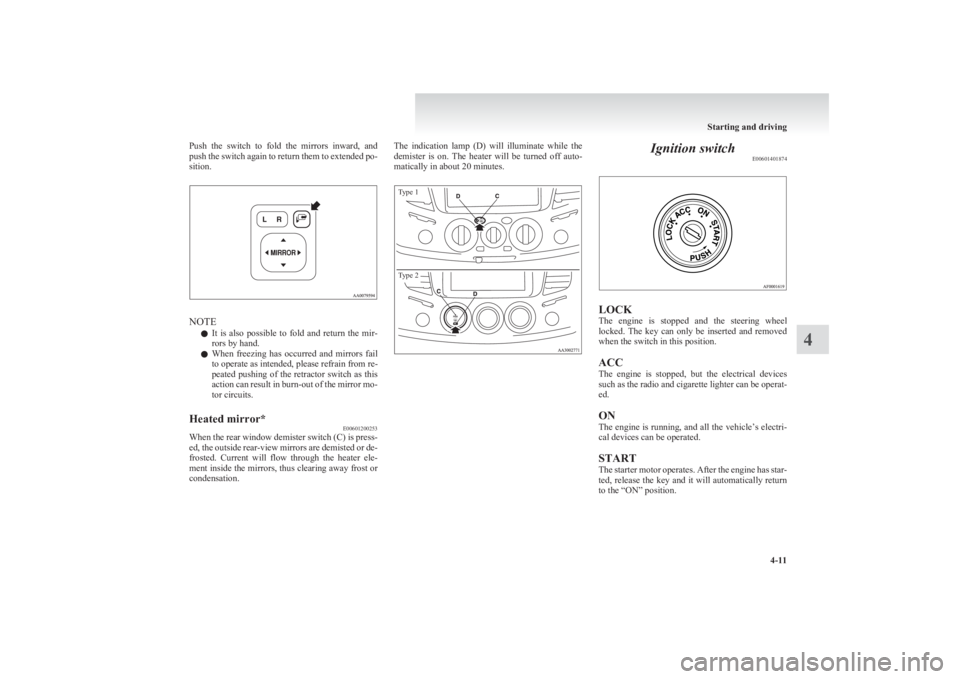
When the rear window demister switch (C) is press-
ed, the outside rear-view mirrors are demisted or de-
frosted. Current will flow through the heater ele-
ment inside the mirrors, thus clearing away frost or
condensation.
The indication lamp (D) will illuminate while the
demister is on. The heater will be turned off auto-
matically in about 20 minutes.Type 1Type 2
Ignition switch E00601401874
LOCK
The engine is stopped and the steering wheel
locked. The key can only be inserted and removed
when the switch in this position.
ACC
The engine is stopped, but the electrical devices
such as the radio and cigarette lighter can be operat-
ed.
ON
The engine is running, and all the vehicle’s electri-
cal devices can be operated.
START
The starter motor operates. After the engine has star-
ted, release the key and it will automatically return
to the “ON” position.
Starting and driving
4-11
4
Page 183 of 330
Ventilators.................................................................................... 5-02
Heater/Manual air conditioning* ..................................................5-03
Automatic air conditioning* ......................................................... 5-08
Important operation tips for the air conditioning..........................5-12
Air purifier* .................................................................................. 5-12
LW/MW/FM electronic tuning radio with CD player* ................5-13
To use the external audio input function* ....................................5-27
Steering wheel remote control switch* ........................................5-28
Error codes .................................................................................... 5-30
Audio system anti-theft feature .................................................... 5-32
Handling of compact discs ........................................................... 5-32
Antenna ......................................................................................... 5-34
Sun visors ..................................................................................... 5-35
Vanity mirror* .............................................................................. 5-36
Ashtray..........................................................................................5-36
Cigarette lighter ............................................................................ 5-37
Accessory socket* ........................................................................ 5-38
Digital clock* ............................................................................... 5-39
Interior lamps ................................................................................ 5-39
Storage spaces...............................................................................5-41
Cup holder* .................................................................................. 5-44
Bottle holder ................................................................................. 5-45
Convenient hook ........................................................................... 5-46
Coat hook* .................................................................................... 5-46
First-aid kit and warning triangle securing bands* ......................5-46For pleasant driving5
Page 185 of 330
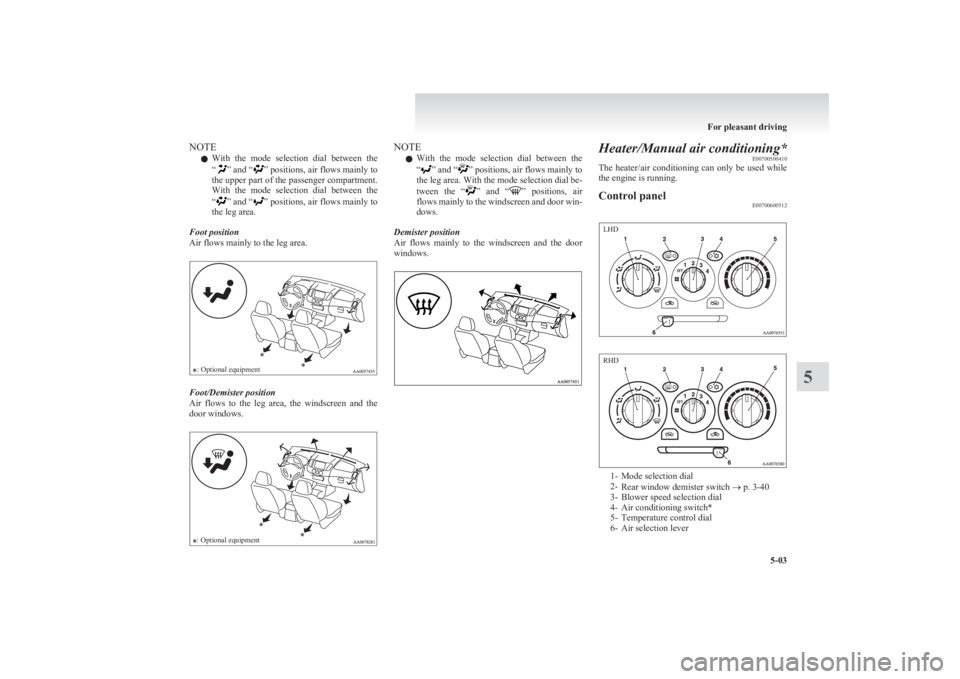
NOTEl With the mode selection dial between the
“
” and “” positions, air flows mainly to
the upper part of the passenger compartment.
With the mode selection dial between the
“
” and “” positions, air flows mainly to
the leg area.
Foot position
Air flows mainly to the leg area.
: Optional equipment
Foot/Demister position
Air flows to the leg area, the windscreen and the
door windows.
: Optional equipmentNOTE
l With the mode selection dial between the
“
” and “” positions, air flows mainly to
the leg area. With the mode selection dial be-
tween the “
” and “” positions, air
flows mainly to the windscreen and door win-
dows.
Demister position
Air flows mainly to the windscreen and the door
windows.
Heater/Manual air conditioning* E00700500410
The heater/air conditioning can only be used while
the engine is running.Control panel E00700600512
1- Mode selection dial
2- Rear window demister switch ® p. 3-40
3- Blower speed selection dial
4- Air conditioning switch*
5- Temperature control dial
6- Air selection lever
For pleasant driving
5-03
5 LHD RHD
Page 186 of 330
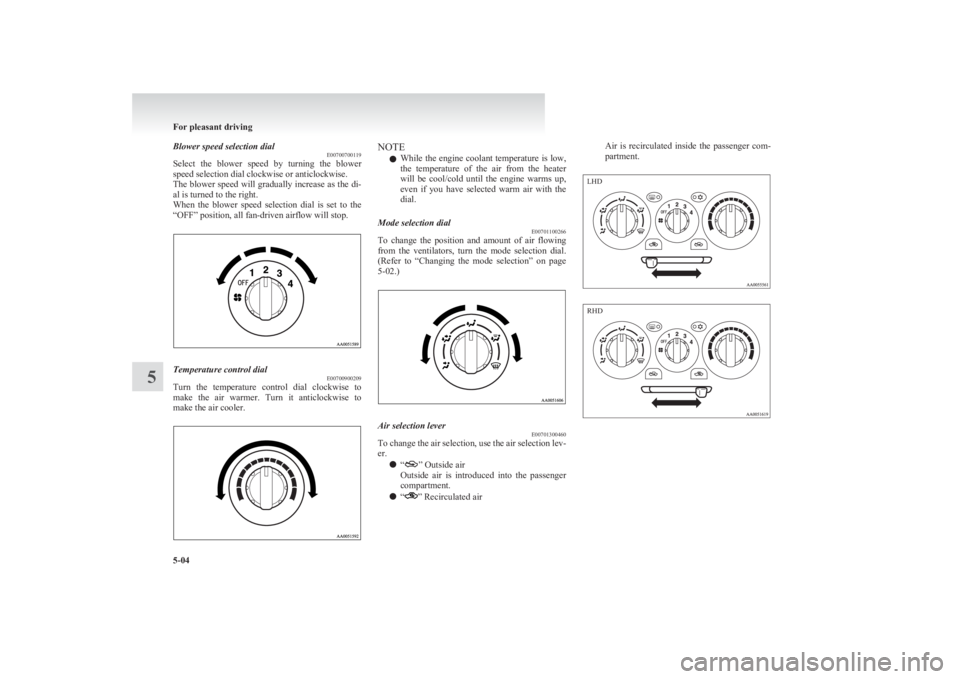
Blower speed selection dialE00700700119
Select the blower speed by turning the blower
speed selection dial clockwise or anticlockwise.
The blower speed will gradually increase as the di-
al is turned to the right.
When the blower speed selection dial is set to the
“OFF” position, all fan-driven airflow will stop.Temperature control dial E00700900209
Turn the temperature control dial clockwise to
make the air warmer. Turn it anticlockwise to
make the air cooler.
NOTE
l While the engine coolant temperature is low,
the temperature of the air from the heater
will be cool/cold until the engine warms up,
even if you have selected warm air with the
dial.Mode selection dial E00701100266
To change the position and amount of air flowing
from the ventilators, turn the mode selection dial.
(Refer to “Changing the mode selection” on page
5-02.)
Air selection lever E00701300460
To change the air selection, use the air selection lev-
er.
l “
” Outside air
Outside air is introduced into the passenger
compartment.
l “
” Recirculated air
Air is recirculated inside the passenger com-
partment.
For pleasant driving
5-04
5 LHD RHD