usb input terminal MITSUBISHI L200 2012 Owner's Manual (in English)
[x] Cancel search | Manufacturer: MITSUBISHI, Model Year: 2012, Model line: L200, Model: MITSUBISHI L200 2012Pages: 370, PDF Size: 23.14 MB
Page 8 of 370
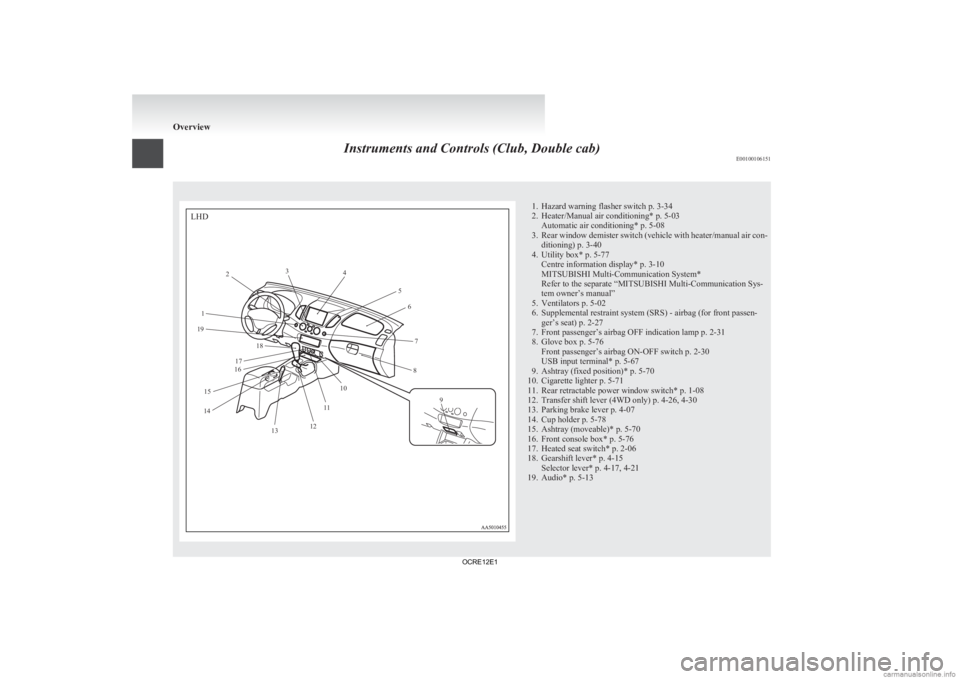
Instruments and Controls (Club, Double cab)
E001001061511. Hazard warning flasher switch p. 3-34
2.
Heater/Manual air conditioning* p. 5-03Automatic air conditioning* p. 5-08
3. Rear window demister switch (vehicle with heater/manual air con- ditioning) p. 3-40
4. Utility box* p. 5-77 Centre information display* p. 3-10
MITSUBISHI Multi-Communication System*
Refer to the separate “MITSUBISHI Multi-Communication Sys-
tem owner’s manual”
5. Ventilators p. 5-02
6. Supplemental restraint system (SRS) - airbag (for front passen- ger’s seat) p. 2-27
7. Front passenger’s airbag OFF indication lamp p. 2-31
8. Glove box p. 5-76 Front passenger’s airbag ON-OFF switch p. 2-30
USB input terminal* p. 5-67
9. Ashtray (fixed position)* p. 5-70
10. Cigarette lighter p. 5-71
11. Rear retractable power window switch* p. 1-08
12. Transfer shift lever (4WD only) p. 4-26, 4-30
13. Parking brake lever p. 4-07
14. Cup holder p. 5-78
15. Ashtray (moveable)* p. 5-70
16. Front console box* p. 5-76
17. Heated seat switch* p. 2-06
18. Gearshift lever* p. 4-15 Selector lever* p. 4-17, 4-21
19. Audio* p. 5-13 OverviewLHD1 2
3
4
56
7
8
9
10
11
12
13
14 15 16
17 18
19
OCRE12E1
Page 9 of 370
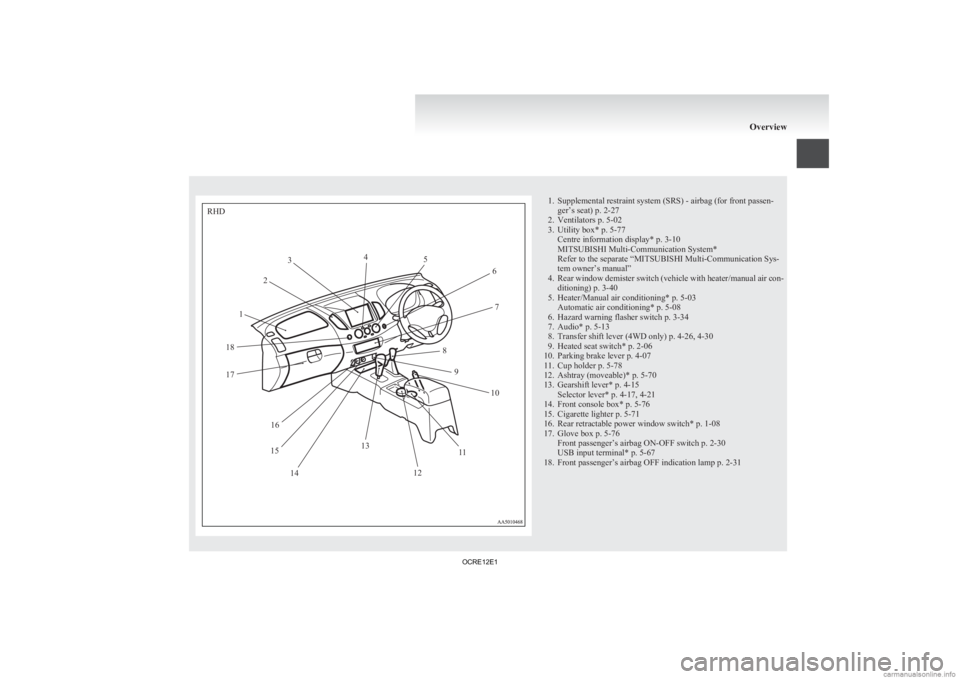
1. Supplemental restraint system (SRS) - airbag (for front passen-
ger’s seat) p. 2-27
2.
Ventilators p. 5-02
3. Utility box* p. 5-77 Centre information display* p. 3-10
MITSUBISHI Multi-Communication System*
Refer to the separate “MITSUBISHI Multi-Communication Sys-
tem owner’s manual”
4. Rear window demister switch (vehicle with heater/manual air con- ditioning) p. 3-40
5. Heater/Manual air conditioning* p. 5-03 Automatic air conditioning* p. 5-08
6. Hazard warning flasher switch p. 3-34
7. Audio* p. 5-13
8. Transfer shift lever (4WD only) p. 4-26, 4-30
9. Heated seat switch* p. 2-06
10. Parking brake lever p. 4-07
11. Cup holder p. 5-78
12. Ashtray (moveable)* p. 5-70
13. Gearshift lever* p. 4-15 Selector lever* p. 4-17, 4-21
14. Front console box* p. 5-76
15. Cigarette lighter p. 5-71
16. Rear retractable power window switch* p. 1-08
17. Glove box p. 5-76 Front passenger’s airbag ON-OFF switch p. 2-30
USB input terminal* p. 5-67
18. Front passenger’s airbag OFF indication lamp p. 2-31 OverviewRHD12
3
4
5
6
7
8 9 10
11
12
13
14
15 16
17
18
OCRE12E1
Page 185 of 370
Ventilators
.................................................................................... 5-02
Heater/Manual air conditioning* ..................................................5-03
Automatic air conditioning* ......................................................... 5-08
Important operation tips for the air conditioning
..........................5-12
Air purifier*.................................................................................. 5-12
LW/MW/FM electronic tuning radio with CD player* ................5-13
To play tracks from USB device* ................................................5-27
To play tracks from a Bluetooth ®
device (vehicles with
Bluetooth ®
2.0 interface)..........................................................5-36
To use the external audio input function* ....................................5-39
Steering wheel remote control switch* ........................................5-40
Error codes.................................................................................... 5-42
Error codes (iPod)......................................................................... 5-44
Error codes (USB memory device) ..............................................5-46
Audio system anti-theft feature .................................................... 5-48
Handling of compact discs ........................................................... 5-48
Antenna......................................................................................... 5-50
Link System* ................................................................................ 5-51
Bluetooth ®
2.0 interface* ............................................................. 5-51
USB input terminal* ..................................................................... 5-67
Sun visors..................................................................................... 5-69
Vanity mirror* .............................................................................. 5-70
Ashtray..........................................................................................5-70
Cigarette lighter ............................................................................ 5-71
Accessory socket*........................................................................ 5-72
Digital clock* ............................................................................... 5-73
Interior lamps ................................................................................ 5-73
Storage spaces...............................................................................5-75
Cup holder*.................................................................................. 5-78
Bottle holder ................................................................................. 5-79 Convenient hook
........................................................................... 5-80
Coat hook*.................................................................................... 5-80
First-aid kit and warning triangle securing bands* ......................5-80 For pleasant driving
5
OCRE12E1
Page 211 of 370
l
The display can show up to 16 characters. If
a folder name, track name, or item of ID3 tag
information has more than 16 characters,
press the PAGE button (6) to view the next
16 characters.
l Folder names and track names can each be
displayed up to a length of 32 characters.
Items of ID3 tag information can each be dis-
played up to a length of 30 characters.
l Characters that the CD player cannot display
are shown as “ ”. To play tracks from USB device*
E00756100149
You
can connect your iPod or USB memory device
to the USB input terminal and play music files stor-
ed in the iPod or USB memory device.
See the following section for the types of connecta-
ble devices and supported files.
Refer to “Types of connectable devices and suppor-
ted file specifications” on page 5-68.
See the following sections for the connecting meth-
ods, “How to connect an iPod” on page 5-67 and
“How to connect a USB memory device” on page
5-67.
If your vehicle is equipped with a Bluetooth ®
2.0
interface, you can play music files in your iPod or
USB memory device via voice operation.
Refer to “To play iPod tracks via voice operation”
on page 5-30 and “To play USB memory device
tracks via voice operation” on page 5-35.
NOTE
l The protected file by copyright might not be
able to start playback.
l It is recommended to adjust the equalizer of
the connected device is flat. For pleasant driving
5-27 5
OCRE12E1
Page 213 of 370
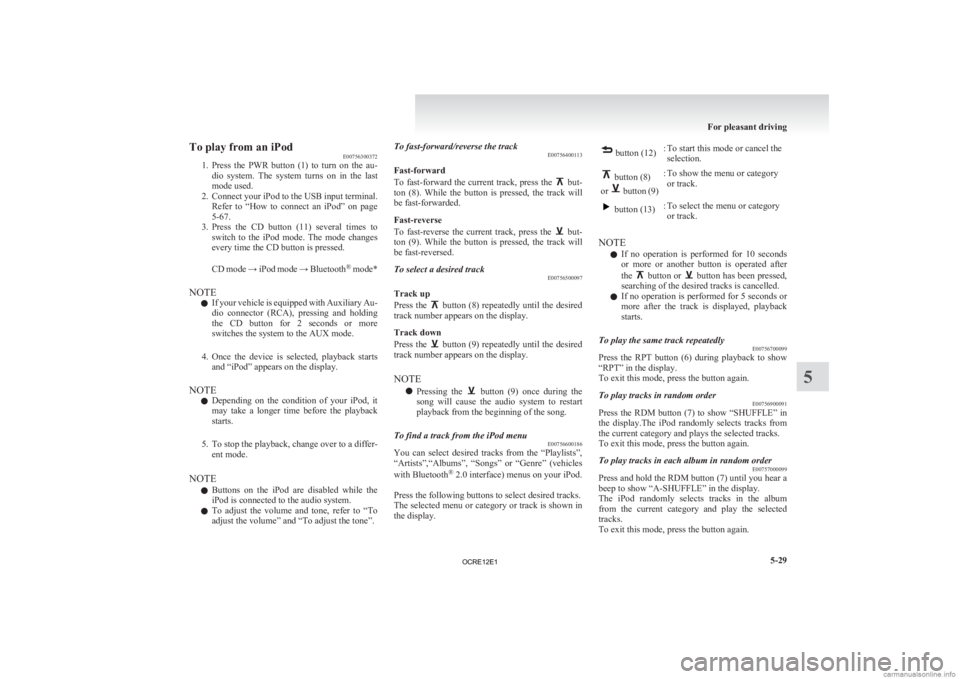
To play from an iPod
E00756300372
1. Press
the PWR button (1) to turn on the au-
dio system. The system turns on in the last
mode used.
2. Connect your iPod to the USB input terminal. Refer to “How to connect an iPod” on page
5-67.
3. Press the CD button (11) several times to switch to the iPod mode. The mode changes
every time the CD button is pressed.
CD mode → iPod mode → Bluetooth ®
mode*
NOTE l If your vehicle is equipped with Auxiliary Au-
dio connector (RCA), pressing and holding
the CD button for 2 seconds or more
switches the system to the AUX mode.
4. Once the device is selected, playback starts and “iPod” appears on the display.
NOTE l Depending on the condition of your iPod, it
may take a longer time before the playback
starts.
5. To stop the playback, change over to a differ- ent mode.
NOTE l Buttons on the iPod are disabled while the
iPod is connected to the audio system.
l To adjust the volume and tone, refer to “To
adjust the volume” and “To adjust the tone”. To fast-forward/reverse the track
E00756400113
Fast-forward
To
fast-forward the current track, press the but-
ton
(8). While the button is pressed, the track will
be fast-forwarded.
Fast-reverse
To fast-reverse the current track, press the but-
ton
(9). While the button is pressed, the track will
be fast-reversed.
To select a desired track E00756500097
Track up
Press
the button (8) repeatedly until the desired
track number appears on the display.
Track down
Press
the button (9) repeatedly until the desired
track number appears on the display.
NOTE
l Pressing
the button (9) once during the
song
will cause the audio system to restart
playback from the beginning of the song.
To find a track from the iPod menu E00756600186
You can select desired tracks from the “Playlists”,
“Artists”,“Albums”,
“Songs” or “Genre” (vehicles
with Bluetooth ®
2.0 interface) menus on your iPod.
Press the following buttons to select desired tracks.
The selected menu or category or track is shown in
the display. button (12)
: To start this mode or cancel the
selection. button (8)
or button (9)
: To show the menu or category
or track. button (13)
: To select the menu or category
or track.
NOTE l If
no operation is performed for 10 seconds
or more or another button is operated after
the button or button has been pressed,
searching of the desired tracks is cancelled.
l If
no operation is performed for 5 seconds or
more after the track is displayed, playback
starts.
To play the same track repeatedly E00756700099
Press the RPT button (6) during playback to show
“RPT” in the display.
To exit this mode, press the button again.
To play tracks in random order E00756900091
Press the RDM button (7) to show “SHUFFLE” in
the
display.The iPod randomly selects tracks from
the current category and plays the selected tracks.
To exit this mode, press the button again.
To play tracks in each album in random order E00757000099
Press and hold the RDM button (7) until you hear a
beep to show “A-SHUFFLE” in the display.
The
iPod randomly selects tracks in the album
from the current category and play the selected
tracks.
To exit this mode, press the button again. For pleasant driving
5-29 5
OCRE12E1
Page 218 of 370
To play from a USB memory device
E00762500366
1. Press
the PWR button (1) to turn on the au-
dio system. The system turns on in the last
mode used.
2. Connect your USB memory device to the USB input terminal.
Refer to “How to connect a USB memory de-
vice” on page 5-67.
3. Press the CD button (11) several times to switch to the USB mode. The mode changes
as follows every time the CD button is pressed.
CD mode → USB mode → Bluetooth ®
mode*
NOTE l If your vehicle is equipped with Auxiliary Au-
dio connector (RCA), pressing and holding
the CD button for 2 seconds or more
switches the system to the AUX mode.
4. Once the device is selected, playback starts and “USB” appears on the display.
NOTE l Depending on the condition of your USB de-
vice, it may take a longer time before the play-
back starts.
5. To stop the playback, change over to a differ- ent mode.
NOTE l To adjust the volume and tone, refer to “To
adjust the volume” and “To adjust the tone”. Supported compressed music files
E00758300305
This
audio can play MP3, WMA, AAC and WAV
files recorded in a USB memory device. This audio
supports up to 65,535 files in 700 folders on 8 levels.
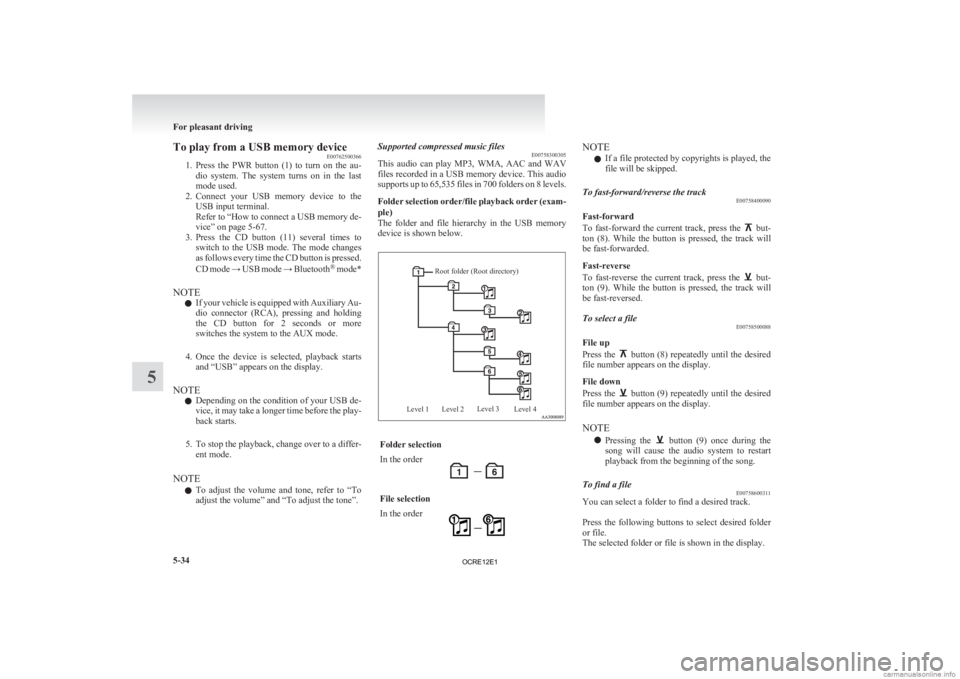
Folder selection order/file playback order (exam-
ple)
The folder and file hierarchy in the USB memory
device is shown below.
Root folder (Root directory)
Level 1 Level 2 Level 3
Level 4 Folder selection
In the order
File selection
In the order NOTE
l If a file protected by copyrights is played, the
file will be skipped.
To fast-forward/reverse the track E00758400090
Fast-forward
To
fast-forward the current track, press the but-
ton
(8). While the button is pressed, the track will
be fast-forwarded.
Fast-reverse
To fast-reverse the current track, press the but-
ton
(9). While the button is pressed, the track will
be fast-reversed.
To select a file E00758500088
File up
Press
the button (8) repeatedly until the desired
file number appears on the display.
File down
Press
the button (9) repeatedly until the desired
file number appears on the display.
NOTE
l Pressing
the button (9) once during the
song
will cause the audio system to restart
playback from the beginning of the song.
To find a file E00758600311
You can select a folder to find a desired track.
Press
the following buttons to select desired folder
or file.
The selected folder or file is shown in the display. For pleasant driving
5-34
5
OCRE12E1
Page 235 of 370
NOTE
l Be
sure to remove the roof antenna in the fol-
lowing cases: • When using an automatic car wash.
• When placing a car cover over the vehicle.
l Before driving into a structure that has a low
ceiling, fold down the antenna to prevent it
from hitting the ceiling. Link System*
E00764500012
The
Link System takes overall control of the devi-
ces connected via the USB input terminal or the
Bluetooth ®
2.0 interface allowing the connected de-
vices to be operated by using the switches in the ve-
hicle or voice commands.
See the following section for details on how to op-
erate.
Refer to “Bluetooth ®
2.0 interface” on page 5-51.
Refer to “USB input terminal” on page 5-67.
Refer to “To play tracks from USB device” on
page 5-27.
Refer to “To play tracks from a Bluetooth ®
device”
on page 5-36.
Refer to “To use the external audio input function”
on page 5-39.
Bluetooth ®
is a registered trademark of BLUE-
TOOTH SIG, INC.
Link System End User Licence Agree-
ment E00764600013
You have acquired a device that includes software
licensed
by MITSUBISHI MOTORS CORPORA-
TION from JOHNSON CONTROLS Inc (the auto-
motive experience business unit), and their subse-
quent 3 rd
party suppliers. For a complete list of
these 3 rd
party products and their end user licence
agreements, please go to the following website.
http://www.jciblueconnect.com/faq/fulldisclo-
sure.pdf Bluetooth
®
2.0 interface*
E00726000556
The Bluetooth ®
2.0 interface allows for making/re-
ceiving hands-free calls in the vehicle using a Blue-
tooth ®
compatible cellular phone based on the wire-
less communication technology commonly known
as Bluetooth ®
. It also allows the user to play mu-
sic, saved in a Bluetooth ®
music player, from the
vehicle’s speakers.
The system is equipped with a voice recognition
function, which allows you to make hands-free
calls by simple switch operations and voice com-
mand operations using a defined voice tree.
The Bluetooth ®
2.0 interface can be used when the
ignition switch is in the “ON” or “ACC” position.
Before you can use the Bluetooth ®
2.0 interface,
you must pair the Bluetooth ®
device and Blue-
tooth ®
2.0 interface. Refer to “Connecting the Blue-
tooth® 2.0 interface and Bluetooth® device” on
page 5-55.
Bluetooth ®
is a registered trademark of BLUE-
TOOTH SIG, INC. For pleasant driving
5-51 5
OCRE12E1
Page 251 of 370
USB input terminal*
E00761900015
You
can connect your USB memory device or
iPod* to play music files stored in the USB memo-
ry device or iPod.
The following explains how to connect and remove
a USB memory device or iPod.
Refer to the following sections for details on how
to play music files:
Refer to “To play tracks from USB device” on
page 5-27.
*: “iPod” is a registered trademark of Apple Inc. in
the United States and other countries.
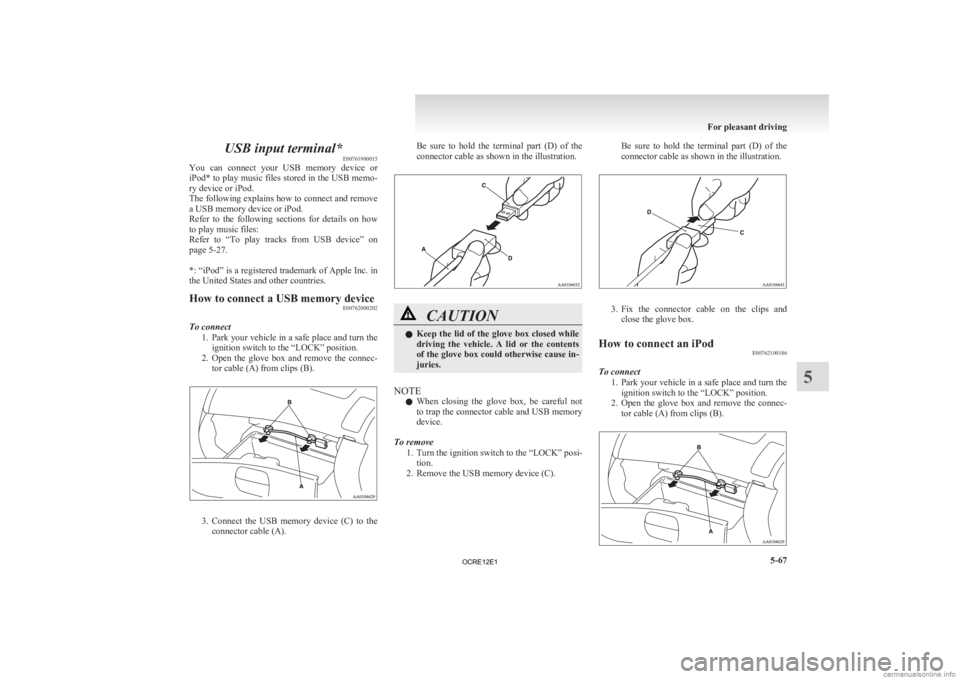
How to connect a USB memory device E00762000202
To connect 1. Park
your vehicle in a safe place and turn the
ignition switch to the “LOCK” position.
2. Open the glove box and remove the connec- tor cable (A) from clips (B). 3. Connect
the USB memory device (C) to the
connector cable (A). Be sure to hold the terminal part (D) of the
connector cable as shown in the illustration.
CAUTION
l
Keep
the lid of the glove box closed while
driving the vehicle. A lid or the contents
of the glove box could otherwise cause in-
juries.
NOTE l When
closing the glove box, be careful not
to trap the connector cable and USB memory
device.
To remove 1. Turn the ignition switch to the “LOCK” posi-tion.
2. Remove the USB memory device (C). Be sure to hold the terminal part (D) of the
connector cable as shown in the illustration.
3. Fix
the connector cable on the clips and
close the glove box.
How to connect an iPod E00762100186
To connect 1. Park
your vehicle in a safe place and turn the
ignition switch to the “LOCK” position.
2. Open the glove box and remove the connec- tor cable (A) from clips (B). For pleasant driving
5-67 5
OCRE12E1
Page 253 of 370
l
You can charge your iPod by connecting it to
the
USB input terminal when the ignition
switch is in the “ACC” or “ON” position.
l Do not keep your USB memory device or
iPod in your vehicle.
l It is recommended that you back up files in
case of data damage.
l Do not connect to the USB input terminal
any device (hard disk, card reader, memory
reader, etc.) other than the connectable devi-
ces specified in the previous section. The de-
vice and/or data may be damaged. If any of
these devices was connected by mistake, re-
move it after turning the ignition switch to
the “LOCK” position.
File specifications E00762400017
You can play music files of the following specifica-
tions
that are saved in a USB memory device or oth-
er device supporting mass storage class. Item Condition
File format MP3, WMA, AAC,
WAV
Maximum number of
levels
(including the
root) Level 8
Number of folders 700
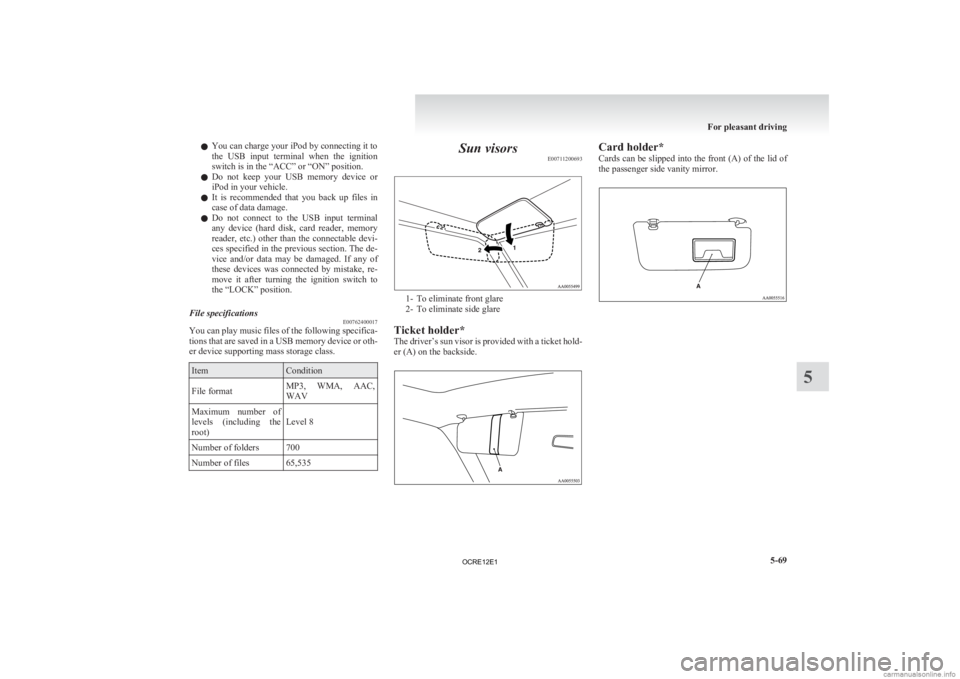
Number of files 65,535 Sun visors
E00711200693 1- To eliminate front glare
2-
To eliminate side glare
Ticket holder*
The driver’s sun visor is provided with a ticket hold-
er (A) on the backside. Card holder*
Cards
can be slipped into the front (A) of the lid of
the passenger side vanity mirror. For pleasant driving
5-69 5
OCRE12E1
Page 260 of 370
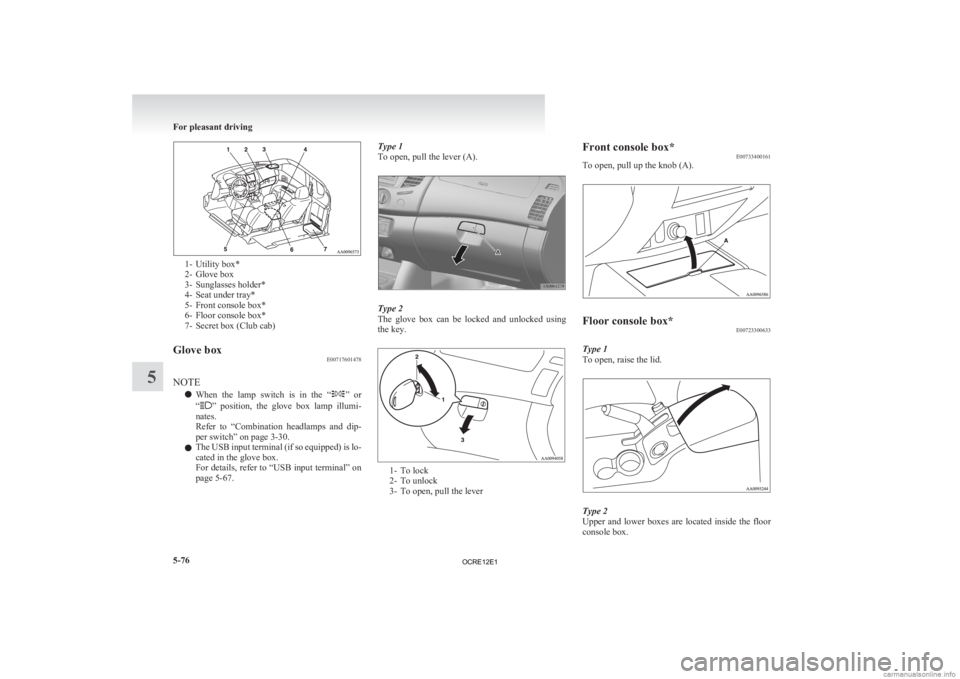
1- Utility box*
2-
Glove box
3- Sunglasses holder*
4- Seat under tray*
5- Front console box*
6- Floor console box*
7- Secret box (Club cab)
Glove box E00717601478
NOTE l When
the lamp switch is in the “ ”
or
“ ” position, the glove box lamp illumi-
nates.
Refer to “Combination headlamps and dip-
per switch” on page 3-30.
l The USB input terminal (if so equipped) is lo-
cated in the glove box.
For details, refer to “USB input terminal” on
page 5-67. Type 1
To open, pull the lever (A).
Type 2
The
glove box can be locked and unlocked using
the key. 1- To lock
2-
To unlock
3- To open, pull the lever Front console box*
E00733400161
To open, pull up the knob (A). Floor console box*
E00723300633
Type 1
To open, raise the lid. Type 2
Upper
and lower boxes are located inside the floor
console box. For pleasant driving
5-76
5
OCRE12E1