ESP MITSUBISHI L200 2013 (in English) Owner's Guide
[x] Cancel search | Manufacturer: MITSUBISHI, Model Year: 2013, Model line: L200, Model: MITSUBISHI L200 2013Pages: 362, PDF Size: 21.07 MB
Page 165 of 362
Limited-slip differential*E00606900037
A limited-slip differential is applied for the rear
wheel differential only. The features of this limited-
slip differential are described below:
Just as with a conventional differential, the wheel
on one side is allowed to turn at a different speed
from the wheel on the other side when the vehicle
is cornering. The difference between the limited-
slip differential and a conventional differential is
that if the wheel on one side of the vehicle loses trac-
tion, a greater amount of torque is applied to the
wheel on the other side to improve traction.
NOTE l Even if there is a difference in the amount of
traction the wheels can get, if both of them
are spinning, the limited-slip differential will
not be effective.CAUTIONl Never start the engine while one of the
rear wheels is jacked up and the other in
contact with the ground; doing so may
cause the vehicle to jump forward.
l When attempting to extract the vehicle
from snow, mud, etc., and the engine is
run continuously at high speed, the limi-
ted-slip differential will be adversely af-
fected.Braking E00607001928
All the parts of the brake system are critical to safe-
ty. We recommend you to have the vehicle
checked at regular intervals according to the serv-
ice booklet.CAUTIONl Avoid driving habits that cause heavy
braking and never “ride” the brakes by
resting your foot on the brake pedal
while driving.
It causes brake overheating and fade.
Brake system
The service brake is divided into two brake cir-
cuits. And your vehicle is equipped with power
brakes. If one brake circuit fails, the other is availa-
ble to stop the vehicle. If you should lose the pow-
er assist for some reason, the brakes will still work.
In these situations, even if the brake pedal moves
down to the very end of its possible stroke or re-
sists being depressed, keep depressing the brake ped-
al down harder and further than usual; stop driving
as soon as possible and have the brake system re-
paired.
WARNINGl Do not turn off the engine while your ve-
hicle is in motion. If you turn off the en-
gine while driving, the power assistance
for the braking system will stop working
and your brakes will not work effectively.WARNINGl If the power assist is lost or if either
brake hydraulic system stops working
properly, have your vehicle checked im-
mediately.
Warning lamp
The brake warning lamp illuminates to indicate a
fault in the braking system. Refer to “Brake warn-
ing lamp” on page 3-08.
When brakes are wet
Check the brake system while driving at a low
speed immediately after starting, especially when
the brakes are wet, to confirm they work normally.
A film of water can be formed on the brake discs
or brake drums and prevent normal braking after
driving in heavy rain or through large puddles, or
after the vehicle is washed. If this occurs, dry the
brakes out by driving slowly while lightly depress-
ing the brake pedal.
When driving downhill
It is important to take advantage of the engine brak-
ing by shifting to a lower shift position while driv-
ing on steep downhill roads in order to prevent the
brakes from overheating.
Starting and driving
4-39
OKTE13E1
4
Page 169 of 362
Power steering systemE00607400387
The power steering system operates while the en-
gine is running. It helps reduce the effort needed to
turn the steering wheel.
The power steering system has mechanical steering
capability in case the power assist is lost. If the pow-
er assist is lost for some reason, you will still be
able to steer your vehicle, but you will notice it
takes much more effort to steer. If this happens,
have your vehicle inspected at an authorized
MITSUBISHI MOTORS service point.WARNINGl Do not stop the engine while the vehicle is
moving. Stopping the engine would make
the steering wheel extremely hard to
turn, possibly resulting in an accident.CAUTIONl Do not leave the steering wheel turned all
the way in one direction. This can cause
damage to the power steering system.Active Stability & Traction
Control (ASTC)* E00616700344
The active stability & traction control (ASTC)
takes overall control of the anti-lock brake system,
traction control function and Active Stability Con-
trol function to help maintain the vehicle’s control
and traction. Please read this section in conjunction
with the page on the anti-lock brake system, trac-
tion control function and Active Stability Control
function.
Anti-lock brake system (ABS) ® p. 4-40
Active Traction Control function ® p. 4-44
Active Stability Control function ® p. 4-44CAUTIONl Do not over-rely on the ASTC. This sys-
tem, like any other system, has limits and
cannot help you to maintain traction and
control of the vehicle in all circumstan-
ces. Reckless driving may lead to acci-
dents. Always drive carefully, taking into
account the traffic, road and environmen-
tal conditions.
l Be sure to use the same specified type and
size of tyre on all 4 wheels. Otherwise, the
ASTC may not work correctly.
NOTE
l After your vehicle is driven a short distance
after starting the engine, a click is heard from
the engine compartment; however, this is on-
ly the sound of ASTC being checked.
l Some vibration will be felt in the vehicle
body and a whining sound of a motor will be
heard from the engine compartment when
the ASTC functions. This is a normal result
of the ASTC operation, and does not indicate
a malfunction.
l The ASTC does not operate while the ABS
warning lamp is illuminated.
l On vehicles with the rear differential lock,
the ASTC and ABS functions are suspended
while the rear differential lock is activated.
ASTC indication lamp, ASTC OFF indica-
tion lamp and ABS warning lamp are illumi-
nated while these functions are suspended. It
does not indicate a problem. When the rear
differential lock is disengaged, these lamps
go out and function again.
Refer to “ABS warning lamp” on page 4-41,
“ ASTC indication lamp, ASTC OFF indica-
tion lamp” on page 4-44.Driving hints E00616800039
When extricating the vehicle from mud, sand or
fresh snow, you may find that operation of the
ASTC prevents the engine speed from increasing
in response to depression of the accelerator pedal.
If this happens and the vehicle remains stuck as a
result, deactivate the ASC function by pressing the
“ASC OFF” switch. The vehicle will then be easier
to extricate. (Brake control of the ATC function is
still working to prevent wheel spins when the ASC
function is deactivated by pressing the “ASC OFF”
switch.)
Starting and driving
4-43
OKTE13E1
4
Page 197 of 362
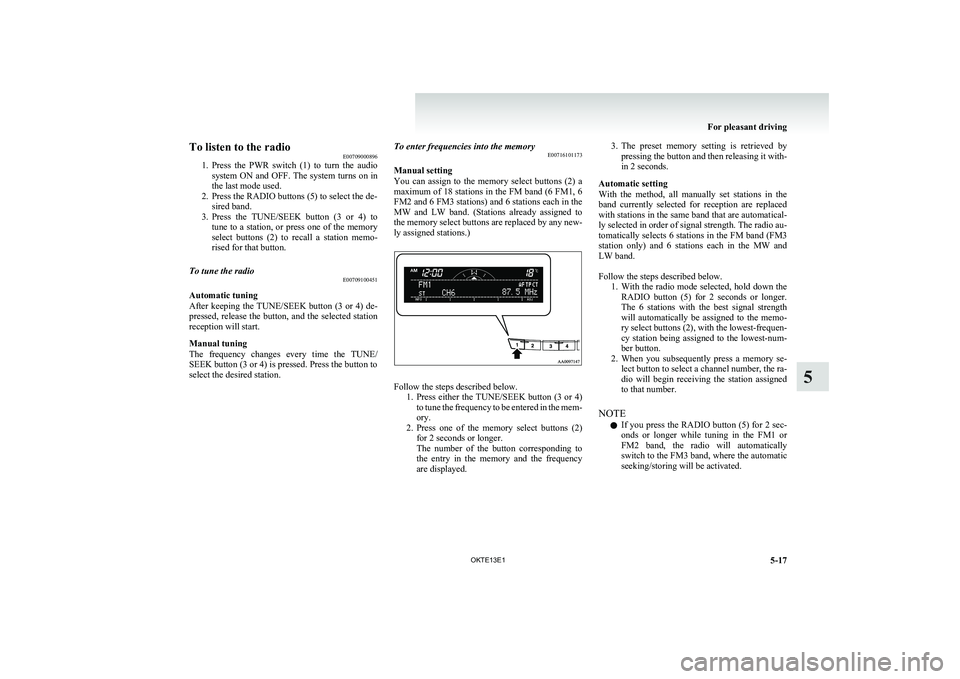
To listen to the radioE00709000896
1. Press the PWR switch (1) to turn the audio
system ON and OFF. The system turns on in
the last mode used.
2. Press the RADIO buttons (5) to select the de- sired band.
3. Press the TUNE/SEEK button (3 or 4) to
tune to a station, or press one of the memory
select buttons (2) to recall a station memo-
rised for that button.To tune the radio E00709100451
Automatic tuning
After keeping the TUNE/SEEK button (3 or 4) de-
pressed, release the button, and the selected station
reception will start.
Manual tuning
The frequency changes every time the TUNE/
SEEK button (3 or 4) is pressed. Press the button to
select the desired station.
To enter frequencies into the memory E00716101173
Manual setting
You can assign to the memory select buttons (2) a
maximum of 18 stations in the FM band (6 FM1, 6
FM2 and 6 FM3 stations) and 6 stations each in the
MW and LW band. (Stations already assigned to
the memory select buttons are replaced by any new-
ly assigned stations.)
Follow the steps described below. 1.Press either the TUNE/SEEK button (3 or 4)
to tune the frequency to be entered in the mem-
ory.
2. Press one of the memory select buttons (2)
for 2 seconds or longer.
The number of the button corresponding to
the entry in the memory and the frequency
are displayed.
3. The preset memory setting is retrieved by
pressing the button and then releasing it with-
in 2 seconds.
Automatic setting
With the method, all manually set stations in the
band currently selected for reception are replaced
with stations in the same band that are automatical-
ly selected in order of signal strength. The radio au-
tomatically selects 6 stations in the FM band (FM3
station only) and 6 stations each in the MW and
LW band.
Follow the steps described below. 1.With the radio mode selected, hold down the
RADIO button (5) for 2 seconds or longer.
The 6 stations with the best signal strength
will automatically be assigned to the memo-
ry select buttons (2), with the lowest-frequen-
cy station being assigned to the lowest-num-
ber button.
2. When you subsequently press a memory se-
lect button to select a channel number, the ra-
dio will begin receiving the station assigned
to that number.
NOTE l If you press the RADIO button (5) for 2 sec-
onds or longer while tuning in the FM1 or
FM2 band, the radio will automatically
switch to the FM3 band, where the automatic
seeking/storing will be activated.
For pleasant driving
5-17
OKTE13E1
5
Page 200 of 362
NOTEl If the TUNE/SEEK button (3 or 4) is pressed
for more than 1 second, the radio will try to
find out another broadcast of the same pro-
gram type as currently selected.
l If no station is found with your desired PTY,
the display will show “EMPTY” for about
5 seconds and the radio will return to the pre-
vious station.How to enter PTYs in the memory E00721400135
As many as 6 PTYs can be entered in the memory.
Follow the steps described below. 1.Press either the TUNE/SEEK button (3 or 4)
to tune the PTY to be entered in the memory.
2. Press one of the memory select buttons (2)
for 2 seconds or longer. The number of the
button corresponding to the entry into the
memory and the PTY are displayed.
3. The preset memory setting is retrieved by
pressing the button and then releasing it with-
in about 2 seconds.
Traffic information E00721600254
The radio will automatically tune in to traffic infor-
mation broadcasts while receiving FM broadcasts
or playing compact discs etc.
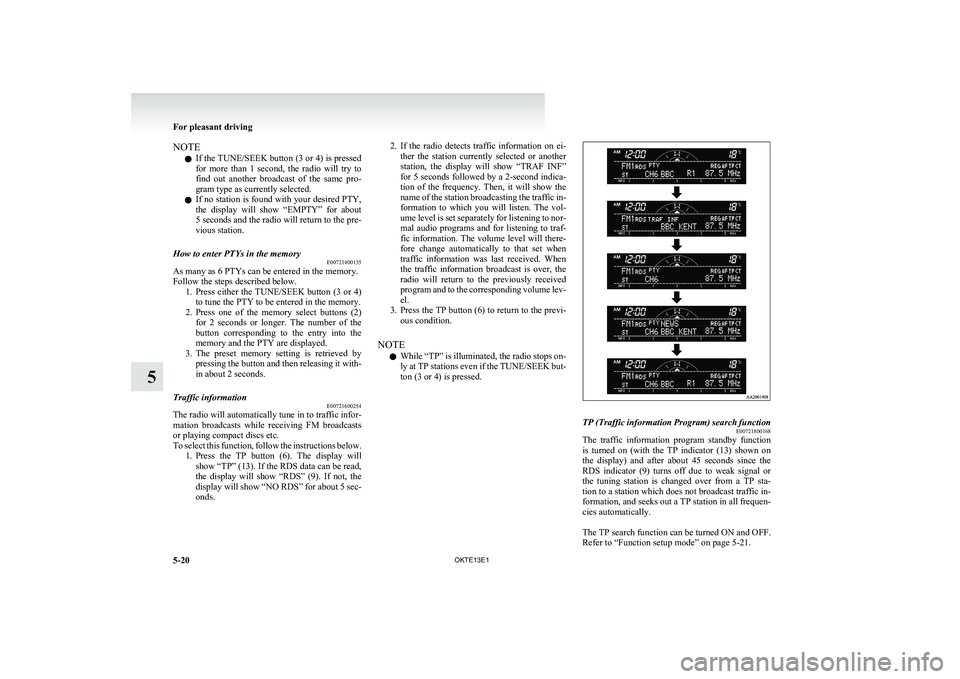
To select this function, follow the instructions below. 1.Press the TP button (6). The display will
show “TP” (13). If the RDS data can be read,
the display will show “RDS” (9). If not, the
display will show “NO RDS” for about 5 sec-
onds.
2. If the radio detects traffic information on ei-
ther the station currently selected or another
station, the display will show “TRAF INF”
for 5 seconds followed by a 2-second indica-
tion of the frequency. Then, it will show the
name of the station broadcasting the traffic in-
formation to which you will listen. The vol-
ume level is set separately for listening to nor-
mal audio programs and for listening to traf-
fic information. The volume level will there-
fore change automatically to that set when
traffic information was last received. When
the traffic information broadcast is over, the
radio will return to the previously received
program and to the corresponding volume lev-
el.
3. Press the TP button (6) to return to the previ-
ous condition.
NOTE l While “TP” is illuminated, the radio stops on-
ly at TP stations even if the TUNE/SEEK but-
ton (3 or 4) is pressed.TP (Traffic information Program) search function E00721800168
The traffic information program standby function
is turned on (with the TP indicator (13) shown on
the display) and after about 45 seconds since the
RDS indicator (9) turns off due to weak signal or
the tuning station is changed over from a TP sta-
tion to a station which does not broadcast traffic in-
formation, and seeks out a TP station in all frequen-
cies automatically.
The TP search function can be turned ON and OFF.
Refer to “Function setup mode” on page 5-21.
For pleasant driving
5-20 OKTE13E1
5
Page 201 of 362
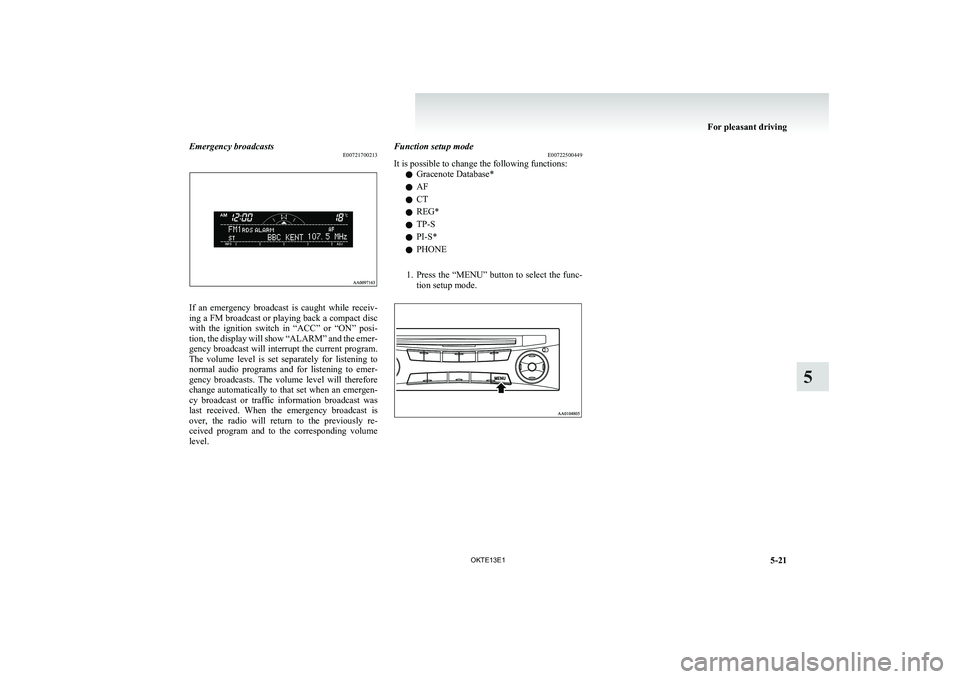
Emergency broadcastsE00721700213
If an emergency broadcast is caught while receiv-
ing a FM broadcast or playing back a compact disc
with the ignition switch in “ACC” or “ON” posi-
tion, the display will show “ALARM” and the emer-
gency broadcast will interrupt the current program.
The volume level is set separately for listening to
normal audio programs and for listening to emer-
gency broadcasts. The volume level will therefore
change automatically to that set when an emergen-
cy broadcast or traffic information broadcast was
last received. When the emergency broadcast is
over, the radio will return to the previously re-
ceived program and to the corresponding volume
level.
Function setup mode E00722500449
It is possible to change the following functions:
l Gracenote Database*
l AF
l CT
l REG*
l TP-S
l PI-S*
l PHONE
1. Press the “MENU” button to select the func-
tion setup mode.
For pleasant driving
5-21
OKTE13E1
5
Page 235 of 362
Entering the password
If a password has been set and the security function
is enabled, the voice guide will say “Hands-free sys-
tem is locked. State the password to continue”
when the SPEECH button is pressed to enter voice
recognition mode. Say the 4-digit password num-
ber to enter the password.
If the entered password is wrong, the voice guide
will say “<4- digit password>, Incorrect password.
Please try again”. Enter the correct password.
NOTE l You can re-enter the password as many times
as you want.
l If you have forgotten your password, say
“Cancel” to quit the voice input mode and
then check with a MITSUBISHI MOTORS
Authorized Service Point.
Disabling the password
Use the following procedure to turn off the security
function by disabling the password.
NOTE l System must be unlocked to disable the pass-
word.
1. Press the SPEECH button.
2. Say “Setup”.
3. Say “Password.”
4. The voice guide will say “Password is ena-
bled. Would you like to disable it?”
Answer “Yes.” Answer “No” to cancel the
disabling of the password and return to the
main menu.5. When the disabling of the password is com-
pleted, the voice guide will say “Password is
disabled” and the system will return to the
main menu.Speaker enrollment function E00727400209
The Bluetooth®
2.0 interface can use the speaker en-
rollment function to create a voice model for one
person per language.
This makes it easier for the Bluetooth ®
2.0 inter-
face to recognise voice commands said by you.
You can turn a voice model registered with the
speaker enrollment function on and off whenever
you want.
Speaker enrollment E00727500196
It takes about 2 to 3 minutes to complete the speak-
er enrollment process.
To ensure the best results, run through the process
while in the driver’s seat, in an environment that is
as quiet as possible (when there is no rain or strong
winds and the vehicle windows are closed). Please
turn off your phone while in speaker enrollment to
prevent interruption of the process.
Use the following procedure for speaker enrollment. 1.Stop your vehicle in a safe area, put the gear-
shift lever in the “N” (Neutral) position
(M/T ), or the selector lever in the “P”
(PARK) position ( A/T), and pull the parking
brake lever.
NOTE l Speaker enrollment is not possible unless the
vehicle is parked. Make sure you park the ve-
hicle in a safe area before attempting speaker
enrollment.
2. Press the SPEECH button.
3. Say “Voice training”.
4. The voice guide will say “This operation
must be performed in a quiet environment
while the vehicle is stopped. See the owner’s
manual for the list of required training phra-
ses. Press and release the SPEECH button
when you are ready to begin. Press the HANG-
UP button to cancel at any time”.
Press the SPEECH button to start the speaker
enrollment process.
NOTE l If you do not start the speaker enrollment proc-
ess within 3 minutes of pressing the
SPEECH button, the speaker enrollment func-
tion will time out.
The voice guide will say “Speaker Enroll-
ment has timed out”. The system will then
beep and the voice recognition mode will be
deactivated.
5. The voice guide will prompt for phrase 1. Re-
peat the corresponding phrase listed in table
“Enrollment commands” on page 5-66.
The system will register your voice and then
move on to the registration of the next com-
mand. Continue the process until all phrases
have been registered.
NOTE l To repeat the most recent voice training com-
mand, press and release the SPEECH button.
l If you press the HANG-UP button anytime
during the process, the system will beep and
stop the speaker enrollment process.
For pleasant driving
5-55
OKTE13E1
5
Page 237 of 362
lThe pairing code entered here is only used
for the Bluetooth ®
connection certification.
It is any 4-digit number the user would like
to select.
Remember the pairing code as it needs to be
keyed into the Bluetooth ®
device later in the
pairing process.
Depending on the connection settings of the
Bluetooth ®
device, this code may have to be
entered each time you connect the Blue-
tooth ®
device to the Bluetooth ®
2.0 inter-
face. For the default connection settings, re-
fer to the instructions for the device.
7. The voice guide will say “Start pairing proce-
dure on the device. See the device manual
for instructions.” Enter in the Bluetooth ®
de-
vice the 4-digit number you have registered
in Step 6.
NOTE l According to the corresponding device to
Bluetooth ®
, it might take a few minutes to
pair the Bluetooth ®
device with the Blue-
tooth ®
2.0 interface.
l If the Bluetooth ®
2.0 interface cannot recog-
nize the Bluetooth ®
device, the voice guide
will say “Pairing has timed out” and the pair-
ing process will be cancelled.
Confirm that the device you are pairing sup-
ports Bluetooth ®
, and try pairing it again.
l If you enter the wrong number, the voice
guide will say “Pairing failed” and the pair-
ing process will be cancelled. Confirm the
number is right, and try pairing it again.8. The voice guide will say “Please say the
name of the device after the beep.” You can
assign a desired name for the Bluetooth ®
de-
vice and register it as a device tag. Say the
name you want to register after the beep.
NOTE l When the confirmation function is on, after
repeating the device tag you have said, the
voice guide will ask “Is this correct?” An-
swer “Yes.”
To change the device tag, answer “No” and
then say the device tag again.
9. The voice guide will say “Pairing complete,”
after which a beep will be played and the pair-
ing process will end.Selecting a device E00760700016
If multiple paired Bluetooth®
devices are available
in the vehicle, the cellular phone or music player
most recently connected is automatically connected
to the Bluetooth ®
2.0 interface.
You can connect to the other cellular phone or mu-
sic player by following setting change procedures.
To select a cellular phone 1. Press the SPEECH button.
2. Say “Setup”.
3. Say “Select phone.”
4. After the voice guide says “Please say,” the
numbers of the cellular phones and device
tags of corresponding cellular phones will be
read out in order, starting with the cellular
phone that has been most recently connected.
Say the number of the cellular phone that
you want to connect to.
When the confirmation function is on, the sys-
tem will ask you again whether the phone
that you want to connect to is correct. An-
swer “Yes” to continue and connect to the cel-
lular phone.
Answer “No,” and the voice guide will say
“Please say.” Say the number of the phone
that you want to connect to.
NOTE l You can connect to a phone at any time by
pressing the SPEECH button and saying the
number, even before all of the paired num-
bers and device tags of corresponding cellu-
lar phones are read out by the system.
5. The selected phone will be connected to the
Bluetooth ®
2.0 interface. The voice guide
will say “
system will return to the main menu.
To select a music player 1. Press the SPEECH button.
2. Say “Setup”.
3. Say “Select music player.”
4. After the voice guide says “Please say,” the
numbers of the music players and device tags
of corresponding music players will be read
out in order, starting with the music player
that has been most recently connected.
Say the number of the music player that you
want to connect to.
When the confirmation function is on, the sys-
tem will ask you again whether the music
player that you want to connect to is correct.
Answer “Yes” to continue and connect to the
music player.
For pleasant driving
5-57
OKTE13E1
5
Page 238 of 362
Answer “No,” and the voice guide will say
“Please say.” Say the number of the music
player that you want to connect to.
NOTE l You can connect to a music player at any
time by pressing the SPEECH button and say-
ing the number, even before all of the paired
numbers and device tags of corresponding mu-
sic players are read out by the system.
5. The selected music player will be connected
to the Bluetooth ®
2.0 interface.
The voice guide will say “
ted” and then the system will return to the
main menu.
Deleting a device
Use the following procedure to delete a paired Blue-
tooth ®
device from the Bluetooth ®
2.0 interface.
1. Press the SPEECH button.
2. Say “Setup”.
3. Say “Pairing options.”
4. The voice guide will say “Select one of the
following: pair, edit, delete, or list.” Say “De-
lete.”
5. After the voice guide says “Please say,” the
numbers of the devices and device tags of cor-
responding devices will be read out in order,
starting with the device that has been most re-
cently connected. After it completes reading
all pairs, the voice guide will say “or all.”
Say the number of the device that you want
to delete from the system.
If you want to delete all paired phones from
the system, say “All.”6. For confirmation purposes, the voice guide
will say “Deleting
Is this correct?” or “Deleting all devices. Is
this correct?”
Answer “Yes” to delete the phone(s).
Answer “No” to return to Step 4.
7. The voice guide will say “Deleted,” and then
the system will end the device deletion proc-
ess.
NOTE l If the device deletion process fails for some
reason, the voice guide will say “Delete
failed” and then the system will cancel delet-
ing the device.To check a paired Bluetooth ®
device
E00760800017
You can check a paired Bluetooth ®
device by fol-
lowing the steps below. 1. Press the SPEECH button.
2. Say “Setup”.
3. Say “Pairing options.”
4. The voice guide will say “Select one of the
following: pair, edit, delete, or list.” Say
“List.”
5. The voice guide will read out device tags of
corresponding devices in order, starting with
the Bluetooth ®
device that has been connec-
ted most recently.
6. After the device tags of all paired Bluetooth ®
devices have been read, the system will say
“End of list, would you like to start from the
beginning?”
To hear the list again from the beginning , an-
swer “Yes.”
When you are done, answer “No” to return to
the main menu.
NOTE
l If you press and release the SPEECH button
and say “Continue” or “Previous” while the
list is being read, the system will advance or
rewind the list.
Say “Continue” to proceed to the device with
the next highest number or “Previous” to re-
turn to the phone with the previous number.
l You can change the device tag by pressing
and releasing the SPEECH button and then
saying “Edit” while the list is being read.
l You can change the phone to be connected
by pressing and releasing the SPEECH but-
ton and then saying “Select phone” while the
list is being read.
l You can change the music player to be con-
nected by pressing and releasing the
SPEECH button and then saying “Select mu-
sic player” while the list is being read.Changing a device tag E00760900018
You can change the device tag of a paired cellular
phone or music player.
Follow the steps below to change a device tag. 1. Press the SPEECH button.
2. Say “Setup”.
3. Say “Pairing options.”
4. The voice guide will say “Select one of the
following: pair, edit, delete, or list.” Say “Ed-
it.”
5. The voice guide will say “Please say,” and
read out the numbers of the Bluetooth ®
devi-
ces and device tags of corresponding devices
in order, starting with the Bluetooth ®
that
has been most recently connected.
After all paired device tags have been read,
the voice guide will say “Which device,
For pleasant driving
5-58 OKTE13E1
5
Page 240 of 362
es, the voice guide will say “More than one
match was found, would you like to call
want to call, answer “Yes.”
Answer “No,” and the name of the next match-
ing person will be uttered by the voice guide.
NOTE l If you say “No” to all names read by the sys-
tem, the voice guide will say “Name not
found, returning to main menu” and the sys-
tem will return to the main menu.
5. If only one telephone number is registered un-
der the name you just said, the voice guide
proceeds to Step 6.
If two or more telephone numbers are regis-
tered that match the name you just said, the
voice guide will say “Would you like to call
er]?” Select the location to call.
NOTE l If the name you selected has matching data
in the vehicle phone book but no telephone
number is registered under the selected loca-
tion, the voice guide will say “{home/work/
mobile/other} not found for
you like to add location or try again?”
Say “Try again,” and the system will return
to Step 3.
Say “Add location” and you can register an
additional telephone number under the selec-
ted location.l If the name you selected has matching data
in the mobile phone book but no telephone
number is registered under the selected loca-
tion, the voice guide will say “{home/work/
mobile/other} not found for
you like to try again?”
Answer “Yes,” and the system will return to
Step 3.
Answer “No,” and the call will be cancelled.
Start over again from Step 1.
6. The voice guide will say “Calling
telephone number.
NOTE l When the confirmation function is on, the sys-
tem will ask if the name and location of the
receiver are correct.
If the name is correct, answer “Yes.”
To change the name or location to call, an-
swer “No.” The system will return to Step 3.
Redialing
You can redial the last number called, based on the
history of dialed calls in the paired cellular phone.
Use the following procedure to redial. 1. Press the SPEECH button.
2. Say “Redial.”SEND function E00761300035
During a call, press the SPEECH button to enter
voice recognition mode, then say “
SEND” to generate DTMF tones.
For example, if during a call you need to simulate
the press of a phone button as a response to an auto-
mated system, press the SPEECH button and speak
“1 2 3 4 pound SEND” and the 1234# will be sent
on your cellular phone.Receiving calls E00761600012
If an incoming phone call is received while the ig-
nition switch is in the “ACC” or “ON” position, the
audio system will be automatically turned on and
switched to the incoming call, even when the audio
system was originally off.
The voice guide announcement for the incoming
call will be output from the front passenger’s seat
speaker.
If the CD player or radio was playing when the in-
coming call was received, the audio system will
mute the sound from the CD player or radio and out-
put only the incoming call.
To receive the call, press the PICK-UP button on
the steering wheel control switch.
When the call is over, the audio system will return
to its previous state.
MUTE function E00760300041
At any time during a call, you can mute the vehicle
microphone.
Pressing the SPEECH button and then saying
“Mute” during a call will turn ON the MUTE func-
tion and mute the microphone.
Saying “Mute off” in the same way will turn off
the MUTE function and cancel the mute on the mi-
crophone.
For pleasant driving
5-60 OKTE13E1
5
Page 252 of 362
CAUTIONlWhen the cigarette lighter socket is used
as a power source for an electric appli-
ance, be sure that the electric appliance
operates at 12 V and has an electric ca-
pacity of 120 W or less. In addition, long
use of the electric appliance without run-
ning the engine may run down the battery.Accessory socket* E00711601160
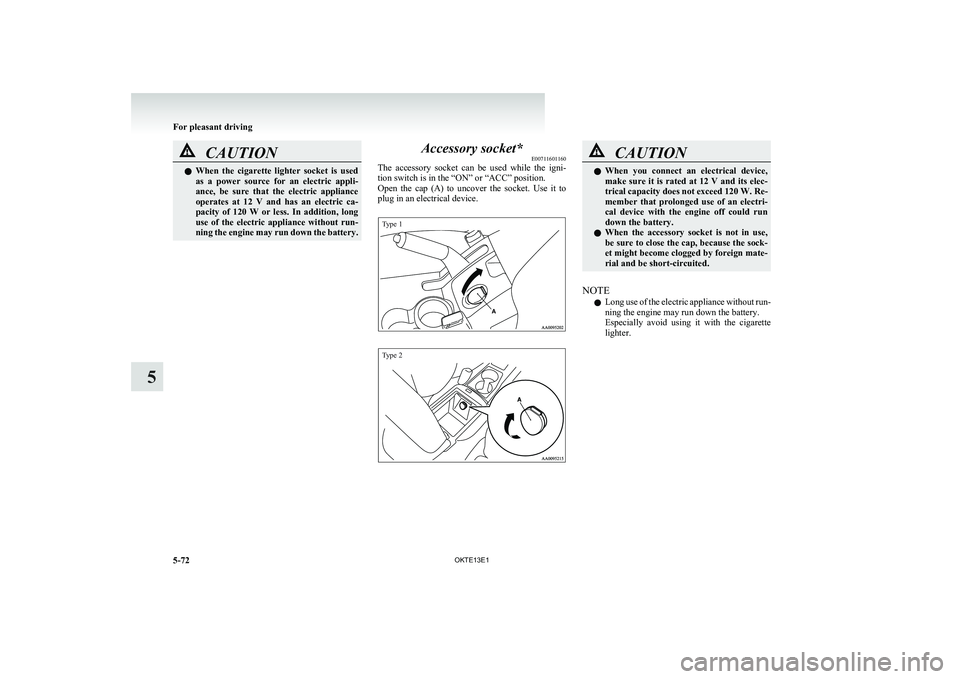
The accessory socket can be used while the igni-
tion switch is in the “ON” or “ACC” position.
Open the cap (A) to uncover the socket. Use it to
plug in an electrical device.
Type 1Type 2
CAUTIONl When you connect an electrical device,
make sure it is rated at 12 V and its elec-
trical capacity does not exceed 120 W. Re-
member that prolonged use of an electri-
cal device with the engine off could run
down the battery.
l When the accessory socket is not in use,
be sure to close the cap, because the sock-
et might become clogged by foreign mate-
rial and be short-circuited.
NOTE
l Long use of the electric appliance without run-
ning the engine may run down the battery.
Especially avoid using it with the cigarette
lighter.
For pleasant driving
5-72 OKTE13E1
5