fuel tank MITSUBISHI L200 2013 Owner's Manual (in English)
[x] Cancel search | Manufacturer: MITSUBISHI, Model Year: 2013, Model line: L200, Model: MITSUBISHI L200 2013Pages: 362, PDF Size: 21.07 MB
Page 2 of 362
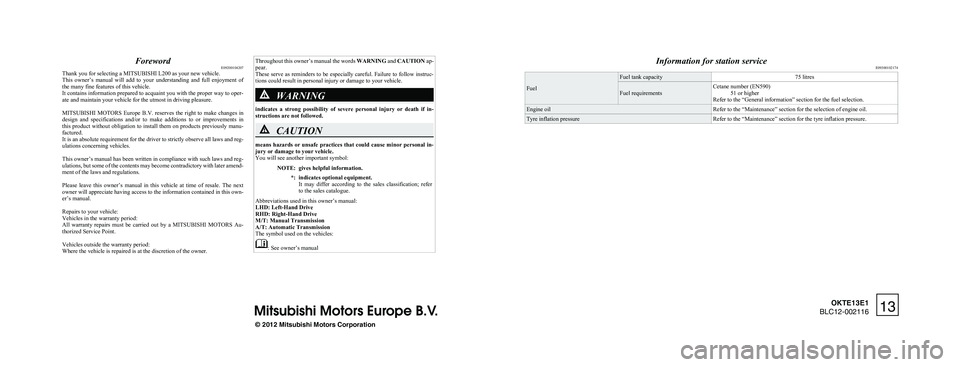
ForewordE09200104207
Thank you for selecting a MITSUBISHI L200 as your new vehicle.
This owner’s manual will add to your understanding and full enjoyment of
the many fine features of this vehicle.
It contains information prepared to acquaint you with the proper way to oper-
ate and maintain your vehicle for the utmost in driving pleasure.
MITSUBISHI MOTORS Europe B.V. reserves the right to make changes in
design and specifications and/or to make additions to or improvements in
this product without obligation to install them on products previously manu-
factured.
It is an absolute requirement for the driver to strictly observe all laws and reg-
ulations concerning vehicles.
This owner’s manual has been written in compliance with such laws and reg-
ulations, but some of the contents may become contradictory with later amend-
ment of the laws and regulations.
Please leave this owner’s manual in this vehicle at time of resale. The next
owner will appreciate having access to the information contained in this own-
er’s manual.
Repairs to your vehicle:
Vehicles in the warranty period:
All warranty repairs must be carried out by a MITSUBISHI MOTORS Au-
thorized Service Point.
Vehicles outside the warranty period:
Where the vehicle is repaired is at the discretion of the owner.
Throughout this owner’s manual the words WARNING and CAUTION ap-
pear.
These serve as reminders to be especially careful. Failure to follow instruc-
tions could result in personal injury or damage to your vehicle.WARNING
indicates a strong possibility of severe personal injury or death if in-
structions are not followed.
CAUTION
means hazards or unsafe practices that could cause minor personal in-
jury or damage to your vehicle.
You will see another important symbol:
NOTE:gives helpful information.*:indicates optional equipment.
It may differ according to the sales classification; refer
to the sales catalogue.
Abbreviations used in this owner’s manual:
LHD: Left-Hand Drive
RHD: Right-Hand Drive
M/T: Manual Transmission
A/T: Automatic Transmission
The symbol used on the vehicles:
: See owner’s manual
Information for station service E09300102174
Fuel
Fuel tank capacity75 litresFuel requirementsCetane number (EN590)
51 or higher
Refer to the “General information” section for the fuel selection.Engine oilRefer to the “Maintenance” section for the selection of engine oil.Tyre inflation pressureRefer to the “Maintenance” section for the tyre inflation pressure.
© 2012 Mitsubishi Motors Corporation13
OKTE13E1
BLC12-002116
Page 4 of 362
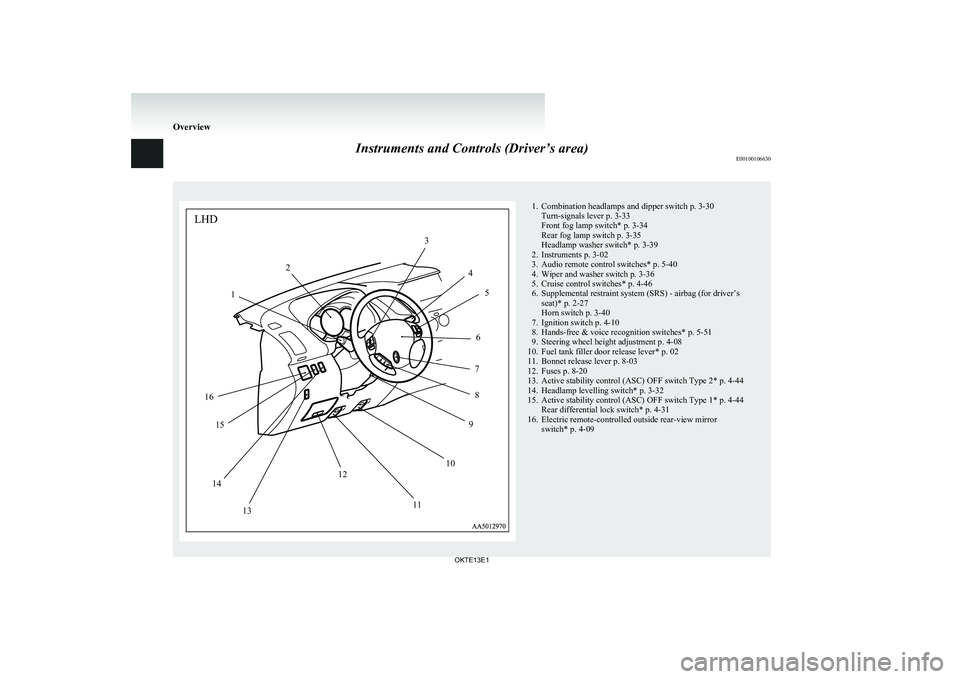
Instruments and Controls (Driver’s area)E00100106630
1LHD23456789101112131415161. Combination headlamps and dipper switch p. 3-30
Turn-signals lever p. 3-33
Front fog lamp switch* p. 3-34
Rear fog lamp switch p. 3-35
Headlamp washer switch* p. 3-39
2. Instruments p. 3-02
3. Audio remote control switches* p. 5-40
4. Wiper and washer switch p. 3-36
5. Cruise control switches* p. 4-46
6. Supplemental restraint system (SRS) - airbag (for driver’s seat)* p. 2-27
Horn switch p. 3-40
7. Ignition switch p. 4-10
8. Hands-free & voice recognition switches* p. 5-51
9. Steering wheel height adjustment p. 4-08
10. Fuel tank filler door release lever* p. 02
11. Bonnet release lever p. 8-03
12. Fuses p. 8-20
13. Active stability control (ASC) OFF switch Type 2* p. 4-44
14. Headlamp levelling switch* p. 3-32
15. Active stability control (ASC) OFF switch Type 1* p. 4-44 Rear differential lock switch* p. 4-31
16. Electric remote-controlled outside rear-view mirror switch* p. 4-09
Overview
OKTE13E1
Page 5 of 362
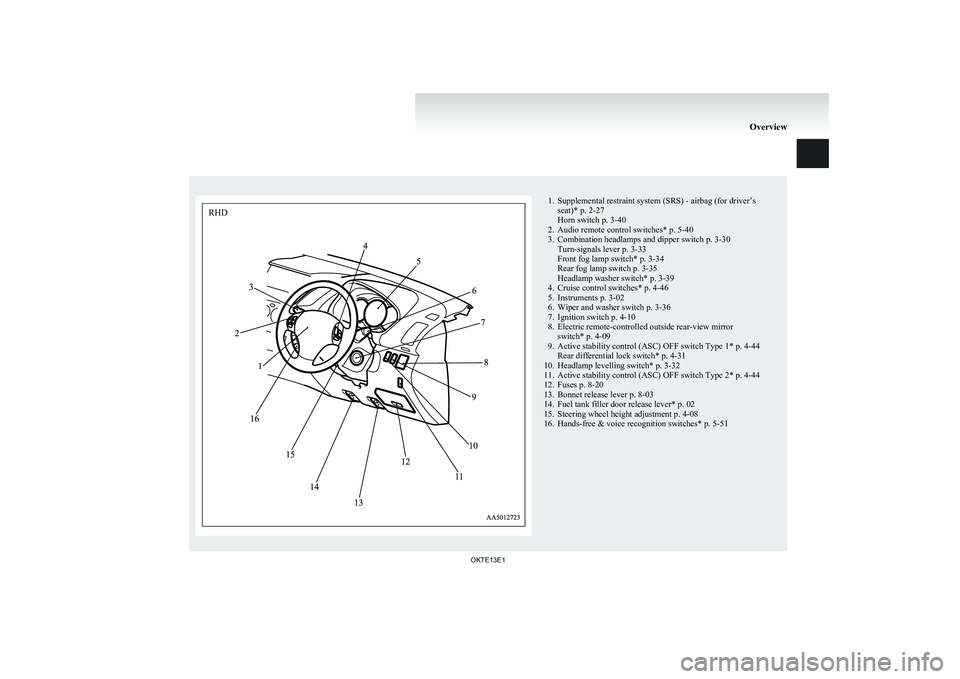
1. Supplemental restraint system (SRS) - airbag (for driver’sseat)* p. 2-27
Horn switch p. 3-40
2. Audio remote control switches* p. 5-40
3. Combination headlamps and dipper switch p. 3-30 Turn-signals lever p. 3-33
Front fog lamp switch* p. 3-34
Rear fog lamp switch p. 3-35
Headlamp washer switch* p. 3-39
4. Cruise control switches* p. 4-46
5. Instruments p. 3-02
6. Wiper and washer switch p. 3-36
7. Ignition switch p. 4-10
8. Electric remote-controlled outside rear-view mirror switch* p. 4-09
9. Active stability control (ASC) OFF switch Type 1* p. 4-44 Rear differential lock switch* p. 4-31
10. Headlamp levelling switch* p. 3-32
11. Active stability control (ASC) OFF switch Type 2* p. 4-44
12. Fuses p. 8-20
13. Bonnet release lever p. 8-03
14. Fuel tank filler door release lever* p. 02
15. Steering wheel height adjustment p. 4-08
16. Hands-free & voice recognition switches* p. 5-51
Overview
OKTE13E1RHD
Page 18 of 362
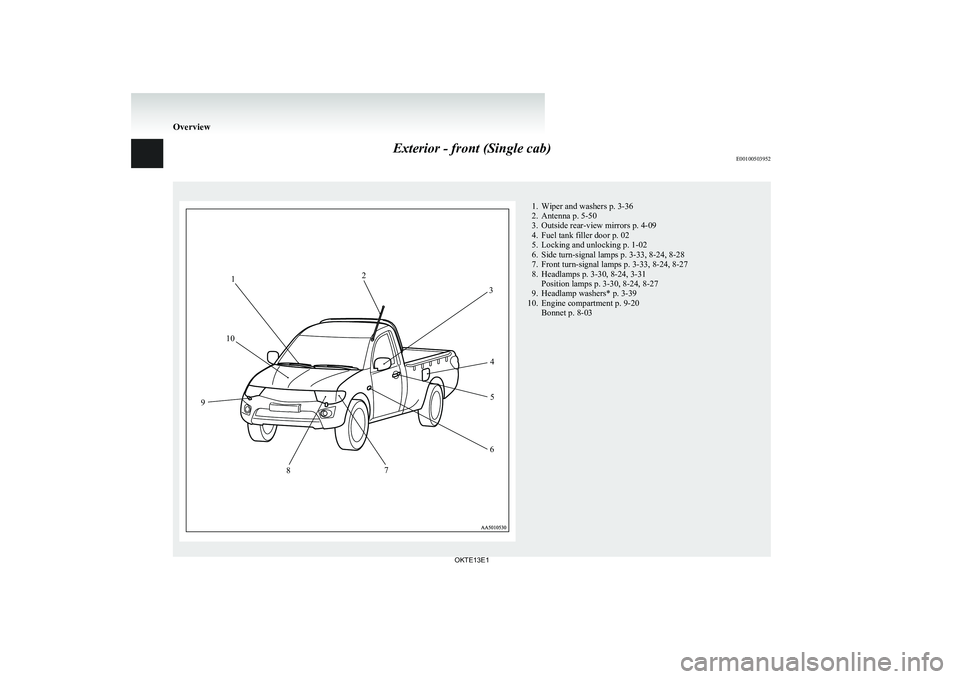
Exterior - front (Single cab)E001005039521. Wiper and washers p. 3-36
2. Antenna p. 5-50
3. Outside rear-view mirrors p. 4-09
4. Fuel tank filler door p. 02
5. Locking and unlocking p. 1-02
6. Side turn-signal lamps p. 3-33, 8-24, 8-28
7. Front turn-signal lamps p. 3-33, 8-24, 8-27
8. Headlamps p. 3-30, 8-24, 3-31 Position lamps p. 3-30, 8-24, 8-27
9. Headlamp washers* p. 3-39
10. Engine compartment p. 9-20 Bonnet p. 8-03
Overview
OKTE13E112
3
45
6
7
8
9
10
Page 20 of 362
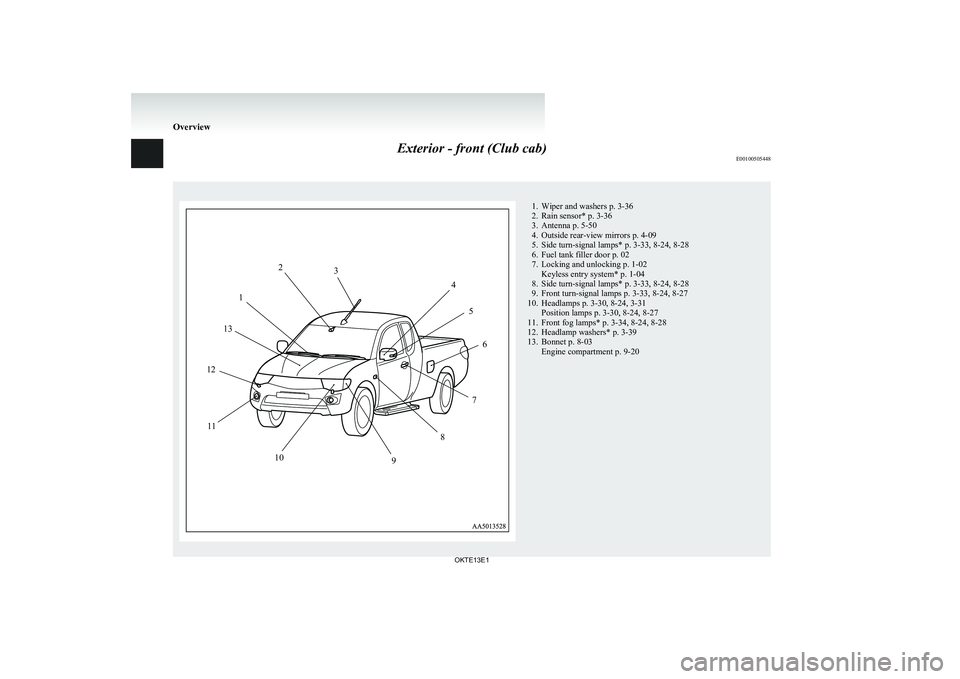
Exterior - front (Club cab)E00100505448
123456789101112131. Wiper and washers p. 3-36
2. Rain sensor* p. 3-36
3. Antenna p. 5-50
4. Outside rear-view mirrors p. 4-09
5. Side turn-signal lamps* p. 3-33, 8-24, 8-28
6. Fuel tank filler door p. 02
7. Locking and unlocking p. 1-02 Keyless entry system* p. 1-04
8. Side turn-signal lamps* p. 3-33, 8-24, 8-28
9. Front turn-signal lamps p. 3-33, 8-24, 8-27
10. Headlamps p. 3-30, 8-24, 3-31 Position lamps p. 3-30, 8-24, 8-27
11. Front fog lamps* p. 3-34, 8-24, 8-28
12. Headlamp washers* p. 3-39
13. Bonnet p. 8-03 Engine compartment p. 9-20
Overview
OKTE13E1
Page 22 of 362
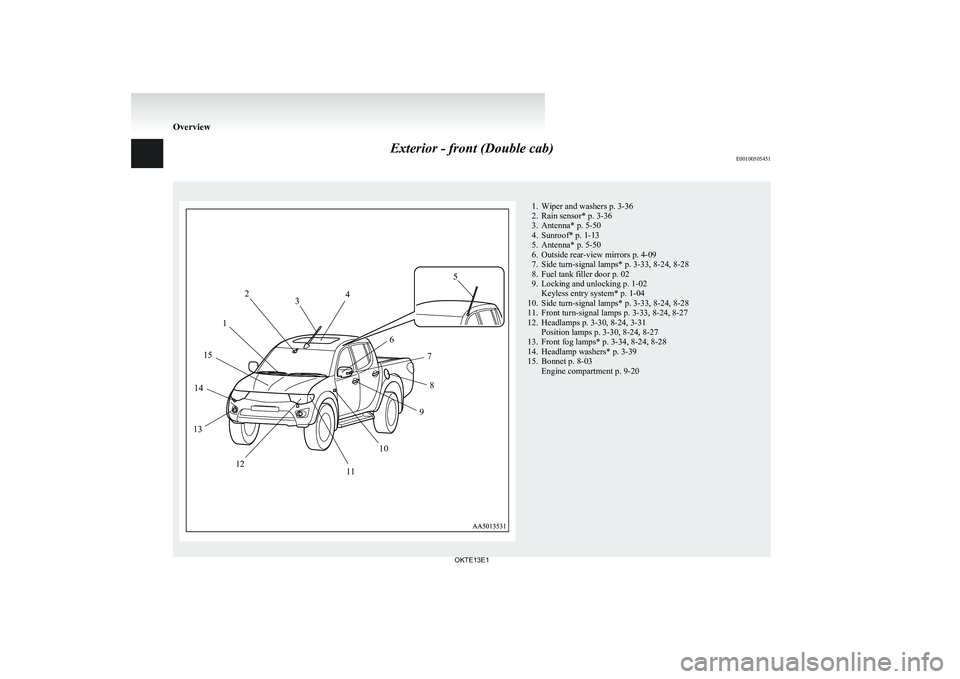
Exterior - front (Double cab)E00100505451
2345678910111213141511. Wiper and washers p. 3-36
2. Rain sensor* p. 3-36
3. Antenna* p. 5-50
4. Sunroof* p. 1-13
5. Antenna* p. 5-50
6. Outside rear-view mirrors p. 4-09
7. Side turn-signal lamps* p. 3-33, 8-24, 8-28
8. Fuel tank filler door p. 02
9. Locking and unlocking p. 1-02 Keyless entry system* p. 1-04
10. Side turn-signal lamps* p. 3-33, 8-24, 8-28
11. Front turn-signal lamps p. 3-33, 8-24, 8-27
12. Headlamps p. 3-30, 8-24, 3-31 Position lamps p. 3-30, 8-24, 8-27
13. Front fog lamps* p. 3-34, 8-24, 8-28
14. Headlamp washers* p. 3-39
15. Bonnet p. 8-03 Engine compartment p. 9-20
Overview
OKTE13E1
Page 25 of 362
Fuel selection................................................................................... 02
Filling the fuel tank .......................................................................... 02
Installation of accessories ................................................................ 04
Modification/alterations to the electrical or fuel systems ................04
Genuine parts ................................................................................... 05
Used engine oils safety instructions and disposal infor- mation .......................................................................................... 05
Disposal information for used batteries ...........................................05General information
OKTE13E1
Page 26 of 362
Fuel selectionE00200102907Recommended fuelCetane number (EN590)
51 or higherCAUTIONlYour vehicle is designed to use only diesel
fuel that meets the EN590 standard.
Use of any other type of diesel fuel would
adversely affect the engine’s performance
and durability.
NOTE
l Due to the separation of paraffin, the fluidity
of the fuel decreases considerably as the tem-
perature falls.
Because of this fact there are two kinds of
fuel: “summer” and “winter”.
This must be considered in winter use.
Select either of the two kinds of fuel in ac-
cordance with ambient temperature. Above -5 °C: “Summer” diesel
Below -5 °C: “Winter” diesel
When travelling abroad, find out in advance
about the fuels served in local service stations.
l Poor-quality diesel fuel can cause deposits to
form in the injector, resulting in black smoke
and rough idling.
If these problems occur, you are advised to
add a cleaning additive to the diesel fuel
when you refuel the vehicle.
The additive will break up and remove the de-
posits, thereby returning the engine to a nor-
mal condition.
Be sure to use a MITSUBISHI MOTORS
GENUINE DIESEL FUEL SYSTEM
CLEANER. Using an unsuitable additive
could make the engine malfunction. For de-
tails, please contact a MITSUBISHI
MOTORS Authorized Service Point.Filling the fuel tank E00200202025WARNINGlWhen handling fuel, comply with the safe-
ty regulations displayed by garages and
filling stations.
l Before removing the fuel cap, be sure to
get rid of your body’s static electricity by
touching a metal part of the car or the
fuel pump. Any static electricity on your
body could create a spark that ignites
fuel vapour.
l Perform the whole refueling process
(opening the fuel tank filler door, remov-
ing the fuel cap, etc.) by yourself. Do not
let any other person come near the fuel
tank filler. If you allowed a person to
help you and that person was carrying
static electricity, fuel vapour could be ig-
nited.
l Do not move away from the fuel tank fill-
er until refueling is finished. If you
moved away and did something else (for
example, cleaning your windscreen) part-
way through the refueling process, you
could pick up a fresh charge of static elec-
tricity.
l If the tank cap must be replaced, use only
a MITSUBISHI MOTORS original part.
Fuel tank capacity
75 litres
Refueling 1. Before filling with fuel, stop the engine.
General information
02 OKTE13E1
Page 27 of 362
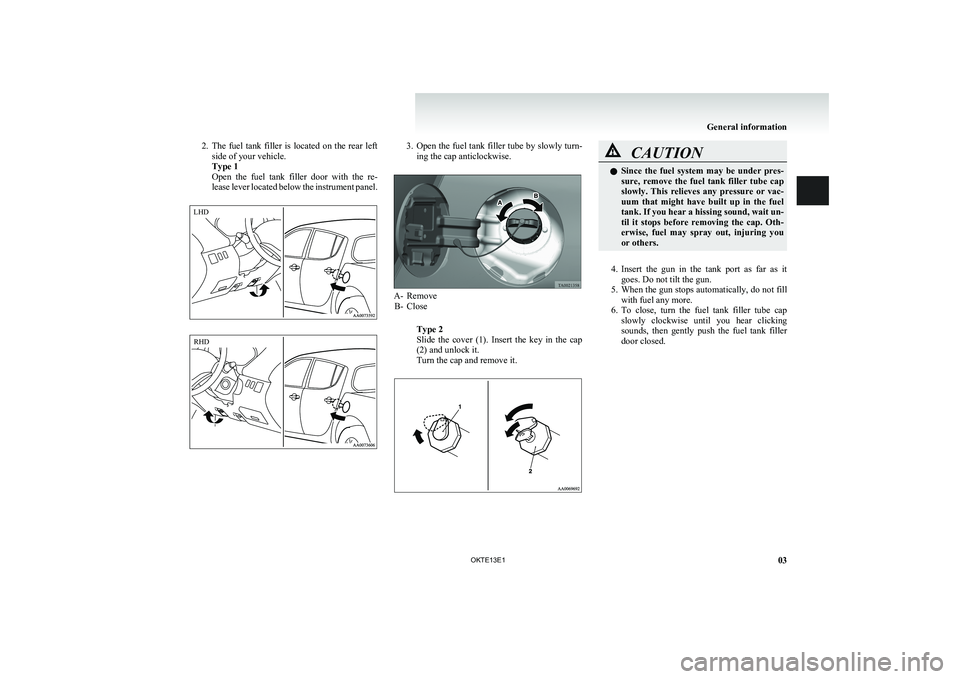
2.The fuel tank filler is located on the rear left
side of your vehicle.
Type 1
Open the fuel tank filler door with the re-
lease lever located below the instrument panel.3. Open the fuel tank filler tube by slowly turn-
ing the cap anticlockwise.
A- Remove B- Close
Type 2
Slide the cover (1). Insert the key in the cap
(2) and unlock it.
Turn the cap and remove it.
CAUTIONl Since the fuel system may be under pres-
sure, remove the fuel tank filler tube cap
slowly. This relieves any pressure or vac-
uum that might have built up in the fuel
tank. If you hear a hissing sound, wait un-
til it stops before removing the cap. Oth-
erwise, fuel may spray out, injuring you
or others.
4. Insert the gun in the tank port as far as it
goes. Do not tilt the gun.
5. When the gun stops automatically, do not fill
with fuel any more.
6. To close, turn the fuel tank filler tube cap
slowly clockwise until you hear clicking
sounds, then gently push the fuel tank filler
door closed.
General information
03
OKTE13E1LHD RHD
Page 90 of 362
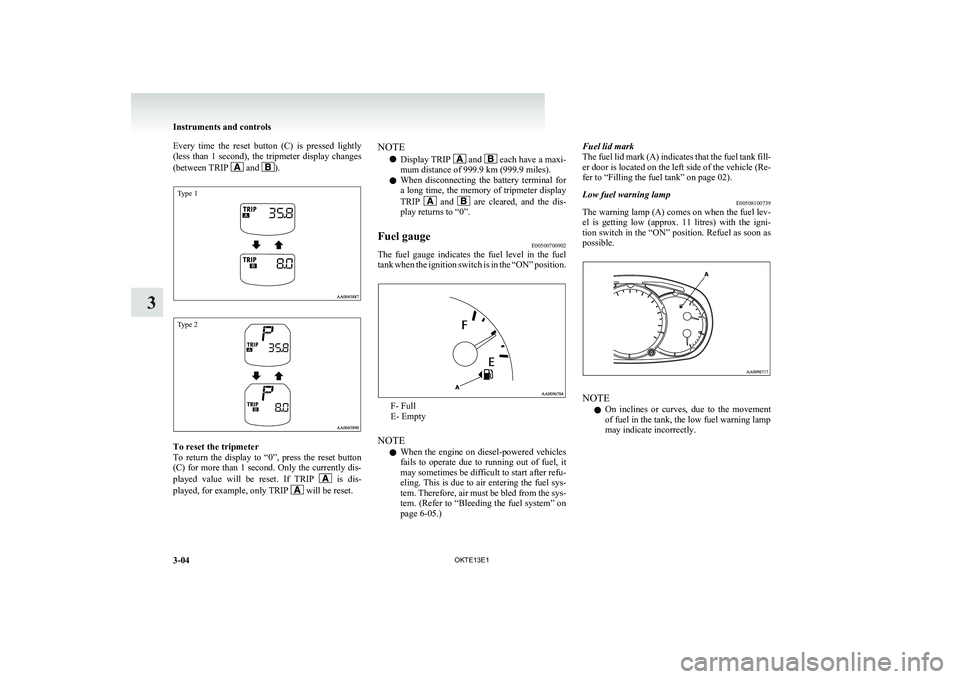
Every time the reset button (C) is pressed lightly
(less than 1 second), the tripmeter display changes
(between TRIP
and ).
Type 1Type 2
To reset the tripmeter
To return the display to “0”, press the reset button
(C) for more than 1 second. Only the currently dis-
played value will be reset. If TRIP
is dis-
played, for example, only TRIP will be reset.
NOTE
l Display TRIP
and each have a maxi-
mum distance of 999.9 km (999.9 miles).
l When disconnecting the battery terminal for
a long time, the memory of tripmeter display
TRIP
and are cleared, and the dis-
play returns to “0”.
Fuel gauge E00500700902
The fuel gauge indicates the fuel level in the fuel
tank when the ignition switch is in the “ON” position.
F- Full
E- Empty
NOTE l When the engine on diesel-powered vehicles
fails to operate due to running out of fuel, it
may sometimes be difficult to start after refu-
eling. This is due to air entering the fuel sys-
tem. Therefore, air must be bled from the sys-
tem. (Refer to “Bleeding the fuel system” on
page 6-05.)
Fuel lid mark
The fuel lid mark (A) indicates that the fuel tank fill-
er door is located on the left side of the vehicle (Re-
fer to “Filling the fuel tank” on page 02).Low fuel warning lamp E00508100739
The warning lamp (A) comes on when the fuel lev-
el is getting low (approx. 11 litres) with the igni-
tion switch in the “ON” position. Refuel as soon as
possible.
NOTE
l On inclines or curves, due to the movement
of fuel in the tank, the low fuel warning lamp
may indicate incorrectly.
Instruments and controls
3-04 OKTE13E1
3