start stop button MITSUBISHI L200 2013 Owner's Manual (in English)
[x] Cancel search | Manufacturer: MITSUBISHI, Model Year: 2013, Model line: L200, Model: MITSUBISHI L200 2013Pages: 362, PDF Size: 21.07 MB
Page 132 of 362
Parking brakeE00600501562
To park the vehicle, first bring it to a complete
stop, fully engage the parking brake, and then
move the gearshift lever to 1 st
(on an uphill) or Re-
verse (on a downhill) position for vehicles with man-
ual transmission or set the selector lever to “P”
(PARK) position on automatic transmission vehi-
cles.CAUTIONl Before driving, be sure that the parking
brake is fully released and brake warning
lamp is off.
If a vehicle is driven without releasing the
parking brake, the brake will be overhea-
ted, resulting in ineffective braking and
possible brake failure.
l When you intend to apply the parking
brake, firmly press the brake pedal to
bring the vehicle to a complete stop be-
fore pulling the parking brake lever. Pull-
ing the parking brake lever with the vehi-
cle moving could make the rear wheels
lock up, thereby making the vehicle unsta-
ble. It could also make the parking brake
malfunction.
l If the brake warning lamp does not extin-
guish when the parking brake is fully re-
leased, the brake system may be abnormal.
Have your vehicle checked immediately.
For details, refer to “Brake warning
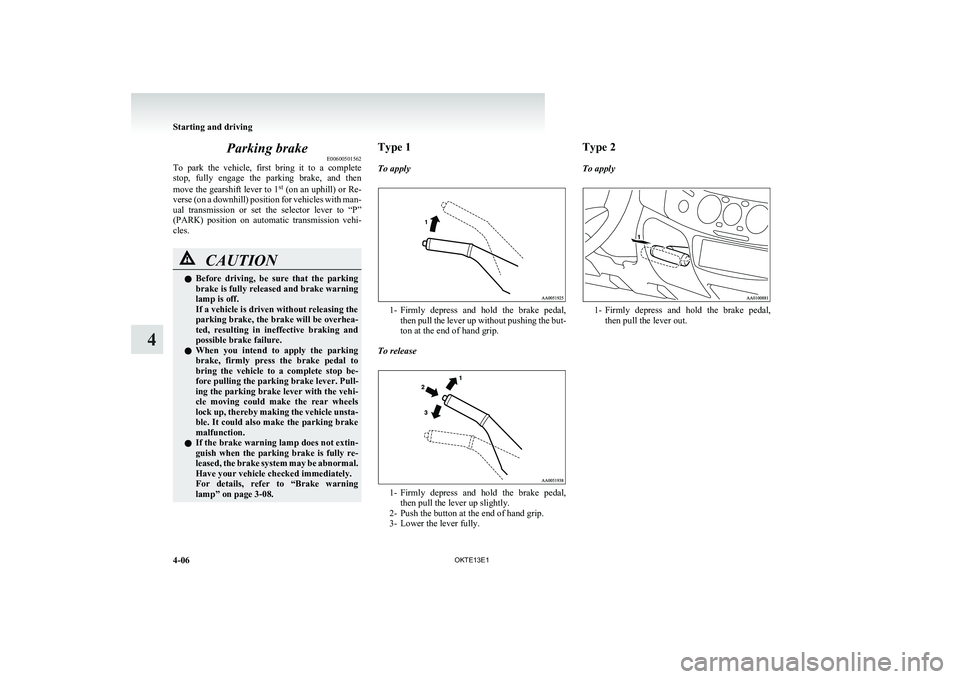
lamp” on page 3-08.Type 1
To apply
1- Firmly depress and hold the brake pedal,
then pull the lever up without pushing the but-
ton at the end of hand grip.
To release
1- Firmly depress and hold the brake pedal,
then pull the lever up slightly.
2- Push the button at the end of hand grip.
3- Lower the lever fully.
Type 2
To apply
1- Firmly depress and hold the brake pedal,
then pull the lever out.
Starting and driving
4-06 OKTE13E1
4
Page 137 of 362
NOTEl If your vehicle is equipped with the Daytime
Running Lamp, when the ignition switch is
in the “ON”, the headlamp low beams etc.
are turned on.
Refer to “Headlamps” on page 3-30.
l Your vehicle is equipped with an electronic
immobilizer.
To start the engine, the ID code which the
transponder inside the key sends must match
the one registered in the immobilizer comput-
er.
Refer to “Electronic immobilizer” on page
1-03.
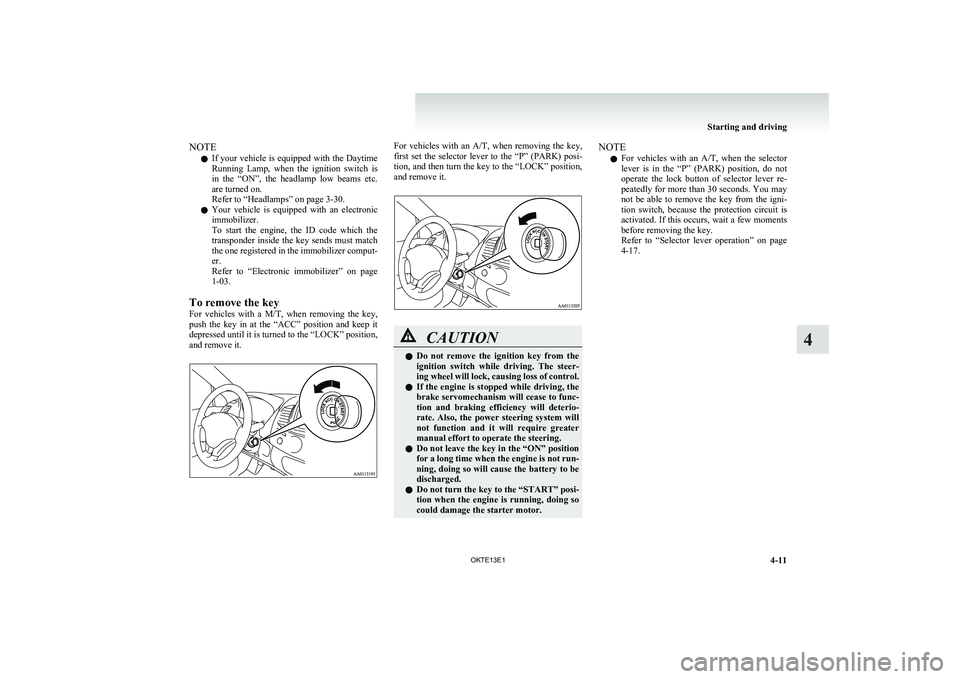
To remove the key
For vehicles with a M/T, when removing the key,
push the key in at the “ACC” position and keep it
depressed until it is turned to the “LOCK” position,
and remove it.For vehicles with an A/T, when removing the key,
first set the selector lever to the “P” (PARK) posi-
tion, and then turn the key to the “LOCK” position,
and remove it.CAUTIONl Do not remove the ignition key from the
ignition switch while driving. The steer-
ing wheel will lock, causing loss of control.
l If the engine is stopped while driving, the
brake servomechanism will cease to func-
tion and braking efficiency will deterio-
rate. Also, the power steering system will
not function and it will require greater
manual effort to operate the steering.
l Do not leave the key in the “ON” position
for a long time when the engine is not run-
ning, doing so will cause the battery to be
discharged.
l Do not turn the key to the “START” posi-
tion when the engine is running, doing so
could damage the starter motor.NOTE
l For vehicles with an
A/T, when the selector
lever is in the “P” (PARK) position, do not
operate the lock button of selector lever re-
peatedly for more than 30 seconds. You may
not be able to remove the key from the igni-
tion switch, because the protection circuit is
activated. If this occurs, wait a few moments
before removing the key.
Refer to “Selector lever operation” on page
4-17.
Starting and driving
4-11
OKTE13E1
4
Page 204 of 362
To listen to a CDE00709602290
1. Insert a disc with the label facing up, and the
CD player will begin playing even if another
mode is being used. The CD indicator (18),
the track number (16), the playing time (17)
will appear on the display.
2. When the CD mode is selected by pressing
the CD (12) button several times with the
disc in the player, the CD player will start
playback.
3. To stop the CD, turn off the power by press-
ing the PWR switch (11) or change over to
the another mode by pressing the RADIO but-
ton or CD button, or eject the disc by press-
ing the eject button (1).
NOTE l To adjust the volume and tone, refer to
“To
adjust the volume” on page 5-15 and “To ad-
just the tone” on page 5-15.
l An 8 cm compact disc cannot be played on
this CD player.
l For information concerning the handling of
compact discs, refer to “Handling of compact
discs” on page 5-48.
To fast-forward/fast-reverse the disc
Fast-forward
You can fast-forward the disc by pressing the
button (9). While the button is kept pressed, the
disc will be fast-forwarded.
Fast-reverse
You can fast-reverse the disc by pressing the
but-
ton (10). While the button is kept pressed, the disc
will be fast-reversed.
NOTE
l When you have fast-forwarded/fast-reversed
the disc, the playing-time may be shown
with deviation.
To listen to an MP3 CD
This CD player allows you to play MP3 (MPEG Au-
dio Layer-3) files recorded on CD-ROMs, CD-Rs
(recordable CDs), and CD-RWs (rewritable CDs)
in ISO9660 Level 1/Level 2, Joliet, and Romeo for-
mats. Each disc may have a maximum of 16 trees,
100 folders, and 255 files per disc. During MP3
playback, the unit can display ID3 tag information.
For information concerning ID3 tag, refer to “CD
text and MP3 title display” on page 5-26.
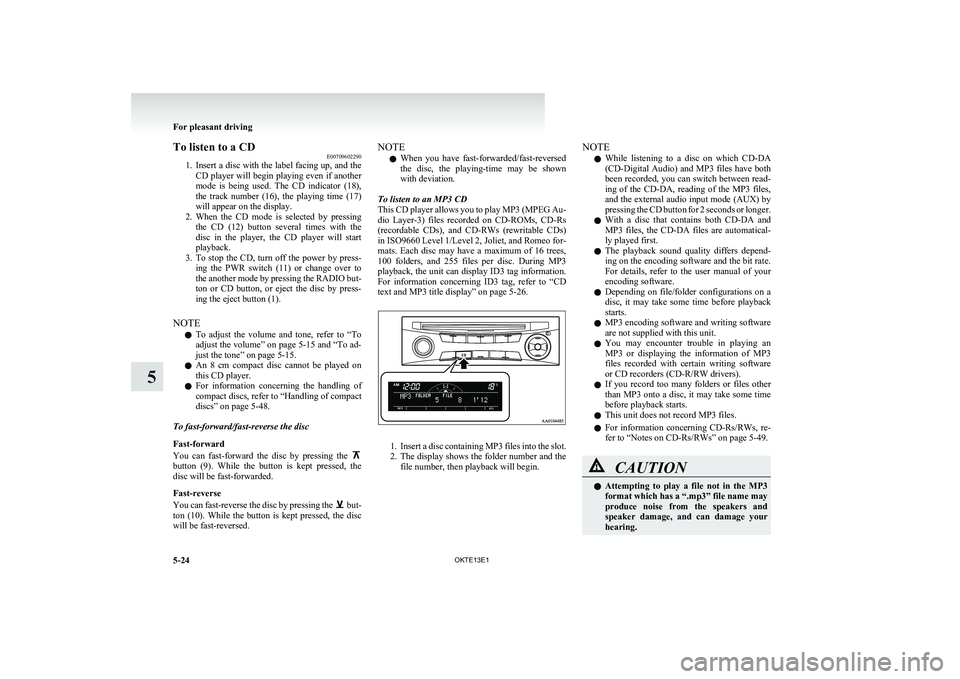
1. Insert a disc containing MP3 files into the slot.
2. The display shows the folder number and the
file number, then playback will begin.
NOTE
l While listening to a disc on which
CD-DA
(CD-Digital Audio) and MP3 files have both
been recorded, you can switch between read-
ing of the CD-DA, reading of the MP3 files,
and the external audio input mode (AUX) by
pressing the CD button for 2 seconds or longer.
l With a disc that contains both
CD-DA and
MP3 files, the CD-DA files are automatical-
ly played first.
l The playback sound quality differs depend-
ing on the encoding software and the bit rate.
For details, refer to the user manual of your
encoding software.
l Depending on file/folder configurations on a
disc, it may take some time before playback
starts.
l MP3 encoding software and writing software
are not supplied with this unit.
l You may encounter trouble in playing an
MP3 or displaying the information of MP3
files recorded with certain writing software
or CD recorders (CD-R/RW drivers).
l If you record too many folders or files other
than MP3 onto a disc, it may take some time
before playback starts.
l This unit does not record MP3 files.
l For information concerning CD-Rs/RWs, re-
fer to “Notes on CD-Rs/RWs” on page 5-49.CAUTIONl Attempting to play a file not in the MP3
format which has a “.mp3” file name may
produce noise from the speakers and
speaker damage, and can damage your
hearing.
For pleasant driving
5-24 OKTE13E1
5
Page 209 of 362
To play from an iPodE00756300372
1. Press the PWR button (1) to turn on the au-
dio system. The system turns on in the last
mode used.
2. Connect your iPod to the USB input terminal.
Refer to “How to connect an iPod” on page
5-67.
3. Press the CD button (11) several times to
switch to the iPod mode. The mode changes
every time the CD button is pressed.
CD mode → iPod mode → Bluetooth ®
mode*
NOTE l If your vehicle is equipped with Auxiliary Au-
dio connector (RCA), pressing and holding
the CD button for 2 seconds or more
switches the system to the AUX mode.
4. Once the device is selected, playback starts
and “iPod” appears on the display.
NOTE l Depending on the condition of your iPod, it
may take a longer time before the playback
starts.
5. To stop the playback, change over to a differ-
ent mode.
NOTE l Buttons on the iPod are disabled while the
iPod is connected to the audio system.
l To adjust the volume and tone, refer to “To
adjust the volume” and “To adjust the tone”.To fast-forward/reverse the track E00756400113
Fast-forward
To fast-forward the current track, press the
but-
ton (8). While the button is pressed, the track will
be fast-forwarded.
Fast-reverse
To fast-reverse the current track, press the
but-
ton (9). While the button is pressed, the track will
be fast-reversed.
To select a desired track E00756500097
Track up
Press the
button (8) repeatedly until the desired
track number appears on the display.
Track down
Press the
button (9) repeatedly until the desired
track number appears on the display.
NOTE l Pressing the
button (9) once during the
song will cause the audio system to restart
playback from the beginning of the song.
To find a track from the iPod menu E00756600186
You can select desired tracks from the “Playlists”,
“Artists”,“Albums”, “Songs” or “Genre” (vehicles
with Bluetooth ®
2.0 interface) menus on your iPod.
Press the following buttons to select desired tracks.
The selected menu or category or track is shown in
the display.
button (12):To start this mode or cancel the
selection. button (8)
or
button (9)
:To show the menu or category
or track. button (13):To select the menu or category
or track.
NOTE
l If no operation is performed for 10 seconds
or more or another button is operated after
the
button or button has been pressed,
searching of the desired tracks is cancelled.
l If no operation is performed for 5 seconds or
more after the track is displayed, playback
starts.
To play the same track repeatedly E00756700099
Press the RPT button (6) during playback to show
“RPT” in the display.
To exit this mode, press the button again.
To play tracks in random order E00756900091
Press the RDM button (7) to show “SHUFFLE” in
the display.The iPod randomly selects tracks from
the current category and plays the selected tracks.
To exit this mode, press the button again.
To play tracks in each album in random order E00757000099
Press and hold the RDM button (7) until you hear a
beep to show “A-SHUFFLE” in the display.
The iPod randomly selects tracks in the album
from the current category and play the selected
tracks.
To exit this mode, press the button again.
For pleasant driving
5-29
OKTE13E1
5
Page 214 of 362
To play from a USB memory deviceE00762500366
1. Press the PWR button (1) to turn on the au-
dio system. The system turns on in the last
mode used.
2. Connect your USB memory device to the
USB input terminal.
Refer to “ How to connect a USB memory de-
vice” on page 5-67.
3. Press the CD button (11) several times to
switch to the USB mode. The mode changes
as follows every time the CD button is pressed.
CD mode → USB mode → Bluetooth ®
mode*
NOTE l If your vehicle is equipped with Auxiliary Au-
dio connector (RCA), pressing and holding
the CD button for 2 seconds or more
switches the system to the AUX mode.
4. Once the device is selected, playback starts
and “USB” appears on the display.
NOTE l Depending on the condition of your USB de-
vice, it may take a longer time before the play-
back starts.
5. To stop the playback, change over to a differ-
ent mode.
NOTE l To adjust the volume and tone, refer to “To
adjust the volume” and “To adjust the tone”.Supported compressed music files E00758300305
This audio can play MP3, WMA, AAC and WAV
files recorded in a USB memory device. This audio
supports up to 65,535 files in 700 folders on 8 levels.
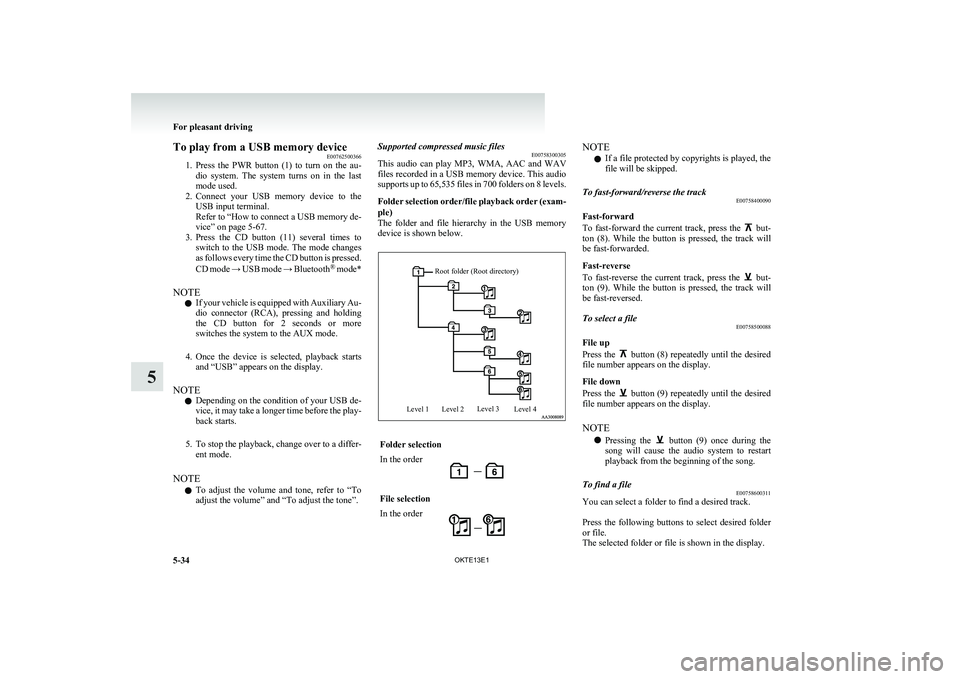
Folder selection order/file playback order (exam-
ple)
The folder and file hierarchy in the USB memory
device is shown below.Root folder (Root directory)Level 1Level 2Level 3Level 4Folder selectionIn the orderFile selectionIn the orderNOTE
l If a file protected by copyrights is played, the
file will be skipped.To fast-forward/reverse the track E00758400090
Fast-forward
To fast-forward the current track, press the
but-
ton (8). While the button is pressed, the track will
be fast-forwarded.
Fast-reverse
To fast-reverse the current track, press the
but-
ton (9). While the button is pressed, the track will
be fast-reversed.
To select a file E00758500088
File up
Press the
button (8) repeatedly until the desired
file number appears on the display.
File down
Press the
button (9) repeatedly until the desired
file number appears on the display.
NOTE l Pressing the
button (9) once during the
song will cause the audio system to restart
playback from the beginning of the song.
To find a file E00758600311
You can select a folder to find a desired track.
Press the following buttons to select desired folder
or file.
The selected folder or file is shown in the display.
For pleasant driving
5-34 OKTE13E1
5
Page 218 of 362
To listen to tracks from a device con-
nected via Bluetooth ®
E00762700225
1. Press the PWR button (1) to turn on the au-
dio system. The system turns on in the last
mode used.
2. Press the CD button (8) several times to
switch to the BT-A (Bluetooth ®
) mode. The
mode changes as follows every time the CD
button is pressed.
CD mode → USB (iPod) mode → Blue-
tooth ®
mode
NOTE l For vehicles equipped with Auxiliary Audio
connector (RCA), pressing and holding the
CD button for 2 seconds or more switches
the system to the AUX mode.
3. Connect your Bluetooth ®
device.
Refer to “Connecting the Bluetooth® 2.0 in-
terface and Bluetooth® device” on page
5-56.
4. Playback starts automatically.
NOTE l Depending on the connected device, the play-
back may not start automatically.
In this case, operate the connected device to
start the playback.To stop the playback (if supported by the device) E00762800079
To stop the playback, press and hold the button
(9) until you hear a beep.
To restart the playback, press the
button (10).
To pause the playback (if supported by the device) E00762900083
To pause the playback, press the
button (9).
To restart the playback, press the button (10).
To fast-forward/reverse the track (if supported by
the device) E00765600010
Fast-forward
To fast-forward the current track, press the
but-
ton (6). While the button is pressed, the track will
be fast-forwarded.
Fast-reverse
To fast-reverse the current track, press the
but-
ton (7). While the button is pressed, the track will
be fast-reversed.
To select a track (if supported by the device) E00763000094
Track up
Press the
button (6) repeatedly until the desired
track number appears on the display.
Track down
Press the
button (7) repeatedly until the desired
track number appears on the display.
NOTE l Pressing the
button (7) once during the
song will cause the audio system to restart
playback from the beginning of the song.
To play the same track or all tracks repeatedly (if
supported by the device) E00763100079
Press the RPT button (4) several times to show
“1-RPT” (same track repeat mode) or “ A-RPT” (all
tracks repeat mode) in the display.
The mode changes as follows every time the RPT
button is pressed.
1-RPT mode → A-RPT mode → mode off
To exit these mode, press the RPT button several
times until the 1-RPT indicator or the A-RPT indi-
cator goes off.To play tracks in random order (if supported by
the device) E00763200070
Press the RDM button (5) to show “RDM” in the
display.
The system randomly selects and plays tracks from
all tracks in the Bluetooth ®
device.
To exit this mode, press the button again.
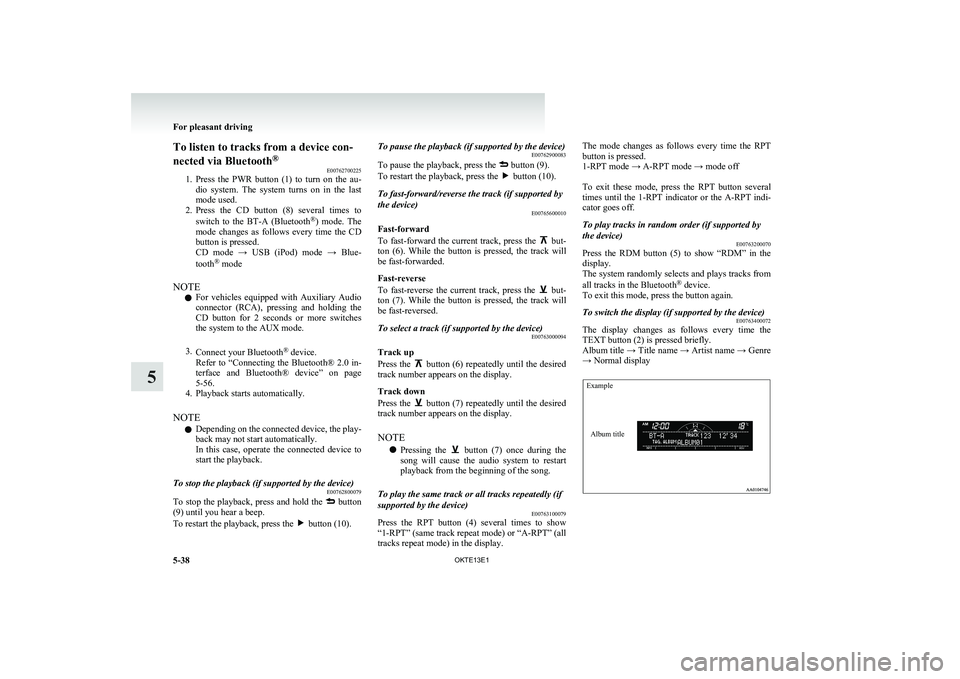
To switch the display (if supported by the device) E00763400072
The display changes as follows every time the
TEXT button (2) is pressed briefly.
Album title → Title name → Artist name → Genre
→ Normal display
ExampleAlbum title
For pleasant driving
5-38 OKTE13E1
5
Page 228 of 362
Audio system anti-theft featureE00710200348
To prevent theft of the audio system, the control
knob can be removed. Always remove the control
knob when you leave the vehicle.
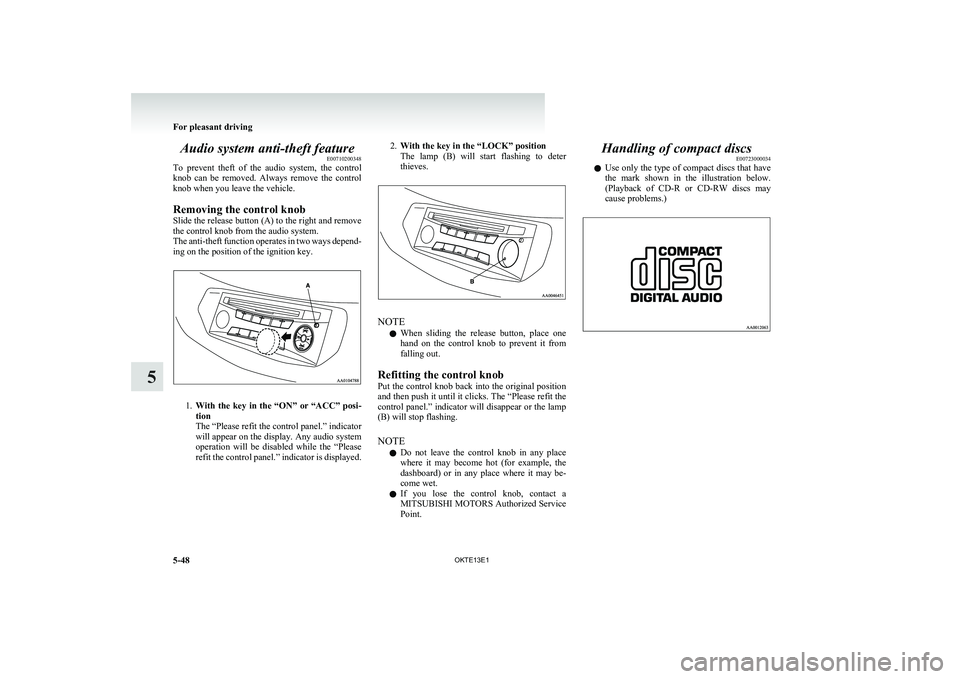
Removing the control knob
Slide the release button (A) to the right and remove
the control knob from the audio system.
The anti-theft function operates in two ways depend-
ing on the position of the ignition key.
1. With the key in the “ON” or “ACC” posi-
tion
The “Please refit the control panel.” indicator
will appear on the display. Any audio system
operation will be disabled while the “Please
refit the control panel.” indicator is displayed.
2. With the key in the “LOCK” position
The lamp (B) will start flashing to deter
thieves.
NOTE
l When sliding the release button, place one
hand on the control knob to prevent it from
falling out.
Refitting the control knob
Put the control knob back into the original position
and then push it until it clicks. The “Please refit the
control panel.” indicator will disappear or the lamp
(B) will stop flashing.
NOTE l Do not leave the control knob in any place
where it may become hot (for example, the
dashboard) or in any place where it may be-
come wet.
l If you lose the control knob, contact a
MITSUBISHI MOTORS Authorized Service
Point.
Handling of compact discs E00723000034
l Use only the type of compact discs that have
the mark shown in the illustration below.
(Playback of CD-R or CD-RW discs may
cause problems.)
For pleasant driving
5-48 OKTE13E1
5
Page 234 of 362
NOTEl The voice guide will repeat the same mes-
sage twice. The first message is in the cur-
rent language, and the second message is in
the selected language.
l If many entries are registered in the vehicle
phone book, changing the language will take
longer.
l Changing the language deletes the mobile
phone book imported to the Bluetooth ®
2.0
interface. If you wish to use it, you will have
to import it again.
6. When the voice guide says “English (French,
Spanish, Italian, German, Dutch, Portuguese
or Russian) selected,” the language change
process will be completed and the system
will return to the main menu.Useful voice commands E00760000019Help functionE00760100010
The Bluetooth®
2.0 interface is equipped with a
help function. If you say “Help” when the system
is waiting for a voice command input, the system
will tell you a list of the commands that can be
used under the circumstances.
Cancelling E00760200011
There are two cancel functions.
If you are at the main menu, say “Cancel” to exit
from the Bluetooth ®
2.0 interface.
If you are anywhere else within the system, say
“Cancel” to return to the main menu.
Confirmation function setting E00760400013
The Bluetooth ®
2.0 interface is equipped with a con-
firmation function.
With the confirmation function activated, you are
given more opportunities than normal to confirm a
command when making various settings to the Blue-
tooth ®
2.0 interface. This allows you to decrease
the possibility that a setting is accidentally changed.
The confirmation function can be turned on or off
by following the steps below. 1. Press the SPEECH button.
2. Say “Setup”.
3. Say “Confirmation prompts”.
4. The voice guide will say “Confirmation
prompts are
confirmation prompts
Answer “Yes” to change the setting or an-
swer “No” to keep the current setting.
5. The voice guide will say “Confirmation
prompts are
will return to the main menu.Security function E00760500131
It is possible to use a password as a security func-
tion by setting a password of your choice for the
Bluetooth ®
2.0 interface.
When the security function is turned on, it is neces-
sary to make a voice input of a 4-digit password in
order to use all functions of the Bluetooth ®
2.0 in-
terface, except for reception.
Setting the password
Use the following procedure to turn on the security
function by setting a password. 1. Press the SPEECH button.
2. Say “Setup”.
3. Say “Password.”
4. The voice guide will say “Password is disa-
bled. Would you like to enable it?” Answer
“Yes.”
Answer “No” to cancel the setting of the pass-
word and return to the main menu.
5. The voice guide will say “Please say a 4-dig-
it password. Remember this password. It will
be required to use this system”.
Say a 4-digit number which you want to set
as a password.
6. For confirmation purposes, the voice guide
will say “Password <4-digit password>. Is
this correct?” Answer “Yes.”
Answer “No” to return to the password input
in Step 5.
7. When the registration of the password is com-
pleted, the voice guide will say “Password is
enabled” and the system will return to the
main menu.
NOTE l Password will be required to access the sys-
tem after the next ignition cycle.
l It is required for a little time after engine
stop that the entered password is actually re-
corded in the system.
If the ignition switch is made to “ACC” or
“ON” or the engine is started immediately af-
ter engine stop, there is a case when the en-
tered password is not recorded in the system.
At this time, please try to enter the password
again.
For pleasant driving
5-54 OKTE13E1
5
Page 235 of 362
Entering the password
If a password has been set and the security function
is enabled, the voice guide will say “Hands-free sys-
tem is locked. State the password to continue”
when the SPEECH button is pressed to enter voice
recognition mode. Say the 4-digit password num-
ber to enter the password.
If the entered password is wrong, the voice guide
will say “<4- digit password>, Incorrect password.
Please try again”. Enter the correct password.
NOTE l You can re-enter the password as many times
as you want.
l If you have forgotten your password, say
“Cancel” to quit the voice input mode and
then check with a MITSUBISHI MOTORS
Authorized Service Point.
Disabling the password
Use the following procedure to turn off the security
function by disabling the password.
NOTE l System must be unlocked to disable the pass-
word.
1. Press the SPEECH button.
2. Say “Setup”.
3. Say “Password.”
4. The voice guide will say “Password is ena-
bled. Would you like to disable it?”
Answer “Yes.” Answer “No” to cancel the
disabling of the password and return to the
main menu.5. When the disabling of the password is com-
pleted, the voice guide will say “Password is
disabled” and the system will return to the
main menu.Speaker enrollment function E00727400209
The Bluetooth®
2.0 interface can use the speaker en-
rollment function to create a voice model for one
person per language.
This makes it easier for the Bluetooth ®
2.0 inter-
face to recognise voice commands said by you.
You can turn a voice model registered with the
speaker enrollment function on and off whenever
you want.
Speaker enrollment E00727500196
It takes about 2 to 3 minutes to complete the speak-
er enrollment process.
To ensure the best results, run through the process
while in the driver’s seat, in an environment that is
as quiet as possible (when there is no rain or strong
winds and the vehicle windows are closed). Please
turn off your phone while in speaker enrollment to
prevent interruption of the process.
Use the following procedure for speaker enrollment. 1.Stop your vehicle in a safe area, put the gear-
shift lever in the “N” (Neutral) position
(M/T ), or the selector lever in the “P”
(PARK) position ( A/T), and pull the parking
brake lever.
NOTE l Speaker enrollment is not possible unless the
vehicle is parked. Make sure you park the ve-
hicle in a safe area before attempting speaker
enrollment.
2. Press the SPEECH button.
3. Say “Voice training”.
4. The voice guide will say “This operation
must be performed in a quiet environment
while the vehicle is stopped. See the owner’s
manual for the list of required training phra-
ses. Press and release the SPEECH button
when you are ready to begin. Press the HANG-
UP button to cancel at any time”.
Press the SPEECH button to start the speaker
enrollment process.
NOTE l If you do not start the speaker enrollment proc-
ess within 3 minutes of pressing the
SPEECH button, the speaker enrollment func-
tion will time out.
The voice guide will say “Speaker Enroll-
ment has timed out”. The system will then
beep and the voice recognition mode will be
deactivated.
5. The voice guide will prompt for phrase 1. Re-
peat the corresponding phrase listed in table
“Enrollment commands” on page 5-66.
The system will register your voice and then
move on to the registration of the next com-
mand. Continue the process until all phrases
have been registered.
NOTE l To repeat the most recent voice training com-
mand, press and release the SPEECH button.
l If you press the HANG-UP button anytime
during the process, the system will beep and
stop the speaker enrollment process.
For pleasant driving
5-55
OKTE13E1
5
Page 236 of 362
6.When all enrollment commands have been
read out, the voice guide will say “Speaker
enrollment is complete”. The system will
then end the speaker enrollment process and
return to the main menu.
NOTE l Completing the speaker enrollment process
will turn on the voice model automatically.
l The commands “Help” and “Cancel” will not
work in this mode.Enabling and disabling the voice model and re-
training E00727600096
You can turn a voice model registered with the
speaker enrollment function on and off whenever
you want.
You can also retrain the system.
Use the following procedure to perform these ac-
tions. 1. Press the SPEECH button.
2. Say “Voice training”.
3. If you have completed a speaker enrollment
process once already, the voice guide will
say either “Enrollment is enabled. Would
you like to disable or retrain?” or “Enroll-
ment is disabled. Would you like to enable
or retrain?”
4. When enrollment is “enabled”, the voice mod-
el is on; when enrollment is “disabled”, the
voice model is off. Say the command that
fits your needs.
Say “Retrain” to start the speaker enrollment
process and recreate a new voice model. (Re-
fer to “Speaker enrollment” on page 5-55.)
Connecting the Bluetooth ®
2.0 inter-
face and Bluetooth ®
device
E00760600204
Before you can make or receive hands-free calls or
play music using the Bluetooth ®
2.0 interface func-
tion, you must pair the Bluetooth ®
device and Blue-
tooth ®
2.0 interface.
NOTE l Pairing is required only when the device is
used for the first time. Once the device has
been paired with the Bluetooth ®
2.0 inter-
face, you only need to bring the device into
the vehicle next time and the device will au-
tomatically connect to the Bluetooth ®
2.0 in-
terface (if supported by the device).
Up to 7 Bluetooth ®
devices can be paired with the
Bluetooth ®
2.0 interface.
If multiple paired Bluetooth ®
devices are available
in the vehicle, the cellular phone or music player
most recently connected is automatically connected
to the Bluetooth ®
2.0 interface.
You can also change a Bluetooth ®
device to be con-
nected.
To pair
To pair a Bluetooth ®
device with the Bluetooth ®
2.0 interface, follow the steps below. 1.Stop your vehicle in a safe area, put the gear-
shift lever in the “N” (Neutral) position
(M/T ), or the selector lever in the “P”
(PARK) position ( A/T), and pull the parking
brake lever.NOTE
l You cannot pair Bluetooth ®
devices with the
Bluetooth ®
2.0 interface unless the vehicle is
parked. Before pairing a Bluetooth ®
device
with the Bluetooth ®
2.0 interface, confirm
that the vehicle is parked in a safe location.
2. Press the SPEECH button.
3. Say “Setup”.
4. Say “Pairing options.”
5. The voice guide will say “Select one of the
following: pair, edit, delete, or list.” Say
“Pair.”
NOTE l If 7 devices have already been paired, the
voice guide will say “Maximum devices
paired” and then the system will end the pair-
ing process. To register a new device, delete
one device and then repeat the pairing process.
(Refer to “Deleting a device” on page 5-57.)
6. The voice guide will say “Please say a 4-dig-
it pairing code.” Say a 4-digit number.
When the confirmation function is on, the sys-
tem will confirm whether the number said is
acceptable. Answer “Yes.”
Answer “No” to return to pairing code selec-
tion.
NOTE l Some Bluetooth ®
devices require a specific
pairing code.
Please refer to the device manual for pairing
code requirements.
For pleasant driving
5-56 OKTE13E1
5