air conditioning MITSUBISHI L200 2014 (in English) User Guide
[x] Cancel search | Manufacturer: MITSUBISHI, Model Year: 2014, Model line: L200, Model: MITSUBISHI L200 2014Pages: 362, PDF Size: 20.97 MB
Page 182 of 362
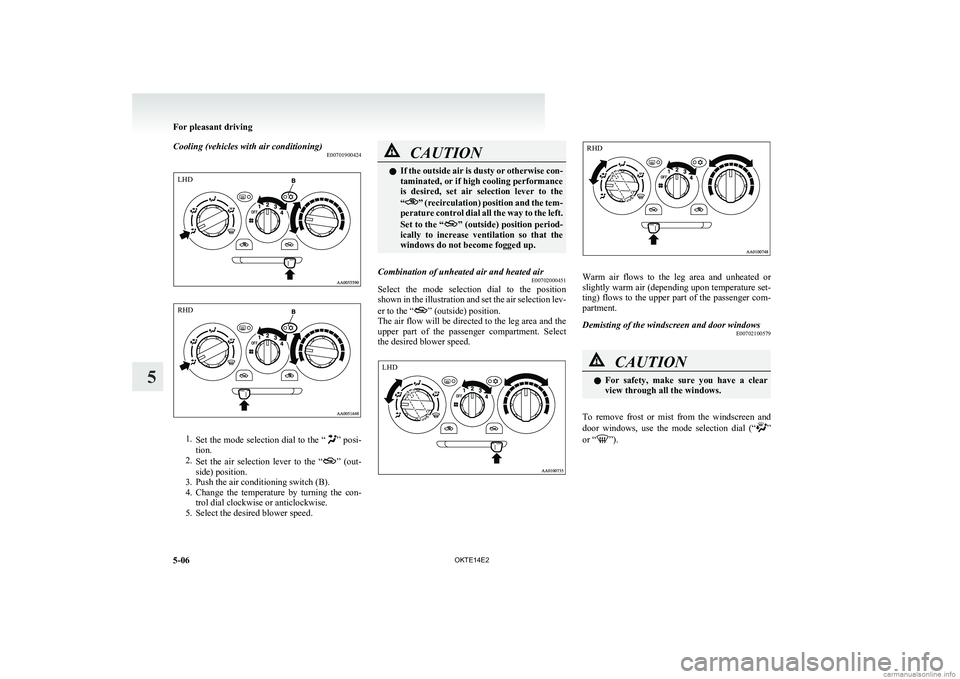
Cooling (vehicles with air conditioning)E00701900424
1.Set the mode selection dial to the “” posi-
tion.
2. Set the air selection lever to the “
” (out-
side) position.
3. Push the air conditioning switch (B).
4. Change the temperature by turning the con-
trol dial clockwise or anticlockwise.
5. Select the desired blower speed.
CAUTIONl If the outside air is dusty or otherwise con-
taminated, or if high cooling performance
is desired, set air selection lever to the
“
” (recirculation) position and the tem-
perature control dial all the way to the left.
Set to the “
” (outside) position period-
ically to increase ventilation so that the
windows do not become fogged up.
Combination of unheated air and heated air E00702000451
Select the mode selection dial to the position
shown in the illustration and set the air selection lev-
er to the “
” (outside) position.
The air flow will be directed to the leg area and the
upper part of the passenger compartment. Select
the desired blower speed.
Warm air flows to the leg area and unheated or
slightly warm air (depending upon temperature set-
ting) flows to the upper part of the passenger com-
partment.
Demisting of the windscreen and door windows E00702100579CAUTIONlFor safety, make sure you have a clear
view through all the windows.
To remove frost or mist from the windscreen and
door windows, use the mode selection dial (“”
or “”).
For pleasant driving
5-06 OKTE14E2
5LHD RHD LHD RHD
Page 183 of 362
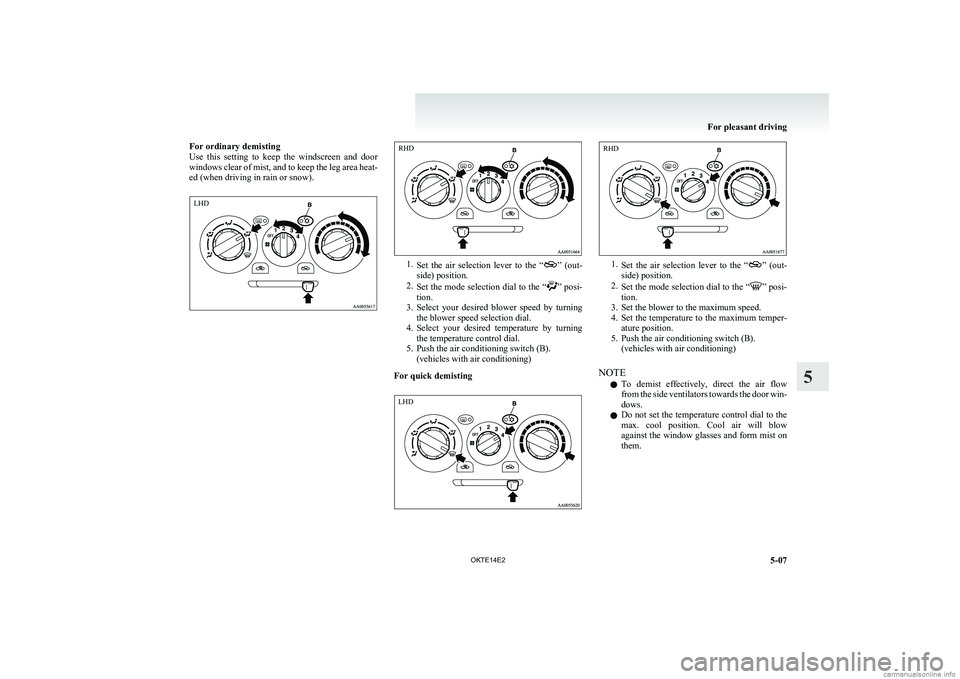
For ordinary demisting
Use this setting to keep the windscreen and door
windows clear of mist, and to keep the leg area heat-
ed (when driving in rain or snow).
1. Set the air selection lever to the “” (out-
side) position.
2. Set the mode selection dial to the “
” posi-
tion.
3. Select your desired blower speed by turning
the blower speed selection dial.
4. Select your desired temperature by turning
the temperature control dial.
5. Push the air conditioning switch (B). (vehicles with air conditioning)
For quick demisting
1. Set the air selection lever to the “” (out-
side) position.
2. Set the mode selection dial to the “
” posi-
tion.
3. Set the blower to the maximum speed.
4. Set the temperature to the maximum temper-
ature position.
5. Push the air conditioning switch (B). (vehicles with air conditioning)
NOTE l To demist effectively, direct the air flow
from the side ventilators towards the door win-
dows.
l Do not set the temperature control dial to the
max. cool position. Cool air will blow
against the window glasses and form mist on
them.
For pleasant driving
5-07
OKTE14E2
5LHD RHD LHD RHD
Page 184 of 362
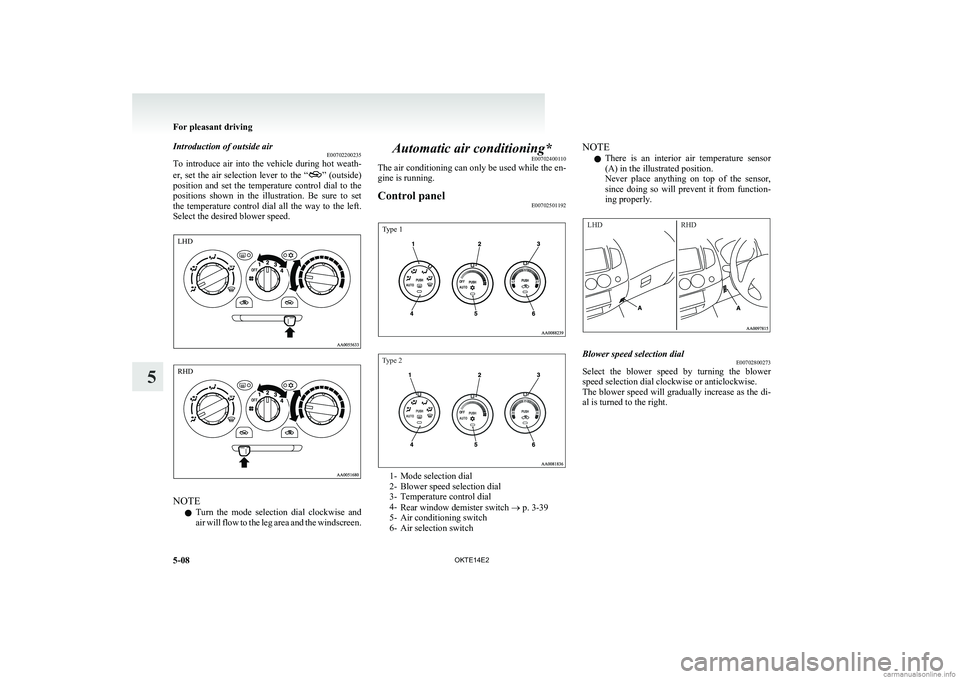
Introduction of outside airE00702200235
To introduce air into the vehicle during hot weath-
er, set the air selection lever to the “
” (outside)
position and set the temperature control dial to the
positions shown in the illustration. Be sure to set
the temperature control dial all the way to the left.
Select the desired blower speed.
NOTE
l Turn the mode selection dial clockwise and
air will flow to the leg area and the windscreen.
Automatic air conditioning* E00702400110
The air conditioning can only be used while the en-
gine is running.Control panel E00702501192Type 1Type 2
1- Mode selection dial
2- Blower speed selection dial
3- Temperature control dial
4- Rear window demister switch ® p. 3-39
5- Air conditioning switch
6- Air selection switch
NOTE
l There is an interior air temperature sensor
(A) in the illustrated position.
Never place anything on top of the sensor,
since doing so will prevent it from function-
ing properly.LHDRHDBlower speed selection dial E00702800273
Select the blower speed by turning the blower
speed selection dial clockwise or anticlockwise.
The blower speed will gradually increase as the di-
al is turned to the right.
For pleasant driving
5-08 OKTE14E2
5 LHD RHD
Page 186 of 362
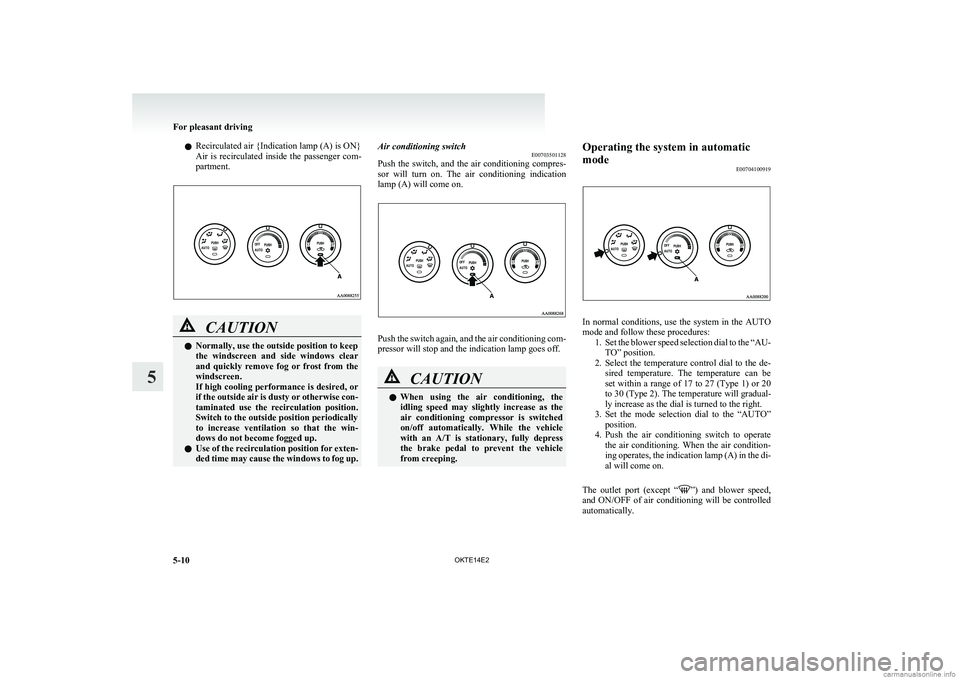
lRecirculated air {Indication lamp (A) is ON}
Air is recirculated inside the passenger com-
partment.CAUTIONl Normally, use the outside position to keep
the windscreen and side windows clear
and quickly remove fog or frost from the
windscreen.
If high cooling performance is desired, or
if the outside air is dusty or otherwise con-
taminated use the recirculation position.
Switch to the outside position periodically
to increase ventilation so that the win-
dows do not become fogged up.
l Use of the recirculation position for exten-
ded time may cause the windows to fog up.Air conditioning switch E00703501128
Push the switch, and the air conditioning compres-
sor will turn on. The air conditioning indication
lamp (A) will come on.
Push the switch again, and the air conditioning com-
pressor will stop and the indication lamp goes off.
CAUTIONl When using the air conditioning, the
idling speed may slightly increase as the
air conditioning compressor is switched
on/off automatically. While the vehicle
with an A/T is stationary, fully depress
the brake pedal to prevent the vehicle
from creeping.Operating the system in automatic
mode E00704100919
In normal conditions, use the system in the AUTO
mode and follow these procedures: 1.Set the blower speed selection dial to the “AU-
TO” position.
2. Select the temperature control dial to the de-
sired temperature. The temperature can be
set within a range of 17 to 27 (Type 1) or 20
to 30 (Type 2). The temperature will gradual-
ly increase as the dial is turned to the right.
3. Set the mode selection dial to the “AUTO”
position.
4. Push the air conditioning switch to operate
the air conditioning. When the air condition-
ing operates, the indication lamp (A) in the di-
al will come on.
The outlet port (except “
” ) and blower speed,
and ON/OFF of air conditioning will be controlled
automatically.
For pleasant driving
5-10 OKTE14E2
5
Page 187 of 362
NOTEl Set the temperature at about 22 (Type 1) or
25 (Type 2) under normal conditions.
l When the temperature is set to the highest or
the lowest setting under the AUTO opera-
tion, the air selection, mode selection, blower
speed and the air conditioning will be auto-
matically changed as follows.
Also, if manually operated after an automatic
changeover, manual operation will be selec-
ted. •Quick Heating (When the temperature is
set to the highest setting)
Outside air will be introduced, the air
flow will select foot position, and the air
conditioning will stop.
• Quick Cooling (When the temperature is
set to the lowest setting)
Inside air will be recirculated, the air
flow will select face position, and the air
conditioning will operate.Operating the system in manual mode E00704200040
Blower speed and ventilator mode may be control-
led manually by setting the blower speed selection
dial and the mode selection dial to the desired posi-
tions. To return to automatic operation, set the dials
to the “AUTO” position.
Demisting of the windscreen and door windows E00704300689CAUTIONlFor safety, make sure you have a clear
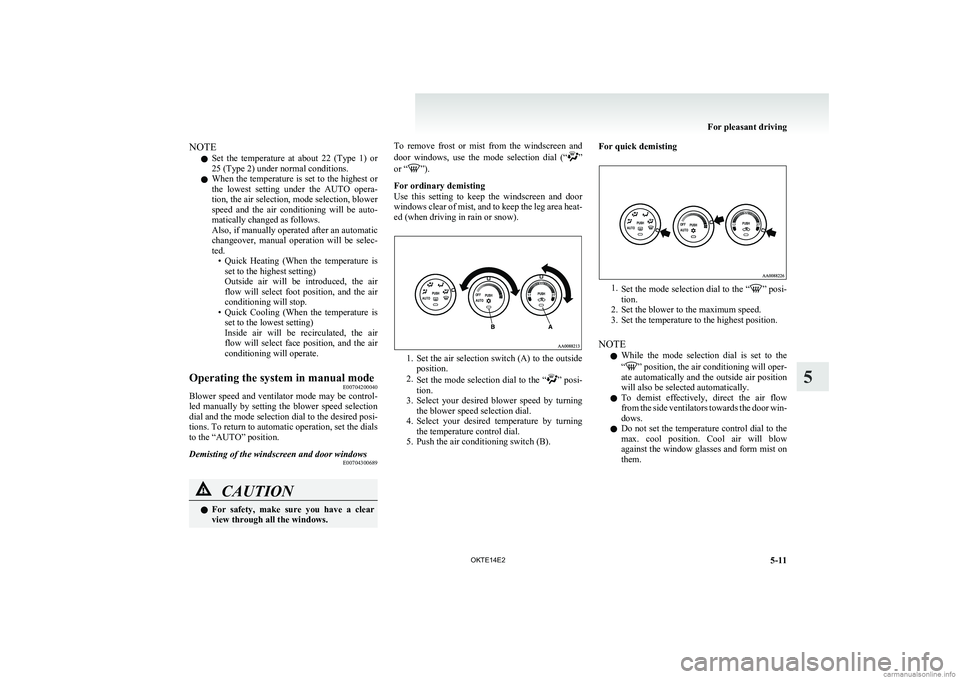
view through all the windows.To remove frost or mist from the windscreen and
door windows, use the mode selection dial (“”
or “”).
For ordinary demisting
Use this setting to keep the windscreen and door
windows clear of mist, and to keep the leg area heat-
ed (when driving in rain or snow).
1. Set the air selection switch (A) to the outside
position.
2. Set the mode selection dial to the “
” posi-
tion.
3. Select your desired blower speed by turning
the blower speed selection dial.
4. Select your desired temperature by turning
the temperature control dial.
5. Push the air conditioning switch (B).
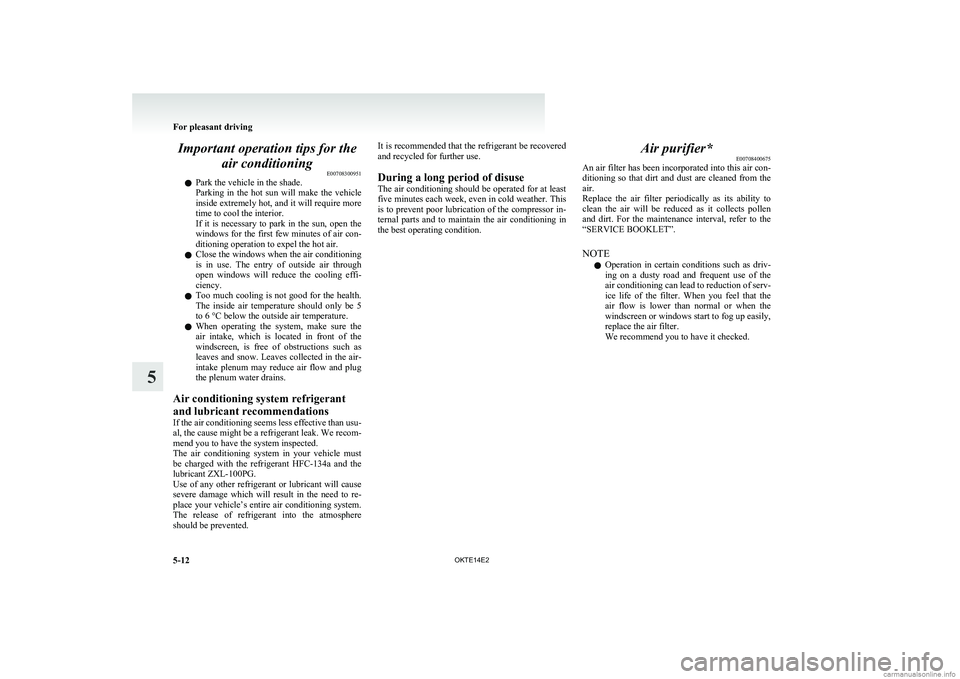
For quick demisting
1. Set the mode selection dial to the “” posi-
tion.
2. Set the blower to the maximum speed.
3. Set the temperature to the highest position.
NOTE l While the mode selection dial is set to the
“
” position, the air conditioning will oper-
ate automatically and the outside air position
will also be selected automatically.
l To demist effectively, direct the air flow
from the side ventilators towards the door win-
dows.
l Do not set the temperature control dial to the
max. cool position. Cool air will blow
against the window glasses and form mist on
them.
For pleasant driving
5-11
OKTE14E2
5
Page 188 of 362
Important operation tips for theair conditioning E00708300951
l Park the vehicle in the shade.
Parking in the hot sun will make the vehicle
inside extremely hot, and it will require more
time to cool the interior.
If it is necessary to park in the sun, open the
windows for the first few minutes of air con-
ditioning operation to expel the hot air.
l Close the windows when the air conditioning
is in use. The entry of outside air through
open windows will reduce the cooling effi-
ciency.
l Too much cooling is not good for the health.
The inside air temperature should only be 5
to 6 °C below the outside air temperature.
l When operating the system, make sure the
air intake, which is located in front of the
windscreen, is free of obstructions such as
leaves and snow. Leaves collected in the air-
intake plenum may reduce air flow and plug
the plenum water drains.
Air conditioning system refrigerant
and lubricant recommendations
If the air conditioning seems less effective than usu-
al, the cause might be a refrigerant leak. We recom-
mend you to have the system inspected.
The air conditioning system in your vehicle must
be charged with the refrigerant HFC-134a and the
lubricant ZXL-100PG.
Use of any other refrigerant or lubricant will cause
severe damage which will result in the need to re-
place your vehicle’s entire air conditioning system.
The release of refrigerant into the atmosphere
should be prevented.It is recommended that the refrigerant be recovered
and recycled for further use.
During a long period of disuse
The air conditioning should be operated for at least
five minutes each week, even in cold weather. This
is to prevent poor lubrication of the compressor in-
ternal parts and to maintain the air conditioning in
the best operating condition.Air purifier* E00708400675
An air filter has been incorporated into this air con-
ditioning so that dirt and dust are cleaned from the
air.
Replace the air filter periodically as its ability to
clean the air will be reduced as it collects pollen
and dirt. For the maintenance interval, refer to the
“SERVICE BOOKLET”.
NOTE l Operation in certain conditions such as driv-
ing on a dusty road and frequent use of the
air conditioning can lead to reduction of serv-
ice life of the filter. When you feel that the
air flow is lower than normal or when the
windscreen or windows start to fog up easily,
replace the air filter.
We recommend you to have it checked.
For pleasant driving
5-12 OKTE14E2
5
Page 292 of 362
Service precautionsE01000100706
Adequate care of your vehicle at regular intervals
serves to preserve the value and appearance as long
as possible.
Maintenance items as described in this owner’s man-
ual can be performed by the owner.
We recommend you to have the periodic inspection
and maintenance performed by a MITSUBISHI
MOTORS Authorized Service Point or another spe-
cialist.
In the event a malfunction or other problem is dis-
covered, we recommend you to have it checked
and repaired. This section contains information on
inspection maintenance procedures that you can do
yourself. Follow the instructions and cautions for
each of the various procedures.WARNINGl When checking or servicing the inside of
the engine compartment, make sure the
engine is switched off and has had a
chance to cool down.
l If it is necessary to do work in the engine
compartment with the engine running, be
especially careful that your clothing, hair,
etc., does not become caught by the fans,
drive belts, or other moving parts.
l For vehicle with air conditioning, the fan
may turn on automatically even if the en-
gine is not running; turn the ignition key
to “LOCK” position and remove the key
to ensure safety while you work in the en-
gine compartment.WARNINGl Do not smoke, cause sparks or allow open
flames around fuel or battery. The fumes
are flammable.
l Be extremely cautious when working
around the battery. It contains poisonous
and corrosive sulphuric acid.
l Do not get under your vehicle with just
the body jack supporting it. Always use
automotive jack stands.
l Improper handling of components and
materials used in the vehicle can endan-
ger your personal safety. We recommend
you to consult a specialist for necessary in-
formation.Catalytic converter E01000200925
For ordinary use, there are no particular precautions.
The exhaust gas scavenging devices used with the
catalytic converter are extremely efficient for the re-
duction of noxious gases. The catalytic converter is
installed in the exhaust system.
It is important to keep the engine properly tuned to
ensure proper catalyst operation and prevent possi-
ble catalyst damage.CAUTIONl Damage to the catalytic converter can re-
sult if your vehicle is not kept in proper
operating condition. In the event of an en-
gine malfunction particularly involving
engine misfire or other apparent loss of
performance, have your vehicle serviced
promptly.
Continued operation of your vehicle with
a severe overheated condition may result
in possible damage to the converter and
vehicle.WARNINGl As with any vehicle, do not park or oper-
ate this vehicle in areas where combusti-
ble materials such as dry grass or leaves
can come in contact with a hot exhaust
since a fire could occur.
l Paint should not be applied to the catalyt-
ic converter.
Maintenance
8-02 OKTE14E2
8
Page 312 of 362
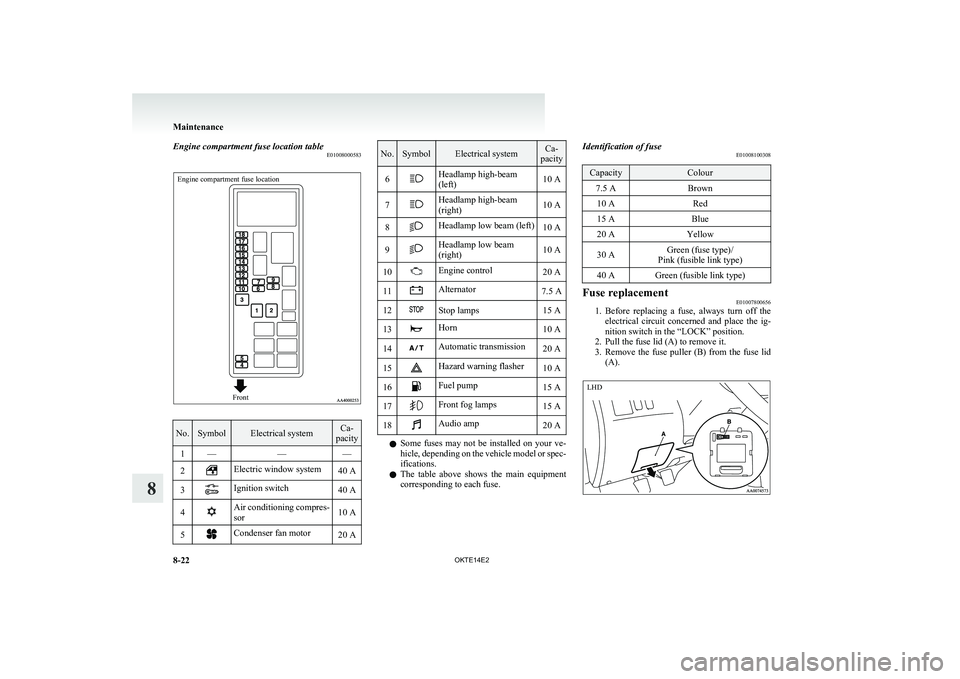
Engine compartment fuse location tableE01008000583Engine compartment fuse locationFront
No.SymbolElectrical systemCa-
pacity1———2Electric window system40 A3Ignition switch40 A4Air conditioning compres-
sor10 A5Condenser fan motor20 ANo.SymbolElectrical systemCa-
pacity6Headlamp high-beam
(left)10 A7Headlamp high-beam
(right)10 A8Headlamp low beam (left)10 A9Headlamp low beam
(right)10 A10Engine control20 A11Alternator7.5 A12Stop lamps15 A13Horn10 A14Automatic transmission20 A15Hazard warning flasher10 A16Fuel pump15 A17Front fog lamps15 A18Audio amp20 A
l Some fuses may not be installed on your ve-
hicle, depending on the vehicle model or spec-
ifications.
l The table above shows the main equipment
corresponding to each fuse.
Identification of fuse E01008100308CapacityColour7.5 ABrown10 ARed15 ABlue20 AYellow30 AGreen (fuse type)/
Pink (fusible link type)40 AGreen (fusible link type)Fuse replacement E01007800656
1.Before replacing a fuse, always turn off the
electrical circuit concerned and place the ig-
nition switch in the “LOCK” position.
2. Pull the fuse lid (A) to remove it.
3. Remove the fuse puller (B) from the fuse lid
(A).
Maintenance
8-22 OKTE14E2
8 LHD
Page 346 of 362
![MITSUBISHI L200 2014 (in English) User Guide No.ItemQuantityLubricants1Engine coolant8.2 litres
[includes 0.65 litre in the reserve tank]MITSUBISHI MOTORS GENUINESUPER LONG LIFE COOLANT or equivalent2Automatic transmission fluid9.7 litresMITSUBI](/img/19/34876/w960_34876-345.png "MITSUBISHI L200 2014 (in English) User Guide No.ItemQuantityLubricants1Engine coolant8.2 litres
[includes 0.65 litre in the reserve tank]MITSUBISHI MOTORS GENUINESUPER LONG LIFE COOLANT or equivalent2Automatic transmission fluid9.7 litresMITSUBI")
No.ItemQuantityLubricants1Engine coolant8.2 litres
[includes 0.65 litre in the reserve tank]MITSUBISHI MOTORS GENUINESUPER LONG LIFE COOLANT or equivalent2Automatic transmission fluid9.7 litresMITSUBISHI MOTORS GENUINEATF SP III3Brake fluidAs requiredBrake fluid DOT3 or DOT44Clutch fluidAs requiredBrake fluid DOT3 or DOT45Power steering fluidAs requiredMITSUBISHI MOTORS GENUINE PSF
(Power Steering Fluid)
6Engine oil
Oil pan2WD with 15 inch tyres6.5 litres
Refer to page 8-04.
2WD with 16 inch tyres, 4WD5.5 litresOil filter0.8 litreOil cooler0.1 litre7Washer fluid4.8 litres,
4.5 litres *1—8Manual transmis-
sion oil2WD2.3 litresMITSUBISHI MOTORS GENUINE MTF API classification GL-3 SAE 75W-854WD3.4 litres
9Transfer oil2.5 litres
MITSUBISHI MOTORS GENUINEMTF API classification GL-3 SAE
75W-85 or MITSUBISHI MOTORS
GENUINE Multi Gear Oil API classi- fication GL-4 SAE 75W-85*1: Vehicles with “front (Type 1)” (Refer to “Outside” on page 8-24)
*2 : 4WD vehicles only
*3 : Double cab with capacity up air conditioning
Specifications
9-22 OKTE14E2
9
Page 347 of 362
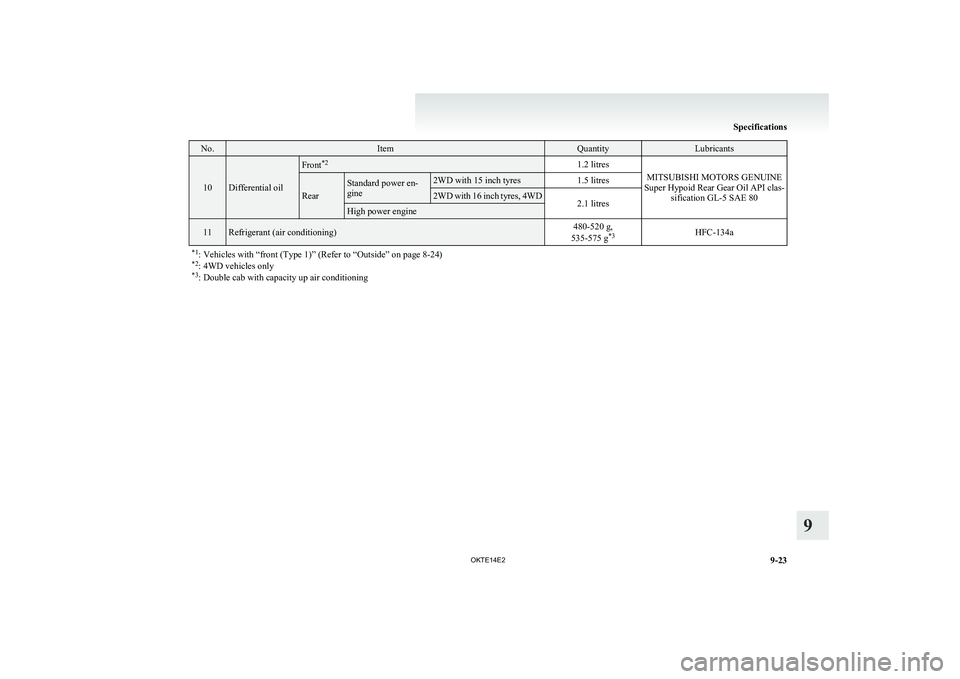
No.ItemQuantityLubricants
10Differential oil
Front*21.2 litres
MITSUBISHI MOTORS GENUINE
Super Hypoid Rear Gear Oil API clas- sification GL-5 SAE 80Rear
Standard power en-
gine2WD with 15 inch tyres1.5 litres2WD with 16 inch tyres, 4WD2.1 litresHigh power engine11Refrigerant (air conditioning)480-520 g,
535-575 g *3HFC-134a*1
: Vehicles with “front (Type 1)” (Refer to “Outside” on page 8-24)
*2 : 4WD vehicles only
*3 : Double cab with capacity up air conditioning
Specifications
9-23
OKTE14E2
9