check engine MITSUBISHI L200 2014 (in English) User Guide
[x] Cancel search | Manufacturer: MITSUBISHI, Model Year: 2014, Model line: L200, Model: MITSUBISHI L200 2014Pages: 362, PDF Size: 20.97 MB
Page 162 of 362
Limited-slip differential*E00606900037
A limited-slip differential is applied for the rear
wheel differential only. The features of this limited-
slip differential are described below:
Just as with a conventional differential, the wheel
on one side is allowed to turn at a different speed
from the wheel on the other side when the vehicle
is cornering. The difference between the limited-
slip differential and a conventional differential is
that if the wheel on one side of the vehicle loses trac-
tion, a greater amount of torque is applied to the
wheel on the other side to improve traction.
NOTE l Even if there is a difference in the amount of
traction the wheels can get, if both of them
are spinning, the limited-slip differential will
not be effective.CAUTIONl Never start the engine while one of the
rear wheels is jacked up and the other in
contact with the ground; doing so may
cause the vehicle to jump forward.
l When attempting to extract the vehicle
from snow, mud, etc., and the engine is
run continuously at high speed, the limi-
ted-slip differential will be adversely af-
fected.Braking E00607001928
All the parts of the brake system are critical to safe-
ty. We recommend you to have the vehicle
checked at regular intervals according to the serv-
ice booklet.CAUTIONl Avoid driving habits that cause heavy
braking and never “ride” the brakes by
resting your foot on the brake pedal
while driving.
It causes brake overheating and fade.
Brake system
The service brake is divided into two brake cir-
cuits. And your vehicle is equipped with power
brakes. If one brake circuit fails, the other is availa-
ble to stop the vehicle. If you should lose the pow-
er assist for some reason, the brakes will still work.
In these situations, even if the brake pedal moves
down to the very end of its possible stroke or re-
sists being depressed, keep depressing the brake ped-
al down harder and further than usual; stop driving
as soon as possible and have the brake system re-
paired.
WARNINGl Do not turn off the engine while your ve-
hicle is in motion. If you turn off the en-
gine while driving, the power assistance
for the braking system will stop working
and your brakes will not work effectively.WARNINGl If the power assist is lost or if either
brake hydraulic system stops working
properly, have your vehicle checked im-
mediately.
Warning lamp
The brake warning lamp illuminates to indicate a
fault in the braking system. Refer to “Brake warn-
ing lamp” on page 3-08.
When brakes are wet
Check the brake system while driving at a low
speed immediately after starting, especially when
the brakes are wet, to confirm they work normally.
A film of water can be formed on the brake discs
or brake drums and prevent normal braking after
driving in heavy rain or through large puddles, or
after the vehicle is washed. If this occurs, dry the
brakes out by driving slowly while lightly depress-
ing the brake pedal.
When driving downhill
It is important to take advantage of the engine brak-
ing by shifting to a lower shift position while driv-
ing on steep downhill roads in order to prevent the
brakes from overheating.
Starting and driving
4-38 OKTE14E2
4
Page 165 of 362
If the warning lamp illuminates while
driving E00607300663
If only the ABS warning lamp illuminates l Avoid hard braking and high-speed driving.
Stop the vehicle in a safe place.
Restart the engine and check to see whether
the lamp goes out after a few minutes driv-
ing; if it then remains off during driving,
there is no problem.
However, if the lamp does not go out, or if it
lights up again when the vehicle is driven,
we recommend you to have the vehicle
checked as soon as possible.
l The ABS warning lamp can illuminate if the
battery voltage is insufficient when the en-
gine is started. In this case, it does not indi-
cate an ABS fault.
Charge the battery by allowing the engine to
idle for a while.
If the battery has been charged but the ABS
warning lamp continues to illuminate or illu-
minates intermittently, have the vehicle in-
spected.
If the ABS warning lamp and brake warning
lamp illuminate at the same time
l The ABS and brake force distribution func-
tion may not work, so hard braking could
make the vehicle unstable.
Avoid hard braking and high-speed driving.
Stop the vehicle in a safe place and contact a
MITSUBISHI MOTORS Authorized Service
Point.NOTE
l Immediately after the vehicle starts moving
after engine start up, a whining sound of a mo-
tor will be heard from the engine compart-
ment. If the brake pedal is depressed at that
moment, you can feel the brake pedal pulsat-
ing.
This pulsation is due to the self-diagnosis op-
eration of the ABS and does not indicate a
malfunction.
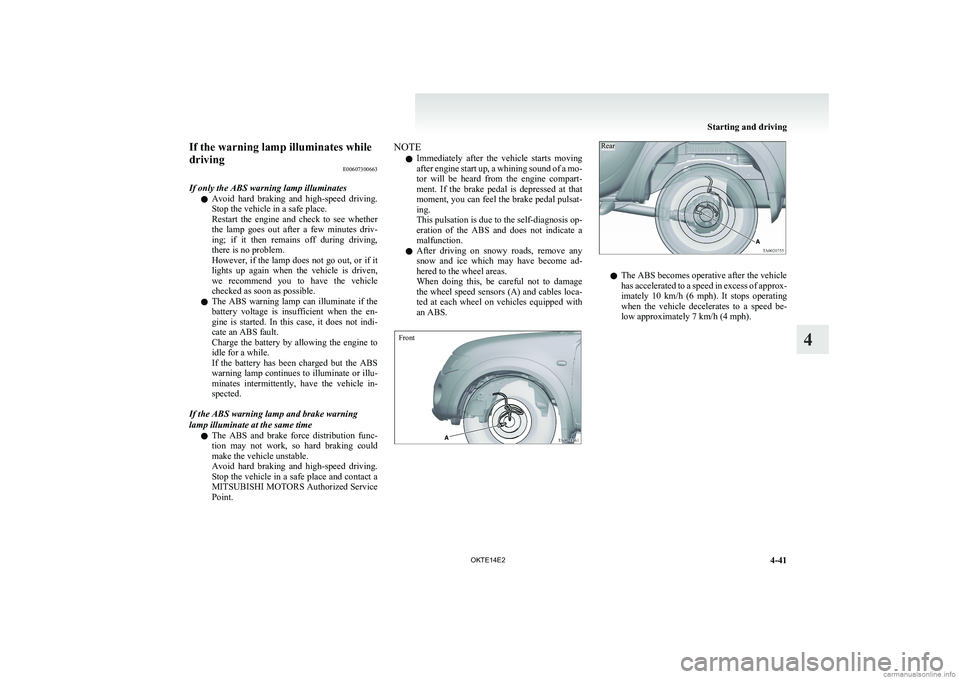
l After driving on snowy roads, remove any
snow and ice which may have become ad-
hered to the wheel areas.
When doing this, be careful not to damage
the wheel speed sensors (A) and cables loca-
ted at each wheel on vehicles equipped with
an ABS.FrontRear
l The ABS becomes operative after the vehicle
has accelerated to a speed in excess of approx-
imately 10 km/h (6 mph). It stops operating
when the vehicle decelerates to a speed be-
low approximately 7 km/h (4 mph).
Starting and driving
4-41
OKTE14E2
4
Page 166 of 362
Power steering systemE00607400387
The power steering system operates while the en-
gine is running. It helps reduce the effort needed to
turn the steering wheel.
The power steering system has mechanical steering
capability in case the power assist is lost. If the pow-
er assist is lost for some reason, you will still be
able to steer your vehicle, but you will notice it
takes much more effort to steer. If this happens,
have your vehicle inspected at an authorized
MITSUBISHI MOTORS service point.WARNINGl Do not stop the engine while the vehicle is
moving. Stopping the engine would make
the steering wheel extremely hard to
turn, possibly resulting in an accident.CAUTIONl Do not leave the steering wheel turned all
the way in one direction. This can cause
damage to the power steering system.Active Stability & Traction
Control (ASTC)* E00616700344
The active stability & traction control (ASTC)
takes overall control of the anti-lock brake system,
traction control function and Active Stability Con-
trol function to help maintain the vehicle’s control
and traction. Please read this section in conjunction
with the page on the anti-lock brake system, trac-
tion control function and Active Stability Control
function.
Anti-lock brake system (ABS) ® p. 4-39
Active Traction Control function ® p. 4-43
Active Stability Control function ® p. 4-43CAUTIONl Do not over-rely on the ASTC. This sys-
tem, like any other system, has limits and
cannot help you to maintain traction and
control of the vehicle in all circumstan-
ces. Reckless driving may lead to acci-
dents. Always drive carefully, taking into
account the traffic, road and environmen-
tal conditions.
l Be sure to use the same specified type and
size of tyre on all 4 wheels. Otherwise, the
ASTC may not work correctly.
NOTE
l After your vehicle is driven a short distance
after starting the engine, a click is heard from
the engine compartment; however, this is on-
ly the sound of ASTC being checked.
l Some vibration will be felt in the vehicle
body and a whining sound of a motor will be
heard from the engine compartment when
the ASTC functions. This is a normal result
of the ASTC operation, and does not indicate
a malfunction.
l The ASTC does not operate while the ABS
warning lamp is illuminated.
l On vehicles with the rear differential lock,
the ASTC and ABS functions are suspended
while the rear differential lock is activated.
ASTC indication lamp, ASTC OFF indica-
tion lamp and ABS warning lamp are illumi-
nated while these functions are suspended. It
does not indicate a problem. When the rear
differential lock is disengaged, these lamps
go out and function again.
Refer to “ABS warning lamp” on page 4-40,
“ ASTC indication lamp, ASTC OFF indica-
tion lamp” on page 4-43.Driving hints E00616800039
When extricating the vehicle from mud, sand or
fresh snow, you may find that operation of the
ASTC prevents the engine speed from increasing
in response to depression of the accelerator pedal.
If this happens and the vehicle remains stuck as a
result, deactivate the ASC function by pressing the
“ASC OFF” switch. The vehicle will then be easier
to extricate. (Brake control of the ATC function is
still working to prevent wheel spins when the ASC
function is deactivated by pressing the “ASC OFF”
switch.)
Starting and driving
4-42 OKTE14E2
4
Page 168 of 362
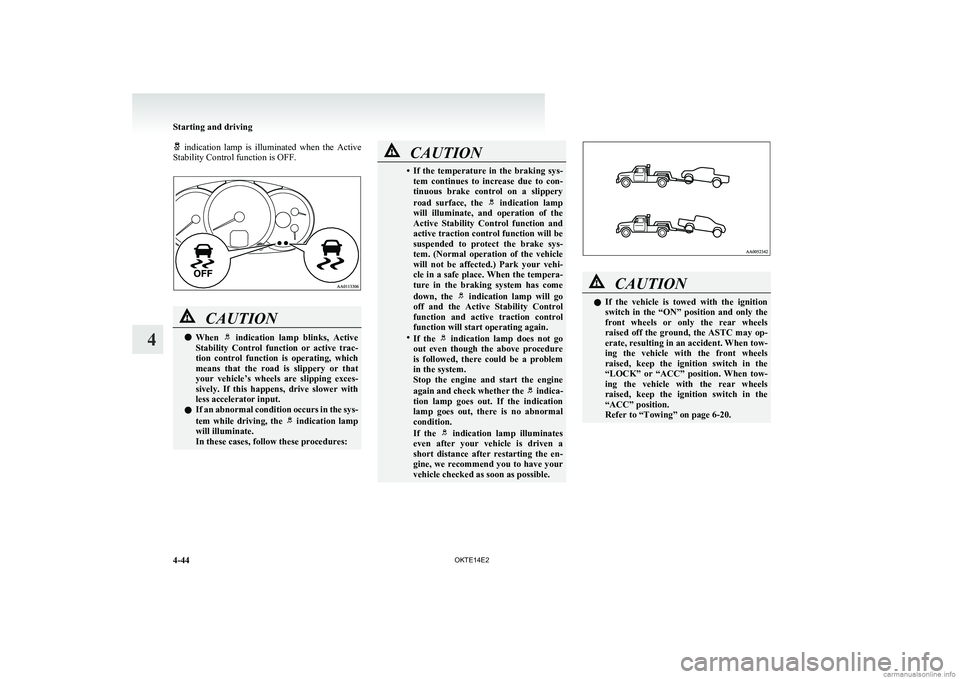
indication lamp is illuminated when the Active
Stability Control function is OFF.CAUTIONl When indication lamp blinks, Active
Stability Control function or active trac-
tion control function is operating, which
means that the road is slippery or that
your vehicle’s wheels are slipping exces-
sively. If this happens, drive slower with
less accelerator input.
l If an abnormal condition occurs in the sys-
tem while driving, the
indication lamp
will illuminate.
In these cases, follow these procedures:
CAUTION• If the temperature in the braking sys-
tem continues to increase due to con-
tinuous brake control on a slippery
road surface, the
indication lamp
will illuminate, and operation of the
Active Stability Control function and
active traction control function will be
suspended to protect the brake sys-
tem. (Normal operation of the vehicle
will not be affected.) Park your vehi-
cle in a safe place. When the tempera-
ture in the braking system has come
down, the
indication lamp will go
off and the Active Stability Control
function and active traction control
function will start operating again.
• If the
indication lamp does not go
out even though the above procedure
is followed, there could be a problem
in the system.
Stop the engine and start the engine
again and check whether the
indica-
tion lamp goes out. If the indication
lamp goes out, there is no abnormal
condition.
If the
indication lamp illuminates
even after your vehicle is driven a
short distance after restarting the en-
gine, we recommend you to have your
vehicle checked as soon as possible.
CAUTIONl If the vehicle is towed with the ignition
switch in the “ON” position and only the
front wheels or only the rear wheels
raised off the ground, the ASTC may op-
erate, resulting in an accident. When tow-
ing the vehicle with the front wheels
raised, keep the ignition switch in the
“LOCK” or “ACC” position. When tow-
ing the vehicle with the rear wheels
raised, keep the ignition switch in the
“ACC” position.
Refer to “Towing” on page 6-20.
Starting and driving
4-44 OKTE14E2
4
Page 189 of 362
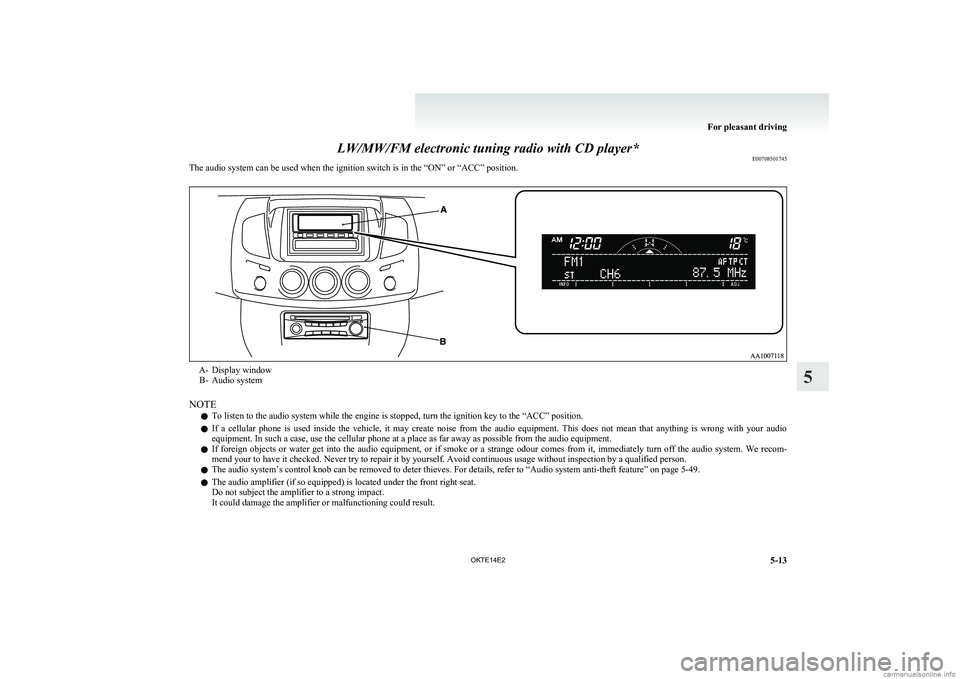
LW/MW/FM electronic tuning radio with CD player*E00708501745
The audio system can be used when the ignition switch is in the “ON” or “ACC” position.A- Display window
B- Audio system
NOTE
l To listen to the audio system while the engine is stopped, turn the ignition key to the “ACC” position.
l If a cellular phone is used inside the vehicle, it may create noise from the audio equipment. This does not mean that anything is wrong with your audio
equipment. In such a case, use the cellular phone at a place as far away as possible from the audio equipment.
l If foreign objects or water get into the audio equipment, or if smoke or a strange odour comes from it, immediately turn off the audio system. We recom-
mend your to have it checked. Never try to repair it by yourself. Avoid continuous usage without inspection by a qualified person.
l The audio system’s control knob can be removed to deter thieves. For details, refer to “Audio system anti-theft feature” on page 5-49.
l The audio amplifier (if so equipped) is located under the front right seat.
Do not subject the amplifier to a strong impact.
It could damage the amplifier or malfunctioning could result.
For pleasant driving
5-13
OKTE14E2
5
Page 260 of 362
If the vehicle breaks downE00800101166
If the vehicle breaks down on the road, move it to
the shoulder and use the hazard warning flashers and/
or the warning triangle etc.
Refer to “Hazard warning flasher switch” on page
3-34.
If the engine stops/fails
Vehicle operation and control are affected if the en-
gine stops.
Before moving the vehicle to a safe area, be aware
of the following:
l The brake booster becomes inoperative and
the pedal effort will increase. Press down the
brake pedal harder than usual.
l Since the power steering pump is no longer
operative, the steering wheel feels heavy
when turning it.Emergency starting E00800502112
If the engine cannot be started because the battery
is weak or dead, the battery from another vehicle
can be used with jumper cables to start the engine.WARNINGl To start the engine using jumper cables
connected from another vehicle, perform
the correct procedures according to the in-
struction manual. Incorrect procedures
could result in a fire or explosion or dam-
age to the vehicles.
1. Get the vehicles close enough so the jumper
cables can reach, but be sure the vehicles
aren’t touching each other.
If they are, it could cause a ground connec-
tion you don’t want. The vehicle will not
start, and the bad grounding could damage
the electrical systems.
CAUTIONl Check the other vehicle. It must have a 12-
volt battery.
If the other system isn’t 12-volt, shorting
can damage both vehicles.
2. You could be injured if the vehicles move.
Set the parking brake firmly on each vehicle.
Put an automatic transmission in “P”
(PARK) or a manual transmission in “N”
(Neutral). Turn off the ignition switch.
WARNINGl Turn off the ignition on both vehicles be-
forehand.
Make sure that the cables or your clothes
cannot be caught by the fan or drive belt.
Personal injury could result.
NOTE
l Turn off all lamps, heater and other electrical
loads. This will avoid sparks and help save
both batteries.
3. Make sure battery electrolyte is at the proper
level.
Refer to “Battery” on page 8-10.
WARNINGl If electrolyte fluid is not visible, or ap-
pears to be frozen, Do Not Attempt Jump
Starting!
A battery might rupture or explode if the
temperature is below the freezing point
or if it is not filled to the proper level.
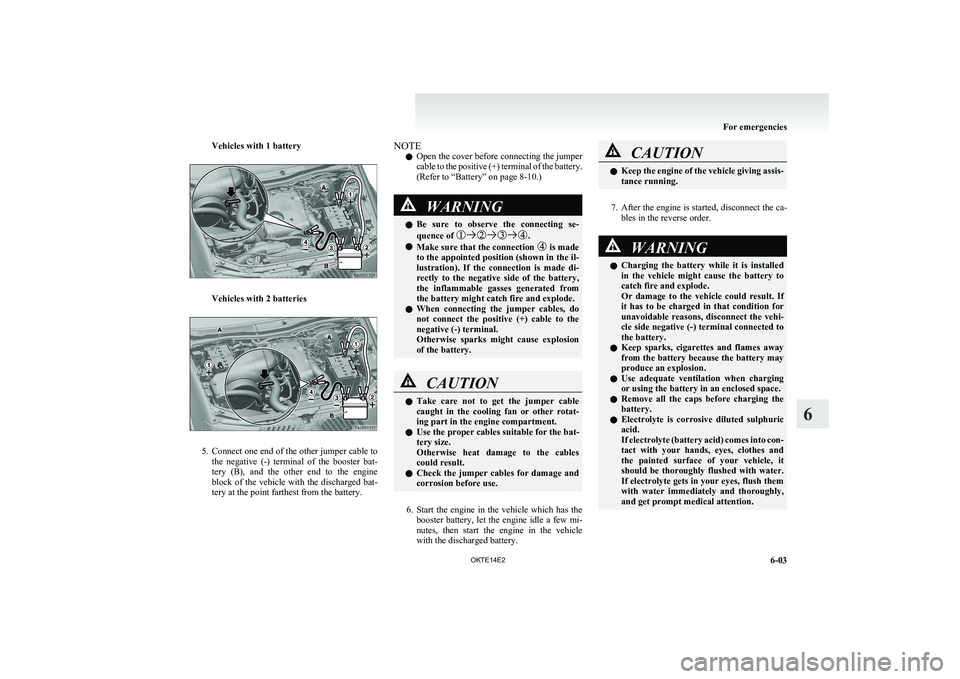
4. Connect one end of one jumper cable to the
positive (+) terminal of the discharged bat-
tery (A), and the other end to the positive (+)
terminal of the booster battery (B).
For emergencies
6-02 OKTE14E2
6
Page 261 of 362
Vehicles with 1 battery
Vehicles with 2 batteries
5.Connect one end of the other jumper cable to
the negative (-) terminal of the booster bat-
tery (B), and the other end to the engine
block of the vehicle with the discharged bat-
tery at the point farthest from the battery.
NOTE
l Open the cover before connecting the jumper
cable to the positive (+) terminal of the battery.
(Refer to “Battery” on page 8-10.)WARNINGl Be sure to observe the connecting se-
quence of .
l Make sure that the connection is made
to the appointed position (shown in the il-
lustration). If the connection is made di-
rectly to the negative side of the battery,
the inflammable gasses generated from
the battery might catch fire and explode.
l When connecting the jumper cables, do
not connect the positive (+) cable to the
negative (-) terminal.
Otherwise sparks might cause explosion
of the battery.
CAUTIONl Take care not to get the jumper cable
caught in the cooling fan or other rotat-
ing part in the engine compartment.
l Use the proper cables suitable for the bat-
tery size.
Otherwise heat damage to the cables
could result.
l Check the jumper cables for damage and
corrosion before use.
6. Start the engine in the vehicle which has the
booster battery, let the engine idle a few mi-
nutes, then start the engine in the vehicle
with the discharged battery.
CAUTIONl Keep the engine of the vehicle giving assis-
tance running.
7. After the engine is started, disconnect the ca-
bles in the reverse order.
WARNINGl Charging the battery while it is installed
in the vehicle might cause the battery to
catch fire and explode.
Or damage to the vehicle could result. If
it has to be charged in that condition for
unavoidable reasons, disconnect the vehi-
cle side negative (-) terminal connected to
the battery.
l Keep sparks, cigarettes and flames away
from the battery because the battery may
produce an explosion.
l Use adequate ventilation when charging
or using the battery in an enclosed space.
l Remove all the caps before charging the
battery.
l Electrolyte is corrosive diluted sulphuric
acid.
If electrolyte (battery acid) comes into con-
tact with your hands, eyes, clothes and
the painted surface of your vehicle, it
should be thoroughly flushed with water.
If electrolyte gets in your eyes, flush them
with water immediately and thoroughly,
and get prompt medical attention.
For emergencies
6-03
OKTE14E2
6
Page 262 of 362
CAUTIONlDo not attempt to start the engine by pull-
ing or pushing the vehicle.
It could damage your vehicle.
l Always wear protective eye goggles when
working near the battery.
l Keep the battery out of the reach of chil-
dren.
NOTE
l On vehicles with anti-lock brake system, if
the vehicle is put in motion without fully
charging the battery, it might cause the loss
of smooth engine operation and the antilock
brake warning lamp to illuminate.
Refer to “Anti-lock brake system (ABS)” on
page 4-39.
Engine overheating E00800602777
If the water temperature gauge indication remains
in the overheating zone for a long time, the engine
may be overheating. If this occurs, take the follow-
ing corrective measures: 1. Stop the vehicle in a safe place.
2. Check whether steam is coming from the en-
gine compartment.
[ If steam does not come from the engine com-
partment]
With the engine still running, raise the bon-
net to ventilate the engine compartment.
[If steam is coming from the engine compart-
ment]
Stop the engine, and when the steam stops,
raise the bonnet to ventilate the engine com-
partment. Restart the engine.WARNINGl Do not open the bonnet while steam is com-
ing from the engine compartment. It
could cause steam or hot water to spurt
out, causing burns. Hot water could spurt
out even when there is no steam coming
out, and some parts will be very hot. Be
very careful when opening the bonnet.
l Be careful of hot steam, which could be
blowing off the reserve tank cap.
l Do not attempt to remove the radiator
cap while the engine is hot.
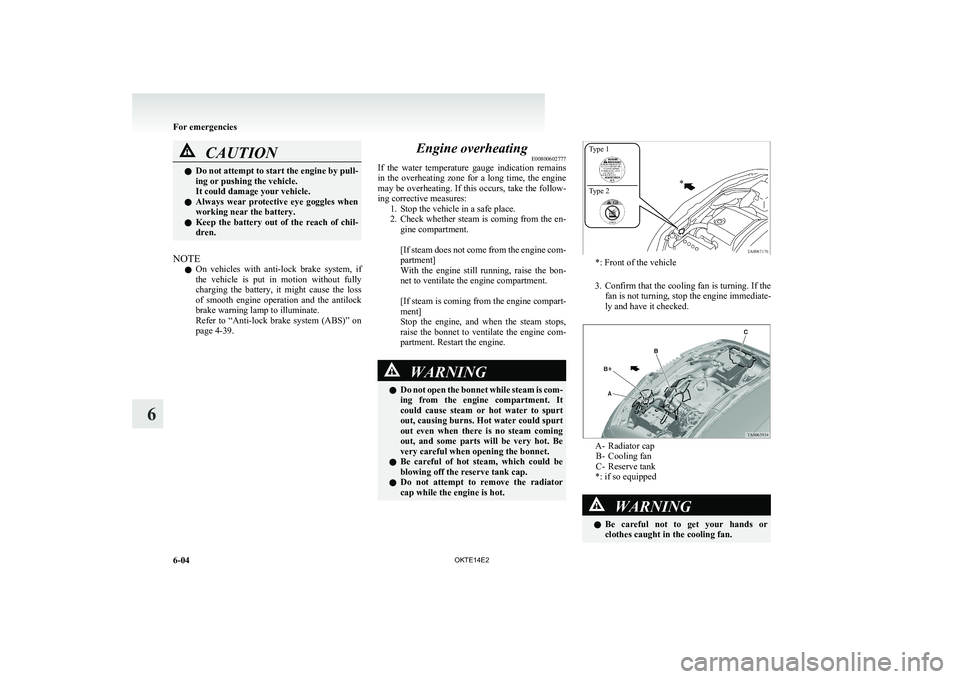
*: Front of the vehicle
3. Confirm that the cooling fan is turning. If the
fan is not turning, stop the engine immediate-
ly and have it checked.
A- Radiator cap B- Cooling fan
C- Reserve tank
*: if so equipped
WARNINGl Be careful not to get your hands or
clothes caught in the cooling fan.
For emergencies
6-04 OKTE14E2
6 Type 1
Type 2
Page 263 of 362
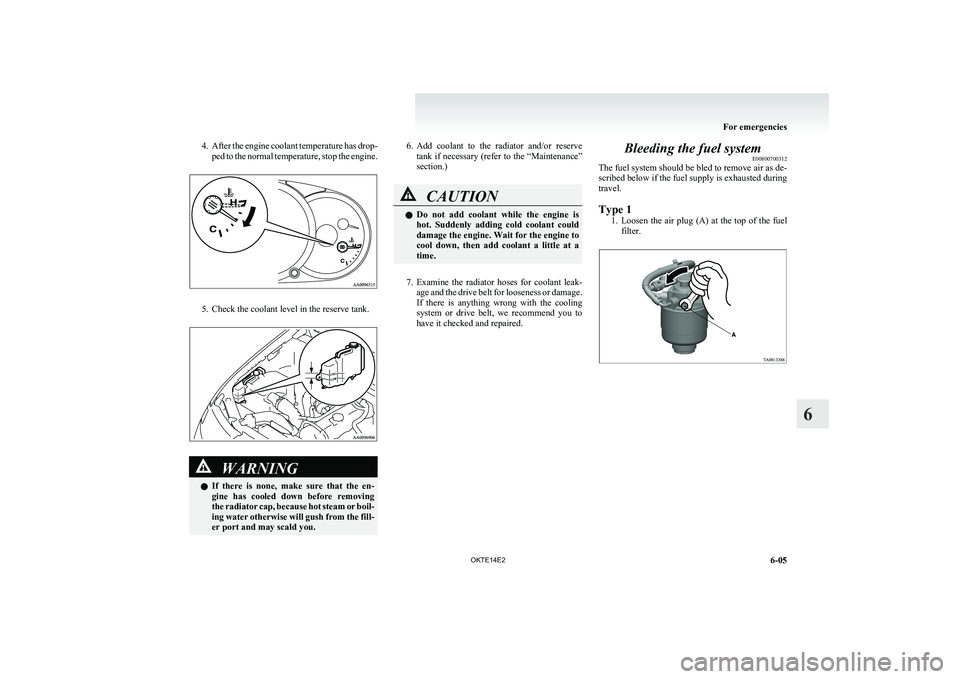
4.After the engine coolant temperature has drop-
ped to the normal temperature, stop the engine.
5. Check the coolant level in the reserve tank.
WARNINGl If there is none, make sure that the en-
gine has cooled down before removing
the radiator cap, because hot steam or boil-
ing water otherwise will gush from the fill-
er port and may scald you.6. Add coolant to the radiator and/or reserve
tank if necessary (refer to the “Maintenance”
section.)CAUTIONl Do not add coolant while the engine is
hot. Suddenly adding cold coolant could
damage the engine. Wait for the engine to
cool down, then add coolant a little at a
time.
7. Examine the radiator hoses for coolant leak-
age and the drive belt for looseness or damage.
If there is anything wrong with the cooling
system or drive belt, we recommend you to
have it checked and repaired.
Bleeding the fuel system E00800700312
The fuel system should be bled to remove air as de-
scribed below if the fuel supply is exhausted during
travel.
Type 1 1.Loosen the air plug (A) at the top of the fuel
filter.
For emergencies
6-05
OKTE14E2
6
Page 264 of 362
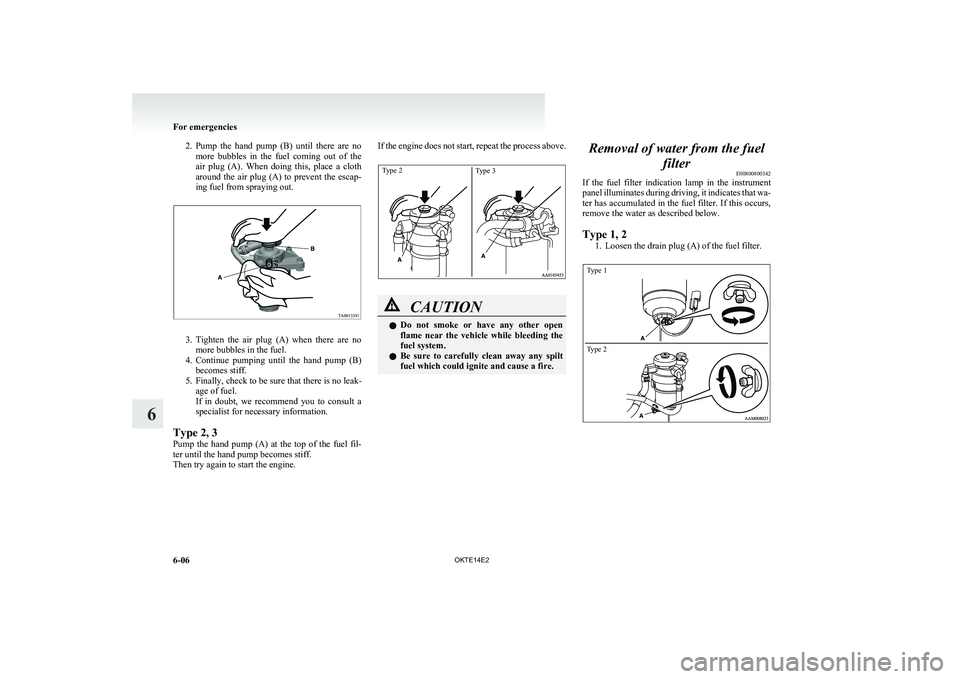
2.Pump the hand pump (B) until there are no
more bubbles in the fuel coming out of the
air plug (A). When doing this, place a cloth
around the air plug (A) to prevent the escap-
ing fuel from spraying out.
3. Tighten the air plug (A) when there are no
more bubbles in the fuel.
4. Continue pumping until the hand pump (B)
becomes stiff.
5. Finally, check to be sure that there is no leak- age of fuel.
If in doubt, we recommend you to consult a
specialist for necessary information.
Type 2, 3
Pump the hand pump (A) at the top of the fuel fil-
ter until the hand pump becomes stiff.
Then try again to start the engine.
If the engine does not start, repeat the process above.Type 2Type 3
CAUTIONl Do not smoke or have any other open
flame near the vehicle while bleeding the
fuel system.
l Be sure to carefully clean away any spilt
fuel which could ignite and cause a fire.Removal of water from the fuel
filterE00800800342
If the fuel filter indication lamp in the instrument
panel illuminates during driving, it indicates that wa-
ter has accumulated in the fuel filter. If this occurs,
remove the water as described below.
Type 1, 2 1. Loosen the drain plug (A) of the fuel filter.
Type 1Type 2
For emergencies
6-06 OKTE14E2
6