roof MITSUBISHI L200 2014 (in English) User Guide
[x] Cancel search | Manufacturer: MITSUBISHI, Model Year: 2014, Model line: L200, Model: MITSUBISHI L200 2014Pages: 362, PDF Size: 20.97 MB
Page 83 of 362
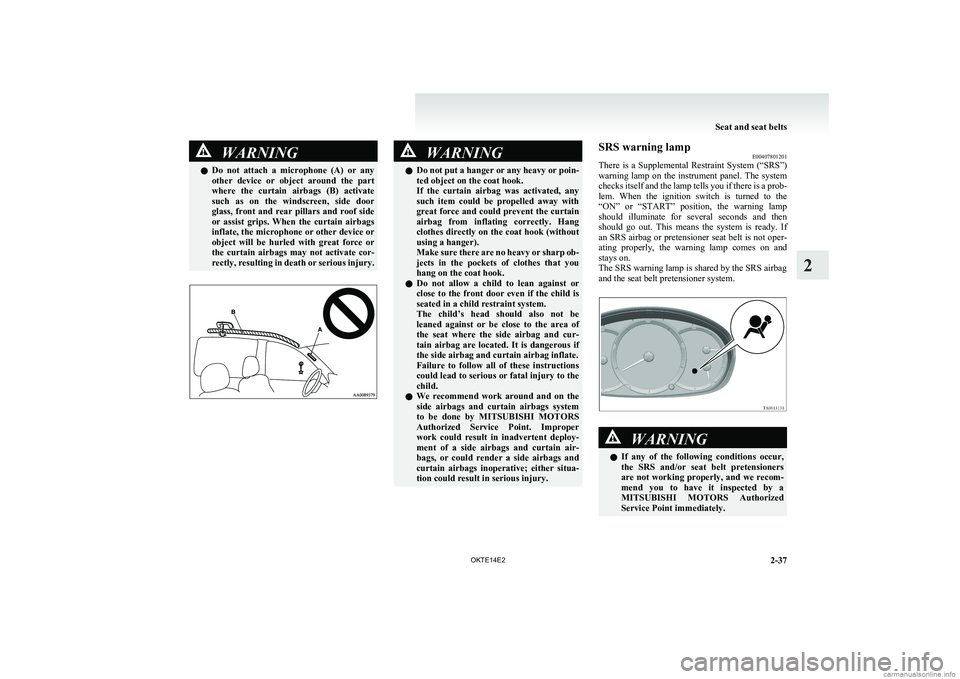
WARNINGlDo not attach a microphone (A) or any
other device or object around the part
where the curtain airbags (B) activate
such as on the windscreen, side door
glass, front and rear pillars and roof side
or assist grips. When the curtain airbags
inflate, the microphone or other device or
object will be hurled with great force or
the curtain airbags may not activate cor-
rectly, resulting in death or serious injury.WARNINGl Do not put a hanger or any heavy or poin-
ted object on the coat hook.
If the curtain airbag was activated, any
such item could be propelled away with
great force and could prevent the curtain
airbag from inflating correctly. Hang
clothes directly on the coat hook (without
using a hanger).
Make sure there are no heavy or sharp ob-
jects in the pockets of clothes that you
hang on the coat hook.
l Do not allow a child to lean against or
close to the front door even if the child is
seated in a child restraint system.
The child’s head should also not be
leaned against or be close to the area of
the seat where the side airbag and cur-
tain airbag are located. It is dangerous if
the side airbag and curtain airbag inflate.
Failure to follow all of these instructions
could lead to serious or fatal injury to the
child.
l We recommend work around and on the
side airbags and curtain airbags system
to be done by MITSUBISHI MOTORS
Authorized Service Point. Improper
work could result in inadvertent deploy-
ment of a side airbags and curtain air-
bags, or could render a side airbags and
curtain airbags inoperative; either situa-
tion could result in serious injury.SRS warning lamp E00407801201
There is a Supplemental Restraint System (“SRS”)
warning lamp on the instrument panel. The system
checks itself and the lamp tells you if there is a prob-
lem. When the ignition switch is turned to the
“ON” or “START” position, the warning lamp
should illuminate for several seconds and then
should go out. This means the system is ready. If
an SRS airbag or pretensioner seat belt is not oper-
ating properly, the warning lamp comes on and
stays on.
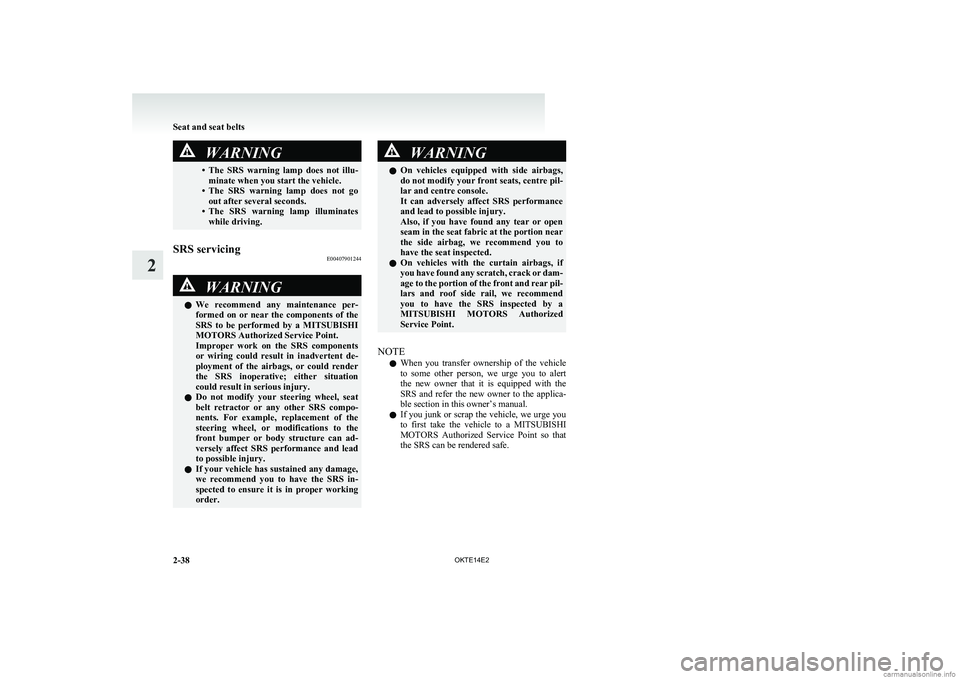
The SRS warning lamp is shared by the SRS airbag
and the seat belt pretensioner system.WARNINGl If any of the following conditions occur,
the SRS and/or seat belt pretensioners
are not working properly, and we recom-
mend you to have it inspected by a
MITSUBISHI MOTORS Authorized
Service Point immediately.
Seat and seat belts
2-37
OKTE14E2
2
Page 84 of 362
WARNING•The SRS warning lamp does not illu-
minate when you start the vehicle.
• The SRS warning lamp does not go
out after several seconds.
• The SRS warning lamp illuminates
while driving.SRS servicing E00407901244WARNINGlWe recommend any maintenance per-
formed on or near the components of the
SRS to be performed by a MITSUBISHI
MOTORS Authorized Service Point.
Improper work on the SRS components
or wiring could result in inadvertent de-
ployment of the airbags, or could render
the SRS inoperative; either situation
could result in serious injury.
l Do not modify your steering wheel, seat
belt retractor or any other SRS compo-
nents. For example, replacement of the
steering wheel, or modifications to the
front bumper or body structure can ad-
versely affect SRS performance and lead
to possible injury.
l If your vehicle has sustained any damage,
we recommend you to have the SRS in-
spected to ensure it is in proper working
order.WARNINGl On vehicles equipped with side airbags,
do not modify your front seats, centre pil-
lar and centre console.
It can adversely affect SRS performance
and lead to possible injury.
Also, if you have found any tear or open
seam in the seat fabric at the portion near
the side airbag, we recommend you to
have the seat inspected.
l On vehicles with the curtain airbags, if
you have found any scratch, crack or dam-
age to the portion of the front and rear pil-
lars and roof side rail, we recommend
you to have the SRS inspected by a
MITSUBISHI MOTORS Authorized
Service Point.
NOTE
l When you transfer ownership of the vehicle
to some other person, we urge you to alert
the new owner that it is equipped with the
SRS and refer the new owner to the applica-
ble section in this owner’s manual.
l If you junk or scrap the vehicle, we urge you
to first take the vehicle to a MITSUBISHI
MOTORS Authorized Service Point so that
the SRS can be rendered safe.
Seat and seat belts
2-38 OKTE14E2
2
Page 106 of 362
3.When the declination adjustment has been
completed, press the “SET” function button.
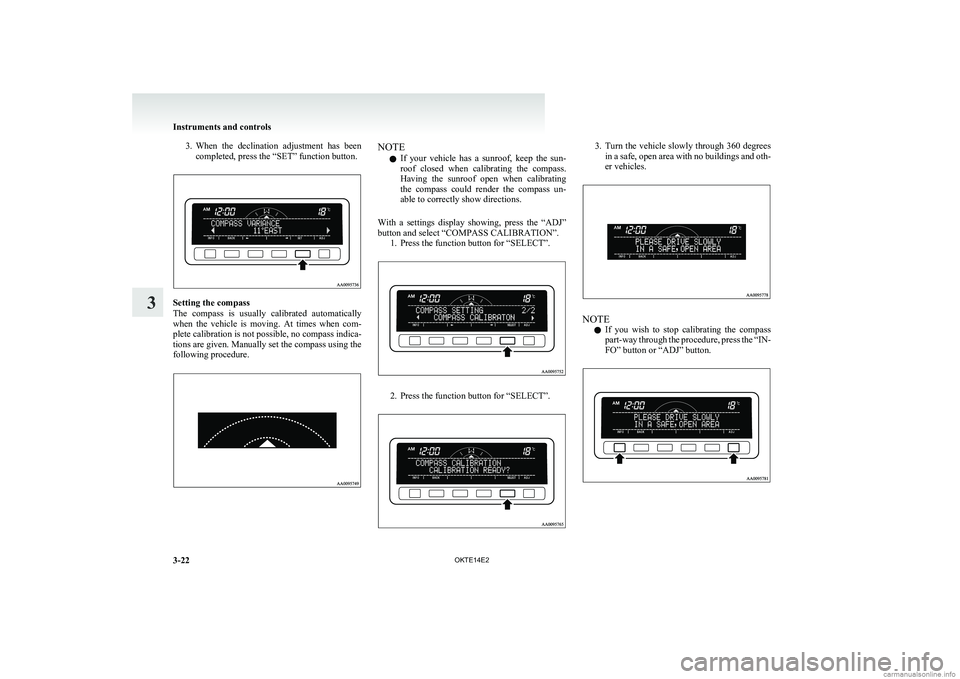
Setting the compass
The compass is usually calibrated automatically
when the vehicle is moving. At times when com-
plete calibration is not possible, no compass indica-
tions are given. Manually set the compass using the
following procedure.
NOTE
l If your vehicle has a sunroof, keep the sun-
roof closed when calibrating the compass.
Having the sunroof open when calibrating
the compass could render the compass un-
able to correctly show directions.
With a settings display showing, press the “ADJ”
button and select “COMPASS CALIBRATION”. 1. Press the function button for “SELECT”.
2. Press the function button for “SELECT”.
3.Turn the vehicle slowly through 360 degrees
in a safe, open area with no buildings and oth-
er vehicles.
NOTE
l If you wish to stop calibrating the compass
part-way through the procedure, press the “IN-
FO” button or “ADJ” button.
Instruments and controls
3-22 OKTE14E2
3
Page 160 of 362
Crossing a stream
4-wheel drive vehicles are not necessarily water-
proof. If the electrical circuits become wet, further
operation of the vehicle will be impossible; there-
fore, avoid crossing streams unless absolutely nec-
essary. If crossing a stream is unavoidable, use the
following procedure: 1.Check depths of a stream and geographical
features before attempting to cross a stream
and ford the stream where the water is as shal-
low as practicable.
2. Set the transfer shift lever to “4L” position
(easy select 4WD), “4LLc” position (super se-
lect 4WD).
3. Drive slowly at a speed of approximately
5 km/h (3 mph) to avoid splashing too much
water.CAUTIONl Never cross a stream where the water is
deep.
Do not change gears while crossing the
stream.
Frequent crossing of streams can adverse-
ly affect the life span of the vehicle; we rec-
ommend you to take the necessary meas-
ures to prepare, inspect, and repair the ve-
hicle.
After crossing a stream, apply the brakes to be sure
they are functioning properly. If the brakes are wet
and not functioning properly, dry them out by driv-
ing slowly while lightly depressing the brake pedal.
Inspect each part of the vehicle carefully.
Inspection and maintenance
following rough road operation E00606700048
After operating the vehicle in rough road condi-
tions, be sure to perform the following inspection
and maintenance procedures:
l Check that the vehicle has not been damaged
by rocks, gravel, etc.
l Carefully wash the vehicle with water.
After washing, drive the vehicle slowly
while lightly depressing the brake pedal in or-
der to dry out the brakes. If the brakes still
do not function properly, we recommend you
to have the brakes checked as soon as possible.
l Remove the insects, dried grass, etc. clog-
ging the radiator core.
l After crossing a stream, be sure to have the
following items inspected at a MITSUBISHI
MOTORS Authorized Service Point and take
the necessary measures. •Check the brake system and, if necessary,
have it serviced.
• Check the engine, transmission, transfer,
and differential oil or grease level and tur-
bidity. If the oil or grease is milky, it indi-
cates water contamination. Replace it
with new oil or grease.
• Grease the propeller shaft.
• Check the inside of the vehicle. If ingress
of water is found, dry the carpet etc.
• Inspect the headlamps. If the headlamp
bulb is flooded with water, we recom-
mend you to have it drained.Cautions on handling of 4-wheel
drive vehicles E00606800368
Tyres and wheels
Since the driving torque can be applied to the 4
wheels, the performance of the vehicle when oper-
ating in 4-wheel drive is greatly affected by the con-
dition of the tyres.
Pay close attention to the tyres.
l Install specified tyres on all wheels. Refer to
“Tyres and wheels” on page 9-17.
l Be sure to fit all 4 tyres and wheels of the
same size and type.
When replacement of any of the tyres or
wheels is necessary, replace all of them.
l All tyres should be rotated whenever the
wear difference between the front and rear
tyres is recognizable.
Good vehicle performance cannot be expected if
there is a difference in wear between tyres. Refer to
“Tyre rotation” on page 8-13.
l Check the tyre inflation pressure regularly.
Starting and driving
4-36
OKTE14E2
4
Page 227 of 362
lThe unit may not successfully play back a
CD-R/RW that was made by the combina-
tion of writing software, a CD recorder
(CD-R/RW drive) and a disc if they are in-
compatible with one another.
l This player cannot play the
CD-R/RW discs
if the session is not closed.
l This player cannot play
CD-R/RW discs
which contain other than CD-DA or MP3 da-
ta (Video CD, etc.).
l Be sure to observe the handling instructions
for the CD-R/RW disc.WARNINGl Operating the CD player in a manner oth-
er than specifically instructed herein may
result in hazardous radiation exposure.
Do not remove the cover and attempt to
repair the CD player by yourself. There
are no user serviceable parts inside. In
case of malfunction, we recommend you
to have it checked.Antenna E00710500022Pillar antenna* E00710700109
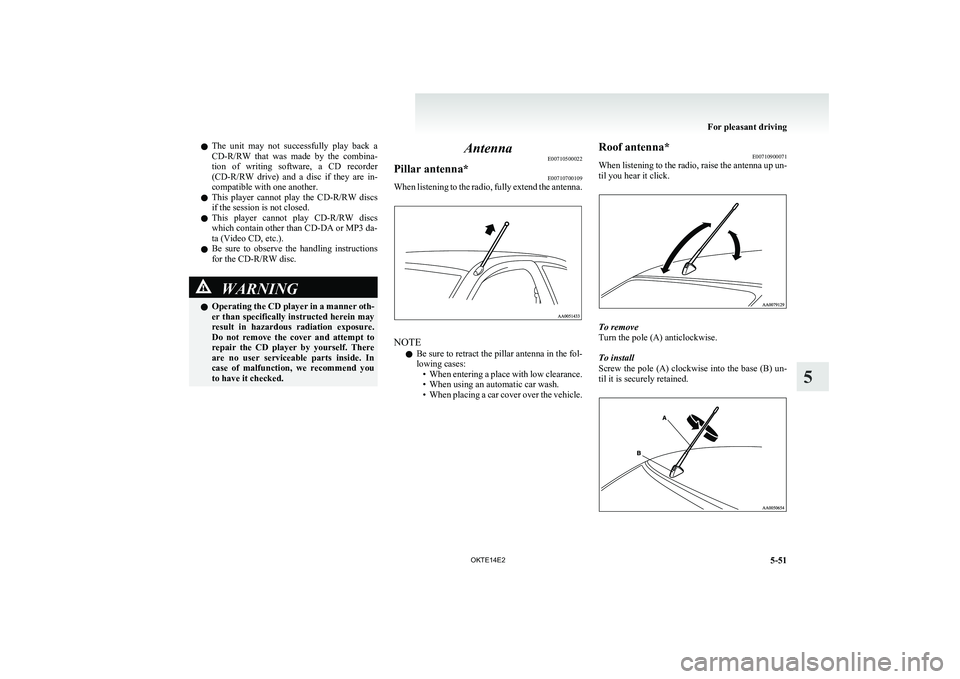
When listening to the radio, fully extend the antenna.
NOTE
l Be sure to retract the pillar antenna in the fol-
lowing cases: •When entering a place with low clearance.
• When using an automatic car wash.
• When placing a car cover over the vehicle.
Roof antenna*
E00710900071
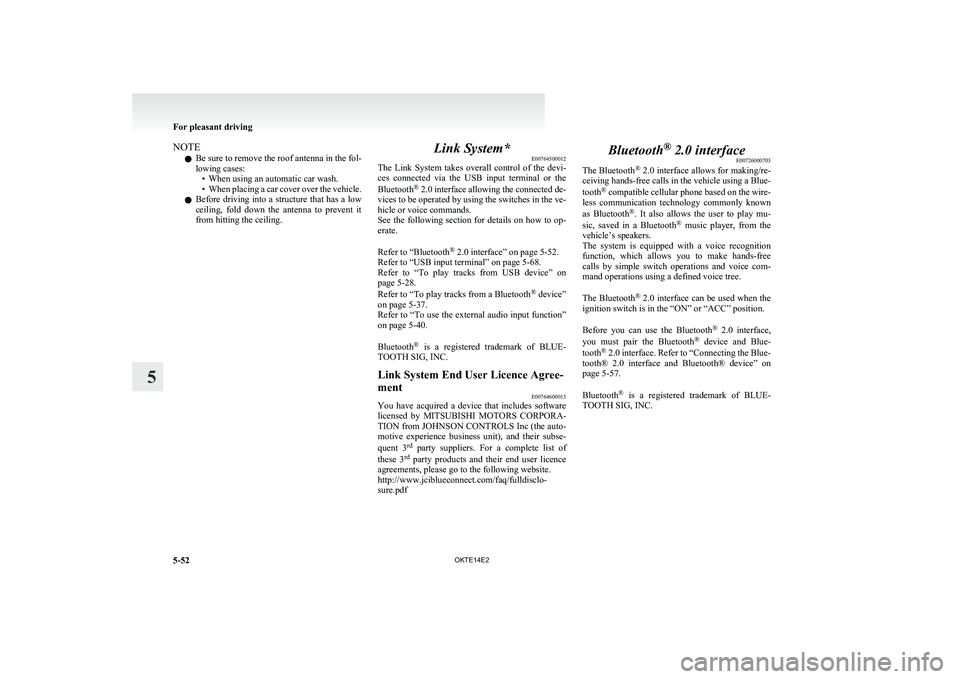
When listening to the radio, raise the antenna up un-
til you hear it click.
To remove
Turn the pole (A) anticlockwise.
To install
Screw the pole (A) clockwise into the base (B) un-
til it is securely retained.
For pleasant driving
5-51
OKTE14E2
5
Page 228 of 362
NOTEl Be sure to remove the roof antenna in the fol-
lowing cases: • When using an automatic car wash.
• When placing a car cover over the vehicle.
l Before driving into a structure that has a low
ceiling, fold down the antenna to prevent it
from hitting the ceiling.Link System* E00764500012
The Link System takes overall control of the devi-
ces connected via the USB input terminal or the
Bluetooth ®
2.0 interface allowing the connected de-
vices to be operated by using the switches in the ve-
hicle or voice commands.
See the following section for details on how to op-
erate.
Refer to “Bluetooth ®
2.0 interface” on page 5-52.
Refer to “USB input terminal” on page 5-68.
Refer to “To play tracks from USB device” on
page 5-28.
Refer to “To play tracks from a Bluetooth ®
device”
on page 5-37.
Refer to “To use the external audio input function”
on page 5-40.
Bluetooth ®
is a registered trademark of BLUE-
TOOTH SIG, INC.Link System End User Licence Agree-
ment E00764600013
You have acquired a device that includes software
licensed by MITSUBISHI MOTORS CORPORA-
TION from JOHNSON CONTROLS Inc (the auto-
motive experience business unit), and their subse-
quent 3 rd
party suppliers. For a complete list of
these 3 rd
party products and their end user licence
agreements, please go to the following website.
http://www.jciblueconnect.com/faq/fulldisclo-
sure.pdf
Bluetooth ®
2.0 interface
E00726000703
The Bluetooth ®
2.0 interface allows for making/re-
ceiving hands-free calls in the vehicle using a Blue-
tooth ®
compatible cellular phone based on the wire-
less communication technology commonly known
as Bluetooth ®
. It also allows the user to play mu-
sic, saved in a Bluetooth ®
music player, from the
vehicle’s speakers.
The system is equipped with a voice recognition
function, which allows you to make hands-free
calls by simple switch operations and voice com-
mand operations using a defined voice tree.
The Bluetooth ®
2.0 interface can be used when the
ignition switch is in the “ON” or “ACC” position.
Before you can use the Bluetooth ®
2.0 interface,
you must pair the Bluetooth ®
device and Blue-
tooth ®
2.0 interface. Refer to “Connecting the Blue-
tooth® 2.0 interface and Bluetooth® device” on
page 5-57.
Bluetooth ®
is a registered trademark of BLUE-
TOOTH SIG, INC.
For pleasant driving
5-52 OKTE14E2
5
Page 288 of 362
CAUTIONlAfter washing the vehicle, drive the vehi-
cle slowly while lightly depressing the
brake pedal several times in order to dry
out the brakes.
Leaving the brakes wet could result in re-
duced braking performance. Also, there
is a possibility that they could freeze up
or become inoperative due to rust, render-
ing the vehicle unable to move.
l When using an automatic car wash, pay
attention to the following items, referring
to the operation manual or consulting a
car wash operator. If the following proce-
dure is not followed, it could result in dam-
age to your vehicle. • The outside mirrors are retracted.
• If your vehicle is equipped with the pil-
lar antenna, it can be retracted.
• If your vehicle is equipped with the
roof antenna, it can be removed.
During cold weather
Salt and other chemicals spread on the roads in
some areas in winter can have a harmful effect on
the vehicle body. You should therefore wash the ve-
hicle as often as possible in accordance with our
care-instructions. It is recommended to have a pres-
ervative applied and the underfloor protection
checked before and after the cold weather season.
After washing your vehicle, wipe off all water-
drops from the rubber parts around the doors to pre-
vent the doors from freezing.
NOTE
l To prevent freezing of the weatherstripping
on the doors, bonnet, etc., they should be trea-
ted with silicone spray.Waxing E00901000687
Waxing the vehicle will help prevent the adherence
of dust and road chemicals to the paintwork. Apply
a wax solution after washing the vehicle, or at least
once every three months to assist displacing of water.
Do not wax your vehicle in direct sunlight. You
should wax after the surfaces have cooled.
CAUTIONl Waxes containing high abrasive com-
pounds should not be used. Such waxes re-
move rust and stains effectively from the
paintwork but they are harmful to the lus-
tre on the painted surface and the plated
surface.
Further, they are harmful to glossy surfa-
ces such as grille, garnish, mouldings, etc.
l Do not use petrol or paint thinners to re-
move road tar or other contamination to
the vehicle surface.
l Do not apply wax on the areas having
black mat coating as it can cause uneven
discolouration, patches, blurs, etc. If
stained with wax, immediately wipe off
with a piece of soft cloth and warm water.CAUTIONl On vehicles with a sunroof, be careful
when waxing the area around the sunroof
opening, not to put any wax on the weath-
erstrip (black rubber). If stained with
wax, the weatherstrip cannot maintain a
weatherproof seal with the sunroof.Polishing E00901100011
The vehicle should only be polished if the paint-
work has become stained or lost its lustre. Matt-fin-
ish parts and plastic bumpers must not be polished,
polishing these parts will stain them or damage
their finish.
Damaged paint E00901200155
Small cracks and scratches in the paint coat should
be touched up as soon as possible with
MITSUBISHI touch-up paint to prevent corrosion.
Check body areas facing the road or the tyres care-
fully for damage to the paint coat caused by flying
stones, etc. The paint code number for your vehicle
can be found on the vehicle information code plate.
(Refer to “Vehicle labeling” on page 9-02.)
Cleaning plastic parts E00901300446
Use a sponge or chamois leather.
If a car wax adheres on a grey or black rough sur-
face of the bumper, moulding or lamps, the surface
becomes white. In such a case, wipe it off using
lukewarm water and soft cloth or chamois leather.
Vehicle care
7-04 OKTE14E2
7
Page 289 of 362
CAUTIONlDo not use a scrubbing brush or other
hard tools as they may damage the plastic
part surface.
l Do not use wax containing compound (pol-
ishing powder) which may damage the
plastic part surface.
l Do not bring the plastic parts into contact
with petrol, light oil, brake fluids, engine
oils, greases, paint thinners, and sulphu-
ric acid (battery electrolyte) which may
crack, stain or discolour the plastic parts.
If they touch the plastic parts, wipe them
off with soft cloth, chamois or the like
and an aqueous solution of neutral deter-
gent then immediately rinse the affected
parts with water.Chrome parts E00901400014
In order to prevent spots and corrosion of chrome
parts, wash with water, dry thoroughly, and apply a
special protective coating. This should be done
more frequently in winter.
Aluminium wheels* E00901500116
1.Remove dirt using a sponge while sprinkling
water on the vehicle.
2. Use neutral detergent on any dirt that cannot
be removed easily with water.
Rinse off the neutral detergent after washing
the vehicle.
3. Dry the vehicle thoroughly using a chamois
leather or a soft cloth.
CAUTIONl Do not use a brush or other hard imple-
ment on the wheels.
Doing so could scratch the wheels.
l Do not use any cleaner that contains an
abrasive substance or is acidic or alka-
line. Doing so could cause the coating on
the wheels to peel or become discoloured
or stained.
l Do not directly apply hot water using a
steam cleaner or by any other means.
l Contact with seawater and road deicer
can cause corrosion. Rinse off such sub-
stances as soon as possible.Window glass E00901600058
The window glass can normally be cleaned using
only a sponge and water.
Glass cleaner can be used to remove oil, grease,
dead insects, etc. After washing the glass, wipe dry
with a clean, dry, soft cloth. Never use the same
cloth to wipe the window glass as would be used to
wipe the paintwork; wax from the painted surfaces
could adhere to the glass and reduce its transparen-
cy and visibility.
NOTE l To clean the inside of the rear window, al-
ways use a soft cloth and wipe the window
glass along the demister heater element so as
not to cause damage.
Wiper blades E00901700017
Use a soft cloth and glass cleaner to remove grease,
dead insects, etc., from the wiper blades. Replace
the wiper blades when they no longer wipe proper-
ly. (Refer to page “Wiper blades” on page 8-17.)Cleaning the sunroof* E00901800180
Clean the inside of the sunroof with a soft cloth.
Hard deposits should be wiped away with a cloth
dipped in warm, neutral detergent solution. Wipe
away the solution with a sponge dipped in fresh wa-
ter.
NOTE l The surface treatment on the inside of the
glass may be removed if hard cloth or organ-
ic solvent (benzine, kerosene, thinner, etc.) is
used.
Engine compartment E00902100265
Clean the engine compartment at the beginning and
end of winter. Pay particular attention to flanges,
crevices and peripheral parts where dust containing
road chemicals and other corrosive materials might
collect.
If salt and other chemicals are used on the roads in
your area, clean the engine compartment at least ev-
ery three months.
Never spray or splash water on the electrical com-
ponents in the engine compartment, as this may
cause damage.
Do not bring the nearby parts, the plastic parts and
so on into contact with sulphuric acid (battery elec-
trolyte) which may crack, stain or discolour them.
Vehicle care
7-05
OKTE14E2
7
Page 311 of 362
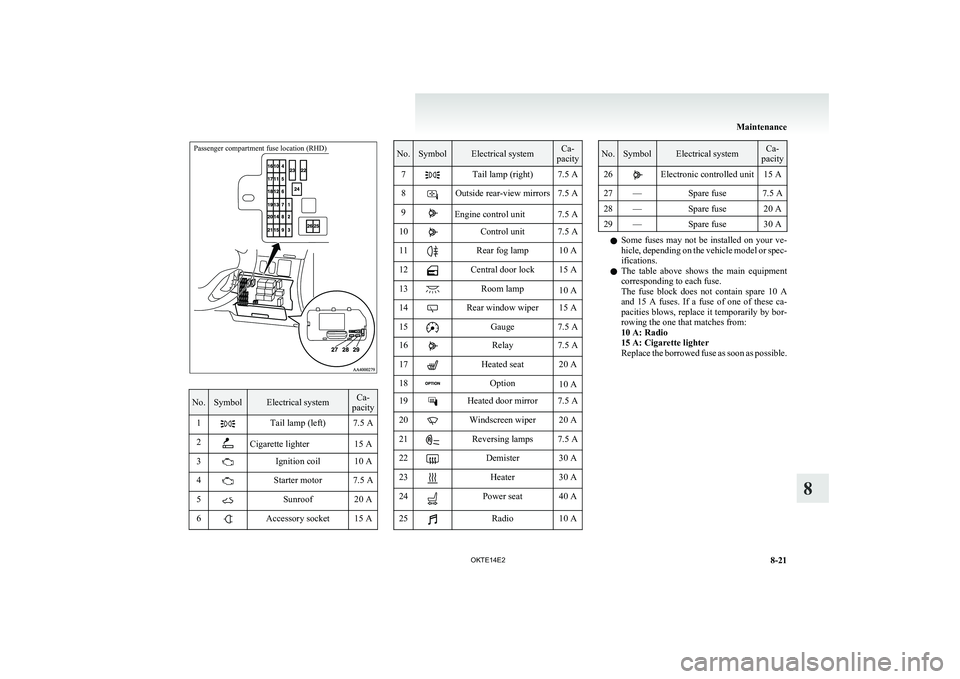
Passenger compartment fuse location (RHD)
No.SymbolElectrical systemCa-
pacity1Tail lamp (left)7.5 A2Cigarette lighter15 A3Ignition coil10 A4Starter motor7.5 A5Sunroof20 A6Accessory socket15 ANo.SymbolElectrical systemCa-
pacity7Tail lamp (right)7.5 A8Outside rear-view mirrors7.5 A9Engine control unit7.5 A10Control unit7.5 A11Rear fog lamp10 A12Central door lock15 A13Room lamp10 A14Rear window wiper15 A15Gauge7.5 A16Relay7.5 A17Heated seat20 A18Option10 A19Heated door mirror7.5 A20Windscreen wiper20 A21Reversing lamps7.5 A22Demister30 A23Heater30 A24Power seat40 A25Radio10 ANo.SymbolElectrical systemCa-
pacity26Electronic controlled unit15 A27—Spare fuse7.5 A28—Spare fuse20 A29—Spare fuse30 A
l Some fuses may not be installed on your ve-
hicle, depending on the vehicle model or spec-
ifications.
l The table above shows the main equipment
corresponding to each fuse.
The fuse block does not contain spare 10 A
and 15 A fuses. If a fuse of one of these ca-
pacities blows, replace it temporarily by bor-
rowing the one that matches from:
10 A: Radio
15 A: Cigarette lighter
Replace the borrowed fuse as soon as possible.
Maintenance
8-21
OKTE14E2
8
Page 349 of 362
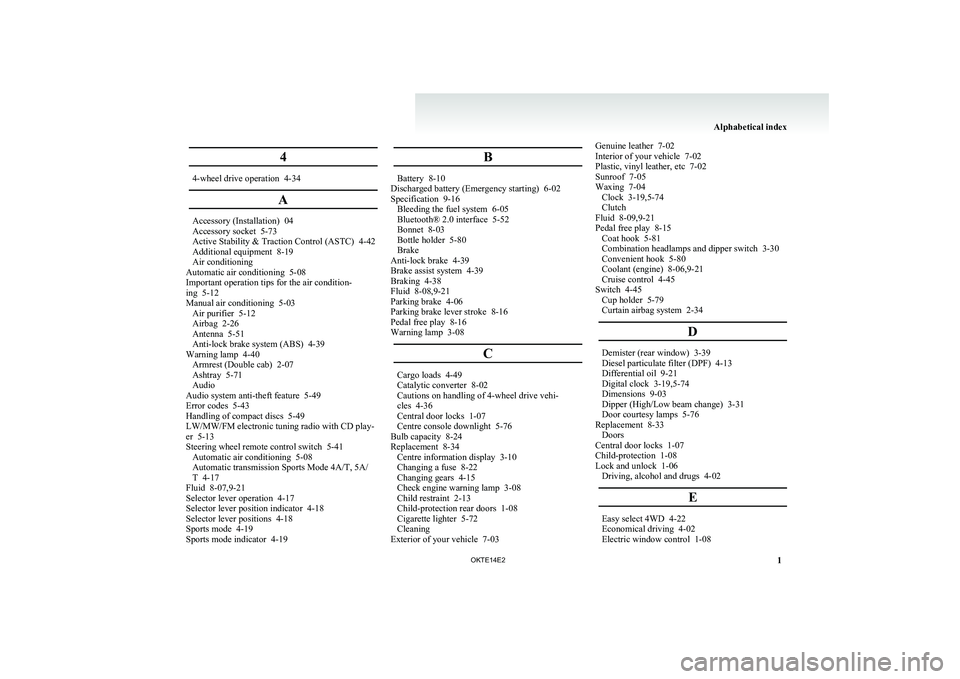
4
4-wheel drive operation 4-34
AAccessory (Installation) 04
Accessory socket 5-73
Active Stability & Traction Control (ASTC)
4-42
Additional equipment 8-19
Air conditioning
Automatic air conditioning 5-08
Important operation tips for the air condition-
ing 5-12
Manual air conditioning 5-03 Air purifier 5-12
Airbag 2-26
Antenna 5-51
Anti-lock brake system (ABS) 4-39
Warning lamp 4-40 Armrest (Double cab) 2-07
Ashtray 5-71
Audio
Audio system anti-theft feature 5-49
Error codes 5-43
Handling of compact discs 5-49
LW/MW/FM electronic tuning radio with CD play-
er 5-13
Steering wheel remote control switch 5-41 Automatic air conditioning 5-08
Automatic transmission Sports Mode 4A/T, 5A/
T 4-17
Fluid 8-07,9-21
Selector lever operation 4-17
Selector lever position indicator 4-18
Selector lever positions 4-18
Sports mode 4-19
Sports mode indicator 4-19 BBattery 8-10
Discharged battery (Emergency starting)
6-02
Specification 9-16 Bleeding the fuel system 6-05
Bluetooth® 2.0 interface 5-52
Bonnet 8-03
Bottle holder 5-80
Brake
Anti-lock brake 4-39
Brake assist system 4-39
Braking 4-38
Fluid 8-08,9-21
Parking brake 4-06
Parking brake lever stroke 8-16
Pedal free play 8-16
Warning lamp 3-08
C Cargo loads 4-49
Catalytic converter
8-02
Cautions on handling of 4-wheel drive vehi-
cles 4-36
Central door locks 1-07
Centre console downlight 5-76
Bulb capacity 8-24
Replacement 8-34 Centre information display 3-10
Changing a fuse 8-22
Changing gears 4-15
Check engine warning lamp 3-08
Child restraint 2-13
Child-protection rear doors 1-08
Cigarette lighter 5-72
Cleaning
Exterior of your vehicle 7-03 Genuine leather 7-02
Interior of your vehicle
7-02
Plastic, vinyl leather, etc 7-02
Sunroof 7-05
Waxing 7-04 Clock 3-19,5-74
Clutch
Fluid 8-09,9-21
Pedal free play 8-15 Coat hook 5-81
Combination headlamps and dipper switch 3-30
Convenient hook 5-80
Coolant (engine) 8-06,9-21
Cruise control 4-45
Switch 4-45 Cup holder 5-79
Curtain airbag system 2-34
D Demister (rear window) 3-39
Diesel particulate filter (DPF)
4-13
Differential oil 9-21
Digital clock 3-19,5-74
Dimensions 9-03
Dipper (High/Low beam change) 3-31
Door courtesy lamps 5-76
Replacement 8-33 Doors
Central door locks 1-07
Child-protection 1-08
Lock and unlock 1-06 Driving, alcohol and drugs 4-02
E Easy select 4WD 4-22
Economical driving
4-02
Electric window control 1-08 Alphabetical index
1OKTE14E2