ABS MITSUBISHI L200 2014 Owner's Manual (in English)
[x] Cancel search | Manufacturer: MITSUBISHI, Model Year: 2014, Model line: L200, Model: MITSUBISHI L200 2014Pages: 362, PDF Size: 20.97 MB
Page 2 of 362
ForewordE09200104597
Thank you for selecting a MITSUBISHI L200 as your new vehicle.
This owner’s manual will add to your understanding and full enjoyment of
the many fine features of this vehicle.
It contains information prepared to acquaint you with the proper way to oper-
ate and maintain your vehicle for the utmost in driving pleasure.
MITSUBISHI MOTORS Europe B.V. reserves the right to make changes in
design and specifications and/or to make additions to or improvements in
this product without obligation to install them on products previously manu-
factured.
It is an absolute requirement for the driver to strictly observe all laws and reg-
ulations concerning vehicles.
This owner’s manual has been written in compliance with such laws and reg-
ulations, but some of the contents may become contradictory with later amend-
ment of the laws and regulations.
Please leave this owner’s manual in this vehicle at time of resale. The next
owner will appreciate having access to the information contained in this own-
er’s manual.
Repairs to your vehicle:
Vehicles in the warranty period:
All warranty repairs must be carried out by a MITSUBISHI MOTORS Au-
thorized Service Point.
Vehicles outside the warranty period:
Where the vehicle is repaired is at the discretion of the owner.
Throughout this owner’s manual the words WARNING and CAUTION ap-
pear.
These serve as reminders to be especially careful. Failure to follow instruc-
tions could result in personal injury or damage to your vehicle.WARNING
indicates a strong possibility of severe personal injury or death if in-
structions are not followed.
CAUTION
means hazards or unsafe practices that could cause minor personal in-
jury or damage to your vehicle.
You will see another important symbol:
NOTE:gives helpful information.*:indicates optional equipment.
It may differ according to the sales classification; refer
to the sales catalogue.
Abbreviations used in this owner’s manual:
LHD: Left-Hand Drive
RHD: Right-Hand Drive
M/T: Manual Transmission
A/T: Automatic Transmission
The symbol used on the vehicles:
: See owner’s manual
Information for station service E09300102174
Fuel
Fuel tank capacity75 litresFuel requirementsCetane number (EN590)
51 or higher
Refer to the “General information” section for the fuel selection.Engine oilRefer to the “Maintenance” section for the selection of engine oil.Tyre inflation pressureRefer to the “Maintenance” section for the tyre inflation pressure.
© 2013 Mitsubishi Motors Corporation14
OKTE14E2
BLC-13-001038
Page 59 of 362
Refer to “SRS warning lamp” on page 2-37.Force limiter systemE00406000078
In the event of a collision, each force limiter sys-
tem will effectively absorb the load applied to the
seat belt so as to minimize the impact to the passen-
ger.
Child restraint E00406401297
When transporting children in your vehicle, some
type of child restraint system should always be
used according to the size of the child. This is re-
quired by law in most countries.
The regulations concerning driving with children in
the front seat may differ from country to country.
You are advised to comply with the relevant regula-
tions.WARNINGl When possible, put children in the rear
seat. Accident statistics indicate that chil-
dren of all sizes and ages are safer when
properly restrained in the rear seat rath-
er than in the front seat. (Double cab and
Club cab)
l Holding a child in your arms is no substi-
tute for a restraint system. Failure to use
a proper restraint system can result in se-
vere or fatal injury to the child.
l Each child restraint device or fixing is to
be used only by one child.
l When attaching a child restraint to the
rear seat, place the front seatbacks in the
upright position.
Otherwise, the child could be seriously in-
jured in the event of hard braking or a col-
lision. (Double cab and Club cab)Caution for installing the child re-
straint on vehicles with a front passen-
ger airbag E00406500565
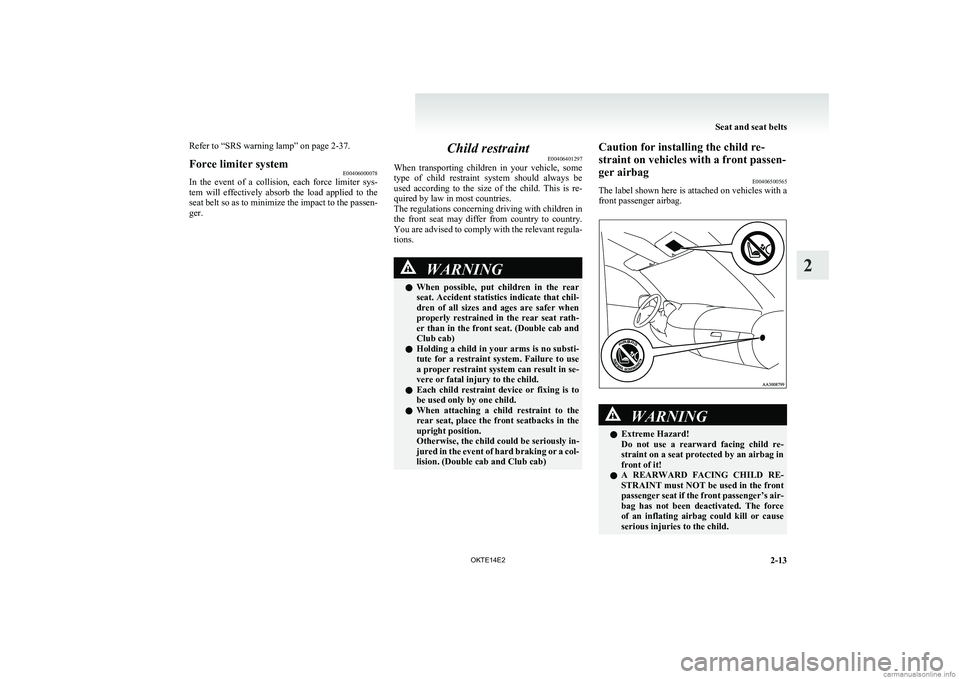
The label shown here is attached on vehicles with a
front passenger airbag.WARNINGl Extreme Hazard!
Do not use a rearward facing child re-
straint on a seat protected by an airbag in
front of it!
l A REARWARD FACING CHILD RE-
STRAINT must NOT be used in the front
passenger seat if the front passenger’s air-
bag has not been deactivated. The force
of an inflating airbag could kill or cause
serious injuries to the child.
Seat and seat belts
2-13
OKTE14E2
2
Page 78 of 362
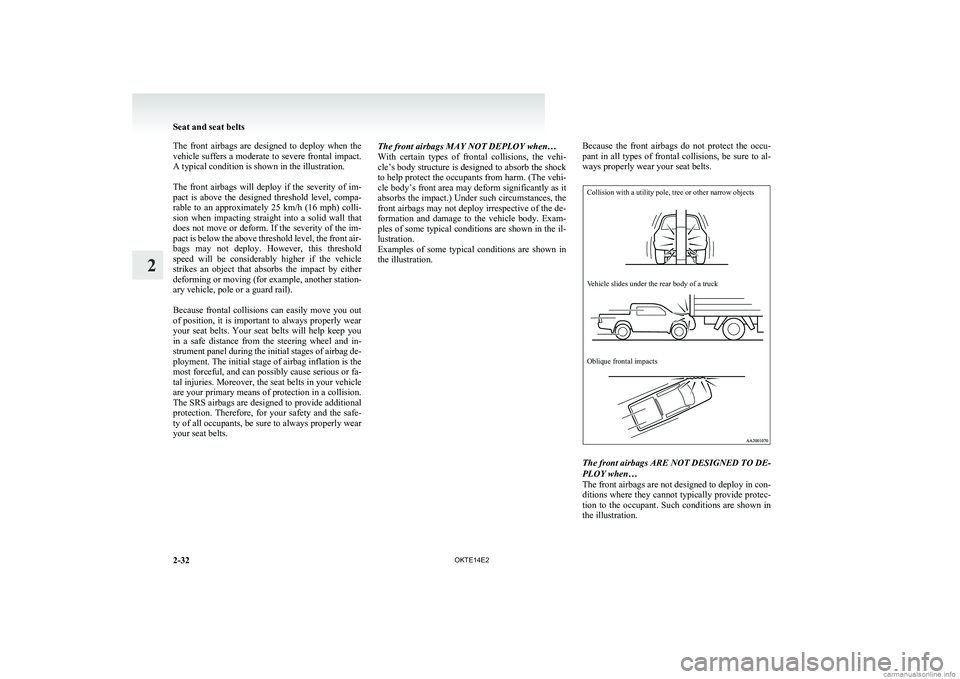
The front airbags are designed to deploy when the
vehicle suffers a moderate to severe frontal impact.
A typical condition is shown in the illustration.
The front airbags will deploy if the severity of im-
pact is above the designed threshold level, compa-
rable to an approximately 25 km/h (16 mph) colli-
sion when impacting straight into a solid wall that
does not move or deform. If the severity of the im-
pact is below the above threshold level, the front air-
bags may not deploy. However, this threshold
speed will be considerably higher if the vehicle
strikes an object that absorbs the impact by either
deforming or moving (for example, another station-
ary vehicle, pole or a guard rail).
Because frontal collisions can easily move you out
of position, it is important to always properly wear
your seat belts. Your seat belts will help keep you
in a safe distance from the steering wheel and in-
strument panel during the initial stages of airbag de-
ployment. The initial stage of airbag inflation is the
most forceful, and can possibly cause serious or fa-
tal injuries. Moreover, the seat belts in your vehicle
are your primary means of protection in a collision.
The SRS airbags are designed to provide additional
protection. Therefore, for your safety and the safe-
ty of all occupants, be sure to always properly wear
your seat belts.The front airbags MAY NOT DEPLOY when…
With certain types of frontal collisions, the vehi-
cle’s body structure is designed to absorb the shock
to help protect the occupants from harm. (The vehi-
cle body’s front area may deform significantly as it
absorbs the impact.) Under such circumstances, the
front airbags may not deploy irrespective of the de-
formation and damage to the vehicle body. Exam-
ples of some typical conditions are shown in the il-
lustration.
Examples of some typical conditions are shown in
the illustration.
Because the front airbags do not protect the occu-
pant in all types of frontal collisions, be sure to al-
ways properly wear your seat belts.Collision with a utility pole, tree or other narrow objectsVehicle slides under the rear body of a truckOblique frontal impacts
The front airbags ARE NOT DESIGNED TO DE-
PLOY when…
The front airbags are not designed to deploy in con-
ditions where they cannot typically provide protec-
tion to the occupant. Such conditions are shown in
the illustration.
Seat and seat belts
2-32 OKTE14E2
2
Page 81 of 362
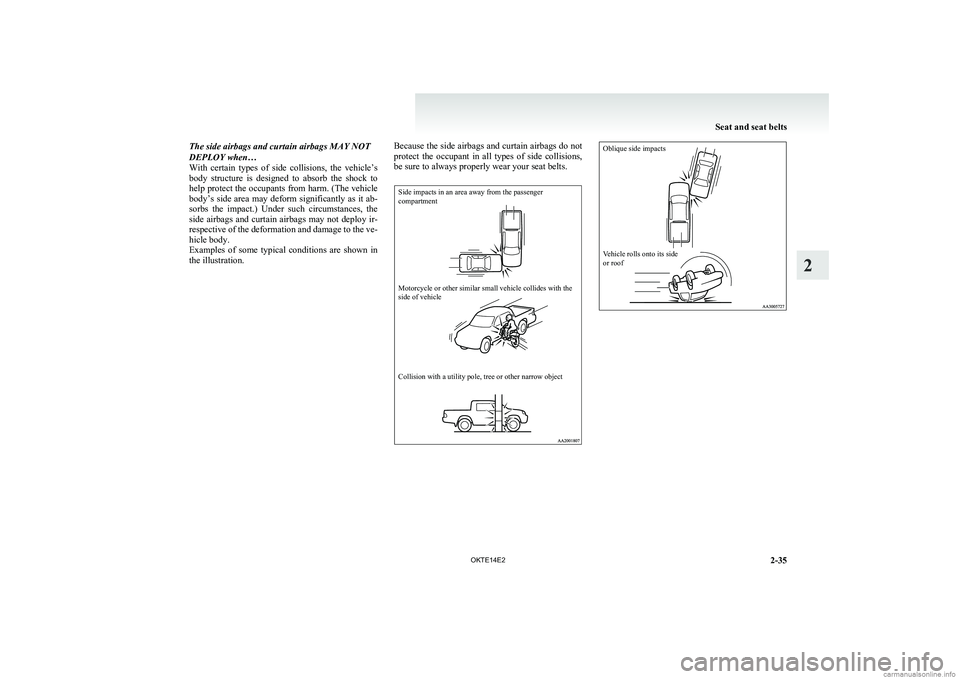
The side airbags and curtain airbags MAY NOT
DEPLOY when…
With certain types of side collisions, the vehicle’s
body structure is designed to absorb the shock to
help protect the occupants from harm. (The vehicle
body’s side area may deform significantly as it ab-
sorbs the impact.) Under such circumstances, the
side airbags and curtain airbags may not deploy ir-
respective of the deformation and damage to the ve-
hicle body.
Examples of some typical conditions are shown in
the illustration.
Because the side airbags and curtain airbags do not
protect the occupant in all types of side collisions,
be sure to always properly wear your seat belts.Side impacts in an area away from the passenger
compartmentMotorcycle or other similar small vehicle collides with the
side of vehicleCollision with a utility pole, tree or other narrow objectOblique side impactsVehicle rolls onto its side
or roof
Seat and seat belts
2-35
OKTE14E2
2
Page 90 of 362
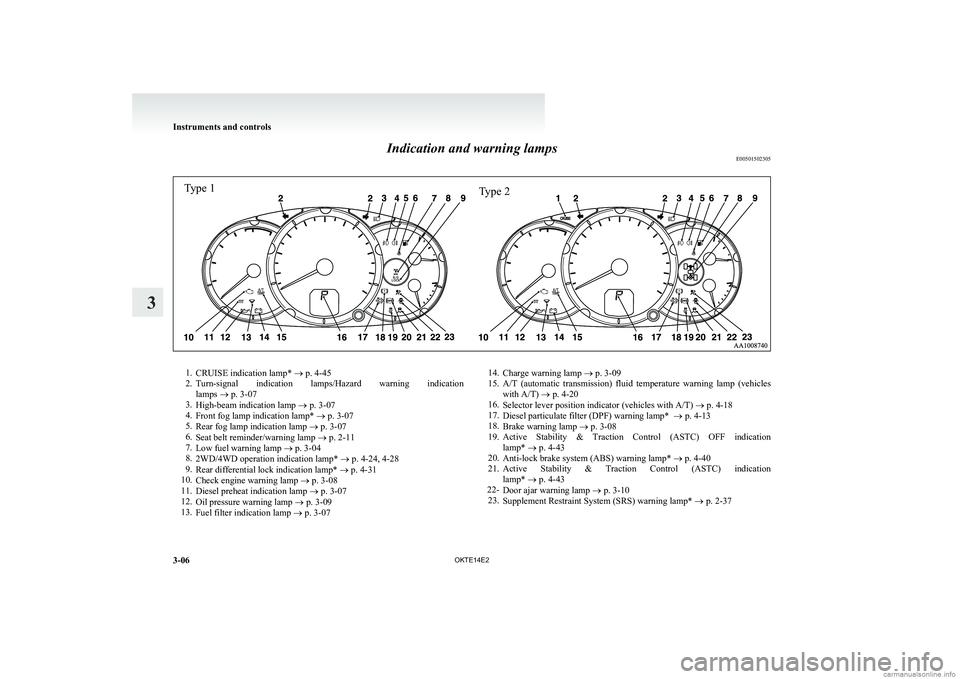
Indication and warning lampsE005015023051.CRUISE indication lamp* ® p. 4-45
2. Turn-signal indication lamps/Hazard warning indication
lamps ® p. 3-07
3. High-beam indication lamp ® p. 3-07
4. Front fog lamp indication lamp* ® p. 3-07
5. Rear fog lamp indication lamp ® p. 3-07
6. Seat belt reminder/warning lamp ® p. 2-11
7. Low fuel warning lamp ® p. 3-04
8. 2WD/4WD operation indication lamp* ® p. 4-24, 4-28
9. Rear differential lock indication lamp* ® p. 4-31
10. Check engine warning lamp ® p. 3-08
11. Diesel preheat indication lamp ® p. 3-07
12. Oil pressure warning lamp ® p. 3-09
13. Fuel filter indication lamp ® p. 3-0714.
Charge warning lamp ® p. 3-09
15. A/T (automatic transmission) fluid temperature warning lamp (vehicles
with A/T) ® p. 4-20
16. Selector lever position indicator (vehicles with A/T) ® p. 4-18
17. Diesel particulate filter (DPF) warning lamp* ® p. 4-13
18. Brake warning lamp ® p. 3-08
19. Active Stability & Traction Control (ASTC) OFF indication
lamp* ® p. 4-43
20. Anti-lock brake system (ABS) warning lamp* ® p. 4-40
21. Active Stability & Traction Control (ASTC) indication
lamp* ® p. 4-43
22- Door ajar warning lamp ® p. 3-10
23. Supplement Restraint System (SRS) warning lamp* ® p. 2-37
Instruments and controls
3-06 OKTE14E2
3Type 1Type 2
Page 92 of 362
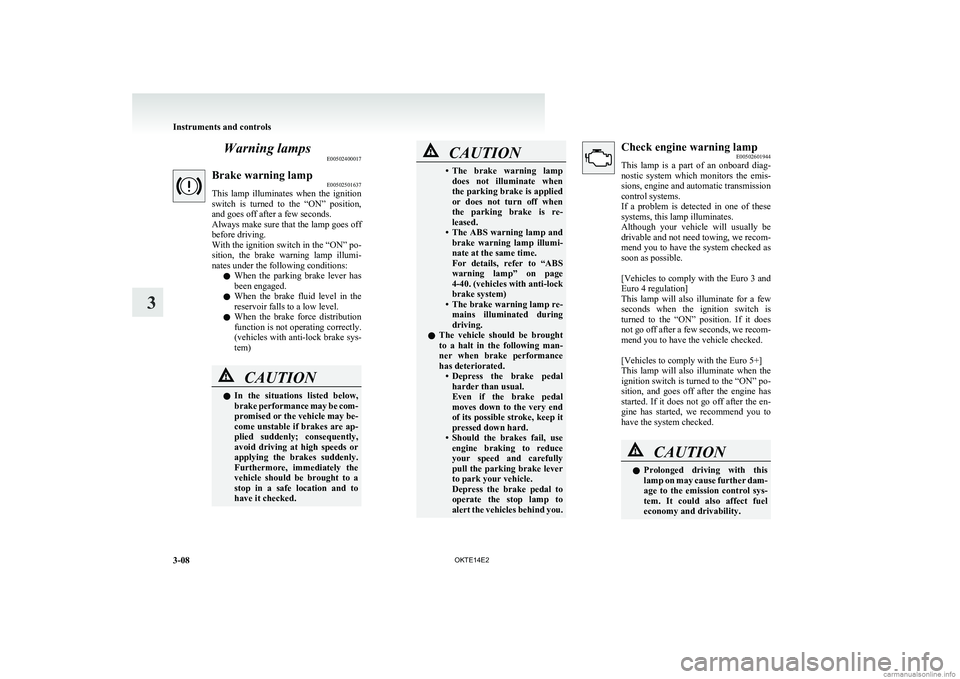
Warning lampsE00502400017Brake warning lamp E00502501637
This lamp illuminates when the ignition
switch is turned to the “ON” position,
and goes off after a few seconds.
Always make sure that the lamp goes off
before driving.
With the ignition switch in the “ON” po-
sition, the brake warning lamp illumi-
nates under the following conditions:
l When the parking brake lever has
been engaged.
l When the brake fluid level in the
reservoir falls to a low level.
l When the brake force distribution
function is not operating correctly.
(vehicles with anti-lock brake sys-
tem)CAUTIONl In the situations listed below,
brake performance may be com-
promised or the vehicle may be-
come unstable if brakes are ap-
plied suddenly; consequently,
avoid driving at high speeds or
applying the brakes suddenly.
Furthermore, immediately the
vehicle should be brought to a
stop in a safe location and to
have it checked.CAUTION• The brake warning lamp
does not illuminate when
the parking brake is applied
or does not turn off when
the parking brake is re-
leased.
• The ABS warning lamp and
brake warning lamp illumi-
nate at the same time.
For details, refer to “ABS
warning lamp” on page
4-40. (vehicles with anti-lock
brake system)
• The brake warning lamp re-
mains illuminated during
driving.
l The vehicle should be brought
to a halt in the following man-
ner when brake performance
has deteriorated. •Depress the brake pedal
harder than usual.
Even if the brake pedal
moves down to the very end
of its possible stroke, keep it
pressed down hard.
• Should the brakes fail, use
engine braking to reduce
your speed and carefully
pull the parking brake lever
to park your vehicle.
Depress the brake pedal to
operate the stop lamp to
alert the vehicles behind you.Check engine warning lamp E00502601944
This lamp is a part of an onboard diag-
nostic system which monitors the emis-
sions, engine and automatic transmission
control systems.
If a problem is detected in one of these
systems, this lamp illuminates.
Although your vehicle will usually be
drivable and not need towing, we recom-
mend you to have the system checked as
soon as possible.
[ Vehicles to comply with the Euro 3 and
Euro 4 regulation]
This lamp will also illuminate for a few
seconds when the ignition switch is
turned to the “ON” position. If it does
not go off after a few seconds, we recom-
mend you to have the vehicle checked.
[Vehicles to comply with the Euro 5+]
This lamp will also illuminate when the
ignition switch is turned to the “ON” po-
sition, and goes off after the engine has
started. If it does not go off after the en-
gine has started, we recommend you to
have the system checked.CAUTIONl Prolonged driving with this
lamp on may cause further dam-
age to the emission control sys-
tem. It could also affect fuel
economy and drivability.
Instruments and controls
3-08 OKTE14E2
3
Page 125 of 362
Economical driving.......................................................................4-02
Driving, alcohol and drugs ........................................................... 4-02
Safe driving techniques ................................................................ 4-03
Running-in recommendations.......................................................4-04
Parking brake ................................................................................ 4-06
Parking .......................................................................................... 4-07
Steering wheel height adjustment .................................................4-08
Inside rear-view mirror ................................................................. 4-08
Outside rear-view mirrors ............................................................. 4-09
Ignition switch .............................................................................. 4-10
Steering wheel lock ...................................................................... 4-12
Starting..........................................................................................4-12
Diesel particulate filter (DPF)* .................................................... 4-13
Manual transmission ..................................................................... 4-14
Automatic transmission Sports Mode 4A/T, 5A/T .......................4-17
Easy select 4WD* ......................................................................... 4-22
Super select 4WD* ....................................................................... 4-26
Rear differential lock* .................................................................. 4-30
4-wheel drive operation ................................................................ 4-34
Inspection and maintenance following rough road oper- ation .......................................................................................... 4-36
Cautions on handling of 4-wheel drive vehicles ..........................4-36
Limited-slip differential* .............................................................. 4-38
Braking ......................................................................................... 4-38
Brake assist system* ..................................................................... 4-39
Anti-lock brake system (ABS)* ................................................... 4-39
Power steering system .................................................................. 4-42
Active Stability & Traction Control (ASTC)* .............................4-42
Cruise control* ............................................................................. 4-45
Cargo loads ................................................................................... 4-49Trailer towing
............................................................................... 4-49Starting and driving
OKTE14E2
4
Page 155 of 362
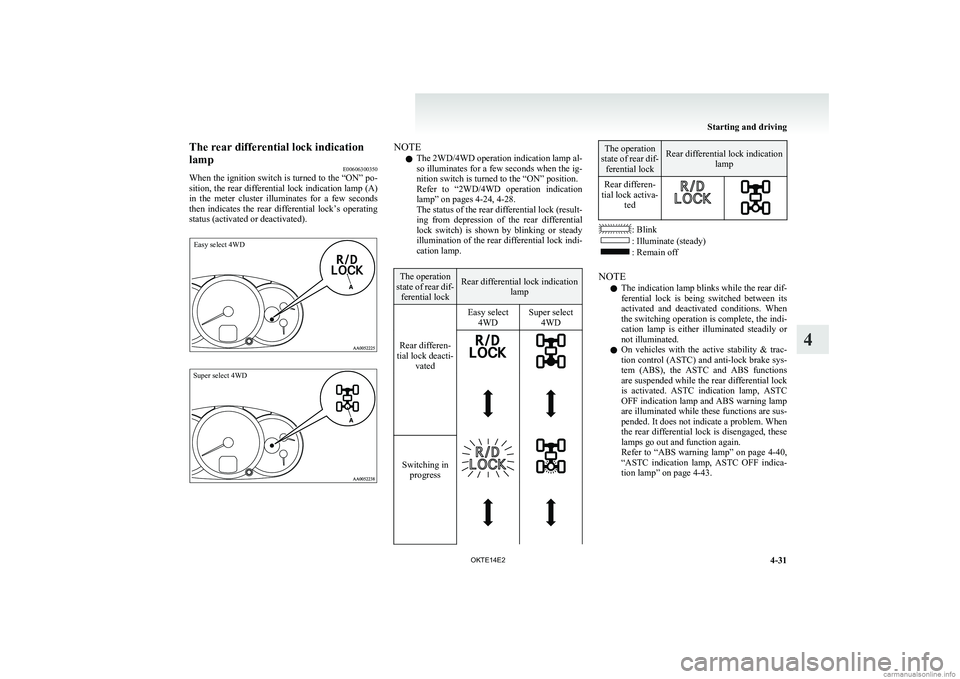
The rear differential lock indication
lamp E00606300350
When the ignition switch is turned to the “ON” po-
sition, the rear differential lock indication lamp (A)
in the meter cluster illuminates for a few seconds
then indicates the rear differential lock’s operating
status (activated or deactivated).Easy select 4WDSuper select 4WDNOTE
l The 2WD/4WD operation indication lamp al-
so illuminates for a few seconds when the ig-
nition switch is turned to the “ON” position.
Refer to “2WD/4WD operation indication
lamp” on pages 4-24, 4-28.
The status of the rear differential lock (result-
ing from depression of the rear differential
lock switch) is shown by blinking or steady
illumination of the rear differential lock indi-
cation lamp.The operation
state of rear dif- ferential lockRear differential lock indication lamp Easy select4WDSuper select 4WDRear differen-
tial lock deacti- vated
Switching inprogress
The operation
state of rear dif- ferential lockRear differential lock indication lampRear differen-
tial lock activa- ted
: Blink: Illuminate (steady): Remain off
NOTE l The indication lamp blinks while the rear dif-
ferential lock is being switched between its
activated and deactivated conditions. When
the switching operation is complete, the indi-
cation lamp is either illuminated steadily or
not illuminated.
l On vehicles with the active stability & trac-
tion control (ASTC) and anti-lock brake sys-
tem (ABS), the ASTC and ABS functions
are suspended while the rear differential lock
is activated. ASTC indication lamp, ASTC
OFF indication lamp and ABS warning lamp
are illuminated while these functions are sus-
pended. It does not indicate a problem. When
the rear differential lock is disengaged, these
lamps go out and function again.
Refer to “ABS warning lamp” on page 4-40,
“ ASTC indication lamp, ASTC OFF indica-
tion lamp” on page 4-43.
Starting and driving
4-31
OKTE14E2
4
Page 156 of 362
lOn vehicles with the anti-lock brake system
(ABS), the ABS function is suspended while
the rear differential lock is activated.
The ABS warning lamp is illuminated while
ABS functionality is suspended.
Refer to “ABS warning lamp” on page 4-40.
l If the indication lamp continues blinking af-
ter the switch has been pressed to deactivate
the rear differential lock, hold the steering
wheel in the straight ahead position then slow-
ly depress and release the accelerator pedal
several times.
l If the indication lamp continues blinking af-
ter the switch has been pressed to activate
the rear differential lock, bear in mind the fol-
lowing instructions: •If the vehicle speed is 12 km/h (7 mph)
or higher, decelerate to a speed of 6 km/h
( 4 mph) or lower. The indication lamp
will illuminate steadily and the rear differ-
ential lock will be activated.
• If the vehicle speed is 12 km/h (7 mph)
or lower, turn the steering wheel from
side to side until the indication lamp illu-
minates steadily. If the vehicle is stuck in
soft ground, make sure the area around
the vehicle is clear then repeatedly at-
tempt to drive forward and backward.
The indication lamp will illuminate stead-
ily and the rear differential lock will be ac-
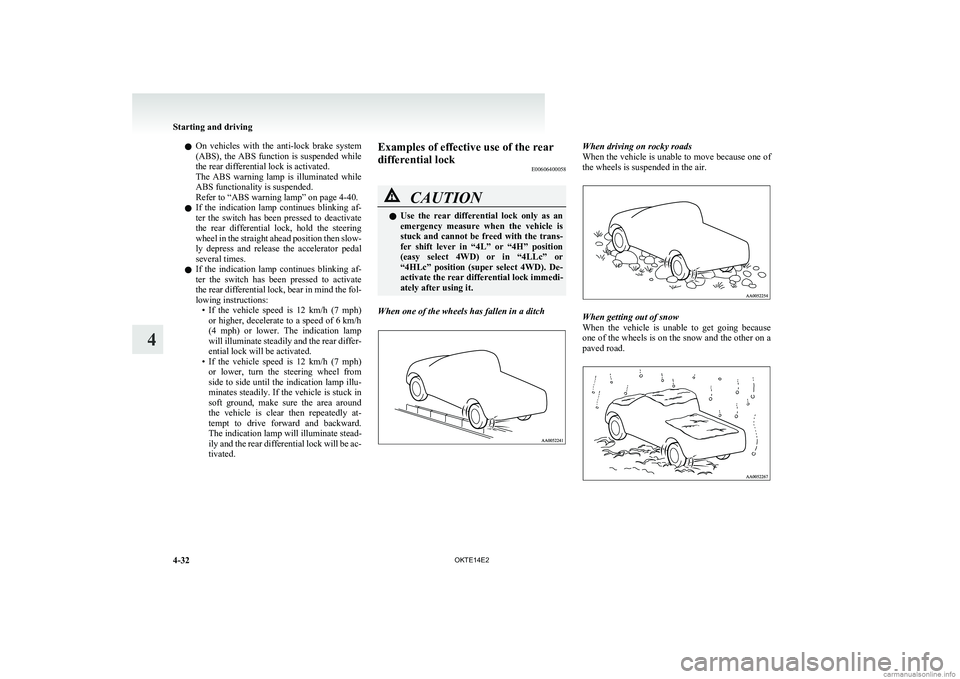
tivated.Examples of effective use of the rear
differential lock E00606400058CAUTIONlUse the rear differential lock only as an
emergency measure when the vehicle is
stuck and cannot be freed with the trans-
fer shift lever in “4L” or “4H” position
(easy select 4WD) or in “4LLc” or
“4HLc” position (super select 4WD). De-
activate the rear differential lock immedi-
ately after using it.
When one of the wheels has fallen in a ditch
When driving on rocky roads
When the vehicle is unable to move because one of
the wheels is suspended in the air.
When getting out of snow
When the vehicle is unable to get going because
one of the wheels is on the snow and the other on a
paved road.
Starting and driving
4-32 OKTE14E2
4
Page 160 of 362
Crossing a stream
4-wheel drive vehicles are not necessarily water-
proof. If the electrical circuits become wet, further
operation of the vehicle will be impossible; there-
fore, avoid crossing streams unless absolutely nec-
essary. If crossing a stream is unavoidable, use the
following procedure: 1.Check depths of a stream and geographical
features before attempting to cross a stream
and ford the stream where the water is as shal-
low as practicable.
2. Set the transfer shift lever to “4L” position
(easy select 4WD), “4LLc” position (super se-
lect 4WD).
3. Drive slowly at a speed of approximately
5 km/h (3 mph) to avoid splashing too much
water.CAUTIONl Never cross a stream where the water is
deep.
Do not change gears while crossing the
stream.
Frequent crossing of streams can adverse-
ly affect the life span of the vehicle; we rec-
ommend you to take the necessary meas-
ures to prepare, inspect, and repair the ve-
hicle.
After crossing a stream, apply the brakes to be sure
they are functioning properly. If the brakes are wet
and not functioning properly, dry them out by driv-
ing slowly while lightly depressing the brake pedal.
Inspect each part of the vehicle carefully.
Inspection and maintenance
following rough road operation E00606700048
After operating the vehicle in rough road condi-
tions, be sure to perform the following inspection
and maintenance procedures:
l Check that the vehicle has not been damaged
by rocks, gravel, etc.
l Carefully wash the vehicle with water.
After washing, drive the vehicle slowly
while lightly depressing the brake pedal in or-
der to dry out the brakes. If the brakes still
do not function properly, we recommend you
to have the brakes checked as soon as possible.
l Remove the insects, dried grass, etc. clog-
ging the radiator core.
l After crossing a stream, be sure to have the
following items inspected at a MITSUBISHI
MOTORS Authorized Service Point and take
the necessary measures. •Check the brake system and, if necessary,
have it serviced.
• Check the engine, transmission, transfer,
and differential oil or grease level and tur-
bidity. If the oil or grease is milky, it indi-
cates water contamination. Replace it
with new oil or grease.
• Grease the propeller shaft.
• Check the inside of the vehicle. If ingress
of water is found, dry the carpet etc.
• Inspect the headlamps. If the headlamp
bulb is flooded with water, we recom-
mend you to have it drained.Cautions on handling of 4-wheel
drive vehicles E00606800368
Tyres and wheels
Since the driving torque can be applied to the 4
wheels, the performance of the vehicle when oper-
ating in 4-wheel drive is greatly affected by the con-
dition of the tyres.
Pay close attention to the tyres.
l Install specified tyres on all wheels. Refer to
“Tyres and wheels” on page 9-17.
l Be sure to fit all 4 tyres and wheels of the
same size and type.
When replacement of any of the tyres or
wheels is necessary, replace all of them.
l All tyres should be rotated whenever the
wear difference between the front and rear
tyres is recognizable.
Good vehicle performance cannot be expected if
there is a difference in wear between tyres. Refer to
“Tyre rotation” on page 8-13.
l Check the tyre inflation pressure regularly.
Starting and driving
4-36
OKTE14E2
4