display MITSUBISHI L200 2014 Owner's Manual (in English)
[x] Cancel search | Manufacturer: MITSUBISHI, Model Year: 2014, Model line: L200, Model: MITSUBISHI L200 2014Pages: 362, PDF Size: 20.97 MB
Page 8 of 362
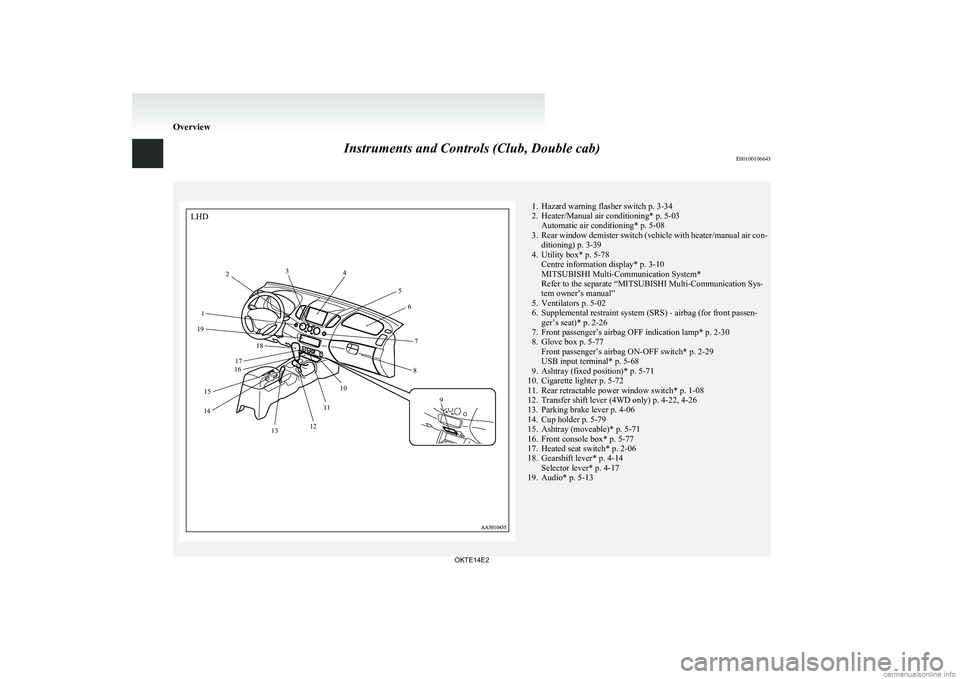
Instruments and Controls (Club, Double cab)E001001066431. Hazard warning flasher switch p. 3-34
2. Heater/Manual air conditioning* p. 5-03 Automatic air conditioning* p. 5-08
3. Rear window demister switch (vehicle with heater/manual air con-
ditioning) p. 3-39
4. Utility box* p. 5-78 Centre information display* p. 3-10
MITSUBISHI Multi-Communication System*
Refer to the separate “MITSUBISHI Multi-Communication Sys-
tem owner’s manual”
5. Ventilators p. 5-02
6. Supplemental restraint system (SRS) - airbag (for front passen- ger’s seat)* p. 2-26
7. Front passenger’s airbag OFF indication lamp* p. 2-30
8. Glove box p. 5-77 Front passenger’s airbag ON-OFF switch* p. 2-29
USB input terminal* p. 5-68
9. Ashtray (fixed position)* p. 5-71
10. Cigarette lighter p. 5-72
11. Rear retractable power window switch* p. 1-08
12. Transfer shift lever (4WD only) p. 4-22, 4-26
13. Parking brake lever p. 4-06
14. Cup holder p. 5-79
15. Ashtray (moveable)* p. 5-71
16. Front console box* p. 5-77
17. Heated seat switch* p. 2-06
18. Gearshift lever* p. 4-14 Selector lever* p. 4-17
19. Audio* p. 5-13
Overview
OKTE14E2LHD1 2
3
4
56
7
8
9
10
11
12
13
14 15 16
17 18
19
Page 9 of 362
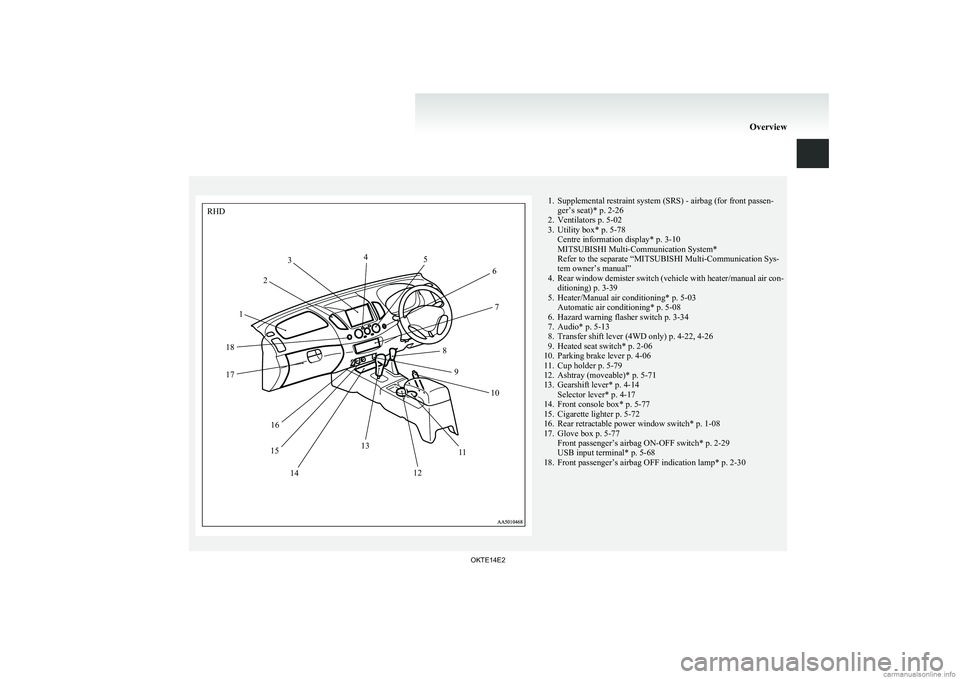
1. Supplemental restraint system (SRS) - airbag (for front passen-ger’s seat)* p. 2-26
2. Ventilators p. 5-02
3. Utility box* p. 5-78 Centre information display* p. 3-10
MITSUBISHI Multi-Communication System*
Refer to the separate “MITSUBISHI Multi-Communication Sys-
tem owner’s manual”
4. Rear window demister switch (vehicle with heater/manual air con-
ditioning) p. 3-39
5. Heater/Manual air conditioning* p. 5-03 Automatic air conditioning* p. 5-08
6. Hazard warning flasher switch p. 3-34
7. Audio* p. 5-13
8. Transfer shift lever (4WD only) p. 4-22, 4-26
9. Heated seat switch* p. 2-06
10. Parking brake lever p. 4-06
11. Cup holder p. 5-79
12. Ashtray (moveable)* p. 5-71
13. Gearshift lever* p. 4-14 Selector lever* p. 4-17
14. Front console box* p. 5-77
15. Cigarette lighter p. 5-72
16. Rear retractable power window switch* p. 1-08
17. Glove box p. 5-77 Front passenger’s airbag ON-OFF switch* p. 2-29
USB input terminal* p. 5-68
18. Front passenger’s airbag OFF indication lamp* p. 2-30
Overview
OKTE14E2RHD12
3
4
5
6
7
8 9 10
11
12
13
14
15 16
17
18
Page 26 of 362
Fuel selectionE00200102907Recommended fuelCetane number (EN590)
51 or higherCAUTIONlYour vehicle is designed to use only diesel
fuel that meets the EN590 standard.
Use of any other type of diesel fuel would
adversely affect the engine’s performance
and durability.
NOTE
l Due to the separation of paraffin, the fluidity
of the fuel decreases considerably as the tem-
perature falls.
Because of this fact there are two kinds of
fuel: “summer” and “winter”.
This must be considered in winter use.
Select either of the two kinds of fuel in ac-
cordance with ambient temperature. Above -5 °C: “Summer” diesel
Below -5 °C: “Winter” diesel
When travelling abroad, find out in advance
about the fuels served in local service stations.
l Poor-quality diesel fuel can cause deposits to
form in the injector, resulting in black smoke
and rough idling.
If these problems occur, you are advised to
add a cleaning additive to the diesel fuel
when you refuel the vehicle.
The additive will break up and remove the de-
posits, thereby returning the engine to a nor-
mal condition.
Be sure to use a MITSUBISHI MOTORS
GENUINE DIESEL FUEL SYSTEM
CLEANER. Using an unsuitable additive
could make the engine malfunction. For de-
tails, please contact a MITSUBISHI
MOTORS Authorized Service Point.Filling the fuel tank E00200202025WARNINGlWhen handling fuel, comply with the safe-
ty regulations displayed by garages and
filling stations.
l Before removing the fuel cap, be sure to
get rid of your body’s static electricity by
touching a metal part of the car or the
fuel pump. Any static electricity on your
body could create a spark that ignites
fuel vapour.
l Perform the whole refueling process
(opening the fuel tank filler door, remov-
ing the fuel cap, etc.) by yourself. Do not
let any other person come near the fuel
tank filler. If you allowed a person to
help you and that person was carrying
static electricity, fuel vapour could be ig-
nited.
l Do not move away from the fuel tank fill-
er until refueling is finished. If you
moved away and did something else (for
example, cleaning your windscreen) part-
way through the refueling process, you
could pick up a fresh charge of static elec-
tricity.
l If the tank cap must be replaced, use only
a MITSUBISHI MOTORS original part.
Fuel tank capacity
75 litres
Refueling 1. Before filling with fuel, stop the engine.
General information
02 OKTE14E2
Page 85 of 362
Instruments................................................................................... 3-02
Indication and warning lamps.......................................................3-06
Indication lamps ........................................................................... 3-07
Warning lamps .............................................................................. 3-08
Centre information display* ......................................................... 3-10
Combination headlamps and dipper switch ..................................3-30
Headlamp levelling switch* ......................................................... 3-32
Turn-signals lever ......................................................................... 3-33
Hazard warning flasher switch ..................................................... 3-34
Front fog lamp switch* ................................................................. 3-34
Rear fog lamp switch .................................................................... 3-35
Wiper and washer switch .............................................................. 3-36
Rear window demister switch.......................................................3-39
Horn switch...................................................................................3-40Instruments and controls
OKTE14E2
3
Page 87 of 362
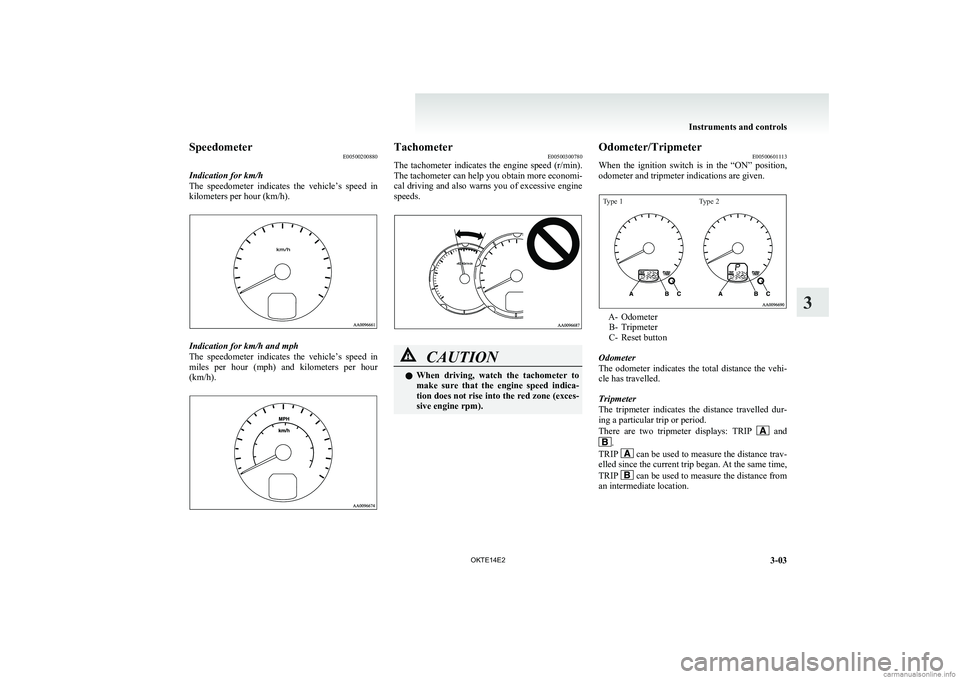
SpeedometerE00500200880
Indication for km/h
The speedometer indicates the vehicle’s speed in
kilometers per hour (km/h).
Indication for km/h and mph
The speedometer indicates the vehicle’s speed in
miles per hour (mph) and kilometers per hour
(km/h).
Tachometer E00500300780
The tachometer indicates the engine speed (r/min).
The tachometer can help you obtain more economi-
cal driving and also warns you of excessive engine
speeds.CAUTIONl When driving, watch the tachometer to
make sure that the engine speed indica-
tion does not rise into the red zone (exces-
sive engine rpm).Odometer/Tripmeter E00500601113
When the ignition switch is in the “ON” position,
odometer and tripmeter indications are given.Type 1Type 2
A- Odometer B- Tripmeter
C- Reset button
Odometer
The odometer indicates the total distance the vehi-
cle has travelled.
Tripmeter
The tripmeter indicates the distance travelled dur-
ing a particular trip or period.
There are two tripmeter displays: TRIP
and.
TRIP can be used to measure the distance trav-
elled since the current trip began. At the same time,
TRIP
can be used to measure the distance from
an intermediate location.
Instruments and controls
3-03
OKTE14E2
3
Page 88 of 362
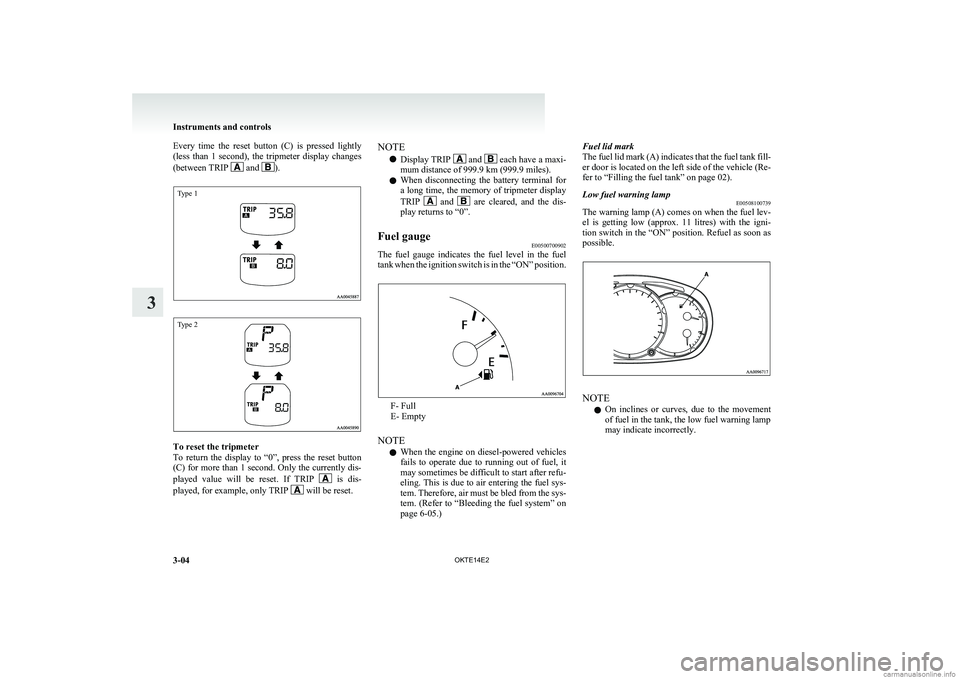
Every time the reset button (C) is pressed lightly
(less than 1 second), the tripmeter display changes
(between TRIP
and ).
Type 1Type 2
To reset the tripmeter
To return the display to “0”, press the reset button
(C) for more than 1 second. Only the currently dis-
played value will be reset. If TRIP
is dis-
played, for example, only TRIP will be reset.
NOTE
l Display TRIP
and each have a maxi-
mum distance of 999.9 km (999.9 miles).
l When disconnecting the battery terminal for
a long time, the memory of tripmeter display
TRIP
and are cleared, and the dis-
play returns to “0”.
Fuel gauge E00500700902
The fuel gauge indicates the fuel level in the fuel
tank when the ignition switch is in the “ON” position.
F- Full
E- Empty
NOTE l When the engine on diesel-powered vehicles
fails to operate due to running out of fuel, it
may sometimes be difficult to start after refu-
eling. This is due to air entering the fuel sys-
tem. Therefore, air must be bled from the sys-
tem. (Refer to “Bleeding the fuel system” on
page 6-05.)
Fuel lid mark
The fuel lid mark (A) indicates that the fuel tank fill-
er door is located on the left side of the vehicle (Re-
fer to “Filling the fuel tank” on page 02).Low fuel warning lamp E00508100739
The warning lamp (A) comes on when the fuel lev-
el is getting low (approx. 11 litres) with the igni-
tion switch in the “ON” position. Refuel as soon as
possible.
NOTE
l On inclines or curves, due to the movement
of fuel in the tank, the low fuel warning lamp
may indicate incorrectly.
Instruments and controls
3-04 OKTE14E2
3
Page 89 of 362
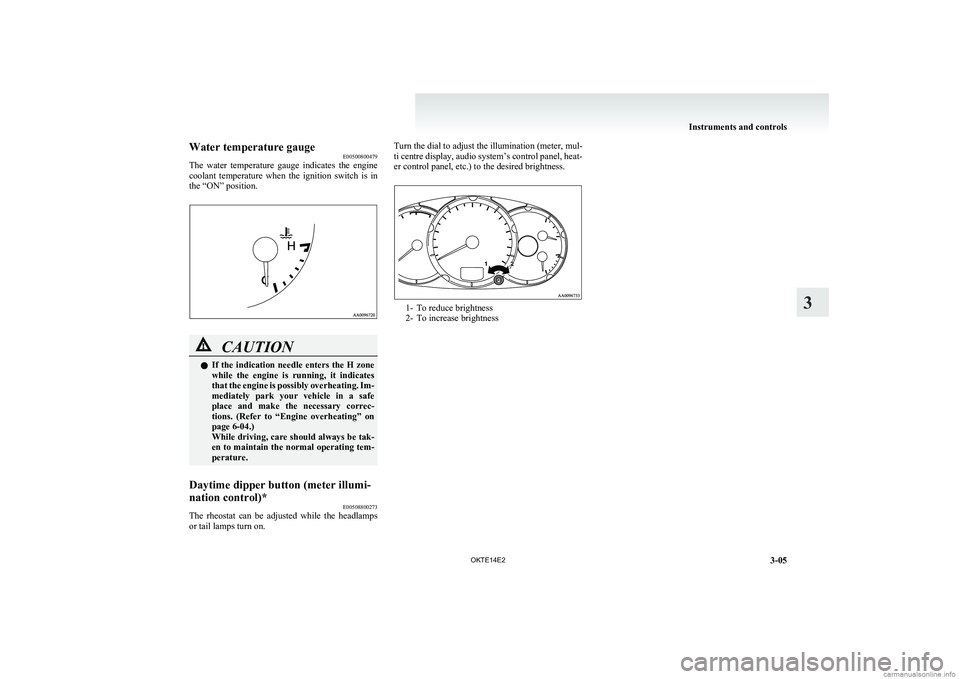
Water temperature gaugeE00500800479
The water temperature gauge indicates the engine
coolant temperature when the ignition switch is in
the “ON” position.CAUTIONl If the indication needle enters the H zone
while the engine is running, it indicates
that the engine is possibly overheating. Im-
mediately park your vehicle in a safe
place and make the necessary correc-
tions. (Refer to “Engine overheating” on
page 6-04.)
While driving, care should always be tak-
en to maintain the normal operating tem-
perature.Daytime dipper button (meter illumi-
nation control)* E00508800273
The rheostat can be adjusted while the headlamps
or tail lamps turn on.
Turn the dial to adjust the illumination (meter, mul-
ti centre display, audio system’s control panel, heat-
er control panel, etc.) to the desired brightness.
1- To reduce brightness
2- To increase brightness
Instruments and controls
3-05
OKTE14E2
3
Page 94 of 362
Door ajar warning lampE00503300475
This lamp illuminates when a door is ei-
ther open or not completely closed.
If the vehicle speed reaches approximate-
ly 8 km/h (5 mph) with a door open or
incompletely closed, the warning lamp
flashes 16 times and a buzzer simultane-
ously sounds 16 times as a warning.CAUTIONl Before moving your vehicle,
check that the warning lamp is
OFF.
NOTE
l It is possible to change the buzzer
setting for either of the following
types of operation. For further in-
formation, we recommend you to
consult a MITSUBISHI
MOTORS Authorized Service
Point. •No buzzer operation (buzzer
disabled)
• Continuous buzzer operation
Centre information display* E00517800279WARNINGlWhen operating the system for a pro-
longed period, make sure the vehicle is
parked in a well-ventilated area to avoid
the accumulation of toxic fumes inside
and outside of the passenger compartment.CAUTIONl The driver should not operate the display
while the vehicle is in motion.
l When operating the system, stop the vehi-
cle in a safe area.
When the ignition switch is turned to the “ACC” po-
sition, the screen switches on automatically.
NOTE
l Placing a cellular phone in the monitor’s
small storage compartment may weaken the
phone’s reception. This does not indicate a
fault with the system.
l Use of wireless devices such as transceivers
or a cellular phone near the monitor may
make the following condition on the display.
This does not indicate a fault with the system. • The screen goes dark temporarily.
• The compass may not show the correct di-
rection.
l Depending on the angle of view, you may
see reddish horizontal lines on the monitor.
The lines are a characteristic of the vacuum
fluorescent display (VFD) used in the moni-
tor. They do not indicate a fault.
Instruments and controls
3-10 OKTE14E2
3
Page 95 of 362
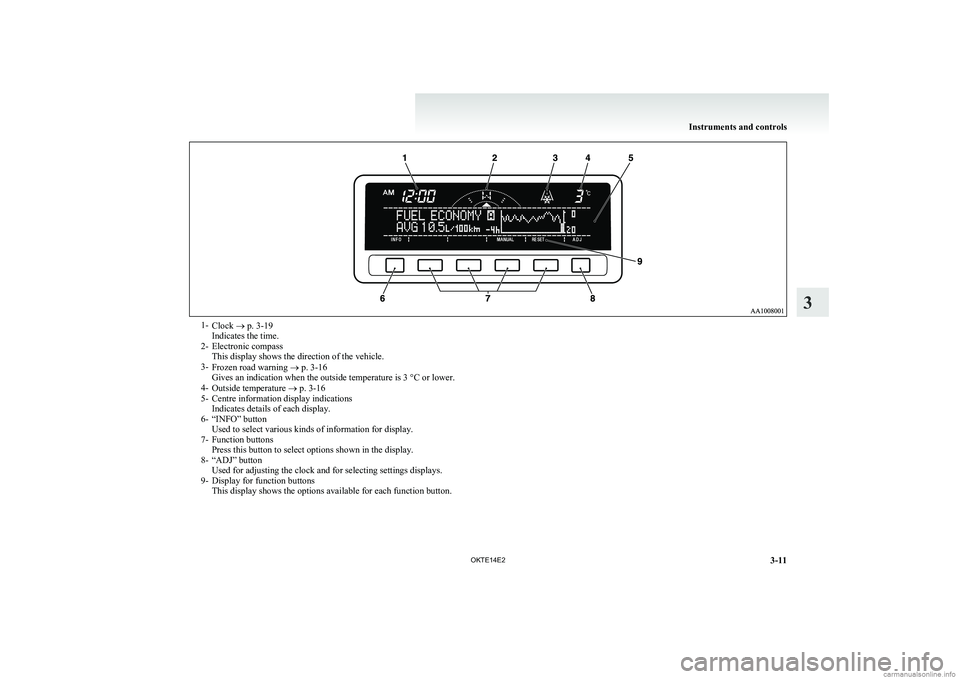
1-Clock ® p. 3-19
Indicates the time.
2- Electronic compass This display shows the direction of the vehicle.
3- Frozen road warning ® p. 3-16
Gives an indication when the outside temperature is 3 °C or lower.
4- Outside temperature ® p. 3-16
5- Centre information display indications Indicates details of each display.
6- “INFO” button Used to select various kinds of information for display.
7- Function buttons
Press this button to select options shown in the display.
8- “ADJ” button Used for adjusting the clock and for selecting settings displays.
9- Display for function buttons This display shows the options available for each function button.
Instruments and controls
3-11
OKTE14E2
3
Page 96 of 362
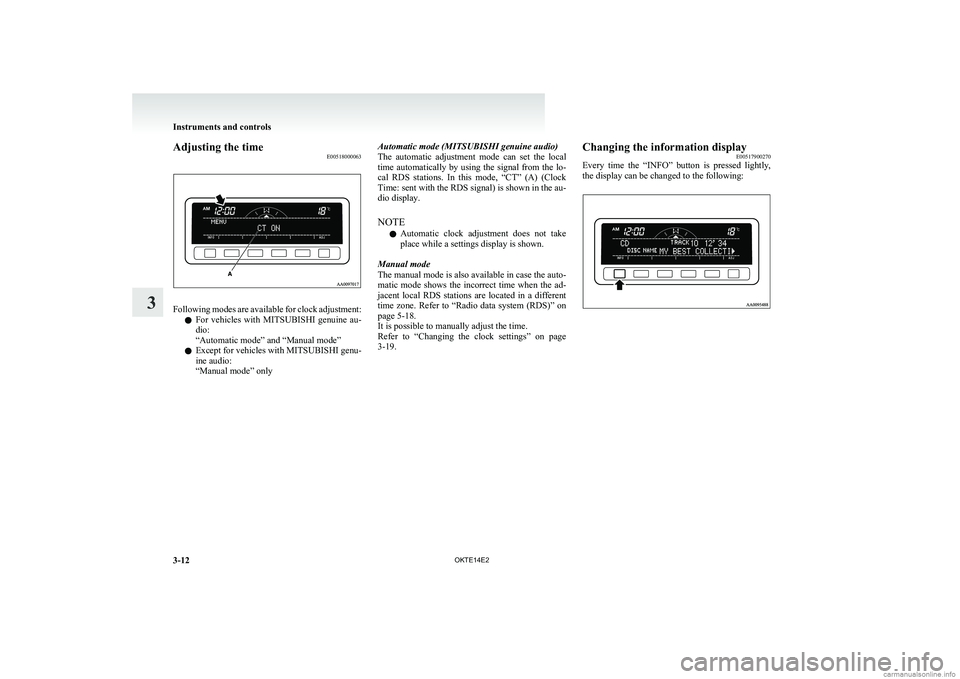
Adjusting the timeE00518000063
Following modes are available for clock adjustment:
l For vehicles with
MITSUBISHI genuine au-
dio:
“Automatic mode” and “Manual mode”
l Except for vehicles with
MITSUBISHI genu-
ine audio:
“Manual mode” only
Automatic mode (MITSUBISHI genuine audio)
The automatic adjustment mode can set the local
time automatically by using the signal from the lo-
cal RDS stations. In this mode, “CT” (A) (Clock
Time: sent with the RDS signal) is shown in the au-
dio display.
NOTE l Automatic clock adjustment does not take
place while a settings display is shown.
Manual mode
The manual mode is also available in case the auto-
matic mode shows the incorrect time when the ad-
jacent local RDS stations are located in a different
time zone. Refer to “Radio data system (RDS)” on
page 5-18.
It is possible to manually adjust the time.
Refer to “Changing the clock settings” on page
3-19.Changing the information display E00517900270
Every time the “INFO” button is pressed lightly,
the display can be changed to the following:
Instruments and controls
3-12 OKTE14E2
3