37-3 MITSUBISHI LANCER 2006 Workshop Manual
[x] Cancel search | Manufacturer: MITSUBISHI, Model Year: 2006, Model line: LANCER, Model: MITSUBISHI LANCER 2006Pages: 800, PDF Size: 45.03 MB
Page 231 of 800
37-1
GROUP 37
POWER STEERING
CONTENTS
GENERAL INFORMATION . . . . . . . .37-3
SERVICE SPECIFICATIONS . . . . . . .37-6
LUBRICANTS . . . . . . . . . . . . . . . . . .37-7
SEALANTS . . . . . . . . . . . . . . . . . . . .37-7
SPECIAL TOOLS . . . . . . . . . . . . . . . .37-8
ON-VEHICLE SERVICE . . . . . . . . . . .37-11
STEERING WHEEL FREE PLAY CHECK . 37-11
STEERING ANGLE CHECK . . . . . . . . . . . . 37-11
TIE ROD END BALL JOINT TURNING
TORQUE CHECK . . . . . . . . . . . . . . . . . . . . 37-12
STATIONARY STEERING EFFORT
CHECK . . . . . . . . . . . . . . . . . . . . . . . . . . . . 37-12
STEERING WHEEL RETURN TO
CENTRE CHECK . . . . . . . . . . . . . . . . . . . . 37-13
DRIVE BELT TENSION CHECK. . . . . . . . . 37-13
FLUID LEVEL CHECK . . . . . . . . . . . . . . . . 37-13
FLUID REPLACEMENT . . . . . . . . . . . . . . . 37-13
POWER STEERING SYSTEM AIR
BLEEDING . . . . . . . . . . . . . . . . . . . . . . . . . 37-14
OIL PUMP PRESSURE TEST . . . . . . . . . . 37-14
POWER STEERING PRESSURE
SWITCH CHECK . . . . . . . . . . . . . . . . . . . . . 37-15
TIE ROD END BALL JOINT DUST
COVER CHECK . . . . . . . . . . . . . . . . . . . . . 37-15
STEERING COLUMN SHAFT ASSEMBLY
SHOCK ABSORBING MECHANISM
CHECK . . . . . . . . . . . . . . . . . . . . . . . . . . . . 37-15
STEERING WHEEL . . . . . . . . . . . . . .37-17
REMOVAL AND INSTALLATION
REMOVAL AND INSTALLATION
Continued on next page
WARNINGS REGARDING SERVICING OF SUPPLEMENTAL RESTRAINT SYSTEM (SRS) EQUIPPED VEHICLES
WARNING
•Improper service or maintenance of any component of the SRS, or any SRS-related component, can lead to
personal injury or death to service personnel (from inad vertent firing of the air bag) or to the driver and
paassenger (from renderin g the SRS inoperative).
•Service or maintenance of any SRS component or SRS-related component must be performed only at an
authorized MITSUBISHI dealer.
•MITSUBISHI dealer personnel must thoroughly review th is manual, and especially its GROUP 52B - Supplemental
Restraint System (SRS) before begi nning any service or maintenance of any component of the SRS or any
SRS-related component.
NOTE
The SRS includes the following components: SRS air bag control unit, SRS warning light, front impact sensors, air bag module,
clock spring, and interconnecting wiring. Other SRS-related components (that may have to be removed/installed in connection
with SRS service or maintenance) are indicated in the table of contents by an asterisk (*).
Page 232 of 800
37-2
STEERING COLUMN SHAFT
ASSEMBLY . . . . . . . . . . . . . . . . . . . .37-20
REMOVAL AND INSTALLATION . . . . . . . . 37-20
DISASSEMBLY AND REASSEMBLY . . . . . 37-22
POWER STEERING GEAR BOX AND
LINKAGE . . . . . . . . . . . . . . . . . . . . . .37-23
REMOVAL AND INSTALLATION . . . . . . . . 37-23
INSPECTION . . . . . . . . . . . . . . . . . . . . . . . 37-24
DISASSEMBLY AND REASSEMBLY . . . . . 37-26
TIE ROD END BALL JOINT DUST COVER
REPLACEMENT . . . . . . . . . . . . . . . . . . . . . 37-35
POWER STEERING OIL PUMP
ASSEMBLY. . . . . . . . . . . . . . . . . . . . .37-35
REMOVAL AND INSTALLATION . . . . . . . . 37-35
INSPECTION. . . . . . . . . . . . . . . . . . . . . . . . 37-36
DISASSEMBLY AND REASSEMBLY . . . . . 37-37
INSPECTION. . . . . . . . . . . . . . . . . . . . . . . . 37-39
POWER STEERING HOSES . . . . . . .37-40
REMOVAL AND INSTALLATION . . . . . . . . 37-40
Page 233 of 800

GENERAL INFORMATION
POWER STEERING37-3
GENERAL INFORMATION
M1372000100661
Power steering has been adopted in all vehicles to
make the steering system easier to handle.
FEATURES
•A 4-spoke steering wheel is used.
•MOMO leather-wrapped 3-spoke steering wheel
is used.
•A steering column has a shock absorbing mecha-
nism and a tilt steering mechanism.
•Integral-type rack and pinion gear with high rigid-
ity and excellent response is used.
•A vane type pump with a fluid flow rate control
system which change steering effort according to
the engine speed is used.
•The separate plastic resin oil reservoir is used to
reduce weight and to make the fluid level check
-
ing easier.
SPECIFICATIONS
ItemInviteIntense
Steering
wheelTy p e4-spoke typeMOMO leather-wrapped
3-spoke type
Outside diameter mm380365
Maximum number of turns3.193.08
Steering
columnColumn mechanismShock absorbing mechanism and Tilt steering mechanism
Power steering typeIntegral type
Oil pumpTy p eVane pump
Basic discharge amount cm3/rev.7.2 <1300, 1600>
8.1 <2000>
7.2 <1300, 1600>
8.1 <2000>
Relief pressure MPa8.88.8
Reservoir typeSeparate type (plastic)
Pressure switchEquipped
Steering
gearTy p eRack and pinion
Stroke ratio (Rack stroke/Steering
wheel maximum turning radius)45.7445.74
Rack stroke mm146141
Page 255 of 800
POWER STEERING GEAR BOX AND LINKAGE
POWER STEERING37-25
NOTE: When measuring, remove the bellows from
the rack housing. Measure the pinion torque through
the whole stroke of the rack.
If the measured value is not within the standard
range, first adjust the rack support cover, and then
check the total pinion torque again.
If the total pinion torque cannot be adjusted to within
the standard range by adjusting the rack support
cover, check the rack support cover, rack support
spring, rack support and replace any parts if neces
-
sary.
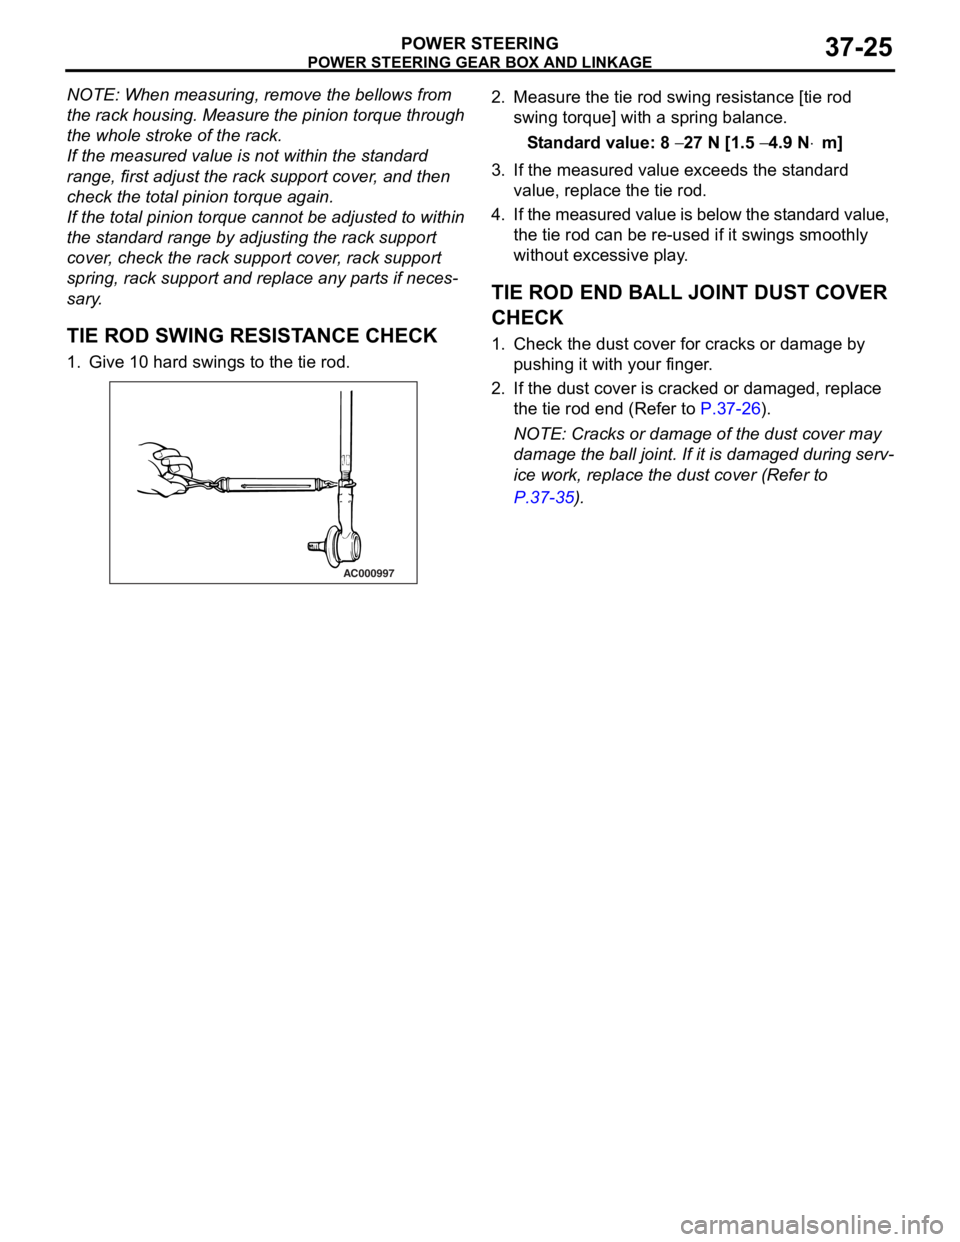
TIE ROD SWING RESISTANCE CHECK
1. Give 10 hard swings to the tie rod.
AC000997
2. Measure the tie ro d swin g resist ance [tie rod
swing to rque] with a spring bala n ce.
St andard va lue: 8 − 27 N [1.5 − 4.9 N⋅m]
3.If the measu r ed value exceeds the st a ndard
value , replace the tie rod.
4. If the measured value is below the st a ndard valu e,
th e tie rod can be re-use d if it swings smo o thly
wit hout e xce ssive play .
TIE ROD END BALL JOINT DUST COVER
CHECK
1.Check t he dust co ver f o r cracks or da mage by
p u shing it with your finger .
2.If the du st cover is cracked o r damaged, repla c e
th e tie rod end (Refer to
P.37-26).
NOTE: Cracks or dama ge of t he dust co ver may
d
a
mag
e the ball joint. If it is da mag ed du ring serv
-
ice work, replace the du st cove r (Re f er to
P.37-35).
Page 260 of 800
POWER STEERING GEAR BOX AND LINKAGE
POWER STEERING37-30
2. Turn the rack stopper anticlockwise to remove the circlip.
<
BUSHING/OIL SEAL/O-RING/RACK
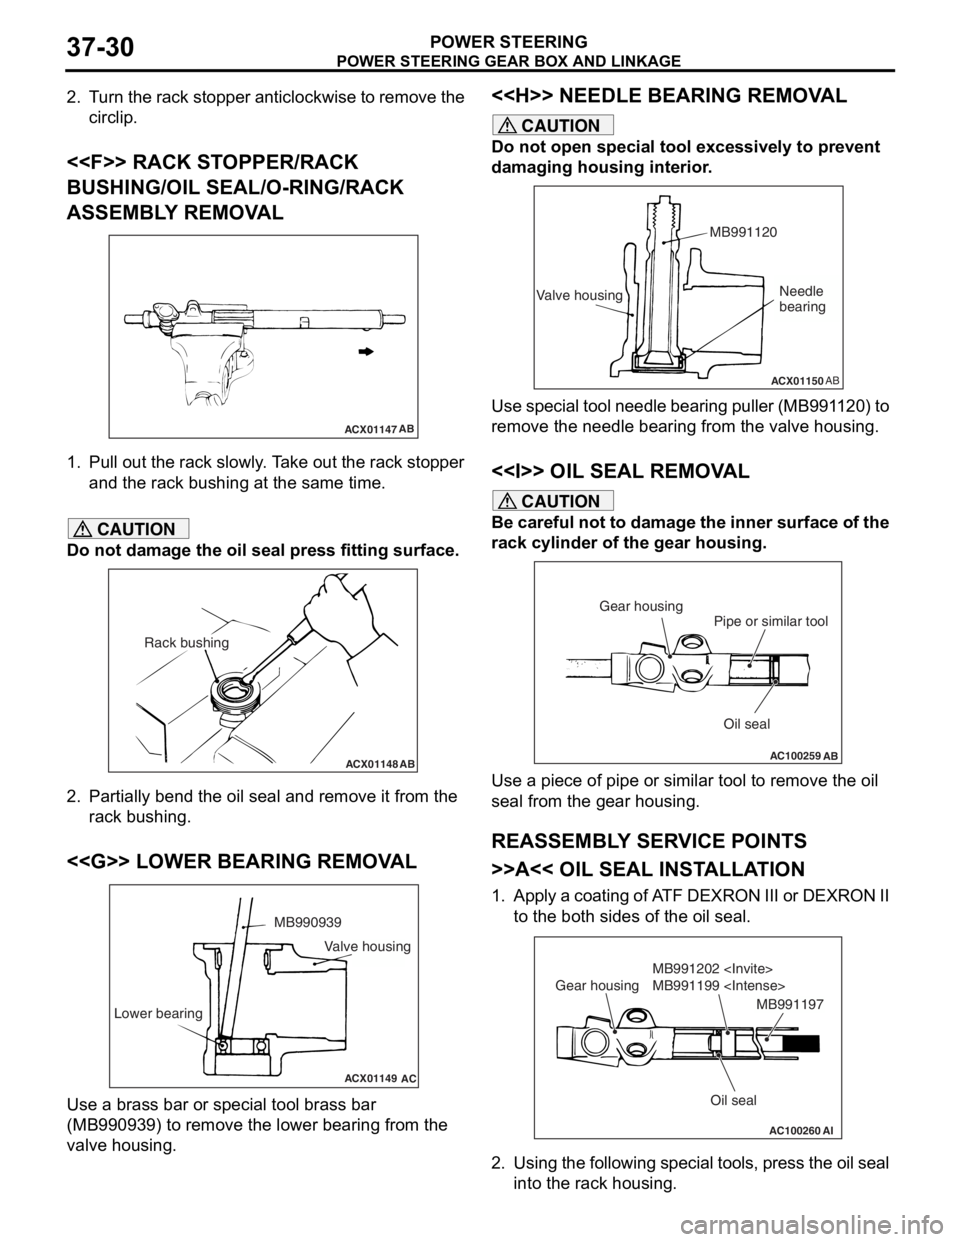
ASSEMBLY REMOVAL
ACX01147 AB
1.
Pull out th e rack slo w ly . T a ke out th e rack stop per
an d the rack bushing at the same time.
CAUTION
Do not damage the oil seal press fitting surface.
ACX01148AB
Rack bushing
2. Partially bend the oil seal and remove it from the
rack bushing.
<
ACX01149
MB990939
Lower bearing
AC
Valve housing
Use a brass bar or special tool brass bar
(MB990939) to remove the lower bearing from the
valve housing.
<
CAUTION
Do not open special tool excessively to prevent
damaging housing interior.
ACX01150 AB
Valve housing MB991120Needle
bearing
Use special tool needle bearing puller (MB991120) to
remove the needle bearing from the valve housing.
<> OIL SEAL REMOVAL
CAUTION
Be careful not to damage the inner surface of the
rack cylinder of the gear housing.
AC100259
Oil seal
Pipe or similar tool
Gear housing
AB
Use a piece of pipe or simila
r tool to remove the oil
seal from the gear housing.
REASSEMBLY SERVICE POINTS
>>A<< OIL SEAL INSTALLATION
1. Apply a coating of ATF DEXRON III or DEXRON II to the both sides of the oil seal.
AC100260AI
Oil seal
MB991202
MB991199
Gear housing
MB991197
2. Using the following special tools, press the oil seal
into the rack housing.
Page 261 of 800
POWER STEERING GEAR BOX AND LINKAGE
POWER STEERING37-31
•Bar (long type) (MB991197)
•Oil seal installer (MB991199)
•Oil seal and bearing installer (MB991202)
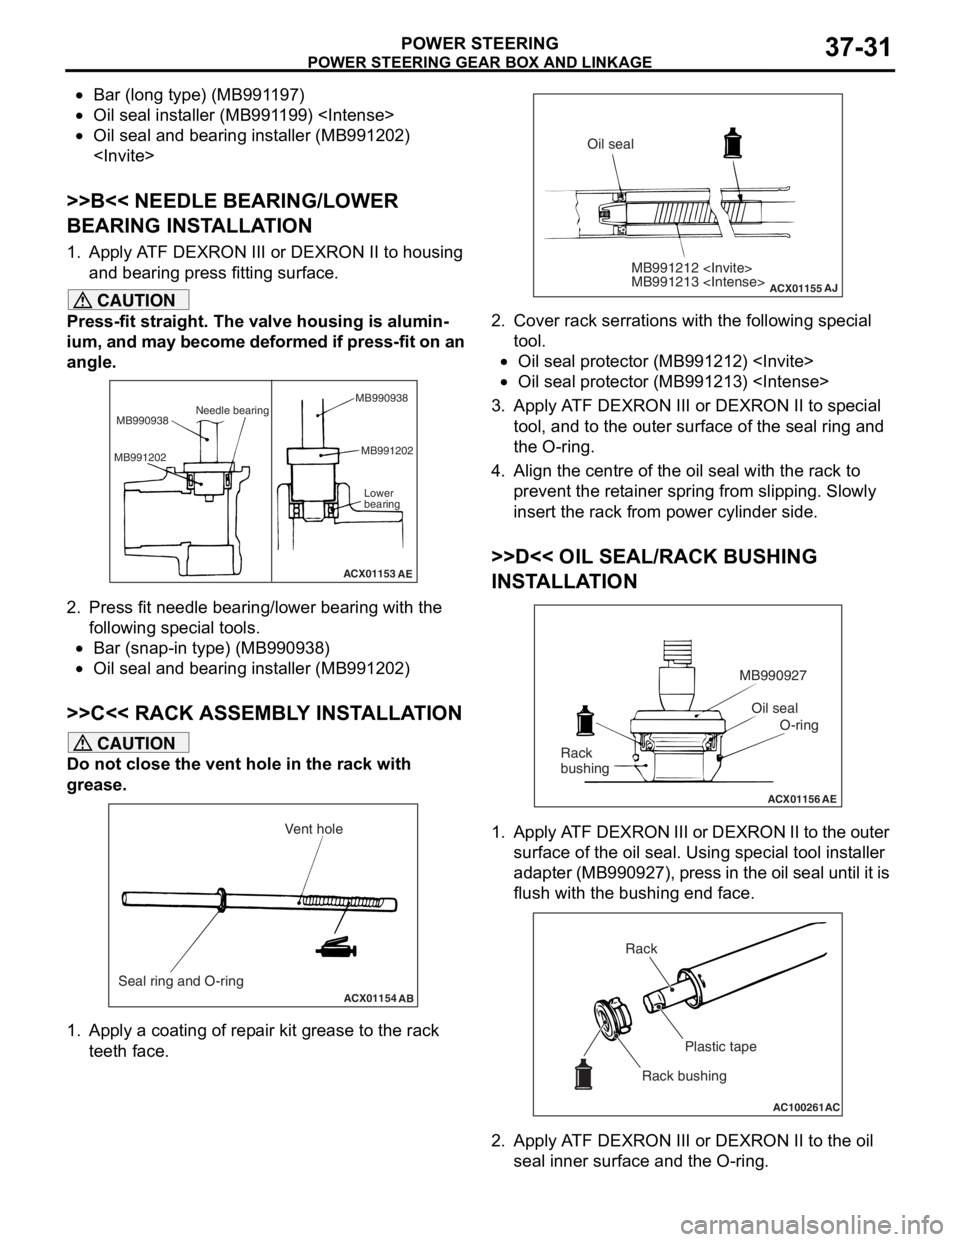
>>B<< NEEDLE BEARING/LOWER
BEARING INSTALLATION
1. Apply ATF DEXRON III or DEXRON II to housing and bearing press fitting surface.
CAUTION
Press-fit straight. The valve housing is alumin-
ium, and may become deformed if press-fit on an
angle.
ACX01153
Needle bearing
MB990938
MB991202 MB991202
Lower
bearing
AE
MB990938
2. Press fit needle bearing/lower bearing with the
following special tools.
•Bar (snap-in type) (MB990938)
•Oil seal and bearing installer (MB991202)
>>C<< RACK ASSEMBLY INSTALLATION
CAUTION
Do not close the vent hole in the rack with
grease.
ACX01154 AB
Seal ring and O-ring Vent hole
1. Apply a coating of repair kit grease to the rack
teeth face.
ACX01155
MB991212
MB991213
AJ
Oil seal
2. Cover rack serrations with the following special tool.
•Oil seal protector (MB991212)
•Oil seal protector (MB991213)
3. Apply ATF DEXRON III or DEXRON II to special
tool, and to the outer surface of the seal ring and
the O-ring.
4. Align the centre of the oil seal with the rack to prevent the retainer spring from slipping. Slowly
insert the rack from power cylinder side.
>>D<< OIL SEAL/RACK BUSHING
INSTALLATION
ACX01156 AE
Oil seal
O-ring
MB990927
Rack
bushing
1. Apply ATF DEXRON III or DEXRON II to the outer surface of the oil seal. Using special tool installer
adapter (MB990927), press in the oil seal until it is
flush with the bushing end face.
AC100261 AC
Rack
Plastic tape
Rack bushing
2. Apply ATF DEXRON III or DEXRON II to the oil seal inner surface and the O-ring.
Page 262 of 800
POWER STEERING GEAR BOX AND LINKAGE
POWER STEERING37-32
3. Wrap the rack end with plastic tape, and push the rack bushing onto the rack.
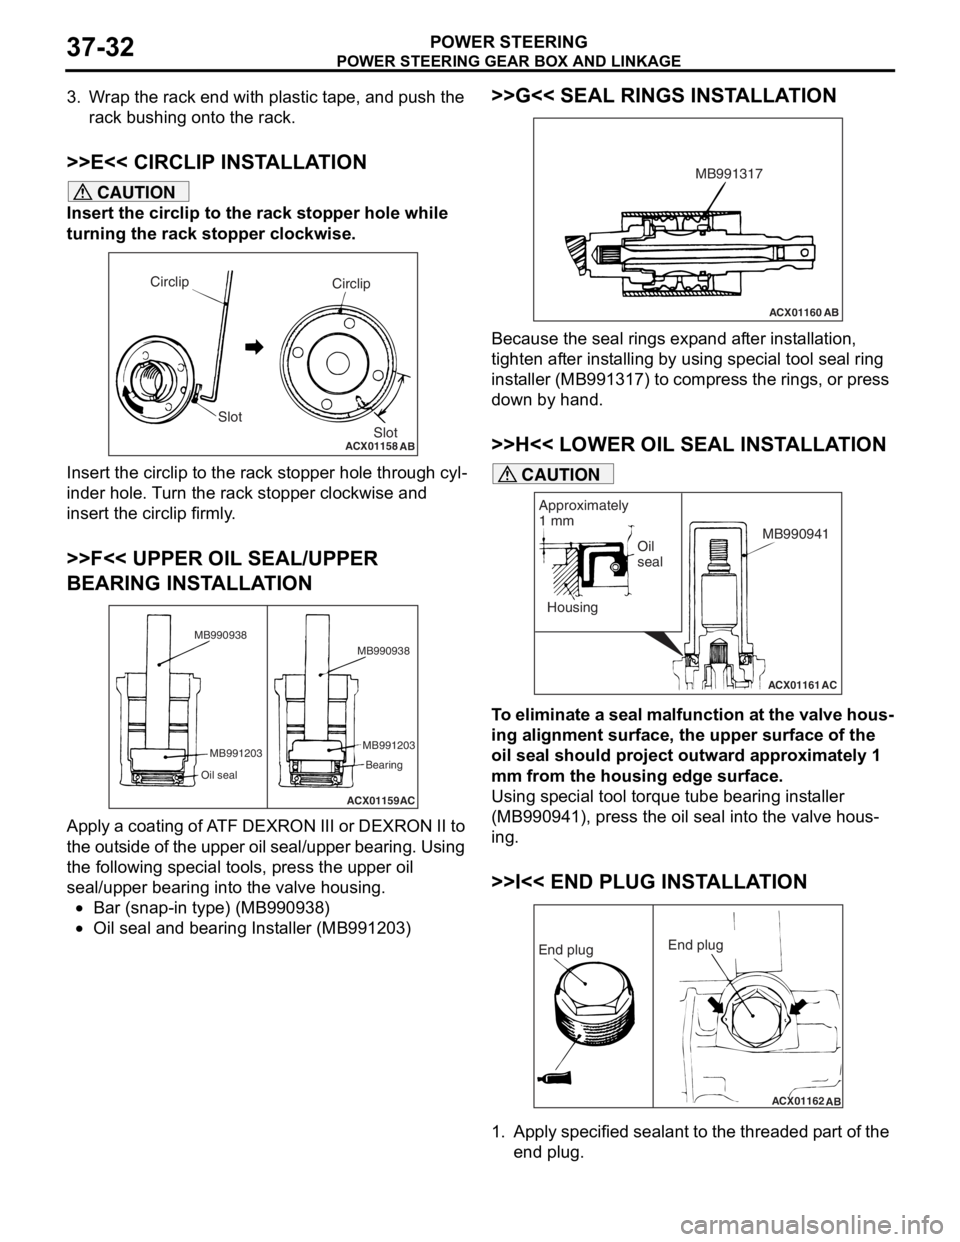
>>E<< CIRCLIP INSTALLATION
CAUTION
Insert the circlip to the rack stopper hole while
turning the rack stopper clockwise.
ACX01158
Circlip
Slot
AB
Circlip
Slot
Insert the circlip to the rack stopper hole through cyl-
inder hole. Turn the rack stopper clockwise and
insert the circlip firmly.
>>F<< UPPER OIL SEAL/UPPER
BEARING INSTALLATION
ACX01159AC
MB990938
MB991203
Oil seal
MB991203 Bearing
MB990938
Apply a coating of ATF DEXRON III or DEXRON II to
the outside of the upper oil seal/upper bearing. Using
the following special tools, press the upper oil
seal/upper bearing into the valve housing.
•Bar (snap-in type) (MB990938)
•Oil seal and bearing Installer (MB991203)
>>G<< SEAL RINGS INSTALLATION
ACX01160
AB
MB991317
Because the seal rings expand after installation,
tighten after installing by using special tool seal ring
installer (MB991317) to compress the rings, or press
down by hand.
>>H<< LOWER OIL SEAL INSTALLATION
ACX01161
Housing
AC
Oil
seal
Approximately
1 mm
MB990941
CAUTION
To eliminate a seal malfunction at the valve hous-
ing alignment surface, the upper surface of the
oil seal should project outward approximately 1
mm from the housing edge surface.
Using special tool torque tube bearing installer
(MB990941), press the oil seal into the valve hous
-
ing.
>>I<< END PLUG INSTALLATION
ACX01162
AB
End plug End plug
1. Apply specified sealant to the threaded part of the
end plug.
Page 263 of 800
POWER STEERING GEAR BOX AND LINKAGE
POWER STEERING37-33
Specified sealant: 3M ATD Part No.8661 or
equivalent
2. Secure the threaded portion of the end plug at two places by using a punch.
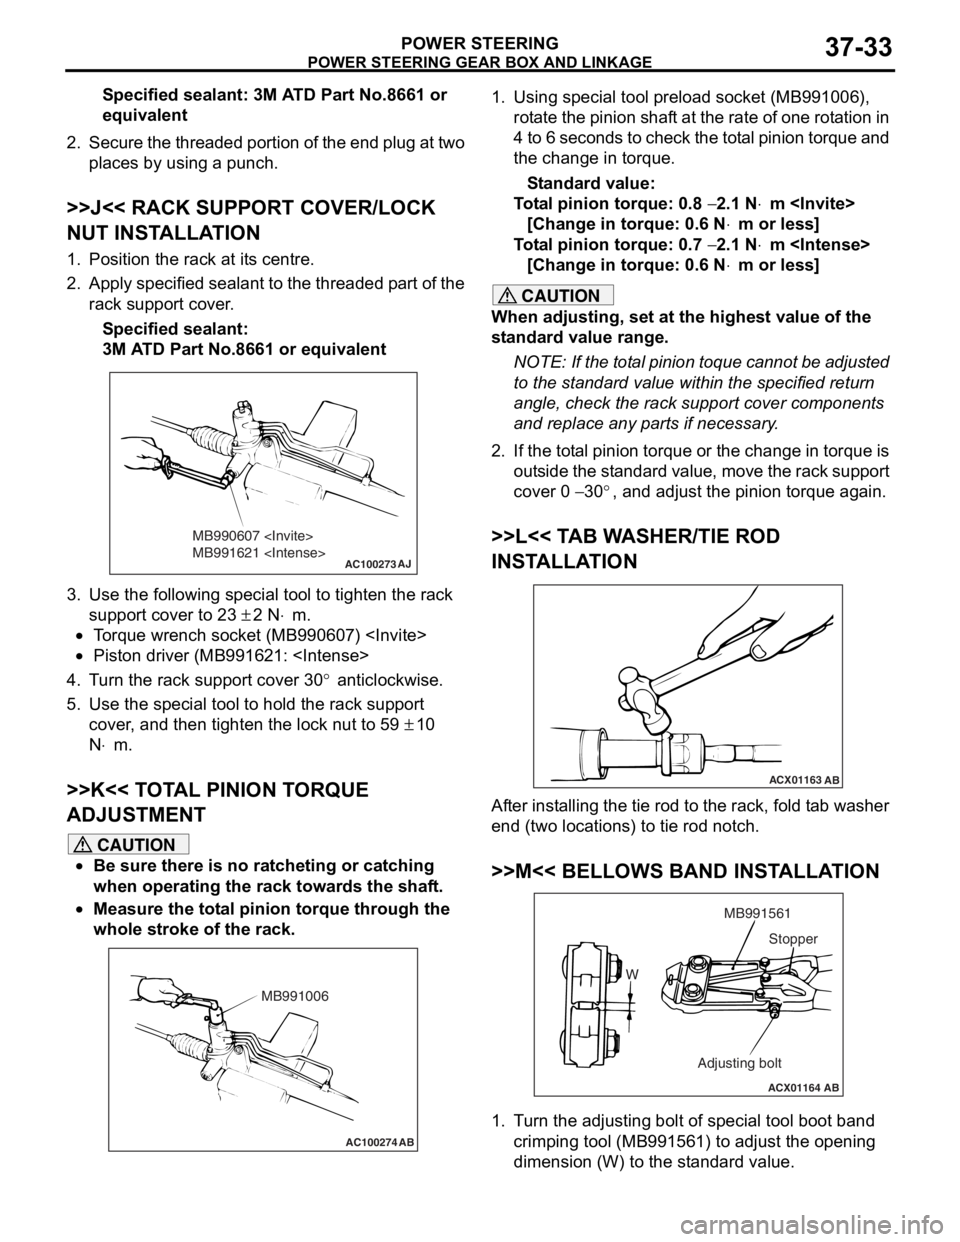
>>J<< RACK SUPPORT COVER/LOCK
NUT INSTALLATION
1. Position the rack at its centre.
2. Apply specified sealant to the threaded part of the
rack support cover.
Specified sealant:
3M ATD Part No.8661 or equivalent
AC100273
MB990607
MB991621
AJ
3.Use the fo llo wing special to ol to tigh ten the rack
suppor t cover to 2 3
± 2 N⋅m.
•To rque wren ch socket (MB990607 )
•Piston driver (MB9916 21:
4.T u rn the rack suppo rt cover 30° anticlockwise .
5.Use the special tool to hold the r a ck sup port
cove r , and t hen tighten the lock nut to 59
± 10
N
⋅m.
>>K<< T O T A L PINION T O RQUE
ADJUSTMENT
CAUTION
•Be sure there is no ratcheting or catching
when operating the rack towards the shaft.
•
AC100274 AB
MB991006
Measure the total pinion torque through the
whole stroke of the rack.
1. Using special tool preload socket (MB991006),
rotate the pinion shaft at the rate of one rotation in
4 to 6 seconds to check the total pinion torque and
the change in torque.
Standard value:
Total pinion torque: 0.8 − 2.1 N⋅m
[Change in torque: 0.6 N
⋅m or less]
Total pinion torque: 0.7 − 2.1 N⋅m
[Change in torque: 0.6 N
⋅m or less]
CAUTION
When adjusting, set at the highest value of the
standard value range.
NOTE: If the total pinion toque cannot be adjusted
to the standard value within the specified return
angle, check the rack support cover components
and replace any parts if necessary.
2. If the total pinion torque or the change in torque is outside the standard value, move the rack support
cover 0
− 30°, and adjust the pinion torque again.
>>L<< TAB WASHER/TIE ROD
INSTALLATION
ACX01163 AB
After installing the tie rod to the rack, fold tab washer
end (two locations) to tie rod notch.
>>M<< BELLOWS BAND INSTALLATION
ACX01164 AB
W MB991561
Adjusting bolt Stopper
1. Turn the adjusting bolt of special tool boot band
crimping tool (MB991561) to adjust the opening
dimension (W) to the standard value.
Page 264 of 800
POWER STEERING GEAR BOX AND LINKAGE
POWER STEERING37-34
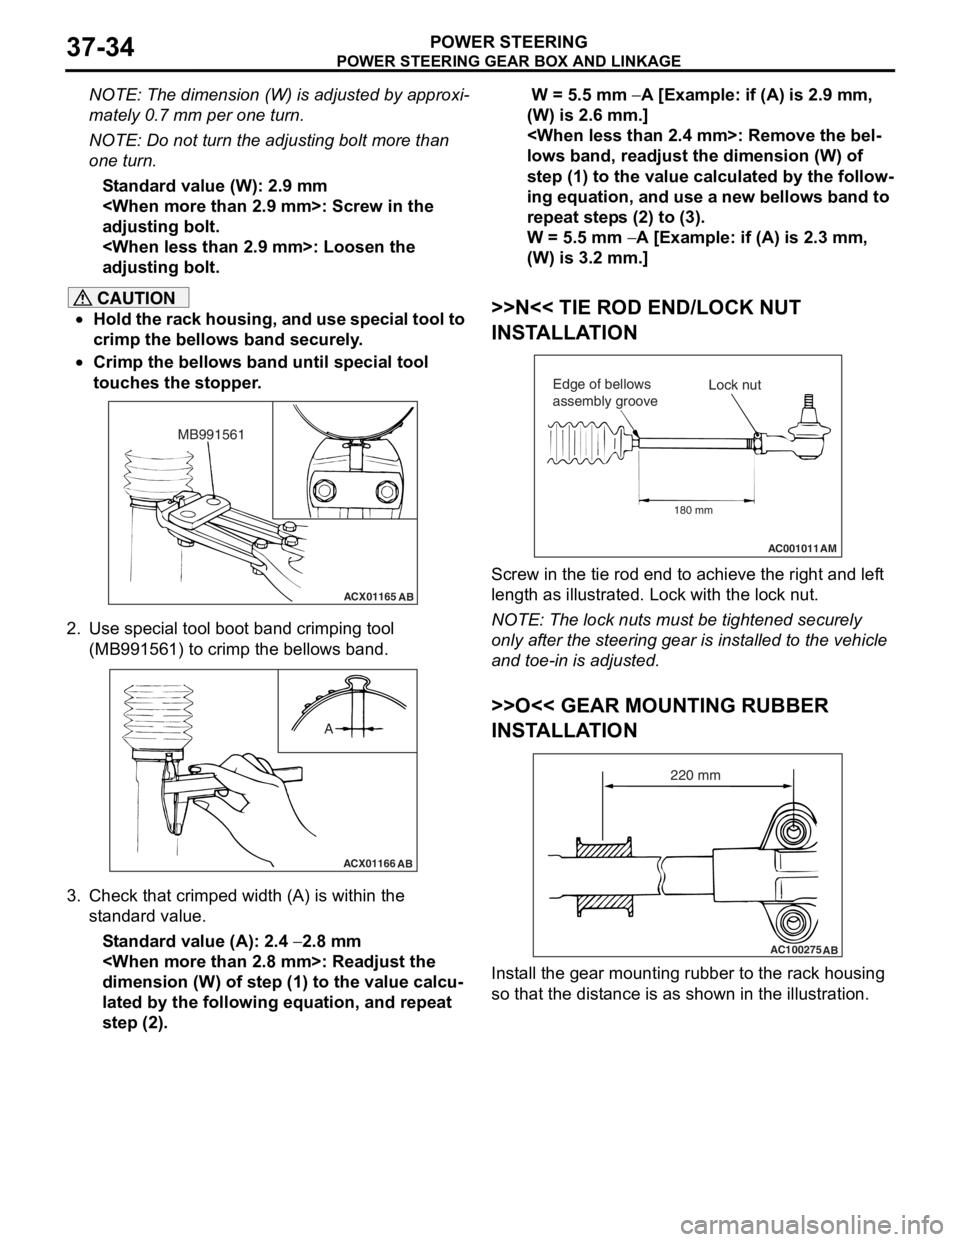
NOTE: The dimension (W) is adjusted by approxi-
mately 0.7 mm per one turn.
NOTE: Do not turn the adjusting bolt more than
one turn.
Standard value (W): 2.9 mm
adjusting bolt.
adjusting bolt.
CAUTION
•Hold the rack housing, and use special tool to
crimp the bellows band securely.
•
ACX01165AB
MB991561
Crimp the bellows band until special tool
touches the stopper.
2. Use special tool boot band crimping tool (MB991561) to crimp the bellows band.
ACX01166 AB
A
3. Check that crimped width (A) is within the
standard value.
Standard value (A): 2.4 − 2.8 mm
dimension (W) of step (1) to the value calcu
-
lated by the following equation, and repeat
step (2).
W = 5.5 mm − A [Example: if (A) is 2.9 mm,
(W) is 2.6 mm.]
lows band, readjust the dimension (W) of
step (1) to the value calculated by the follow
-
ing equation, and use a new bellows band to
repeat steps (2) to (3).
W = 5.5 mm − A [Example: if (A) is 2.3 mm,
(W) is 3.2 mm.]
>>N<< TIE ROD END/LOCK NUT
INSTALLATION
AC001011 AM
Lock nut
Edge of bellows
assembly groove
180 mm
Screw in the tie rod end to achieve the right and left
length as illustrated. Lock with the lock nut.
NOTE: The lock nuts must be tightened securely
only after the steering gear is installed to the vehicle
and toe-in is adjusted.
>>O<< GEAR MOUNTING RUBBER
INSTALLATION
AC100275 AB
220 mm
Install the gear mounting rubber to the rack housing
so that the distance is as shown in the illustration.
Page 265 of 800
POWER STEERING OIL PUMP ASSEMBLY
POWER STEERING37-35
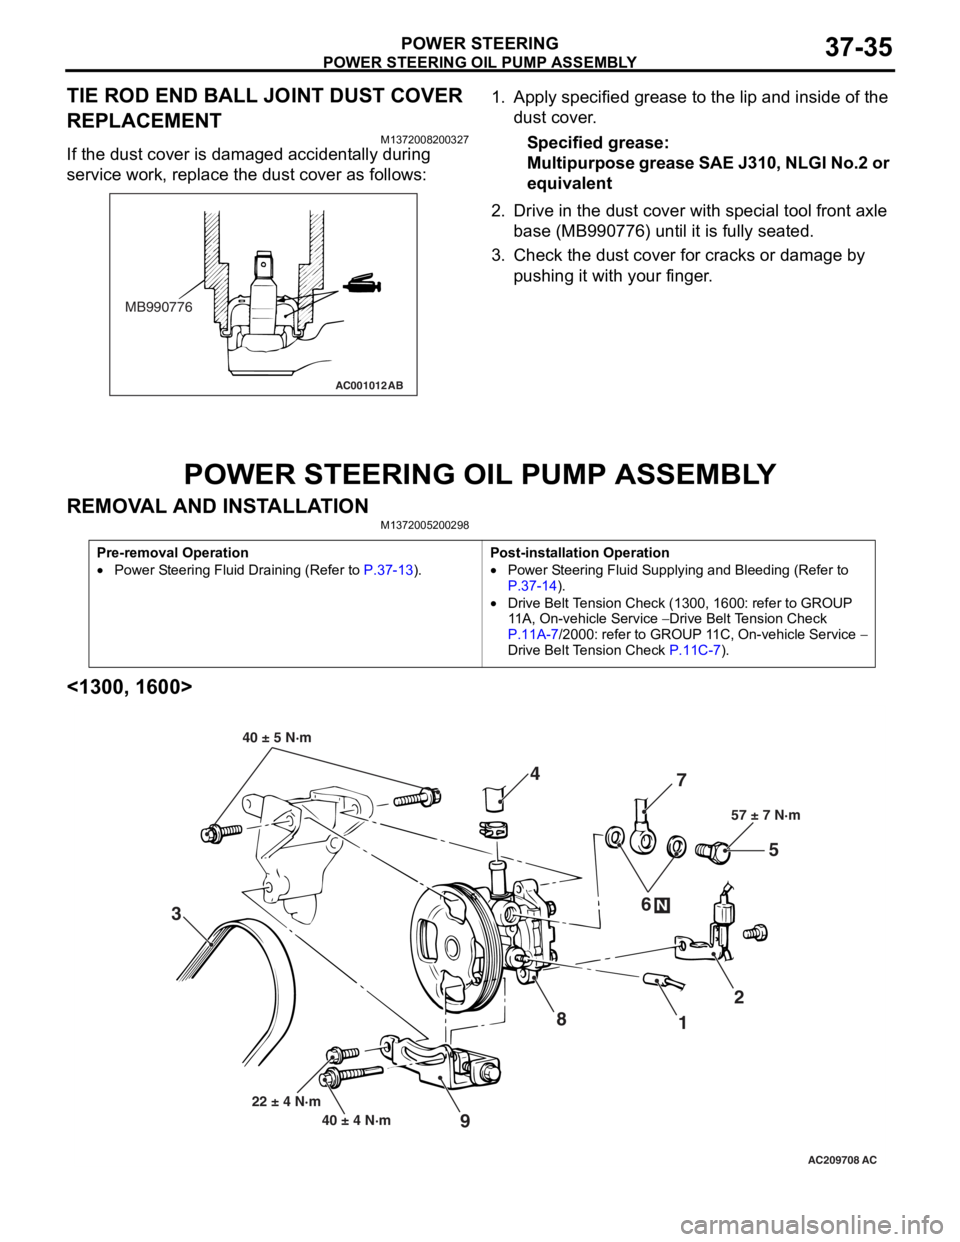
TIE ROD END BALL JOINT DUST COVER
REPLACEMENT
M1372008200327
If the dust cover is damaged accidentally during
service work, replace the dust cover as follows:
AC001012AB
MB990776
1.App l y specified grea se to the lip an d inside of the
d u st c o ve r .
Specified grease:
Mu l t i p u r po se g r ea se SAE J3 10 , NL GI No .2 or
equival
ent
2.Drive in the d u st cover with special tool f r ont axle
b a se (MB9907 76) unt il it is fully seated .
3.Check t he dust co ver f o r cracks or da mage by
p u shing it with your finger .
POWER STEERING OIL PUMP ASSEMBL Y
REMOVA L AND INST ALLA TIONM13720052 0029 8
Pre-removal Operation
•Power Steering Fluid Draining (Refer to P.37-13).
Post-installation Operation
•Power Steering Fluid Supplying and Bleeding (Refer to
P.37-14).
•Drive Belt Tension Check (1300, 1600: refer to GROUP
11A, On-vehicle Service
− Drive Belt Tension Check
P.11A-7/2000: refer to GROUP 11C, On-vehicle Service − Drive Belt Tension Check P.11C-7).
<1300, 1600>
AC209708
87
1 2
3 4
5
6
57 ± 7 N·m
40 ± 4 N·m
22 ± 4 N·m
N
9
40 ± 5 N·m
AC