thread MITSUBISHI LANCER 2006 User Guide
[x] Cancel search | Manufacturer: MITSUBISHI, Model Year: 2006, Model line: LANCER, Model: MITSUBISHI LANCER 2006Pages: 800, PDF Size: 45.03 MB
Page 213 of 800
Removal steps
>>B<<1.Stabilizer link connection
<>2.Lower arm bolt
3.Coil spring nut
4.Coil spring bolt
>>A<<5.Shock absorber assembly
SHOCK ABSORBER ASSEMBLY
REAR SUSPENSION34-15
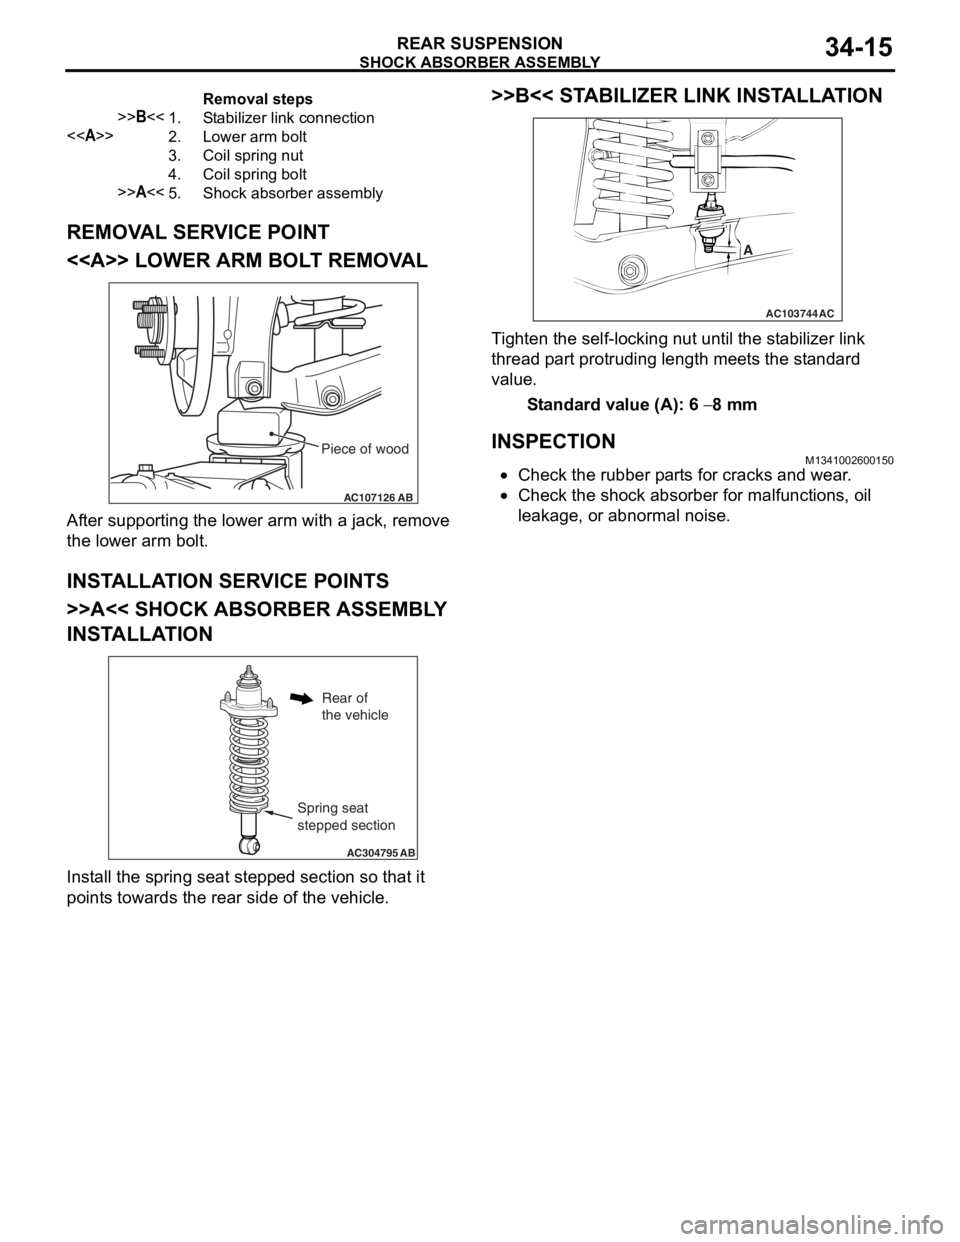
REMOVAL SERVICE POINT
<> LOWER ARM BOLT REMOVAL
AC107126AB
Piece of wood
After suppo rting the lo we r arm with a jack, remove
the lo
we r arm b o lt.
INSTALLA T ION SER VICE POINT S
>>A<< SHOCK ABSORBER ASSEMBL Y
INST
ALLA TION
AC304795 AB
Spring seat
stepped section
Rear of
the vehicle
Install the sprin g se at ste pped section so th at it
point
s towards the rea r side of th e ve hicle.
>>B<< STABILIZER LINK INST ALLA TION
AC103744
A
AC
Ti ghten the self-locking nut un til t he st ab ilizer link
thread
p a rt protrud i ng length mee t s the st a ndard
value.
St andard va lue (A): 6 − 8 mm
INSPECTIONM13410026 0015 0
•Check the rubbe r p a rt s for cracks a nd wear .
•Check the sho c k abso r ber for malfunct i ons, oil
le
akag e, or a bnormal no ise .
Page 217 of 800
STABILIZER BAR
REAR SUSPENSION34-19
STABILIZER BAR
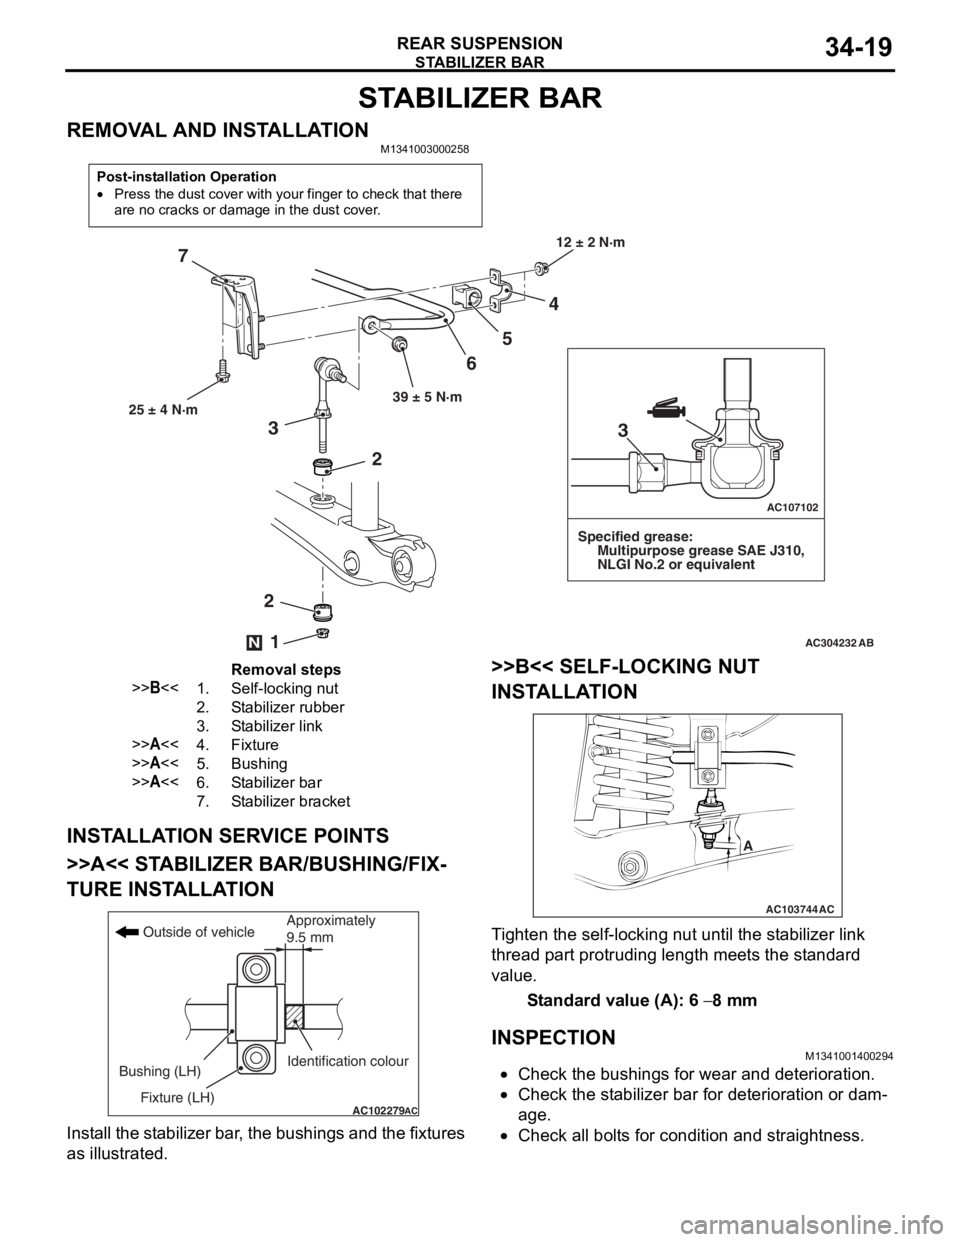
REMOVAL AND INSTALLATIONM1341003000258
Post-installation Operation
•Press the dust cover with your finger to check that there
are no cracks or damage in the dust cover.
AC304232
AC107102
AB
12 ± 2 N·m
39 ± 5 N·m
4
5
6
7
25 ± 4 N·m
Specified grease:
Multipurpose grease SAE J310,
NLGI No.2 or equivalent
2
2
3
1N
3
Removal steps
>>B<<1.Self-locking nut
2.Stabilizer rubber
3.Stabilizer link
>>A<<4.Fixture
>>A<<5.Bushing
>>A<<6.Stabilizer bar
7.Stabilizer bracket
INST ALLA T ION SER VICE POINT S
>>A<< STABILIZER BAR/BUSHING/FIX-
TURE INST ALLA TION
AC102279AC
Outside of vehicle
Bushing (LH) Fixture (LH) Identification colourApproximately
9.5 mm
Inst
all the st abilizer bar , th e bushings and the fixtures
as illustrate
d.
>>B<< SELF-LOCKING NUT
INST
ALLA TION
AC103744
A
AC
Ti ghten the self-locking nut un til t he st ab ilizer link
thread
p a rt protrud i ng length mee t s the st a ndard
value.
St andard va lue (A): 6 − 8 mm
INSPECTION
M13410014 0029 4
•Check the bushing s for wea r and d e terio r ation .
•Check the st abilizer bar for dete r iorat i on o r dam-
age.
•Check all bo lt s for cond itio n and straightness.
Page 242 of 800
ON-VEHICLE SERVICE
POWER STEERING37-12
TIE ROD END BALL JOINT TURNING
TORQUE CHECK
M1372001500554
CAUTION
•Do not remove the tie rod end nut from the
ball joint. Loosen it and use special tool to
avoid possible damage to the ball joint
threads.
•
AC208247AJ
CordBoltMB991897
or
MB992011
Nut
Ball joint
Hang special tool with cord to prevent it from
falling.
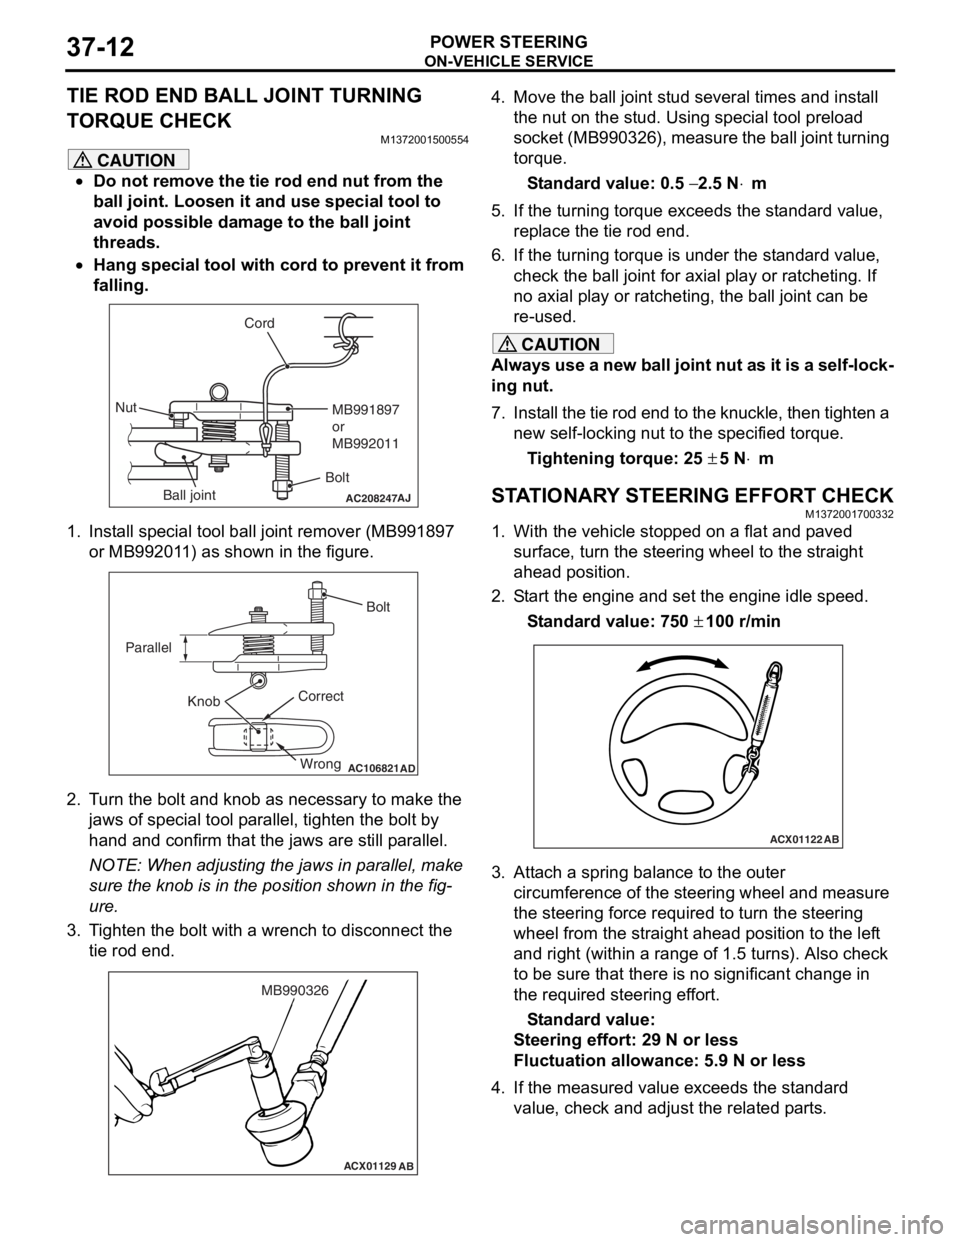
1. Install special tool ball joint remover (MB991897 or MB992011) as shown in the figure.
AC106821
Knob
Parallel
Bolt
Correct Wrong
AD
2. Turn the bolt and knob as necessary to make the jaws of special tool parallel, tighten the bolt by
hand and confirm that the jaws are still parallel.
NOTE: When adjusting the jaws in parallel, make
sure the knob is in the position shown in the fig
-
ure.
3. Tighten the bolt with a wrench to disconnect the tie rod end.
ACX01129 AB
MB990326
4. Move the ball joint stud several times and install
the nut on the stud. Using special tool preload
socket (MB990326), measure the ball joint turning
torque.
Standard value: 0.5 − 2.5 N⋅m
5. If the turning torque exceeds the standard value, replace the tie rod end.
6. If the turning torque is under the standard value, check the ball joint for axial play or ratcheting. If
no axial play or ratcheting, the ball joint can be
re-used.
CAUTION
Always use a new ball joint nut as it is a self-lock-
ing nut.
7. Install the tie rod end to the knuckle, then tighten a new self-locking nut to the specified torque.
Tightening torque: 25 ± 5 N⋅m
STATIONARY STEERING EFFORT CHECKM1372001700332
1. With the vehicle stopped on a flat and paved
surface, turn the steering wheel to the straight
ahead position.
2. Start the engine and set the engine idle speed.
Standard value: 750 ± 100 r/min
ACX01122 AB
3. Attach a spring balance to the outer
circumference of the steering wheel and measure
the steering force required to turn the steering
wheel from the straight ahead position to the left
and right (within a range of 1.5 turns). Also check
to be sure that there is no significant change in
the required steering effort.
Standard value:
Steering effort: 29 N or less
Fluctuation allowance: 5.9 N or less
4. If the measured value exceeds the standard value, check and adjust the related parts.
Page 262 of 800
POWER STEERING GEAR BOX AND LINKAGE
POWER STEERING37-32
3. Wrap the rack end with plastic tape, and push the rack bushing onto the rack.
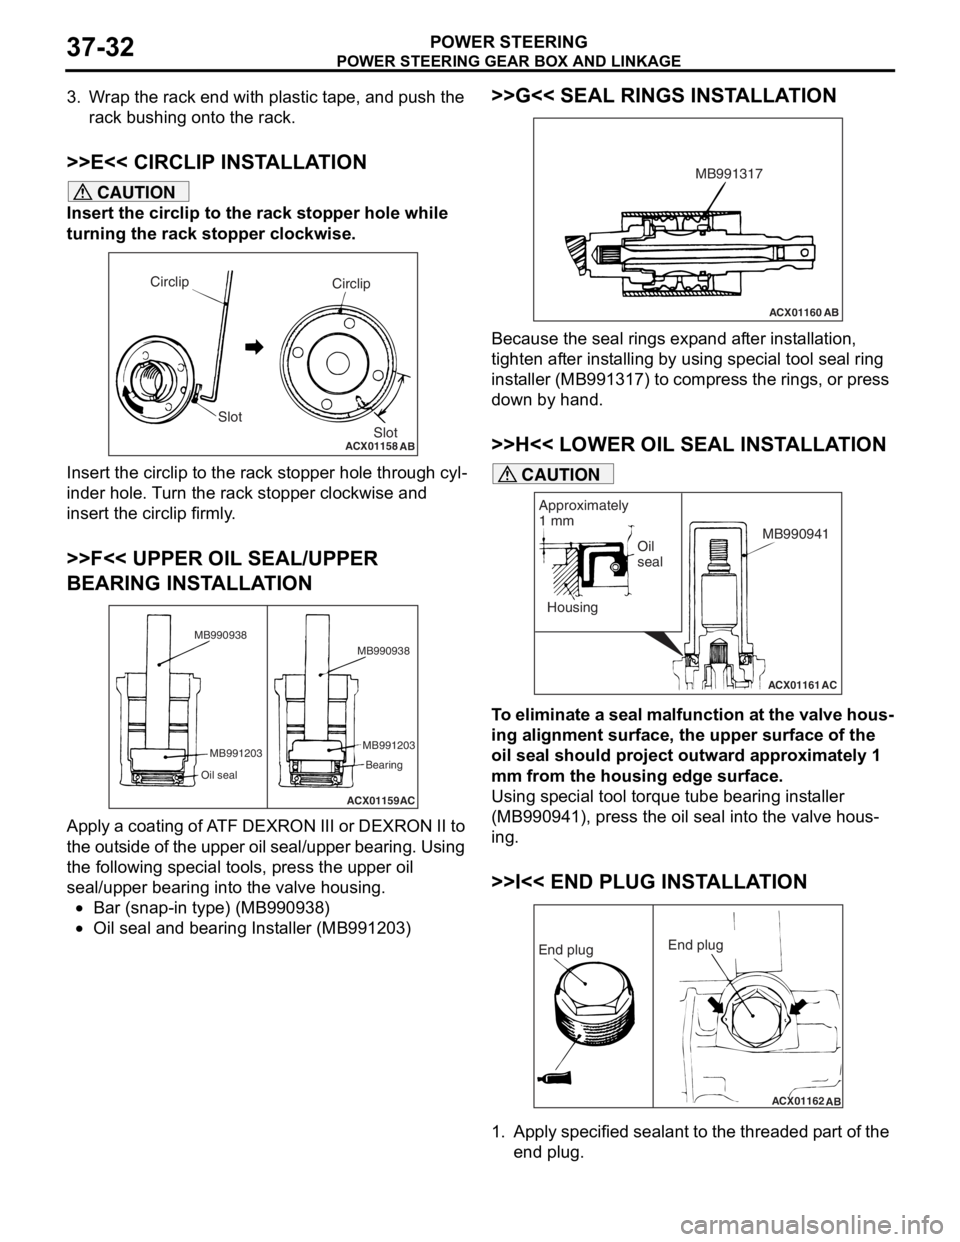
>>E<< CIRCLIP INSTALLATION
CAUTION
Insert the circlip to the rack stopper hole while
turning the rack stopper clockwise.
ACX01158
Circlip
Slot
AB
Circlip
Slot
Insert the circlip to the rack stopper hole through cyl-
inder hole. Turn the rack stopper clockwise and
insert the circlip firmly.
>>F<< UPPER OIL SEAL/UPPER
BEARING INSTALLATION
ACX01159AC
MB990938
MB991203
Oil seal
MB991203 Bearing
MB990938
Apply a coating of ATF DEXRON III or DEXRON II to
the outside of the upper oil seal/upper bearing. Using
the following special tools, press the upper oil
seal/upper bearing into the valve housing.
•Bar (snap-in type) (MB990938)
•Oil seal and bearing Installer (MB991203)
>>G<< SEAL RINGS INSTALLATION
ACX01160
AB
MB991317
Because the seal rings expand after installation,
tighten after installing by using special tool seal ring
installer (MB991317) to compress the rings, or press
down by hand.
>>H<< LOWER OIL SEAL INSTALLATION
ACX01161
Housing
AC
Oil
seal
Approximately
1 mm
MB990941
CAUTION
To eliminate a seal malfunction at the valve hous-
ing alignment surface, the upper surface of the
oil seal should project outward approximately 1
mm from the housing edge surface.
Using special tool torque tube bearing installer
(MB990941), press the oil seal into the valve hous
-
ing.
>>I<< END PLUG INSTALLATION
ACX01162
AB
End plug End plug
1. Apply specified sealant to the threaded part of the
end plug.
Page 263 of 800
POWER STEERING GEAR BOX AND LINKAGE
POWER STEERING37-33
Specified sealant: 3M ATD Part No.8661 or
equivalent
2. Secure the threaded portion of the end plug at two places by using a punch.
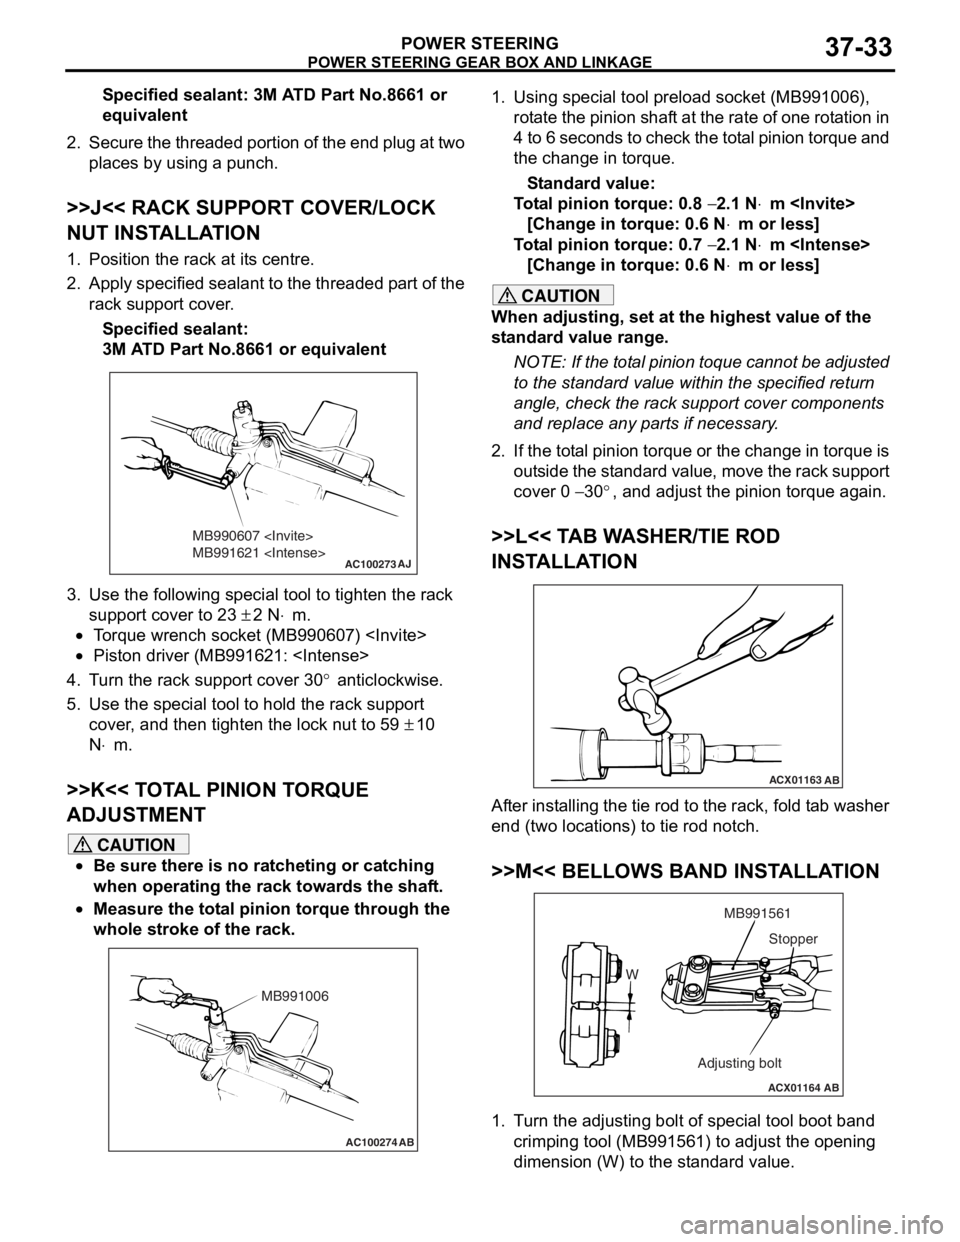
>>J<< RACK SUPPORT COVER/LOCK
NUT INSTALLATION
1. Position the rack at its centre.
2. Apply specified sealant to the threaded part of the
rack support cover.
Specified sealant:
3M ATD Part No.8661 or equivalent
AC100273
MB990607
MB991621
AJ
3.Use the fo llo wing special to ol to tigh ten the rack
suppor t cover to 2 3
± 2 N⋅m.
•To rque wren ch socket (MB990607 )
•Piston driver (MB9916 21:
4.T u rn the rack suppo rt cover 30° anticlockwise .
5.Use the special tool to hold the r a ck sup port
cove r , and t hen tighten the lock nut to 59
± 10
N
⋅m.
>>K<< T O T A L PINION T O RQUE
ADJUSTMENT
CAUTION
•Be sure there is no ratcheting or catching
when operating the rack towards the shaft.
•
AC100274 AB
MB991006
Measure the total pinion torque through the
whole stroke of the rack.
1. Using special tool preload socket (MB991006),
rotate the pinion shaft at the rate of one rotation in
4 to 6 seconds to check the total pinion torque and
the change in torque.
Standard value:
Total pinion torque: 0.8 − 2.1 N⋅m
[Change in torque: 0.6 N
⋅m or less]
Total pinion torque: 0.7 − 2.1 N⋅m
[Change in torque: 0.6 N
⋅m or less]
CAUTION
When adjusting, set at the highest value of the
standard value range.
NOTE: If the total pinion toque cannot be adjusted
to the standard value within the specified return
angle, check the rack support cover components
and replace any parts if necessary.
2. If the total pinion torque or the change in torque is outside the standard value, move the rack support
cover 0
− 30°, and adjust the pinion torque again.
>>L<< TAB WASHER/TIE ROD
INSTALLATION
ACX01163 AB
After installing the tie rod to the rack, fold tab washer
end (two locations) to tie rod notch.
>>M<< BELLOWS BAND INSTALLATION
ACX01164 AB
W MB991561
Adjusting bolt Stopper
1. Turn the adjusting bolt of special tool boot band
crimping tool (MB991561) to adjust the opening
dimension (W) to the standard value.