roof moulding MITSUBISHI LANCER 2006 Workshop Manual
[x] Cancel search | Manufacturer: MITSUBISHI, Model Year: 2006, Model line: LANCER, Model: MITSUBISHI LANCER 2006Pages: 800, PDF Size: 45.03 MB
Page 285 of 800
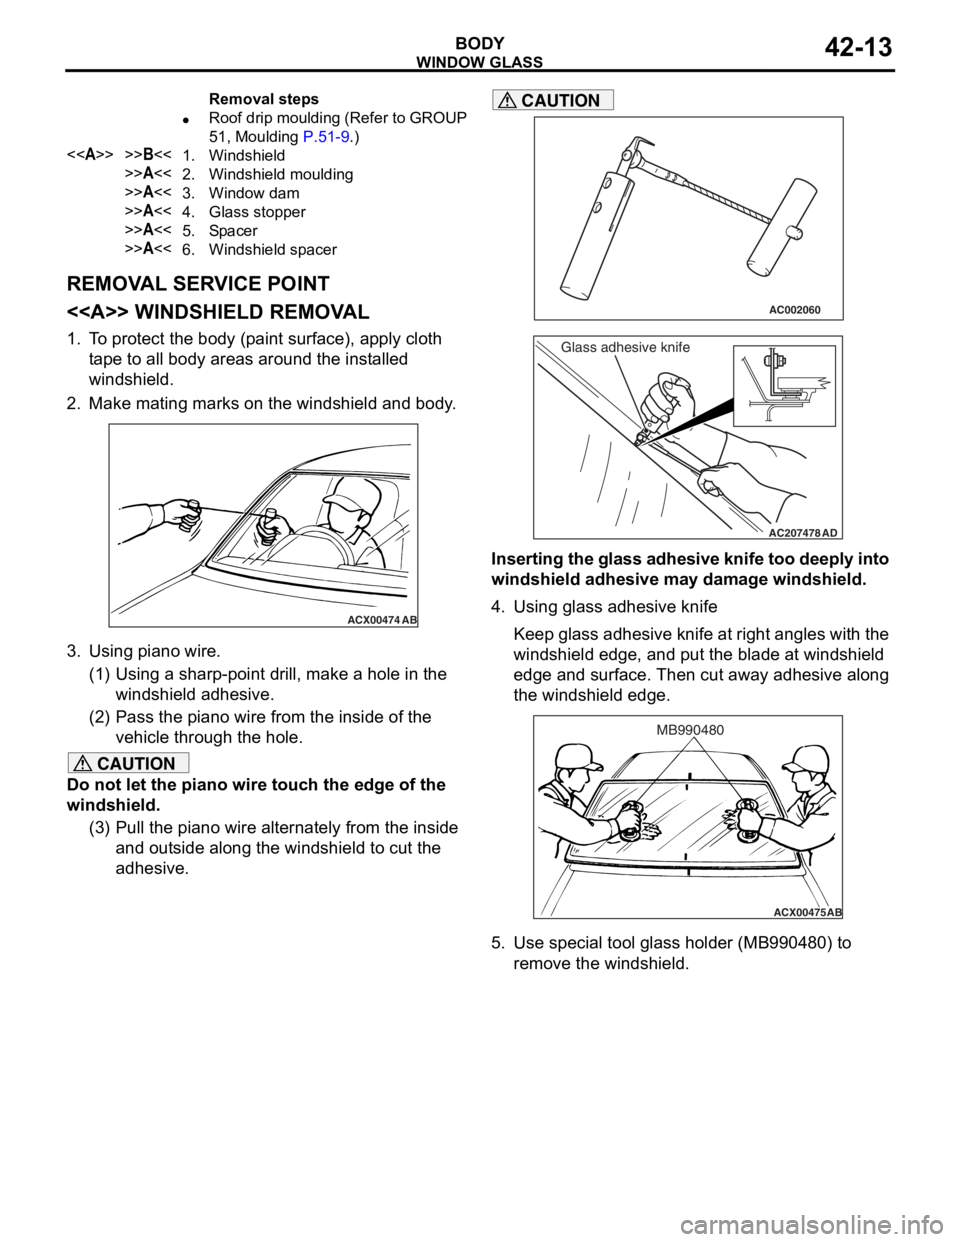
Removal steps
•Roof drip moulding (Refer to GROUP
51, Moulding
P.51-9.)
<>>>B<<1.Windshield
>>A<<2.Windshield moulding
>>A<<3.Window dam
>>A<<4.Glass stopper
>>A<<5.Spa cer
>>A<<6.Windshield spacer
WI NDOW GLASS
BO D Y42-13
REMOV A L SER V ICE POINT
<> WI NDSHIELD REMOV A L
1.T o prot ect th e body (p ain t surfa c e), a pply cloth
t ape to all bod y area s aro und th e inst a lle d
windshield.
2.Make mating marks on th e windshie l d an d body .
ACX00474
AB
3.Using p i ano wire.
(1)U sin g a sharp-po int d r ill, make a h o le in the
windshield ad hesive.
(2)P ass the p i ano wire from the inside of the
veh i cle thro ugh the hole.
CAUTION
Do not let the piano wire touch the edge of the
windshield.
(3) Pull the piano wire alternately from the inside and outside along the windshield to cut the
adhesive.
AC002060
AC207478
Glass adhesive knife
AD
CAUTION
Inserting the glass adhesive knife too deeply into
windshield adhesive may damage windshield.
4. Using glass adhesive knife
Keep glass adhesive knife at right angles with the
windshield edge, and put the blade at windshield
edge and surface. Then cut away adhesive along
the windshield edge.
ACX00475 AB
MB990480
5. Use special tool glass holder (MB990480) to
remove the windshield.
Page 289 of 800
WINDOW GLASS
BODY42-17
REAR WINDOW GLASS
REMOVAL AND INSTALLATION
M1422001600111
Pre-removal and Post-installation Operation
•High-mounted Stop Lamp Assembly Removal and Instal-lation
High-Mounted Stop Lamp
P.54A-84.)
•Rear Pillar Trim and Rear Shelf Trim Removal and Instal-
lation (Refer to GROUP 52A, Trims P.52A-13.)
•Headlining Removal and Installation (Refer to GROUP
52A, Headlining
P.52A-23.)
Y0500AU
Y0502AUY0501AU
Y0564AU
AC006056
1 1
7
7
AB
6
25
4
9
7
3
N
2N
2N
N
4N
N
3N3N
NN
2N
Ceramic line
Mark
Apply the primer and
adhesive along the
fictitious lines (seal line)
between each of
the marks. Section A – A
Section B – B
Seal line
centre
Primer
8N
10N
Adhesive: 3M ATD Part No. 8609 Super Fast Urethane Auto Glass Sealant or equivalent and
3M ATD Part No. 8608 Super Fast Urethane Primer or equivalent
16 mm
A
A
B
B
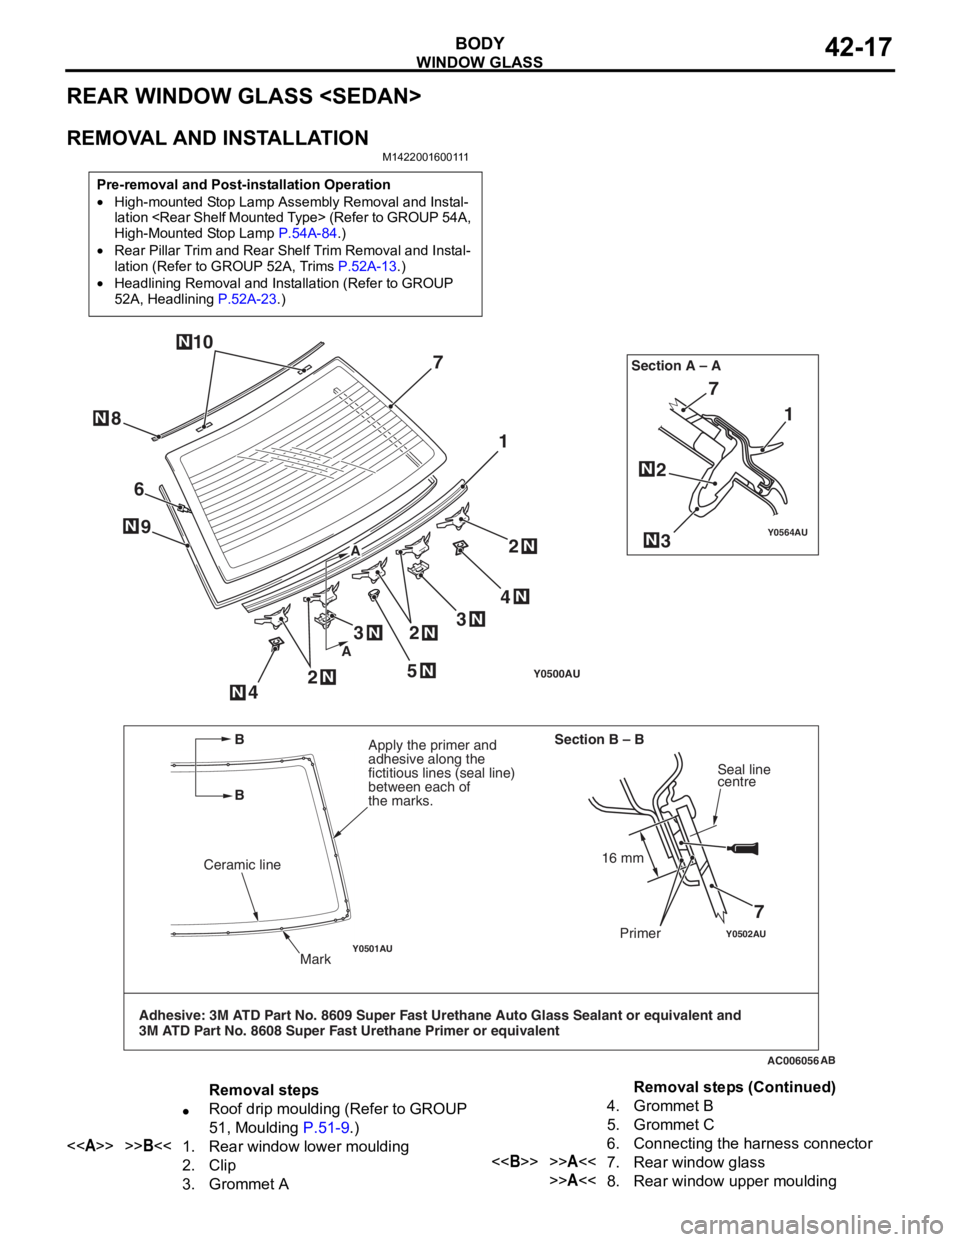
Removal steps
•Roof drip moulding (Refer to GROUP
51, Moulding
P.51-9.)
<>>>B<<1.Rear window lower moulding
2.Clip
3.Grommet A
4.Grommet B
5.Grommet C
6.Connecting the harness connector
<>>>A<<7.Rear window glass
>>A<<8.Rear window upper moulding
Removal steps (Continued)
Page 311 of 800
DOOR
BODY42-39
WINDOW GLASS RUNCHANNEL AND
DOOR OPENING WEATHERSTRIP
REMOVAL AND INSTALLATION
M1423003100290
AC304409AB
Section A – A
Sealant: 3M ATD Part No.8633 or equivalent Door
: Sectional view of
clip position
: Sectional view of clip position
6
2
1
4
365
A A
1
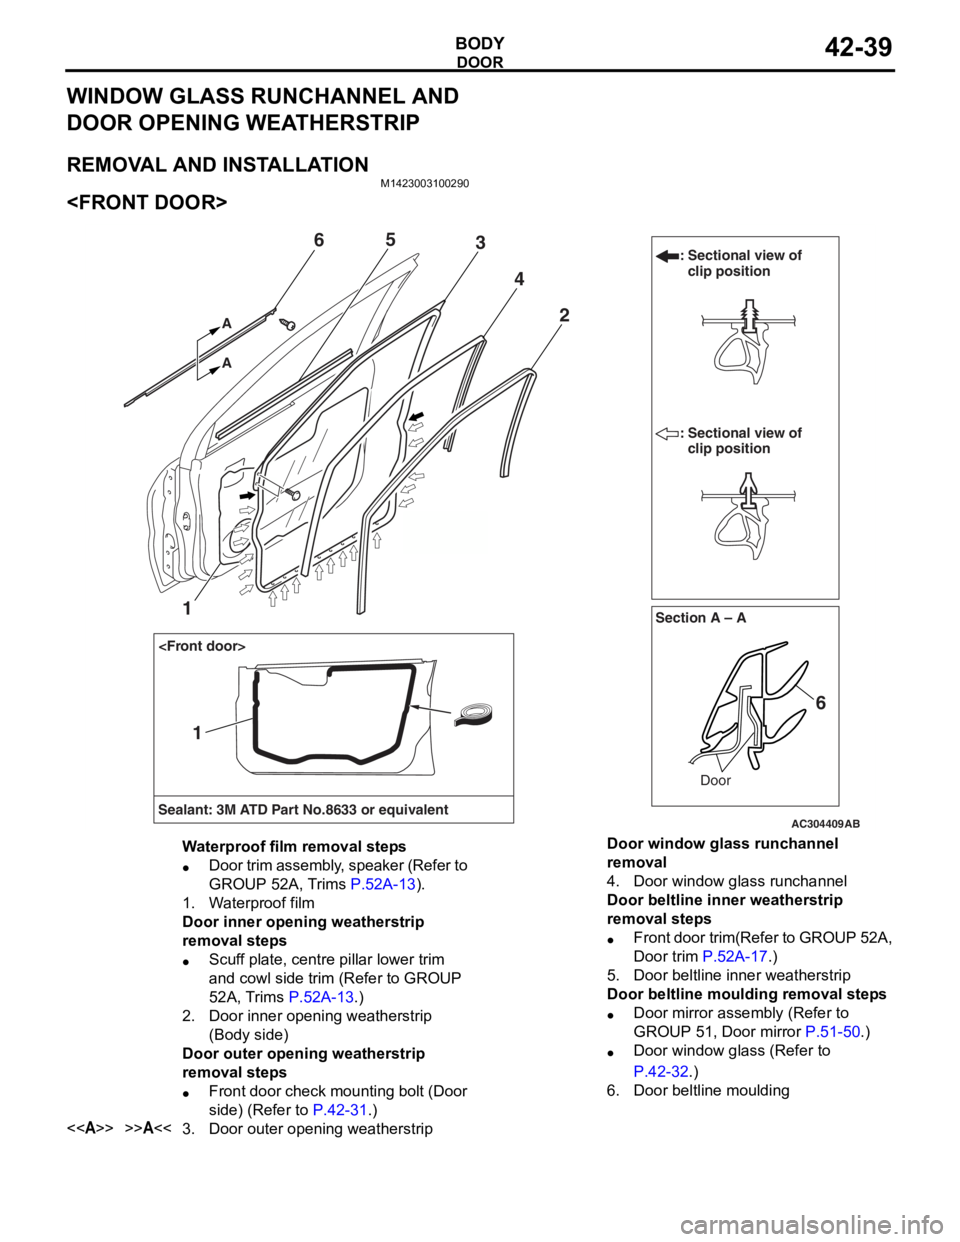
Waterproof film removal steps
•Door trim assembly, speaker (Refer to
GROUP 52A, Trims
P.52A-13).
1.Waterproof film
Door inner opening weatherstrip
removal steps
•Scuff plate, centre pillar lower trim
and cowl side trim (Refer to GROUP
52A, Trims
P.52A-13.)
2.Door inner opening weatherstrip
(Body side)
Door outer opening weatherstrip
removal steps
•Front door check mounting bolt (Door
side) (Refer to
P.42-31.)
<>>>A<<3.Door outer opening weatherstrip
Door window glass runchannel
removal
4.Door window glass runchannel
Door beltline inner weatherstrip
removal steps
•Front door trim(Refer to GROUP 52A,
Door trim
P.52A-17.)
5.Door beltline inner weatherstrip
Door beltline moulding removal steps
•Door mirror assembly (Refer to
GROUP 51, Door mirror
P.51-50.)
•Door window glass (Refer to
P.42-32.)
6.Door beltline moulding
Page 312 of 800
DOOR
BODY42-40
AC304418AB
Section A – ADoor
: Sectional view of clip position
: Sectional view of clip position
7
2
4
5
7
A A
3
Section B – B
Door
4
3
6
BB
Sealant: 3M ATD Part No.8633 or equivalent
1
1
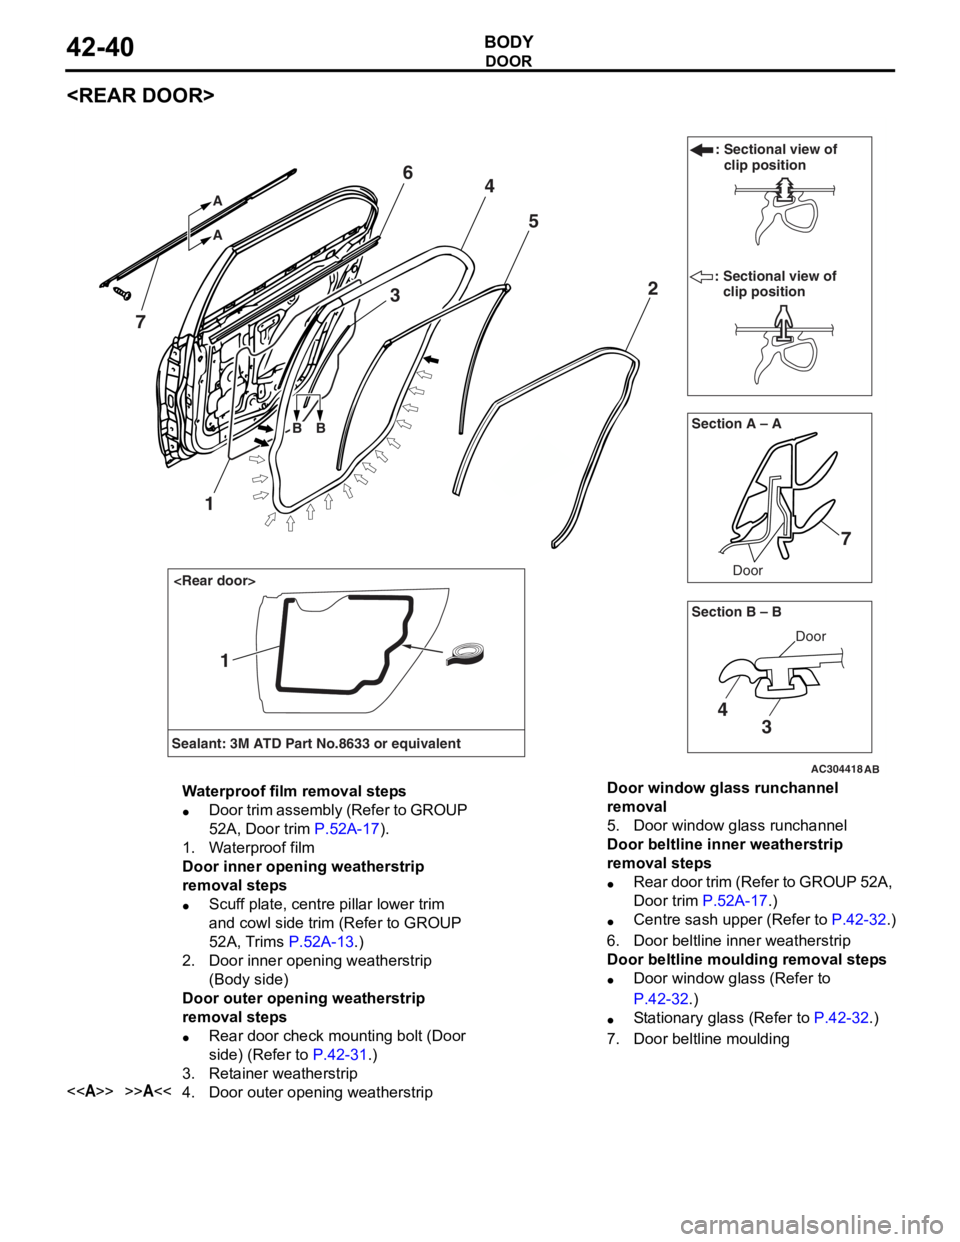
Waterproof film removal steps
•Door trim assembly (Refer to GROUP
52A, Door trim
P.52A-17).
1.Waterproof film
Door inner opening weatherstrip
removal steps
•Scuff plate, centre pillar lower trim
and cowl side trim (Refer to GROUP
52A, Trims
P.52A-13.)
2.Door inner opening weatherstrip
(Body side)
Door outer opening weatherstrip
removal steps
•Rear door check mounting bolt (Door
side) (Refer to
P.42-31.)
3.Retainer weatherstrip
<>>>A<<4.Door outer opening weatherstrip
Door window glass runchannel
removal
5.Door window glass runchannel
Door beltline inner weatherstrip
removal steps
•Rear door trim (Refer to GROUP 52A,
Door trim
P.52A-17.)
•Centre sash upper (Refer to P.42-32.)
6.Door beltline inner weatherstrip
Door beltline moulding removal steps
•Door window glass (Refer to
P.42-32.)
•Stationary glass (Refer to P.42-32.)
7.Door beltline moulding
Page 333 of 800
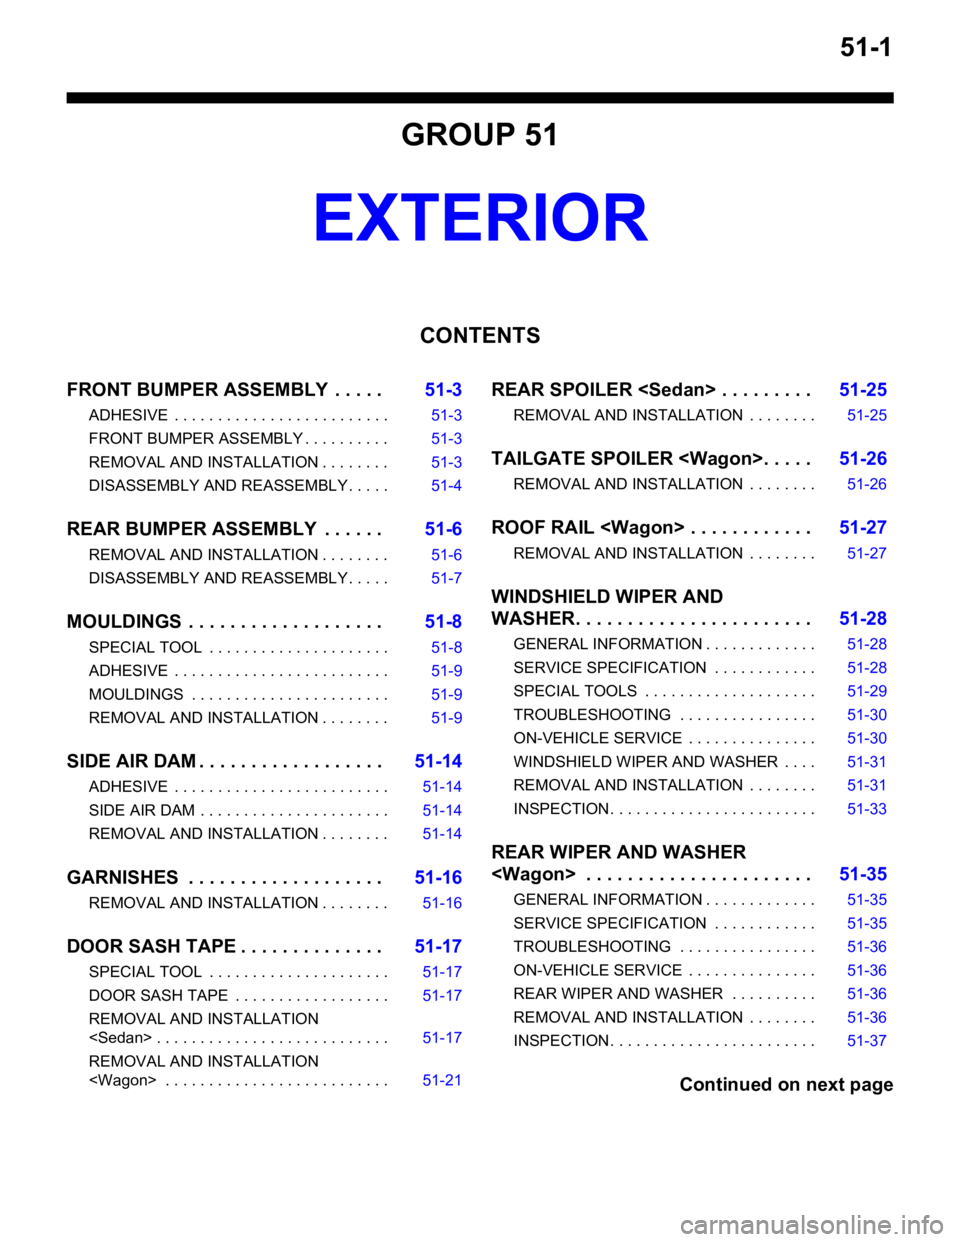
51-1
GROUP 51
EXTERIOR
CONTENTS
FRONT BUMPER ASSEMBLY . . . . .51-3
ADHESIVE . . . . . . . . . . . . . . . . . . . . . . . . . 51-3
FRONT BUMPER ASSEMBLY . . . . . . . . . . 51-3
REMOVAL AND INSTALLATION . . . . . . . . 51-3
DISASSEMBLY AND REASSEMBLY . . . . . 51-4
REAR BUMPER ASSEMBLY . . . . . .51-6
REMOVAL AND INSTALLATION . . . . . . . . 51-6
DISASSEMBLY AND REASSEMBLY . . . . . 51-7
MOULDINGS . . . . . . . . . . . . . . . . . . .51-8
SPECIAL TOOL . . . . . . . . . . . . . . . . . . . . . 51-8
ADHESIVE . . . . . . . . . . . . . . . . . . . . . . . . . 51-9
MOULDINGS . . . . . . . . . . . . . . . . . . . . . . . 51-9
REMOVAL AND INSTALLATION . . . . . . . . 51-9
SIDE AIR DAM . . . . . . . . . . . . . . . . . .51-14
ADHESIVE . . . . . . . . . . . . . . . . . . . . . . . . . 51-14
SIDE AIR DAM . . . . . . . . . . . . . . . . . . . . . . 51-14
REMOVAL AND INSTALLATION . . . . . . . . 51-14
GARNISHES . . . . . . . . . . . . . . . . . . .51-16
REMOVAL AND INSTALLATION . . . . . . . . 51-16
DOOR SASH TAPE . . . . . . . . . . . . . .51-17
SPECIAL TOOL . . . . . . . . . . . . . . . . . . . . . 51-17
DOOR SASH TAPE . . . . . . . . . . . . . . . . . . 51-17
REMOVAL AND INSTALLATION
REMOVAL AND INSTALLATION
REAR SPOILER
REMOVAL AND INSTALLATION . . . . . . . . 51-25
TAILGATE SPOILER
REMOVAL AND INSTALLATION . . . . . . . . 51-26
ROOF RAIL
REMOVAL AND INSTALLATION . . . . . . . . 51-27
WINDSHIELD WIPER AND
WASHER. . . . . . . . . . . . . . . . . . . . . . .51-28
GENERAL INFORMATION . . . . . . . . . . . . . 51-28
SERVICE SPECIFICATION . . . . . . . . . . . . 51-28
SPECIAL TOOLS . . . . . . . . . . . . . . . . . . . . 51-29
TROUBLESHOOTING . . . . . . . . . . . . . . . . 51-30
ON-VEHICLE SERVICE . . . . . . . . . . . . . . . 51-30
WINDSHIELD WIPER AND WASHER . . . . 51-31
REMOVAL AND INSTALLATION . . . . . . . . 51-31
INSPECTION. . . . . . . . . . . . . . . . . . . . . . . . 51-33
REAR WIPER AND WASHER
GENERAL INFORMATION . . . . . . . . . . . . . 51-35
SERVICE SPECIFICATION . . . . . . . . . . . . 51-35
TROUBLESHOOTING . . . . . . . . . . . . . . . . 51-36
ON-VEHICLE SERVICE . . . . . . . . . . . . . . . 51-36
REAR WIPER AND WASHER . . . . . . . . . . 51-36
REMOVAL AND INSTALLATION . . . . . . . . 51-36
INSPECTION. . . . . . . . . . . . . . . . . . . . . . . . 51-37
Continued on next page
Page 342 of 800
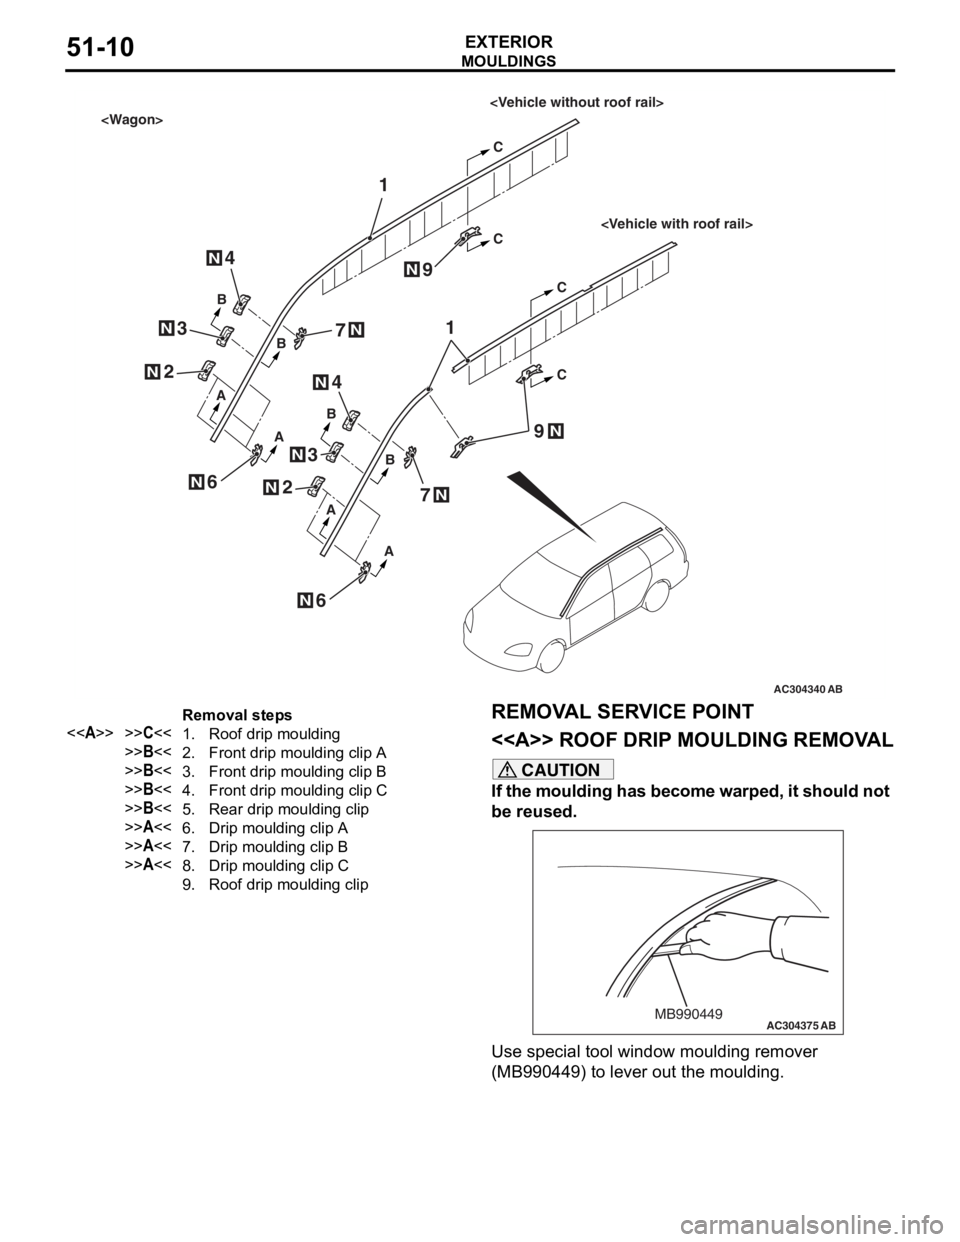
AC304340
1
1
AA
AA
AB
B
B
C
C
C
C
B B
N
N
N
2
N2
4
3
N3
N4
N
6
9
7
N
6N
N
7N
N9
Removal steps
<>>>C<<1.Roof drip moulding
>>B<<2.Front drip moulding clip A
>>B<<3.Front drip moulding clip B
>>B<<4.Front drip moulding clip C
>>B<<5.Rear drip moulding clip
>>A<<6.Drip moulding clip A
>>A<<7.Drip moulding clip B
>>A<<8.Drip moulding clip C
9.Roof drip moulding clip
MO
UL DI N G S
EXTERIOR51-10
REMOVA L SER VICE POINT
<> ROOF DRIP MOULDING REMOV A L
CAUTION
If the moulding has become warped, it should not
be reused.
AC304375MB990449AB
Use special tool window moulding remover
(MB990449) to lever out the moulding.
Page 343 of 800
MOULDINGS
EXTERIOR51-11
INSTALLATION SERVICE POINTS
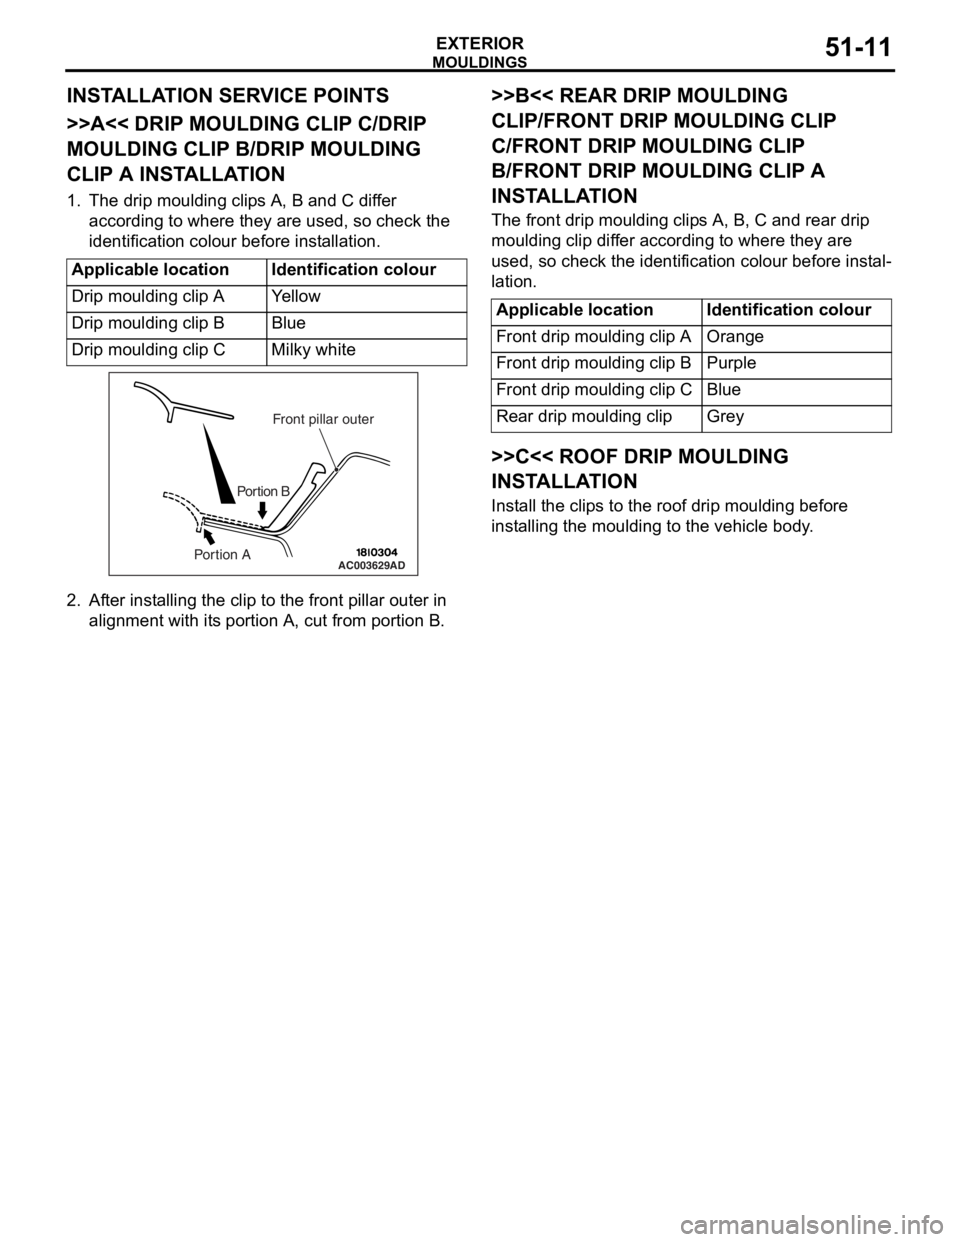
>>A<< DRIP MOULDING CLIP C/DRIP
MOULDING CLIP B/DRIP MOULDING
CLIP A INSTALLATION
1. The drip moulding clips A, B and C differ according to where they are used, so check the
identification colour before installation.
Applicable locationIdentification colour
Drip moulding clip AYe l l o w
Drip moulding clip BBlue
Drip moulding clip CMilky white
AC003629
Front pillar outer
Portion B
Portion AAD
2. Af ter inst alling the clip to the f r ont pilla r outer in
align m ent with it s portio n A, cu t from portion B.
>>B<< REAR DRIP MOULDING
CLIP/FRONT DRIP MOULDING CLIP
C/FRONT DRIP MOULDING CLIP
B/FRONT DRIP MOULDING CLIP A
INST
ALLA TION
The front drip mou l din g clip s A, B, C an d rear d r ip
moulding
clip dif f er accordin g to where they are
used
, so check th e ide n tification colou r before inst al
-
lation.
Applicable locationIdentification colour
Front drip moulding clip AOrange
Front drip moulding clip BPurple
Front drip moulding clip CBlue
Rear drip moulding clipGrey
>>C<< ROOF DRIP MOULDING
INSTALLA TION
Install the clip s to th e roof d r ip mould i ng before
inst
allin g the moulding to the vehicle body .